1
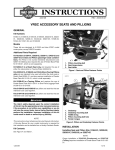
FLTR/I ROAD GLIDE®
i06758
Kit Number 52027-01
NOTE
If equipped with a rider backrest, remove backrest.
1
1. Raise lid of right side saddlebag.
2. Grasp bail wire inside saddlebag and rotate each stud a
full 1/4 turn counter-clockwise. Remove bail head studs
and flat washers. Remove saddlebag.
3. Remove right side of grabstrap by removing bolt and
washer securing grabstrap and saddlebag mounting
bracket to chrome frame cover. Draw free end of
passenger grabstrap to opposite side of motorcycle.
2
CAUTION
Removing seat without first removing passenger
grabstrap will result in damage to the rear fender.
1.
2.
Slit for backrest
Stitched rectangular outline
Figure 2. Slit for Rider Backrest
4. Remove screw to detach seat mounting bracket from
top of rear fender.
5. Push seat rearward to free tongue at front of seat from
slot in frame backbone and remove seat from frame.
i06757
6. If vehicle is equipped with a rider backrest, locate the
rectangular stitched outline on the vinyl portion of the
sheepskin cover, between the rider and passenger
sheepskin surfaces. Using a razor blade, X-acto® knife,
or similar sharp cutting tool, very carefully cut a slit the
length of the rectangular area being careful to stay
within the rectangle.
7. Install sheepskin cover on seat starting at the front and
stretching over the rear.
NOTE
The cover is designed to fit snugly, so some stretching and
manipulating may be necessary to attain proper fit.
8. Make sure cover is centered on seat and the elastic
band wraps around sides and under bottom of seat.
When cover is in the proper position and tight, secure
Velcro® strap on the underside of the seat cover.
Figure 3. FLHRC Concho Centered in Clearance Hole
13. Position saddlebag on vehicle.
9. Place covered seat on frame backbone and firmly push
front of seat downward and rearward until tongue
engages slot in frame backbone.
10. Push seat forward until rear fender seat retention nut is
centered in hole of seat mounting bracket. Install screw.
Hold edge of cover out of the way while tightening
screw to prevent damage to the cover.
1WARNING
After installing seat, pull upward on front of seat to be
sure it is in locked position. While riding, a loose seat
can shift causing loss of control, which could result in
death or serious injury. (00070a)
11. Wrap passenger grabstrap over top of sheepskin.
12. Insert bolt with flat washer through passenger grabstrap
mounting plate and then through slotted hole of
saddlebag front mounting bracket. Insert bolt in forward
hole in chrome frame tube cover. Snug saddlebag front
mounting bracket bolt, but do not tighten.
-J00821
14. Verify that the rubber insert at bottom of saddlebag fits
snugly on lower saddlebag support rail.
15. Place flat washers on bail head studs. With groove at
end of stud held in a horizontal position, insert stud
through holes in saddlebag and rear mounting bracket.
When groove engages wire form of spring plate on
inboard side of bracket, turn stud clockwise a full 1/4
turn until it snaps in place.
16. Install front bail head stud in the same manner. If
necessary, rotate saddlebag front mounting bracket to
align spring plate with hole in saddlebag. Tighten front
saddlebag mounting bracket bolt, making sure
passenger grabstrap mounting plate remains in the
proper orientation.
17. If so equipped, install backrest.
2 of 4