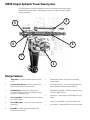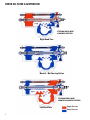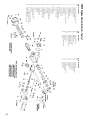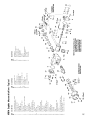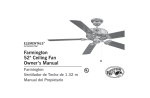
1
TRW Automotive
Commercial Steering Systems
HFB Steering Gear
Service Manual
HFB70 SERIES
Die Cut
HFB70 Integral Hydraulic Power Steering Gear
This steering gear was specifically designed for motor trucks; new design features and our design
experience with previous models of integral hydraulic power steering gears have been combined
into this new product.
3
5
6
4
1
2
Design Features
1.
Rotary Valve - This device provides responsive steering
control
•
Balanced Area Cylinder - Back pressures cannot affect
steering stability
2.
Precision Roller Bearings - Allow the steering gear to
operate with high efficiency and reversibility
•
High Temperature Seals - These specially developed seals
may be operated intermittently at 300°F (148.9°C)
3.
Unloading Valves - Furnish power steering pump
protection and reduce pressure to unload steering linkage
at the ends of steering gear travel
•
Manual Steering Capability - Provides for steering control in
the event of hydraulic failure
•
4.
Recirculating Balls - Combines high mechanical efficiency
with smooth operation
Compactness - Lowest weight to output torque ratio in the
industry
•
Auxiliary Porting Available - For auxiliary cylinder control
5.
Dirt and Water Seals - Lip type seals on both input and
output shafts
•
Seal Protectors - Provide protection from harsh environment
6.
Torsion Bar - Provides positive valve centering with
definitive “feel of the road”
Definitions
NOTE:
A NOTE gives key information to make procedures easier or clearer.
CAUTION:
A CAUTION refers to those procedures which must be followed to
avoid damage to the gear.
WARNING:
A WARNING REFERS TO THOSE PROCEDURES WHICH MUST BE
FOLLOWED FOR THE SAFETY OF THE DRIVER AND THE PERSON
INSPECTING OR REPAIRING THE GEAR.
Disclaimer
This Service Manual has been prepared by TRW Ross Gear Division for reference and use by
mechanics who have been trained to repair and service steering components and systems on
heavy commercial vehicles. TRW Ross Gear Division has exercised reasonable care and diligence
to present accurate, clear and complete information and instructions regarding the techniques
and tools required for maintaining, repairing and servicing the complete line of TRW Ross Gear
HFB70 Integral Power Steering Gears. However, despite the care and effort taken in preparing this
general Service Manual, TRW makes no warranties that (a) the Service Manual or any explanations,
illustrations, information, techniques or tools described herein are either accurate, complete or
correct as applied to a specific HFB70 steering gear, or (b) any repairs or service of a particular
HFB70 steering gear will result in a properly functioning steering gear.
If inspection or testing reveals evidence of abnormal wear or damage to the HFB70 steering gear
or if you encounter circumstances not covered in the Manual, STOP - CONSULT THE VEHICLE
MANUFACTURER’S SERVICE MANUAL AND WARRANTY. DO NOT TRY TO REPAIR OR SERVICE
AN HFB70 STEERING GEAR WHICH HAS BEEN DAMAGED OR INCLUDES ANY PART THAT SHOWS
EXCESSIVE WEAR UNLESS THE DAMAGED AND WORN PARTS ARE REPLACED WITH ORIGINAL
TRW REPLACEMENT AND SERVICE PARTS AND THE UNIT IS RESTORED TO TRW’S SPECIFICATIONS
FOR THE HFB70 STEERING GEAR.
It is the responsibility of the mechanic performing the maintenance, repairs or service on a particular
HFB70 steering gear to (a) inspect the steering gear for abnormal wear and damage, (b) choose a
repair procedure which will not endanger his/her safety, the safety of others, the vehicle, or the
safe operation of the vehicle, and (c) fully inspect and test the HFB70 steering gear and the vehicle
steering system to insure that the repair or service of the steering gear has been properly performed
and that the steering gear and system will function properly.
This TRW Ross Gear Division vehicle power steering gear is covered by one or more of United States
patent numbers: 3,896,702; 3,606,819; 3,741,074; 3,773,081; 3,955,473; 3,935,790; and 3,921,669.
Other United States patent applications are pending, and corresponding foreign patents are pending
and issued.
©TRW INC 1989
1
Table of Contents
Page
HFB70 Design Features and Phantom View . . . . . . . . . . . . . . . . . . . . . . . . . . .Inside front cover
Definitions and Patents . . . . . . . . . . . . . . . . . . . . . . . . . . . . . . . . . . . . . . . . . . . . . . . . . . . . . . .1
Introduction . . . . . . . . . . . . . . . . . . . . . . . . . . . . . . . . . . . . . . . . . . . . . . . . . . . . . . . . . . . . . . . .3
HFB70 Oil Flow Illustration . . . . . . . . . . . . . . . . . . . . . . . . . . . . . . . . . . . . . . . . . . . . . . . . . . . .4
HFB70 General Design and Operation . . . . . . . . . . . . . . . . . . . . . . . . . . . . . . . . . . . . . . . . . . . .5
Troubleshooting Information . . . . . . . . . . . . . . . . . . . . . . . . . . . . . . . . . . . . . . . . . . . . . . . . . . .6
Troubleshooting Guide . . . . . . . . . . . . . . . . . . . . . . . . . . . . . . . . . . . . . . . . . . . . . . . . . . . . . . . .8
Repairs and Adjustments on Vehicle . . . . . . . . . . . . . . . . . . . . . . . . . . . . . . . . . . . . . . . . . . . .11
—The Sector Shaft and Trunnion Cover . . . . . . . . . . . . . . . . . . . . . . . . . . . . . . . . . . . . . . . .11
—The Worm Shaft/Input Shaft Seal . . . . . . . . . . . . . . . . . . . . . . . . . . . . . . . . . . . . . . . . . .14
—Worm Shaft Preload Adjustment . . . . . . . . . . . . . . . . . . . . . . . . . . . . . . . . . . . . . . . . . . .17
—Poppet Valve Adjustment . . . . . . . . . . . . . . . . . . . . . . . . . . . . . . . . . . . . . . . . . . . . . . . . .18
—Cross Shaft or Sector Shaft Adjustment . . . . . . . . . . . . . . . . . . . . . . . . . . . . . . . . . . . . .19A
HFB70 Exploded Assembly View— Typical . . . . . . . . . . . . . . . . . . . . . . . . . . . . . . . . . . . . . .19B
Torque Chart . . . . . . . . . . . . . . . . . . . . . . . . . . . . . . . . . . . . . . . . . . . . . . . . . . . . . . . . . . . . .19D
Tools and Materials Required for Servicing . . . . . . . . . . . . . . . . . . . . . . . . . . . . . . . . . . . . . .19D
Disassembly . . . . . . . . . . . . . . . . . . . . . . . . . . . . . . . . . . . . . . . . . . . . . . . . . . . . . . . . . . . . . .20
Inspection . . . . . . . . . . . . . . . . . . . . . . . . . . . . . . . . . . . . . . . . . . . . . . . . . . . . . . . . . . . . . . . .31
Assembly . . . . . . . . . . . . . . . . . . . . . . . . . . . . . . . . . . . . . . . . . . . . . . . . . . . . . . . . . . . . . . . . .34
Final Adjustment . . . . . . . . . . . . . . . . . . . . . . . . . . . . . . . . . . . . . . . . . . . . . . . . . . . . . . . . . . .49
Hydraulic Fluid . . . . . . . . . . . . . . . . . . . . . . . . . . . . . . . . . . . . . . . . . . . . . . . . . . . . . . . . . . . . .50
Filling and Air Bleeding the System . . . . . . . . . . . . . . . . . . . . . . . . . . . . . . . . . . . . . . . . . . . . .50
WARNINGS for Proper Steering Gear Operation . . . . . . . . . . . . . . . . . . . . . . . . . . . . . . . . . . .50
Steering System Maintenance Tips . . . . . . . . . . . . . . . . . . . . . . . . . . . . . . . . . . . . . . . . . . . . .52
WARNING: ALL STEERING MECHANISMS ARE LIFE AND LIMB ITEMS. AS
SUCH, IT IS IMPERATIVE THAT THE INSTRUCTIONS IN THIS BOOKLET ARE
FOLLOWED TO THE LETTER. FAILURE TO OBSERVE THE PROCEDURES SET
OUT IN THIS PAMPHLET MAY RESULT IN LOSS OF STEERING.
2
Introduction
Service Manual for Model HFB70
This service manual has one purpose: to guide you in maintaining, troubleshooting and servicing
the HFB70 Hydrapower ™ integral power steering gear.
Material in this manual is organized so you can work on the HFB70 and get results without wasting
time or being confused. To get these results, you should review the contents of this manual before
you begin any work on the HFB70.
The section of this manual on General Design and Operation, treats the major parts of the HFB70
and explains how they function together. The knowledge you acquire from reviewing this section
should assist you in solving your steering problem.
This manual also contains troubleshooting information and checklists. With them, you can diagnose
a steering problem without removing the HFB70 from the vehicle. If you must service the HFB70
the checklists will help you to determine where the problem may be.
The three-column format of the Repairs, Adjustments, Disassembly, Inspection and Assembly sections
will make it easier for you to service the HFB70. Column 1 gives a brief key for each procedure.
Column 2 explains in detail the procedure you should follow. Column 3 illustrates this procedure
with photographs. Pay special attention to the notes, cautions, and warnings.
A foldout page with the same typical HFB70 exploded assembly view on both sides is provided in
this manual. The component part names and item numbers assigned on this exploded assembly
view correspond with names and item numbers (in parentheses) used in the disassembly, assembly
and other procedures set forth in this manual. When this exploded assembly view page is folded
out, you can easily identify components and locate their relative position on the exploded assembly
view as you follow the disassembly, assembly and other procedures.
As you gain experience in servicing the HFB70, you may find that some information in this manual
could be clearer and more complete. If so, let us know about it. Don’t try to second guess the
manual; if you are stuck, contact us. Servicing the HFB70 should be a safe and productive procedure.
3
HFB70 OIL FLOW ILLUSTRATION
STEERING WHEEL INPUT
CLOCKWISE ROTATION
Right Hand Turn
Neutral - No Steering Action
STEERING WHEEL INPUT
COUNTER-CLOCKWISE ROTATION
Left Hand Turn
Supply Pressure
Return Pressure
4
HFB70: General Design and Operation
Design
Operation
Integral Power Steering
What Happens During a Steering
Maneuver
The HFB70 power steering gear is the latest
design in the Ross family of integral hydraulic
power steering gears. Integral hydraulic
power steering means that the gear box
contains a manual steering mechanism, a
hydraulic control valve, and a hydraulic power
cylinder, all in a single, compact package.
Rotary Control Valve
The rotary control valve combines simplicity
of construction with desirable performance
characteristics. The speed at which the driver
can turn the steering wheel with power
assist is dependent upon the pump flow
(measured in gallons per minute-gpm or
Liters/Min.) directed to a cylinder cavity.
The pressure (measured in pounds per square
inch—psi or bar) required for the gear to
steer the vehicle is created by the power
steering pump to overcome resistance at the
steered wheels. The control valve senses
these requirements and directs fluid to the
cylinder cavity at the proper flow rate and
pressure.
Pressure Means Work,
Flow Means Speed
The higher pressure a gear can withstand,
the more work it can perform. The HFB70 can
steer a vehicle with a front end weight rating
of about 16,000 pounds (7257 Kg) through a
turn at low vehicle speed and engine idle. As
the driver turns the steering wheel faster or
slower, more or less fluid will be required by
the gear in one minute. For the HFB70,
maximum operating pressure is 2000 psi
(137.9 bar), maximum flow rate 8 gpm (30
Liters/Min). NOTE: The recommended
minimum flow at 1 1/2 hand wheel
turns/second must be no less than 3.4 gpm
(13 Liters/Min.). If the HFB70 steering gear is
controlling an auxiliary cylinder, increased
minimum flow is required based on the size
of the auxiliary cylinder and the vehicle’s
steering geometry.
When the driver turns the steering wheel, he
transmits force from the wheel to the
steering gear input shaft. A torsion bar,
pinned at its one end to the input shaft and
at its other end to the worm shaft, turns with
the input shaft and exerts a rotational force
on the worm shaft. In response to this
rotational force, the worm shaft, acting
through the recirculating ball mechanism,
tries to move the rack piston axially through
the gear housing cylinder bore.
Bleed Systems
Some HFB70 gears which are mounted with
the output shaft above the rack piston bore
are equipped with a manual bleed screw.
The procedure for servicing the manual bleed
screw is described under “Filling and Air
Bleeding” (page 50) in this manual.
The rack piston’s axial movement is resisted
by its engagement to the sector shaft, which
is connected by linkage to the steered
wheels. Because of this resistance, the
torsion bar is twisted by the input shaft,
thereby actuating the control valve.
Pressurized fluid, directed by the control
valve, assists in moving the rack piston
axially through the cylinder bore. The rack
piston then turns the sector shaft to steer the
vehicle.
Shock Loads to the Gear
If the steered wheels receive a shock load,
the shock forces are transmitted through the
sector shaft, to the rack piston, and onto the
worm shaft. The internal geometry of the
steering gear causes the control valve to
send high pressure fluid to the correct
cylinder cavity to resist the shock forces. By
absorbing the shock forces hydraulically, the
steering gear prevents objectionable kickback
at the steering wheel.
Unloading (Poppet) Valves
The HFB70 gears are equipped with two
unloading valves, one at each end of the rack
piston. One valve or the other, depending on
the direction of turn, will trip as the steered
wheels approach the axle stops (which must
be set according to manufacturer’s
specification). The tripped valve reduces
pressure in the gear and helps to reduce heat
generated by the pump. At the same time,
the valves also reduce forces on the steering
linkage.
5
Troubleshooting Information
Preliminary Checks
When a customer comes to you with a problem related to his truck’s
steering, you can save a lot of time and work if you first verify the
problem. Make sure you’re both talking the same language about the
same problem. If he says the truck’s hard to steer, find out exactly
what he means. Is it hard steering into a right or left turn? Only when
turning the steering wheel while the truck is sitting still? Is there only
intermittent power steering? Or is there no power assist at all?
If at all possible, and if it’s safe to do so, test drive the truck. If you’re
not familiar with the rig, let the customer drive it while you sit beside
him. Take hold of the wheel while he drives to get a feel for the
problem he’s talking about. Since most of his driving will be with his
truck hauling a load, arrange for a load if one is required to reproduce
the steering problem.
Typical Steering System
Once you’ve determined the problem and its symptoms, don’t jump
right in to tear the steering gear or pump apart.
In most cases, in fact, the gear should be the last component you
check. There are many other components in the steering system that
could be causing the problem (see FIG. 1 & 1A). These you should
check first.
Begin, then, by checking the steered wheels: make sure that the tires
are at correct pressure and equal all around, that they are properly
sized, and that they are not worn or damaged.
Next, have the front-end alignment checked and look for abnormal
looseness or tightness in the steering linkage, ball joints, and king
pins.
A service replacement hose or fluid line may be misrouted or may be
too small in diameter, or it may be restricted in some ether way.
Reroute any hose that is kinked or bent sharply. Replace any hoses
that are not the same as original equipment.
Continue by checking the power steering fluid reservoir to make sure
that oil is up to the correct level. Also, check the pump drive belt, if
one is used, to see if it is slipping. The belt may be tight, but it may
also be glazed, and a slipping belt doesn’t always squeal. If you adjust
the belt, check the specifications.
These are just some of the checks you should make before you turn to
the steering gear or pump. The Troubleshooting Guide on pages 8 thru
10 explains what to diagnose for a particular steering problem. Match
the trouble symptom against the chart and follow the recommended
troubleshooting sequence. Doing so will most likely save you time and
may prevent unnecessary repairs and costs.
Hydraulic Tests
Figure 1
Typical Steering System
(with Auxiliary Cylinder)
Figure 1A
6
If the checks described above all prove satisfactory, it is possible that
the cause of the steering problem can be traced to a lack of pressure
or insufficient flow. In this case, you may have to do more detailed
troubleshooting that involves conducting hydraulic tests.
Preparation for Hydraulic Tests
To conduct the following hydraulic tests, first install a flow meter,
pressure gage and load (shut off) valve in the fluid supply line to the
steering gear, as indicated by the instructions that come with the flow
meter. Steering system analyzers are available with the 3 units
integral. Place a thermometer in the reservoir (FIG. 2) You must use a
flow meter, and it is recommended that you use a thermometer, if you
are to troubleshoot the hydraulic system accurately. Start the engine
and warm the hydraulic system up by partially closing the load valve
until the pressure gage reads 1000 psi (69.0 Bar). When the fluid
temperature, as indicated on the thermometer, reaches between
125°F (51.7°C) and 135°F (57 2°C), open the load valve. The system is
warmed up, and you can conduct the tests.
THERMOMETER
PRESSURE
GAGE
RESERVOIR
FILTER
POWER
STEERING
PUMP
LOAD
(SHUTOFF)
VALVE
FLOW METER
STEERING GEAR
Figure 2
CAUTION: Do not close the load valve completely and
leave it closed, or you may damage the pump. At no time
allow fluid temperature to exceed 180°F (82.2°C). Run all
the tests at the prescribed temperature range of 125°F
(51.7°C) 135°F (57.2°C).
Power Steering Pump Pressure Test
With the engine idling, close the load valve and read the pressure
gage. If the pressure reads below the minimum specified by the pump
manufacturer, repair or replace the pump.
Now, fully close the load valve until the pressure gage registers the
pressure at which the pump is relieving. When pump relief is reached,
flow rate must be zero. IMMEDIATELY OPEN THE LOAD VALVE. The
flow rate must instantly return to the original reading. If this rate does
not return immediately, the pump is malfunctioning, which can result
in intermittent power assist.
Now, set the engine at governed rpm, and fully close the load valve
again until pump relief is reached. At pump relief, the flow rate must
be zero. IMMEDIATELY OPEN THE LOAD VALVE. The flow rate must
instantly return to the original reading. If this rate does not return
immediately, the pump is malfunctioning, which can result in
intermittent power assist.
NOTE: Conduct the pump flow test once at idle rpm and
three times at governed rpm.
CAUTION: Do not allow the fluid temperature to exceed
180°F (82.2°C). Run each phase of this test between 125°F
(51.7°C) and 135°F (57.2°C).
Steering Gear Internal Leakage Test
To test the steering gear for internal leakage, you must first prevent
operation of the gear’s internal unloading (poppet) valves. This will
allow full pump relief pressure to develop. To prevent operation of the
poppets, place an unhardened steel spacer block, about 1 inch thick
and long enough to keep your fingers clear, between the axle and stop
at one wheel (see FIG. 3)
CAUTION: Do not keep the load valve closed for longer
than 5 seconds to avoid damaging the pump. Closing the
load valve causes the pump to operate at relief pressure
and the fluid temperature to increase rapidly. Allow fluid
to cool between 125°F (51.7°C) and 135°F (57.2°C) before
you resume with the other tests.
Power Steering Pump Flow Test
WARNING: MAXIMUM FLOW RATE FOR THE HFB70
STEERING GEAR IS 8 GPM (30 LITER/MIN). FLOW RATE
SHOULD NOT EXCEED 8 GPM (30 LITER/MIN). EXCESSIVE
FLOW CAN CAUSE DAMAGE TO INTERNAL PARTS OF
THE STEERING GEAR, WHICH COULD RESULT IN A LOSS
OF POWER STEERING.
NOTE: If flow specifications and methods of checking
flow rate are provided by the vehicle manufacturer, you
should follow those instructions rather than the
procedure described below.
With the engine idling and the fluid temperature between 125°F
(51.7°C) and 135°F (57.2°C), check the pump manufacturer’s
specifications for flow rate. Compare these specifications with the
flow rate on the flow meter.
Figure 3
With the fluid temperature between 125°F (51 7°C) and 135°F
(57.2°C), turn the steering wheel until the axle stops bottom on the
spacer block (FIG. 3).
CAUTION: When running this test, do not hold the
steering wheel in the full turn position for longer than 5
to 10 seconds at a time to avoid damaging the pump.
WARNING: KEEP YOUR FINGERS CLEAR OF THE AXLE
STOPS AND SPACER BLOCK DURING THIS TEST. MAKE
SURE THAT THE SPACER BLOCK CONTACTS THE AXLE
STOP SQUARELY. CONTACT THAT IS NOT SQUARE
COULD BREAK THE AXLE STOPS OR DANGEROUSLY
THROW OR EJECT THE SPACER BLOCK.
7
Apply 20 lbs. (9.1 KG) to the rim of the steering wheel during this test
to be sure that the steering gear control valve is fully
closed. The pressure gage should now read pump relief pressure, as
noted during the pump pressure test. You can now read steering gear
internal leakage on the flow meter.
Acceptable internal leakage can range from 0 to 1.5 gpm. (5.7
Liters/Min.)
Repeat this test for the opposite direction of turn.
If internal leakage is greater than 1.0 gpm (3.8 Liters/ Min.) and there
is no auxiliary hydraulic cylinder in the system, repair the gear. If the
internal leakage is greater than 1.5 gpm (5.7 Liters/Min.) and there is
an auxiliary hydraulic cylinder in the system, controlled by the HFB70
gear, isolate the auxiliary cylinder from the system by disconnecting
the auxiliary cylinder hydraulic lines at the HFB70 unit’s auxiliary
ports. Plug those ports with suitable pressure plugs or caps. Connect
the disconnected lines together if a rotary auxiliary cylinder is in the
system. Plug the disconnected lines if a linear auxiliary cylinder is in
the system and disconnect the linear cylinder from the steering linkage, making sure it will clear the steered axle. Repeat the internal
leakage test. If the internal leakage is less than 1.0 gpm (3.8
Liters/Min.), repair the auxiliary cylinder. If the internal leakage is
greater than 1.0 gpm (3.8 Liters/Min.), repair the HFB70 gear. See
internal leakage diagram, FIGURE 4.
NOTE: When hydraulic tests are completed and fluid
lines are reconnected, check fluid level and air bleed the
system. Reference page 50.
Figure 4
NOTE: If all seals as included in the complete seal kit
have been correctly replaced, and the HFB70 steering
gear cannot pass the internal leakage test, or if intermittent loss of power steering occurs, a service worm
shaft/input shaft, valve sleeve assembly is required.
Troubleshooting Guide
I.
Normal Noises
•
You or the driver may hear a “hissing” noise from the control valve when it is actuated during
a steering maneuver.
•
You or the driver may hear a noise as fluid bypasses through the poppets at full turn.
•
You or the driver may hear a noise from the system relief valve when it is required to actuate.
•
You or the driver may hear pump “growl” from some types of power steering pumps.
II. Abnormal Noises
•
If the power steering pump is belt driven, a “squealing” noise may indicate that the belts
should be tightened or replaced.
•
A “clicking” noise heard during a turn, or when changing directions, may indicate that some
component is loose and shifting under load.
•
A change in the normal noise of the pump may indicate that air has been induced into the
system or that fluid level is low.
8
III.
Possible Steering Problems and Causes
Road Wander
•
Tire pressure incorrect or unequal left to right.
•
Components in steering linkage loose or worn (Steering wheel to road wheel).
•
Wheel bearings improperly adjusted or worn.
•
Front end alignment out of specification.
•
Dry fifth wheel or poor finish on fifth wheel or trailer plate.
•
Steering gear mounting bolts loose on frame.
•
Steering gear improperly adjusted.
•
Looseness in rear axle assemblies or trailer bogies.
•
Tire pressure low.
•
Front end components binding.
•
Front end alignment incorrect.
•
Tight front axle king pins.
•
Dry fifth wheel or poor finish on fifth wheel or trailer plate.
•
Steering column binding.
•
Pump flow insufficient.
•
Steering gear improperly adjusted.
•
Steering gear control valve sleeve sticking.
•
Badly worn or unevenly worn tires.
•
Improperly mounted tire or wheel.
•
Wheel bearings improperly adjusted or worn.
•
Components in steering linkage loose or worn.
•
Wheels or brake drums out of balance.
•
Front end alignment incorrect.
•
Air in the hydraulic system.
No Recovery
Shimmy
External Oil Leakage
•
Finding the location of leak may be difficult, since oil may run away from leak source, the
fittings, hoses, pump, or gear to a low point on the gear or chassis.
•
A leak from the vent plug at the side cover indicates failure of the sector shaft oil seal inside
the side cover.
Oversteering or Darting
•
Dry fifth wheel or poor finish on fifth wheel or trailer plate.
•
Front end components binding or loose.
•
Steering column binding.
9
•
Steering gear improperly adjusted.
•
Steering gear control valve sleeve sticking.
•
Rear axle mounts (rear steer).
High Steering Effort in One Direction
•
Unequal tire pressure.
•
Vehicle overloaded.
•
Inadequate hydraulic system pressure.
•
Excessive internal leakage in one direction of turn only (verify with internal leakage test).
High Steering Effort in Both Directions
•
Low tire pressure.
•
Vehicle overloaded.
•
Low hydraulic fluid level.
•
Low pressure or flow from pump.
•
Components of steering system binding.
•
Restriction in return line, or line too small in diameter.
•
Excessive internal leakage (verify with internal leakage test).
•
Oversize tires (check manufacturer’s specifications).
Lost Motion (Lash) at the Steering Wheel
•
Steering wheel loose on the shaft.
•
Loose connection between the steering gear, intermediate column, and steering column.
•
Steering gear loose on frame.
•
Pitman arm loose on output shaft.
•
Components in steering linkage loose or worn.
•
Steering gear improperly adjusted.
Excessive Heat [150°F (65.6°C) Over Ambient]. Not to Exceed 250°F (121°C) Continuously
•
Excessive pump flow.
•
Vehicle overloaded.
•
Undersized replacement hose or line.
•
Restricted hose or line that is kinked or severely bent or internally
blocked.
•
Restricted recentering of gear valve caused by column bind or side
load on the input shaft.
•
Poppet not adjusted properly (only for gears equipped with poppets).
•
Prolonged stationary vehicle operation.
WARNING: IF THE HYDRAULIC SYSTEM FLUID BECOMES
OVERHEATED, IT CAN CAUSE THE SEALS IN THE STEERING
GEAR AND PUMP TO SHRINK, HARDEN, OR CRACK AND
LOSE THEIR SEALING ABILITY.
10
Repairs and Adjustments on Vehicle
When you have conducted the checks and tests described in the troubleshooting sections, you
may find it necessary to repair or adjust the steering gear. Since removing the gear from the
vehicle is usually difficult and time-consuming, you will probably find it easier to perform the
following repairs and adjustments with the gear on the vehicle. The photographs in this section show a gear mounted on a mock-up frame for clearer illustration.
Figure 5
1 The Sector Shaft And Trunnion Cover
remove pitman
arm
1.1 If a leak is detected in the trunnion cover area on many HFB70
installations, you can remove the trunnion cover to gain access to
the sector shaft seal package while the steering gear is on the
vehicle. First remove the pitman arm nut and bolt and then the
pitman arm from the sector shaft (48). SEE FIGURES 5 & 6. Check
the radial position of the pitman arm to the sector shaft prior to
removal of pitman arm. Add timing marks to the arm and shaft if
necessary to insure correct alignment at reassembly.
NOTE
NOTE: A chisel will help you loosen the pitman arm.
Use only a puller if you cannot remove the pitman
arm with your hands.
WARNING
WARNING: WHEN USING A CHISEL TO SPREAD THE
PITMAN ARM BOSS IN ORDER TO LOOSEN THE
PITMAN ARM FOR REMOVAL FROM THE SHAFT,
MAINTAIN A FIRM GRIP ON THE CHISEL AT ALL
TIMES. FAILURE TO DO THIS MAY RESULT IN THE
CHISEL FLYING LOOSE WHICH COULD CAUSE AN
INJURY. NEVER LEAVE THE CHISEL WEDGED IN THE
PITMAN ARM BOSS. IF YOU CANNOT REMOVE THE
PITMAN ARM FROM THE SHAFT WITH A CHISEL AND
YOUR HANDS, REMOVE THE CHISEL FROM THE
PITMAN ARM AND USE A PULLER ONLY TO REMOVE
THE PITMAN ARM.
remove
protector boot,
fitting and dirt
and water seal
1.2 Remove protector boot (60), grease fitting (61) and dirt and water
seal (26). SEE FIGURE 7, 8. Discard protector boot and dirt and
water seal.
clean sector
shaft
1.3 Clean the sector shaft (48) with a fine grade of emery paper. Be
sure to remove any paint. SEE FIGURE 9.
Figure 6
Figure 7
Figure 8
Figure 9
11
remove trunnion
cover & seal
package
1.4 Next, remove the four trunnion cover bolts (28) washers (27) and
trunnion cover (25). SEE FIGURE 10. A 1/2 inch socket required.
Be prepared for fluid loss. Then remove and discard the sector
shaft seal package consisting of the two-piece sector shaft seal
(23), the Teflon* backup washer (24), and the trunnion cover seal
ring (22). SEE FIGURE 11.
clean and
inspect trunnion
cover
1.5 Clean the trunnion cover (25) with petroleum based solvent, blow
dry and inspect the seal cavity and sealing face for nicks or
corrosion. Replace the trunnion cover with a new one if these
conditions exist.
WARNING
WARNING: SINCE THEY ARE FLAMMABLE, BE
EXTREMELY CAREFUL WHEN USING ANY SOLVENT.
EVEN A SMALL EXPLOSION OR FIRE COULD CAUSE
INJURY OR DEATH.
WARNING
WARNING: WEAR EYE PROTECTION AND BE SURE
TO COMPLY WITH OSHA OR OTHER MAXIMUM AIR
PRESSURE REQUIREMENTS.
Figure 10
Figure 11
install new
washer
1.6 Place the trunnion cover (25) on a bench to install the new seal
package. Start with the new Teflon backup washer (24).
install new seal
1.7 Install the new two-piece sector shaft seal (23), so that the words
“oil side” are visible after seal is in place. SEE FIGURE 12.
WARNING
install new seal
ring
WARNING: THE WORDS “OIL SIDE” MUST BE
VISIBLE ON THE SEAL AFTER IT IS IN PLACE. IF NOT,
THE SEAL WILL NOT FUNCTION, AND A LOSS OF
POWER STEERING ASSIST MAY OCCUR.
Figure 12
1.8 Grease the new trunnion cover seal ring (22) and install it into the
cover groove.
Figure 13
tape sector
shaft
NOTE
1.9 Cover the serrations of the sector shaft (48) with tape to avoid
damaging the seals during installation. SEE FIGURE 13.
NOTE: Use only one layer of tape.
*Teflon is a registered trademark of DuPont Corporation
12
Figure 14
install trunnion
cover, washers
& bolts
1.10 Install the trunnion cover (25) and four trunnion cover washers
(27) and bolts (28). Torque bolts to 15-22 ft. lbs. (20-30 N m) if
dry or 11-16 ft. lbs. (15-22 N m) if lubricated. 1/2 inch socket
required. SEE FIGURES 14, 15, 16.
Figure 15
install new dirt
& water seal
1.11 Pack clean high temperature industrial grease per Ross
specification 045231, *Mobil temp. 1 or 2 or equivalent around
seal area of sector shaft (48). Install a new dirt and water seal
(26) using a suitable blunt end drift. SEE FIGURE 17.
Figure 16
assemble
protector boot
& fitting
1.12 Apply a generous amount of the same grease to protector boot
(60) in the area inside of the smaller diameter ring. Assemble
protector boot onto sector shaft (48) and trunnion cover (25),
locating the grease fitting hole toward the input shaft end of
gear assembly. Insert grease fitting (61) into protector boot.
Remove tape from sector shaft serrations. SEE FIGURE 18.
Figure 17
install pitman
arm
1.13 Reconnect the pitman arm, making sure the timing mark on the
pitman arm aligns with the timing mark on the sector shaft.
SEE FIGURE 19.
Figure 18
WARNING
WARNING: WHEN USING A CHISEL TO SPREAD THE
PITMAN ARM BOSS FOR ASSEMBLY ONTO THE
SECTOR SHAFT (48), MAINTAIN A FIRM GRIP ON THE
CHISEL AT ALL TIMES. FAILURE TO DO THIS MAY
RESULT IN THE CHISEL FLYING LOOSE WHICH
COULD CAUSE AN INJURY. NEVER LEAVE THE
CHISEL WEDGED IN THE PITMAN ARM BOSS.
*Mobil Temp is a Registered Trademark of Mobil Oil Co.
Figure 19
13
install and
torque pitman
arm bolt
CAUTION
fill and bleed
system
1.14 Insert the pitman arm clamp bolt and nut assembly, using a
3/4-16 grade 8 bolt. SEE FIGURE 20. If the bolt is lubricated or
plated, torque its to 300-320 ft. lbs. (407-434 N m). If dry and
unplated, torque to 380-420 ft. lbs. (515-569 N m).
CAUTION: Be sure there is no spreading wedge left
in the pitman arm boss before torquing pitman arm
clamp bolt.
1.15 Before operating the steering gear, fill the with the
recommended fluid and bleed air the system by following the
Filling and Air Bleeding instructions on page 50.
Figure 20
2 The Worm Shaft/Input Shaft Seal
remove input
coupling &
protector, clean
input shaft
WARNING
2.1 If there is a leak in the shaft seal, you can usually replace the
input shaft seal assembly with the gear on the vehicle. Start by
removing the input coupling per the vehicle manufacturers
instructions. SEE FIGURE 21. Remove seal protector (62) and clean
the area around the input shaft with a fine grade of emery paper.
SEE FIGURE 22 & 23.
WARNING: DO NOT DRIVE OR PRY COUPLING FROM
WORM SHAFT/INPUT SHAFT. INTERNAL DAMAGE TO
THE STEERING GEAR CAN RESULT. IF COUPLING IS
TIGHT, INSERT SCREWDRIVER INTO SLOT TO
RELEASE.
Figure 21
Figure 22
Figure 23
remove and plug
the return line
2.2 Remove and plug the return line. SEE FIGURE 24.
Figure 24
14
remove seal
2.3 Remove and discard the dirt and water seal (4) SEE FIGURE 25.
Figure 25
remove retaining
ring
2.4 Remove the seal retaining ring (5) from the valve housing (8).
SEE FIGURE 26.
Figure 26
apply air
pressure to port
WARNING
2.5 Hold a shop rag over the worm shaft/input shaft and apply shop
air pressure to the valve housing (8) return port. SEE FIGURE 27.
WARNING: BE SURE TO WEAR EYE PROTECTION,
AND TO COMPLY WITH OSHA OR OTHER MAXIMUM
AIR PRESSURE REQUIREMENTS.
Figure 27
remove seal &
washer
2.6 The air pressure will force the two-piece input shaft seal (7) and
the steel backup washer (6) to pop out of the gear, and some fluid
will squirt out of the gear. SEE FIGURE 28. Discard the seal.
Disconnect the shop air as soon as the seal assembly is out.
Figure 28
15
install seal
package
2.7 Apply clean grease to the new input shaft seal assembly (7),
washer (6) and the input shaft. Install the new two piece input
shaft seal flat side up and the steel backup washer, using the
seal driving tool J28490. SEE FIGURE 29. Install the retaining ring
(5).
Figure 29
grease input
shaft
2.8 Pack the area around the worm shaft/input shaft (16) and dirt and
water seal (4) cavity with high temperature industrial grease per
Ross specification 045231, *Mobil Temp 1 or 2 or equivalent.
SEE FIGURE 30.
Figure 30
install seal
2.9 Install the new dirt and water seal (4) with tool J28490 or a
suitable blunt end drift. SEE FIGURE 31.
Figure 31
assemble seal
protector
2.10 Add more grease to seal area and assemble seal protector (62)
onto worm shaft/input shaft (16), seating it in the relief groove
just beyond the input shaft serrations with cupped side toward
the gear. SEE FIGURE 32.
reconnect line
2.11 Remove the plug and reconnect the return line.
Figure 32
*Mobil Temp is a Registered Trademark of Mobil Oil Co.
16
reconnect input
coupling
2.12 Reconnect the input coupling. If the input coupling male
assembly slides free of the female end during reassembly,
realign the timing marks to insure proper phasing of the U-joints.
Refer to Vehicle Service Manual for proper torque.
WARNING
fill and bleed
system
WARNING: MISTIMED U-JOINTS CAN RESULT IN A
BUMPY SENSATION AT THE STEERING WHEEL AND
POSSIBLY AFFECT STEERING CONTROL.
2.13 Before operating the steering gear, fill the system with the
recommended fluid only and bleed the system following the
filling and bleeding instructions on page 50.
Adjustments
You can make three adjustments to the gear while it is mounted on the vehicle: the worm
shaft preload adjustment, the poppet valve adjustment and the sector shaft adjustment.
3 Worm Shaft Preload Adjustment
Figure 33
(With vehicle engine off)
loosen sealing
nut and adjusting
screw
3.1 Back off the worm shaft adjusting screw sealing nut (39) three
turns. SEE FIGURE 33. Back off the worm shaft preload adjusting
screw (38) at least one turn. SEE FIGURE 34. Inspect the threads
between the jam nut and end cover (37) for foreign matter. Clean
the threads or replace the sealing nut if necessary.
SEE FIGURE 35.
Figure 34
torque adjusting
screw
NOTE
3.2 While torquing the worm shaft preload adjusting screw (38) to
60-70 in. lbs. (81-95 N m) have someone lightly move the
steering wheel back and forth about one inch (25 mm) total.
NOTE: While torquing the adjusting screw, make
sure that the worm shaft adjusting screw sealing nut
(39) does not tighten against end cover.
Figure 35
torque sealing
nut
NOTE
3.3 Torque the worm shaft adjusting screw sealing nut (39) to 70-80
ft. lbs. (95-108 N m), making sure that the worm shaft preload
adjusting screw (38) does not move. SEE FIGURE 36.
NOTE: If the sealing material in the sealing nut has
separated, remove the adjusting screw and replace
the sealing nut with a new one onto the nonslotted
end of the adjusting screw.
Figure 36
17
4 Poppet Valve Adjustment
(With vehicle engine on)
set axle stops
4.1 Before adjustment, properly set the axle stops manufacturer’s
specifications.
install flow
meter
4.2 Install a pressure gage/flow meter package in the supply line
from the pump to the gear. (Make sure the flow meter can be
pressurized.) Bring the fluid temperature up to approximately
130°F, (54°C), using the method described in the troubleshooting
section (page 6).
rotate sector
shaft
CAUTION
NOTE
ADJUST THIS
POPPET SCREW
4.3 With the engine at idle, have someone turn the steering wheel to
full lock, (axle against axle stop) while you observe the rotation of
the sector shaft (48). SEE FIGURE 37. If the sector shaft rotates
counter clockwise as shown, adjust the poppet adjusting screw
identified in FIGURE 37. If the sector shaft rotates clockwise,
adjust the other poppet adjusting screw.
CAUTION: If relief pressure is reached while the
steering wheel is at full lock (axle against axle stop),
release the steering wheel from this position. At no
time should relief pressure be maintained for longer
than 5 seconds as damage to the pump may result.
NOTE: You must maintain enough force on the
steering wheel to assure that the steering gear
control valve is completely closed when reading
pressure gage.
loosen sealing
nut and adjusting
screw
4.4 Once you have determined which poppet to adjust and the
steering wheel is in full lock (axle stop to axle stop), loosen the
poppet adjusting screw sealing nut (2) and the poppet adjusting
screw (3 or 42) until the pressure gage reads maximum pump
relief pressure. SEE FIGURE 38. 11/16 inch box end wrench and
screw driver required.
set adjusting
screw & tighten
sealing nut
4.5 Manually (no power tool) and carefully screw in the poppet
adjusting screw (3 or 42) until the pressure gage shows a
significant drop in pressure, 200-400 psi (13.8-27.6 Bar) with the
steering wheel in full lock. Tighten the poppet adjusting sealing
nut (2) to 12-18 ft. lbs. (16-24 N m).
repeat for other
poppet
4.6 To adjust the other poppet, repeat these instructions for full lock
in the other direction. SEE FIGURE 39.
ADJUST THIS
POPPET SCREW
Figure 37
Figure 38
Figure 39
18
5 Cross-shaft or Sector-shaft Adjustment
(With vehicle engine off)
locate adjusting
nut
5.1 If the sector-shaft adjusting screw jam nut (58), located on the
side cover, is not accessible, the steering gear must be removed
prior to adjustment.
remove the drag
link
5.2 If the sector shaft adjusting screw (49) is accessible, remove the
drag link from the pitman arm.
CAUTION
CAUTION: This adjustment must be performed with
the sector shaft on its center of travel.
NOTE
NOTE: Because of pitman arm or internal stops or
poppet adjustment the “center of travel” for this
adjustment may not be the center of sector shaft or
handwheel rotation.
center the
sector shaft
5.3 To position the sector shaft (48) on center of travel for this
adjustment rotate steering wheel (worm shaft/input shaft) until
the timing mark across the end of the sector shaft is
perpendicular to the worm shaft/ input shaft (16). SEE FIGURE 40,
page 20.
check for lash
5.4 With the sector shaft (48) in the center position, grasp the pitman
arm and gently try to move this arm back and forth in the
direction of travel. Finger-tip force is adequate to detect lash of a
loose sector shaft. There must be no movement of the input shaft
or sector shaft. If no lash is detected, do not adjust.
position
adjusting screw
5.5 If lash is detected, loosen jam nut (58) with a 3/4 inch socket and
move the adjusting screw (49) clockwise until the sector shaft and
rack piston (29) are in contact. [Use no more than 10 ft. lbs.
(14 N m) of torque]. Then, turn the adjusting screw
counterclockwise one turn.
check for lash
5.6 At this point, there should be lash at the pitman arm.
eliminate lash
5.7 To adjust, slowly turn the adjusting screw (49) clockwise until no
lash is felt at the pitman arm. Hold the adjusting screw in place,
and tighten the jam nut (58). Final torque 40-45 ft. lbs.
(54-61 N m).
recheck for lash
5.8 Recheck the pitman arm for lash. Turn the steering wheel 1/4 turn
each side of center. No lash should be felt. If lash exists, repeat
adjustments 5.3-5.8.
connect drag link
5.9 Re-connect drag link to pitman arm.
19A
DESCRIPTION
Valve Housing Bolts (4 used, 2.125 long)
Poppet Screw Sealing Nuts (2)
Poppet Adjusting Screw
Dirt and Water Seal
Retaining Ring
Steel Backup Washer
Input Shaft Seal (Two piece)
Valve Housing
End Cover and Valve Housing Seal Rings
Trust Washer (2)
Thrust Bearing
Teflon Seal Rings (2)
Backup “O” Rings (2)
Valve Sleeve
Worm Shaft/Input Shaft
Worm Shaft Backup “O” Ring
Teflon Worm Shaft Seal
Housing
Bleed Screw
Housing Bearing
Retaining Ring
Trunnion Cover Seal Ring
Sector Shaft Seal (Two piece)
Backup Washer
Trunnion Cover
Dirt and Water Seal
Trunnion Cover Washers (4)
Trunnion Cover Bolts (4)
Rack Piston
Retaining Rings (2)
Poppet Seats (2)
Poppets (2)
Spacer Rod
Spring
Rack Piston Backup “O”’ Ring
Teflon Rack Piston Seal
End Cover
Worm Shaft Preload Adjusting Screw
Worm Shaft Adjusting Screw Sealing Nut
End Cover Washers (4)
End Cover Bolts (4 used, 1.625 long)
ITEM
NO .
42.
43.
44.
45.
46.
46A.
47.
*47A.
47B.
48.
49.
50.
Poppet Adjusting Screw
Balls (34)
Ball Return Guides (2)
Ball Return Guide Cap Seal
Ball Return Guide Cap
Ball Return Guide Clip
Allen or Torx Head Screws (2)
Lock Tabs (2)
Hex Head Bolts (2)
Sector Shaft
Sector Shaft Adjusting Screw
Retainer
DESCRIPTION
HFB70 Exploded Assembly View - Typical
ITEM
NO .
1.
2.
3.
4.
5.
6.
7.
8.
9.
10.
11.
12.
13.
14.
16.
17.
18.
19.
19A.
20.
21.
22.
23.
24.
25.
26.
27.
28.
29.
30.
31.
32.
33.
34.
35.
36.
37.
38.
39.
40.
41.
ITEM
NO .
51.
52.
*53.
54.
55.
56.
57.
58.
59.
60.
61.
62.
DESCRIPTION
Retaining Ring
Side Cover Seal (Two piece)
Teflon Backup Washer
Steel Backup Washer
Side Cover Gasket
Side Cover Ass’y
Vent Plug
Jam Nut
Special Ring Head Bolts (8)
Seal Protector Boot
Grease Fitting
Seal Protector
19B
ITEM
NO .
1.
2.
3.
4.
5.
6.
7.
8.
9.
10.
11.
12.
13.
14.
16.
17.
18.
19.
19A.
20.
21.
22.
23.
24.
25.
26.
27.
28.
29.
30.
31.
32.
33.
34.
35.
36.
37.
38.
39.
40.
41.
Valve Housing Bolts (4 used, 2.125 long)
Poppet Screw Sealing Nuts (2)
Poppet Adjusting Screw
Dirt and Water Seal
Retaining Ring
Steel Backup Washer
Input Shaft Seal (Two piece)
Valve Housing
End Cover and Valve Housing Seal Rings
Trust Washer (2)
Thrust Bearing
Teflon Seal Rings (2)
Backup “O” Rings (2)
Valve Sleeve
Worm Shaft/Input Shaft
Worm Shaft Backup “O” Ring
Teflon Worm Shaft Seal
Housing
Bleed Screw
Housing Bearing
Retaining Ring
Trunnion Cover Seal Ring
Sector Shaft Seal (Two piece)
Backup Washer
Trunnion Cover
Dirt and Water Seal
Trunnion Cover Washers (4)
Trunnion Cover Bolts (4)
Rack Piston
Retaining Rings (2)
Poppet Seats (2)
Poppets (2)
Spacer Rod
Spring
Rack Piston Backup “O”’ Ring
Teflon Rack Piston Seal
End Cover
Worm Shaft Preload Adjusting Screw
Worm Shaft Adjusting Screw Sealing Nut
End Cover Washers (4)
End Cover Bolts (4 used, 1.625 long)
DESCRIPTION
ITEM
NO .
42.
43.
44.
45.
46.
46A.
47.
*47A.
47B.
48.
49.
50.
Poppet Adjusting Screw
Balls (34)
Ball Return Guides (2)
Ball Return Guide Cap Seal
Ball Return Guide Cap
Ball Return Guide Clip
Allen or Torx Head Screws (2)
Lock Tabs (2)
Hex Head Bolts (2)
Sector Shaft
Sector Shaft Adjusting Screw
Retainer
DESCRIPTION
HFB70 Exploded Assembly View - Typical
19C
ITEM
NO .
51.
52.
*53.
54.
55.
56.
57.
58.
59.
60.
61.
62.
Retaining Ring
Side Cover Seal (Two piece)
Teflon Backup Washer
Steel Backup Washer
Side Cover Gasket
Side Cover Ass’y
Vent Plug
Jam Nut
Special Ring Head Bolts (8)
Seal Protector Boot
Grease Fitting
Seal Protector
DESCRIPTION
Torque Chart
Part Name
Item Number
Torque
Trunnion Cover Bolts
28
15-22 ft. lbs. (20-30 N m)
Trunnion Cover Bolts
28 If Lubricated
11-16 ft. lbs. (15-22 N m)
Worm Shaft Preload Adjusting Screw
38
60-70 in. lbs. (6.8-7.9 N m)
Worm Shaft Adjusting Screw Sealing Nut
39
70-80 ft. lbs. (95-108 N m)
Poppet Adjusting Screw Sealing Nuts
2
12-18 ft. lbs. (16-24 N m)
Poppet Seats
31
20-25 ft. lbs. (27-34 N m)
Hex Head Bolts
47B
14-22 ft. lbs. (19-30 N m)
Allen or Torx Head Screws
47
14-22 ft. lbs. (19-30 N m)
End Cover Bolts
41
150-170 ft. lbs. (203-230 N m)
End Cover Bolts
41 If Lubricated
108-128 ft. lbs. (146-174 N m)
Valve Housing Bolts
1
150-170 ft. lbs. (203-230 N m)
Valve Housing Bolts
1 If lubricated
108-128 ft. lbs. (146-174 N m)
Special Bolts
59
150-170 ft. lbs. (203-230 N m)
Special Bolts
59 If lubricated
108-128 ft. lbs. (146-174 N m)
Bleed Screw
19A
27-33 in. lbs. (3.1-3.7 N m)
Pitman Arm Clamp Bolt
Lubricated/Plated
300-320 ft. lbs. (407-434 N m)
Pitman Arm Clamp Bolt
Dry/Unplated
380-420 ft. lbs. (515-569 N m)
Jam Nut
58
40-45 ft. lbs. (54-61 N m)
Universal joint bolts-torque to vehicle manufacturer’s specifications.
All torques specified in this manual are for dry/unplated parts unless otherwise specified.
Tools and Materials Required for Servicing
Manual
Tape
Grease, Wheel bearing grease
Grease—**Mobil Temp 1 or 2 or equivalent
Special Tools:*
Seal Installation Tool J26739
Seal Compression Tool J26740
Seal installation Tool J26741
Seal Compression Tool J26742
Seal Driving Tool J28490
Bearing Mandrel J26743
Adjustable wrench
Knife
Chisel
Torque Wrench-in. lbs. IN m)
Torque Wrench-ft. lbs. IN m)
Soft Punch
Retaining Ring pliers
Ratchet
Sockets: 112, 13/16, 15/16 inch
Allen sockets: 5/16, 5/32 inch
12-point sockets: 11/16, 314, 13/ 16 inch
Torx sockets: T-30
Pitman arm puller
Screw driver
Slot type screwdriver socket
*NOTE: SPECIAL TOOLS ARE AVAILABLE FROM:
Kent-Moore Tool Division
29784 Little Mack
Roseville, Ml 48066
Phone: 313-574-2332 or 1-800-328-6657
For complete HFB70 service tool set, order Part No. J26837.
**Mobile Temp is a Registered Trademark of Mobile Oil Co.
19D
Disassembly
Preparation
•
•
•
•
THOROUGHLY CLEAN OFF ALL OUTSIDE DIRT, ESPECIALLY FROM AROUND FITTINGS
AND HOSE CONNECTIONS, BEFORE YOU REMOVE THE GEAR.
Drain the steering gear assembly.
Remove input and output shaft connections per 1.1 and 2.1, Page 11 and 14.
Remove the supply and return lines from the gear, and immediately plug all port holes
and fluid lines.
WARNING: THIS STEERING GEAR WEIGHS APPROXIMATELY 112 POUNDS, 51
KG, DRY. EXERCISE CAUTION WHEN YOU REMOVE, LIFT, OR CARRY IT. DO
NOT POUND THE UNIVERSAL JOINT OR INPUT SHAFT COUPLING ON OR OFF
THE INPUT SHAFT. INTERNAL DAMAGE TO THE STEERING GEAR CAN
RESULT.
•
•
•
Remove the steering gear from the vehicle and take it to a clean surface (a piece of
wrapping paper makes an excellent disposable top)
Clean and dry the gear before you start to disassemble it.
As you disassemble the gear, clean all parts in clean, petroleum-based solvent, and
blow them dry only.
WARNING: SINCE THEY ARE FLAMMABLE, BE EXTREMELY CAREFUL WHEN
USING ANY SOLVENT. EVEN A SMALL EXPLOSION OR FIRE COULD CAUSE
INJURY OR DEATH. WARNING: WEAR EYE PROTECTION AND BE SURE TO
COMPLY WITH OSHA OR OTHER MAXIMUM AIR PRESSURE REQUIREMENTS.
CAUTION: Never steam clean or high-pressure wash hydraulic steering components. Do not force or abuse closely fitted parts.
•
•
Keep each part separate to avoid nicks and burrs.
Discard all seals, O-rings, and gaskets removed from the gear. Replace them with new
parts only.
Disassembly
position gear &
sector shaft
CAUTION
remove protector
boot & dirt and
water seal
TIMING MARK
1. Position the steering gear firmly in a vise with the gear’s worm
shaft/input shaft (16) in a horizontal direction. Prepare for fluid
drainage and unplug fluid line ports. Rotate worm shaft/input
shaft with an 11/16 inch or 3/4 inch 12 point socket or box end
wrench, through the gear travel several times to purge hydraulic
fluid from the unit. Then position the timing mark located on the
end of the sector shaft (48) to a vertical direction. SEE FIGURE 40.
CAUTION: Clamp only against housing mounting
bosses or attach a plate to the mounting bosses for
this purpose. Do not clamp against the body of
housing.
Figure 40
2. Remove protector boot (60), grease fitting (61) and the dirt and
water seal (26) from the trunnion cover (25). SEE FIGURE 41.
Discard boot and seal.
Figure 41
20
clean sector
shaft and loosen
jam nut
3. Remove any paint or corrosion from the exposed area of the
sector shaft (48), and loosen the jam nut (58) on the sector shaft
adjusting screw (49). 3/4 inch socket required.
remove trunnion
cover bolts &
washers
4. Remove the four bolts (28) and washers (27) from the trunnion
cover with a 1/2 inch socket. SEE FIGURE 42.
remove trunnion
cover and seal
package
5. Remove the trunnion cover (25). Remove and discard the seal ring
(22), the two piece sector shaft seal (23) and the Teflon back-up
washer (24) from the trunnion cover. SEE FIGURE 43.
tape sector shaft
6. Tape the serrations and bolt groove of the sector shaft (48) with
one layer of masking tape to prevent loose bearing rolls from
“hanging up” the sector shaft during its removal. The tape should
not extend on to the sector shaft bearing diameter.
SEE FIGURE 44.
Figure 42
Figure 43
Figure 44
remove side
cover bolts
7. Prepare for fluid to drain, and remove eight special ring head
bolts (59) from the side cover (56) with a 13/16 inch socket.
SEE FIGURE 45.
Figure 45
NOTE
NOTE: These bolts are special because they are
equipped with either a ring or washer design on the
underside of the head. If you replace one or more
bolts, you must use bolts of either design and of the
SAME SPECIAL TYPE AND LENGTH AS THOSE YOU
REMOVED. Do not use a substitute. You can get these
bolts through your OEM parts distributor.
SEE FIGURE 46.
Figure 46
21
begin to remove
side cover &
sector shaft
NOTE
CAUTION
8. Begin to remove the side cover (56) and sector shaft (48) as an
assembly. SEE FIGURE 47. Stop removal when the bearing rolls
in the housing bearing (20) are half exposed. Coat the bearing
rolls with grease. As a means of starting the removal of the side
cover and sector shaft assembly, you may use a soft hammer or
wooden hammer handle. SEE FIGURE 48.
NOTE: When the bearing rolls are half exposed and it
is evident that the unit has a caged bearing (rolls
retained), the following caution note does not apply.
Figure 47
CAUTION: Take care to remove this assembly slowly,
or it may come out too quickly for you to retain the
loose bearing rolls in the housing bearing race.
Follow the shaft end with the bearing tool (J26743) to
retain the rolls, or when the rolls are half exposed,
be sure to coat them with grease to retain them in the
housing bearing. If one or more of the rolls is lost,
you must replace the entire bearing.
Figure 48
remove side
cover and sector
shaft
CAUTION
9. Finish removing the side cover (56) and sector shaft (48) as an
assembly. Remove side cover gasket (55) and discard.
CAUTION: The bearing may contain 41 or 42 rolls,
depending upon the type used. Bearing BR-970 has 41
rolls. Bearing BR 9701 has 42 rolls. The identification
number can be found on the outside edge of the
bearing race flange. There is also a set of bearing
rolls in the side cover, with either 41 or 42 rolls. The
quantity may not be the same as in the housing
bearing. Do not mix these rolls.
remove bearing
rolls
10. If the housing (19) bearing has loose rolls, the bearing rolls from
the bearing (20) race, count them and put them aside as a set for
cleaning, inspecting and reassembly.
remove jam nut
11. Remove the sector shaft adjusting screw jam nut (58).
SEE FIGURE 49. 3/4 inch socket required.
remove sector
shaft
Figure 49
Figure 50
12. Screw the sector shaft adjusting screw (49) through the side
cover (56) SEE FIGURE 50. Place the side cover exterior face down
and lift the sector shaft (48) out vertically. SEE FIGURE 51.
Figure 51
22
NOTE
NOTE: If the side cover bearing assembly has
uncaged (loose) rolls, the vertical position will allow
the side cover bearing rolls to fall into the side cover,
where you may easily collect and count them.
Immediately gather all of the side cover bearing rolls
and count them.
CAUTION
CAUTION: Take care not to lose any rolls during
disassembly and assembly, or you will have to
replace the complete side cover assembly.
WARNING
Figure 52
WARNING: IF THE BEARING IS THE UNCAGED
(LOOSE) ROLL TYPE, DO NOT MIX THE ROLLS FROM
THE SIDE COVER WITH THE ROLLS FROM THE
HOUSING BEARING. THE BEARING RACE AND ROLLS
ARE A MATCHED SET. INTERCHANGING THE ROLLS
COULD RESULT IN PREMATURE BEARING OR SEAL
FAILURE, WHICH COULD CAUSE A LOSS OF POWER
STEERING.
Figure 53
remove side
cover seal pack
13. Remove the retaining ring (51), the two-piece side cover seal (52),
the Teflon backup washer (53). and the steel backup washer (54)
from the side cover. Discard seal and Teflon washer. SEE FIGURES
52, 53. Remove and discard vent plug (57).
remove retainer
and adjusting
screw
14. Only if replacement of the retainer (50) and or adjusting screw
(49) is required (see inspection procedure 8 page 33), place the
sector shaft (48) firmly in a soft jawed vise and unstake the
retainer using a suitable chisel. Turn the retainer out of the sector
shaft pocket and remove the adjusting screw. Discard the
retainer. SEE FIGURE 54.
loosen worm
shaft & poppet
nuts & screws
Figure 54
15. Loosen the worm shaft adjusting screw sealing nut (39) with a
1-1/16 inch box end wrench, and loosen the worm shaft preload
adjusting screw (38) approximately two turns with a 5/16 inch
allen socket or screw driver. SEE FIGURE 55. Loosen the poppet
adjusting screw sealing nut (2) and the poppet adjusting screw
(42) approximately two turns. An 11/16 inch box end required.
Figure 55
23
remove end
cover bolts
16. Remove the four end cover bolts (41) with a 13/16 inch socket
and remove four washers (40). SEE FIGURE 56.
Figure 56
remove end
cover
NOTE
17. Remove the end cover (37). Some fluid will drain. SEE FIGURE 57.
NOTE: The worm shaft adjusting screw and sealing
nut and poppet adjusting screw and sealing nut do
not have to be removed from the end cover (37)
unless apparent fluid leaks at the adjusting screws
indicate the sealing nuts and or screws be replaced.
Figure 57
remove seal ring
18. Remove and discard the end cover seal ring (9) from the end cover
(37). SEE FIGURE 58.
remove seal
protector
19. Remove seal protector (62) from worm shaft/input shaft (16) and
discard.
Figure 58
clean input shaft
20. Clean any paint or foreign material from the input shaft with a
fine grade emery paper. SEE FIGURE 59.
loosen poppet
nut & screw
21. Loosen the poppet adjusting screw sealing nut (2) and the poppet
adjusting screw (3) in the valve housing (8) approximately two
turns.
Figure 59
remove valve
housing bolts
22. Remove the four valve housing bolts (1) with a 13/16 inch socket.
SEE FIGURE 60.
Figure 60
24
remove valve
housing
NOTE
23. Remove the valve housing (8). Some fluid will drain.
SEE FIGURE 61.
NOTE: The valve sleeve (14) will probably remain in
the valve housing.
Figure 61
WARNING
remove valve
sleeve
WARNING: DO NOT DISASSEMBLE THE WORM
SHAFT/INPUT SHAFT ASSEMBLY (16), WHICH
INCLUDES THE WORM SHAFT, INPUT SHAFT,
TORSION BAR, TORSION BAR PINS, DRIVE RING AND
DRIVE RING RETAINER, AND INSERT. DO NOT
UNBEND THE DRIVE RING RETAINER TANGS THAT
HOLD THE DRIVE RING IN PLACE. SEE FIGURE 62.
DOING EITHER WILL ALTER THE VALVE TIMING,
WHICH COULD CAUSE THE VEHICLE TO PULL TO ONE
SIDE OR THE OTHER.
Figure 62
24. Remove the valve sleeve (14) from the valve housing (8).
SEE FIGURE 63.
Figure 63
remove thrust
washers &
bearing
NOTE
25. Remove the first thrust washer (10) and the thrust bearing (11)
and then the second thrust washer (10) from the valve housing.
SEE FIGURE 64.
NOTE: The first thrust washer may stay on the end of
the valve sleeve.
Figure 64
25
remove seal
rings
26. Remove and discard the valve housing seal ring (9) from the valve
housing (8)
remove dirt &
water seal
27. Remove and discard the dirt and water seal (4). SEE FIGURE 65.
Figure 65
remove retaining
ring
28. Remove retaining ring (5). SEE FIGURE 66.
Figure 66
remove valve
housing seal
pack
NOTE
29. Remove steel backup washer (6), and two-piece input shaft seal
(7) from the valve housing (8). SEE FIGURE 67. Discard seal.
NOTE: The poppet adjusting screw (3) and sealing nut
(2) do not have to be removed from valve housing
unless apparent leaks at the adjusting screw
indicate sealing nut and or adjusting screw be
replaced.
Figure 67
remove seal
rings
30. Remove and discard the two Teflon seal rings (12) from valve
sleeve (14). SEE FIGURE 68.
Figure 68
remove “O” rings
31. Remove the two backup “O” rings (13) from the valve sleeve
grooves. SEE FIGURE 69.
Figure 69
26
remove rack
piston & worm
shaft
NOTE
32. Remove the rack piston (29) worm shaft/ input shaft (16)
assembly from the gear housing (19). SEE FIGURE 70.
Lay the rack piston (29) worm shaft (6) assembly on a clean rag to
keep the piston from rolling.
NOTE: The worm shaft part of the assembly will be
inside the rack piston, with the input shaft part of the
worm protruding from the rack piston. Take care
when removing this assembly from the housing. To
prevent the teflon rack piston seal (36) from getting
caught in the sector shaft cavity, remove the worm
shaft rack piston assembly from the long end of the
housing.
Figure 70
Figure 71
remove ball
return guide clip,
if equipped
NOTE
33. For rack pistons with the ball return guide clip (46A), bend the
tangs down that are on the clip or on the two locking tabs (47A).
SEE FIGURE 68. Remove the two hex head bolts (47B), lock tabs
and clip. Discard lock tabs. SEE FIGURE 72. 1/2 inch hex socket
required.
NOTE: The current HFB70 units and seal kits will
utilize a ball return guide clip (46A/47A) with the two
tabs integral to it.
Figure 72
NOTE
NOTE: If the seal kit being used includes a ball return
guide clip (46A/47A) with integral lock tabs, discard
the ball return guide clip removed from the unit.
Figure 73
remove ball
return guide cap,
if equipped
34. For a rack piston with the ball return guide cap (46) instead of the
clip, remove the two special screws (47) which will require either
a 5/32 inch allen wrench or a T-30 Torx wrench. SEE FIGURE 73.
Remove the ball return guide cap and the ball return cap seal (45).
SEE FIGURE 74. Discard screws and cap seal.
Figure 74
27
remove guides
& balls
35. Remove the two ball return guide halves (44). SEE FIGURE 75.
Remove the balls (43) from the rack piston (29) by rotating the
worm shaft/input shaft (16) until the 34 balls fall out.
SEE FIGURE 76.
CAUTION
CAUTION: Assembly contains a set of 34 matched
balls, and you must take special care not to lose any.
If any balls are lost, a complete, new set of matched
balls will be required.
WARNING
WARNING: INCORRECT MATCHING OF BALLS,
WORMSCREW AND RACK PISTON CAN RESULT IN
LOSS OF STEERING, WHICH COULD RESULT IN AN
ACCIDENT.
NOTE
Figure 75
Figure 76
NOTE: Ball return guides are closely fitted with the
rack piston and you may have to remove them by
carefully inserting a screw driver between the rack
piston and the ball return guides. See composite
picture of both types of rack piston assemblies and
two types of ball guides. SEE FIGURE 77.
Figure 77
remove worm
shaft
36. Remove the worm shaft/input shaft (16) from the rack piston (29).
SEE FIGURE 78.
Figure 78
remove seal ring
37. Remove and discard the rack piston seal ring (36). SEE FIGURE 79.
Figure 79
28
remove rack
piston “O” ring
38. Remove and discard the rack piston backup “O” ring (35) from the
rack piston. SEE FIGURE 80.
Figure 80
remove worm
shaft seal and
“O” ring
CAUTION
WARNING
remove poppets,
if necessary
39. Remove and discard the worm shaft seal ring (18). Then, remove
and discard the worm shaft “O” ring (17) from the worm
shaft/input shaft (16). SEE FIGURE 81.
CAUTION: This completes the extent that the worm
shaft/input shaft (16) may be disassembled for
service. See Warning on Page 25.
Figure 81
WARNING: DURING STEP 40 YOU SHOULD WEAR EYE
PROTECTION, AS THE SPRING LOADED POPPETS
COULD EJECT, AND CAUSE EYE INJURY.
40. It is not usually required to service the poppet assembly. If
required, however, position the rack piston (29) carefully in a vise
equipped with soft jaws. Then, remove two retaining rings (30),
two poppet seats (31), two poppets (32), nylon spacer rod (33),
and spring (34). SEE FIGURES 82, 83, 84
Figure 82
Figure 83
Figure 84
29
remove housing
bearing if
necessary
41. The housing bearing assembly (20) or race should only be
removed if you determine that the bearing must be replaced after
following inspection procedures 4, 5 and 6 on page 32. Remove
the bearing in the following manner: Use bearing mandrel (special
tool) J26743 to apply pressure from the side cover opening and
press the bearing out through the trunnion cover opening. SEE
FIGURE 85. Maintain a good, square contact between the housing
and press base to avoid damaging the housing bearing bore.
Remove retaining ring (21) from bearing. Discard bearing.
Figure 85
CAUTION
CAUTION: If the bearing is cocked while you press it
out, it will burnish the bore, causing it to become
oversized. You will then have to replace the gear
housing.
NOTE
NOTE: Service housing assembly includes: housing
(19), bearing assembly (20), retaining ring (21) and
bleed screw (19A).
remove bleed
screw
42. Remove bleed screw (19A). A 5/16 inch socket required.
SEE FIGURE 86.
This completes the disassembly of the HFB70 steering gear.
Figure 86
30
Inspection
•
Check to make sure that all sealing surfaces and seal cavities are free from nicks and
corrosion. If any part is nicked or corroded where sealing occurs, you must replace the
part to insure proper sealing.
•
Wash all parts in clean petroleum-based solvent. Blow them dry only.
WARNING
WARNING
WARNING: SINCE THEY ARE FLAMMABLE, BE
EXTREMELY CAREFUL WHEN USING ANY SOLVENT.
EVEN A SMALL EXPLOSION OR FIRE COULD CAUSE
INJURY OR DEATH.
Figure 87
WARNING: WEAR EYE PROTECTION AND BE SURE
TO COMPLY WITH OSHA OR OTHER MAXIMUM AIR
PRESSURE REQUIREMENTS.
inspect rack
piston teeth
1. Inspect the rack piston (29) teeth for cracks and wear. If you can
detect a step by running your fingernail horizontally across the
teeth surface, you must replace both the rack piston and sector
shaft (48) and use a set of 34 service balls (43). SEE FIGURE 87.
inspect rack
piston internal
grooves
2. Inspect the rack piston internal ball-track grooves for brinelling
(dents) or spalling (flaking). SEE FIGURE 88. If either condition
exists, you must replace all of the following parts: the rack piston
(29), the worm shaft/input shaft assembly (16), the valve sleeve
(14) and the set of 34 balls (43).
inspect worm
shaft
3. Inspect the worm shaft/input shaft assembly (16) ball track
grooves for brinelling or spalling. SEE FIGURE 89. If either
condition exists, you must replace all of the following parts: the
worm shaft/input shaft assembly (16), the rack piston (29), the
valve sleeve (14), the set of 34 balls. Visually inspect the upper
shaft seal area near the input shaft serrations for nicks, and run
your fingernail edge across the sealing surface to detect steps.
SEE FIGURE 90. Visually inspect the sleeve (14) contact area of
the worm shaft/ input shaft for discoloration from excess heat. If
either of these conditions exist you must replace the worm
shaft/input shaft assembly (16) and valve sleeve (14) as a
matched set.
Figure 88
Figure 89
Figure 90
NOTE
NOTE: The input shaft is pinned to the worm shaft by
the torsion bar pin, and the assembly is flexible and
may appear slightly bent at this joint. This slight bend
is normal. SEE FIGURE 91.
Figure 91
31
inspect housing
cylinder bore
NOTE
inspect housing
faces
inspect housing
and side cover
bearings
WARNING
4. Inspect the housing (19) cylinder bore. SEE FIGURE 92. You will
probably notice normal scoring marks running lengthwise through
the bore. Since this scoring is normal, you should not compare it
to the scoring considered detrimental in the cylinder bores of an
internal combustion engine. Replace the housing only if you’ve
tested it for internal leakage (as described in the troubleshooting
section on page 7) and you’ve determined that the scoring, and
not damaged seals, is responsible for the excessive internal
leakage, greater than 1.5 gpm (5.7 liters/min.)
NOTE: In running the internal leakage test after
reassembly of the unit, make sure that internal
leakage exceeding 1.0 gpm (3.8 liters/min.) can only
be attributed to the housing and not to the improper
assembly of the new seals in the worm shaft, rack
piston, and valve assembly, before you decide to
replace the housing.
5. Inspect the housing (19) faces for nicks that would prevent proper
sealing. Replace the gear housing if these nicks are present and
cannot be easily removed with a fine-toothed flat file without
changing the dimensional characteristics. SEE FIGURE 93.
Figure 92
Figure 93
6. Inspect the housing bearing and the side cover bearing race and
rolls for brinelling or spalling. If either condition exists, replace
the damaged housing bearing (20). For the housing bearing,
follow disassembly step 41 and assembly step 2, Pages 30 and
34. If the side cover bearing is damaged, replace side cover
assembly. SEE FIGURES 94, 95.
WARNING: FOR BEARING TYPE WITH UNCAGED
(LOOSE) ROLLS DO NOT MIX THE ROLLS FROM THE
SIDE COVER BEARING WITH THE ROLLS FROM THE
HOUSING BEARING. THE BEARING RACE AND
ROLLERS ARE A MATCHED SET, INTERCHANGING
THE ROLLS COULD RESULT IN PREMATURE BEARING
OR SEAL FAILURE, WHICH COULD CAUSE A LOSS OF
POWER STEERING.
Figure 94
Figure 95
32
inspect sector
shaft assembly
NOTE
7. Inspect the sector shaft (48) bearing and sealing areas and sector
teeth contact surfaces for brinelling or spalling. SEE FIGURE 96.
Run your fingernail edge across these areas to detect steps.
Inspect also for cracks. Remove any masking tape from the shaft
serrations and inspect for twisted or otherwise damaged
serrations. If any of these conditions exist, replace the sector
shaft.
NOTE: A service shaft assembly will have the
adjusting screw (49) and retainer (50) assembled into
it. The screw (49) and retainer (50) can be serviced
separately if required.
inspect adjusting
screw and
retainer
8. Inspect the sector shaft assembly for damaged adjusting screw
(49) threads. The staked retainer (50) must be locked in place, and
have no cracks. The adjusting screw must rotate by hand with no
perceptible end play (lash) Replace adjusting screw, if damaged.
Replace the retainer, if damaged, or if the adjusting screw
requires replacement or adjustment.
inspect thrust
washers and
bearing
9. Inspect the thrust bearing (11) rollers for any deterioration.
Inspect the two thrust washers for brinelling, spalling, or cracks.
SEE FIGURE Replace any part with these conditions.
INSPECTION AREAS
Figure 96
This completes inspection of the HFB70 steering gear.
Figure 97
33
Assembly
62
22
Preparation
•
23
Wash all parts in clean petroleum-based solvent. Blow them dry only.
35
WARNING
WARNING: SINCE THEY ARE FLAMMABLE,
EXTREMELY CAREFUL WHEN USING ANY SOLVENT.
EVEN A SMALL EXPLOSION OR FIRE COULD CAUSE
INJURY OR DEATH.
36
Figure 98
WARNING
WARNING: WEAR EYE PROTECTION AND BE SURE
TO COMPLY WITH OSHA OR OTHER MAXIMUM AIR
PRESSURE REQUIREMENTS
•
Replace all seals, seal rings, and gaskets with new ones each time you disassemble the
gear.
•
Ross Gear does provide individual seals, seal rings, and gaskets, as well as complete
and partial seal kits. SEE FIGURE 98. These parts should be available thru most OEM
parts distributors. (Contact your local dealer for availability 9
Figure 99
Assembly
assemble worm
shaft O ring &
seal ring
1. Slide compression tool J26740, small diameter end first, onto the
worm end of worm shaft/input shaft (16) until it is beyond the
seal ring groove. Using seal installation tool J26739 assemble the
new worm shaft o-ring (17), and then the new seal ring (18). SEE
FIGURE 99, 100. Next, compress the seal ring by pulling the
compression tool back over the seal ring. Allow the worm
shaft/input shaft to set with compression tool in place for at least
ten minutes. SEE FIGURE 101.
CAUTION
CAUTION: Be sure the compression tool is assembled
correctly before assembly of the seal ring. If the tool
is backwards it cannot be pulled over the new seal
ring for compression or for tool removal without
destroying the seal ring.
CAUTION
CAUTION: Allow for the 10 minutes to insure that the
O-ring and seal ring are properly seated when you
install the worm shaft into the rack piston. If you do
not allow for this time, the seal may tear or be cut
when you place the worm into the rack.
Figure 100
Figure 101
install housing
bearing and
retaining ring
2. If you are installing a new housing bearing (20) or using the old
housing and bearing assembly, apply a generous amount of clean
grease to the bearing race to retain the bearing rolls. Then, place
the rolls into the race, being sure you have the correct quantity of
rolls for your particular bearing assembly. To install the NEW
bearing assembly (20) into the housing, first install the
Figure 102
34
60
55
17 18
9
61
46A/47A 57 2 39 12
45
47
4
52
13
26
53
7
24
retaining ring (21) into the groove on the bearing’s outside
diameter. Then press the bearing into the housing from the
trunnion side using bearing , mandrel (special tool) J26743
against the lettered end of the bearing shell so that the retaining
ring is away from the housing bore. SEE FIGURE 102. During this
procedure be sure that the housing is square with press base and
the bearing is not cocked.
NOTE
NOTE: Bearing BR 970 requires 41 rolls, and Bearing
BR 970-1 requires 42 rolls.
CAUTION
CAUTION: The bearing rolls must be in place to
insure proper installation of the bearing. If the rolls
are improperly installed, the bearing race may col
lapse and fail. The flange may break, causing
premature failure of the bearing. Again, do not mix
the housing bearing rolls with the side cover bearing
rolls. Be sure the bearing mandrel used is clean.
NOTE
NOTE: The bearing assembly (20) may be of caged
(retained) roll type therefore not requiring reassembly
of the rolls.
install rack
piston seal and
O-ring
WARNING
install poppet
assembly
Figure 103
Figure 104
3. Install the new rack piston backup O- ring (35) and the new Teflon
rack piston seal ring (36) into the rack piston (29) ring groove. SEE
FIGURES 103, 104. Do not over stretch the rings as you install
them. Coat with a liberal amount of grease.
WARNING: DURING STEP 4, YOU SHOULD WEAR EYE
PROTECTION, AS THE SPRING LOADED POPPETS
COULD EJECT, AND CAUSE EYE INJURY.
4. If the poppets were removed, position rack piston (29) in a soft
jawed vise and install one poppet seat (31). SEE FIGURE 105.
From the other end of the rack piston install one poppet (32), the
spring (34), the nylon spacer rod (33), the other poppet (32), and
the other poppet seat (31). Torque both poppet seats to 20-25 ft.
lbs. (27-34 N m). Install both retaining rings (30).
SEE FIGURES 106, 107.
Figure 105
Figure 106
Figure 107
35
install worm
shaft/input shaft
into rack piston
5. When the 10 minute compression time has elapsed, remove the
compression tool from the worm shaft/input shaft assembly (16).
Grease the worm shaft seal ring (18) and the sealing surface
inside the rack piston (29). Install the worm shaft/input shaft
assembly into the rack piston end that will position the worm seal
ring in the rack bore and the worm ball track grooves to accept
the set of balls through the rack piston ball guide holes.
SEE FIGURE 108.
CAUTION
CAUTION: Steps 6-11 describe the installation of the
rack piston balls, guides, and caps or clips. Read
through each step carefully to determine which ones
you should follow.
NOTE
NOTE: If your ball return guides do not have a hole in
the top for loading balls, then proceed to step 8. If
your ball return guides do have a hole in the top, then
follow steps 6 & 7. SEE FIGURE 77 Page 28.
assemble ball
return guides
WARNING
assemble balls
WARNING
assemble balls
Figure 108
6. Assemble the ball return guides (44) into the rack piston (29).
Make sure that the ball return guides are seated.
WARNING: DO NOT SEAT GUIDES WITH A HAMMER.
DAMAGE TO GUIDES CAN RESULT IN SUBSEQUENT
LOCK-UP OR LOSS OF STEERING.
7. Assemble 34 balls (43) into the ball return guides (44) and rack
piston (29). Drop the balls through the hole provided in the ball
return guides. As you drop the balls, rotate the worm shaft/input
shaft (16) to pull the balls down into the grooves. SEE FIGURE
109. Read warning, then go to step 10.
Figure 109
WARNING: MAKE SURE THE BALL RETURN GUIDES
STAY DOWN IN PLACE WHILE YOU ASSEMBLE THE
BALLS. FAILURE TO HOLD THE GUIDES DOWN MAY
RESULT IN A BALL BEING TRAPPED OUTSIDE THE
CLOSED LOOP. A TRAPPED BALL CAN RESULT IN A
STEERING LOCKUP, WHICH COULD CAUSE AN
ACCIDENT.
8. For ball return guides which do not have the hole in top, follow
this procedure. Insert the eraser end of a pencil into one ball
return guide hole of the rack piston as far as it will go. Drop 22
balls (of the 34 total) into the other ball return guide hole of the
rack piston. SEE FIGURE 110. Turn the worm shaft/input shaft (16)
to advance the balls toward the other hole. You will feel
resistance at the pencil after you drop the 22nd ball. At this time,
a ball will be visible at the base of each hole. Remove the pencil.
Figure 110
36
WARNING
install ball
return guide
halves
NOTE
assemble ball
return guide clip
NOTE
WARNING: DO NOT TURN THE WORM SHAFT OR
ALLOW THE RACK PISTON TO MOVE AFTER YOU
REMOVE THE PENCIL. IF THE WORM SHAFT OR RACK
PISTON MOVE BEFORE BALL RETURN GUIDES ARE IN
PLACE, A BALL MAY MOVE INTO THE DEAD TRACK
BEYOND THE BALL RETURN GUIDES. THIS CAN
RESULT IN A STEERING LOCKUP, WHICH COULD
CAUSE AN ACCIDENT.
9. Coat the ball return guides (44) liberally with grease and insert
the remaining 12 balls into a guide half. SEE FIGURES 111, 112.
Join the guide halves together and install this subassembly into
the rack piston.
Figure 111
NOTE: For models with the ball return clip (46A) per
form step 10. SEE FIGURE 72. For models with the ball
return guide cap (46) perform step 11. SEE FIGURE 74.
10. If your gear is equipped with the ball return guide clip (46A),
install it so that both bolt hole faces are in full contact with the
rack piston (29) surface. Install the two lock tabs (47A) and the
two hexagon head bolts (47B) Torque the bolts to 14-22 ft. lbs.
(19-30 N m). Finish by bending up the lock tabs against the bolt
heads. SEE FIGURES 113, 114. 1/2 inch socket required.
Figure 112
NOTE: The current ball return guide clip (46A/47A)
will have integral lock tabs and be included in
current service seal kits.
Figure 113
Figure 114
37
assemble ball
return guide cap
WARNING
11. If your gear is equipped with the ball return guide cap (46),
instead of the clip, grease the new ball return guide cap seal (45)
and place it in the seal groove of the cap. Assemble the cap so
that the seal makes full contact with the rack piston surface. SEE
FIGURE 115. Install the two new Allen head or Torx head screws
(47) and torque them to 14-22 ft. lbs. (19-30 N m). A 5/32 inch
Allen socket or a T-30 Torx socket required. SEE FIGURE 116.
WARNING: ROTATE THE WORM SHAFT FROM END OF
TRAVEL TO END OF TRAVEL, TO MAKE CERTAIN
THAT YOU HAVE INSTALLED THE BALLS PROPERLY. IF
YOU CANNOT ROTATE THE SHAFT, YOU WILL HAVE
TO REMOVE THE BALLS AND REASSEMBLE THEM. IF
YOU INSTALL THE GEAR ON A TRUCK WITH THE
SHAFT UNABLE TO ROTATE, THE GEAR WILL NOT
FUNCTION.
Figure 115
Figure 116
install rack
piston worm
shaft assembly
into housing
CAUTION
NOTE
12. Position the housing (19) securely in a vise as it was for the
disassembly procedures. SEE FIGURE 40 page 20. Apply a
generous amount of clean grease to the Teflon rack piston seal
(36) and to the housing cylinder bore. SEE FIGURE 117. Install the
rack piston (29) worm shaft/input shaft (16) assembly into the
long end of the housing so that the Teflon rack piston seal goes in
last. SEE FIGURE 118.
CAUTION: Be certain that the seal enters the long
end last; otherwise, a large section of the seal will
be cut and the vehicle will have no power steering
assist.
NOTE: To ease the later assembly of the sector shaft
(48), rotate the rack piston worm shaft assembly in
the housing so that the rack piston teeth are exposed
in the sector shaft cavity of the housing.
assemble worm
shaft, poppet
adjusting screws
& sealing nuts
13. If disassembled, assemble a new worm shaft/input shaft
adjusting screw sealing nut (39) onto the solid (nonslotted) end of
the worm shaft preload adjusting screw (38), so that the seal on
the sealing nut will face the end cover (37). Assemble one NEW
poppet valve adjusting screw sealing nut (2) onto the poppet
valve adjusting screw (42) and assemble the other NEW poppet
valve adjusting. screw sealing nut (2) onto the other poppet valve
adjusting screw (3) in the same manner as described for parts (39)
and (38).
assemble poppet
screw assembly
into end cover
14. Assemble poppet adjusting screw (42) and nut (2) assembly into
end cover (37) a few turns. Final adjustments will be made later.
38
Figure 117
Figure 118
NOTE
NOTE: The poppet valve adjusting screws may or may
not be of the same length. If not the same length,
assemble the shorter adjusting screw (42), 2.25 in.
(57 mm) long, into the end cover (37).
WARNING
WARNING: IF THE SCREWS ARE OF UNEQUAL
LENGTH, YOU MUST INSTALL THE SHORTER SCREW
INTO END COVER. OTHERWISE, THE POPPET
ASSEMBLY MAY BREAK AND CAUSE THE STEERING
GEAR TO LOCKUP, POSSIBLY RESULTING IN AN
ACCIDENT.
install worm
shaft preload
adjusting screw
15. Assemble the worm shaft preload adjusting screw (38) and nut
(39) assembly into the end cover (37) a few turns. Final
adjustments will be made later. A slot screw driver or 5/16 inch
Allen wrench socket required.
install end cover
seal ring
16. Apply clean grease to the end cover seal ring groove on the end
cover (37). Install the new end cover seal ring (9) into the end
cover seal ring groove. SEE FIGURE 119.
NOTE
NOTE: When installed, the end cover seal ring should
extend slightly above the machined surface of the
end cover.
CAUTION
CAUTION: When performing step 17, make sure that
the rack piston (29) teeth are fully visible in the
sector shaft cavity of the housing. This is necessary
to insure proper location of the poppets, and to insure
that the poppet adjusting screw will contact the
poppets.
install end cover
17. Position the end cover (37) so that the poppet adjusting screw
(42) is aligned with the end of the poppet (32). SEE FIGURE 120.
install end cover
bolts
18. Install the four end cover bolts (41), 1.625 in. (41 mm) long, and
washers (40), and torque the bolts to 150-170 ft. lbs.
(203-230 N m) if dry, or 108-128 ft. lbs. (146-174 N m) if
lubricated. A 13/16 inch socket required. SEE FIGURE 121.
install valve
sleeve rings
& seals
19. Grease the two new backup O-rings (13) and the two new Teflon
seal rings (12). Using seal installation tool J26741, assemble the
backup O-rings and then the Teflon seal rings onto the valve
sleeve (14). SEE FIGURES 122, 123.
NOTE
NOTE: Assemble each O ring and seal ring from the
end closest to its groove.
Figure 119
Figure 120
Figure 121
Figure 122
Figure 123
39
compress rings
CAUTION
20. Use compression tool J26742 to compress the Teflon seal rings.
SEE FIGURE 124. Leave the compression tool on for 10 minutes.
CAUTION: A minimum of ten minutes with the
compression tool in place is required to ensure that
the seal rings are properly seated. Otherwise, the
valve sleeve will be difficult to assemble into the
valve housing, and the seal rings may be damaged
during installation.
assemble poppet
adjusting screw
21. Assemble the poppet valve adjusting screw (3) and nut (2)
assembly into the valve housing (8) 4 or 5 turns. Final adjustments
will be made later. Be sure you have the correct length adjusting
screw.
install valve
housing seal ring
22. Apply clean grease to the valve housing (8) seal ring groove.
Install a new valve housing seal ring (9) into valve housing seal
ring groove. SEE FIGURE 125.
NOTE
install thrust
washer
NOTE: When installed, the valve housing seal ring
should extend slightly above the machined surface of
the valve housing.
Figure 124
Figure 125
23. Apply a generous amount of clean grease to one thrust washer
(10). Install the thrust washer into the valve housing (8), making
sure to center the washer. SEE FIGURE 126.
Figure 126
install thrust
bearing
WARNING
24. Apply a generous amount of clean grease to the thrust bearing
(11). Install the thrust bearing into the valve housing (onto the
thrust washer), making sure to center the bearing on the washer.
SEE FIGURE 127.
WARNING: THE THRUST WASHER AND THRUST
BEARING MUST BE FLAT AND CENTERED IN THE
COUNTERBORE SURFACE, OTHERWISE, THE THRUST
WASHER COULD BREAK WHEN YOU ASSEMBLE THE
VALVE HOUSING INTO THE GEAR HOUSING (19). SEE
FIGURE 128. A BROKEN WASHER COULD CAUSE
UNCONTROLLABLE STEERING, POSSIBLY RESULTING
IN AN ACCIDENT.
Figure 127
Figure 128
40
install thrust
washer
WARNING
assemble valve
sleeve onto
valve housing
WARNING
position rack
piston & rotate
worm shaft
WARNING
25. When the 10 minute compression time has elapsed, remove the
compression tool J26742 from the valve sleeve (14). Apply more
grease to the valve sleeve seals, and grease the thrust washer
face on the end of the valve sleeve without the drive slots. Place
the other thrust washer (10) onto the valve sleeve end without
the drive slots. SEE FIGURE 129.
WARNING: THIS THRUST WASHER MUST BE
SECURELY IN PLACE ON THE VALVE SLEEVE. IF IT IS
NOT, IT CAN BREAK AND CAUSE UNCONTROLLABLE
STEERING, POSSIBLY RESULTING IN AN ACCIDENT.
Figure 129
26. Assemble the valve sleeve (14) with attached thrust washer
down, into the valve housing (8). SEE FIGURE 130. When the
valve sleeve is in place, it should measure between .370 and .400
inches (9.40-10.16 mm) above the face of the valve housing to the
end of the valve sleeve nose. SEE FIGURE 131.
WARNING: DO NOT FORCE VALVE SLEEVE DOWN
INTO THE VALVE HOUSING. MAKE SURE VALVE
SLEEVE SEAL RINGS ARE COMPRESSED.
MISASSEMBLY OR INCORRECT MEASUREMENT MAY
CAUSE THE THRUST WASHERS OR THRUST BEARING
TO BREAK DURING GEAR OPERATION, WHICH WILL
RESULT IN UNCONTROLLABLE STEERING.
Figure 130
27. Position the rack piston (29) so that it is flush with the open end
of the gear housing (19). Rotate the worm shaft (16) until it
extends out of the rack piston as far as it will go.
WARNING: WORM SHAFT AND VALVE SLEEVE UNITS
ARE ASSEMBLED AND SOLD AS MATCHED SETS.
USE ONLY PREMATCHED SETS FOR REPLACEMENT.
NEVER MATE AN OLD SLEEVE WITH A NEW WORM
OR AN OLD WORM WITH A NEW SLEEVE. TO DO SO
MAY DAMAGE THE GEAR OR INJURE THE DRIVER, OR
DO BOTH DURING OPERATION.
.370 TO .400 In.
(9.40 TO 10.16 mm)
Figure 131
41
install valve
assembly onto
worm shaft/input
shaft assembly
NOTE
WARNING
finish valve
housing
installation
28. Locate the timing mark on the valve sleeve (14), a faint, punched
mark on the chamfered edge of the valve sleeve or an indented
mark on the front face, of the sleeve. SEE FIGURE 132. Locate the
scribed timing mark on the worm shaft. SEE FIGURE 62, page 25.
Next, grasp the valve housing/ valve sleeve assembly with your
thumbs on the valve housing face and your fingers applying
pressure to keep the valve sleeve in the valve housing. SEE
FIGURE 133. Align the previously located timing marks and place
the valve housing/valve sleeve assembly onto the input shaft end
of the worm shaft/ input shaft (16) until the drive lugs are fully
engaged in the valve sleeve slots. SEE FIGURE 134.
NOTE: Valve sleeves are identified and matched to a
right or left hand lead of the worm screw. If the
screw has a right hand thread (that is, goes into the
rack piston when turned clockwise), the valve sleeve
will have the letter “R” stamped between the seal
lands. For a left hand worm lead (which will come
out of the rack piston when turned clockwise) the
mating valve sleeve has no identifying letter or has
the letter “L” stamped between the seal lands.
WARNING: IF YOU PLACE AN INCORRECT VALVE
SLEEVE ON A WORM AND ASSEMBLE THIS INTO THE
GEAR, THE GEAR WILL NOT FUNCTION PROPERLY.
INSTEAD, THE MECHANISM WILL JERK THE
STEERING WHEEL WITH SUCH FORCE, THAT IT
COULD INJURE THE DRIVER.
TIMING MARKS
Figure 132
Figure 133
TIMING MARKS
Figure 134
29. Maintain pressure on the valve end of the valve housing (8) to
insure continued engagement of the drive lugs and thrust bearing
package. SEE FIGURE 135. While maintaining pressure, rotate the
valve housing to align the poppet adjusting screw (3) with the
poppet (32) in the rack piston (29). Continue pressure, and rotate
the input shaft to bring the valve housing into contact with the
gear housing face.
Figure 135
install valve
housing bolts
30. Assemble four valve housing bolts (1), 2.125 in. (53.98 mm) long,
into the housing (19) and torque to 150-170 ft. lbs. (203-230 N m)
if dry or 108-128 ft. lbs. (146-174 N m) if lubricated. A 13/16 inch
socket required. SEE FIGURE 136.
assemble
adjusting screw
31. If the adjusting screw (49) has been removed from the sector
shaft (48), clamp the sector shaft into a soft-faced vise by
gripping the serrated end. Coat the expanded end of the new
and retainer
42
Figure 136
adjusting screw with a suitable grade of wheel bearing grease
and insert into recess in end of sector shaft. Thread a new sector
shaft screw retainer (50) into the sector shaft and adjust to permit
free rotation of sector shaft adjusting screw by hand without
perceptible end play [.000 to .002 in. (.05 mm) loose]. Stake the
new retainer into the two slots provided using a suitable punch
and again check freedom of adjusting screw movement and end
play. SEE FIGURE 137.
WARNING
grease side
bearing cover
bearing
WARNING: USE CARE IN SECURELY STAKING THE
RETAINER (50) INTO THE SECTOR SHAFT SLOTS. A
RETAINER THAT IS BROKEN OR CRACKED DURING
THE STAKING PROCEDURE MUST BE REPLACED AS
IT COULD RESULT IN THE SECTOR SHAFT NOT BEING
RETAINED AND THE LOSS OF MANUAL AND POWER
STEERING CONTROL.
32. Apply a generous amount of clean wheel grease (do not
substitute another type of grease) to the bearing race or caged
bearing assembly inside the side cover (56).
CAUTION
CAUTION: Use only wheel bearing grease. This
bearing is sealed and will receive no lubrication
from the hydraulic fluid in the gear. Failure to use
wheel bearing grease could result in premature
bearing wear.
NOTE
NOTE: You will have 41 or 42 rolls to assemble into
the side cover bearing; 41 rolls—BR-970; 42 rolls—
BR-970-1. Do not these rolls for the side cover with
the rolls for the trunnion cover side of the gear
housing.
assemble side
cover bearing
Figure 137
33. If the side cover does not have a caged bearing assembly,
assemble 41 or 42 rolls into the side cover bearing race. Grease
must retain rolls. SEE FIGURE 138.
Figure 138
NOTE
NOTE: If the service replacement Teflon backup
washer (53) is not an integral part of the service
replacement seal (52), see alternate service
construction (52/53) on exploded assembly foldout
page, examine the lead in chamfer or radius on the
side cover (short) end of sector shaft (48) bearing
diameter. SEE FIGURE 139. If rough edges can be felt
by drawing a thumb nail across the lead in chamfer
or radius on the end of sector shaft, skip procedures
#34, #35, #36 and follow procedures #37, #38, #39.
Figure 139
43
CAUTION
assemble side
cover seal pack
CAUTION: Following procedures #34, #35, #36 with a
sector shaft that does not pass the “thumb nail test,”
and a replacement seal (52) that does not have the
Teflon washer (53) integral to it can result in the seal
being destroyed when assembling sector shaft into
side cover.
34. Assemble the steel back up washer (54) into side cover (56).
Assemble a new Teflon washer (53) then a new two piece seal
(52), or a new two piece seal that has the integral Teflon washer
(52/53) into the side cover, such that the words “Oil side” are
visible after the seal is assembled. SEE FIGURE 140.
CAUTION
CAUTION: Be sure that a separate Teflon washer (53)
is not used with a two piece seal (52/53) that has the
Teflon washer integral to it.
WARNING
WARNING: THE WORDS “OIL SIDE” MUST BE
VISIBLE ON THE SEAL AFTER IT IS IN PLACE. IF NOT,
THE SEAL WILL NOT FUNCTION, AND A LOSS OF
POWER STEERING ASSIST MAY OCCUR.
Figure 141
assemble
retaining ring
35. Assemble retaining ring (51) into the ring groove in the side cover.
SEE FIGURE 141
install sector
shaft into side
36. Apply a generous amount of clean grease to the short bearing
area of the sector shaft (48), and insert the sector shaft into the
side cover (56). Screw the adjusting screw into the side cover
until it reaches solid height. Then, back out the adjusting screw
one turn, so that the side cover rotates freely on the sector shaft.
SEE FIGURE 142.
CAUTION
Figure 140
CAUTION: Be sure that one or more bearing rolls do
not become dislodged during assembly of sector
shaft into side cover.
assemble steel
& Teflon washers
into side cover
(alternate)
37. If the replacement Teflon washer (53) is not an integral part of the
two-piece seal (52) and the sector shaft (48) did not pass the
“thumb nail test,” assemble the steel backup washer (54) and
then the Teflon washer (53) into the side cover (56) bearing bore.
SEE FIGURE 143.
assemble
retaining ring
and seal
(alternate)
38. Assemble retaining ring (51) onto the side cover end of sector
shaft (48). Assemble the two- piece seal (52) onto the end of the
sector shaft about 1 inch (25.4 mm). The words “oil side” on the
seal must face toward the sector shaft. SEE FIGURE 144.
Figure 142
Figure 143 - ALTERNATE
Figure 144 - ALTERNATE
44
CAUTION
install sector
shaft into side
cover
(alternate)
assemble vent
plug
WARNING
assemble jam
nut
CAUTION: Be sure the two piece seal and the side
cover bearing rolls remain correctly assembled and
that the vent plug (57) has been removed during these
procedures.
39. Be sure the side cover bearing, the sector shaft bearing diameter
and seal are well greased, then insert sector shaft (48) assembly
into the side cover (56) bearing only until the shaft will retain the
loose side cover bearing rolls in place (about 8 turns of adjusting
screw) Slowly and carefully work the two piece seal (52) down
the sector shaft and squarely into the side cover until it is past
the retaining ring groove. Then work the retaining ring (51) into
the retaining ring groove. Use an appropriate blunt end punch or
punches. SEE FIGURE 145. Carefully turn the adjusting screw (49)
through side cover until it reaches solid height then back screw
one turn, so that the side cover rotates freely on sector shaft.
40. Assemble the vent plug (57) into the hole provided on the side
cover (56). Press the vent plug in flush with the side cover.
SEE FIGURE 146.
Figure 145 - ALTERNATE
Figure 146
WARNING: DO NOT WELD OR OTHERWISE PLUG
THIS HOLE IN ANY PERMANENT MANNER. THIS IS A
SAFETY VENT WHICH FUNCTIONS ONLY IF THE SIDE
COVER SEAL FAILS. IF THE SEAL FAILS AND THE
PLUG CANNOT VENT, THE STEERING GEAR MAY
LOCKUP OR OTHERWISE MALFUNCTION.
41. Assemble the jam nut (58) onto the adjusting screw (49) a few
threads. Final adjustment will be made later.
Figure 147
CENTER SPACE
install side
cover gasket
42. Apply clean grease to the new side cover gasket (55), and
assemble it onto the side cover (56) There must be enough grease
to hold the gasket in place. SEE FIGURE 147.
center rack
piston
43 There are four teeth on the rack piston (29) SEE FIGURE 148.
Position the tooth space between the second and third teeth in
the center of the housing sector shaft cavity. SEE FIGURE 149.
This will center the rack piston in the cavity.
CAUTION
Figure 148
CAUTION: If the rack piston is not centered when
sector shaft is installed, the gear travel will be
severely limited in one direction of travel, and
significant internal damage to the steering gear can
occur when the gear is operated.
Figure 149
45
make initial
worm preload
adjustment
44. With the rack piston (29) in its center position, torque the worm
shaft/input shaft adjusting screw (38) using a 5/16 inch Allen
wrench socket into solid height (15 to 20 ft. lbs.
[20.3 to 27.1 N m]). Then loosen the adjusting screw 1/4 to 1/2
turn and note torque required to rotate worm shaft/ input shaft
(16) through 90° each side of center, using an 12 point socket that
will fit input shaft serrations and an appropriate torque wrench.
SEE FIGURE 150. Loosen adjusting screw if noted input shaft
torque exceeds 15 in. lbs. (17 N m). Return rack piston to center
position.
Figure 150
WARNING
WARNING: AS YOU PLACE THE SECTOR SHAFT
THROUGH THE HOUSING BEARING (20), BE CAREFUL
NOT TO KNOCK OUT ANY OF THE BEARING ROLLS.
SEE FIGURE 151. BE CAREFUL ALSO NOT TO PINCH
THE SIDE COVER GASKET (55). SHOULD THE
BEARING ROLLS BE KNOCKED OUT, OR THE SIDE
COVER GASKET PINCHED, PREMATURE BEARING
AND SEAL FAILURE MAY OCCUR, WHICH COULD
RESULT IN A LOSS OF POWER STEERING ASSIST.
install sector
shaft/side cover
into housing
45. Clean off any old tape on the sector shaft (48) serrations. Retape
the serrations and bolt groove with one layer of tape. Assemble
the sector shaft (48) side cover (56) assembly into the gear
housing (19), with the center tooth of the sector shaft engaging
the tooth space between the second and third teeth on the rack
piston. SEE FIGURE 152.
install side
cover bolts
46. Assemble the eight special ring head bolts (59) and torque them
to 150-170 ft Lbs. (203-230 N m) if dry or 108-125 ft. lbs.
(146-174 N m) if lubricated. 13/16 inch socket required.
assemble
trunnion cover
seal pack
47. Place the trunnion cover (25) on a bench to install the new seal
package. Start with the Teflon backup washer (24).
assemble seal
48. Assemble the two-piece sector shaft seal (23) so that the words
“oil side” are visible. SEE FIGURE 153.
WARNING
Figure 151
Figure 152
WARNING: THE WORDS “OIL SIDE” MUST BE
VISIBLE. IF NOT, THE SEAL WILL NOT FUNCTION AND
A LOSS OF POWER STEERING ASSIST MAY OCCUR.
Figure 153
46
install trunnion
cover seal ring
49. Grease the new trunnion cover seal ring (22) and install it into the
trunnion cover seal ring groove.
install trunnion
cover, bolts,
washers & seal
50. Before installing the trunnion cover (25) and seal assembly onto
the housing (19), visually inspect the housing bearing (20) to
insure that all bearing rolls are properly in place. Then, install the
trunnion cover. SEE FIGURE 154. Install four trunnion cover bolts
(28) and washers (27) and torque the bolts to 15-22 ft. lbs.
(20-30 N m) if dry or 11-16 ft. lbs. (15-22 N m) if lubricated. SEE
FIGURE 155. A 1/2 inch socket required. Pack clean high
temperature industrial grease per Ross specification 045231. *
Mobil Temp 1 or 2 grease or equivalent around the seal area of
sector shaft (48). Install a new dirt and water seal (26) using a
suitable blunt end drift.
Figure 154
Figure 155
assemble seal
protector boot &
grease fitting
51. Apply more of the special grease around the seal area of sector
shaft and to the new protector boot (60) in the area inside of the
smaller diameter ring. Assemble the protector boot onto the
sector shaft and trunnion cover. Locate the boot grease fitting
hole toward the input shaft end of gear assembly. SEE FIGURE
156. Insert grease fitting (61) into protector boot.
Figure 156
install input
shaft seal pack
52. Apply clean grease in the input shaft seal assembly (7), washer
(6) and to the input shaft. Install the new two-piece input shaft
seal (7) flat side out and the steel backup washer (6), using seal
driving tool J28490. Install the retaining ring (5).
SEE FIGURES 157, 158.
pack with
grease and
install dirt and
water seal
53. Pack the area around the input shaft with high temperature
industrial grease per Ross specification 045231, Mobil Temp 1 or
2 or equivalent, and install the dirt and water seal (4), using seal
driving tool J28490 or suitable blunt ended drift.
Figure 157
*Mobil Temp is a Registered Trademark of Mobil Oil Co.
Figure 158
47
assemble seal
protector
54. Apply more of the special grease to the cupped side of the new
seal protector (62) and assemble it, cupped side in on to the
worm shaft/input shaft (16) and into the serration relief groove.
SEE FIGURE 159.
Figure 159
install manual
bleed screw,
if equipped
55. If your gear is equipped with the manual bleed screw (l9A), install
it into the gear housing (19) and torque it to 27-33 in. lbs.
(3.1-3.7 N m). SEE FIGURE 160. 5/16 inch hex socket required.
Figure 160
This completes assembly of the HFB70 steering gear. Before you
install the gear onto the vehicle, make final adjustments described on
next page. All ports should be plugged until unit is installed on
vehicle.
48
Final Adjustment
center steering
gear
NOTE
tighten adjusting
screw
NOTE
1. To center the steering gear, rotate worm shaft/input shaft (16)
until the timing mark on the end of sector shaft (48) is
perpendicular to the worm shaft/input shaft. SEE FIGURE 161. A
12 point box end or socket wrench required.
NOTE: Initial worm preload adjustment was
accomplished in assembly procedure 44, page 46,
before assembly of sector shaft (48).
Figure 161
2. Tighten sector shaft adjusting screw (49) to provide 25 to
30 in.lbs. (2.8 to 3.4 N m) of torque required to rotate the worm
shaft/input shaft (16) through 180° each side of center.
SEE FIGURE 162
NOTE: This procedure will properly mesh and seat
the rack piston teeth and sector shaft teeth for final
adjustments.
loosen adjusting
screw and note
torque
3. Loosen sector shaft adjusting screw (49) one turn and note
maximum torque required to rotate the worm shaft/input shaft
(16) through 180° each side of center.
adjust adjusting
screw
4. Adjust sector shaft adjusting screw (49) to increase maximum
torque noted in procedure #3 by 2 to 4 in. lbs. (.23 to .45 N m).
Torque jam nut (58) using a 3/4 inch socket, to 40 to 45 ft. lbs. (54
to 61 N m) and check worm shaft/input shaft torque again.
Re-adjust if worm shaft/input shaft torque exceeds 20 in. lbs.
(2.3 N m).
adjust worm
shaft/input shaft
adjusting screw
TIMING MARK
Figure 162
5. Adjust worm shaft/input shaft adjusting screw (38), a 5/16 inch
Allen wrench or screwdriver required, to increase maximum worm
shaft/ input shaft (16) torque noted in procedure #4 by 10 to
15 in. lbs. (1.1 to 1.7 N m). Torque sealing nut (39) to 70-80 ft. lbs.
(95-108 N m) using a 1-1/16 inch socket and check worm shaft/
input shaft torque again. Readjust if worm shaft/ input shaft
torque exceeds 35 in. lbs. (4.0 N m). SEE FIGURE 163.
This completes the final adjustments of the HFB70 gear to be made
before it is installed into the vehicle’s steering system. Install the gear
by following instructions in the vehicle shop manual. Then follow the
succeeding sections of this service manual (HFB70) on “HYDRAULIC
FLUID” and “FILLING AND AIR BLEEDING THE SYSTEM” which also
includes instructions for adjustment of the optional adjustable poppet
valve.
Figure 163
49
Hydraulic Fluid
The steering system should be kept filled with one of the following fluids:
AUTOMATIC TRANSMISSION FLUID TYPE “E” or “F”
FORD SPEC. M2C138CJ
AUTOMATIC TRANSMISSION FLUID DEXRON 11
SHELL ROTELLA T...................................................................................SAE 30
MOBIL .............................................................................................SAE 10W30
ASHLAND .......................................................................................SAE 10W40
UNION.............................................................................................SAE 10W40
TEXACO...........................................................................................SAE 10W40
TEXACO...........................................................................................SAE 15W40
MOBIL .............................................................................................SAE 10W40
UNICAL GAURDOL .........................................................................SAE 15W40
UNICAL GAURDOL .................................................................................SAE 30
ESSOLUBE.......................................................................................SAE 15W40
CHEVERON .....................................................................................SAE 15W40
EMERY FRIGID-GO-OW-02 SYNTHETIC
WARNING: COMPLETELY FLUSH THE STEERING SYSTEM WITH ONE OF THE RECOMMENDED
FLUIDS ABOVE ONLY. DO NOT MIX OIL TYPES. ANY MIXTURE OR ANY UNAPPROVED OIL COULD
LEAD TO SEAL DETERIORATION AND LEAKS. A LEAK COULD ULTIMATELY CAUSE THE LOSS OF
FLUID, WHICH COULD RESULT IN A LOSS OF POWER STEERING ASSIST.
Filling and Air Bleeding the System
CAUTION: For steps 1 and 2, do not turn the steering wheel. Otherwise,
air may be induced into the system.
1.
Fill the reservoir nearly full. Crank the engine for 10 seconds without, if possible, allowing
it to start. If the engine does start, shut it off immediately. Check and refill the reservoir.
Repeat at least three times, each time checking and refilling the reservoir.
CAUTION: Do not allow the fluid to drop significantly or run out of the
reservoir. This may induce air into the system.
2.
Start the engine and let it idle for 2 minutes. Shut the engine off and check the fluid level
in the reservoir.
3.
Start the engine again. Steer the vehicle from full left to full right turn several times.
Add fluid, as necessary, to the fill line on the dipstick.
NOTE: Poppets, if equipped on the gear, must be adjusted so that they
relieve pressure at full left and right turns to aid in the removing of air
from the system. At this time, make sure any poppets are properly adjusted.
If they are not, adjust them in accordance with section 4 (page 18) and repeat step 3.
The above procedures should remove all the air from the steering system, unless the gear is mounted
in an inverted position and is equipped with the manual bleed screw (l9A). SEE FIGURE 160, Page 48.
If this is so, refer to step 4.
50
4.
Remove the air from a gear mounted in an inverted position and equipped with a manual
bleed screw (l9A) by following steps 1, 2 and 3 above. Then, with the engine idling, steer
the gear from full left turn to full right turn several times. With the steering gear in neutral
(no steering action), loosen the manual bleed screw about one turn, allowing air and
aerated fluid to “bleed out” around the bleed screw until only clear (non aerated) fluid is
bleeding out then close the bleed screw. 5/16 inch socket required. Check and refill reservoir.
Repeat this procedure 3 or 4 times starting with the steering maneuver with bleed screw
closed, until only clear (non aerated) fluid is discharged when bleed screw is loosened.
Torque the manual bleed screw to 27-33 in. lbs. (3.1-3.7 N m). Check and refill reservoir
CAUTION: Do not turn steering wheel with bleed screw loosened as this
could induce air into the system.
Warnings for Proper Steering Gear Operation
WARNING: DO NOT WELD, BRAZE, OR SOLDER ANY STEERING GEAR OR
SYSTEM ARM COMPONENTS.
WARNING: MAXIMUM FLOW UNDER ANY CONDITIONS MUST NOT
EXCEED 8 GPM (30 LITERS/MIN).
WARNING: MAXIMUM OPERATING PRESSURE MUST NOT EXCEED 2000 PSI
(137.9 BAR).
WARNING: ALWAYS CAREFULLY INSPECT ANY STEERING COMPONENT
WHICH HAS BEEN (OR IS SUSPECTED TO HAVE BEEN) SUBJECTED TO
IMPACT. REPLACE ANY DAMAGED OR QUESTIONABLE COMPONENT.
51
Steering System Maintenance Tips
52
-
Prevent internal bottoming of the steering gear. Carefully check axle stops to be sure that
they meet the manufacturer’s specifications. -Regularly check the fluid and the fluid level in
the power steering reservoir.
-
Keep tires inflated to correct pressure.
-
Always use a puller, never a hammer or torch, to remove pitman arms.
-
Investigate and immediately correct the cause of any play, rattle, or shimmy in any part of
the steering linkage or steering mechanism.
-
Remove the cause of steering column misalignment.
-
Encourage all drivers to report any malfunctions or accidents that could have damaged
steering components.
-
Do not attempt to weld any broken steering component. Replace the component with original
equipment only.
-
Do not cold straighten, hot straighten, or bend any steering system component.
-
Always clean off around the reservoir filler cap before you remove it. Prevent dirt or other
foreign matter from entering the hydraulic systems. -Investigate and correct any external leaks,
no matter how minor.
-
Replace filters and pumps in compliance with specification.
-
If extended stationary use of vehicle is developing excessive hydraulic fluid temperatures
consult vehicle manufacturer for auxiliary cooling method.
-
Maintain grease pack applied behind the input and output shaft’s dirt and water seal and
seal protector as a general maintenance procedure. Grease fitting provided in output shaft
seal protector.
TRW Automotive
Commercial Steering Systems
800 Heath Street
Lafayette, IN 47904
Tel 765.423.5377
Fax 765.429.1868
http://www.trw.com/commercialsteering
© TRW Inc. 2000
TRW1109
Rev. 3/00