1
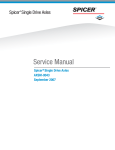
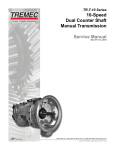
Torque-Hub® Electric Drive
E01HA010A2300, E01HA010A2400
Service Manual
Rev 10/19/12
1
While every precaution has been taken in the preparation of this document, Fairfield Manufacturing Co. Inc. assumes no
liability with respect to the use of the documentation described herein, or for any act or omission of Fairfield Manufacturing
Co. Inc. concerning this documentation. Torque-Hub® is a registered trademark of Fairfield Manufacturing Co. Inc.
Features and specifications are subject to change without notice.
2
Planetary Electric Drive Service Manual
Content
Introduction
Roll and Leak Test
Tightening and Torquing Bolts
Lubrication Information
Manual Disengage Procedure
Disassembly Instructions
Motor Disassembly
Gearbox Main Disassembly
Input Carrier Disassembly
Hub Disassembly
Spindle Disassembly
Assembly Instructions
Spindle Subassembly
Hub Subassembly
Input Carrier Subassembly
Gearbox Main Assembly
Motor Assembly
Parts List
Motor Maintenance Procedure Appendix A
Assembly Tools
General Information
Contact Information
4
5
6
7
8
12
13
15
16
17
21
23
24
26
28
29
32
40
42
3
Planetary Electric Drive Service Manual
Introduction
This manual is a step-by-step guide to the disassembly and
®
assembly of the E01H Electric drive Torque-Hub units. It is
designed for the customer or shop mechanic who is repairing this
®
particular Torque-Hub model.
Users of this manual should note that each part mentioned is
followed by an identification number enclosed in parentheses.
These part numbers may be referred to in the Parts List section of
this manual and on the illustrated parts breakdown of this unit.
Any specialized tools normally used to assemble this unit are noted
in the assembly procedures and diagrammed in the assembly tools
section.
Users should familiarize themselves with the procedures for roll and
leak testing, as well as bolt tightening and torquing found on the
following two pages before any servicing of the assembly.
Standard safety practices should be followed during the procedures
described. Safety glasses and safety shoes should be worn. Be
especially alert when you see the word CAUTION. This indicates
that a particular operation could cause personal injury if not
performed properly or if certain safety procedures are not followed.
The word NOTE is used to bring attention to certain procedures or
helpful hints that will aid in the disassembly and assembly process.
DISCLAIMER: This manual will cover how to completely assemble
®
and disassemble this E01H Electric drive Torque-Hub unit.
However, if the unit is under warranty you should contact your
Fairfield customer service representative for a replacement unit.
The warranty will no longer be valid if the unit is disassembled by
non-Fairfield personnel.
4
Planetary Electric Drive Service Manual
Roll and Leak Test
®
Torque-Hub units should always be roll and leak tested before
disassembly (if possible) and after assembly to make sure the unit’s
gears, bearings and seals are working properly. The following
information briefly outlines what to look for when performing these
tests.
NOTE: The brake must be released before performing the roll test.
This can be accomplished by supplying 24 Volts D.C. to the brake
connector. The brake can also be released by following the manual
disengage procedures outlined on page 8.
The Roll Test
The purpose of the roll test is to determine if the unit’s gears are
rotating consistently, easily and properly. You should be able to
rotate the wheel or hub of the gearbox by hand. If you feel more
drag is felt in the gears only at certain points, then the gears are not
rolling consistently and easily and should be examined for improper
installation or defects. Some gear packages roll with more difficulty
than others. Do not be concerned if the gears in your unit seem to
roll hard as long as they roll with consistency. Rotate the gearbox
both clockwise and counterclockwise the same number of turns as
the ratio of the unit. The gearbox ratio is the same number as the
last three numbers on the ID tag.
The Leak Test
The purpose of a leak test is to make sure the unit is airtight. You
can tell if your unit has a leak if the pressure gauge reading on your
leak checking fitting starts to fall after the unit has been pressurized
and allowed to equalize.Leaks will most likely occur at the pipe
plugs, the main seal, or wherever o-rings or gaskets are located.
The exact location of a leak can usually be detected by brushing a
soap and water solution around the main seal and where the o-rings
or gaskets meet on the exterior of the unit and then checking for air
bubbles. If a leak is detected in a seal, o-ring, or gasket the part
must be replaced, and the unit rechecked. Leak test at 10 psi for 20
minutes.
5
Planetary Electric Drive Service Manual
Tightening and Torquing Bolts
If an air impact wrench is used to tighten bolts, extreme care should
be taken to ensure the bolts are not tightened beyond their specified
torque. The following steps describe how to tighten and torque bolts
or socket head cap screws in a bolt circle.
1. Tighten (but do not torque) bolt “A” until snug.
2. Go to the opposite side of the bolt circle and tighten bolt “B” until
equally snug.
3. Crisscross around the bolt circle and tighten the remaining bolts.
4. Use a torque wrench to apply the specified torque to bolt “A.”
5. Using the same sequence, crisscross around the bolt circle and
apply an equal torque to the remaining bolts.
6
Planetary Electric Drive Service Manual
Lubrication Information
Oil Type and Capacity:
®
This Torque-Hub unit is shipped with ISO 68 viscosity oil (hydraulic
fluid). It is designed to utilize the same oil throughout its service life.
However, should it need to be serviced the oil will need to be
drained and replaced.
In the event of servicing, fill the unit with ISO grade 68 oil or oil of a
similar viscosity (80W gear oil or 20W engine oil).
The gearbox will need to be filled with 10 oz of oil.
Oil Filling Instructions:
10 oz of gearbox oil will fill the gearbox cavity approximately half
full. To check the oil level, rotate the wheel so that the cover plugs
are at 12 o-clock and 3 o-clock. Allow the oil to settle. Slowly loosen
the 3 o-clock plug. If oil begins to come out then the oil level is
sufficient. If no oil is noticed at the 3 o-clock plug location, then
remove both plugs. Slowly add oil at the 12 o-clock plug location
until oil begins to seep out of the 3-clock plug location. Reinstall and
tighten plugs to 40 in-lbs.
7
Planetary Electric Drive Service Manual
Manual Disengage Procedure
®
NOTE: In the event of a power loss to the Torque-Hub , the parking brake will engage as a
safety precaution. Should the unit need to be towed or pushed to an area where it can be
serviced or recharged the operator will need to manually disengage the parking brakes. The
following procedure outlines how this is to be done.
CAUTION: If the machine is on any incline, the wheels must be adequately blocked prior to
manually disengaging the brakes. Failure to do so may result in injury or even death.
1.
Make sure the E-stop plunger is pushed in and the key is removed from the ignition
Switch.
2.
Remove the 2 Back Cover Bolts (B1). The Brake Cover Bolts are also the release bolts
for the brake. The size of the back cover bolts is M5 x 0.8 x 20mm long.
3.
Remove the Brake Cover (M1).
4.
Insert the Back Cover Bolts (B1) into the two Manual Release holes in the brake housing.
Continued on Next Page
8
5.
Tighten down bolts and the brake will disengage.
6.
Repeat this procedure for the other wheel drive.
CAUTION: The disengage bolts must be removed from the brake housing after the
machine is towed or pushed to its servicing location. The brakes cannot be engaged with
the disengage Screws in the brake housing. This will cause the machine to roll when parked
on an incline.
This concludes the Manual Disengage Procedure.
9
THIS PAGE
INTENTIONALLY
LEFT BLANK
10
DISASSEMBLY
11
Planetary Electric Drive Service Manual
Motor Disassembly
1.
Make sure the E-stop plunger is pushed in and the key is removed from the ignition switch.
2.
Disconnect the cable from the power controller.
3.
Drain the oil out of the unit by removing Cover Plug (G29) (see page 13), note the condition
of the oil.
4.
Remove the 2 Motor Mounting Bolts (M7) and Washers (M8).
5.
Gently remove the Motor (13).
NOTE: Reference Appendix A for maintenance procedures internal to the motor.
This concludes the Motor Disassembly.
12
Planetary Electric Drive Service Manual
Gear Box Main Disassembly
1.
Using a screwdriver, pry the end of the Retaining Ring (G19) out of the groove in the
Housing Subassembly, then grasp the loose end of the Retaining Ring (G19) and pull the
rest of the way out.
2.
Remove Cover (G11). Thrust Washer (G21) should remain in the inner counter bore of the
Cover (G11) when removed.
NOTE: To remove the cover the motor must be removed. Slide a rod through the motor
shaft hole and gently tap with a rubber hammer to force the cover out.
3.
Remove Input Sun Gear (G4).
4.
Remove Input Carrier Subassembly.
5.
Remove O-ring (G20) from Housing Sub-Assembly. Discard O-ring (G20).
6.
Remove Input Ring Gear (G3).
Continued on Next Page
13
NOTE: The Input Ring Gear (G3) is held in with a press fit on its outside diameter. Insert
jacking screws (1/4-20UNC, grade 8) with at least 1.5 inches of thread length into each of
the three tapped holes to force the ring gear out. Be sure and alternate between the jacking
screws to keep the ring gear from becoming misaligned in the bore. The screws will push
against the outer race of the main bearing. This bearing will have to be replaced afterwards.
7.
Using a screwdriver, remove Spiral Retaining Ring (G27).
8.
Pull Hub Subassembly off of the Spindle Sub-assembly.
This concludes the Gear Box Main Disassembly.
14
Planetary Electric Drive Service Manual
Input Carrier Disassembly
CAUTION: Safety glasses must be worn during these next steps.
1.
Remove Retaining Rings (G18) from each of the three Planet Shafts (G6).
NOTE: Do not overstress these Retaining Rings when removing them.
2.
Remove Thrust Plate (G23).
3.
Remove Thrust Washer (G25) from each Planet Shaft (G6).
4.
Slide each Input Planet Gear (G5) off the Planet Shaft (G6).
5.
Press out Bushing (G26) from the bore of each Planet Gear (G5). Bushings cannot be
reused when removed.
6.
Remove the other Thrust Washer (G25) from each Planet Shaft (G6).
7.
Remove Retaining Ring (G24) from Output Sun Gear (G8).
8.
Slide Output Sun Gear (G8) out from the center of the Input Carrier (G7).
9.
Remove the three Planet Shafts (G6) from the Input Carrier.
NOTE: The Planet Shafts (G6) are held in with a press fit. To avoid damage to the parts, use
an arbor or hydraulic press to remove the Planet Shafts (G6).
This concludes the Input Carrier Disassembly.
15
Planetary Electric Drive Service Manual
Hub Disassembly
1.
Remove Main Wheel Bearing (G14).
NOTE: This part is held in the hub with a press fit. To remove have the hub setting seal side
up. Use a plate or rod with a large enough diameter push in the inner race of the bearing.
Apply force to the push the bearing out. This bearing will need to be replaced upon
reassembly.
2.
Remove main Lip Seal (G16).
NOTE: This Lip Seal (G16) is also held in with a press fit. Remove the Lip Seal only if the
hub or seal needs to be replaced. The Lip Seal will most likely become damaged during
removal. Try not to damage the hub bore.
This concludes the Hub Disassembly.
16
Planetary Electric Drive Service Manual
Spindle Disassembly
1.
Place Spindle Sub-Assembly on bench with Planet Gears (G9) facing up.
NOTE: Do not damage or scratch the seal surface of the spindle (G1) during disassembly.
2.
Remove three Output Planet Shafts (G10).
NOTE: These Planet Shafts are held in with a press fit. Use the tapped hole in the end of the
pin in conjunction with a slide hammer or similar tool to remove them.
3.
Remove the Output Planet Gear (G9), Thrust Washer (G25), and Tanged Washer (G32) out
each of gear window of the Spindle (G1).
NOTE: The Output Planet Gears (G9) are a very similar in size to the Input Planet Gears
(G5), tag or label the Planet Gears to avoid confusion.
4.
Press out Bushing (G26) from the bore of each Planet Gear (G9). Bushings cannot be
reused when removed.
5.
Remove the Main Bearing (G14) from the outside diameter of the Spindle (G1).
Continued on Next Page
17
NOTE: This bearing is held in with a press fit. You will need to pry against the spindle (G1)
to remove it. A new bearing should be used when the unit is reassembled.
CAUTION: Safety glasses must be worn during these next steps.
6.
Remove the Bearing Retaining Ring (G28) from the bore of the Spindle (G1).
7.
Remove the shaft Ball Bearing (G15) from the center bore.
8.
Press out the Motor Shaft Seal (G17) from the center bore. The Seal cannot be reused when
removed.
This concludes the Spindle Disassembly.
18
THIS PAGE
INTENTIONALLY
LEFT BLANK
19
ASSEMBLY
20
Planetary Electric Drive Service Manual
Spindle Subassembly
1.
Place the Spindle (G1) on the bench with the carrier portion facing up.
NOTE: Do not damage or scratch the seal surface of the Spindle (G1) during assembly.
2.
Install Input Ball Bearing (G15) into the Spindle bore (G1).
CAUTION: Safety glasses must be worn during these next steps.
3.
Using Retaining Ring Pliers, install Retaining Ring (G28) into the groove in the Spindle (G1)
bore.
4.
Using the appropriate pressing tool (T-182377), press on Main Bearing (G14) until it is fully
seated.
5.
Use the Output Planet Pin (G10) as a pressing tool to install the Planet Bushing (G26) into
the bore of each Planet Gear (G9). The shaft will help guide the bushing into the bore as
well as prevent damage from the press.
6.
Place Tanged Thrust Washer (G32) into each planet window of the Spindle (G1). Make sure
the tang sits in the cast groove on the inside of the window.
Continued on Next Page
21
7.
Place a Thrust Washer (G25) onto the Output Planet Gear (G9). Line up the bores as best
as you can. Use grease to hold the Thrust Washer in place.
8.
Slide the Output Planet Gear (G9) into the window with the Tanged Thrust Washer (G32)
until the bores line up.
9.
Insert Output Planet Shaft (G10) into the Planet Shaft hole of the Spindle (G1) and through
the bores of the Thrust Washers (G25) & (G32) and the Planet Gear (G9).
10.
Before pressing the Output Planet Shaft (G10) into the Spindle (G1), make sure the Output
Planet gear (G9) spins freely.
11.
Press the Output Planet Shaft (G10) into the Spindle (G1) until it bottoms out. Make sure the
Output Planet Gear (G9) turns freely after the Planet Shaft is pressed in.
12.
Repeat Steps 5-11 for the other two Output Planet Gears (G9).
13.
Turn the Spindle (G1) over so that the carrier end is down.
14.
Using a flat plate or rod, press the Motor Shaft Seal (G17) into the center bore so that it is
flush with the face of the Spindle (G1).
This concludes the Spindle Subassembly.
22
Planetary Electric Drive Service Manual
Hub Subassembly
1.
Put Hub (G2) on a table with the tapped holes facing down.
2.
Using a flat plate in conjunction with a pressing tool, press in the Seal (G16) so it is .060 inch
inside the edge of the hub.
NOTE: The Seal has a thin outer shell that can be easily damaged if not installed with care.
It is a good idea to start the Seal into the bore with a rubber mallet before pressing.
3.
Flip the Hub (G2) over.
4.
Using the appropriate pressing tool (T-174356), press the Main Bearing (G14) into the bore
until it bottoms out.
This concludes the Hub Subassembly.
23
Planetary Electric Drive Service Manual
Input Carrier Subassembly
1.
Use the Input Planet Shaft (G6) as a pressing tool to install the Planet Bushing (G26) into
the bore of each Planet Gear (G5). The shaft will help guide the bushing into the bore as
well as prevent damage from the press.
2.
Press three Input Planet Shafts (G6) into the three holes of the Input Carrier (G7). The head
of the Input Planet Shaft (G6) needs to sit flush in the counter bore of the Input Carrier (G7)
hole.
3.
Insert Output Sun Gear (G8) into the splined bore of the Input Carrier (G7). The gear tooth
end of the Output Sun Gear (G8) should protrude in the opposite direction of the Input
Planet Shafts (G6).
CAUTION: Safety glasses must be worn during these next steps.
4.
Using retaining ring pliers, install the Retaining Ring (G24) into the groove of the Output Sun
Gear (G8). Make sure that the Retaining Ring (G24) is correctly seated in the groove and
that the Output Sun Gear (G8) cannot be pulled out of the Input Carrier (G7).
5.
Place a Thrust Washer (G25) on each side of the Input Planet Gear (G5). Line up the bores
as well as you can visually.
6.
Place the Input Planet Gear (G5) and Thrust Washers (G25) onto the Input Planet Shaft
(G6) sticking out from the Input Carrier (G7).
Continued on Next Page
24
7.
Repeat 5 & 6 for the other 2 Planet Gears (G5).
8.
Put the Thrust Plate (G23) onto the three Input Planet Shafts (G6). Use the three holes on
the outermost bolt circle. The other three holes are for a different gear ratio.
9.
Using the appropriate retaining ring pliers put a Retaining Ring (G18) into the groove of each
Input Planet Shaft (G6).
NOTE: Do not overstress the Retaining Rings (G18).
This concludes the Input Carrier Subassembly.
25
Planetary Electric Drive Service Manual
Gearbox Main Assembly
1.
Inspect seal surface of Spindle Subassembly. Remove any debris that may be present.
2.
Apply a coating of grease to the Lip Seal (G16) in the Hub Subassembly.
3.
Place Spindle (G1) Subassembly on table with carrier side up.
4.
Carefully install the Hub Subassembly (seal side down) onto the Spindle Subassembly. This
installation should be a slip fit and takes place in 3 stages.
NOTE: The hub slides together until the gear teeth of the hub hit the gear teeth of the 3
output planets (G9).
NOTE: Find the Output Planet Gear (G9) that is tight and turn it until you feel it go into mesh
with the hub gear teeth, apply slight downward pressure to the hub and then find the next
gear that is tight and do the same.
NOTE: Once all the Output Planet Gears (G9) are in mesh apply pressure to the hub, it
should push on the rest of the way.
Continued on Next Page
26
5.
Install Retaining Ring (G27) into the groove on the OD of the Spindle (G1) carrier. This is a
Spiral Retaining Ring so it will not require pliers. You will need to pull the Retaining Ring
(G27) apart and work it into the groove.
6.
Using the appropriate pressing tool (T-174356), press in the Input Ring Gear (G3) into the
bore of Hub Subassembly.
NOTE: Do not use excessive pressing force because it will be reacted by the main wheel
bearings.
7.
Install the Input Carrier Subassembly into mesh. The Output Sun Gear (G8) portion of the
Input Carrier Subassembly will mesh with the Output Planet Gears (G9) and the Input Planet
Gears (G5) mounted on the Input Carrier Subassembly will mesh with the Input Ring Gear
(G3).
8.
Install the Input Sun Gear (G4) into the area between the three Input Planet Gears (G5).
9.
Apply a coating of grease to the Cover O-ring (G20) and install it into the o-ring groove of the
Hub Subassembly.
NOTE: It may be helpful to stretch the O-ring (G20) out prior to assembly to avoid pinching
or shearing when the Cover (G11) is assembled.
10.
Apply Loctite 380 or 480 glue to Cover Thrust Washer (G21) and place it in the center
counter bore of the Cover (G11) so that the steel face of the washer is out of the bore.
NOTE: Make sure that both the Cover Thrust Washer (G21) and the Cover (G11) have good
clean surfaces for the Loctite to properly adhere.
11.
Center the Cover (G11) in the hub bore so that the JLG logo is up. Push it into the bore.
12.
Install the Cover Retaining Ring (G19) into the groove of the Hub Sub-assembly.
This concludes the Gear Box Main Assembly.
27
Planetary Electric Drive Service Manual
Motor Assembly
1.
Insert motor (13) into back of the gearbox. Try to keep the end of the motor shaft from
causing damage to the lip seal in the gearbox.
NOTE: The motor may need to be rotated to line up the sun gear splines with the motor
shaft splines.
2.
Install the 2 Motor Mounting Bolts (M7) and Washers (M8). Tighten to 9-11 ft-lbs.
3.
Connect the end of the cable to the power controller.
4.
Fill the gearbox with oil per the type & capacity specified on Page 7.
This concludes the Motor Assembly.
28
Planetary Electric Drive Service Manual
Parts List
Kit
Number
Qty
G11
1
Description
COVER
AME035HC02
G20
1
COVER O’RING
Cover Kit
G21
1
COVER THRUST WASHER
G19
1
COVER SNAP RING
G29
2
O’RING COVER PLUG
G16
1
MAIN LIP SEAL
AME035HS01
G14
1
MAIN BEARING
Main Seal Kit
G20
1
COVER O’RING
G5
3
INPUT PLANET GEAR
G26
3
PLANET BUSHING
G25
6
PLANET THRUST WASHERS
G18
3
PLANET PIN RETAINING RINGS
AME035C101
Input Carrier Kit
G6
3
PLANET SHAFT
45:1
G23
1
THRUST PLATE
G24
1
OUTPUT SUN RETAINING RING
G8
1
OUTPUT SUN
G4
1
INPUT SUN
G7
1
CARRIER
G20
1
COVER O’RING
G5
3
INPUT PLANET GEAR
G26
3
PLANET BUSHING
G25
6
PLANET THRUST WASHERS
AME035C102
G18
3
PLANET PIN RETAINING RINGS
Input Carrier Kit
G6
3
PLANET SHAFT
31:1
G23
1
THRUST PLATE
G24
1
OUTPUT SUN RETAINING RING
G8
1
OUTPUT SUN
G4
1
INPUT SUN
G7
1
CARRIER
G20
1
COVER O’RING
G16
1
MAIN LIP SEAL
G20
1
COVER O’RING
AME035HH01
G2
1
HUB
Hub Kit
G14
1
MAIN BEARING
1
MAIN BEARING RETAINING RING
G27
Continued on Next Page
29
Kit
AME035HR01
Input Ring Kit
AME035C201
Gearbox Output Planet Kit
AME035BM03
Number
Qty
Description
G3
1
INPUT RING
G20
1
COVER O’RING
G27
1
MAIN BEARING RETAINING RING
G14
1
MAIN BEARING
G14
G32
G25
G15
1
3
3
1
G28
1
G9
G20
G26
G27
G10
3
1
3
1
3
MAIN BEARING
TANGED THRUST WASHERS
PLANET THRUST WASHERS
SHAFT BEARING
SHAFT BEARING RETAINING
RING
OUTPUT PLANET GEAR
COVER O’RING
PLANET BUSHING
MAIN BEARING RETAINING RING
OUTPUT PLANET PIN
11
1
BRAKE DISC
11
1
BRAKE KIT
12
1
BRAKE COVER GASKET
12
1
BRAKE COVER FILLER STRIP
M7
2
MOTOR MOUNTING BOLTS
M8
2
WASHERS
M7
2
MOTOR MOUNTING BOLTS
M8
2
WASHERS
Brake Disc
AME035BM02
Brake Kit
AME035MH03
A23 Motor
Hardware Kit
AME035MH04
A24 Motor
Hardware Kit
Continued on Next Page
30
Kit
AME035MB04
Brush and Bearing Kit
A23 & A24 Motors
AME035MA08
A23 Motor Kit
AME035MA09
A24 Motor Kit
AME035MC03
A23, A24 Motor Cover Kit
Number
Qty
Description
M5
2
BRUSH AND TERMINAL SERVICE
KIT
M8
1
MOTOR BEARING
M7
1
BEARING RETAINING RING
13
1
ELECTRIC MOTOR
17
1
MOTOR LIP SEAL
13
1
ELECTRIC MOTOR
17
1
MOTOR LIP SEAL
13/12
1
COVER KIT
31
Motor Maintenance Procedure
Appendix A
Section 1: Glossary of Parts
Section 2: Trouble Shooting
Section 3: Disassembly
Section 4: Inspection and Service
Section 5: Reassembly
Section 6: Servicing Guidelines
34
35
36
37
38
40
32
Motor Maintenance Procedure
Section 1: Glossary of Parts
NOTE: A well-planned maintenance program will save many hours of future down time and
expense on a piece of equipment. We recommend periodic maintenance consisting of
inspections of motors, batteries and wiring circuitry.
CAUTION: Eye protection should be worn during any maintenance operation.
This concludes the Glossary of Parts.
33
Motor Maintenance Procedure
Section 2: Trouble Shooting
1.
Turn off all power to unit and disconnect main battery power. Disconnect motor connections
from the controller.
2.
Verify field continuity between the blue and red wires. If available, use a 4-wire ohmmeter to
verify the field resistance per the applicable motor specification below.
3.
Verify armature continuity between the red and black wires. If available, use a 4-wire
ohmmeter to verify the armature resistance per the applicable motor specification below.
4.
Using a dielectric tester, verify that there are no shorts between the following items:
a.
Field connector pins and the case of the motor.
b.
Armature terminals and the case of the motor.
c.
Field connector pins to the to the armature terminals.
5.
Verify continuity in 2 pin brake connector. Measure the brake resistance and verify that it is
between 18 and 22 Ohms.
Drive Part Number
Field Resistance @ 75°F
Armature Resistance @ 75°F
E01HA010A2400XX
0.210 Ohms
0.037 Ohms
E01HA010A2300XX
0.127 Ohms
0.051 Ohms
This concludes the Trouble Shooting.
34
Motor Maintenance Procedure
Section 3: Disassembly
1.
Remove the 2 brake cover screws and set aside. These screws will be needed to release
the brake. Remove the brake cover.
2.
Remove the gasket (11) and the filler strip that is in the groove of the commutator end head
(9).
3.
Install the 2 cover mounting screws into the threaded holes in the brake assembly and
tighten to manually release the brake. Refer image in the “Manual Disengage Procedure” on
page 8.
4.
Remove the 3 screws holding the brake assembly (10) to the motor. Carefully remove the
brake assembly, brake disc and reaction disc from the motor by sliding off of the shaft.
5.
Remove the screws holding the commutator end head (9) in place and remove the
commutator end head from the frame and field assembly (1). The armature (3) will be
attached to the commutator end head.
6.
Pull back the brush springs in the commutator end head (9), pull the brush back and rest the
springs on the side of the brush. The brushes should move freely within the holders.
7.
Use an arbor press to remove the armature (3) from the commutator end head assembly (9).
8.
Remove the snap ring (7) and bearing (8) from the commutator end head. Discard the
bearing.
This concludes the Disassembly.
35
Motor Maintenance Procedure
Section 4: Inspection and Service
1.
Carefully blow out any accumulated carbon dust and dirt from the end head and the frame
and field assembly using clean, oil free, compressed air.
2.
Replace brushes (6) that are worn below their usable length (.600 in), show signs of uneven
wear or signs of overheating, such as discolored brush shunts and brush springs.Brushes
should always be replaced in complete sets of four. Use identical replacement parts; do not
substitute brush grades as the brushes are matched to the motor type and application to
provide the best service. Substituting brushes of the wrong grade can cause premature
commutator failure, excessive brush wear, or unpredictable machine performance.
3.
Make sure the brush box assembly (4) is tight on the commutator end head. Replace brush
box assemblies in the commutator end head if they are physically damaged or brush holders
are loose on the brush plate.
4.
Visually inspect the frame and field assembly (1) for overheating or other signs of damage.
Check all wiring to insure that the insulation is in good condition. Verify that pole screws are
torqued to 250-300 in-lbs [28.2-33.9 N-m]. Verify field resistance using a suitable ohmmeter
per the appropriate motor specification. Verify that the field is electrically isolated from the
frame using a dielectric tester. Replace as necessary.
5.
Visually inspect the armature (3) assembly for signs of overheating or physical damage.
Visually inspect the seal surface of the shaft for excessive wear. Check for grounded circuits
using a dielectric tester by applying voltage between the commutator and the shaft. Visually
inspect the commutator for excessive wear and overheating. Replace as necessary.
6.
Visually inspect the brake surfaces for excessive wear. Replace brake assembly (10) if
necessary.
7.
Visually inspect the brake connector and field connections for frayed insulation, loose
terminals, or other damage. Replace as necessary.
This concludes the Inspection and Service.
36
Motor Maintenance Procedure
Section 5: Reassembly
1.
After inspection and servicing, reassemble the wiring in the commutator end head (9) as
originally found. Ensure the wiring does not contact metal parts and that it allows the
brushes to move unrestricted in the holders. Motor terminals must be assembled as shown
Figure 4. Torque bottom terminal nut to 110-140 in-lb [12.4-15.8 N-m].
2.
After the motor has been disassembled, it is recommended that new bearings be installed
because bearings may have been damaged during removal. Although the bearings may
appear and feel good, the bearing races could be “brinelled” (races or balls deformed) and
may exhibit noise and vibration problems or fail within a relatively short period of service.
Press a new bearing (8) into the commutator end head, pressing on the outer race only. See
Figure 3. Replace the snap ring (7) in the snap ring groove.
3.
Press the armature (3) commutator end into the commutator end head and bearing
assembly, carefully supporting the inner-race of the bearing. See Figure 3.
4.
Carefully release the brush springs (6) allowing the brushes to contact the commutator.
Make sure brush shunts do not interfere with spring movement.
5.
Assemble the commutator end head to the frame and field assembly (1) and tighten the
screws to 120-140 in-lbs [13.6-15.8 N-m]. Make sure to align the field connection with the
notch in the commutator end head. Seal wires where they exit from commutator end head
with the grommet (9).
6.
Align wires from brake assembly (10) into notch in the commutator end head. Install brake
disc in between brake assembly and reaction disc with hub facing towards brake assembly.
Install onto shaft of motor aligning wires with groove in commutator end head. Secure brake
assembly to commutator end head using 3 bolts.
Continued on Next Page
37
7.
Install filler strip (11) behind the brake leads into groove of commutator end head. Place
gasket (11) onto the back of the commutator end head.
8.
Install Brake Assembly (10).
9.
Remove brake cover screws from brake assembly and affix cover (12) to motor using the 2
brake cover screws.
This concludes the Reassembly.
38
Motor Maintenance Procedure
Section 6: Servicing Guidelines
Since the operating environment of industrial equipment varies widely, the following are suggested
for periodic maintenance inspection intervals.
1.
Normal Service – Perform routine inspection (outlined in Section 4) every 1,000 hours of
drive time.
2.
Severe Service – Perform routine inspection every 500 hours of drive time. Severe service
environments are listed below:
a.
Dusty or dirty locations like cement plants, lumber and flour mills, coal mining, stone
quarries, etc.
b.
High temperature areas like steel mills, foundries, etc.
c.
Environments with sudden temperature change, such as in refrigeration plant, etc.
This concludes the Servicing Guidelines.
39
Planetary Electric Drive Repair Instructions
Assembly Tools
T182377 – ASSEMBLY PRESS TOOL
40
T174356 – ASSEMBLY PRESS TOOL
41
Planetary Electric Drive Repair Instructions
Contact Information
With more than 90 years of experience, Fairfield Manufacturing
Co. Inc. has become the largest U.S. non-captive producer of
gears, custom gear assemblies, planetary final drives and related
gear products. Fairfield Manufacturing Co. Inc., headquartered in
Lafayette, Indiana USA, is distinguished by our extensive design,
manufacturing and applications engineering capabilities.
Our 500,000 square foot plant is a modern, fully equipped
manufacturing facility that includes a full service heat treat
department.
Our philosophy of synchronous engineering is a partnership that
matches our best and brightest people with your people to evaluate
your unique requirements, and develop products and assemblies
that meet your needs.
For more information, contact Fairfield Manufacturing Co Inc. today.
Mailing Address
Fairfield Manufacturing Co. Inc.
U.S. 52 South / P.O. Box 7940
Lafayette IN 47903-7940
Shipping Address
2309 Concord Road
Lafayette, IN 47909
Fax
Main
Applications Engineering
Sales and Service
(765) 772-4001
(765) 772-4011
(765) 772-4010
E-mail
Applications Engineering
Sales
[email protected]
[email protected]
Website
www.oerlikon.com/fairfield
42
THIS PAGE
INTENTIONALLY
LEFT BLANK
43
Oerlikon Fairfield
U.S. 52 South / P.O. Box 7940
Lafayette, IN 47903 USA
765-772-4000
www.oerlikon.com/fairfield
44