1
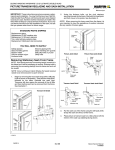
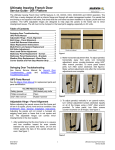
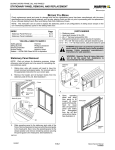
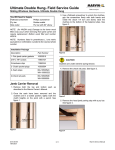
SLIDING WINDOWS HARDWARE--ULTIMATE DOUBLE HUNG MAGNUM
SASH REMOVAL AND REPLACEMENT
Note to the Service Technician
Read this instruction thoroughly BEFORE beginning to remove or install the sash on your Ultimate Double Hung Magnum
product. Failure to properly follow the instructions may result in product damage and/or personal injury.
WARNING: Ultimate Double Hung Magnum sash can be very heavy (in excess of 100
pounds per sash) and awkward to handle. Failure to acquire adequate assistance may
result in damage to the unit and/or personal injury.
2.
You Will Need to Supply
Phillips screwdriver
Flat head screwdriver
Safety goggles
Flexible Putty knife
INDEX
Removing the Bottom Sash . . . . . . . . . . . . . . . . . . .
Removing the Top Sash . . . . . . . . . . . . . . . . . . . . . .
Installing the Top Sash . . . . . . . . . . . . . . . . . . . . . . .
Installing the Bottom Sash . . . . . . . . . . . . . . . . . . . .
Raise the bottom sash to a recommended 3″ (76) up from
the sill. With a person at each side of the window place
a putty knife or plastic credit card between the bottom
sash checkrail and balance tube. Slide the putty knife
down approximately 1/2″ (13) past the top of the sash to
release the latch blade. See Figure 2.
Page
5.2.26
5.2.26
5.2.27
5.2.28
Removing the Bottom Sash
1.
Remove interior jamb stop by first unscrewing the top
screws. Lift the sash to the fully up position and remove
the lower screws. Grasp and remove jamb stop. See
figure 1a and b.
Figure 2
3.
Ease top of sash towards you to a horizontal position. Lift
both sides of the sash upward 2″--3″ (51--76) (separating
the pivot pins from the clutches). Rotate the sash
counterclockwise until pins clear the jambs and remove
the sash. See figure 3.
(a)
(b)
Figures 1a and 1b.
WARNING: Upon removal of the sash the
heavy duty spiral balance system can be
under extreme tension.
Figure 3
Removing the Top Sash
4.
19913957
8/9/2005
8/2005
Remove the top
sash wood jamb
filler by pushing on
the
flange and
rotating the filler
towards the exterior.
See figure 4.
Figure 4
5.2.26
Marvin Service Manual
11708609
SLIDING WINDOWS HARDWARE--ULTIMATE DOUBLE HUNG MAGNUM
SASH REMOVAL AND REPLACEMENT
5.
Remove the exterior clad jamb filler by pushing on the
flange and rotating the filler towards the interior. Take
care not to drop the filler. See figure 5A. Wood units have
a two part bottom filler. Remove the lower section
following the same procedure as removing the clad filler.
The top portion of the filler may be removed by placing
a flat screwdriver behind the filler and carefully prying it
off. See illustration 5B.
(a)
(a)
(b)
(b)
Figure 5
(c)
(d)
Figure 6
NOTE: Some clad fillers may require inserting a flat
screwdriver under the exterior edge of the filler. Gently pry
it away from the jamb carrier.
CAUTION: When replacing the sash, both pivot
pins must be positioned above the balance
clutch assembly located in the jamb carrier track.
Installing the Top Sash
7.
Ensure that both left and right clutches are parallel and
in the (vertical) locked position. See figure 7.
NOTE: To reposition the clutches use both hands on a flat
screwdriver to rotate the clutch cam to the released
(horizontal) position. Firmly holding the screwdriver with both
hands, slide the clutch to the desired position. Rotate the
balance clutch cam to the locked (vertical) position.
released
(horizontal) position
6.
Lower the top sash a minimum of 4″ (102) and with a
person at each side of the unit release the top tilt latches.
Ease top of sash towards you to a horizontal position. Lift
both sides of the sash upward 2″--3″(51--76) (separating
the pivot pins from the clutches). Rotate the sash
counterclockwise until pins clear the jambs and remove
the sash. See figure 6.
locked
(vertical) position
Figure 7
8/2005
5.2.27
Marvin Service Manual
11708609
SLIDING WINDOWS HARDWARE--ULTIMATE DOUBLE HUNG MAGNUM
SASH REMOVAL AND REPLACEMENT
8.
With a person on each side of the sash, insert the top
sash ensuring that the pivot pins are placed above the
jamb clutches. Lift window into place, pull back on the tilt
latch and tilt the unit up into place. Release the latch
ensuring that the latch pin is properly seated and the
sash is securely in place. See figure 8.
Installing the Bottom Sash
10.
Ensure that both left and right clutches are parallel and
in the locked position. With a person on each side of the
sash insert the bottom sash ensuring that the pivot pins
are placed above the jamb clutches. Lift the sash up
into place using a putty knife to depress the latch
blades. Once into place remove the putty knife
ensuring that the latch blades are properly seated into
the jamb carrier. See figure 10.
(a)
(c)
(b)
Figure 8
9.
Replace the interior jamb top and bottom fillers by first
inserting the flange side of the filler into place and
pushing on the filler to rotate and snap the filler into place.
See figure 9.
Figure 10
11.
Install the interior jamb stop and reinstall ALL interior
jamb stop screws. See figure 11.
Figure 11
Figure 9
8/2005
5.2.28
Marvin Service Manual
11708609