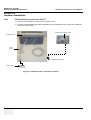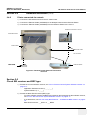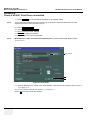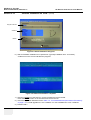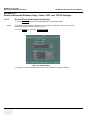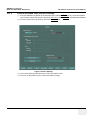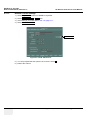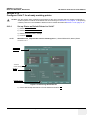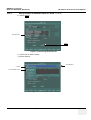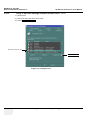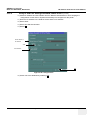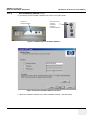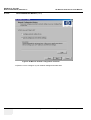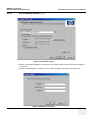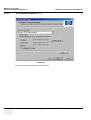
1
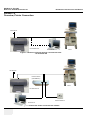
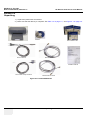
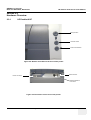
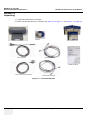
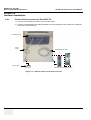
GE Medical Systems
Technical
Publication
Direction EP194516
Revision 01
GE Medical Systems
HP Deskjet 6127 Installation Manual
for EchoPAC PC and Vivid 7
Operating Documentation
Copyright© 2003 by General Electric Co.
GE MEDICAL SYSTEMS
DIRECTION EP194516, REVISION 01
HP DESKJET 6127 INSTALLATION MANUAL
IMPORTANT PRECAUTIONS
LANGUAGE
•
•
WARNING
•
•
•
•
AVERTISSEMENT
•
•
•
•
WARNUNG
•
•
THIS SERVICE MANUAL IS AVAILABLE IN ENGLISH ONLY.
IF A CUSTOMER’S SERVICE PROVIDER REQUIRES A
LANGUAGE OTHER THAN ENGLISH, IT IS THE CUSTOMER’S
RESPONSIBILITY TO PROVIDE TRANSLATION SERVICES.
DO NOT ATTEMPT TO SERVICE THE EQUIPMENT UNLESS THIS
SERVICE MANUAL HAS BEEN CONSULTED AND IS
UNDERSTOOD.
FAILURE TO HEED THIS WARNING MAY RESULT IN INJURY TO
THE SERVICE PROVIDER, OPERATOR OR PATIENT FROM
ELECTRIC SHOCK, MECHANICAL OR OTHER HAZARDS.
CE MANUEL DE MAINTENANCE N’EST DISPONIBLE QU’EN
ANGLAIS.
SI LE TECHNICIEN DU CLIENT A BESOIN DE CE MANUEL DANS
UNE AUTRE LANGUE QUE L’ANGLAIS, C’EST AU CLIENT QU’IL
INCOMBE DE LE FAIRE TRADUIRE.
NE PAS TENTER D’INTERVENTION SUR LES ÉQUIPEMENTS
TANT QUE LE MANUEL SERVICE N’A PAS ÉTÉ CONSULTÉ ET
COMPRIS.
LE NON-RESPECT DE CET AVERTISSEMENT PEUT ENTRAÎNER
CHEZ LE TECHNICIEN, L’OPÉRATEUR OU LE PATIENT DES
BLESSURES DUES À DES DANGERS ÉLECTRIQUES,
MÉCANIQUES OU AUTRES.
DIESES KUNDENDIENST-HANDBUCH EXISTIERT NUR IN
ENGLISCHER SPRACHE.
FALLS EIN FREMDER KUNDENDIENST EINE ANDERE SPRACHE
BENÖTIGT, IST ES AUFGABE DES KUNDEN FÜR EINE
ENTSPRECHENDE ÜBERSETZUNG ZU SORGEN.
VERSUCHEN SIE NICHT, DAS GERÄT ZU REPARIEREN, BEVOR
DIESES KUNDENDIENST-HANDBUCH NICHT ZU RATE
GEZOGEN UND VERSTANDEN WURDE.
WIRD DIESE WARNUNG NICHT BEACHTET, SO KANN ES ZU
VERLETZUNGEN DES KUNDENDIENSTTECHNIKERS, DES
BEDIENERS ODER DES PATIENTEN DURCH ELEKTRISCHE
SCHLÄGE, MECHANISCHE ODER SONSTIGE GEFAHREN
KOMMEN.
iii
GE MEDICAL SYSTEMS
DIRECTION EP194516, REVISION 7/4/03
•
•
AVISO
•
•
•
•
ATENÇÃO
•
•
•
•
AVVERTENZA
•
•
iv
HP DESKJET 6127 INSTALLATION MANUAL
ESTE MANUAL DE SERVICIO SÓLO EXISTE EN INGLÉS.
SI ALGÚN PROVEEDOR DE SERVICIOS AJENO A GEMS
SOLICITA UN IDIOMA QUE NO SEA EL INGLÉS, ES
RESPONSABILIDAD DEL CLIENTE OFRECER UN SERVICIO DE
TRADUCCIÓN.
NO SE DEBERÁ DAR SERVICIO TÉCNICO AL EQUIPO, SIN
HABER CONSULTADO Y COMPRENDIDO ESTE MANUAL DE
SERVICIO.
LA NO OBSERVANCIA DEL PRESENTE AVISO PUEDE DAR
LUGAR A QUE EL PROVEEDOR DE SERVICIOS, EL OPERADOR
O EL PACIENTE SUFRAN LESIONES PROVOCADAS POR
CAUSAS ELÉCTRICAS, MECÁNICAS O DE OTRA NATURALEZA.
ESTE MANUAL DE ASSISTÊNCIA TÉCNICA SÓ SE ENCONTRA
DISPONÍVEL EM INGLÊS.
SE QUALQUER OUTRO SERVIÇO DE ASSISTÊNCIA TÉCNICA,
QUE NÃO A GEMS, SOLICITAR ESTES MANUAIS NOUTRO
IDIOMA, É DA RESPONSABILIDADE DO CLIENTE FORNECER
OS SERVIÇOS DE TRADUÇÃO.
NÃO TENTE REPARAR O EQUIPAMENTO SEM TER
CONSULTADO E COMPREENDIDO ESTE MANUAL DE
ASSISTÊNCIA TÉCNICA.
O NÃO CUMPRIMENTO DESTE AVISO PODE POR EM PERIGO A
SEGURANÇA DO TÉCNICO, OPERADOR OU PACIENTE DEVIDO
A‘ CHOQUES ELÉTRICOS, MECÂNICOS OU OUTROS.
IL PRESENTE MANUALE DI MANUTENZIONE È DISPONIBILE
SOLTANTO IN INGLESE.
SE UN ADDETTO ALLA MANUTENZIONE ESTERNO ALLA GEMS
RICHIEDE IL MANUALE IN UNA LINGUA DIVERSA, IL CLIENTE È
TENUTO A PROVVEDERE DIRETTAMENTE ALLA TRADUZIONE.
SI PROCEDA ALLA MANUTENZIONE DELL’APPARECCHIATURA
SOLO DOPO AVER CONSULTATO IL PRESENTE MANUALE ED
AVERNE COMPRESO IL CONTENUTO.
NON TENERE CONTO DELLA PRESENTE AVVERTENZA
POTREBBE FAR COMPIERE OPERAZIONI DA CUI DERIVINO
LESIONI ALL’ADDETTO ALLA MANUTENZIONE,
ALL’UTILIZZATORE ED AL PAZIENTE PER FOLGORAZIONE
ELETTRICA, PER URTI MECCANICI OD ALTRI RISCHI.
GE MEDICAL SYSTEMS
DIRECTION EP194516, REVISION 01
HP DESKJET 6127 INSTALLATION MANUAL
DAMAGE IN TRANSPORTATION - FOR USA ONLY
All packages should be closely examined at time of delivery. If damage is apparent
write “Damage In Shipment” on ALL copies of the freight or express bill BEFORE
delivery is accepted or “signed for” by a GE representative or hospital receiving
agent. Whether noted or concealed, damage MUST be reported to the carrier
immediately upon discovery, or in any event, within 14 days after receipt, and the
contents and containers held for inspection by the carrier. A transportation
company will not pay a claim for damage if an inspection is not requested within
this 14 day period.
Call Traffic and Transportation, Milwaukee, WI (262) 827-3468 or 8*285-3468
immediately after damage is found. At this time be ready to supply name of carrier,
delivery date, consignee name, freight or express bill number, item damaged and
extent of damage.
Complete instructions regarding claim procedure are found in Section “S” of the
Policy And Procedures Bulletins.
CERTIFIED ELECTRICAL CONTRACTOR STATEMENT - FOR USA ONLY
All electrical Installations that are preliminary to positioning of the equipment at the
site prepared for the equipment shall be performed by licensed electrical
contractors. Other connections between pieces of electrical equipment,
calibrations and testing shall be performed by qualified GE Medical Systems
personnel. In performing all electrical work on these products, GE will use its own
specially trained field engineers. All of GE’s electrical work on these products will
comply with the requirements of the applicable electrical codes.
v
GE MEDICAL SYSTEMS
DIRECTION EP194516, REVISION 7/4/03
HP DESKJET 6127 INSTALLATION MANUAL
The purchaser of GE equipment shall only utilize qualified personnel (i.e., GE’s
field engineers, personnel of third-party service companies with equivalent training,
or licensed electricians) to perform electrical servicing on the equipment.
OMISSIONS & ERRORS
For USA Only
If there are any omissions, errors or suggestions for improving this documentation,
please contact the GE Medical Systems Global Documentation Group with specific
information listing the system type, manual title, part number, revision number,
page number and suggestion details. E-mail the information to:
[email protected]
GE Medical Systems employees should use the Customer Quality Assurance
(CQA) System to report all documentation omissions, errors or suggestions.
For USA Only
vi
GE MEDICAL SYSTEMS
DIRECTION EP194516, REVISION 01
HP DESKJET 6127 INSTALLATION MANUAL
Revision History
Revision
Date
Reason for change
01
July 2003
First version of manual
List of Effected Pages
Pages
Revision
All pages
01
Pages
Revision
-
Pages
Revision
vii
GE MEDICAL SYSTEMS
DIRECTION EP194516, REVISION 01
HP DESKJET 6127 INSTALLATION MANUAL
This page was intentionally left blank.
viii
-
GE MEDICAL SYSTEMS
DIRECTION EP194516, REVISION 01
HP DESKJET 6127 INSTALLATION MANUAL
Table of Contents
CHAPTER 1
Introduction
Overview . . . . . . . . . . . . . . . . . . . . . . . . . . . . . . . . . . . . . . . . . . . . . . . . . . . . . . . . . 1 - 1
Time to complete . . . . . . . . . . . . . . . . . . . . . . . . . . . . . . . . . . . . . . . . . . . . . . . . . . . 1 - 1
Environmental dangers . . . . . . . . . . . . . . . . . . . . . . . . . . . . . . . . . . . . . . . . . . . . . . 1 - 1
Patient vicinity UL 2601-1 . . . . . . . . . . . . . . . . . . . . . . . . . . . . . . . . . . . . . . 1 - 2
Patient environment IEC 601-1 . . . . . . . . . . . . . . . . . . . . . . . . . . . . . . . . . . 1 - 2
Furnished Materials . . . . . . . . . . . . . . . . . . . . . . . . . . . . . . . . . . . . . . . . . . . . . . . . . 1 - 3
Upgrade Software . . . . . . . . . . . . . . . . . . . . . . . . . . . . . . . . . . . . . . . . . . . . 1 - 3
New Software . . . . . . . . . . . . . . . . . . . . . . . . . . . . . . . . . . . . . . . . . . . . . . . . 1 - 3
Overview, Printer Connection . . . . . . . . . . . . . . . . . . . . . . . . . . . . . . . . . . . . . . . . . 1 - 4
Table of Contents
ix
GE MEDICAL SYSTEMS
DIRECTION EP194516, REVISION 01
HP DESKJET 6127 INSTALLATION MANUAL
CHAPTER 2
Vivid 7 Printer Installation
Overview . . . . . . . . . . . . . . . . . . . . . . . . . . . . . . . . . . . . . . . . . . . . . . . . . . . . . . . . . 2 - 1
Unpacking . . . . . . . . . . . . . . . . . . . . . . . . . . . . . . . . . . . . . . . . . . . . . . . . . . . . . . . . 2 - 2
Hardware Overview . . . . . . . . . . . . . . . . . . . . . . . . . . . . . . . . . . . . . . . . . . . . . . . . . 2 - 3
HP DeskJet 6127 . . . . . . . . . . . . . . . . . . . . . . . . . . . . . . . . . . . . . . . . . . . . . 2 - 3
Hardware Installation . . . . . . . . . . . . . . . . . . . . . . . . . . . . . . . . . . . . . . . . . . . . . . . . 2 - 4
Printer directly connected to Vivid 7 . . . . . . . . . . . . . . . . . . . . . . . . . . . . . . . 2 - 4
Printer connected via network . . . . . . . . . . . . . . . . . . . . . . . . . . . . . . . . . . . 2 - 5
Check SW versions and BEP type. . . . . . . . . . . . . . . . . . . . . . . . . . . . . . . . . . . . . . 2 - 5
Check if HP6127 Print Driver is installed . . . . . . . . . . . . . . . . . . . . . . . . . . . . . . . . . 2 - 6
Pre-installation Backup . . . . . . . . . . . . . . . . . . . . . . . . . . . . . . . . . . . . . . . . . . . . . . 2 - 7
Backup procedure . . . . . . . . . . . . . . . . . . . . . . . . . . . . . . . . . . . . . . . . . . . . 2 - 7
Record Software Option Keys, Video, VCR and TCP/IP Settings . . . . . . . . . . . . . . 2 - 9
Record Software Option Keys . . . . . . . . . . . . . . . . . . . . . . . . . . . . . . . . . . . 2 - 9
Record VCR and Video settings . . . . . . . . . . . . . . . . . . . . . . . . . . . . . . . . . 2 - 10
Record TCP/IP Settings . . . . . . . . . . . . . . . . . . . . . . . . . . . . . . . . . . . . . . . . 2 - 11
Record IP and Port Settings for Standard Printer on Vivid 7 . . . . . . . . . . . . 2 - 12
Software Loading . . . . . . . . . . . . . . . . . . . . . . . . . . . . . . . . . . . . . . . . . . . . . 2 - 16
Software Installation on Vivid 7 . . . . . . . . . . . . . . . . . . . . . . . . . . . . . . . . . . . . . . . . 2 - 17
Restore Recorded Software Keys, Video, VCR, and TCP/IP settings . . . . . . . . . . . 2 - 20
Restore Recorded Software Option Keys . . . . . . . . . . . . . . . . . . . . . . . . . . 2 - 20
Restore Recorded Video and VCR Settings . . . . . . . . . . . . . . . . . . . . . . . . 2 - 21
Restore TCP/IP Settings . . . . . . . . . . . . . . . . . . . . . . . . . . . . . . . . . . . . . . . 2 - 22
Configure Vivid 7 for already working printer . . . . . . . . . . . . . . . . . . . . . . . . . . . . . . 2 - 23
Set up Printer as Default Printer for Vivid 7 . . . . . . . . . . . . . . . . . . . . . . . . . 2 - 23
Verify IP and Port Settings Standard Printer Vivid 7 . . . . . . . . . . . . . . . . . . 2 - 26
Check Printer Operation Vivid 7 . . . . . . . . . . . . . . . . . . . . . . . . . . . . . . . . . . 2 - 30
Configure Vivid 7 for a new printer . . . . . . . . . . . . . . . . . . . . . . . . . . . . . . . . . . . . . 2 - 31
Preparations . . . . . . . . . . . . . . . . . . . . . . . . . . . . . . . . . . . . . . . . . . . . . . . . . 2 - 31
Run Installation Wizard . . . . . . . . . . . . . . . . . . . . . . . . . . . . . . . . . . . . . . . . 2 - 31
Set up Printer as Default Printer for Vivid 7 . . . . . . . . . . . . . . . . . . . . . . . . . 2 - 41
x
-
GE MEDICAL SYSTEMS
DIRECTION EP194516, REVISION 01
HP DESKJET 6127 INSTALLATION MANUAL
Check Printer Operation Vivid 7 . . . . . . . . . . . . . . . . . . . . . . . . . . . . . . . . . 2 - 43
-
xi
GE MEDICAL SYSTEMS
DIRECTION EP194516, REVISION 01
HP DESKJET 6127 INSTALLATION MANUAL
CHAPTER 3
EchoPAC PC Printer installations
Overview . . . . . . . . . . . . . . . . . . . . . . . . . . . . . . . . . . . . . . . . . . . . . . . . . . . . . . . . . 3 - 1
Unpacking . . . . . . . . . . . . . . . . . . . . . . . . . . . . . . . . . . . . . . . . . . . . . . . . . . . . . . . . 3 - 2
Hardware Overview . . . . . . . . . . . . . . . . . . . . . . . . . . . . . . . . . . . . . . . . . . . . . . . . . 3 - 3
HP DeskJet 6127 . . . . . . . . . . . . . . . . . . . . . . . . . . . . . . . . . . . . . . . . . . . . . 3 - 3
Hardware Installation . . . . . . . . . . . . . . . . . . . . . . . . . . . . . . . . . . . . . . . . . . . . . . . . 3 - 4
Printer directly connected to EchoPAC PC . . . . . . . . . . . . . . . . . . . . . . . . . 3 - 4
Printer connected via network . . . . . . . . . . . . . . . . . . . . . . . . . . . . . . . . . . . 3 - 5
Check SW versions and PC type. . . . . . . . . . . . . . . . . . . . . . . . . . . . . . . . . . . . . . . 3 - 5
Check if HP6127 Printer Driver is installed . . . . . . . . . . . . . . . . . . . . . . . . . . . . . . . 3 - 6
Pre Installation Backup . . . . . . . . . . . . . . . . . . . . . . . . . . . . . . . . . . . . . . . . . . . . . . 3 - 7
Backup procedure . . . . . . . . . . . . . . . . . . . . . . . . . . . . . . . . . . . . . . . . . . . . 3 - 7
Record SW Options Keys and TCP/IP Settings. . . . . . . . . . . . . . . . . . . . . . . . . . . . 3 - 9
Record SW Options Keys . . . . . . . . . . . . . . . . . . . . . . . . . . . . . . . . . . . . . . 3 - 9
Record IP and Port Settings . . . . . . . . . . . . . . . . . . . . . . . . . . . . . . . . . . . . . 3 - 11
Software Installation on EchoPAC PC . . . . . . . . . . . . . . . . . . . . . . . . . . . . . . . . . . . 3 - 14
Restore Recorded Software Options Keys and TCP/IP Settings. . . . . . . . . . . . . . . 3 - 20
Restore Recorded Software Options Keys . . . . . . . . . . . . . . . . . . . . . . . . . 3 - 20
Restore Recorded TCP/IP Settings . . . . . . . . . . . . . . . . . . . . . . . . . . . . . . . 3 - 20
Configure EchoPAC PC for an already working printer . . . . . . . . . . . . . . . . . . . . . . 3 - 21
Set up Printer as Default Printer for EchoPAC PC . . . . . . . . . . . . . . . . . . . . 3 - 21
Verify IP and Port Settings EchoPAC PC . . . . . . . . . . . . . . . . . . . . . . . . . . 3 - 24
Check Printer Operation on EchoPAC PC . . . . . . . . . . . . . . . . . . . . . . . . . . 3 - 27
Configure EchoPAC PC for a New Printer. . . . . . . . . . . . . . . . . . . . . . . . . . . . . . . . 3 - 30
Preparations . . . . . . . . . . . . . . . . . . . . . . . . . . . . . . . . . . . . . . . . . . . . . . . . . 3 - 30
Run Installation Wizard . . . . . . . . . . . . . . . . . . . . . . . . . . . . . . . . . . . . . . . . 3 - 30
Set up Printer as Default Printer for EchoPAC PC . . . . . . . . . . . . . . . . . . . . 3 - 40
Check Printer Operation On EchoPAC PC . . . . . . . . . . . . . . . . . . . . . . . . . 3 - 42
xii
-
GE MEDICAL SYSTEMS
DIRECTION EP194516, REVISION 01
HP DESKJET 6127 INSTALLATION MANUAL
CHAPTER 4
Maintenance
Overview. . . . . . . . . . . . . . . . . . . . . . . . . . . . . . . . . . . . . . . . . . . . . . . . . . . . . . . . . 4 - 1
Print Cartridge Replacement Procedure. . . . . . . . . . . . . . . . . . . . . . . . . . . . . . . . .
Prerequisite . . . . . . . . . . . . . . . . . . . . . . . . . . . . . . . . . . . . . . . . . . . . . . . . .
Preparations . . . . . . . . . . . . . . . . . . . . . . . . . . . . . . . . . . . . . . . . . . . . . . . .
Removal Procedure . . . . . . . . . . . . . . . . . . . . . . . . . . . . . . . . . . . . . . . . . .
Installation Procedure . . . . . . . . . . . . . . . . . . . . . . . . . . . . . . . . . . . . . . . . .
Automatic Verification . . . . . . . . . . . . . . . . . . . . . . . . . . . . . . . . . . . . . . . . .
-
4-2
4-2
4-2
4-3
4-4
4-5
xiii
GE MEDICAL SYSTEMS
DIRECTION EP194516, REVISION 01
xiv
HP DESKJET 6127 INSTALLATION MANUAL
-
GE MEDICAL SYSTEMS
DIRECTION EP194516, REVISION 01
HP DESKJET 6127 INSTALLATION MANUAL
Chapter 1
Introduction
Section 1-1
Overview
This chapter gives an overview of this printer delivery of furnished materials and includes a printer
connections overview.
Table 1-1 Contents in Chapter 1
Section
Description
Page Number
1-1
Overview
1-1
1-2
Time to complete
1-1
1-4
Furnished Materials
1-3
1-5
Overview, Printer Connection
1-4
Section 1-2
Time to complete
One person 30 minutes.
Section 1-3
Environmental dangers
WARNING
ALL DEVICES MEETING IEC60950 MUST BE KEPT OUTSIDE OF THE PATIENT
ENVIRONMENT, AS DEFINED IN IEC60601-1-1, UNLESS IT, ACCORDING TO IEC606011-1, IS EQUIPPED WITH:
A) ADDITIONAL PROTECTIVE EARTH.
OR:
B) EXTRA ISOLATING TRANSFORMER.
Commercial devices such as laser cameras, printers, VCRs and external monitors, usually exceed
allowable leakage current limits and, when plugged into separate AC outlets, are in violation of patient
safety standards. Suitable electrical isolation of such external AC outlets, or providing the device with
extra protective earth, will be required in order to meet UL2601-1 and IEC60601-1 standards for
electrical leakage.
Chapter 1 - Introduction
1-1
GE MEDICAL SYSTEMS
DIRECTION EP194516, REVISION 01
1-3-1
HP DESKJET 6127 INSTALLATION MANUAL
Patient vicinity UL 2601-1
2.12.101
In area in which patients are normally cared for, the patient vicinity is the space with surfaces likely to
be contacted by the patient or attendant who can touch the patient. This encloses a space within the
room 1.83 m (6 ft.) beyond the perimeter of the bed (examination table, dental chair, treatment booth,
and the like) in its intended location, and extending vertically 2.29 m (7.5 ft.) above the floor.
Patient environment
Patient environment
2,5m
1,5m
1,5m
Figure 1-1 Patient safety information
1-3-2
Patient environment IEC 601-1
Sub clause 2.204
Such an area is an environment in which medical diagnosis, monitoring or treatment is carried out. It is
very difficult to attach unique dimensions to the PATIENT ENVIROMENT.
In practice a distance of 2,5 m (8.2 ft.) above the floor on which the medical personnel stand and a
horizontal distance of 1,5 m (4.9 ft.) have justified themselves as indicative of the dimensions of the
Patient Environment.
The patient environment/vicinity will be depicted as a dashed line in this procedure. See example above.
1-2
-
GE MEDICAL SYSTEMS
DIRECTION EP194516, REVISION 01
HP DESKJET 6127 INSTALLATION MANUAL
Section 1-4
Furnished Materials
Table 1-2 Furnished Materials (Part Number EP100516)
QTY
Part Name
Part Number
1
HP Deskjet 6127 Printer
066E0414
1
1
Printer Software CD
Part of 066E0414 delivery
N
1
Power Cable, USA
Part of 066E0414 delivery
1
1
Power Cable, Europe
Part of 066E0414 delivery
1
2
Ethernet Cable
070D2950
2
1
Ethernet Cable, twisted
070D2951
2
1
Application Software
FC200220-10
2.3.0 SW
2
1
Application Software
FC200360-01
3.0.0 SW
2
1
BEP1 System Software for Vivid 7
FC200165-05
1.3.3 SW
2
1
BEP2 System Software for Vivid 7
FC200265-04
1.3.3 SW
2
1
System SW for EchoPAC PC on DW300
EP200435-06
1.3.3 SW
2
1
System SW for EchoPAC PC on EVO W4000
EP200458-06
1.3.3 SW
2
1
System SW for EchoPAC PC on HPXW4100
EP200590-01
1.3.3 SW
1
HP DeskJet 6127, IMAN
EP194516
01
1-4-1
Comments
FRU
N
Upgrade Software
Appliactions SW 2.3.0 CD combined with correct 1.3.3 System SW CD ( See table above) upgrade all
older sw, before SW v 2.3.0. The Upgrade adds the Printer Driver for this printer to the EchoPAC PC
Computer or Vivid 7 Scanner and repairs some reported errors in earlier SW versions.
1-4-2
New Software
The v3.0.0 Software is included in this kit only for use if, for some reason, there is a need to re-install
the SW. It is not intended for other puposes.
Chapter 1 - Introduction
1-3
GE MEDICAL SYSTEMS
DIRECTION EP194516, REVISION 01
HP DESKJET 6127 INSTALLATION MANUAL
Section 1-5
Overview, Printer Connection
100-240VAC
HP DeskJet 6127
Vivid 7
EchoPAC PC
Figure 1-2 Overview of Printer directly connected to Vivid
7 or EchoPAC PC
100-240VAC
Ethernet Switch
(PN 066E0741)
Vivid 7
HP DeskJet 6127
Ethernet Network
EchoPAC PC
Figure 1-3 Overview. Printer connected via network
1-4
Section 1-5 - Overview, Printer Connection
GE MEDICAL SYSTEMS
DIRECTION EP194516, REVISION 01
HP DESKJET 6127 INSTALLATION MANUAL
Chapter 2
Vivid 7 Printer Installation
Section 2-1
Overview
This chapter covers the installation and setup of the HP Deskjet 6127 Printer.
Table 2-1 Main Sections in Chapter 2
Section
Description
Page Number
2-1
Overview
2-1
2-2
Unpacking
2-2
2-3
Hardware Overview
2-3
2-4
Hardware Installation
2-4
2-6
Check if HP6127 Print Driver is
installed
2-6
2-7
Pre-installation Backup
2-7
2-8
Record Software Option Keys, Video,
VCR and TCP/IP Settings
2-9
2-10
Software Installation on Vivid 7
2-17
2-11
Restore Recorded Software Keys,
Video, VCR, and TCP/IP settings
2-20
2-12
Configure Vivid 7 for already working
printer
2-23
2-13
Configure Vivid 7 for a new printer
2-31
Chapter 2 - Vivid 7 Printer Installation
2-1
GE MEDICAL SYSTEMS
DIRECTION EP194516, REVISION 01
HP DESKJET 6127 INSTALLATION MANUAL
Section 2-2
Unpacking
1.) Unpack the printer with accessories.
2.) Make sure that the delivery is complete. See Table 1-2 on page 1-3 , and Figure 2-1 on page 2-2 .
Software
Power Cable US
SW Installation CDs
Ethernet Cable
Installation Manual
Power Cable Europe standard
Twisted Ethernet Cable
Figure 2-1 Furnished Materials
2-2
Section 2-2 - Unpacking
GE MEDICAL SYSTEMS
DIRECTION EP194516, REVISION 01
HP DESKJET 6127 INSTALLATION MANUAL
Section 2-3
Hardware Overview
2-3-1
HP DeskJet 6127
Interrupt button
Continue button
Power On/Off button
Figure 2-2 Buttons and LEDs on the front of the printer
USB connector
Power connector
Ethernet Network
Connector
Figure 2-3 Connectors on the rear of the printer
Chapter 2 - Vivid 7 Printer Installation
2-3
GE MEDICAL SYSTEMS
DIRECTION EP194516, REVISION 01
HP DESKJET 6127 INSTALLATION MANUAL
Section 2-4
Hardware Installation
2-4-1
Printer directly connected to Vivid 7
1.) Connect the HP DeskJet Printer to the AC mains outlet.
2.) Connect the twisted Ethernet Cable (070D2951) from the Deskjet Printer directly to the Ethernet
Connector on the Vivid 7.
.
Ethernet connection on Vivid 7
HP DeskJet 6127
Power
Cable
Twisted Ethernet Cable
Mains Outlet
Figure 2-4 DeskJet Printer connections overview
2-4
Section 2-4 - Hardware Installation
GE MEDICAL SYSTEMS
DIRECTION EP194516, REVISION 01
Section 2-4
2-4-2
HP DESKJET 6127 INSTALLATION MANUAL
Hardware Installation (cont’d)
Printer connected via network
1.) Connect the HP DeskJet Printer to the AC mains outlet.
2.) Connect the Ethernet Cable (070D2950) to the Deskjet Printer and the Ethernet Switch.
3.) Connect the Ethernet Cable (070D2950) from the Ethernet Switch to the Vivid 7.
.
Ethernet connection on Vivid 7
HP DeskJet 6127
Power Cable
Ethernet Cable
AC Converter
Ethernet Switch
Mains Outlet
Figure 2-5 DeskJet Printer Network connections
overview
Section 2-5
Check SW versions and BEP type
1.) Record the current software versions, see 2-2-8-4 "Record Current System Software Version" on
page 2-11.
-
Application Software Version (v.__.__.___)
-
System Software (v.1.__.___)
2.) Record the Back-End Processor (BEP) type:
-
For some software versions the BEP type is listed on the same page as the software versions,
see 2-2-8-4 "Record Current System Software Version" on page 2-11.
-
If not listed there, see 2-2-8-6 "Verify BIOS Version -- to Determine BEP Version" on page 215.
Back-End Processor: ___BEP1 or ___BEP2.
Chapter 2 - Vivid 7 Printer Installation
2-5
GE MEDICAL SYSTEMS
DIRECTION EP194516, REVISION 01
HP DESKJET 6127 INSTALLATION MANUAL
Section 2-6
Check if HP6127 Print Driver is installed
1.) Select CONFIG (F2) on the Qwerty Keyboard on the operator panel.
NOTE:
If not Logged ON already, then the Operator Log On window is displayed.Select adm from the
Operator pull-down menu and select Log On.
2.) Select CONNECTIVITY.
3.) Select ADDITIONAL OUTPUTS.
4.) Select Standard Printer Settings.
5.) SELECT to display Print Setup.
6.) Examine the List in the scroll window.
NOTE:
With SW v2.3.0, steps 3 and 4 have the following text “3.) Select SERVICES.,and 4.) Select
Standard Print.”
Scroll Window
OK
Figure 2-6 Print Setup
7.) If the HP Deskjet 6127 is listed in the Scroll Window, click OK twice and continue from Section 213 on page 2- 31.
8.) If it is not listed, continue from Section 2-7 on page 2- 7
Select OK close the Print Setup Window.
2-6
Section 2-6 - Check if HP6127 Print Driver is installed
GE MEDICAL SYSTEMS
DIRECTION EP194516, REVISION 01
HP DESKJET 6127 INSTALLATION MANUAL
Section 2-7
Pre-installation Backup
2-7-1
Backup procedure
Use a blank dedicated MO disk when doing a backup. This MO disk should only be used for backup/
restore purpose (Do not use this MO disk when doing Export or Save as.). The backupprocedure will
OVERWRITE the existing data on the MO disk.
CAUTION When formatting the MO disk, give it a logical name and make sure to physically label the disk with the mention “Backup”.
A labelling convention should be followed so that each MO disk gets a unique label.
If moving images, make sure to have enough formatted MO disks before disponible.
1.) Insert a dedicated formatted (see page 435) MO disk in the MO drive.
2.) Press CONFIG (F2) on the alphanumeric keyboard. The Log In window is displayed asking
for operator ID and password.
3.) Select the user with administration rights and enter the password.
4.) Select Log on.The Setup dialogue window is displayed.
5.) Select the Admin setup category.The Backup sheet is displayed (Figure 8-35).
6.) Select:
-
Patient archive to backup patient records and reports.
System setting to copy system settings and user presets. The system configuration
backup can be used to configure several Vivid 7/Vivid 7 PRO units with identical presets,
providing the units have the same software version.
-
Move oldest images to move images and reports from the local harddrive onto MO disks.
Adjust the time span next to Older than to move images and reports older than that setting.
7.) Select the MO disk as destination.
8.) Press Backup Now.
-
The system is checking that the MO disk is inserted. If not, a dialogue window is
displayed prompting the user to insert a MO disk. Press OK to resume backup.
The system is checking that the MO disk is formatted. If not, a dialogue window is
displayed prompting the user to format the disk.
The system is checking the available space on MO disk for the patient archive. If there
is not sufficient free space a dialogue window is displayed. Press OK, the media is
ejected and insert a new formatted MO disk. A progress dialogue is displayed
showing the current operation being performed. If the amount of data exceeds the
capacity of the MO disk the user is prompted to insert a new (formatted) MO disk. At
the end of the process a status for each item is displayed in the Result column. If errors
occur during backup, a list of the patient records/ examinations that could not be backed
up is displayed.
Chapter 2 - Vivid 7 Printer Installation
2-7
GE MEDICAL SYSTEMS
DIRECTION EP194516, REVISION 01
2-7-1
HP DESKJET 6127 INSTALLATION MANUAL
Backup procedure (cont’d)
Figure 2-7 The Backup sheet
1.) Select the item to backup
2.) Select and adjust the Move images function
3.) Select the MO disk as backup destination
4.) Start backup
5.) Adjust the backup reminder
2-8
Section 2-7 - Pre-installation Backup
GE MEDICAL SYSTEMS
DIRECTION EP194516, REVISION 01
HP DESKJET 6127 INSTALLATION MANUAL
Section 2-8
Record Software Option Keys, Video, VCR and TCP/IP Settings
2-8-1
NOTE:
Record Software Option Keys
Service Key is not required and should NOT be installed prior to Upgrade.
1.) Select CONFIG (F2) on the Qwerty Keyboard on the operator panel.
NOTE:
If not already Logged ON the Operator Log On window is displayed. Select adm from the
Operator pull-down menu and select Log On.
2.) From ADMIN tab, select the SYSTEM ADMIN.
Figure 2-8 System Admin
3.) Record Software Option Keys from Software Options Key window.
WARNING
Make sure that the SW Option Keys have been recorded correctly. If the key is incorrect,
you will not be able to log on after the SW installation has been completed. The Option
Key is case sensitive. Hyphenates must also be recorded. There may be more than one
Option Key.
Table 2-2 Software Option Keys
Software Option Keys
Chapter 2 - Vivid 7 Printer Installation
2-9
GE MEDICAL SYSTEMS
DIRECTION EP194516, REVISION 01
2-8-2
HP DESKJET 6127 INSTALLATION MANUAL
Record VCR and Video settings
1.) From the QWERTY keyboard on the Operator Panel, select CONFIG (F2 key), from the operator
log in window, select adm from the pull down menu, then select LOG ON. (No password Needed).
2.) From the lower part of the window, select the SERVICE tab.
.
Figure 2-9 Video Settings
3.) From Video Settings pull down menu, record displayed Format.
4.) From the VCR pull down menu, record displayed VCR type.
Table 2-3 Video Settings
Recording table for Video Settings
2 - 10
Section 2-8 - Record Software Option Keys, Video, VCR and TCP/IP Settings
GE MEDICAL SYSTEMS
DIRECTION EP194516, REVISION 01
2-8-3
HP DESKJET 6127 INSTALLATION MANUAL
Record TCP/IP Settings
1.) Select CONNECTIVITY.
2.) Choose TCPIP tab.
TCPIP
CONNECTIVITY
Figure 2-10 TCP/IP Example Settings
3.) Record all settings (you may use the table below).
.
Table 2-4 TCPIP Settings Table
Function
Setting
Computer Name
IP-Address
Subnet Mask
Default Gateway
Remote Archive IP-Address
Remote Archive Name
AE Title
Port Number
2-2-8-4
Record Current System Software Version
1.) From the alphanumeric keyboard on the Operator Panel, press CONFIG (F2 key)
2.) From the operator log in window, select ADM from the pull down menu.
3.) Select LOG ON. (No password needed).
4.) Select ABOUT tab.
Verify that the SW versions are the same as on the CD you installed from.
Chapter 2 - Vivid 7 Printer Installation
2 - 11
GE MEDICAL SYSTEMS
DIRECTION EP194516, REVISION 01
2-8-5
HP DESKJET 6127 INSTALLATION MANUAL
Record IP and Port Settings for Standard Printer on Vivid 7
1.) Select CONNECTIVITY.
2.) Select ADDITIONAL OUTPUTS.
3.) Select Standard Printer Settings.
NOTE:
With SW v2.3.0, steps 2and 3 have the following text “2.) Select SERVICES.,and 3.) Select
Standard Print.”
ADDITIONAL
OUTPUTS
Standard
Printer Settings
CONNECTIVITY
Figure 2-1 Additional Outputs screen
OPEN
Figure 2-2 Standard Printer Settings Dialog
4.) Select OPEN
5.) Select Printer
6.) Select Properties.
2 - 12
Section 2-8 - Record Software Option Keys, Video, VCR and TCP/IP Settings
GE MEDICAL SYSTEMS
DIRECTION EP194516, REVISION 01
2-8-5
HP DESKJET 6127 INSTALLATION MANUAL
Record IP and Port Settings for Standard Printer on Vivid 7 (cont’d)
Printer
Properties
Figure 2-3 Properties
Chapter 2 - Vivid 7 Printer Installation
2 - 13
GE MEDICAL SYSTEMS
DIRECTION EP194516, REVISION 01
2-8-5
HP DESKJET 6127 INSTALLATION MANUAL
Record IP and Port Settings for Standard Printer on Vivid 7 (cont’d)
7.) Select the Ports Tab
8.) Choose pre-selected printer Port.
9.) Select CONFIGURE PORT.
Pre Selected Printer Port.
CONFIGURE PORT
Figure 2-4 Configure Port
10.)Select and Record Printer Name or IP Address.
11.)Select Raw.
12.)Select and Record Port Number.
13.)Select CANCEL twice
14.)Close Printer Setup window.
Printer Name or IP
Address
Raw
Port Number
OK
Figure 2-5 Configure Port
2 - 14
Section 2-8 - Record Software Option Keys, Video, VCR and TCP/IP Settings
GE MEDICAL SYSTEMS
DIRECTION EP194516, REVISION 01
2-2-8-6
HP DESKJET 6127 INSTALLATION MANUAL
Verify BIOS Version -- to Determine BEP Version
1.) Power down the System.
2.) Wait until the LCD’s on the Operator Panel are switched off and the ON/Standby Button has turned
yellow.
3.) Power ON the System.
Figure 2-1 BIOS version visible at power up
4.) When the system is booting, record BIOS version, that is displayed on the screen, in table 1-8.
Table 2-1 BIOS recording
BIOS Version
5.) Verify BIOS version in Table 2-1 to the list below.
-
If BIOS version is 1.7, 1.7.1, 1.7.2 or 1.7.3 then the unit has a BEP-1.
-
If BIOS version is P07.14.1V7 or P08.16.1V7 then the unit has a BEP-2.
-
If BIOS version is D.50.1.V7 then the unit has a BEP-2.
6.) Check the correct BEP type or record the correct type (BEP-1 or BEP-2).
Chapter 2 - Vivid 7 Printer Installation
2 - 15
GE MEDICAL SYSTEMS
DIRECTION EP194516, REVISION 01
2-2-9
2-2-9-1
HP DESKJET 6127 INSTALLATION MANUAL
Software Loading
Overview
This software loading procedure covers:
•
Installation of BT’03 software (SW.v.3.n.n) on Vivid 7 units with BT’01 software (SW v.1.n.n).
•
Installation of BT’03 Software (SW.v.3.n.n) on HP Deskjet 6127 units with BT’02 software (SW
v.2.n.n).
A total of three CDs are included in each kit,
NOTE:
2 - 16
•
one CD with BEP-1 System Software
•
one CD with BEP-2 System Software
•
one CD with the Application Software
ONLY two of the CD’s are to be used, depending on BEP-type.
Section 2-8 - Record Software Option Keys, Video, VCR and TCP/IP Settings
GE MEDICAL SYSTEMS
DIRECTION EP194516, REVISION 01
HP DESKJET 6127 INSTALLATION MANUAL
Section 2-10
Software Installation on Vivid 7
NOTE:
Before you select the correct SW CD check if the Scanner has BEP1 or BEP2 whch is also vital
in your chouice of CD
1.) Insert the System Software CD into the Vivid 7 CD drive. See Table 1-2, “Furnished Materials (Part
Number EP100516),” on page 1-3) to obtain the correct one.
2.) Shut down Vivid 7.
3.) Boot Vivid 7. It boots from the Inserted System Software CD and the installation program starts.
Figure 2-1 Startup from Ghost CD
Enter the Serial
Number here
Enter a B
Figure 2-2 Installation Screen
4.) When requested, enter the Scanners Serial number: Vivid7- 001890 (example). Always Enter two
zero’s before you enter the serial number. This means that when you have a Vivid 7 serial number
which is 1890 you enter 001890. When the Serial number is 1123 you enter 001123.
5.) Choose software installation B only. System Configuration and User Configurations (customer
presets) will be lost unless option B is selected.
Chapter 2 - Vivid 7 Printer Installation
2 - 17
GE MEDICAL SYSTEMS
DIRECTION EP194516, REVISION 01
Section 2-10
HP DESKJET 6127 INSTALLATION MANUAL
Software Installation on Vivid 7 (cont’d)
Progress Indicator
Statistics
Details
Figure 2-3 Ghost Installation Progress
6.) Wait for Software installation to be performed. (Typically installation time: 10 minutes).
A status bar on the screen indicates the progress.
Figure 2-4 Software Installation completes
7.) After the installation of the first CD, you are prompted to remove theCD.
Press the EJECT button on the CD drive and remove the CD.
8.) Insert the Application Software CD see Table 1-2, “Furnished Materials (Part Number EP100516),”
on page 1-3. For field upgrades it is 2.3.0 software. For new installations it is 3.0.0 software.
9.) Restart Vivid 7.
2 - 18
Section 2-10 - Software Installation on Vivid 7
GE MEDICAL SYSTEMS
DIRECTION EP194516, REVISION 01
Section 2-10
HP DESKJET 6127 INSTALLATION MANUAL
Software Installation on Vivid 7 (cont’d)
Figure 2-5 Start Picture
10.)When system is rebooted, a dialog box with INSTALL SW is shown. Select this and confirm OK.
11.)A couple of Start Loader Warnings appear. Consider these and select OK
INSTALL SW
Figure 2-6 Start Application
12.)The system will now be loaded with application software. Remove CD after completion and reboot
the scanner.
13.)The unit will boot up from the installed software. The first startup from new software may be slightly
slower than a normal startup.
Chapter 2 - Vivid 7 Printer Installation
2 - 19
GE MEDICAL SYSTEMS
DIRECTION EP194516, REVISION 01
HP DESKJET 6127 INSTALLATION MANUAL
Section 2-11
Restore Recorded Software Keys, Video, VCR, and TCP/IP settings
2-11-1
Restore Recorded Software Option Keys
1.) Select CONFIG (F2) on the Qwerty Keyboard on the operator panel.
NOTE:
If not already Logged ON the Operator Log On window is displayed. Select adm from the
Operator pull-down menu and select Log On.
2.) From ADMIN tab, select the SYSTEM ADMIN.
Figure 2-7 System Admin
3.) Restore recorded Software Option Keys in the Software Key Options window.
2 - 20
Section 2-11 - Restore Recorded Software Keys, Video, VCR, and TCP/IP settings
GE MEDICAL SYSTEMS
DIRECTION EP194516, REVISION 01
2-11-2
HP DESKJET 6127 INSTALLATION MANUAL
Restore Recorded Video and VCR Settings
1.) From the QWERTY keyboard on the Operator Panel, select CONFIG (F2 key), from the operator
log in window, select adm from the pull down menu, then select LOG ON. (No password Needed).
2.) From the lower part of the window, select the SERVICE tab.
.
Figure 2-8 Video Settings
3.) From Video Settings pull down menu, restore recorded Format.
4.) From the VCR pull down menu, restore recorded VCR type.
Chapter 2 - Vivid 7 Printer Installation
2 - 21
GE MEDICAL SYSTEMS
DIRECTION EP194516, REVISION 01
2-11-3
HP DESKJET 6127 INSTALLATION MANUAL
Restore TCP/IP Settings
1.) Select F2 (CONFIG) button on QWERTY Keyboard.
2.) Select CONNECTIVITY->TCP/IP tab.
3.) Insert settings you wrote down in 2-8-3 on page 2-11 .
4.) Select SAVE SETTINGS.
SAVE SETTINGS
Figure 2-9 TCPIP TAB Screen.
5.) You are prompted that the system has to reboot, select OK.
6.) Reboot the scanner.
2 - 22
Section 2-11 - Restore Recorded Software Keys, Video, VCR, and TCP/IP settings
GE MEDICAL SYSTEMS
DIRECTION EP194516, REVISION 01
HP DESKJET 6127 INSTALLATION MANUAL
Section 2-12
Configure Vivid 7 for already working printer
NOTICE Use this section when configuring the System for the use of a printer which is already configured on
another System or network. If the Printer new and unused, go to Section 2-13 on page 2- 31.If replacing
a defect printer then the installation Wizard must be usedas described inSection 2-13 on page 2- 31.
2-12-1
Set up Printer as Default Printer for Vivid 7
1.) Select CONNECTIVITY.
2.) Select ADDITIONAL OUTPUTS.
3.) Select Standard Printer Settings.
4.) Choose SELECT.
NOTE:
With SW v2.3.0, steps 2 and 3 have the following text “2.) Select SERVICES.,and 3.) Select
Standard Print.”
ADDITIONAL
OUTPUTS
Standard
Printer Settings
SELECT
CONNECTIVITY
Figure 2-10 Choosing Standard Print
5.) Select HP Deskjet 6127series in Scroll Window and select OK.
Chapter 2 - Vivid 7 Printer Installation
2 - 23
GE MEDICAL SYSTEMS
DIRECTION EP194516, REVISION 01
2-12-1
HP DESKJET 6127 INSTALLATION MANUAL
Set up Printer as Default Printer for Vivid 7 (cont’d)
6.) Scroll to printer.
7.) Select OK.
Scroll Window
OK
Figure 2-11 Print Setup
2 - 24
Section 2-12 - Configure Vivid 7 for already working printer
GE MEDICAL SYSTEMS
DIRECTION EP194516, REVISION 01
2-12-1
HP DESKJET 6127 INSTALLATION MANUAL
Set up Printer as Default Printer for Vivid 7 (cont’d)
8.) Select OPEN.
Standard Print
OPEN
Figure 2-12 Choosing Standard Print
9.) Select Set as Default Printer.
10.)Close Window.
Close Window
Printer
Set as Default Printer
Figure 2-13 Set as Default Printer
Chapter 2 - Vivid 7 Printer Installation
2 - 25
GE MEDICAL SYSTEMS
DIRECTION EP194516, REVISION 01
2-12-2
HP DESKJET 6127 INSTALLATION MANUAL
Verify IP and Port Settings Standard Printer Vivid 7
1.) Select CONNECTIVITY.
2.) Select ADDITIONAL OUTPUTS.
3.) Select Standard Printer Settings.
NOTE:
With SW v2.3.0, steps 2 and 3 have the following text “2.) Select SERVICES.,and 3.) Select
Standard Print.”
ADDITIONAL
OUTPUTS
Standard
Printer Settings
CONNECTIVITY
Figure 2-14 Additional Outputs screen
OPEN
Figure 2-15 Standard Printer Settings Dialog
4.) Select OPEN
5.) Select Printer
6.) Select Properties.
2 - 26
Section 2-12 - Configure Vivid 7 for already working printer
GE MEDICAL SYSTEMS
DIRECTION EP194516, REVISION 01
2-12-2
HP DESKJET 6127 INSTALLATION MANUAL
Verify IP and Port Settings Standard Printer Vivid 7 (cont’d)
Printer
Properties
Figure 2-16 Properties
Chapter 2 - Vivid 7 Printer Installation
2 - 27
GE MEDICAL SYSTEMS
DIRECTION EP194516, REVISION 01
2-12-2
HP DESKJET 6127 INSTALLATION MANUAL
Verify IP and Port Settings Standard Printer Vivid 7 (cont’d)
7.) Select Ports
8.) Select the entry that has a check mark.
9.) Select CONFIGURE PORT.
Standard TCP\IP Port HP.
CONFIGURE PORT
Figure 2-17 Configure Port
2 - 28
Section 2-12 - Configure Vivid 7 for already working printer
GE MEDICAL SYSTEMS
DIRECTION EP194516, REVISION 01
2-12-2
HP DESKJET 6127 INSTALLATION MANUAL
Verify IP and Port Settings Standard Printer Vivid 7 (cont’d)
10.)Obtain IP Address and Port Number from the Network Administrator or from studying the
configuration of other PCs or Systems that already are configured for the printer.
11.)Enter the IP-Address in the Field for Printer Name or IP-Address.
12.)Select Raw.
13.)Select and Edit Port Number.
14.)Select OK.
Printer Name or
IP Address
Raw
Port Number
OK
Figure 2-18 Configure Port
15.)Close rest of the Windows by selecting OK.
Chapter 2 - Vivid 7 Printer Installation
2 - 29
GE MEDICAL SYSTEMS
DIRECTION EP194516, REVISION 01
2-12-3
HP DESKJET 6127 INSTALLATION MANUAL
Check Printer Operation Vivid 7
Check printer operation as described in Chapter 2-13-4 - Check Printer Operation Vivid 7
2 - 30
Section 2-12 - Configure Vivid 7 for already working printer
GE MEDICAL SYSTEMS
DIRECTION EP194516, REVISION 01
HP DESKJET 6127 INSTALLATION MANUAL
Section 2-13
Configure Vivid 7 for a new printer
NOTICE This section is used when connecting a new printer to an existing network
2-13-1
Preparations
1.) Make sure the printer is connected to the same network as your EchoPAC PC either by using direct
connect (crossed cable) or “the wall”.
2.) Make sure the printer is turned on, ink and paper has been loaded.
2-13-2
Run Installation Wizard
1.) Start Vivid 7.
2.) Select user adm, then select LOG ON.
3.) Select F2 (CONFIG) button on QWERTY Keyboard.
4.) Select SERVICE.
5.) Select HP Deskjet 6127 in the Network Printer Scroll Window.
6.) Select START SETUP PROGRAM.and select Next
Scroll Window
START SETUP PROGRAM
SERVICE
Figure 2-19 Start Setup Program
Chapter 2 - Vivid 7 Printer Installation
2 - 31
GE MEDICAL SYSTEMS
DIRECTION EP194516, REVISION 01
2-13-2
HP DESKJET 6127 INSTALLATION MANUAL
Run Installation Wizard (cont’d)
Figure 2-20 Setup Program starts
Figure 2-21 Setup maintenance type selection
7.) Select “Add an additional printer or printer driver”, and Select Next.
2 - 32
Section 2-13 - Configure Vivid 7 for a new printer
GE MEDICAL SYSTEMS
DIRECTION EP194516, REVISION 01
2-13-2
HP DESKJET 6127 INSTALLATION MANUAL
Run Installation Wizard (cont’d)
Figure 2-22 Network setup selection
8.) Select “Basic network setup for a PC or server (recommended), and select Next.
Chapter 2 - Vivid 7 Printer Installation
2 - 33
GE MEDICAL SYSTEMS
DIRECTION EP194516, REVISION 01
2-13-2
HP DESKJET 6127 INSTALLATION MANUAL
Run Installation Wizard (cont’d)
Figure 2-23 Printer specification addressing selection
9.) Select “Specify a printer by address”, and select Next.
2 - 34
Section 2-13 - Configure Vivid 7 for a new printer
GE MEDICAL SYSTEMS
DIRECTION EP194516, REVISION 01
2-13-2
HP DESKJET 6127 INSTALLATION MANUAL
Run Installation Wizard (cont’d)
10.)Locate the printers hardware address at the rear cover of the printer.
Location of
Hardware address
Press here to Print
a sheet of
information
containing
Hardware Address
Figure 2-24 Obtaining The Hardware Address
Figure 2-25 Printer Hardware Address insertion
11.)Enter the Hardware Address in the field “Hardware Address”, and select Next.
Chapter 2 - Vivid 7 Printer Installation
2 - 35
GE MEDICAL SYSTEMS
DIRECTION EP194516, REVISION 01
2-13-2
HP DESKJET 6127 INSTALLATION MANUAL
Run Installation Wizard (cont’d)
Figure 2-26 Manual network Configuration selection
12.)Select “Let me configure my own network settings and select Next.
2 - 36
Section 2-13 - Configure Vivid 7 for a new printer
GE MEDICAL SYSTEMS
DIRECTION EP194516, REVISION 01
2-13-2
HP DESKJET 6127 INSTALLATION MANUAL
Run Installation Wizard (cont’d)
Figure 2-27 Network setting
13.)If this is a first time installation of the printer you probably need to change the TCP/IP settings for
the printer.
14.)Select “Change Settings”,.enter the correct TCP/IP settings for the printer, and select OK.
Figure 2-28 Settings changing
Chapter 2 - Vivid 7 Printer Installation
2 - 37
GE MEDICAL SYSTEMS
DIRECTION EP194516, REVISION 01
2-13-2
HP DESKJET 6127 INSTALLATION MANUAL
Run Installation Wizard (cont’d)
Figure 2-29 Network communication settings result
verification
15.)Verify correct TCP/IP settings, and select Next.
2 - 38
Section 2-13 - Configure Vivid 7 for a new printer
GE MEDICAL SYSTEMS
DIRECTION EP194516, REVISION 01
2-13-2
HP DESKJET 6127 INSTALLATION MANUAL
Run Installation Wizard (cont’d)
Figure 2-30 Start Installation
16.)Select “Install”.
Chapter 2 - Vivid 7 Printer Installation
2 - 39
GE MEDICAL SYSTEMS
DIRECTION EP194516, REVISION 01
2-13-2
HP DESKJET 6127 INSTALLATION MANUAL
Run Installation Wizard (cont’d)
Figure 2-31 Installation Progress
17.)Select the “Print a test page” check box, and press “Finish”.
18.)Verify that a test page is printed correctly from the HP6127 printer.
2 - 40
Section 2-13 - Configure Vivid 7 for a new printer
GE MEDICAL SYSTEMS
DIRECTION EP194516, REVISION 01
2-13-3
HP DESKJET 6127 INSTALLATION MANUAL
Set up Printer as Default Printer for Vivid 7
1.) Select CONNECTIVITY.
2.) Select ADDIONAL OUTPUTS.
3.) Select Standard Printer settings.
4.) Choose SELECT to dislay Print Setup.
NOTE:
With SW v2.3.0, steps 2 and 3 have the following text “2.) Select SERVICES.,and 3.) Select
Standard Print.”
SERVICES
Standard Print
SELECT
CONNECTIVITY
Figure 2-32 Choosing Standard Print
5.) Select Printer entry created by the wizard in Section 2-10 on page 2- 17.
6.) Select OK.
Scroll Window
OK
Figure 2-33 Print Setup
Chapter 2 - Vivid 7 Printer Installation
2 - 41
GE MEDICAL SYSTEMS
DIRECTION EP194516, REVISION 01
2-13-3
HP DESKJET 6127 INSTALLATION MANUAL
Set up Printer as Default Printer for Vivid 7 (cont’d)
7.) Select OPEN.
Standard Print
OPEN
Figure 2-34 Choosing Standard Print
8.) Select Printer.
9.) Select Set as Default Printer.
10.)Close Window.
Close Window
Printer
Set as Default Printer
Figure 2-35 Set as Default Printer
11.)Select OK
12.)Select F2 to exit from Config
2 - 42
Section 2-13 - Configure Vivid 7 for a new printer
GE MEDICAL SYSTEMS
DIRECTION EP194516, REVISION 01
2-13-4
HP DESKJET 6127 INSTALLATION MANUAL
Check Printer Operation Vivid 7
1.) Verify that the Printer Power is ON.
2.) Insert paper in Printer.
3.) Wait until the Scanner has fully booted.
4.) Select user adm, then select LOG ON.
User adm
LOGON
Figure 2-36 Logon Window on Vivid 7
5.) Push the REPORT button on the Vivid 7 Control Panel.
REPORT button
Figure 2-37 Control Panel on Vivid 7
Chapter 2 - Vivid 7 Printer Installation
2 - 43
GE MEDICAL SYSTEMS
DIRECTION EP194516, REVISION 01
2-13-4
HP DESKJET 6127 INSTALLATION MANUAL
Check Printer Operation Vivid 7 (cont’d)
6.) The screen in the figure below appears.
7.) Select MORE.
MORE
Figure 2-38 Select More
8.) Select PRINT.
PRINT
Figure 2-39 Select Print
If this page is printed, the HP Deskjet 6127 works successfully.
2 - 44
Section 2-13 - Configure Vivid 7 for a new printer
GE MEDICAL SYSTEMS
DIRECTION EP194516, REVISION 01
HP DESKJET 6127 INSTALLATION MANUAL
Chapter 3
EchoPAC PC Printer installations
Section 3-1
Overview
This chapter contains instructions on how to Install this Printer on the EchoPAC PC.
Table 3-1 Main Steps in Chapter 1
Section
Description
Page Number
3-1
Overview
3-1
3-2
Unpacking
3-2
3-3
Hardware Overview
3-3
3-4
Hardware Installation
3-4
3-6
Check if HP6127 Printer Driver is
installed
3-6
3-7
Pre Installation Backup
3-7
3-4
Record SW Options Keys and TCP/
IP Settings
3-9
3-5
Software Installation on EchoPAC PC
3-14
3-6
Restore Recorded Software Options
Keys and TCP/IP Settings
3-20
3-7
Configure EchoPAC PC for an
already working printer
3-21
3-8
Configure EchoPAC PC for a New
Printer
3-30
Chapter 3 - EchoPAC PC Printer installations
3-1
GE MEDICAL SYSTEMS
DIRECTION EP194516, REVISION 01
HP DESKJET 6127 INSTALLATION MANUAL
Section 3-2
Unpacking
1.) Unpack the printer with accessories.
2.) Make sure that the delivery is complete. See Table 1-2 on page 1-3 , and Figure 3-1 on page 3-2 .
Software
Power Cable US
SW Installation CDs
Ethernet Cable
Installation Manual
Power Cable Europe standard
Twisted Ethernet Cable
Figure 3-1 Furnished Materials
3-2
Section 3-2 - Unpacking
GE MEDICAL SYSTEMS
DIRECTION EP194516, REVISION 01
HP DESKJET 6127 INSTALLATION MANUAL
Section 3-3
Hardware Overview
3-3-1
HP DeskJet 6127
Interrupt button
(Prints an
information sheet
with Printer
Hardware address)
Continue button
Power On/Off button
Figure 3-2 Buttons and LEDs on the front of the printer
USB connector
Power connector
Printer Hardware
Address
Ethernet Network
Connector
Figure 3-3 Connectors on the rear of the printer
Chapter 3 - EchoPAC PC Printer installations
3-3
GE MEDICAL SYSTEMS
DIRECTION EP194516, REVISION 01
HP DESKJET 6127 INSTALLATION MANUAL
Section 3-4
Hardware Installation
3-4-1
Printer directly connected to EchoPAC PC
1.) Connect the HP DeskJet Printer to the AC mains outlet.
2.) Connect the twisted Ethernet Cable (070D2951) from the Deskjet Printer directly to the Ethernet
Connector on EchoPAC PC.
.
HP DeskJet 6127
Power
Cable
Twisted Ethernet Cable
Mains Outlet
EchoPAC PC Ethernet connection
Figure 3-4
3-4
DeskJet Printer connections overview
Section 3-4 - Hardware Installation
GE MEDICAL SYSTEMS
DIRECTION EP194516, REVISION 01
Section 3-4
3-4-2
HP DESKJET 6127 INSTALLATION MANUAL
Hardware Installation (cont’d)
Printer connected via network
1.) Connect the HP DeskJet Printer to the AC mains outlet.
2.) Connect the Ethernet Cable (070D2950) to the Deskjet Printer and the Ethernet Switch.
3.) Connect the Ethernet Cable (070D2950) from the Ethernet Switch to the EchoPAC PC.
.
Ethernet connection on EchoPAC PC
HP DeskJet 6127
Power Cable
Ethernet Cable
Ethernet Switch
Mains
Mains
Outlet
Outlet
Figure 3-5
DeskJet Printer Network connections overview
Section 3-5
Check SW versions and PC type
1.) Record the current software versions, see 3-4-1-2 "Record Current System Software Version" on
page 3-10.
-
Application Software Version (v.__.__.___)
-
System Software (v.1.__.___)
2.) Record the PC type:
-
For some software versions the PC type is listed on the same page as the software versions,
see 3-4-1-2 "Record Current System Software Version" on page 3-10.
Chapter 3 - EchoPAC PC Printer installations
3-5
GE MEDICAL SYSTEMS
DIRECTION EP194516, REVISION 01
HP DESKJET 6127 INSTALLATION MANUAL
Section 3-6
Check if HP6127 Printer Driver is installed
1.) Select CONFIG (F2) on the Qwerty Keyboard on the operator panel.
NOTE:
If not already Logged ON the Operator Log On window is displayed.Select adm from the
Operator pull-down menu and select Log On.
2.) Select CONNECTIVITY.
3.) Select ADDITIONAL OUTPUTS.
4.) Select Standard Printer Settings.
5.) SELECT to display Print Setup.
6.) Examine the List in the scroll window.
NOTE:
With SW v2.3.0, steps 3 and 4 have the following text “3.) Select SERVICES.,and 4.) Select
Standard Print.”
Scroll Window
OK
Figure 3-6 Print Setup
7.) If the HP Deskjet 6127 is listed in the Scroll Window, click OK twice and continue from Section 3-8
on page 3-30.
8.) If the HP Deskjet 6127 is not listed in the Scroll Window, click OK and continue from Section 3-8 on
page 3-30
Select OK close the Print Setup Window.
3-6
Section 3-6 - Check if HP6127 Printer Driver is installed
GE MEDICAL SYSTEMS
DIRECTION EP194516, REVISION 01
HP DESKJET 6127 INSTALLATION MANUAL
Section 3-7
Pre Installation Backup
1.) Select CONFIG (F2) on the Qwerty Keyboard on the operator panel.
3-0-1
Backup procedure
Use a blank dedicated MO disk when doing a backup. This MO disk should only be used for backup/
restore purpose (Do not use this MO disk when doing Export or Save as.). The backupprocedure will
OVERWRITE the existing data on the MO disk.
CAUTION When formatting the MO disk, give it a logical name and make sure to physically label the disk with the mention “Backup”.
A labelling convention should be followed so that each MO disk gets a unique label.
If moving images, make sure to have enough formatted MO disks before disponible.
1.) Insert a dedicated formatted (see page 435) MO disk in the MO drive.
2.) Press CONFIG (F2) on the alphanumeric keyboard. The Log In window is displayed asking
for operator ID and password.
3.) Select the user with administration rights and enter the password.
4.) Select Log on.The Setup dialogue window is displayed.
5.) Select the Admin setup category.The Backup sheet is displayed (Figure 8-35).
6.) Select:
-
Patient archive to backup patient records and reports.
System setting to copy system settings and user presets. The system configuration
backup can be used to configure several EchoPAC PC units with identical presets, providing
the units have the same software version.
-
Move oldest images to move images and reports from the local harddrive onto MO disks.
Adjust the time span next to Older than to move images and reports older than that setting.
7.) Select the MO disk as destination.
8.) Press Backup Now.
-
The system is checking that the MO disk is inserted. If not, a dialogue window is
displayed prompting the user to insert a MO disk. Press OK to resume backup.
The system is checking that the MO disk is formatted. If not, a dialogue window is
displayed prompting the user to format the disk.
The system is checking the available space on MO disk for the patient archive. If there
is not sufficient free space a dialogue window is displayed. Press OK, the media is
ejected and insert a new formatted MO disk. A progress dialogue is displayed
showing the current operation being performed. If the amount of data exceeds the
capacity of the MO disk the user is prompted to insert a new (formatted) MO disk. At
the end of the process a status for each item is displayed in the Result column. If errors
occur during backup, a list of the patient records/ examinations that could not be backed
up is displayed.
Chapter 3 - EchoPAC PC Printer installations
3-7
GE MEDICAL SYSTEMS
DIRECTION EP194516, REVISION 01
3-0-1
HP DESKJET 6127 INSTALLATION MANUAL
Backup procedure (cont’d)
Figure 3-1 The Backup sheet
1.) Select the item to backup
2.) Select and adjust the Move images function
3.) Select the MO disk as backup destination
4.) Start backup
5.) Adjust the backup reminder
6.)
3-8
Section 3-7 - Pre Installation Backup
GE MEDICAL SYSTEMS
DIRECTION EP194516, REVISION 01
HP DESKJET 6127 INSTALLATION MANUAL
Section 3-4
Record SW Options Keys and TCP/IP Settings
3-4-1
Record SW Options Keys
1.) Select CONFIG.
2.) Select ADMIN.
3.) Select the SYSTEM ADMIN tab.
SYSTEM ADMIN
ADMIN Function
Figure 3-7 Locating SW Option Keys
4.) Record SW Options Key(s) from SW Options key window.
NOTE:
Make sure that the SW keys have been recorded correctly. If the hardware ID s incorrect, you
will not be able to log on after the SW installation has been completed. The key is case
sensitive. Hyphenates must also be recorded. There may be more than one key.
Table 3-1 Software Option Keys
Software Option Keys
Chapter 3 - EchoPAC PC Printer installations
3-9
GE MEDICAL SYSTEMS
DIRECTION EP194516, REVISION 01
3-4-1-1
HP DESKJET 6127 INSTALLATION MANUAL
Record TCP/IP Settings
1.) Select CONFIG.
2.) Select CONNECTIVITY.
3.) Choose TCPIP tab.
TCPIP
CONNECTIVITY
Figure 3-8 TCP/IP Example Settings
4.) Record all settings (you may use the table below).
.
Table 3-1 TCPIP Settings Table
Function
Setting
Computer Name
EchoPAC PC-
IP-Address
Subnet Mask
Default Gateway
AE Title
Port
3-4-1-2
Record Current System Software Version
1.) From the alphanumeric keyboard on the Operator Panel, press CONFIG (F2 key)
2.) From the operator log in window, select ADM from the pull down menu.
3.) Select LOG ON. (No password needed).
4.) Select ABOUT tab.
Verify that the SW versions are the same as on the CD you installed from.
3 - 10
Section 3-4 - Record SW Options Keys and TCP/IP Settings
GE MEDICAL SYSTEMS
DIRECTION EP194516, REVISION 01
3-4-2
HP DESKJET 6127 INSTALLATION MANUAL
Record IP and Port Settings
NOTICE This procedure is only valid when replacing a printer.
1.) Select CONFIG.
2.) Select CONNECTIVITY.
3.) Select ADDITIONAL OUTPUTS.
4.) Select Standard Printer Settings.
NOTE:
With SW v2.3.0, steps 3 and 4 have the following text “3.) Select SERVICES.,and 4.) Select
Standard Print.”
ADDITIONAL OUTPUTS
Standard Print
CONNECTIVITY
Figure 3-9 Choosing Standard Print
5.) Select OPEN.
6.) Select Printer.
7.) Select Properties.
OPEN
Figure 3-1 Standard Printer Settings Dialog
Chapter 3 - EchoPAC PC Printer installations
3 - 11
GE MEDICAL SYSTEMS
DIRECTION EP194516, REVISION 01
3-4-2
HP DESKJET 6127 INSTALLATION MANUAL
Record IP and Port Settings (cont’d)
Printer
Properties
Figure 3-10 Properties
3 - 12
Section 3-4 - Record SW Options Keys and TCP/IP Settings
GE MEDICAL SYSTEMS
DIRECTION EP194516, REVISION 01
3-4-2
HP DESKJET 6127 INSTALLATION MANUAL
Record IP and Port Settings (cont’d)
8.) Select Ports Tab.
9.) Select default printer settings.
10.)Select CONFIGURE PORT.
Standard TCP\IP Port HP.
CONFIGURE PORT
Figure 3-11 Configure Port
11.)Select and Record Printer Name or IP Address.
12.)Select Raw.
13.)Select and Record Port Number.
14.)Select CANCEL twice to close Printer Setup window
Printer Name or
IP Address
Raw
Port Number
OK
Figure 3-12 Configure Port
15.)Close rest of the Windows by selecting OK.
Chapter 3 - EchoPAC PC Printer installations
3 - 13
GE MEDICAL SYSTEMS
DIRECTION EP194516, REVISION 01
HP DESKJET 6127 INSTALLATION MANUAL
Section 3-5
Software Installation on EchoPAC PC
1.) Insert the System Software Installation CD for EchoPAC PC into the CD Drive. See Table 1-2 on
page 1-3
2.) Shut down EchoPAC PC.
3.) Boot EchoPAC PC. It boots from the Ghost CD and the Ghost program starts.
Figure 3-13 Steps of startup
4.) When requested, enter the unit’s Computer Name (See 3-4-1-1 on page 3-10 ).
Computer Name
input Field
Figure 3-14 Computer Name entry
3 - 14
Section 3-5 - Software Installation on EchoPAC PC
GE MEDICAL SYSTEMS
DIRECTION EP194516, REVISION 01
Section 3-5
HP DESKJET 6127 INSTALLATION MANUAL
Software Installation on EchoPAC PC (cont’d)
5.) When requested, choose method B.
Previously entered
Computer Name
Warning to be read
Find a discription of B
here
Type a B here
Figure 3-15 Installation Type Selection
NOTE:
When option B is selected-only drive C: will be deleted, but patient data and user settings are
unaffected.
Progress Indicator
Statistics
Details
Figure 3-16 Ghost Installation Progress
Chapter 3 - EchoPAC PC Printer installations
3 - 15
GE MEDICAL SYSTEMS
DIRECTION EP194516, REVISION 01
Section 3-5
HP DESKJET 6127 INSTALLATION MANUAL
Software Installation on EchoPAC PC (cont’d)
6.) Wait for the Software installation to be performed. (Typically installation time: 10 minutes).
A status bar on the screen indicates the progress.
Figure 3-17 Ghost completes and hands the command over to DOS
7.) After the installation you are prompted to remove the inserted CD and enter CD-2.
8.) Select the EJECT button on the CD drive and remove the CD.
9.) Insert the correct Application Software CD as shown in Section 1-4 - Furnished Materials.
NOTE:
For Field Upgrades it is 2.3.0 SW.For installation on new scanners it is 3.0.0 SW
10.)Select CTRL/ALT+DEL to Re-boot EchoPAC PC.
Figure 3-18 Start Picture
3 - 16
Section 3-5 - Software Installation on EchoPAC PC
GE MEDICAL SYSTEMS
DIRECTION EP194516, REVISION 01
Section 3-5
HP DESKJET 6127 INSTALLATION MANUAL
Software Installation on EchoPAC PC (cont’d)
11.)When PC is rebooted, select INSTALL SW in the dialog box.
INSTALL SW
Figure 3-19 Start Application
12.)Select OK.
OK
Figure 3-20 StartLoader
13.)Select OK.
OK
Figure 3-21 StartLoader
Chapter 3 - EchoPAC PC Printer installations
3 - 17
GE MEDICAL SYSTEMS
DIRECTION EP194516, REVISION 01
Section 3-5
HP DESKJET 6127 INSTALLATION MANUAL
Software Installation on EchoPAC PC (cont’d)
14.)Select any key to continue.
Figure 3-22 Continue the Installation
NOTE:
At this point the Windows OS is in a unstable condition, do not interrupt the software installation
or close the cmd.exe window during the installation of the Application Software. This will cause
the Installation to fail.
15.)The system will now be loaded with GEVU software. When Sw installation is completed the
following will appear on the screen:
Figure 3-23 SW Installation completed
3 - 18
Section 3-5 - Software Installation on EchoPAC PC
GE MEDICAL SYSTEMS
DIRECTION EP194516, REVISION 01
Section 3-5
HP DESKJET 6127 INSTALLATION MANUAL
Software Installation on EchoPAC PC (cont’d)
16.)Remove the CD and Select any key to reboot.
17.)The unit will boot up from the installed software. The first startup from new software may be slightly
slower than a normal startup.
Chapter 3 - EchoPAC PC Printer installations
3 - 19
GE MEDICAL SYSTEMS
DIRECTION EP194516, REVISION 01
HP DESKJET 6127 INSTALLATION MANUAL
Section 3-6
Restore Recorded Software Options Keys and TCP/IP Settings
3-6-1
Restore Recorded Software Options Keys
1.) Select CONFIG.
2.) From the ADMIN tab select SYSTEM ADMIN .
3.) Restore the recorded SW Options keys in the SW Options key window
3-6-2
Restore Recorded TCP/IP Settings
1.) When system is up and running go to CONFIG->CONNECTIVITY->TCP/IP tab.
2.) Insert settings you wrote down in 3-4-1-1 on page 3-10 .
3.) Select SAVE SETTINGS.
SAVE SETTINGS
Figure 3-24 TCPIP TAB Screen.
4.) You are prompted that the system has to reboot, select OK. On the Are you Sure...Warning Select
OK once more.
5.) Reboot the EchoPAC PC.
3 - 20
Section 3-6 - Restore Recorded Software Options Keys and TCP/IP Settings
GE MEDICAL SYSTEMS
DIRECTION EP194516, REVISION 01
HP DESKJET 6127 INSTALLATION MANUAL
Section 3-7
Configure EchoPAC PC for an already working printer
NOTICE Use this section when configuring EchoPAC PCs for the use of a printer already configured for use on
another EchoPAC PC. If the printer has not been used before go to Section 3-8 on page 3-30.
3-7-1
Set up Printer as Default Printer for EchoPAC PC
1.) Select CONNECTIVITY.
2.) Select ADDITIONAL OUTPUTS.
3.) Select Standard Printer Settings.
4.) Select SELECT.
NOTE:
With SW v2.3.0, steps 3 and 4 have the following text “3.) Select SERVICES.,and 4.) Select
Standard Print.”
ADDITIONAL
OUTPUTS
Standard
Printer Settings
CONNECTIVITY
Figure 3-25 Choosing Standard Print
5.) Select HP Deskjet 6127 in the Scroll Window.and Select OK.
Chapter 3 - EchoPAC PC Printer installations
3 - 21
GE MEDICAL SYSTEMS
DIRECTION EP194516, REVISION 01
3-7-1
HP DESKJET 6127 INSTALLATION MANUAL
Set up Printer as Default Printer for EchoPAC PC (cont’d)
Scroll Window
OK
Figure 3-26 Print Setup
3 - 22
Section 3-7 - Configure EchoPAC PC for an already working printer
GE MEDICAL SYSTEMS
DIRECTION EP194516, REVISION 01
3-7-1
HP DESKJET 6127 INSTALLATION MANUAL
Set up Printer as Default Printer for EchoPAC PC (cont’d)
6.) Select OPEN.
SERVICES
Standard Print
OPEN
CONNECTIVITY
Figure 3-27 Choosing Standard Print
7.) Select Printer.
8.) Select Set as Default Printer.
9.) Close Window.
Close Window
Printer
Set as Default Printer
Figure 3-28 Set as Default Printer
Chapter 3 - EchoPAC PC Printer installations
3 - 23
GE MEDICAL SYSTEMS
DIRECTION EP194516, REVISION 01
3-7-2
HP DESKJET 6127 INSTALLATION MANUAL
Verify IP and Port Settings EchoPAC PC
1.) Select CONNECTIVITY.
2.) Select ADDITIONAL OUTPUTS.
3.) Select Standard Printer Settings.
4.) Select OPEN.
NOTE:
With SW v2.3.0, steps 2 and 3 have the following text “2.) Select SERVICES.,and 3.) Select
Standard Print.”
ADDITIONAL
OUTPUTS
Standard
Printer Settings
CONNECTIVITY
Figure 3-29 Choosing Standard Print
5.) Select Printer.
Select Properties.
OPEN
Figure 3-1 Standard Printer Settings Dialog
3 - 24
Section 3-7 - Configure EchoPAC PC for an already working printer
GE MEDICAL SYSTEMS
DIRECTION EP194516, REVISION 01
3-7-2
HP DESKJET 6127 INSTALLATION MANUAL
Verify IP and Port Settings EchoPAC PC (cont’d)
Printer
Properties
Figure 3-30 Properties
Chapter 3 - EchoPAC PC Printer installations
3 - 25
GE MEDICAL SYSTEMS
DIRECTION EP194516, REVISION 01
3-7-2
HP DESKJET 6127 INSTALLATION MANUAL
Verify IP and Port Settings EchoPAC PC (cont’d)
6.) Select Ports TAB and select Standard TCP\IP Port HP Deskjet 6127 series.
7.) Select CONFIGURE PORT.
Standard TCP\IP Port HP.
CONFIGURE PORT
Figure 3-31 Configure Port
8.) .Obtain an IP Address and a Port Number from the Network Administrator or from studying the
configuration of other PCs or Systems that already are configured for the printer.
9.) Enter the IP-Address in the field for Printer Name or IP- address.
10.)Select Raw.
11.)Select and Edit Port Number.
12.)Select OK.
Printer Name or IP
Address
Raw
Port Number
OK
Figure 3-32 Configure Port
13.)Close rest of the Windows by selecting OK.
3 - 26
Section 3-7 - Configure EchoPAC PC for an already working printer
GE MEDICAL SYSTEMS
DIRECTION EP194516, REVISION 01
3-7-3
HP DESKJET 6127 INSTALLATION MANUAL
Check Printer Operation on EchoPAC PC
1.) Verify that Printer Power is ON.
2.) Insert paper in Printer.
3.) Select user adm, then select LOG ON.
user adm
LOG ON
Figure 3-33 Logon Window in the EchoPAC PC application
4.) Enter Last Name and Patient ID. Select CREATE PATIENT.
Enter Last Name
Enter Patient ID
CREATE PATIENT
Figure 3-34 Create new Patient
Chapter 3 - EchoPAC PC Printer installations
3 - 27
GE MEDICAL SYSTEMS
DIRECTION EP194516, REVISION 01
3-7-3
HP DESKJET 6127 INSTALLATION MANUAL
Check Printer Operation on EchoPAC PC (cont’d)
5.) Select REPORT.
REPORT
Figure 3-35 Select Report
6.) Select MORE.
MORE
Figure 3-36 Select More
3 - 28
Section 3-7 - Configure EchoPAC PC for an already working printer
GE MEDICAL SYSTEMS
DIRECTION EP194516, REVISION 01
3-7-3
HP DESKJET 6127 INSTALLATION MANUAL
Check Printer Operation on EchoPAC PC (cont’d)
7.) Select PRINT.
PRINT
Figure 3-37 Select Print
If this page is printed, then HP Deskjet 6127 works successfully.
Chapter 3 - EchoPAC PC Printer installations
3 - 29
GE MEDICAL SYSTEMS
DIRECTION EP194516, REVISION 01
HP DESKJET 6127 INSTALLATION MANUAL
Section 3-8
Configure EchoPAC PC for a New Printer
NOTICE This section is only used for connecting a new printer to an existing network
3-8-1
Preparations
1.) Make sure the printer is connected to the same network as your EchoPAC PC either by using direct
connect (crossed cable) or “the wall”.
2.) Make sure the printer is turned on, ink and paper has been loaded.
3-8-2
Run Installation Wizard
1.) Start up EP (no need of service dongle).
2.) Logon as adm.
3.) Enter config, service and select printer model “HP6127” from the Network Printer drop down list.
Figure 3-38 Selecting the HP6127 Printer
3 - 30
Section 3-8 - Configure EchoPAC PC for a New Printer
GE MEDICAL SYSTEMS
DIRECTION EP194516, REVISION 01
3-8-2
HP DESKJET 6127 INSTALLATION MANUAL
Run Installation Wizard (cont’d)
4.) Select the button “Start Setup Program”.
Figure 3-39 Setup Program starts
5.) Select next.
Figure 3-40 Setup maintenance type selection
6.) Select “Add an additional printer or printer driver”, and Select next.
Chapter 3 - EchoPAC PC Printer installations
3 - 31
GE MEDICAL SYSTEMS
DIRECTION EP194516, REVISION 01
3-8-2
HP DESKJET 6127 INSTALLATION MANUAL
Run Installation Wizard (cont’d)
Figure 3-41 Network setup selection
7.) Select “Basic network setup for a PC or server (recommended), and Select next.
3 - 32
Section 3-8 - Configure EchoPAC PC for a New Printer
GE MEDICAL SYSTEMS
DIRECTION EP194516, REVISION 01
3-8-2
HP DESKJET 6127 INSTALLATION MANUAL
Run Installation Wizard (cont’d)
Figure 3-42 Printer specification addressing selection
8.) Select “Specify a printer by address”, and Select next.
Chapter 3 - EchoPAC PC Printer installations
3 - 33
GE MEDICAL SYSTEMS
DIRECTION EP194516, REVISION 01
3-8-2
HP DESKJET 6127 INSTALLATION MANUAL
Run Installation Wizard (cont’d)
9.) Locate the printers hardware address at the rear cover of the printer.
Location of
Hardware address
Press here to Print
a sheet of
information
containing
Hardware Address
Figure 3-1 Obtaining The Hardware Address
Figure 3-43 Printer Hardware Address insertion
10.)Enter the hardware address in the field “Hardware Address”, and Select next.
3 - 34
Section 3-8 - Configure EchoPAC PC for a New Printer
GE MEDICAL SYSTEMS
DIRECTION EP194516, REVISION 01
3-8-2
HP DESKJET 6127 INSTALLATION MANUAL
Run Installation Wizard (cont’d)
Figure 3-44 Manual network Configuration selection
11.)Select “Let me configure my own network settings.
Chapter 3 - EchoPAC PC Printer installations
3 - 35
GE MEDICAL SYSTEMS
DIRECTION EP194516, REVISION 01
3-8-2
HP DESKJET 6127 INSTALLATION MANUAL
Run Installation Wizard (cont’d)
Figure 3-45 Network setting
12.)If this is a first time installation of the printer you probably need to change the TCP/IP settings for
the printer.
13.)Select the button “Change Settings”.
Figure 3-46 Settings changing
3 - 36
Section 3-8 - Configure EchoPAC PC for a New Printer
GE MEDICAL SYSTEMS
DIRECTION EP194516, REVISION 01
3-8-2
HP DESKJET 6127 INSTALLATION MANUAL
Run Installation Wizard (cont’d)
14.)Enter the correct TCP/IP settings for the printer, and Select OK.
Figure 3-47 Network communication settings result verification
15.)Verify correct TCP/IP settings, and Select next.
Chapter 3 - EchoPAC PC Printer installations
3 - 37
GE MEDICAL SYSTEMS
DIRECTION EP194516, REVISION 01
3-8-2
HP DESKJET 6127 INSTALLATION MANUAL
Run Installation Wizard (cont’d)
Figure 3-48 Start Installation
16.)Select “Install”.
3 - 38
Section 3-8 - Configure EchoPAC PC for a New Printer
GE MEDICAL SYSTEMS
DIRECTION EP194516, REVISION 01
3-8-2
HP DESKJET 6127 INSTALLATION MANUAL
Run Installation Wizard (cont’d)
Figure 3-49 Installation Progress
17.)Select the “Print a test page” check box, and Select “Finish”.
18.)Verify that a test page is printed correctly from the HP6127 printer.
Chapter 3 - EchoPAC PC Printer installations
3 - 39
GE MEDICAL SYSTEMS
DIRECTION EP194516, REVISION 01
3-8-3
HP DESKJET 6127 INSTALLATION MANUAL
Set up Printer as Default Printer for EchoPAC PC
1.) Select CONNECTIVITY.
2.) Select ADDITIONAL OUTPUTS.
3.) Select Standard Printer Settings.
4.) Select SELECT.
NOTE:
With SW v2.3.0, steps 2 and 3 have the following text “2.) Select SERVICES.,and 3.) Select
Standard Print.”
ADDITIONAL
OUTPUTS
Standard
Printer Settings
CONNECTIVITY
Figure 3-50 Choosing Standard Print
5.) Select HP Deskjet 6127 in the Scroll Window.and Select OK.
Scroll Window
OK
Figure 3-51 Print Setup
3 - 40
Section 3-8 - Configure EchoPAC PC for a New Printer
GE MEDICAL SYSTEMS
DIRECTION EP194516, REVISION 01
3-8-3
HP DESKJET 6127 INSTALLATION MANUAL
Set up Printer as Default Printer for EchoPAC PC (cont’d)
6.) Select Standard Print.
7.) Select OPEN.
CONFIG
SERVICES
Standard Print
OPEN
CONNECTIVITY
Figure 3-52 Choosing Standard Print
8.) Select Printer.
9.) Select Set as Default Printer.
10.)Close Window.
Close Window
Printer
Set as Default Printer
Figure 3-53 Set as Default Printer
Chapter 3 - EchoPAC PC Printer installations
3 - 41
GE MEDICAL SYSTEMS
DIRECTION EP194516, REVISION 01
3-8-4
HP DESKJET 6127 INSTALLATION MANUAL
Check Printer Operation On EchoPAC PC
Proceed as described in 3-7-3 on page 3-27
3 - 42
Section 3-8 - Configure EchoPAC PC for a New Printer
GE MEDICAL SYSTEMS
DIRECTION EP194516, REVISION 01
HP DESKJET 6127 INSTALLATION MANUAL
Chapter 4
Maintenance
Section 4-1
Overview
This chapter contains instructions on how to replace Print Cartridges.
Table 4-1
Contents in Chapter 4
Section
Description
Page Number
4-1
Overview
4-1
4-2
Print Cartridge Replacement
Procedure
4-2
Chapter 4 - Maintenance
4-1
GE MEDICAL SYSTEMS
DIRECTION EP194516, REVISION 01
HP DESKJET 6127 INSTALLATION MANUAL
Section 4-2
Print Cartridge Replacement Procedure
4-2-1
4-2-2
Prerequisite
•
Print Cartridge Black: HP51645 Series or HP No. 45.
•
Print Cartridge Tri-color: HP6578 Series or HP No. 78.
Preparations
1.) Make sure Paper Out Tray is in down position.
2.) Power ON.
Paper Out Tray up
Paper In Tray
Power ON
Paper Out Tray down
Figure 4-1 HP DeskJet Network Printer
4-2
Section 4-2 - Print Cartridge Replacement Procedure
GE MEDICAL SYSTEMS
DIRECTION EP194516, REVISION 01
4-2-3
HP DESKJET 6127 INSTALLATION MANUAL
Removal Procedure
1.) Raise the front cover. This makes Print Cartridge Cradle move in position for maintenance.
Cradle
Black Print Cartridge
TriColor Print
Cartridge
Figure 4-2 Open Cover and Cradle in position
2.) Open Cradle Latch
3.) Remove Print Cartridge upwards. The bigger TriColor cartridge, to the left of the black cartridge, is
removed the same way.
.
Cradle Latch
Figure 4-3 Replace black Print Cartridge
Chapter 4 - Maintenance
4-3
GE MEDICAL SYSTEMS
DIRECTION EP194516, REVISION 01
4-2-4
HP DESKJET 6127 INSTALLATION MANUAL
Installation Procedure
1.) Remove protective tape from new Print Cartridge
.
Figure 4-4 Remove protective tape
NOTE:
Do not touch ink nozzles or electrical copper contacts on Print Cartridge.
2.) Put Print Cartridge strait down into the Cartridge Cradle.
3.) Close Cradle Latch. It clicks into locked position.
4.) Close Top Cover.
4-4
Section 4-2 - Print Cartridge Replacement Procedure
GE MEDICAL SYSTEMS
DIRECTION EP194516, REVISION 01
4-2-5
HP DESKJET 6127 INSTALLATION MANUAL
Automatic Verification
1.) After a Print Cartridge replacement, HP DeskJet 990Cxi automatically prints out a calibration test
sheet. If a printing has been interrupted to replace Print Cartridge, the printer software will execute
the calibration test after finishing the interrupted printing job.
2.) Verify that Calibration test sheet is OK.
Figure 4-5 Calibration Printout
Chapter 4 - Maintenance
4-5
GE MEDICAL SYSTEMS
DIRECTION EP194516, REVISION 01
HP DESKJET 6127 INSTALLATION MANUAL
This page was intentionally left blank.
4-6
Section 4-2 - Print Cartridge Replacement Procedure
GE MEDICAL SYSTEMS
GE Medical Systems:
Telex 3797371
P.O. Box 414; Milwaukee, Wisconsin 53201, U.S.A.
(Asia, Pacific, Latin America, North America)
GE Ultraschall:Tel: +49 (0) 212 28 02 208
Deutschland GmbH & Co KG
Beethovenstrabe 239, Postfach 11 05 60
D-42655 Solingen, Germany