1
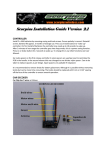
SECTION 2
DISASSEMBLY/ASSEMBLY
Sub-Section
1
2
LIST OF CONTENTS
Page No.
Disassembly
Access to Internal Components
Keyboard : Disassembly for Repair
RAM/EPROM Pack : Disassembly for Repair
LCD Display
2.1
2.1
2.2
2.2
Assembly
Keyboard
Ribbon Connectors
Cartridge Flap
2.2
2.2
2.2
1.
DISASSEMBLY
1.1
Access to Internal Components
1.1.1
Unplug all input/output leads and accessories and turn the Z88 upside
down on the bench top. Peel off two rectangular rubber mounts, one at
each front corner and identify 9 self-tapping screws, 7 spaced equidistantly along the top and side edges, 1 adjacent to the left-hand
side centre screw and 1 left of centre above the bottom edge. Remove
the nine screws. Support the LCD display and keyboard assembly from
the lower side and return the Z88 right side up.
1.1.2
The LCD display and the keyboard assembly may now be separated from
the main circuit board but remain connected to it by ribbon cables.
To remove the LCD display pull the keyboard assembly forward to rest
lightly on the edge of the back cover assembly. Place the index
finger of the left hand on connector SK5, grasp the display ribbon
connector with the thumb and index finger of the right hand and
exerting light pressure, pull the ribbon from SK5. Lift the display
out of the cover assembly base. Use the same procedure to disconnect
the keyboard assembly ribbon cables from connectors SK6 and SK7
respectively, and remove the assembly.
1.1.3
The main circuit board may now be lifted out of the cover assembly
base, with the RS232 connector SKID attached.
2.1
1.2
Keyboard : Disassembly for Repair
1.2.1
The keyboard assembly consists of three items:
- Silicon key mat
- Membrane
- Reaction plate
1.2.2
In order to separate the three parts, carefully peel back the mat from
the edge of the reaction plate, starting at one corner and working
around the assembly. It is possible that the mat may be damaged at
this stage due to the application of excess glue at the production
stage.
1.2.3
The assembly is now held together by three location dowels attached to
the mat and protruding through undersized holes in the membrane and
the reaction plate. To separate, slide the fingers of the left hand
between the reaction plate and the membrane and using a grub
screwdriver push the first dowel out of its aperture. Repeat the
procedure for the other two dowels and lay aside the reaction plate.
Separate the membrane from the key mat by lifting one edge and using
the fingers to ease the three dowels away from the membrane.
1.3
RAM/EPROM Packs : Disassembly for Repair
1.3.1
Each pack is sealed into a case consisting of a top and a bottom
cover. Two press-studs on the top cover locate into the bottom cover
and four studs projecting from the bottom cover are swaged to the top
cover. To separate the two parts of the assembly lift the edge of the
top cover secured by the press studs and insert a screwdriver between
the covers. Taking care not to touch the circuit board, lever the top
cover off the swaged studs. Discard both cover sections.
1.4
LCD Display
1.4.2
The display is not repairable.
2.
ASSEMBLY
2.1
Assembly of the Z88 and its component parts is in general the reverse
of disassembly. Points to watch are set out below.
2.2
Keyboard : Use a pair of tweezers to manoeuvre the keypad dowels into
the holes in the reaction plate. Before applying superglue to the
keypad make sure the keyboard is assembled completely. Apply glue
sparingly in the crack between the silicon keypad and the reaction
plate strut. Apply a few spots of glue only to the right-hand and
left-hand edges but glue all the way along the front of the wide
section which locates above the cartridge flap.
2.2
2.3
Ribbon Connectors : Take the ribbon cable between the thumb and forefinger and push the cable into the connector socket.
2.4
Cartridge Flap : It is possible that the clear polycarbonate plastic
flap becomes disengaged from the case. Replace by first inserting the
right-hand switch operator end into the slot provided and then bend the
left-hand lug inwards until it is possible to press it home.
2.3