1
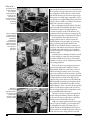
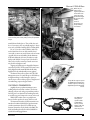
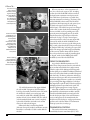
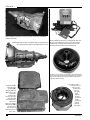
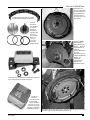
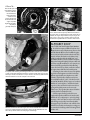
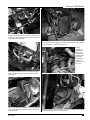
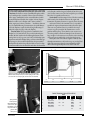
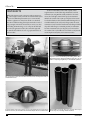
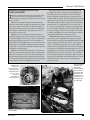
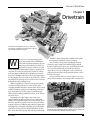
Building A 1935-40 Ford
Chapter 3
Drivetrain
An old name in Ford performance has a new line of
crate motors. Jack Roush now puts his name on dyno’d
and warranted performance engines.
W
hen it comes to selecting running gear for a
street rod, it seems the norm is a small-block
Chevy and an automatic transmission. To prove
that point just look under the hood of the ’3540 Fords at any rod run, and chances are you’ll
see something made by GM in that Ford engine compartment. Of
course there are a variety of reasons for this, not the least of which
are the facts that the small-block Chevy fits like it was meant to be
there, they’re affordable, and let’s face it, they’re good engines. But as
the old saying goes, there’s more than one way to skin a cat—and the
same holds true for powering a street rod. Of course the crew at Hot
Rods by Dean make everything look easy.
While “being different” is often the reason given for putting
a Ford in a Ford, the truth is there are a host of others just as
compelling. Small-block Fords are excellent engines, they’re readily
available, and with the popularity of 5.0 Mustangs, performance
parts abound. But there are still a couple of issues that must be
addressed when installing a small-block Ford in a ’35-40. The first
may be the oil pan.
Depending on the engine’s origin, it may or may not be
equipped with a front-sump pan; however, in most engine-swap
scenarios, a rear sump will be required. At one time the only cure for
that was an early Bronco pan, but now there are factory Ford dualsump pans (these have a small front sump under the oil pump with a
drain plug and a rear sump with a drain plug) as well as aftermarket
replacements (our pan came from Roush). And while it’s true that
due to the location of the oil pump, the Ford is deeper immediately
Drivetrain
behind the vibration damper than a small-block Chevy, with
most suspension combinations, clearance is adequate.
As we’ve said, the other problem with slipping a Ford into
a Ford is the engine’s length. Some builders simply modify the
firewall to make extra room. In our case, the J.B. Donaldson body
has a recessed firewall that will accommodate just about any
engine. However, if you’re working with a stock ’35-40 firewall,
component selection will be critical, particularly when it comes to
the front of the engine.
Over the years there have been a variety of front covers, water
pumps, vibration dampers, and seemingly endless combinations of
The shop door to Jack Roush Performance Engineering rolled up in 1976,
and since then the company has grown to employ over 2,000 people in 50
locations worldwide. They build lots and lots of engines.
27
A Guide To...
Everything is done
in-house at Roush.
Here a block is
being align-honed
to make sure the
main bores are
true and provide an
accurate centerline
for decking
the block.
The key to making
a small-block Ford
perform is getting
it to breathe,
something the
team at Roush has
figured out how to
do. As a result, the
raw castings are
finished to
their specs.
While there
are a variety of
performance levels,
each Roush engine
gets the same
attention to detail
during assembly.
28
pulleys and brackets that have been used. And while that
does complicate selecting components, for the most part
the configurations of factory parts were useless anyway.
Just about all the factory pieces made the engines longer
than practical, in a vintage engine compartment, and on
top of that they were ugly. But Hot Rods by Dean found
a simple solution to all this—it’s called the Front Runner
Engine Drive System from Vintage Air.
Since everything from the front of the block forward
was an issue with a Ford small-block, that’s where Vintage
Air started. They engineered a unique forged front
cover that incorporates mounts for the alternator, A/C
compressor, belt tensioner, and power-steering pump. The
beauty of the design is that no other brackets are required.
Front Runner drive kits include the front cover,
spring-loaded belt tensioner, stainless hardware kit,
crankshaft pulley, water-pump pulley (power-steering
pulley is optional), and serpentine drivebelt. Also
available are two all-inclusive kits that contain an A/C
compressor with hard lines and an alternator. These kits
are available with polished and chromed or anodized
components, and power-steering pumps and pulleys are
optional on either.
Confident that we could make a Ford fit in our Ford,
we went looking for an engine. We wanted something
powerful and reliable from someone we had complete
confidence in; when it comes to Fords that’s just another
way of saying Jack Roush.
For those who have even a passing interest in motorsports, the name Jack Roush is a familiar one. He has
designed, built, modified, or somehow been connected
with cars showing up in winners’ circles of every racing
venue in the country. Over the last 25 years the crew at his
company, Roush Performance, has put together thousands
of engines that have raced and won in drag, road, and
oval track racing, and set numerous records at Bonneville.
With that background and the general reputation Roush
had established, several builders of reproduction Cobras
called looking for a “better” crate motor. Roush responded
and the end result of those inquiries is that you can now
have a Ford engine built to their exacting tolerances and a
two-year/24,000-mile limited warranty.
Currently several series of engines are being offered
in both carbureted and fuel-injected form. All engines
are hot-tested, horsepower and torque are verified on a
dynamometer, and serial numbers are issued.
Unlike some engine suppliers that offer a base engine
with a few options, it’s hard to get your hands around
everything Roush is capable of providing. They can
perform virtually any machining function in-house; in
fact they make their own pulleys, grind cams, CNC-port
heads, and can turn raw castings of blocks, heads and
CHAPTER 3
Building A 1935-40 Ford
Before they are
shipped every
engine is dyno’d and
checked for leaks.
A dyno sheet and
personalized engine
ID tag with a serial
number,
as well as
horsepower and
torque numbers,
are included.
Like we said, Roush builds lots of engines; if they don’t have
one in inventory that’s exactly what you want, they’ll build it
for you.
manifolds into finished pieces. There is little they can’t
do, so if you want it, they can probably supply it—but in
most cases you’ll find something off the rack that will fit.
For our ’36 we chose what’s called the 342R. The
stroked 302 is based on a two-bolt main block and
comes with a custom cast crank, I-beam rods, and a main
cap girdle for bottom-end stability. Roush aluminum
heads and a hydraulic roller cam all combine to make
430 hp with 415 lb-ft of torque. Dyno’d, checked for
leaks, and covered by a warranty, a Roush crate motor
may be the best bargain around.
Topping our Roush engine is a Digital Fuel Injection
system from ACCEL. The Generation VII system comes
with a high-flow intake manifold, billet throttle body,
high-flow fuel rails, and adjustable pressure regulator.
The brain of the injection system is ACCEL’s DFI
Management system; it controls all aspects of fuel delivery
and ignition timing, as well as having the capacity to
activate torque-converter lockup, engine-cooling fans, and
air-conditioning compressor bypass switches.
Choosing A Transmission
Arguably the most popular transmission in street
rodding today is the automatic overdrive. The obvious
advantage to them is the wide gear spread that provides a
low First gear for acceleration from a standing start with
an overdrive top gear for improved economy on the road.
While GM’s overdrive autos are perhaps better
known, Ford has produced a variety of them as well:
The Automatic Overdrive (AOD) transmission was
introduced in 1980 as Ford’s first four-speed automatic
overdrive transmission (aka AOT or FIOD in some
literature). Internals are loosely based on the FMX. The
AOD was finally replaced by the AOD-E/4R70W in
1994 for all remaining applications.
Drivetrain
To top off our engine we opted
for ACCEL DFI. For performance,
throttle response, and mileage,
digital fuel injection is impossible
to beat.
The ACCEL fuel
management
system includes
an ECM, wiring
harness, sensors,
Calmap cable, and
software and a
1-Bar map sensor.
29
A Guide To...
A clean and easy
way to shorten
the front of a Ford
engine is Vintage
Air’s Front Runner.
Shown here is
the complete kit,
they’re available
with polished or
satin components.
When it came time to select a transmission for
our ’36 we relied on the experts at TCI. According
to them, the AOD-E/4R70W is the latest and best
Ford performance transmission and represents the
foreseeable future of performance rear-wheel-drive,
automatic-transmission technology. The beauty of the
AOD-E/4R70W is that it retains all of the AOD’s
good features while improving the weak points (some
of which can be improved in an AOD by using
AOD-E parts). The AOD-E incorporates an enlarged
2-inch–wide overdrive band, thereby eliminating an
obvious weak link, as well as providing some of the
previously mentioned upgrade parts for the AOD.
Another feature that is greatly improved from the
AOD is the “lockup” or torque converter bypass
system. Instead of the weaker concentric input shaft
system of the AOD, the AOD-E/4R70W uses an
actual clutch in the converter to provide lockup under
EEC control, rather than the fixed “60-percent lockup”
in Third and “full lockup” in Fourth gear system of the
AOD. The stronger input shaft and greater flexibility
of this system are further enhanced by the fact that
the converter clutch may actually be partially applied
or “slipped” under electrical PWM (pulse-width
modulation) control from the EEC PCM.
At the heart of the
Front Runner is an
all-new timing cover.
It incorporates
the accessory
mounts such as the
alternator, power
steering pump, and
air-conditioning
compressor; no
additional brackets
are required.
When installing
the Front Runner,
everything from the
front of the block
forward is replaced.
FIXING THE WEAKNESSES
The AOD-E transmission first appeared behind
the 4.6L modular V-8 engines in 1992. Essentially a
beefed-up electronically controlled version of the AOD,
the AOD-E also includes a new and stronger wideratio model (the AOD-EW or 4R70W) which was
introduced in the ’93 Lincoln Mark VIII. The AOD-E
(in both standard and wide ratio versions) completely
replaced the old AOD in 1994 with a new case that
mates to the 5.0L and 3.8L engines.
Fullsize trucks first received the huge E4OD
(Electronic four-speed Overdrive) transmission in 1989.
Internally, it is essentially a C6 with overdrive added to
the front.
30
As good as the 4R70W transmissions are, TCI
makes a host of improvements. First, they start with the
latest cases that include all the factory improvements.
Then they replace all the bushings and seal rings with
the best quality pieces available. In addition, Kevlar-lined
low-reverse and overdrive bands are installed, along with
Alto clutch discs. To enhance performance and increase
the amount of horsepower that can be transmitted, TCI
installs their high-performance overdrive-servo assembly
(11 percent larger than biggest OEM servo) the directdrive input shaft is replaced with TCI heat-treated Vasco
300 high performance input shaft, and a special TCI
pressure-regulator spring increases torque capacity.
After all the modifications are made and the special
parts installed, each transmission assembly is statically
tested for individual hydraulic circuit integrity before
the valve body is put in place. Next each transmission
receives a 100-percent tested, remanufactured valve
body, then it’s off to the dyno to verify proper functions,
pressures, and cooler flow. When a TCI transmission
shows up at your door, it’s ready to go.
TRANSMISSION CONTROLS
The new breed of automatic transmissions are
controlled by electronic control units (ECU). TCI’s
CHAPTER 3
Building A 1935-40 Ford
Although the A/C
compressor mounts
on the left side of
the engine; formed
tubing delivers the
inlet and outlets to the
passenger side to make
connections easier.
newest offering is a transmission control wnit (TCU)
designed specifically to allow the user maximum control
and tuning when using their T-Com WP software. The
user has the choice of line pressures, shift timing and
firmness of shift for both upshift and downshift points.
A feature exclusive to T-Com WP is the ability to have
part-throttle shifts as a function of road speed, while the
wide-open throttle shifts can be a function of engine
rpm. Plus, tuning is quick and simple.
Initial calibration only requires answering a few
quick questions in the calibration program. Tire size and
gear ratio are plugged in to assure proper speed data;
the installer indicates which transmission is being used,
then the unit is ready to go. Additional calibration is
only required if the user wishes to customize the shift
characteristics to suit their wishes. n
These drawings show how compact
a Ford can be made with Vintage
Air’s Front Runner.
The completed Front Runner installation is good looking and
compact. An off-the-shelf tensioner is used, and an enginedriven fan is an option.
Although Ford engines are narrow, exhaust clearance in ’35-40 chassis is tight. We
used Sanderson tight-tuck headers to dodge all the obstacles.
Drivetrain
31
A Guide To...
For the flexibility provided by the wide-ratio gearset, we selected a Ford 4R70W
transmission from TCI.
All TCI transmissions are dyno-tested before delivery, and only the latest
cases that incorporate all the factory improvements are used.
TCI StreetFighter transmissions are equipped with Trans-Scat
kits to increase shift firmness and increase torque capacity.
A stiffer pressure-regulator spring results in increased line
pressure to the direct clutches and overdrive band.
TCI offers a variety of torque converters. This is their Saturday Night
Special. It has a stall speed that is approximately 500 rpm over stock
for increased off-the-line performance, while the lockup feature is
retained for efficient cruising.
Compare the AOD
pan (top) to that
from an E4OD
(bottom). AOD and
AOD-E pans are the
same shape
(at 14.6-inches
long and 13-inches
wide) and both
have 14 bolt holes,
however the
patterns are slightly
different. The E4OD
pan has 20 bolt
holes and is 20.2
inches long and 13.6
inches wide.
32
It’s the little things that
count. The stock Ford
snap ring on the
overdrive drum
is prone to
dislodging
during
high-rpm
operation;
TCI replaces
it with a
special spiral
lock that
eliminates
that problem.
CHAPTER 3
Building A 1935-40 Ford
To improve performance, TCI uses a Kevlarlined band in their overdrive transmissions.
Ford used three
overdrive band
servos, identified
A, B, or C (A is
the biggest),
depending on
application. TCI’s
Super Servo is
11 percent larger
than Ford’s
A-servo
to increase
the band’s
holding capacity.
This flexplate is an
over-the-counter Ford
item. Note the balance
weight and the four
oval holes. You’ll see
the reason for the oval
holes shortly.
For those unfamiliar
with Fords, this is a
starter plate that goes
between the block
and transmission. It
serves two
purposes: first it locates
the starter
in the correct location
relative to the flywheel/
flexplate, and
it locates the
torque converter
properly in the
transmission’s pump.
For the ultimate in shock absorption and vibration isolation, we
chose a TCI polyurethane transmission mount.
The TCI castaluminum
transmission pan
increases fluid
capacity, will stiffen
the trans case, and it
comes with a magnetic
drain plug to trap debris
and simplify oil changes.
Drivetrain
The flexplate will only fit properly one way—with the balance weight toward the block.
The center register also has a flared lip that must face out.
33
A Guide To...
Note the flat spot on
the hub of the torque
converter; it fits into
the transmission’s
front pump. If the
converter is not
seated correctly and
the transmission and
engine are pulled
togetherby the bolts,
the pump is
generally destroyed.
The Roush small-block fits like a glove, of course the setback
in the J.B. Donaldson body helps. With Ford installations
the engine may sit a little higher than with a Chevrolet. In
addition, the engine may be offset to the passenger side
if necessary, as long as the centerline of the engine and
transmission is parallel with the centerline of the chassis.
ALPHABET SOUP
How To Tell One Ford Engine From Another
ike its GM counterpart, small-block Fords have been
produced in a variety of displacements. However, Ford
also built distinctly different series of small-block engines:
the 221, 255 (an under-bored 302 used in the early ’80s),
260, 289, and 302 (all referred to as the Fairlane series);
and the second series includes the 351W, 351C, and
351/400M (called the 335 series). To further complicate
things when mixing and matching Ford parts, within each
series there are significant differences. As an example, 221,
260, and early 289 engines had a five-bolt bellhousing
pattern. From mid-’65-on, all 289s, as well as the 302 and
351 engines that would follow, had a six-bolt pattern.
Something else that confuses the issue is the alphabet
soup Ford used as designations, and the fact that three
different engines had the same displacement: 351W
(Windsor, which looks like a Fairlane-series but uses
an entirely different block), 351C (Cleveland), and the
351/400 M (Modified). All these engines are considered
small-blocks, even though the C and M looked much
larger due to their canted valve heads, because the bore
spacing and head bolt patterns are the same as the
Fairlane series. (The legendary Boss 302 used a Fairlaneseries block with Cleveland-style heads.)
Of all the engines Ford has produced, the most
popular and frequently modified are the 302 (the 5.0L)
small-blocks. As you might suspect—just to keep things
interesting—there’s more than one version of the 5.0, the
earlier flat-tappet style and the ’85-and-later hydraulic
roller-tappet design. The difference is the roller block has
taller lifter bosses and the cam-bearing bores are bigger to
accommodate the shaft’s larger-diameter bearing journals
and base circle.
L
It may take some twisting and turning, but when the converter seats, it will do
so with a noticeable “thunk” from inside the converter. Still, the best way to check is
with a tape measure. It should be 1 inch (or as much as .050-inch less) from the front
of the transmission case to the stud pad on the converter.
With the transmission bolted to the engine, the converter should be able to move front
to rear ever so slightly (push and pull on the studs to check). Remember the oval
holes? They’re for the converter’s drain plug to stick through.
34
CHAPTER 3
Building A 1935-40 Ford
With the engine set in place, the Flaming River shafts and
U-joints were installed; with the Sanderson headers there was
room to spare. Note how the shaft runs under the oil filter. This
is typical in a ’35-40 installation.
To keep our cool, we called on one of the oldest names in the street rod radiator
business, Walker. They can supply a radiator for any ’35-40 with any engine, with and
without transmission coolers and A/C condensers.
Cooling
Components
supplied the
fan. It comes
complete with
a well–thoughtout shroud
and mounting
brackets. In
addition it moves
a ton of air.
On the right side, clearance isn’t an issue. There’s plenty of
room to run the exhaust pipe between the frame/starter/
motor mount.
In this case stock-style Ford motor mounts were used. Although
they are rather large, they cleared the Sanderson headers and
the steering shaft.
Drivetrain
Spending time at the local parts house with a cooperative counterperson should result
in finding molded radiator hoses that fit perfectly.
35
A Guide To...
Thanks to the folks at TCI, here are some things you should know about transmission installations.
Transmission Dos and Don’ts
Dos
Run your transmission with the vehicle on jack stands, so that any
maladjustments are corrected before they can cause damage.
1. Back flush cooler to prevent contamination of new
transmission and converter.
Replace the TCI-installed filter after initial use. (Race: 20
passes; Street: 500 miles) Bushings and clutches in an automatic
have a break-in that generates fiber and metallic particles.
2. If you intend to install a used converter, have it
professionally flushed and fully inspected before using it. Proper
inspection includes measuring pilot, hub, endplay, and overall
length, and comparing those to the manufacturers’ specifications.
3. Verify that the converter is property installed in the
transmission before bolting the unit into the vehicle. Refer to the
enclosed instructions.
4. Thoroughly inspect your flexplate and driveshaft before
installing the transmission. Look for bad teeth, cracks, loose or
missing balance weights, or worn yoke or universal joints. These
problems will cause vibration and other damage.
5. Always install and adjust any required TV or kick-down
cables exactly according to the instructions. Inadequate pressure
will quickly destroy your transmission. Refer to the instructions
supplied with your transmission and/or vehicle service manual.
6. Verify shifter adjustment before starting engine. Vehicle
should start in park and neutral only. Also, severe transmission
damage will occur if the unit is operated between gears. Refer to
shifter instructions or vehicle service for procedures.
7. Check that the transmission-cooler lines are not kinked or
touching the exhaust system.
8. If your transmission is equipped with a vacuum
modulator, it is very important to verify the amount of vacuum
at the modulator with a gauge. Automatic transmissions typically
need a minimum of 12 in. Hg. at idle. A throttle-position
increase should produce a quick decrease in the vacuum reading
at the modulator. Not enough vacuum will cause late, harsh
shifts. Slow response to throttle position changes (due to a
kinked or plugged line) will not property boost line pressure and
will burn up your transmission
Don’ts
1. Don’t accept your transmission from the delivery driver
until you personally inspect it for cracks, dents, or breakage.
2. Never install a converter of unknown specifications or
origin. It could be the wrong application or, if damaged, could
ruin your new transmission.
3. Don’t attempt to use a kinked metal or all-rubber hose to
connect the vacuum modulator if applicable. Proper installation
is a metal line carefully bent, with just a few inches of rubber
hose on either end for connection.
4. Never install a TV cable on a Holley carburetor without
the proper brackets. Your transmission will burn up as a result
of inadequate operating pressure. TCI carries a bracket designed
specifically for Holley carbs.
5. Never use a solid transmission mount in any circumstance.
This will cause the case to crack because it is not designed to be a
stressed member of the chassis.
6. Never install pipe plugs in the cooler fittings. A cooler
loop, in the very least, should be installed so that transmission
lubrication is not compromised.
7. Don’t use Teflon tape when installing cooler fittings into
the case or the case will crack.
8. Don’t overfill your transmission because this will foam and
aerate the fluid, causing heat and low-pressure problems. Be sure
the dipstick and tube are correct for your application.
9. Add at least 4 quarts of transmission fluid to your
transmission before starting the engine to prevent damage.
Continue filling with the engine running to the proper level.
9. Don’t use the vehicle if a problem is suspected with your
new transmission. Many times problems can be rectified while
the transmission is still in the vehicle. However if the transmission
suffers permanent damage it will need to be removed.
10. Re-torque the oil-pan bolts after installation to 13 lb-ft
to prevent leakage.
10. Do not hesitate to call TCI at (662) 224-8972 or e-mail
us if you have any questions about your new TCI transmission.
Even with the
recessed firewall,
things get a little
tight around the back
of the engine with
the fuel rails and
pressure regulator.
The crew at Hot Rods
by Dean revamped
the fuel lines to
increase clearance.
36
With the recessed
firewall, the brake
pedal sticks out
into the engine
compartment. This
is another of the
hundred items
that must have
room to operate
without running into
something else.
CHAPTER 3
Building A 1935-40 Ford
TIPS ONTRANSMISSION INSTALLATION
are for flexplates and the long are for flywheels, but don’t count
on it. You may want to cut to the chase and pick up a set of ARP
bolts; they’re top quality and less money.
Starter plates: Another unique feature of Fords is something
called a starter plate. Sandwiched between the engine and
transmission, its primary function is to properly locate the starter.
As the starter bolts to the transmission case, it is possible to
assemble the engine and transmission without the starter plate.
This causes two problems. First, it is possible for the torque
converter to go deep enough in the transmission to create a
problem with the pump—it may bind or cause excessive wear.
The other problem is that the mounting holes in the starter are
large enough to let the starter move around as it is the raised ring
on the starter motor and the hole in the plate that locates it.
Starter plates don’t come with crate engines or with any of the
aftermarket transmissions, so the best bet is to go to your local Ford
dealer. The correct starter plate for a 5.0 and an AOD is F4TZ7007-A. Don’t forget the inspection cover, F4TZ-7986-AA.
Flexplates: Ford offers a variety of small-block flexplates: which
one is used depends on a number of factors. First is the balance
of the engine. Small-block Fords are externally balanced, which
means the flexplates/flywheels have weights on them. Engines
built from 1981-on use a flexplate with a 50-in/oz balance;
earlier engines used a 28.2 in/oz balance. In addition, diameters
vary. For small-bellhousing C4 transmissions, the small-diameter
157-tooth flexplate is required, while the large-bellhousing C4
and AOD require the larger, 164-tooth flexplate.
Flexplate bolts: The proper bolts for a small-block Ford
flexplate are 7/16-20x7/8-inch. They can be found under part
number M-4216-A-300 in the Ford Racing Performance Parts
catalog. However, if you go into your local Ford dealership’s parts
department and ask for flexplate bolts, you’ll more than likely get
the wrong ones. It seems that Ford’s files have the part numbers
for flexplate bolts and the longer flywheel bolts reversed. A sharp
counterman will look at the microfiche and realize the short bolts
Ford Transmission Dimensions
Simple and sanitary, the Hot Rods by Dean guys installed a
Lokar throttle cable, bracket, and return spring. Lokar cables
are cut to the necessary length, and the ends are installed.
A
3 3/16
B
C
D
21
23 5/16
55 /16
E
19 3/8
Ford Transmission Gear Ratios
FORD
Trying to find
a factory trans
dipstick that fits in
a street rod is just
about futile—plus
they don’t look as
good as this
Lokar piece.
Drivetrain
C4
C6
AOD
AODE-W/
4R70W
Lo
2.46 2.75
2.46
2.72
2.40
2.84
2
1.46 1.57
1.46
1.54
1.47
1.55
3
1.00 1.00
1.00
1.00
1.00
1.00
0.67
0.40
4
37
A Guide To...
Driveshafts
T
he whole drivetrain is only as strong as its weakest component, so
where strength is critical, you’ll need a stout driveshaft and U-joints
to carry the load. Inland Empire Driveline Service recommends that
performance applications are always better off with a new driveshaft,
rather than a modified wrecking-yard example. New shafts are made of
stronger, straighter, and rounder material, and you can have your choice
of steel tubing, aluminum tubing, or even a composite driveshaft. Tell
them what your application is and they’ll recommend the right stuff.
The aluminum driveshafts have become very popular with both racers
and street rodders.
To order a new driveshaft, you have to make a specific, accurate
length measurement, as well as tell the shop what kind of rear axle and
transmission you’re using. With the car fully assembled, or at least with
the rear axle at ride height, measure from the tip of your transmission’s
tailshaft to the centerline of the U-joint cup on the pinion. Then measure
how far the shaft sticks out of the transmission tailshaft housing. There are
a few different kinds of yokes, so if you have a flange at either the rearend,
transmission, or both, measure from the flat surface of the flange and tell the
shop which end the flange is on and its bolt pattern. If your transmission
has a bolt-on transmission yoke (not a slip-yoke), you can measure from
the centerlines of the U-joint saddles at the trans and the rearend. Just make
sure the shop knows exactly how your measurement was taken.
If you’re in search of something trick-looking, Currie offers
aluminum housings. Along with looking good, these can cut
down on unsprung weight. They’re also available polished.
The 9-inch Ford rear axle is the standard under street rods. Here Ray Currie holds an
all-aluminum version.
It’s hard to believe, but 9-inch housings are rare enough that Currie has tooled up to
build new versions; also available is the smooth-back style that street rodders favor.
38
When building 9-inch axles there are a variety of choices in just
about every area, including axletube thickness.
CHAPTER 3
Building A 1935-40 Ford
RearEnd Recommendations From
Currie Enterprises
T
he basic 9-inch Ford rearend is adequate for strength in almost
any street rod, and there are many ring-and-pinion choices
available for whatever gearing you need, but there are sometimes other
factors to consider:
Axles: There are 28-spline and 31-spline axles for Ford rearends
(both stock and aftermarket). For high-power applications, the 31-spline
axles are superior. If you need axles for a rearend you already have, you
need to know the wheel bolt pattern, wheel stud size, axle length, spline
count, bearing size, and the diameter of the register hub on the face of
the axle (where the drum centers).
Bearings: There are several variations in Ford axle bearing sizes:
the small-bearing, large bearing, and the late-model or “Torino” bearing.
On heavy-duty applications, such as heavier vehicles or ones that will be
doing towing, the larger-bearing rearends are recommended. If you’re
ordering parts for an existing application, take the measurements of your
housing end per the drawing before calling Currie. If you’re planning a
rear disc brake conversion, check with the brake manufacturer first, since
most kits fit the Torino-size bearing.
Width: The rearend’s width is measured from one wheel-mounting
surface to the other, sometimes called “drum-to-drum.” To determine the
width if you’re ordering a new rearend, set the chassis at ride height with
the body and fenders (if used) in place. Position the real (not shop rollers)
rear tires and wheels exactly how they should sit in relation to the body and
measure inside between the mounting flanges of the two wheels.
Another Currie
creation is the
9-pluscentersection.
Stronger than the
standard Ford issue
piece, it’s a great
choice for a
street rod with
some horsepower.
Gear ratio: To find out what your “cruising” rpm will be on the
open highway, the formula is: mph x gear ratio x 336 divided by TD
(rear tire diameter). If you are running an overdrive trans (as many
do today), multiply the result by the top-gear overdrive ratio. If your
overdrive is called a “30 percent,” that means your final trans ratio is 0.70.
Thus, if you have 3.70 rearend gears, 27-inch–tall rear tires, 30-percent
OD and want to find out the projected engine speed at 70 mph (where
permitted, of course), it would go like this: (70 x 3.70 x 0.70 x 336) ÷
27 = 2,256 rpm. Gearing is always a compromise. At cruising speed, the
closer to your engine’s torque peak you run, the better the punch will
be. Lower rpms will give you better economy, but go too low and while
in overdrive on the highway you won’t have much response. A target of
2,500-2,900 rpm will be a good compromise for most cars.
Differential action: For 90 percent of the street rod world, a
stock, open-type (non-locking) differential is just fine. A step up in
traction would be the clutch-type limited-slip differential like our TSD
(torque-sensing); perfect for those who have more serious engines and
want to see two black strips when they stand on it, but without the
drawbacks of the racing-style diff. Ours does not have loaded springs in
the clutch-pack, so the differential is quiet and long-lived. For street/
strip applications a Ford “traction-lock” differential has a spring-loaded
clutch pack for heavier cars in the more “abusive” action, but also has
the characteristic tire chirp and occasional chatter (plus, the clutches
don’t last forever). Beyond these types of differentials, there are several
mechanical types that are either too noisy or even dangerous for
average street rod use.
This is the moment
of truth; the first
firing and the
small-block Roush
came to life with a
serious bark. With
fuel injection the
throttle response
is remarkable, and
drivability should
be outstanding.
The Currie 9-inch at home; note the Panhard bar, anti-rollbar,
and ShockWaves.
Drivetrain
39