1
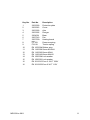
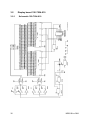
4.3.1
1.
2.
3.
4.
5.
6.
7.
8.
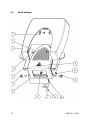
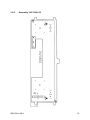
4.3.2
1.
2.
3.
4.
5.
6.
7.
8.
9.
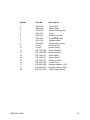
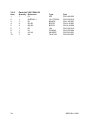
4.3.3
1.
2.
3.
4.
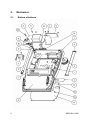
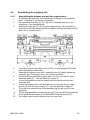
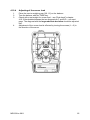
Replacing the heating board
IMPORTANT: Disconnect the device from the mains.
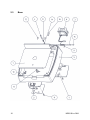
Open up the hood and remove loose parts such as the pan support, the
windshield and the protection plate (16/4.3).
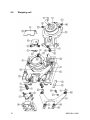
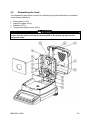
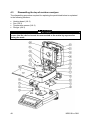
Undo the 2 socket head screws (15/4.3 / marked T on the housing) using a
no. 4
screwdriver and gently tip the top of the moisture analyzer (17/4.3)
back.
Disconnect the ribbon cable (8/4.3) and power lead (9/4.3) from the heating board
and remove the top of the moisture analyzer from the balance.
Undo the ground wire's hexagon nut (6/4.3) using the no. 7 socket wrench from
the top of the balance; make sure to leave the lock washer (5/4.3) on the top of
the balance.
Undo 2 socket head screws (7/4.3) from the heating board using the no. 0
screwdriver and 2 socket head screws (14/4.3) from the mains socket (rear
panel) using the no. 2 screwdriver.
Disconnect the plug-in contacts for the temperature sensor, radiator power
supply and fan from the heating board and remove the heating board
(1/4.3).
Replace board and reassemble in reverse order.
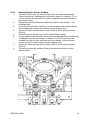
Replacing the fan
IMPORTANT: Disconnect the device from the mains.
Open up the hood and remove loose parts such as the pan support, the
windshield and the protection plate (16/4.3).
Undo the 2 socket head screws (15/4.3 / marked T on the housing) using a
no. 4 screwdriver and gently tip the top of the moisture analyzer (17/4.3) back.
Disconnect the ribbon cable (8/4.3) and power lead (9/4.3) from the
heating board (1/4.3) and remove the top of the moisture analyzer from the
balance.
Undo the ground wire's hexagon nut (6/4.3) using the no. 7 socket wrench
from the top of the balance; make sure to leave the lock washer (5/4.3) on the
top of the balance.
Undo 2 socket head screws (7/4.3) from the heating board using the no. 0
screwdriver and 2 socket head screws (14/4.3) from the mains socket (rear
panel) using the no. 2 screwdriver.
Disconnect the plug-in contacts for the temperature sensor, radiator power
supply and fan from the heating board and remove the heating board.
Remove the fan (2/4.3).
Replace fan and reassemble in reverse order.
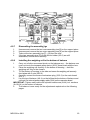
Replacing the temperature sensor
IMPORTANT: Disconnect the device from the mains.
Open up the hood and remove loose parts such as the pan support, the
windshield and the protection plate (16/4.3).
Undo the 2 socket head screws (15/4.3 / marked T on the housing) using a
no. 4 screwdriver and gently tip the top of the moisture analyzer (17/4.3) back.
Disconnect the ribbon cable (8/4.3) and power lead (9/4.3) from the heating board
(1/4.3) and remove the top of the moisture analyzer from the balance.
MRS-SH-e-0811
49