1
Model 9327
1-GHz Amplifier and
Timing Discriminator
Operating and Service Manual
Printed in U.S.A.
ORTEC® Part No. 774750
Manual Revision D
1202
Advanced Measurement Technology, Inc.
a/k/a/ ORTEC®, a subsidiary of AMETEK®, Inc.
WARRANTY
ORTEC* warrants that the items will be delivered free from defects in material or workmanship. ORTEC makes
no other warranties, express or implied, and specifically NO WARRANTY OF MERCHANTABILITY OR
FITNESS FOR A PARTICULAR PURPOSE.
ORTEC’s exclusive liability is limited to repairing or replacing at ORTEC’s option, items found by ORTEC to
be defective in workmanship or materials within one year from the date of delivery. ORTEC’s liability on any
claim of any kind, including negligence, loss, or damages arising out of, connected with, or from the performance
or breach thereof, or from the manufacture, sale, delivery, resale, repair, or use of any item or services covered
by this agreement or purchase order, shall in no case exceed the price allocable to the item or service furnished
or any part thereof that gives rise to the claim. In the event ORTEC fails to manufacture or deliver items called
for in this agreement or purchase order, ORTEC’s exclusive liability and buyer’s exclusive remedy shall be release
of the buyer from the obligation to pay the purchase price. In no event shall ORTEC be liable for special or
consequential damages.
Quality Control
Before being approved for shipment, each ORTEC instrument must pass a stringent set of quality control tests
designed to expose any flaws in materials or workmanship. Permanent records of these tests are maintained for
use in warranty repair and as a source of statistical information for design improvements.
Repair Service
If it becomes necessary to return this instrument for repair, it is essential that Customer Services be contacted in
advance of its return so that a Return Authorization Number can be assigned to the unit. Also, ORTEC must be
informed, either in writing, by telephone [(865) 482-4411] or by facsimile transmission [(865) 483-2133], of the
nature of the fault of the instrument being returned and of the model, serial, and revision ("Rev" on rear panel)
numbers. Failure to do so may cause unnecessary delays in getting the unit repaired. The ORTEC standard
procedure requires that instruments returned for repair pass the same quality control tests that are used for
new-production instruments. Instruments that are returned should be packed so that they will withstand normal
transit handling and must be shipped PREPAID via Air Parcel Post or United Parcel Service to the designated
ORTEC repair center. The address label and the package should include the Return Authorization Number
assigned. Instruments being returned that are damaged in transit due to inadequate packing will be repaired at the
sender's expense, and it will be the sender's responsibility to make claim with the shipper. Instruments not in
warranty should follow the same procedure and ORTEC will provide a quotation.
Damage in Transit
Shipments should be examined immediately upon receipt for evidence of external or concealed damage. The carrier
making delivery should be notified immediately of any such damage, since the carrier is normally liable for damage
in shipment. Packing materials, waybills, and other such documentation should be preserved in order to establish
claims. After such notification to the carrier, please notify ORTEC of the circumstances so that assistance can be
provided in making damage claims and in providing replacement equipment, if necessary.
Copyright © 2002, Advanced Measurement Technology, Inc. All rights reserved.
*ORTEC® is a registered trademark of Advanced Measurement Technology, Inc. All other trademarks used
herein are the property of their respective owners.
iii
CONTENTS
WARRANTY . . . . . . . . . . . . . . . . . . . . . . . . . . . . . . . . . . . . . . . . . . . . . . . . . . . . . . . . . . . . . . . . . . . . . . . ii
SAFETY INSTRUCTIONS AND SYMBOLS . . . . . . . . . . . . . . . . . . . . . . . . . . . . . . . . . . . . . . . . . . . . . . . iv
SAFETY WARNINGS AND CLEANING INSTRUCTIONS . . . . . . . . . . . . . . . . . . . . . . . . . . . . . . . . . . . . . v
1. DESCRIPTION . . . . . . . . . . . . . . . . . . . . . . . . . . . . . . . . . . . . . . . . . . . . . . . . . . . . . . . . . . . . . . . . . . . 1
2. SPECIFICATIONS . . . . . . . . . . . . . . . . . . . . . . . . . . . . . . . . . . . . . . . . . . . . . . . . . . . . . . . . . . . . . . . .
2.1. PERFORMANCE . . . . . . . . . . . . . . . . . . . . . . . . . . . . . . . . . . . . . . . . . . . . . . . . . . . . . . . . . . . . .
2.2. INPUTS AND OUTPUTS . . . . . . . . . . . . . . . . . . . . . . . . . . . . . . . . . . . . . . . . . . . . . . . . . . . . . . .
2.3. CONTROLS AND INDICATORS . . . . . . . . . . . . . . . . . . . . . . . . . . . . . . . . . . . . . . . . . . . . . . . . .
2.4. ELECTRICAL AND MECHANICAL . . . . . . . . . . . . . . . . . . . . . . . . . . . . . . . . . . . . . . . . . . . . . . . .
2.5. ORDERING INFORMATION . . . . . . . . . . . . . . . . . . . . . . . . . . . . . . . . . . . . . . . . . . . . . . . . . . . .
3
3
3
4
4
4
3. INSTALLATION AND OPERATION . . . . . . . . . . . . . . . . . . . . . . . . . . . . . . . . . . . . . . . . . . . . . . . . . . .
3.1. GENERAL . . . . . . . . . . . . . . . . . . . . . . . . . . . . . . . . . . . . . . . . . . . . . . . . . . . . . . . . . . . . . . . . . .
3.2. CONNECTION TO POWER . . . . . . . . . . . . . . . . . . . . . . . . . . . . . . . . . . . . . . . . . . . . . . . . . . . . .
3.3. INPUT CONNECTIONS . . . . . . . . . . . . . . . . . . . . . . . . . . . . . . . . . . . . . . . . . . . . . . . . . . . . . . . .
3.4. OUTPUT CONNECTIONS . . . . . . . . . . . . . . . . . . . . . . . . . . . . . . . . . . . . . . . . . . . . . . . . . . . . . .
3.5. ADJUSTING THE INPUT SIGNAL . . . . . . . . . . . . . . . . . . . . . . . . . . . . . . . . . . . . . . . . . . . . . . . .
3.6. THRESHOLD ADJUSTMENT . . . . . . . . . . . . . . . . . . . . . . . . . . . . . . . . . . . . . . . . . . . . . . . . . . .
3.7. WALK AND WALK ADJUSTMENT . . . . . . . . . . . . . . . . . . . . . . . . . . . . . . . . . . . . . . . . . . . . . . .
3.8. INPUT RANGE SELECTION . . . . . . . . . . . . . . . . . . . . . . . . . . . . . . . . . . . . . . . . . . . . . . . . . . . .
5
5
5
5
5
6
6
6
7
4. MAINTENANCE AND FACTORY REPAIR SERVICE . . . . . . . . . . . . . . . . . . . . . . . . . . . . . . . . . . . . . . 8
5. POWER CONNECTOR PINOUT . . . . . . . . . . . . . . . . . . . . . . . . . . . . . . . . . . . . . . . . . . . . . . . . . . . . . 8
iv
SAFETY INSTRUCTIONS AND SYMBOLS
This manual contains up to three levels of safety instructions that must be observed in order to avoid
personal injury and/or damage to equipment or other property. These are:
DANGER
Indicates a hazard that could result in death or serious bodily harm if the safety instruction is
not observed.
WARNING
Indicates a hazard that could result in bodily harm if the safety instruction is not observed.
CAUTION
Indicates a hazard that could result in property damage if the safety instruction is not
observed.
Please read all safety instructions carefully and make sure you understand them fully before attempting to
use this product.
In addition, the following symbol may appear on the product:
ATTENTION – Refer to Manual
DANGER – High Voltage
Please read all safety instructions carefully and make sure you understand them fully before attempting to
use this product.
v
SAFETY WARNINGS AND CLEANING INSTRUCTIONS
DANGER
Opening the cover of this instrument is likely to expose dangerous voltages. Disconnect the
instrument from all voltage sources while it is being opened.
WARNING Using this instrument in a manner not specified by the manufacturer may impair the
protection provided by the instrument.
Cleaning Instructions
To clean the instrument exterior:
! Unplug the instrument from the ac power supply.
! Remove loose dust on the outside of the instrument with a lint-free cloth.
! Remove remaining dirt with a lint-free cloth dampened in a general-purpose detergent and water
solution. Do not use abrasive cleaners.
CAUTION To prevent moisture inside of the instrument during external cleaning, use only enough liquid
to dampen the cloth or applicator.
!
Allow the instrument to dry completely before reconnecting it to the power source.
vi
1
ORTEC MODEL 9327
1-GHz AMPLIFIER AND TIMING DISCRIMINATOR
C
For picosecond timing with mV signals from
Microchannel plate detectors
Microchannel plate PMTs
Fast photodiodes
Fast photomultiplier tubes
C
C
C
C
C
C
C
1-GHz Amplifier and Timing Discriminator are internally matched for minimum walk and timing jitter
Walk typically <±40 ps over the top 90% of full scale.
Jitter <20 ps FWHM at 50% of full scale
Optimized for pulse widths from 250 ps to 1 ns; accepts pulse widths up to 5 ns
Selectable input pulse height range: 0 to -30 mV, or 0 to -150 mV full scale
2:1 Fine Gain control
Over-Range LED for precise gain adjustment without an oscilloscope
1. DESCRIPTION
The Model 9327 1-GHz Amplifier and Timing
Discriminator combines into one compact
preamplifier-sized package the two functions
normally needed for picosecond timing with ultraf ast
detectors.
It
is
ideal
for
F l uorescence/ Phosphoresce n c e Li f et i m e
Spectrometry (Fig. 1.1), Time-of-Flight Mass
Spectrometry (Fig. 1.2), and LIDAR applications.
The Model 9327 is optimized for use with the
millivolt signals produced by microchannel plate
detectors, microchannel plate photomultiplier tubes,
fast photodiodes, and fast, discrete-dynode
photomultiplier tubes. The compact package avoids
degradation of the sub-nanosecond signals from
these detectors by enabling an exceptionally short
cable connection between the detector and the
amplifier. The timing discriminator output logic pulse
can be transmitted over much longer cables to the
rest of the time spectrometer without compromising
the picosecond time resolution.
The amplifier provides a 1-GHz bandwidth to
minimize the noise and rise time contributions to
timing jitter on detector pulses having widths as
narrow as 250 ps. The 50- amplifier input includes
diode clamps to protect against overload pulses. A
PC-board-mounted jumper controls the coarse gain
to yield two ranges for full-scale input pulse
S
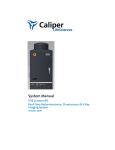
Fig. 1.1. Typical Block Diagram for a Fluoresence Lifetime Spectrometer (with reversed start/stop assignments).
2
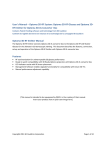
Fig. 1.2. The Model 9327 in a Simplified Illustration of a Time-of-Flight Mass Spectrometer.
The Model 9308 picosecond TIME ANALYZER functions as a multiple-stop time spectrometer.
amplitudes: 0 to -30 mV and 0 to -150 mV. A fine
gain control permits varying the gain over nominally
a 2:1 range. An oscilloscope is not needed to adjust
the gain, because an over-range LED indicates
when pulse amplitudes have exceeded the full-scale
limit of the amplifier. Detector and/or amplifier gain
can be increased until the over-range LED turns on,
and then decreased until the LED just turns off. This
ensures that the pulses utilize all of the amplifier’s
linear range.
The timing discriminator employs a zero-crossing
technique that processes pulse widths from 250 ps
to 5 ns without the need to adjust pulse-shaping
cables. The zero-crossing technique results in
minimal timing jitter and walk as a function of pulse
amplitude. It is optimized for sub-nanosecond pulse
widths, but will accommodate pulses up to 5 ns
wide. The shift in the timing output (walk) as a
function of pulse amplitude is typically less than ±40
ps over the top 90% of full scale when employing a
300-ps input pulse width (Fig. 1.3). The typical
contribution of the 9327 to timing jitter is illustrated
in Figure 1.4. With such a small contribution from
the 9327, the detector normally becomes the
dominant source of timing jitter. The Model 9327
includes a noise discriminator adjustable over a
major fraction of full scale. With the source of
detector events turned off, the discriminator
threshold can be adjusted until the associated LED
is turned on by triggering on noise. Subsequently,
the threshold is adjusted until the LED just turns off,
thus ensuring that the discriminator will not trigger
on noise.
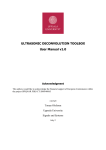
Fig. 1.4. Timing Jitter vs. Pulse Amplitude.
Fig. 1.3. Typical Walk vs. Pulse Amplitude.
Full scale is denoted by the Over Range LED turning on.
Measured with a pulse width of 300 ps FWHM.
Measured with the system in Fig. 1 by replacing the detectors
with a pulser having a pulse width of 300 ps FWHM. Full scale
is denoted by the Over Range LED turning on.
3
The Model 9327 provides two fast-negative NIM
logic signals suitable for operating other timing
instruments with picosecond time resolution. A 100ns wide TTL output is also provided for counting
applications. In addition to excelling in highresolution time spectrometry, the Model 9327 can
be used for single-photon and single-ion counting
applications.
A 3-meter long captive power cord terminated in a
9-pin, D connector supplies power to the unit. Power
can be derived from the mating connectors on a
9308 or 9328 picosecond TIME ANALYZER, a
4002P Portable Power Supply, a 4003 Preamp
Power Output module, or any ORTEC spectroscopy
amplifier. Alternatively, a dc power source in the
range of +12 to +15 V at 350 mA can be connected
to the designated pins on the power connector.
2. SPECIFICATIONS1
2.1. PERFORMANCE
Performance is measured on the 0 to -30 mV input
range unless specified otherwise.
INPUT RANGE 0 to -30 mV (full scale) or 0 to -150
mV (full scale), selectable via a circuit board
jumper.
EQUIVALENT INPUT NOISE <100 µV rms on the
0 to -30 mV range.
TIME SLEWING (Walk) Typically <±40 ps shift in
the timing output as a function of pulse amplitude
over the top 90% of full scale. Includes the
contribution of both the amplifier and the timing
discriminator. Measured with an input pulse width
of 300 ps FWHM.
TIMING JITTER <20 ps FWHM for a pulse
amplitude at 50% of full scale. Measured with the
same pulse shape listed under TIME SLEWING.
PULSE-PAIR RESOLUTION <10 ns at the fastnegative NIM outputs.
OPERATING TEMPERATURE RANGE 0 TO
50°C.
TRANSMISSION DELAY TEMPERATURE
SENSITIVITY <±10 ps/°C from 0 to 50°C.
Measured at 50% of full scale with the pulse shape
listed under TIME SLEWING.
2.2. INPUTS AND OUTPUTS
Input (Amplifier) Rear-panel SMA connector for
negative input pulses. Accepts pulse widths from
250 ps to 5 ns FWHM. Optimized for sub1
Subject to change without notice.
nanosecond pulse widths. Input range is jumper
selectable for 0 to -30 mV or 0 to -150 mV. Input
impedance: 50 ac, <1000 dc to ground. Diode
clamps provide protection against overload to
±2 V dc, or ±10 V for a 50-ns-wide pulse at a duty
cycle <1%.
S
S
AMP OUT Rear-panel SMA test point suitable for
oscilloscope monitoring via a 50- coaxial cable
terminated in 50 . Test point output impedance:
. The amplifier drives the timing
1000
discriminator input in parallel with the output
monitor via an internal connection.
S
S
S
NIM OUT Front- and rear-panel BNC connectors
provide two independent, fast-negative NIM output
logic pulses. Output amplitude is nominally
-800 mV into a 50- load. Pulse width is nominally
4 ns.
S
TTL OUT Rear-panel BNC connector provides a
positive TTL pulse, triggered by the fast-negative
NIM output. The 100-ns width of the TTL pulse is
non-updating. Output impedance: <50 , shortcircuit protected.
S
THRESH Front-panel test-point jack near the
THRESH control permits monitoring of the
threshold setting with a voltmeter for resettability.
Output impedance is 1000 . Nominal output range
is -10 mV to -1 V.
S
WALK Front-panel test-point jack near the WALK
adjustment for monitoring the walk (time slewing)
adjustment. See WALK under Controls and
Indicators.
GND Front-panel test-point jack for connecting the
ground lead of a voltmeter.
4
2.3. CONTROLS AND INDICATORS
INPUT RANGE (Coarse Gain) Circuit board
jumper near the amplifier INPUT permits input
range selection for 0 to -30 mV or 0 to -150 mV.
FINE GAIN Front-panel, 15-turn screwdriver
adjustment to calibrate the full-scale sensitivity.
Can be used as a fine gain control with
approximately a 2:1 range of gain adjustment.
THRESH Front-panel, 15-turn screwdriver
adjustment to set the input discriminator threshold.
Adjustable from <2% to >50% of full scale.
THRESH test-point jack permits monitoring the
setting with a voltmeter.
WALK Front-panel, 15-turn, screwdriver fine
tuning to minimize time slewing as a function of
input pulse amplitude. Adjustable over a range of
approximately ±150 mV. A WALK test jack permits
monitoring the setting through an output
impedance <100 .
S
OUTPUT LED Front-panel LED flashes on each
output pulse to indicate active triggering. Used to
set the threshold beyond the noise level.
preamplifier power connector. This connector is
compatible with the preamplifier power connectors
on ORTEC Models 9328, 9308, 4003, 4002P, or
most ORTEC spectroscopy amplifiers. Power
required is +12 to +15 V at 350 mA (Pin 4) and
Ground (Pins 1 and 2).
WEIGHT
Net 0.48 kg (1.1 lb).
Shipping 1.1 kg (2.5 lb).
DIMENSIONS Approximately 3.3 x 12.5 x 13.5 cm
(1.3 x 4.9 x 5.3 in.).
MISCELLANEOUS Meets EEC standards (CE) for
emissions, susceptibility, and power.
2.5. ORDERING INFORMATION
To order, specify:
Model
Description
9327
1-GHz Amplifier and Timing
Discriminator
Suggested Cable Accessories:
S
OVER RANGE LED Front-panel LED flashes on
each preamplifier pulse that has an amplitude
exceeding full scale. Used during detector gain
adjustment to avoid overloads while maximizing
pulse amplitudes.
SMA58-0.15
RG58U (50- ) Coaxial
Cable with SMA connectors,
0.15-m length
SMA/BNC
SMA to BNC Adapter with
male SMA and female BNC
PWR LED Front-panel LED indicates when power
is being supplied to the unit.
BNC/SMA
BNC to SMA Adapter with
male BNC and female SMA
C-25-12
RG58A/U (50- ) Coaxial
Cable with BNC connectors,
3.7-m (12-ft) length
2.4. ELECTRICAL AND MECHANICAL
POWER REQUIREMENTS The Model 9327
derives its power through a 3-meter long (9-ft.)
captive power cable terminated with a 9-pin D,
S
5
3. INSTALLATION AND OPERATION
3.1. GENERAL
3.4. OUTPUT CONNECTIONS
The 9327 is packaged in a compact case, allowing
it to be placed close to the signal source (such as
a detector). Short input cables will minimize the
signal losses and pickup.
There are four outputs on the Model 9327: two fastnegative NIM logic outputs, one TTL output, and
one amplifier output.
Local voltage regulation within the 9327 allows
flexibility in the supply voltage, which must be
supplied via the 9-pin cable. The unit may be
powered from standard ORTEC preamp power
jacks, or may be supplied from a separate supply
in the +12-V to +15-V range.
3.2. CONNECTION TO POWER
The 9327 uses dc to dc converters, which draw a
current surge on powerup, and more current as the
supply voltage drops. To minimize current limit
problems in the power source, there is a small
delay after application of power to the 9327 before
full power operation of the 9327.
3.3. INPUT CONNECTIONS
The 9327 is designed for use with sub-nanosecond
input pulses. To maintain good input matching and
preserve pulse bandwidth, it is recommended that
the inputs be connected using SMA connectors and
short 50- coax cable.
S
An input protection network is provided on the
9327. Small (<100 mV) dc biases are acceptable,
but large dc offsets will destroy the protection
network. Large transients may damage the
amplifier inputs.
The unit is designed and optimized to work with
sub-nanosecond, negative-going-input pulses. The
9327 will process wider input pulses with degraded
performance.
CAUTION
Ensure that the cable is discharged to ground
before connecting to the 9327 input. The unit can
be damaged if coax cables with high-voltage
charges are hooked to the input. Leakage currents
from detectors operating at high voltages could
charge up coax cables. After the input is
connected, the 9327 input protection network will
prevent high-voltage buildup.
FAST NIM Outputs The two FAST NIM outputs
are intended for precise timing applications with a
Time Analyzer (such as the ORTEC 9308) or a
Time-to-Amplitude Converter (TAC) such as the
ORTEC Models 457, 566, or 567. Each of these two
outputs generates a current pulse, with a width of 4
ns to 5 ns, and an amplitude of approximately -16
mA. The leading edge of the output pulse precisely
marks the time of arrival of the detector pulse at the
input to the 9327. The FAST NIM outputs are
intended to drive a 50- cable terminated in 50
at the remote end of the cable. Thus, these two
outputs produce pulses of nominally -800 mV
cable. The
amplitude on a terminated 50
quiescent level between pulses is nominally 0 V.
Most Time Analyzers and TACs provide the 50termination internally at their inputs. A 50- cable
with BNC connectors can be used to connect the
FAST NIM outputs to either the START or STOP
input of the Time Analyzer. Normally, the length of
this cable is not critical. When driven by a noisefree sub-nanosecond pulser, the 9327 is capable of
a time resolution of <15-ps FWHM (Full Width at
Half Maximum peak height). Consequently, most of
the contribution to the time resolution comes from
timing jitter or noise in the detector connected to the
9327 input.
S
S
S
S
S
TTL Output The third output provides a positive
TTL logic pulse with a width of approximately 100
ns. This output is useful for driving slower
instruments such as counters and ratemeters.
Either 50- or 93- cables with BNC connectors
can be used with the TTL output. The TTL output is
triggered from the FAST NIM outputs, and it flashes
the output LED when active.
S
S
S
AMPLIFIER Output When connected to a 50load via 50cables, this output allows the
amplifier output to be observed with approximately
21:1 voltage attenuation. It can be used for
diagnostics, amplitude monitoring, observing
distortion, etc.
S
6
3.5. ADJUSTING THE INPUT SIGNAL
The OVER RANGE indicator has been provided to
assist the user in adjusting the operating
conditions. Maximum dynamic range is available
when signal amplitudes and gains are such that the
OVER RANGE indicator occasionally flickers.
Controls within the 9327 include the Coarse Gain
jumper, and the Fine Gain adjustment. The coarse
gain jumper changes the discriminator input levels
by about 6:1. The Fine Gain adjustment changes
the amplifier gain over typically a 2:1 range.
Detector operating conditions or external
attenuations prior to the 9327 input will also allow
the input signal level to be adjusted. Any external
attenuators must have sufficient bandwidth to
preserve the risetime of the signal.
3.6. THRESHOLD ADJUSTMENT
A 15-turn threshold adjustment controls the
amplitude threshold for accepting input pulses that
are allowed to produce a timing output.
The adjustment range is -10 mV to -1 mV,
representing the signal level at the amplifier
output/discriminator input. The corresponding level
at the amplifier input/detector output is scaled
down by the amplifier gain, which depends on the
Coarse Gain jumper setting, Fine Gain adjustment,
and pulse width.
Initial Adjustment to Reject Noise The
THRESHOLD control is typically used to prevent
the Model 9327 from triggering on low-level noise.
The simplest way to adjust this control is to turn off
the supply of photons or ions to the detector, while
leaving the detector in its normal operating
condition. Subsequently, the THRESHOLD
adjustment is turned clockwise until the OUTPUT
indicator glows brightly. Under this condition the
9327 is triggering on noise. Next, the THRESHOLD
adjustment is turned counter-clockwise until the
OUTPUT indicator turns off. The threshold setting
will now be just above the noise.
Raising the Threshold for Improved Time
Resolution When the source of photons or ions
is turned on, it may be desirable to raise the
THRESHOLD above the value set in the previous
paragraph. The smallest pulse amplitudes from the
detector have inherently greater timing jitter.
Consequently, the time resolution with any detector
can be improved by rejecting the lower amplitude
pulses. The best way to make this additional
adjustment of the THRESHOLD is to record
resolution (FWHM) of the entire system, along with
throughput (counts/second) as a function of the
threshold setting. Pick the threshold setting that
provides the best trade-off for the application.
3.7. WALK AND WALK ADJUSTMENT
Walk is the amplitude dependance of the system
propagation delay. Walk can be a critical parameter
in experiments which require accurate timing
despite substantial fluctuations in the input signal
amplitude.
The walk adjustment has the greatest effect on the
lowest 10-20% of the input range.
Function and Effect When the WALK is properly
adjusted to match the characteristics of the signal
from the detector, there will be minimal systematic
bias in marking the arrival time of smaller pulses
vs. larger pulses. If the WALK is adjusted too far in
the positive voltage direction, discriminator delay
will increase as the signal gets smaller. If the walk
is set too far negative, then the discriminator
speeds up as the signals get smaller (for very small
signals).
Underlying Causes of Walk In addition to
dispersion already present at the 9327 input, there
are three major sources of walk within the 9327:
(1) Comparator gain-bandwidth limitations;
(2) Amplifier distortion causing pulse shape
changes;
(3) Comparator propagation delay dispersion as a
function of overdrive level.
The walk adjustment compensates for the first
source. The comparator requires some Volt*Second
product over threshold in order that its output
switch. When signals are very small and just barely
cross the comparison threshold, the comparator
propagation delay increases slightly, giving rise to
walk. The walk adjustment introduces an offset
voltage at the comparator input, causing the
comparison to be made a few millivolts sooner
(when the test-point value is negative). This offset
has minimal effect on large signals, but speeds up
the trigger on small signals, thereby counteracting
the gain-bandwidth delays. The optimum setting for
walk performance for the 9327 is typically around
-20 mV (measured at the test point), but will vary
from unit to unit as a function of the variations in
comparator offsets.
7
The amplifier’s distortion contribution to walk is
minimized by operating with signals and gain that
only occasionally cause amplifier overload.
The low gain range (nominally 0 to -150 mV)
attenuates the signal via R50 by placing the jumper
between stake pins SP3 and SP4.
The third source of walk is related to the first
source, but also seems to be related to recovery
from saturation conditions associated with solid
output switching. This source is the dominant driver
in the walk performance of the 9327 for most
usable signal levels. This component of walk is
more prevalent when processing very narrow
pulses, since there is very little time between the
saturated output condition prior to pulse arrival and
the time where the comparator must respond to the
pick-off comparison. Hence, walk performance for
very narrow pulses is more difficult to achieve than
one might expect.
To check or change the jumper setting, the board
must be slid out of the case. Three screws must be
removed to slide the board out: next to the GND
test point; to the left of the TTL output; and to the
right of the INPUT. Pull the board out by pulling on
the end panel that incorporates the captive power
cord.
Walk and Jitter as a Function of Walk Setting
Jitter and walk are not usually optimized at the
same walk setting. Walk is usually optimized at a
slightly negative setting (e.g., -20 mV), while the
best jitter typically occurs at a slightly positive walk
setting.
3.8. INPUT RANGE SELECTION
Two gain ranges are available in the amplifier,
nominally providing either 0 to -30 mV input range
or 0 to -150 mV input range.
The high gain range (nominally 0 to -30 mV)
bypasses an attenuation resistor (R50) by placing
the jumper between stake pins SP1 and SP2, as
shown in Figure 3.1.
Fig. 3.1. Coarse Gain Jumper.
8
4. MAINTENANCE AND FACTORY REPAIR SERVICE
No regular maintenance is required for the Model
9327 other than removal of dust and tightening of
mechanical connections.
The Return Authorization Number should be written
on the address label, the outside of the package,
and on the explanatory letter enclosed with the unit.
A multitude of packages flow into the Receiving
Department at ORTEC each day. Consequently, the
Return Authorization Number is critical to ensure
that your package will be promptly routed to the
Customer Service Department.
In the unlikely event of instrument failure, this unit
can be returned to the ORTEC factory for service
and repair at a nominal cost. Our standard
procedure for repair ensures the same quality
control and checkout that are used for a new
instrument. Always contact ORTEC Customer
Service (800) 251-9750 or (865) 482-4411, before
sending an instrument for repair to obtain shipping
instructions and so that the required Return
Authorization Number can be assigned to the unit.
After inspecting your unit, the Customer Service
Department will contact you regarding the
necessary repairs and the expected cost.
5. POWER CONNECTOR PINOUT
The power cable of the 9327 is compatible with the ORTEC standard preamp power outputs:
9327 Usage
Standard Preamp Power
PIN
FUNCTION
PIN
FUNCTION
1
2
3
4
5
6
7
8
9
Ground
Ground
Reserved
+12 to +15 V
Reserved
Reserved
Reserved
Reserved
Reserved
1
2
3
4
5
6
7
8
9
Ground
Ground
+6 V
+12 V
-6V
-24 V
+24 V
Reserved
-12 V