1
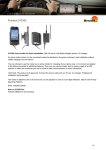
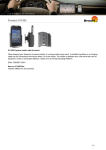
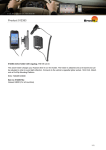
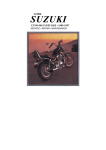
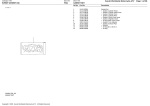
Do-It-Yourself
Suzuki SV650
Carburetor Rejetting
by MickK
Rev. 1.2 2005
http://www.svdownunder.com/
Firstly, please refrain from posting these notes to any other website because some of the text and pictures
contained within have been plagiarized from material available on the internet which I haven't sought
permission to use (as yet).
To view the sources used to create these notes (including the plagiarized material), see References.
I have no problem with you printing out a copy for yourself or linking to these notes from my site, just don't provide
a “local” copy on another website please. This way, I can maintain some control over the updates and if asked to
remove something (like a plagiarized picture), it will be an easy process.
I would like to say upfront that I'm no motorcycle expert and that I compiled these notes for my own personal use
and knowledge when working on my own motorcycle. If others find them useful, I'm glad they can be of use. I'm
also happy to consider any revisions, corrections or additions to these notes and I can be contacted through the
SVDownUnder website as MickK.
Table of Contents
Introduction....................................................................................................................................................5
Throttle Position.............................................................................................................................................5
Carburetor Parts Effected by Throttle Postion.......................................................................................... 5
Rejetting......................................................................................................................................................... 6
Step 1 – Initial Test Ride...........................................................................................................................6
Stock Power Tests................................................................................................................................ 6
Stock Australian 99-02 SV650 Setup...................................................................................................6
Step 2 - Install your Exhaust System and Air Filter..................................................................................7
Exhaust Systems................................................................................................................................... 7
Air Filters..............................................................................................................................................7
Air filter flow rates from highest to lowest......................................................................................7
Desnorkelling your filter (aka Snorkelectomy)............................................................................... 7
Raising the tank & removing the foam............................................................................................8
Fuel....................................................................................................................................................... 8
Common Petrol abbreviations......................................................................................................... 8
Simplified table of common fuels available in Australia................................................................ 8
Step 3 - Select the Main Jet that gives you the best top end power.......................................................... 9
How to remove the carburetors............................................................................................................ 9
General starting points for Main Jet sizes............................................................................................ 9
Mikuni and Dynojet Main Jets........................................................................................................... 10
Main Jet Selection Methods............................................................................................................... 10
Top End Power Test (Full Throttle)................................................................................................... 10
Step 4 - Set the Jet Needle Clip Position that gives you the best mid range power................................11
Jet Needle Taper................................................................................................................................. 11
Mid Range Power Test (Full Throttle)............................................................................................... 12
Mid Range Power Test (1/4 - 3/4 Throttle)........................................................................................ 12
Mid Range Power Test (1/8 to 1/4 Throttle)...................................................................................... 12
Shimming the Jet Needle (fine tuning your Jet Needle clip setting).................................................. 12
Drilling the Slide Holes...................................................................................................................... 13
Drill Bit Chart................................................................................................................................ 13
Step 5 - Set the Fuel Float Height that gives you the best low end power..............................................14
Setting the Fuel Float Height..............................................................................................................14
Making your own Float Height Adjument Tool............................................................................ 14
Float Level Adjustment................................................................................................................. 15
Low End Power Test (Full Throttle).................................................................................................. 15
Step 6 - Synchronise the Carburetors......................................................................................................16
Adjusting the Carburetor.................................................................................................................... 16
Step 7 - Set the Air Mixture Screws that gives you the best cruising throttle control............................ 17
Additional Cooling............................................................................................................................. 17
Pilot Screw Adjusting Tools...............................................................................................................17
Air Mixture Screw Adjustment Methods........................................................................................... 18
Relationship Diagrams.................................................................................................................................19
Throttle Operation................................................................................................................................... 19
0 – 1/8th Throttle Operation....................................................................................................................20
Full Throttle Operation............................................................................................................................21
Test Result Forms ....................................................................................................................................... 22
Main Jet Roll-Off Tests...........................................................................................................................22
Main Jet Full Throttle Tests.................................................................................................................... 22
Jet Needle Full Throttle Tests................................................................................................................. 22
Jet Needle 1/4 – 3/4 Throttle Tests..........................................................................................................22
Jet Needle 1/8 – 1/4 Throttle Tests..........................................................................................................22
Float Height Full Throttle Tests.............................................................................................................. 23
Air Mixture Screw Settings.....................................................................................................................23
Exploded view of Mikuni BDSR39 Carburetor...........................................................................................24
Carburetor Jet Kits....................................................................................................................................... 25
FactoryPro Stage 1 (CRB-S36-1.0 Config 10) Carb Kit.........................................................................25
FactoryPro Stage 2 (CRB-S36-2.0-APK Config 20) Carb Kit............................................................... 25
DynoJet Stage 1 (3171) Carb Kit............................................................................................................ 25
TroubleShooting.......................................................................................................................................... 26
References....................................................................................................................................................27
Introduction
The basis of these notes have come from a series of website printouts I obtained over the last couple of years in
my effort to understand how the Mikuni BDSR39 carburetors work on my Suzuki SV650. From these printouts, I've
produced this document aimed at rejetting the SV carburetors yourself rather than taking your bike to a dyno shop
and getting it done for you. While a dyno shop will probably produce a more accurate torque/power curve, the DIY
wrench monkey will be satisfied in the knowledge that he/she has done it themselves and in doing so, has learned
more about their bike as a result. Be aware that rejetting your bike on a dyno normally takes 1 – 2 days, however,
doing it yourself is going to take much longer due to the number of times you have to strip down and rebuild your
bike for the road tests. To makes things simpler and help you get it right, I've divided the rejetting procedure into
steps which need to be completed in sequence or you'll simply compound any problems that you may come across
in a later process.
Throttle Position
Remember, jetting is all about the throttle position, not the engine speed (although they are somewhat related).
Also be aware that carburetion is effected by altitude, temperature, humidity and air density so try to complete the
rejetting under similar conditions. If you can't, allow some latitude when comparing some of your end results.
Carburetor Parts Effected by Throttle Postion
Mikuni Carburetor (not BDSR39)
Marking the throttle will make tuning easier and your on-road tests a whole lot safer (less time being distracted by
the “small” stuff). It also helps to take most of the guess work out of the tests and makes your results much more
consistent.
Use a felt tip pen to mark the following positions on some white/coloured tape wrapped around the throttle grip:
Closed, 1/8, 1/4, 1/2, 3/4, 7/8, Full
Example:
Rejetting
Step 1 – Initial Test Ride
Before doing anything else, read through this document to get a basic understanding of what it is you're trying to
achieve by rejetting, then warm up your bike and take it for a test ride to get a feel for it's current setup. Although
this is a very subjective test, the knowledge gained by taking your bike for a test ride can be used as a basis to
gauge any changes you make to your carburetor.
Stock Power Tests
Your initial test ride should include the following tests:
Top End Power Test - do a couple of 4th gear full throttle runs from 6500 rpm to Redline.
Mid Range Power Test - do a couple of 3th gear full throttle runs from 4000 - 6000 rpm.
Low End Power Test - do a couple of 2nd gear full throttle runs from 1500 - 3500 rpm.
Cruising Test - do a couple of 2nd, 3rd and 4th gear 1/8th throttle runs at 2500, 5000 and 7500 rpm respectively.
If you experience any flat spots or hesitation in acceleration or any lean surging, take note of it. Hopefully, after the
rejet is completed, you'll have removed these problems and have smooth throttle response throughout the entire
throttle range.
Stock Australian 99-02 SV650 Setup
Mains: Mikuni 137.5
Pilots: Mikuni 17.5
Jet Needle: Mikuni #13383-20F30
Clip Setting: 3rd notch
Shim: Nil
Slide Hole: 1.0 mm
Air Screw: 2.5 turns out
Fuel Float Height: 7.0 mm
Idle: 1300 rpm
Airfilter: Suzuki
Tankrisers: Nil
Fuel: Regular ULP (91 RON)
Exhaust: Suzuki
Step 2 - Install your Exhaust System and Air Filter
Carburetor settings are greatly effected by any changes to your exhaust system and your air filter, and somewhat
by the type of fuel used. Before rejetting, install any aftermarket exhausts and air filters and fill up the tank with the
grade of fuel you intend using.
Exhaust Systems
Changing exhaust systems is usually the primary reason for considering a rejet. Almost all aftermarket exhaust
systems (including slip-ons) are less restricted than the stock Suzuki exhaust so you'll need to go up at least one
Main Jet size to compensate for the better flow. If you install an aftermarket twin/dual exhaust system in place of
the single stock exhaust, you may even need to go up at least two sizes from the stock settings. Having a better
flowing exhaust changes the power curve so you may need to adjust other carburetor settings as well, not just the
Main Jet size.
Air Filters
The air filter has the greatest effect on carburetor tuning. Any changes to the airflow will require a change in your
carburetor settings. Some aftermarket air filters flow better than the stock Suzuki one, so you will have to adjust
your carburation to allow for this. The induction hole size has the greatest effect on the filters flow capacity. There
are several different types of aftermarket air filters and several mods that can be done to the stock and aftermarket
filters to make them flow better. Here is an example of a BMC 205/10 Street Filter that has been “modified”:
Notice the six additional 1” holes that have been drilled and recessed into the top of the BMC filter. They allow the
filter to breathe slightly easier. Individual holes can then be covered/uncovered using race tape to compensate for
changes in altitude, ambient temperature, fuel type etc.
Air filter flow rates from highest to lowest
•
Pods
•
BMC Race Filter
•
Desnorkeled Stock Suzuki Filter
•
Desnorkeled BMC Street Filter
•
New K&N Filter / Modified BMC Street Filter
•
Stock Suzuki Filter
•
BMC Street Filter / Pre-2002 K&N Filter
Desnorkelling your filter (aka Snorkelectomy)
Desnorkeled Filters are standard filters that have been modified by removing the snorkel and the top of the air filter.
In effect, they become “open top” filters and air flow is improved quite significantly over the standard filter and
converting your standard filter to an “open top” filter usually requires a big jump in the Main Jet size (can be an
increase up to 10 sizes). See John Callahan's http://www.geocities.com/catpoopman/sv650_snorkel.html
notes for a very good detailed explanation (with pictures) on how to perform a snorkelectomy on your stock Suzuki
air filter.
Raising the tank & removing the foam
Because of the way the SV650 airbox opening is located up under the tank, some owners like myself have modified
their bikes slightly so the airbox breathes a little better. This is done by removing the sound deadening foam from
under the tank and raising the tank up slightly through the use of spacers. This mod is very easy and will benefit all
types of air filters. As you can see in the picture below (right tank mounting bolt), I used 10 mm rubber feet for
spacers and drilled the center hole slightly larger to accommodate the stock bolts. I do not recommend using
spacers bigger than 20 mm or it will lift the tank up too high (looks unsightly then).
Spacer
Fuel
The type of fuel you intend using is important to jetting because different types of fuel have different densities, as
well as, different additives so they all burn at different rates. Essentially, the higher the density, the slower the
burn, the richer the fuel. Suzuki recommends the SV650 use an unleaded petrol with a rating of 91 RON or better.
Common Petrol abbreviations
HOULP - High Octane Unleaded Petrol (98+ RON)
PULP - Premium Unleaded Petrol (95+ RON)
ULP - Regular Unleaded Petrol (91+ RON)
LRP - Lead Replacement Petrol (96+ RON)
Simplified table of common fuels available in Australia
NAME
COLOUR
OCTANE
DENSITY
(kg/L)
BENZENE
(%vol)
SULPHUR
(mg/kg)
PHOSPHOROUS
(mg/kg)
CALTEX/AMPOL
Vortex 98
Vortex Gold
Unleaded
LRP
Pale Yellow
Pale Yellow
Purple
Red
98+
95+
91+
< 96
0.74-0.785
0.75
0.74
0.75
<
<
<
<
?
< 150
< 500
< 500
?
0
0
1.8
MOBIL
Synergy 8000
Synergy 6000
Synergy 2000
LRP
Yellow
Yellow
Blue
Red
98+
95+
91+
96+
0.74-0.785
?
0.78
0.74
< 4
?
< 5
< 5
?
?
?
?
0
0
0
?
SHELL
Optimax
Premium
Unleaded
LRP
Yellow
Yellow
Purple
Red
98+
96+
91+
96+
0.76
0.74
0.73
0.74
3.3
4.1
2.7
3.3
<
<
<
<
150
150
100
150
0
0
0
25
BP
Ultimate
Premium
Regular
LRP
Pale Yellow
Yellow
Purple
Red
98+
95+
91+
96+
0.75
0.75
0.735
0.75
<
<
<
<
<
<
<
<
150
150
500
500
0
0
0
25
5
5
5
5
1
5
5
5
When choosing a fuel remember that you should aim for fuel that gives you the best engine performance. Usually
this is the least dense fuel that doesn't “knock” (pre-detonate) in the engine. Realistically, you should try all brands
of fuel, however, this is not always practicable and you should choose the fuel that your bike and your wallet seem
to like the most.
I should point out that sometimes minor rich/lean problems can be overcome by choosing a different grade of fuel.
Minor lean problems may be solved by choosing a slightly richer fuel (e.g. changing from ULP to PULP) and minor
rich problems may be solved by going down a grade of fuel (e.g. from HOULP to PULP).
Step 3 - Select the Main Jet that gives you the best top end power
The Main Jet has a progressively greater effect after 1/2 throttle range. After 3/4 throttle, it controls your top end
power band and as such has the most effect on the carburetor. I've seen tuning manuals that recommend leaving
the Main Jet selection until last, however, it took me seventeen fine-tuning adjustments to my carburetors before I
learned that if you don't get the Main Jet right, you'll have to re-do everything because selecting the best Main Jet
initially, eliminates the need to continually tweak the mid and lower tuning ranges to compensate for a "wrong" Main
Jet. FactoryPro state this in their kits and I wholeheartedly agree with them.
How to remove the carburetors
If you are going to do any maintenance on your bike, I highly suggest you at least get a Suzuki Service manual,
and if you can afford it, the Haynes and Clymer manuals too (you can never have too many manuals). To keep the
size of this document manageable, I'll assume you know how to strip your bike and get access to your carburetors.
If you need a refresher, check out John Callahan's http://www.geocities.com/catpoopman/sv650_rejet.html
notes because they provides a very good detailed explanation (with pictures) on how to remove your carburetors
and gain access to your Main Jet.
Location of Main Jet
Main Jet
General starting points for Main Jet sizes
As a guide, you can use the Main Jet sizes listed below to get you started. At almost $10 per jet, the closer you
can get to the “correct” size the happier your wallet will be. These jets will be within a size or two of being correct
for the Australian SV650. Remember, you need at least two jets of the same size.
Stock pipe + BMC Street Filter (Mikuni 135.0)
Stock pipe + Stock Suzuki Filter (Mikuni 137.5)
Stock pipe + Modified BMC Street Filter (Mikuni 140.0 – 142.5)
Stock pipe + Desnorkeled BMC Street Filter (Mikuni 150.0 – 155.0)
Stock pipe + Desnorkeled Stock Suzuki Filter (Mikuni 152.5 - 157.5)
Stock pipe + BMC Race Filter (Mikuni 155.0 – 160.0)
Aftermarket pipe + BMC Street Filter (Mikuni 137.5 - 140.0)
Aftermarket pipe + Stock Suzuki Filter (Mikuni 140.0 - 142.5)
Aftermarket pipe + Modified BMC Street Filter (Mikuni 142.5 – 145.0)
Aftermarket pipe + Desnorkeled BMC Street Filter (Mikuni 152.5 - 157.5)
Aftermarket pipe + Desnorkeled Stock Suzuki Filter (Mikuni 155.0 - 160.0)
Aftermarket pipe + BMC Race filter (Mikuni 157.5 – 162.5)
As far as jet kits go, the FactoryPro and Dynojet kits usually come with several ranges of Main Jets, a pair of Jet
Needles, sometimes a pair of Pilot Jets and an air filter plus a few other bits and pieces (see Kits). It may be
cheaper to buy the kits if they have the jet ranges you are after rather than buying all the items individually. My
advice is shop around and do your homework FIRST before jumping in and buying anything.
NOTE: Some owners use split mains (one size larger Main Jet on the front carb) so it may be cheaper to
buy several, single size jets rather than pairs of jets, however, split mains is normally only done on bikes
with Desnorkeled or Race filters.
Mikuni and Dynojet Main Jets
FactoryPro and DynoJet kits have different jet sizes. This is because Mikuni jets (used by FactoryPro) are marked
according to their flow rate i.e. 150 = 150 cc of fuel per minute, whereas, DynoJet jets are marked according using
a unique DynoJet system (possibly the diameter of the hole of the jet i.e. DJ150 = 1.5mm). Mikuni jets come in
size increments of 2.5 for sizes 50-200 while DynoJet jets come in size increments of 2 for sizes 74-150 and in
increments of 5 for sizes 150-210. Although you may find Mikuni to DynoJet size comparison charts on the
internet, they are not accurate. I have no experience with Dynojet kits so I guess it's a personal thing, however,
being a Mikuni carburetor, I tend to favour Mikuni jets.
Main Jet Selection Methods
Before testing to see whether or not you have selected the best Main Jets, warm up the engine for 15 minutes to
ensure you get consistent results. Don't be concerned with mid & low end power problems just yet as they will be
addressed at a later stage. There are two of ways to test to see if you have selected an appropriate Main Jets
other than putting you bike on a dyno and testing it. They are:
–
Roll-On Method. Select the Main Jets that gives you the highest top speed by making full throttle runs
between two points or markers at a race track. The Main Jets that gives the highest speed at the second
marker are the best. The gear selection and speed must always be the same at the first marker when full
throttle is applied. The distance between the markers must be enough that small differences in performance
can be detected.
–
Roll-Off Method. In 4th gear and over 6000 rpm, open the throttle to the Full position and let the engine
accelerate for several seconds until it is pulling hard then quickly roll off the throttle back to the 7/8 position. If
the engine gains power as you roll off, the Main Jets are too small and if it staggers slightly or hesitates, the
Main Jets are too large. If the engine winds down smoothly and evenly, then the Main Jets are likely correct.
Top End Power Test (Full Throttle)
To test to see if you have the best Main Jets fitted, do a couple of 4th gear full throttle runs from 6500 rpm to
Redline. Remember, if you have a desnorkeled or race filter, split Mains may provide better top end power.
Too Rich - If the engine appears to pull harder at high rpm when first do this but not as hard after a further 15
minutes of hard use, then the Main Jets are probably too large (too rich). Replace with smaller Main Jets and
retest until you find the Main Jets that pulls the hardest on this test.
Too Lean - If the engine doesn't feel like it's pulling as hard as it should based on your stock test ride (it may
stumble and feel like the engine is taking a while to wind up to Redline), then it's likely the mixture is lean and the
Main Jets are too small. If your bike starts to run very badly and seemingly misfire after 7000 rpm, then it's likely
the mixture is very lean and the Main Jets are a couple sizes too small. To test a very lean mixture, block off about
1/3 of your airfilters intake using race tape. If your bike runs better after 7000 rpm, then you need bigger Main Jets.
Replace with larger Main Jets and retest until you find the best.
NOTE: Remember, a rich problem only gets worse after the bike warms up whereas a lean problem will
seem to “correct” itself (or may even disappear altogether).
Step 4 - Set the Jet Needle Clip Position that gives you the best mid range power
The Jet Needle is a long tapered rod that primarily effects carburetion from 1/8 thru 3/4 throttle by controlling how
much fuel can be drawn into the carburetor venturi at any given throttle position. The thinner the taper, the richer
the mixture. The tapers are designed to give different mixtures for different throttle positions. Jet Needles have
notched tops with 4 - 6 clip positions. These are used to make an engine run richer or leaner within the 1/4 to 3/4
throttle range by raising or lowering the Jet Needle inside the Needle Jet accordingly. There are two main
components of the Jet Needle which control your mid range power - the needle clip position and the needle taper.
Jet Needle Taper
As you can see from the picture below, Jet Needle taper and thickness is important and has an effect on emulsion
in the Off-Idle, Mid and Top power ranges. The Mikuni, FactoryPro and DynoJet Jet Needles all have different
sizes and tapers from each other so their emulsion characteristics are also different. This means that they may
have different needle clip settings even though they have the same Main Jet. Jet Needles can have more than one
taper and companies usually offer 3 to 4 Jet Needles to choose from (richer to leaner). Since tapers can't be
physically changed (other than replacing needles), the only way you can change the Jet Needles effect is by
adjusting the needle clip setting to change when the taper becomes active and inactive for a given throttle position.
As an example of just how much the taper effects your carburetor settings, the FactoryPro Stage II Jet Needle
(#0984h5-60v2) is richer at full throttle / 3000 rpm than a FactoryPro Stage I Jet Needle (#0988h-64v2). It's also
richer at full throttle / 5000 - 7000 rpm, by the equivalent of about 2 clip positions (60 is richer than 64).
Mid Range Power Test (Full Throttle)
To test to see if you have the best Jet Needle clip position selected, do a couple of 3th gear full throttle runs from
4000 - 6000 rpm.
Too Rich - If the engine appears to pull harder in this range when you first do this test but not as hard after a
further 15 minutes of hard use, then the Jet Needle is probably set too rich and needs to be lowered. Move the clip
up one notch and retest until you find the best clip position that pulls the hardest on this test for this RPM range.
Too Lean - If the engine doesn't feel like it's pulling as hard as it should based on your stock test ride (it may
stumble and feel like the engine is taking a while to wind up to 6000 rpm), then it's likely the Jet Needle has been
set too lean. Move the clip down one notch and retest until you find the best clip position that pulls the hardest on
this test for this RPM range.
Mid Range Power Test (1/4 - 3/4 Throttle)
If, when doing the Full Throttle power test, you find that several clip settings give good results (may be hard to pick
the best one), do the 1/4 – 3/4 throttle test to select the best clip setting.
Too Rich - If acceleration is crisp but the engine hesitates or staggers as the throttle is quickly closed from 3/4 to
1/2 throttle, the mixture is too rich. Lower the Jet Needle one notch (i.e. make it leaner) and repeat the test. The
needle will be correct when acceleration is crisp at mid-rpm yet the engine does not load up when you wind the
throttle back down.
Too Lean - If acceleration seems soft or flat and the engine is slow to respond when the throttle is quickly opened
from the 1/2 throttle position, the mixture is probably too lean. Raise the Jet Needle one notch (i.e. make it richer)
and repeat the test.
Mid Range Power Test (1/8 to 1/4 Throttle)
To further refine the clip setting, this test will ensure you have selected the best clip setting using the above
methods. Let your engine go cold before starting this test.
Too Rich - If your engine responds crisply at low throttle openings when you first do this test but doesn't feel as
crisp after a further 15 minutes of hard use, chances are the Jet Needle is slightly rich. Lower the Jet Needle by
moving the clip up one notch (i.e. make it leaner). A very rich needle clip setting will appear to give good results on
the full throttle tests but stumble or bog down and almost stall when coming off-idle. The engine may also appear
to be suffering from lean surging.
Too Lean - If your engine suffers from an abnormally slow warm-up or part throttle acceleration is flat and feels like
it takes awhile to get going, your mixture may be too lean. Raise the Jet Needle by moving the clip down one notch
(i.e. make it richer).
Shimming the Jet Needle (fine tuning your Jet Needle clip setting)
If, after setting the Jet Needle correctly, you still find that you have a “flat” spot around the 4500 – 5000 RPM range
when you try to open the throttle in that range, you may need this mod. The term “shimming” refers to adding a
small washer under the Jet Needle clip to raise (richen) the Jet Needle slightly. This washer (called a shim) is
equivalent to half a clip setting. Normally, it's just a case of moving the stock washer from the top of the Jet Needle
clip to under the clip. The stock washer is a 3mm washer about 0.20 inches (0.5 mm) thick. Some sites mention
using two shims under the clip. This is not necessary because two shims equal one notch setting (notches are
approximately 1.0 mm apart). See John Callahan's http://www.geocities.com/catpoopman/howtoshim.html
notes for a very good detailed explanation (with pictures) on how to shim your Jet Needle.
Jet Needle
NOTE: If you still can't seem to get the best clip setting for the mid range power tests (even after doing the
shim mod), then you may not have the correct needle and you might need a richer/leaner one.
Drilling the Slide Holes
This is a mod that DynoJet recommends with their kits. Essentially, this does one thing – it increases throttle
response by drilling the air slide holes using the #54 drill bit (0.55 inches or 1.4 mm) which is included in the
DynoJet kits.
Air Slide Hole
Having no experience with DynoJet kits, I cannot say how this mod performs using their stuff, however, I do have
first hand experience with this mod using stock Suzuki & BMC Street air filters and I DO NOT RECOMMEND doing
this mod on systems with standard air filters because it makes the abrupt on/off throttle response that plague VTwins even worse. From my experience, this mod works best using an “open top” air filter due to the increased air
those filters allow in.
Drilling the slide holes is easy and shouldn't take any more than a few minutes to do. For reference the stock air
hole is 1.0 mm (I used various small sized drill bits to measure it) and I personally, used a 1.2 mm drill (same as
3/64 drill) and it seems to work well for me after I got an “open top” air filter.
See John Callahan's http://www.geocities.com/catpoopman/sv650_slidehole.html notes for a very good
detailed explanation (with pictures) on how to drill your slide holes.
Drill Bit Chart
Millimeters
Inches
Designation
1.0000
0.0394
1.0160
0.0400
#60
1.0414
0.0410
#59
1.0668
0.0420
#58
1.0922
0.0430
#57
1.1000
0.0433
1.1811
0.0465
#56
1.1906
0.0469
3/64
1.2500
0.0492
1.3000
0.0512
1.3208
0.0520
#55
1.3970
0.0550
#54
1.4500
0.0571
1.5000
0.0591
1.5113
0.0595
#53
1.5875
0.0625
1/16
Step 5 - Set the Fuel Float Height that gives you the best low end power
Fuel Float Height combined with the Pilot Jet controls your low end power. The general concensus is that the stock
Mikuni 17.5 Pilot is the best one for our model so this part of the rejetting procedure will focus on getting the fuel
float height correct. Fuel Float Height is critical to the proper operation of all carburetors and supposedly Mikuni
adjusts the float height to the correct level during assembly, however, since the little float tab that control this crucial
setting can be easily bent out of adjustment, it's something worth checking while you have the carbs open. A float
level that is too high can make fine tuning of the idle circuit impossible whereas one that's set too low will have a
similar effect on mid-range tuning.
Location of the Float and Float Tab
Float
Float Tab
Setting the Fuel Float Height
I found it's almost impossible to get the correct fuel float height using the procedures detailed in the Suzuki Service
Manual. Talk about an eyeball measurement!!! To do it the way the manual details requires you to fully strip (and I
mean fully strip) the carburetor just so you can get a vernier caliper into the correct position to make the
measurement. I ended up making my own Fuel Float Height Measuring Tool out of a thin piece of wire.
Making your own Float Height Adjument Tool
Wire
7.0 mm
Float Level Adjustment
1. Hold the carburetor at a 45 degree angle as shown in the diagram below.
2. Measure the distance from the carburetors float bowl gasket surface to the highest point of the float using
vernier calipers or a home-made tool like the one I designed above (measurement A should be 7mm, plus
or minus 0.5 mm).
3. If the float tab is just touching the spring-loaded pin in the needle valve and not depressing the pin, you
have the correct height.
4. If the float tab is depressing the needle valve, or the needle valve is proud of the hole, bend the float tab to
adjust float level to within the specified range.
Low End Power Test (Full Throttle)
To test to see if you have the best float height selected, do a couple of 2nd gear full throttle runs from 1500 – 3500
rpm. You should be able to apply full throttle without the engine missing or stumbling.
Too Rich - If the engine appears to pull harder in this range when you first do this test but not as hard after a
further 15 minutes of hard use, then the Float Level is probably set too rich and needs to be leaned out. One of the
signs to look for that indicates a high fuel float level is the engine feeling "soft" and boggy at part throttle operations.
If this occurs, bend the float tab down so that the Float Level adjustment reads 7.5 – 8.0 mm and repeat the test.
Too Lean - If the engine doesn't feel like it's pulling as hard as it should in this range based on your stock test ride
(it may stumble and feel like the engine is taking a while to wind up to 3500 rpm), then it's likely the Float Level has
been set too lean. Bend the float tab up so that the Float Level adjustment reads 6.0 – 6.5 mm and repeat the test.
NOTE: If there are low-end richness problems, even after lowering the fuel level in the bowl by more than
1.5mm from your initial settings (i.e. a Float Level Adjustment 8.5 mm or more), check for wear of jet needle
and needle jet (part of the emulsion tube).
Step 6 - Synchronise the Carburetors
It's important that each carburetor works as hard as the other or it will create an imbalance in engine performance
effecting the response, smoothness, mileage, performance and running temperature of your engine. Carburetor
synchronisation on the SV650 consists of adjusting the rear throttle valve so that it passes the same fuel-air mixture
as the front. Carburetor Synchonisation is also known as Throttle Valve Synchronisation. To get carburetors
working equally, we synchronise them with each other using a vacuum gauge. There are several types of vacuum
gauges available, but the one I found the easiest to use and set up was the Morgan Carbtune II available from
http://www.carbtune.com/carbdtls.html.
Adjusting the Carburetor
1. First, warm up the engine. Carburetor synchronisation can only be achieved when the engine is at it's
normal operating temperature. Connect the carburetor synchoniser tool to the carburetors as shown in the
Suzuki 99-02 SV650/S Service Manual. If you don't have the manual, there is a very good write-up on
synching the SV carbs by BluePoof at http://www.bluepoof.com/motorcycles/howto/svs_carb_sync/.
Please note, I DO NOT AGREE with the way she has installed new tubing on the carbs to make future carb
sychronisations easy. There is a much easier method that does not require you to fiddle around with the
fuel pump (I have no idea why she did it that way) or cutting tubing.
2. With the airbox removed, slowly adjust the carb synch screw as in the picture below until the vacuum
gauges read level.
Adjusting Screw
Step 7 - Set the Air Mixture Screws that gives you the best cruising throttle control
Before putting the carburetors back on the engine, slowly turn each air mixture screw in until it gently bottoms out.
Slowly open them out to the stock setting of 2 ½ turns. This setting provides a good known starting point. Because
the air mixture screws on the Mikuni BDSR39 are located “downstream” from the throttle valve, opening the screw
(counter-clockwise) results in a richer mixture, while closing the screw (clockwise) leans the mixture. After opening
the air mixture screws to the stock setting, take a note of the flathead slot positions because it will come in handy
come adjustment time.
Additional Cooling
The good news is this step doesn't requires the bike to be ridden to set the air mixture screws correctly, however,
the bad news is that it does require the bike to be idling for long periods of time while the adjustment is made so I
suggest you provide some additional cooling. If the engine becomes too hot during the adjustment procedure, it
will result in the idle mixture being set too lean so I suggest the use of a couple of desk-top fans or one of those
hand-held outdoor leaf blowers/vaccums like in the picture below. If you cannot provide additional cooling, you
may need to take time out for a short ride to cool the engine back to normal temperature.
Pilot Screw Adjusting Tools
Unfortunately, both methods of adjusting the air mixture screws detailed in this step require a special tool to adjust
the air mixture screws while the engine is running because of the location and the difficulty in getting to the screws.
There are several tools available for adjusting those hard to get at pilot screws, unfortunately, they are expensive.
The Bevel 90 Degree Pilot Screw Adjusting Tool from http://www.carbtune.com/bevel.html, will set you back
about $100.00 (it comes with a case and extras), whereas, a Motion Pro Pilot Screw Adjusting Tool from
http://www.motoxtrail.com/ will set you back about $50 (you get what you see). I have the Motion Pro tool and I
don't recommend it for the SV650. The rear carburetor air mixture screw is easily gotten to from the left hand side
of the bike, however, the front carby air mixture screw is not so easily gotten to because the bikes frame gets in the
way so it will require the radiator to be dropped and the overflow bottle to be unbolted and moved up out of the
way. The screw can then be accessed from the right side of the bike.
Motion Pro Pilot Screw Adjusting Tool
Bevel 90 Degree Pilot Screw Adjusting Tool
Air Mixture Screw Adjustment Methods
There are three of ways to adjust the air mixture screw correctly. They are:
–
Highest Idle Method. Start the engine and set the idle speed to around 1300 rpm with the Idle Adjuster. With
the engine warmed up and idling smoothly, turn the air mixture screw clockwise until the idle either slows or
becomes irregular, then turn the screw anti-clockwise until the engine again slows or begins to idle irregularly.
Set the air screw mid-way between these too-rich and too-lean positions and use the Idle Adjuster to re-adjust
the idle speed to 1300 rpm.
–
Highest Vacuum Method. Start the engine and set the idle speed to around 1300 rpm with the Idle Adjuster.
With the engine warmed up and idling smoothly, note the reading on the vacuum gauge (same connections for
Synronising the Carburetors). Next, turn the air mixture screw on the front carby clockwise ¼ turn at a time
until you notice an increase in the vacuum gauge. If the engine stumbles or the vacuum drops turn the air
mixture screw anti-clockwise ¼ turn at a time until you notice an increase in the vacuum gauge. Once an
increase has been seen, do the same procedure to the rear carby then re-adjust the idle to 1300 rpm and start
the procedure over again. Do this procedure ¼ turn at a time until you achieve the highest possible idle
vacuum at a set idle speed of 1300 rpm. It is important to re-set the idle speed back to 1300 rpm after a ¼ turn
adjustment because a higher idle speed will increase the vacuum reading. Maintaining the standard idle speed
of 1300 rpm will make it easier to evaluate changes to the idle-mixture screws.
–
Mixture Colour Method. This method requires the use of special spark plugs to view the colour of the
combustion flame – see http://www.carbtune.com/colortune.html. Install the special spark plugs, start the
engine and set the idle speed to around 1300 rpm with the Idle Adjuster. With the engine warmed up and idling
smoothly, note the colour of the flame and using the special chart. Adjust each of the air mixture screws for the
correct mixture setting.
NOTE: If the highest idle/vaccum is achieved with the air screw less than 1 ½ turns out, the Pilot Jet is too
large and should be exchanged for a smaller one. If the engine speed does not slow or the vacuum does
not fall after 3 ½ turns out, the Pilot Jet is too small and should be exchanged for a larger one.
Relationship Diagrams
Throttle Operation
0 – 1/8th Throttle Operation
Full Throttle Operation
Test Result Forms
Main Jet Roll-Off Tests
137.5
140.0
142.5
145.0
147.5
150.0
152.5
155.0
157.5
160.0
162.5
165.0
Main Jet Full Throttle Tests
137.5
140.0
142.5
145.0
147.5
150.0
152.5
155.0
157.5
160.0
162.5
165.0
Surges
Hesitates
Too Rich
Too Lean
Jet Needle Full Throttle Tests
Clip Posn 1
Clip Posn 2
Clip Posn 3
Clip Posn 4
Clip Posn 5
Clip Posn 6
Clip Posn 2
Clip Posn 3
Clip Posn 4
Clip Posn 5
Clip Posn 6
Clip Posn 2
Clip Posn 3
Clip Posn 4
Clip Posn 5
Clip Posn 6
Too Rich
Too Lean
Jet Needle 1/4 – 3/4 Throttle Tests
Clip Posn 1
Too Rich
Too Lean
Jet Needle 1/8 – 1/4 Throttle Tests
Clip Posn 1
Too Rich
Too Lean
Float Height Full Throttle Tests
6.0 mm
6.5 mm
7.0 mm
7.5 mm
8.0 mm
Too Rich
Too Lean
Air Mixture Screw Settings
Highest Idle Method
Low Limit (closest ¼ turn)
High Limit (closest ¼ turn)
Median (closest ¼ turn)
Highest Vacuum Method
Exploded view of Mikuni BDSR39 Carburetor
For a full part listing with prices (US Dollars), see the online parts microfiche on the Ron Ayers site at
http://www.ronayers.com/fiche/getyear.cfm?man=su&groupid=11730
Carburetor Jet Kits
FactoryPro Stage 1 (CRB-S36-1.0 Config 10) Carb Kit
2 x Mikuni 140.0 Main Jets
2 x Mikuni 142.5 Main Jets
2 x Mikuni 145.0 Main Jets
2 x Mikuni 17.5 Pilot Jets
2 x Mikuni #0988h-64v2_ss 2.9bt Jet Needles
2 x Needle E-Clips
6 x Float bowl replacement bolts (#4 Hex head)
4 x Carb Slide replacement bolts (#4 Hex head)
Note: This kit is for use with Stock Suzuki or BMC 205/10 Street air filters
FactoryPro Stage 2 (CRB-S36-2.0-APK Config 20) Carb Kit
1 x Mikuni 157.5 Main Jet
1 x Mikuni 160.0 Main Jet
1 x Mikuni 162.5 Main Jet
1 x Mikuni 165.0 Main Jet
2 x Mikuni 17.5 Pilot Jets
2 x Mikuni #0984h5-60v2_2.9bt Jet Needles
2 x Needle E-Clips
6 x Float bowl replacement bolts (#4 Hex head)
4 x Carb Slide Cover replacement bolts (#4 Hex head)
1 x BMC 205/10 Race Air Filter
2 x 17 mm Tankrisers + bolts
DynoJet Stage 1 (3171) Carb Kit
2 x DJ132 Main Jets
2 x DJ134 Main Jets
2 x DJ136 Main Jets
2 x DJ138 Main Jets
2 x DJ140 Main Jets
2 x DJ142 Main Jets
2 x DJ144 Main Jets
2 x DJ146 Main Jets
2 x DNO704 Jet Needles
2 x DE0001 Needle E-Clips
2 x DW0001 Adjusting Washers (Shims)
2 x DSP77 Needle Springs
1 x DD #54 Slide Drill
1 x DD #5/32 Plug Drill
1 x DS0001 Screw
Note: This kit is for use with Stock Suzuki or K&N SU-6599 air filters.
DynoJet don't offer Stage 2 (modifed airbox), 3 (pod filters) or 7 (race) kits for the SV650.
TroubleShooting
Carburetor Backfiring
Normally caused by either a loose ignition wire, an air leak on the intake manifold, an overly lean air mixture screw
setting or clogged Pilot Jet.
Exhaust Backfiring
It is normal for many high performance exhaust systems to moderately backfire or pop when the throttle is closed
from mid-to-high rpm. Excessive backfiring can be caused by either a loose ignition wire, air leaks in the headers
or pipes, an overly lean air mixture screw setting or clogged Pilot Jet.
Knocking (Predetonation)
Normally caused by either an overly lean mixture or bad fuel.
Poor Mileage
Normally caused by poorly installed choke cable or incorrect jets or carburetor settings.
Engine Misfiring at Full Throttle
If the engine starts to misfire at full throttle then the mixture is usually far too lean and the Main Jet far too small.
References
http://www.factorypro.com/tech/carbtun.html
http://www.mikuni.com
http://www.motocross.com/motoprof/moto/mcycle/carb101/carb101.html
http://www.nightrider.com/biketech/carb_jet_ranges.htm
http://www.svrider.com/articles/2001jul_carbs.htm
http://www.geocities.com/catpoopman/Johns_bike.html
Suzuki 99-02 SV650/S Service Manual
Haynes 99-02 SV650/S Service Manual
Clymer 99-02 SV650/S Service Manual