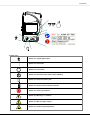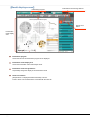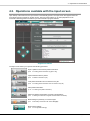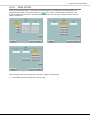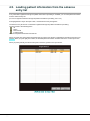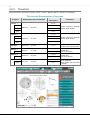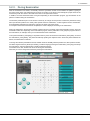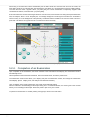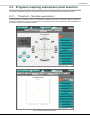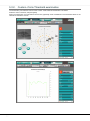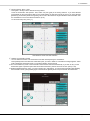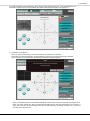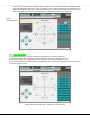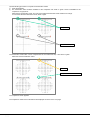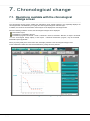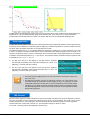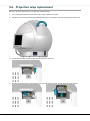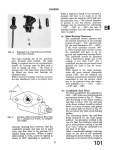
1
INSTRUCTION MANUAL US Introduction Congratulations on your purchase of KOWA AP–7000. KOWA AP–7000 is an automatic perimeter intended for measurement of the visual field. This manual provides a description of the operating procedures of the KOWA AP–7000 and the precautions to be observed during its use. Please read this manual carefully to assure that the instrument can demonstrate its full capabilities and work safely. After you have finished reading, keep this manual in an easily accessible location near the instrument for future reference. Safety precautions This manual describes important precautions to be observed when you use this system to assure that the system is used safely without causing any damage to the human body or property of the purchaser and other persons. The designations and pictorial symbols used in this manual are described in the table below. These should be fully comprehended before reading the text of this manual. This document does not include any information about replacement or repair of parts other than consumables. For details about the replacement or repair of parts, see the Service Manual. Meanings of designations Warning Improper operation of this instrument may incur a risk of causing death or serious injury. Caution Improper operation of this instrument may result in bodily injury*1 or damage to property*2. Descriptions you must read. Describes items you should observe or pay close attention to during operation of this instrument. *1 *2 A bodily injury means an injury, burn, electrical shock and so forth that will not necessitate hospitalization or long – term outpatient treatment. Damage to property means an extensive damage to a house and/or household goods as well as a domestic animal and pet. Meanings of symbols Graphical indication of any danger (including warning and caution). What is warned is explicitly and pictorially indicated by a picture or its associated message on or near a pictorial symbol. Graphical indication of prohibited operation (prohibitive item). What is prohibited is explicitly and pictorially indicated by a picture or its associated message on or near a pictorial symbol. ● Graphical indication of any mandatory action (obligatory item). What must always be done is explicitly and pictorially indicated by a picture or its associated message on or near a pictorial symbol. Disclaimer Kowa is not responsible for: Any damage caused by fire, earthquake, third party’s action, any other accident or user’s intentional or unintentional error, abuse or use under abnormal conditions. Any damage resulting from use of the product or its malfunction (e.g. operating loss, shutdown, change/loss of stored data and so forth). Any damage resulting from disregarding what is described in this manual. Any damage resulting from, for instance, malfunctioning of instrument caused by a combination of connected devices. 1 Warning If any abnormal smell, sound, overheating or smoke should be detected, be sure to turn OFF the main power immediately and then unplug the instrument from the power outlet. Continued use of the instrument may cause the instrument to malfunction or cause a fire. Contact Kowa or your Kowa dealer for inspection. When replacing the projection lamp and the fuse, make sure the main power is turned OFF and then unplugged from the power outlet. Wait for more than 10 minutes, or more than 10 minutes if immediately after use, before replacing. Otherwise, there may occur electrical shock or burn. Unplug Warning High–Voltage When replacing the fuse, make sure the main power is turned OFF and then unplugged from the power outlet. If the fuse holder cover is removed without the instrument unplugged, there may occur electrical shock or burn. Use a designated fuse only. Using an undesignated fuse may cause the instrument to malfunction or cause a fire. Be sure to plug into the power outlet completely and securely. Otherwise there may cause a fire or electrical shock. Obligatory Warning High–Voltage Make sure the instrument is properly grounded to prevent bodily injuries. Connect the plug into the three – wire grounding type outlet with ground wire. Otherwise, there may occur electrical shock. Regularly remove dust on the power plug. Dust accumulated on the power plug may absorb moisture, which may result in isolation failure and cause a fire. Do not load the power outlet or cable with excess of its rated capacity. If the main power supply cable should share a power outlet with other devices and the rated capacity is exceeded, there may cause a fire or electrical shock. The air vent shown must not be obstructed. Obstructing the air vent may increase the internal temperature resulting in malfunction of the instrument or a fire. Do not insert any metal object into an air vent or opening of the instrument. It may cause electrical shock, a fire, or malfunctioning of the instrument. Do not place the instrument close to wall, Because it is too difficult to remove the power supply cable from AC inlet. Prohibitory Do not push the instrument. It may fall down to cause a failure or an injury. Warning High–Voltage Disassembly prohibited 2 Do not place a container or cup containing liquid near the instrument. Spilled liquid entering into the instrument may cause electrical shock. If liquid should be spilled into the instrument, turn OFF the main power immediately, unplug the instrument from the power outlet, and then contact Kowa or your Kowa dealer for inspection. Do not plug or unplug the power supply cable with wet hand. Otherwise, there may occur electrical shock. Do not disassemble, modify or repair the instrument yourself. It may cause a fire, electrical shock, bodily injury, or instrument malfunctioning. Refer all servicing to Kowa or your Kowa dealer. The instrument modified or repaired by anyone other than a Kowa designated repair facility will void the warranty. Introduction Caution The power supply must be provided for the sole use of this instrument. Sharing the same power supply with other external devices may cause instrument malfunctioning. Be sure to prevent the instrument from being operated by anyone other than the following certified personnel: ・MD (Ophthalmologist), ophthalmology resident ・Nurse, vocational nurse ・Orthoptist, Optometrist Obligatory When operating the instrument, use caution so that the patient’s face or hand does not come in contact with the parts of the instrument. Otherwise, it may cause a bodily injury. When operating the instrument, use caution so that the patient’s face does not touch the end of the instrument. Otherwise, it may cause a bodily injury. A patient with the smaller head may get his or her head caught between the components. Handle the projection lamp and the fuse with caution. Otherwise, glass components may be damaged, resulting in a bodily injury. Do not pull the power supply cable when unplugging the instrument from the power outlet. Doing so may damage the cable and cause a fire or electrical shock. Be sure to hold the plug when unplugging. Do not install the instrument at unstable location such as on a shaky base or a tilting surface. Doing so may cause the instrument do to drop or fall over and result in a bodily injury. Caution High–temperature Do not replace the projection lamp immediately after turning OFF the main power. You could be burned by a lamp heated to a high temperature. Wait for more than about 30 minutes to cool the lamp down before replacing. Do not touch the projection lamp bulbs with your bare hand. Otherwise, the lamp may reduce the light intensity or operating life. Prohibitory Keep your fingers off the location of the chin rest and the under the chin rest’s cover. When the chin rest moving, the fingers may be pinched and injured. Do not wipe the outer surface of the instrument with solvents such as benzene, organic solvent, and ether. Doing so may cause discoloration or degradation. For the operator, do not touch the following connectors and patient simultaneously: ・Response button jack ・USB connecter ・Ethernet connecter Do not use a sharp object to perform touch operation on the touch panel. Otherwise, It may cause instrument malfunctioning. Do not apply excessive force to the touch panel. Otherwise, It may cause a failure or an injury. 3 Meanings of symbols 4 Introduction Symbol mark Symbol for “Type B applied part”. Symbol for “Power ON”. Symbol for “Power OFF”. Symbol for instrument status (Power ON or Standby) Symbol for “Response button jack” Symbol for “Reference the instruction manual” Symbol for “Pushing prohibited”. Symbol for “Warning” or “Caution”. Symbol for “Warning High–voltage”. Symbol for “Caution High–temperature”. 5 Operating precautions 1. Operating environment 1) Be sure to prevent the instrument from being operated by anyone other than the following certified personnel: ・MD (Ophthalmologist), ophthalmology resident ・Nurse, vocational nurse ・Orthoptist, Optometrist 2) Handle the instrument with care, and do not apply strong shock to the instrument. Avoid placing any object on the instrument. 3) Avoid high temperature and humidity, direct sunlight, and dust when installing and storing the instrument. Strictly observe the following environmental conditions. Operating Transporting and storing Environmental temperature 10 to 35 ℃ –15 to +60 ℃ 30 to 90 % 10 to 95 % R e l a t i ve h u m i d i t y 4) Avoid condensation when using, transporting or storing the instrument. 5) Place this instrument in a darkroom or a room of which luminance can be reduced as low as a darkroom. 6) When operating the touch panel, be sure to use the input pen included with this instrument. 7) When housing the lens holder, fold it backward, and then to the left side. If you fold the lens holder to the left without folding backward, it may come into contact with the exterior of the instrument. Use great care. 8) When cleaning the head rest, chin rest, response button, and head band, wipe with rubbing alcohol. Do not sterilize them. 9) Do not install any software other than the KOWA AP–7000 accessory software in this instrument. Otherwise, the instrument may be caused to malfunction. Kowa will not be liable for malfunction of the instrument caused by installation or execution of such extra software. 10) Be sure to follow the procedure when terminating the instrument (See “4.1 Switching on and off the instrument”). Do not turn off the power switch when the touch panel is showing a black screen without any data shown or with “It is now safe to turn off your computer” appearing, otherwise it may cause a failure or data loss. In this case, Kowa will not be liable for any failure or data loss. 11) In part of the image display area of the KOWA AP–7000 software, ifjpeg.spi (in the NiftyServeFGALAV library) is used as a jpeg plug – in with permission from Mr. Yoshihito Takemura. 2. Precautions for electric system 1) The power supply must be provided for the sole use of this instrument. Sharing the same power supply with other external devices may cause the instrument to malfunction. 2) When the instrument will not be used for a long period of time, turn off the power switch and disconnect the power plug from the outlet. Otherwise, a fire may start. 3) Use great care to select an installation location of the instrument so that the power plug will not be disconnected during operation of the instrument. In the event the plug is disconnected during operation, be sure to turn off the power switch, and then insert the plug to the outlet. 4) Kowa is not liable for malfunctions and/or damages resulting from maintenance and/or repairs performed by the third party other than an agent authorized by Kowa. 5) Kowa is not liable for malfunctions and/or damages resulting from maintenance and/or repairs using parts other than repair parts specified by Kowa. 6) Be sure to connect the instrument to the specified power source (AC100–230V, 50/60Hz). 7) The input voltage should always be maintained within ± 10% of the rated voltage. 8) This instrument is floor – standing type (not intended for moving). When it is necessary to move the instrument, contact Kowa or your Kowa dealer. 9) Turn off the power switch before connecting the instrument to an external device or connecting/disconnecting the power plug to/from the outlet. 10) Before turning off the power switch, be sure to follow this document. Do not turn off the power switch when the touch panel is showing a black screen without any data shown or with “It is now safe to turn off your computer” shown, otherwise it may cause a failure or data loss. 3. Precautions for instrument 1) Always cover this instrument with dust cover when not in use in order to protect them. 2) This instrument is floor–standing type (not intended for moving). When it is necessary to move the instrument, contact Kowa or your Kowa dealer. 4. Disposal precautions Disposal of this instrument is subject to local waste management and public safety laws and regulations. When you need to dispose the instrument, comply with the ordinances and regulations of the applicable local government and ask an authorized industrial waste management contractor for disposal. 5. Prescription Device Caution Caution Federal law restricts this device to sale by or on the order of a Physician or Practitioner. For US market 6 Introduction Precautions: use of medical electrical system 1. Precautions for use of medical electrical system All components of this medical electrical system may be installed within a limited patient environment (a radius of 1.5m around a patient) when all components are installed in accordance with the installation instructions using “Multi – tap with Isolation Transformer”, which is one of the system components. 2) As a prerequisite for installing this system, other components (a personal computer, printer, video capture printer, video monitor, or other devices) which do not comply with IEC 60601–1 must be powered from “Multi – tap with Isolation Transformer”. The electric power to these components supplied from an electric source other than “Multi – tap with Isolation Transformer” (e.g., power outlets) may cause increased enclosure leakage current or potential difference between protective grounds resulting in the injury to the patient or operator. Use “Multi – tap with Isolation Transformer” only for supplying the power to components other than system components. 3) Any medical electrical equipment connected to this system to compose a medical system must comply with IEC 60601–1. 4) Any non – medical electrical equipment connected to this system to compose a medical system must comply with safety standards of IEC or ISO provisions applicable to such non – medical electrical equipment. 5) Do not use any additional multi – tap or extension power supply cable other than those Kowa specified to this system. 6) Power supply to this system or “Multi – tap with Isolation Transformer” must be provided individually. (Do not route the power supply through other multi – tap to the system or “Multi – tap with Isolation Transformer”.) 7) The power supply cable for electrical equipment composing a medical system must have durability that meets IEC 60245/ IEC 60227 or higher standards. 8) Assure that the power supply is turned OFF when connecting other devices to the system. 9) Do not turn ON the power supply until all devices are completely connected. 10) Do not place or install the devices and the system components on an unstable or inclined table. 1) 2. Precautions for use of “Multi – tap with Isolation Transformer” Do not place “Multi – tap with Isolation Transformer” directly on the floor. Water droplets during room cleaning may enter the multi – tap resulting in the component’s failure. 2) The power supply cable to “Multi – tap with Isolation Transformer” must be connected to a power receptacle with a protective ground terminal equipotential to the protective ground of this instrument. 3) When using a “Multi – tap with Isolation Transformer” receptacle with a protective ground terminal, read the instructions attached to the receptacle to familiarize yourself with the correct use. 1) 3. Daily maintenance and cleaning System components Wipe the soiled outer surface with a firmly squeezed dampened soft cloth. Use mild detergent to remove excessive dirt. Do not use chemicals or solvents such as thinner and benzene. (As the touch panel cover easily gets scratched, lightly wipe it with a soft cloth such as gauze.) Refer to the instructions provided with each device for details of device maintenance and cleaning. 2) Power supply cables, connecting cables, and connectors Visually inspect that all cables have no flaw or damage. Visually verify that earth leads of all components and protective ground terminals are securely connected. Disconnect the power supply cables from the power outlet when you do not use the system for a long period of time. 3) Others When you add a personal computer to the system for filing purposes, captured images are stored in the hard disk drive of the personal computer. Back up the data stored in the hard disk drive regularly since hard disk drives may have a mechanical or electrical failure. 1) 7 Combinations of medical electrical equipment and non–medical electrical equipment Precautions for system 1. IEC 60601–1–1 “Safety requirements for medical electrical systems” describes the components combination grouped into various clinical settings. The brief overview of IEC 60601–1–1 is shown below. Medically used room Situation No. 1a Items A and B are ME EQUIPMENT 1b Items A and B are ME EQUIPMENT powered via a MULTIPLE SOCKETOUTLET 1c Item A is ME EQUIPMENT and B is nonME EQUIPMENT Inside the PATIENT ENVIRONMENT Mains Plug A IEC 60601 Mains Plug B IEC 60601 A IEC 60601 B IEC 60601 MULTIPLE SOCKET-OUTLET Mains Plug A IEC 60601 B IEC xxxxx Mains Plug Outside the PATIENT ENVIRONMENT Nonmedically used room Examples of possible causes for exceeding LEAKAGE CURRENT limits Multiplied APPLIED PARTS of the same type can cause the total PATIENT LEAKAGE CURRENT to exceed limits See Note 1. Earth conductor of the MULTIPLE SOCKET-OUTLET is broken See also 1a. Due to high TOUCH CURRENT of B 1 1d Item A is ME EQUIPMENT and B is nonME EQUIPMENT powered via a MULTIPLE SOCKETOUTLET 1e Item A is ME EQUIPMENT powered from specified power supply in item B 1f Item A is ME EQUIPMENT powered from non-ME EQUIPMENT power supply in B 8 A IEC 60601 B IEC xxxxx MULTIPLE SOCKET-OUTLET The earth conductor of the MULTIPLE SOCKET-OUTLET is broken or, Due to high TOUCH CURRENT of B Apply 16.5 in all situations - Verify total PATIENT LEAKAGE CURRENT - Additional PROTECTIVE EARTH CONNECTION (for A or B) or, - Separating transformer - Additional PROTECTIVE EARTH CONNECTION (for B) or, - Separating transformer (for B) - Additional PROTECTIVE EARTH CONNECTION (for A or B) or, - Separating transformer Mains Plug A IEC 60601 B IEC xxxxx Due to high TOUCH CURRENT of B A IEC 60601 Practical means of compliance B IEC xxxxx DC/AC Mains Plug - Additional PROTECTIVE EARTH CONNECTION (for B) or, - Separating transformer (for B) Introduction Medically used room Situation No. Inside the PATIENT ENVIRONMENT Outside the PATIENT ENVIRONMENT Nonmedically used room No causes of exceeding LEAKAGE CURRENT 2a Items A and B are ME EQUIPMENT 2b Items A and Item B are ME EQUIPMENT powered via a MULTIPLE SOCKETOUTLET 2 2c Item A is ME EQUIPMENT and Item B is non-ME EQUIPMENT 2d Item A is ME EQUIPMENT and item B is non-ME EQUIPMENT powered via a MULTIPLE SOCKETOUTLET 3a Items A and B are ME EQUIPMENT 3b Item A is ME EQUIPMENT and item B is non-ME EQUIPMENT Examples of possible causes for exceeding LEAKAGE CURRENT limits A IEC 60601 Earth conductor of the MULTIPLE SOCKET-OUTLET is broken B IEC 60601 MULTIPLE SOCKET-OUTLET Mains Plug A IEC 60601 B IEC xxxxx A IEC 60601 Mains Plug Mains Plug Due to high TOUCH CURRENT of B See rationale for 16.5. Mains Plug B IEC xxxxx MULTIPLE SOCKET-OUTLET A IEC 60601 The earth conductor of the MULTIPLE SOCKET-OUTLET is broken Mains Plug B IEC 60601 A IEC 60601 B IEC 60601 Mains Plug Common protective earth Mains Plug A IEC 60601 B IEC xxxxx Mains Plug Common protective earth No causes of exceeding LEAKAGE CURRENT Due to high TOUCH CURRENT of B See rationale for 16.5. Practical means of compliance Apply 16.5 in all situations - No further measures are necessary - Additional PROTECTIVE EARTH CONNECTION (for A or B) or, - Separating transformer - Do not use metal connector housing or, - SEPARATION DEVICE - Additional PROTECTIVE EARTH CONNECTION (for A or B) or, - Separating transformer - No further measures are necessary - Do not use metal connector housing for SIGNAL INPUT/OUTPU T PART or, - SEPARATION DEVICE 3 3c Item A is ME EQUIPMENT and item B in is ME EQUIPMENT or non-ME EQUIPMENT Mains Plug A IEC 60601 Common protective earth B IEC 60601 or IEC xxxxx Mains Plug Protective earth with potential difference a) Potential difference between PROTECTIVE EARTH CONNECTION S of A and B b) Due to high TOUCH CURRENT of B See rationale for 16.5. - Additional PROTECTIVE EARTH CONNECTION for (A), or - SEPARATION DEVICE, or - Do not use metal connector housing in the PATIENT ENVIRONMEN T NOTE 1. No causes of TOUCH CURRENT or EARTH LEAKAGE CURRENT exceeding limits. NOTE 2. IEC 60601: MEDICAL ELECTRICAL EQUIPMENT in compliance with IEC 60601. NOTE 3. IEC xxxxx: Non-medical equipment in compliance with relevant IEC safety standards. NOTE 4. Separating transformer: see 16.9.2.1. NOTE 5. If equipment “B” is outside the PATIENT ENVIRONMENT and if equipment “A” is a CLASS II equipment and has accessible conductive parts connected to the PROTECTIVE EARTH CONNECTON of equipment “B” then additional safety measures could be necessary, for example: additional protective earth for “B” or separating transformer or SEPARATION DEVICE. 9 Operational considerations for a hospital grade electrical instrument (safety and accident prevention) 1. Only qualified personnel should operate this instrument. 2. The following items shall be considered when installing the instrument. 1) Install at a location away from water or accidental splashing. 2) Install at a location which will not be adversely affected by atmospheric pressure, temperature, humidity, ventilation, sunlight, dust, air containing salt, sulfur and other substances. 3) Take care to guard against tilt, vibration and strong impacts, e.g., during transportation. 4) Instrument must not be installed at locations where chemicals are stored or gasses are generated. 5) Be careful with the radio frequencies, voltages and allowable amperes (power consumption) of the power supply. 6) Properly connect ground wires. 3. The following items shall be considered before using the instrument. 1) Make sure that the instrument activates properly after checking switch contact, polarity, dial setting and so forth. 2) Make sure that the instrument is properly grounded. 3) Make sure that all cables are properly connected and secured. 4) Use of other instruments and appliances on the same power circuit is liable to cause errors and incorrect flash output resulting in incorrect diagnosis or hazards. 5) External circuits and connectors that may come in direct contact with the patient must be checked frequently for signs of wear. 4. The following items shall be considered when using the instrument. 1) Be sure to minimize the time and quantity required for diagnosis and treatment. 2) Always assure that the instrument and patient are in good condition. 3) When an abnormality is found on the instrument, take proper measures, for instance, stopping the operation of the instrument, to assure the patient’s safety. 4) Do not allow the patient to touch any of the instrument controls. 5. The following items shall be considered after using the instrument. 1) Turn OFF the instrument after setting control switches, dials, and so forth to their initial statuses by the specified procedure. 2) Do not pull on cables for removal because an excessive force is exerted on them. 3) Clean and rearrange accessories, cables, etc. 4) The instrument must be cleaned prior to use. 6. In case of a problem or malfunction, stop the operation and contact Kowa or your Kowa dealer for repair. 7. Instrument shall not be modified. 8. Maintenance 1) Periodically check the instrument and its components for any abnormality. 2) When using the instrument after it has not been used for a while, please check beforehand to assure that it is in normal condition and operates safely. 9. Be careful of the possibility that incorrect operation may be caused by strong electromagnetic waves. This instrument is examined based on IEC 60601–1–2:2001. The purpose of this standard is to maintain safety against dangerous obstacles in typical medical facilities. When this instrument is influenced by another instrument, or when it affects another instrument, or when there is such fear, please move this instrument and the other apparatus to create a distance between the instruments. Moreover, if there is an unknown point, please consult our company or an agency beforehand. 10 Introduction Components and supplies Main body:1 Power supply cable:1 Response button:1 Dust cover:1 Input pen:1 Projection lamp(Replacement):1 Fuses:2 Instruction manual:1 Input pen – strap:1 Head band2 11 Contents Introduction ......................................................................................... 1 Safety precautions ............................................................................................................................................................. 1 Meanings of symbols ....................................................................................................................................................... 4 Operating precautions ..................................................................................................................................................... 6 Precautions: use of medical electrical system .......................................................................................................... 7 Operational considerations for hospital grade electrical instrument (safety and accident prevention) .............................................................................................................................................................. 10 Components and supplies ............................................................................................................................................. 11 Contents .............................................................................................. 12 1. System description .................................................................. 14 1.1. 1.2. 1.3. 1.4. Intended use ........................................................................................................................................................... 14 Principle of measurement and System overview ........................................................................................... 14 Features ................................................................................................................................................................... 14 Name and function of each component 15 2. Installation ................................................................................... 20 2.1. Installation ...............................................................................................................................................................20 2.2. connecting an external device............................................................................................................................ 21 3. Flow of operations ................................................................... 22 4. Preparation for examinations .......................................... 24 4.1. 4.2. 4.3. 4.4. 4.5. 4.6. 4.7. 4.8. 4.9. 4.10. 4.11. Switching on and off the instrument .................................................................................................................24 Operations available with the input screen .....................................................................................................27 Loading patient information by [Open List] ....................................................................................................28 Patient information input .....................................................................................................................................30 Loading patient information from the advance entry list .............................................................................38 Clearing the patient information ........................................................................................................................39 Setting of Examination Program and Examination Parameter ...................................................................40 Each Examination Program.................................................................................................................................45 Perimetry examination fundus images .............................................................................................................57 Configuration settings ..........................................................................................................................................59 Preparation for patients and alignment of examined eyes ....................................................................... 71 5. Examination ................................................................................ 74 5.1. 5.2. 5.3. 5.4. 5.5. 5.6. 5.7. 5.8. Operations available with the examination screen ........................................................................................74 Operational procedure in examination .............................................................................................................76 Programs requiring examination point selection .......................................................................................... 81 Manual examination ..............................................................................................................................................88 Fovea threshold examination (Fovea examination) ......................................................................................95 The eye fixation of a patient ................................................................................................................................95 Gaze monitor...........................................................................................................................................................95 Examination Reliability.........................................................................................................................................96 6. Display, Print, and Analysis of Examination Results ......................................................................................... 97 6.1. 6.2. 6.3. 6.4. 6.5. 6.6. Operation available with the result screen ......................................................................................................97 Examination result switchover and list display..............................................................................................99 Print......................................................................................................................................................................... 100 Both eyes ............................................................................................................................................................... 101 Multi ........................................................................................................................................................................ 104 Analysis of Threshold Examination Result ................................................................................................... 109 6.7 Fundus perimetry examination result display .............................................................................................. 118 6.8. Isopter examination result display .................................................................................................................. 119 6.9. Re–Test ................................................................................................................................................................... 121 6.10. Editing of patient information ........................................................................................................................... 124 12 7. Chronological change ...........................................................126 7.1. 7.2. 7.3. 7.4. 7.5. 7.6. 7.7. 7.8. Operations available with the chronological change screen .................................................................... 126 Print......................................................................................................................................................................... 128 Graph displays ..................................................................................................................................................... 129 Data display........................................................................................................................................................... 133 Changing over the examined eye for display ............................................................................................... 134 Graph emphasizing ............................................................................................................................................. 135 Scrollable display ................................................................................................................................................ 136 Sorting the examination results ....................................................................................................................... 137 8. Link with KOWA VK Series ......................................................138 8.1. Automatic saving of perimetry results into Kowa VK Series .................................................................... 138 8.2. Simplifying the patient information input operation ........................................................................................ 139 8.3. Selecting perimetry examination fundus images ........................................................................................ 139 9. Maintenance and inspection ...........................................140 9.1. 9.2. 9.3. 9.4. 9.5. 9.6. 9.7. 9.8. 9.9. 9.10. Daily maintenance ............................................................................................................................................... 140 Daily inspection (Inspection items for the user) ........................................................................................................ 140 Regular inspection (Maintenance inspection items for the vendor) ............................................................................ 141 Disinfect ................................................................................................................................................................. 141 Cleaning the exterior and the touch panel..................................................................................................... 141 Projection lamp replacement ............................................................................................................................ 142 Fuse Replacement ............................................................................................................................................... 144 List of consumables ............................................................................................................................................ 144 Backup of examination result data .................................................................................................................. 144 Repair of the instrument .................................................................................................................................... 144 10. Troubleshooting .......................................................................146 11. Specification ..............................................................................150 12. Technical information ............................................................152 12.1. Examination points of each examination program ...................................................................................... 152 12.2. Stimulus Intensity and Size ............................................................................................................................... 156 12.3. Spectrum distribution of luminous source.................................................................................................... 157 13. Electromagnetic compatibility (IEC 60601-1-2) .........159 13 1. System description 1.1. Intended use KOWA AP-7000 is an automatic perimeter to perform perimetry examinations and to display examination results. Static quantitative perimetry examinations and kinetic perimetry examinations are available. 1.2. Principle of measurement and System overview 1) 2) 3) 4) 5) 6) 7) When the power switch is turned on, setup items required for examinations appear on the touch panel. The examiner selects a program and sets parameters on the touch panel according to the specified procedure. When an examination begins, stimuli are sequentially projected according to the parameters specified by the control program. A stimulus generated by the projection lamp used as a luminous source is projected in the dome evenly illuminated by the background lamp controlled by the dimming circuit. The size of the stimulus is determined by the dimensions of the hole in the turret. The color and luminance of the stimulus are determined with the color filter and ND filter in the turret. Focusing is carried out by moving the focus lens. The stimulus presentation time is determined by the period of time when the shutter is providing the light path. The stimulus projection position is controlled by horizontally or vertically rotating the projector mirror and projector lens. The stimulus projection order is determined by the control program. A patient makes a response by pushing the response button upon confirmation of the projected stimulus during eye fixation targeted to the LED at the center of the dome. The control program checks for any response and record the check result. After completion of the specified examinations, the results are shown on the touch panel and stored in the instrument. The results can be sent to a printer (available separately). 1.3. Features 1) 2) This instrument is operated through the touch panel. The instrument is provided with various examination programs including the central view program, all view program, screening program, threshold program, and isopter program. 3) In addition to many static examinations, the instrument allows you to carry out dynamic examinations, time – reduced examinations (in time reduction mode), and manually – operated examinations. 4) It is also available with Kowa’s original examination program that allows you to conduct perimetry in combination with a fundus image and check the correspondence between the perimetry result and the fundus image. 5) An examination result is automatically saved upon completion of the exanimation. 6) The threshold program is provided with many functions for displaying and evaluating examination results. 7) The isopter program is provided with a visual field defect grade determination support function. 8) Examination results of both eyes can be displayed and printed, facilitating comprehension of the perimetry of both eyes. 9) It is possible to conduct multiple examinations. The results of these examinations can be displayed and printed. These records make chronological changes easy to observe. 10) Examination results can be printed (printer available separately). In addition, a USB or Ethernet connector can be used to transfer the examination results to external media and personal computers. 14 1 System description 1.4. Name and function of each component Main body Head rest <Applied part> Place the patient’s forehead against the head support, and ensure stability to prevent the face from moving. To examine the right eye, place the forehead against the left dent. To examine the left eye, place the forehead against the right dent. D o me Describe inside the main body. Headband <Applied part> Stabilizes the head position of the patient. Touch panel Allows you to perform operation and data display of this instrument. Data is input by an accessory input pen. Sub-power switch Toggles the operating state of the instrument between Active and Standby. Lens holder Set a corrective lens in. Move back and forth to adjust the distance between the examined eye and the lens. House it when not used. Chin rest <Applied part> Place the patient’s chin on the chin rest, and put it into the stable state to prevent the face from moving. To examine the right eye, place the chin in the left dent. To examine the left eye, place the chin in the right dent. Response button <Applied part> Used while being held by the patient’s hand. The patient pushes the button upon confirmation of the stimulus. Projection lamp cover Remove this cover to replace the projection lamp. Power switch Switches the power ON or OFF. (ON: I 、OFF: ○) USB connector Ethernet connector AC inlet with fuse-holder Insert the power supply cable. A fuse is contained. 15 Display section [Input screen] Menu buttons [Setting] Sub-menu buttons Patient information Eye fixation monitor Chin rest move buttons Examination program Date and time Menu buttons [Setting] Open the corresponding screens: input screen, examination screen, result screen, and chronological change screen. These buttons are placed in the same layout on any screen. The button corresponding to the currently opened screen is shown as if depressed. The buttons which cannot be chosen are shown with black letters on a faint color background. Allows you to make necessary settings. Appears in the same way on any screen. Not available when the examination screen is open. Sub – menu buttons Perform the corresponding operation. The buttons which cannot be chosen are shown in faint color. The buttons vary with the screen. Eye fixation monitor Used to monitor the examined eye. Touch to enlarge an image. Touch again to restore the image. Chin rest move buttons Move the chin rest up, down, left, and right. Used to align the position of the examined eye. Caution message appears during operation of the buttons. 16 Patient information The entered patient information appears. When a text box is pressed, the corresponding input dialog appears. Examination program The specified examination program and its parameters are shown. When a text box is pressed, the corresponding program selection dialog appears. Date and time The current date and time are shown. Shown in the same way on all screens. To set the date and time, press [Setting]. 1 System description [Examination screen] Examination program Corrective lens holder mark Examination point pattern display area Response button mark Examined eye Patient information Examination information Examination status Gaze monitor result display Stimulus presentation point Examination point Response button mark Appears while the response button is being pushed. Stimulus presentation point Corrective lens holder mark Examined eye Appears while the corrective lens holder is standing. Eye being examined is indicated as Left or Right. Point where a stimulus is currently presented. Patient information Gaze monitor result display Appears when the gaze monitor function is active. Patient information entered from the input screen is shown. Examination program Examination information Examination program name (program content) is shown. Examination information is shown including examination date, time, and parameters. Examination point pattern display area Examination status Examination point pattern appears according to the selected examination program. Examination status is shown including examination reliability and remaining examination points. Examination points Points where a stimulus is presented. Upon completion of examination, the examination result for the point is shown according to the examination type. 17 [Result display screen] Examination program Examination result change buttons Result count button Examination result display area Examination program Shows the name of the examination program to be displayed. Examination result display area Shows the examination result and analysis result. Examination result change buttons Sequentially change the display of the examination result. Result count button [Sequential No. of displayed result/Total results] is shown. Press to show a list of examinations conducted with the same ID. 18 1 System description [Chronological change screen] Artifact button Reliability button Exception button Chronological change graph and data display area Examined eye information Chronological change graph and data display area Shows a chronological change graph and data. Examined eye information Shows examined eye information for chronological change. Artifact button Press to show a graph of examination result analysis indexes with artifacts considered. Reliability button Shows a graph excluding the examination results in which any of examination reliability (Fixation Loss, False – positive Reaction, and False – negative Reaction) exceeds the reference value (20%, 33%, or 33%). Exception button Selectable when an MD or VFI graph is displayed. Allows you to specify and exclude examination results from calculation of the MD and VFI linear regressions. 19 2. Installation 2.1. Installation This instrument must be installed by personnel familiar with handling of the instrument according to the installation instructions. (See the Service Manual). ① Mount this instrument on a motor–operated optical table (available separately). <Installation location> ・Place on a horizontal surface in a robust location ・Avoid hot air and moisture ・Avoid exposure to direct sunlight ・Place in a darkroom or a room where luminance can be reduced as low as a darkroom ※ When installing the instrument against the wall, provide a distance of approximately 15 cm between each side of the instrument and the wall. ② Insert the plug of the response button to the response button jack, and insert the protruding portion of the response button to a hole in the left side of the touch panel. ③ Attach the headband to the left and right of the head rest, respectively. ④ Attach the input pen – strap to the hole in the lower left of the touch panel. ⑤ Confirm that the power switch is OFF (○ side), and connect the power supply cable to the AC inlet. ⑥ Insert the power supply cable to the power outlet. This instrument is floor–standing type (not intended for moving). When it is necessary to move the instrument, contact Kowa or your Kowa dealer. Example of installation Warning Obligatory Warning Prohibitory 20 Make sure the instrument is properly grounded to prevent bodily injuries. Connect the plug into the threewire grounding type outlet with ground wire. Otherwise, Warning High–Voltage electrical shock may occur. Do not place the instrument close to the wall, because it is too difficult to remove the power supply cable from AC inlet. 2 Installation 2.2. connecting an external device This instrument is provided with 2 USB connectors and an Ethernet connector as the external interface connector, allowing data output to a printer, media, and a personal computer. When it is necessary to install printer drivers for connecting a printer to the instrument, contact Kowa or your Kowa dealer where you purchased the instrument. In addition, for connecting the instrument to a personal computer, contact Kowa or your Kowa dealer as well. Do not connect or disconnect any external device during examination. Otherwise, it may cause data to be lost. When you use a peripheral device and/or other external device connected to the peripheral device, it must meet all applicable EN (IEC) standards. Data processing devices must meet IEC 60601–1 or IEC 60950. Systems that use such data processing devices must meet IEC 60601–1–1. The system administrator who builds such a system bears all responsibility to have the system comply with the requirements of IEC 60601–1–1. Should you have any questions, contact Kowa or your Kowa dealer. 21 3. Flow of operations 1. Startup (P.24) Darken the room for examination. Set the power switch to ON (| side). Press the sub-power switch. 2. Patient information input and examination program setup (P.27) Enter patient information (ID, name, date of birth, etc.). Set the examination program and parameters. Mount the corrective lens on the corrective lens holder according to the examined eye. Program selection dialog 3. Preparation for patients and alignment of examined eyes (P.71) Explain the instrument and examination to the patient. Cover the eye not to be examined. If the eyelid of the examined eye partially covers the pupil, lift the eyelid and keep it up with tape or the like. Seat the patient and adjust the height of the chair. Adjust the height of the top panel of the motor – operated optical table. Alignment of examined eyes Place the chin of the patient on the chin rest, and place the forehead of the patient against the head rest, setting the face in the stable position. Align the eye of the patient to the center of the dome. Adjust the distance between the examined eye and the corrective lens. 22 3 Flow of operations 4. Practice (P.76) Explain how to use the response button to the patient. Ask the patient to practice using the response button so that the patient will understand the examination. 5. Examination (P.76) Start the examination. Pay attention to the condition of the patient during examination, and check the position and fixation of the examined eye. 6. Result display (P.96) Upon completion of the examination, the examination result display is displayed. Tell the patient that the examination is finished, and release the patient. The eye not to be examined is not covered. Examination 7. Ending (P.24) Press the sub-power switch. When the message “Do you wish to exit the KOWA AP-7000?” appears, select [OK]. Confirm that the power lamp is lit in orange (STANDBY), and then set the power switch to OFF. When ending the examination, be sure to follow the procedure described in “4.1 Switching on and off the instrument”. Do not turn off the power switch when the power lamp is not lit in orange (STANDBY). Otherwise, it may cause a failure or data loss. 23 4. Preparation for examinations 4.1. Switching on and off the instrument How to start the instrument 1. Confirm that the surrounding area of the instrument is dark enough to perform an exanimation. 2. If any peripheral device such as a printer is connected to the instrument, set its power to ON. 3. Set the power switch to ON ( | side), and confirm that the power lamp is lit in orange. 4. When the sub-power switch is pressed, the orange power lamp goes off, and then the green power lamp is lit. 5. The touch panel shows the messages as shown on the right. The chin rest will move for initialization and the following confirmation message appears. Select [OK]. The instrument will start the initialization. Sub-power switch 6. Approximately one minute later, the input screen appears on the touch panel, and the startup operation is complete. ※ During the initialization of this instrument, motor initialization and light adjustment are started upon stabilization of the lamp intensity. In this case, a bright room disables light adjustment. Be sure to operate the instrument in a darkroom. In case of a failure in light adjustment, an initialization error message appears as shown below. When the input screen appears, the light adjustment is complete. The cursor on the touch panel is shown in the hourglass shape when the motor initialization is started, and it is shown in the original shape when the light adjustment is started. 24 4 Preparation for examinations Caution Prohibitory Since the chin rest automatically operates for initialization, do not touch the chin rest or the exterior on the front. Otherwise, it may cause injury. 25 How to stop the instrument 1. Press the sub power switch (which does not respond on the examination screen). 2. When the finish message “Do you wish to exit the KOWA AP-7000?” appears, select [OK]. Sub-power switch 3. Approximately 20 seconds later, the screen enters the state without any data displayed (black screen). 4. Confirm that the power lamp is lit in orange (STANDBY), and then set the power switch to OFF (○ side). When terminating the instrument, always use this procedure. Do not turn off the power switch when the power lamp is not in orange (STANDBY). Otherwise, it may cause a failure or data loss. 26 4 Preparation for examinations 4.2. Operations available with the input screen Upon startup of the instrument, the input screen is automatically opened. The input screen also appears when the menu button [Input] is pressed on another screen. The input screen allows you to make preparations for an examination including patient information input and examination program selection. Input screen The input screen allows you to perform the following operations: Open a patient ID list and load patient information. (P.28 4.3 Loading patient information by [Open List]) Input information about a patient. (P.30 4.4 Patient information input) Load patient information from an advance entry list. (P.38 4.5 Loading patient information from the advance entry list) Clear patient information. (P. 39 4.6 Clearing the patient information) Select and register examination programs and parameters. (P.40 4.7 Setting of Examination Program and Examination Parameter) Make settings for perimetry on fundus images. (P.57 4.9 Perimetry examination with fundus images) Make various settings. (P.59 4.10 Configuration settings) 27 4.3. Loading patient information by [Open List] When you press [Open] on the input screen, the patient ID list dialog appears. In the patient ID list dialog, [Patient ID list] is selected as the default. The patient ID list shows a list of ID information of the patients that have been examined so far. The list consists of the following information items: ID Name First Last N You can load patient information from this patient ID list. When you press a line of the patient information that you wish to load, the line is selected and its background color turns Orange. When you press [OK], the selected patient information is loaded to show the result of the most recent examination that this patient had. When you press [Cancel], the patient ID list dialog is closed to go back to the input screen. When you press [List All Examinations], a list of all examinations that have been conducted so far is shown. The list consists of the following information items.ID: Name Examination Date Examination program Examination eye (Right or Left) No.(Examination serial number) When you load information from this list, the result of the selected examination is shown. The patient ID list allows you to search for data through extraction with the ID, name, and date. When you input multiple IDs, names, and dates (See P. 31 and P. 33 for the input method), and press [Start search], the applicable information is extracted and shown in a list. Press [Reset search] to go back to the original patient ID list. When you press [Today], only the patients that had examinations on that day are extracted and shown. 28 4 Preparation for examinations You can press [Export] in the patient ID list dialog to export all examination results of the selected patient or selected examination results. You can set the export destination, file format, file name, and content of the examination result using the procedures in “4.10 Configuration settings.” When the selected export destination has data with the same file name as the selected file name, a confirmation message appears. When you select “Same as,” the selected file is saved as “file-name-O.” (O stands for a number.) When you select “Overwrite,” the selected file overwrites the existing file. After selecting either one, press [OK], and the file is saved in the selected save mode. When you press [All OK], the selected items are applied to all examination results of the selected patient. When you press [Delete] in the patient ID list dialog, a confirmation message appears. Press [OK] to delete the data of the selected ID. Press [Cancel] to close the confirmation message dialog without deleting the data. You can press [List All Examinations] to delete one selected examination result. When you press [Safety Remove Hardware] in the patient ID list dialog, a list of devices connected to the USB connector is shown. Select devices to remove and press “Stop”. The selected devices are safely removed. (P. 69.) 29 4.4. Patient information input Input information of patients. The input information consists of the following items: Patient information (ID, Name, Correction, Sex, Doctor, Visual Acuity, Diagnosis, Pupil Diameter, Eye pressure, Comment, Drug Administration) Program Parameter When you select a text box on the input screen, the corresponding input dialog appears. (For details on the input method, see the subsequent sections.) When you press [Input Data] in the upper left of the input screen, the patient information input dialog appears. It allows you to input the ID, name, Date of birth, and correction of each patient. When you select a text box, the corresponding input dialog appears. (For details on the input method, see the subsequent sections.) When you press [OK] with necessary items input, the patient information is transferred to the input screen. When you press [Cancel], the dialog is closed, and the input screen returns without any input information. When you press [Registration List], the input information gets registered in the advance entry list. When you press [Clear] in the upper right, all input information is cleared. When you press [Input Data2] in the lower left of the patient information input dialog, input dialog 2 appears. It allows you to input the following information: sex, doctor, visual acuity, diagnosis, pupil diameter, eye pressure, comment, and drug administration. (For details on the input method, see the subsequent sections.) When you press [OK] after inputting necessary items, the patient information is entered. When you press [Cancel], the dialog is closed returning to the previous patient information input dialog without any information entered. When you press [Clear] in the upper right, all input information is cleared. 30 4 Preparation for examinations When you press [Resistration list Delete], the entry list deletion dialog appears. It allows you to select and delete items from the lists of doctors, diagnosis, comments, and drug administrations. When you select an item and press [Delete], a confirmation message dappears. When you press [OK], the selected item is deleted. When you press [Cancel], the confirmation message dialog is closed. When you press [OK] upon completion of the deletion operation, the entry list deletion dialog is closed. It is not necessary to input all the patient information items. However, ID and Date of birth are required and must be entered. The ID is required for identifying examination result data. The date of birth is an important parameter for examinations. When you press [Examination] without the ID and date of birth input, a message dialog appears as shown below. If “Prohibit No ID” is set to OFF in the Configuration dialog (P. Error! Bookmark not defined.), you can press [Cancel] to proceed with the examination without entering an ID. If the Date of birth is not entered, the quality of the examination will be reduced and some analysis functions will be unavailable. 31 4.4.1. ID (Value) If you select “ID” in the Configuration dialog and set “Input” to “Value,” the ID input dialog appears when you select the ID text box on the input screen. You can input an ID using up to 32 characters. Use the keyboard in the dialog to input the ID. [BS] :Deletes the preceding character. ID input dialog After entering the ID, press [OK]. To cancel the input operation, press [Cancel]. When you input an ID of a patient who has been examined before, the name, birth date, sex, correction, and visual acuity in the most recent examination associated with the ID are automatically input. If you input the ID of a patient who has not been examined before but information other than the ID of the patient has already been entered, a confirmation message appears to clear the patient information. When you press [OK], the input ID is entered and the patient information is cleared. When you press [Cancel], the input ID is entered without clearing the patient information. 4.4.2. ID (Name) If you select “ID” in the Configuration dialog and set “Input” to “Character,” the name input dialog appears when you select the ID or Name text box on the input screen. You can input characters in the same way as in the ID input dialog. Up to 32 characters can be entered for an ID. The available number of characters for each name is as shown below depending on the number of displayed names (P. 59). No. of displayed names is 1:32 characters No. of displayed names is 2:15 characters for each input box No. of displayed names is 3:10 characters for each input box Name input dialog 32 4 Preparation for examinations 4.4.3. Date of birth When you press the Day, Month, or Year input box for Date of Birth, the corresponding input dialog appears. The selected item (Day, Month, and/or Year) is shown in Orange. You can input a value using the numeric keys in the dialog. To delete the entered value or selected value, press [Clear] in the lower right. To delete all values, press [All Clear] in the lower left. Year input box Month input box Day input box After entering the date of birth, press [OK]. To cancel the operation, press [Cancel]. ※ The available date of birth begins with 1 January 1895. 33 4.4.4. Correction When you press the Correction text box, the correction input dialog appears. An examination at a point within central 30° requires near correction at a distance of dome diameter 30 cm. This input dialog allows you to input a near correction value for performing the examination at a point within central 30°. You can directly input a numeric value. However, the instrument is provided with a function of enabling a distance correction value input to automatically calculate a near correction value when a corrective lens is used. (Near correction value calculation requires the date of birth to be input in advance.) 1 Selecting the correction method For the near correction input, you can press on the right of the “Method” text box to open the drop – down list and select the method from the list. If correction values are entered with “Method” set to “None” in “ 2 Inputting correction values ” and subsequent steps, “Method” is automatically set to “Lens.” 2 Inputting correction values You can input both distant and near correction information for each eye. The selected item is shown in Orange. You can input a value using the numeric keys in the dialog. Press [Clear] in the lower right to delete the selected value and [All Clear] in the lower left to delete all values. Upon completion of correction value input, press [OK]. To cancel the value input operation, press [Cancel]. ① Sph (Spherical diopter power), Cyl (Cylindrical diopter power) Select a value in the tens place, a value in the ones place, a value after the decimal point, and a sign in this order. The range of available values is as follows. Sph : –25 to +25 Cyl : –10 to +10 ② Axis (Axis degree) Input a value using the numeric keys in the dialog in the range of 10 to 180. 34 4 Preparation for examinations 3 Calculating near correction value from distant correction value This function should be used to calculate a near correction value by inputting a distant correction value in “ 2 correction values” above when a lens is used. If the date of birth is entered, [Distant >> near] is active. When you press [Distant >> near], the calculated near correction value is input. Inputting A near correction value is calculated from a distant correction value in the following method. No need to correct the distorted vision when the Cyl value is 0.25D or less. Sphere equivalent value is used for distorted vision when Cyl is 1.25D or less. (Spherical equivalent value) = (Spherical diopter power) + (Cylindrical diopter power) / 2 The spherical diopter power is calculated based on the table shown below. Near spherical diopter power calculation table Distance Age More than +1 0 – 0.50 – 1.00 – 1.50 – 2.00 – 2.50 – 3.00 Less than – 3.00 Less than 30 Distance * * * * * * * Distance +3.25 30 to 39 Distance +1.00 +1.00 +0.50 * * * * * Distance +3.25 40 to 44 Distance +1.50 +1.50 +1.00 +0.50 * * * * Distance +3.25 45 to 49 Distance +2.00 +2.00 +1.50 +1.00 +0.50 * * * Distance +3.25 50 to 54 Distance +2.50 +2.50 +2.00 +1.50 +1.00 +0.50 * * Distance +3.25 55 to 59 Distance +3.00 +3.00 +2.50 +2.00 +1.50 +1.00 +0.50 * Distance +3.25 More than 60 Distance +3.25 +3.25 +2.75 +2.25 +1.75 +1.25 +0.75 * Distance +3.25 *: No lens required. [Example of calculation] 1. 48-years-old Distance (S: +2.00, C: +2.00, A: 120°) Spherical: +4.00D Distorted vision: +2.00D, Adjust Axis to 120° of the lens holder. 2. 60-years-old Distance (S: +1.50, C: +1.00, A: 70°) Spherical: +5.25D (Spherical equivalent value: +2.00D, Addition power by age: +3.25D) 3. 32-years-old Distance (S: –3.00, C: +0.25, A: 40°) No correction required 4. 18-years-old Distance (S: –4.00) Spherical: –0.75D 5. 65-years-old Emmetropic (S: +0.00) Spherical: +3.25D 6. 40-years-old Distance (S: –1.00) Spherical: +0.50D 35 4.4.5. Doctor When you press the Doctor input box in patient information input dialog 2, the doctor input dialog appears. You can input a doctor’s name using up to 32 characters. The input method is the same as that of the name. When you press [Register], the input doctor is entered to the doctor list. Then, when you press , the doctor list is displayed in the drop–down menu allowing you to select the registered doctor. 4.4.6. Visual Acuity When you press the Visual Acuity text box in patient information input dialog 2, the visual acuity input dialog appears. You can input a value in the range of 0.00 to 2.00. For the visual acuity, both naked vision and corrected vision can be entered for each eye. 4.4.7. Diagnosis When you press the Diagnosis text box in patient information input dialog 2, the diagnosis input dialog appears. You can enter a diagnosis using up to 64 characters. The input method is the same as that of the name. When you press [Register], the input diagnosis is registered in the list. Then, when you press on the right of the text box, the list is displayed in the drop–down menu allowing you to select the input diagnosis. Regarding diagnosis, four items can be selected for each eye. 4.4.8. Pupil Diameter When you press the Pupil Diameter text box in patient information input dialog 2, the pupil diameter input dialog appears. The input range is from 1.0 to 15.0 [mm]. If an examination has been conducted with the pupil diameter measurement function set to ON, the most recent measurement is input. The pupil diameter measurement is a reference value. 4.4.9. Eye Pressure When you press the Eye Pressure text box in patient information input dialog 2, the eye pressure input dialog appears. The input range is from 1 to 40 [mmHg]. 36 4 Preparation for examinations 4.4.10. Comment When you press the Comment text box in patient information input 2dialog, the comment input dialog appears. You can enter a comment using up to 128 characters. The input method is the same as that of the name. When you press [Register], the comment is registered in the comment list. Then, when you press on the right of the text box, the list is shown in the drop–down menu allowing you to select the comment. 4.4.11. Drug Administration When you press the Drug Administration text box in patient information input 2 dialog, the drug administration input dialog appears. You can enter a drug name using up to 32 characters. The input method is the same as that of the name. When you press [Register], the entered drug name is registered in the drug administration list. Then, when you press on the right of the text box, the list is shown in the pull–down menu allowing you to select the drug administration. Regarding drug administration, three items can be selected for each eye. 37 4.5. Loading patient information from the advance entry list If any information registered through the patient information input dialog is available, you can load patient information from the advance entry list. (For how to register information through the patient information input dialog, see P. 30.) Press [Registration List] on the input screen, and the advance entry list appears. The advance entry list is a list of information registered through the patient information input dialog. The list consists of the following items: ID Name Date of birth Fundus images You can load patient information from this list. When you press a line of the patient information that you wish to load, the line is selected and its background color turns Orange. When you press [OK] in this state, the selected patient information is loaded and shown on the input screen. When you press [Cancel], the advance entry list is closed to go back to the input screen. 38 4 Preparation for examinations 4.6. Clearing the patient information Pressing [Clear Data] with patient information input allows you to clear the patient information. When you press [Clear Data], the clear confirmation message appears. When you press [OK], the patient information on the input screen is cleared. When you press [Cancel], the confirmation message dialog closes to return to the input screen. 39 4.7. Setting of Examination Program and Examination Parameter Use the input screen to set an examination program and examination parameters. You can select any of the examination programs shown in the table below. You can change the parameter values for each examination program. When you press [Program], the program selection diagram appears. Examination program Group Screening Supra Threshold Isopter (Kinetic) Custom Perimetry on fundus Fovea examination * 40 Program, Method, Summary Program Standard / Precision / Center / Periphery / Glaucoma / V.Meridian / Center #1 / Center#2 Method 2zone, 3zone, 4zone, Quantify Scotoma Intensity step : 5dB / provability variable (p–value) Quick mode is available (except Center#1, Center#2) Summary Effective in the first examination or group examination Program Standard / Macula / Mariotte / Optional / D–Test / Esterman Both Method Same intensity 2 zone (Only D–Test is 3zone) Summary Simple program to present stimulus of the same intensity at all the points Program Center 1 , Center 2 , Meridian, Macula 1 , Macula 2 , Periphery Method All Threshold, Quick1 / Quick2 / Super quick (Meridian has no Quick) Summary Effective to grasp the disease’s course in detail Program Isopter(Standard) / + Screening1 / +Screening2 / + Threshold Method Auto, Manual (Isopter + other examinations are automatically tested) Summary Effective to grasp the shape of a visual field as an isopter (equal sensitivity curve) Program Circle threshold / 1 point threshold / Quadrant threshold / Optional threshold○/ Optional threshold# / Screening○ / Screening# Summary Program in which you can set the stimulus positions at your option, manual examination which is performed through a dialog with a patient Perimetry combined fundus image. It is available in the Threshold Center examination (Fovea Examination) For details on each examination program, see”4.8 Each Examination Program ”. 4 Preparation for examinations 4.7.1. Examination program setting The program selection dialog allows you to change the settings for examination programs. The examination points (right eye) and parameters for the selected program are shown on the right side of the dialog. When you press [OK] after completing the program setting through [Registration list] or [Program list], the new settings are shown on the input screen. When you press [Cancel], no change is applied. [Registration list] allows you to select a registered examination program from the list. It will be more convenient if you register frequently–used examination programs. The selected examination program is shown in Orange. [Program list] does not save any changes to the program Program selection dialog settings. Use it when performing an examination not to be registered in the registration list or a one–time examination. When you select [Registration list] or [Program list] and press [Setting], the program dialog appears allowing you to change the program settings and parameter settings. The registration list and program list can be used in the same way to select an examination program or change settings. When you press [Setting], the program change dialog appears. [Registration list] allows you to make changes to the selected program, while [Program list] allows you to make changes to an examination program to be performed this time. This dialog allows you to change the selected program to another. Depending on the program, it is also possible to make ON/OFF settings for the quick mode (time reduction mode) and fovea threshold examination (fovea). When you press [OK], the change is applied and the program Program change dialog name change dialog appears. When you press [Cancel], the program change dialog is closed without making any changes. When you press [Parameter] in the lower left of the program change dialog, the parameter value change dialog appears. This dialog allows you to give changes to the parameters in accordance with the selected program. When you press [OK], the changes you have made are applied and the parameter value change dialog is closed. When you press [Cancel], the parameter value change dialog is closed without making any changes. Parameter change dialog 41 When you press [OK] in the program change dialog, the program name change dialog appears. This dialog allows you to change the program name. You can enter a new program name using up to 16 characters. When you press [OK], the program name change is reflected in the program selection dialog. When you press [Cancel], the screen goes back to the program selection dialog without changing the program name. (The changes made to the program are reflected.) Program name change dialog When you press [Add] in the program selection dialog, the program addition dialog appears. When you press [OK] after selecting or changing the program in the same way as in the program change dialog, a new program is added to [Registration list]. You can register up to eight programs. When you press [Delete], the confirmation message dialog appears for program deletion. When you press [OK], the selected program is deleted. [Program list] allows you to change the settings of each program and save the changed settings. When you select [Program list] and press [Add], the program dialog appears allowing you to make program settings and parameter settings. 42 4 Preparation for examinations 4.7.2. Examination parameter setting [Common parameters] In the description below, the values provided with the asterisk mark () are set by default. You can change those parameter values using the parameter value change dialog when necessary. ① Presentation time Standard: 0.2 sec. Optional: You can set a value in the range from 0.1 to 1.2 sec. When you press [Optional], the change button in the upper right of the dialog becomes effective. Press this button to open the numeric value input dialog, and input a new value for the presentation time. ② Presentation interval Standard: Max. 1.5 sec., Min. 0.6 sec. Long: Max. 3.3 sec., Min. 0.6 sec. Auto: The maximum interval is automatically set according to the response time of the patient during an examination. When you press [Auto], Standard and Long appear below it. Then, you can select either one for the initial value. ③ Stimulus size III Select from I through V, which correspond to the Goldmann’s stimulus sizes I through V. ④ Blind spot size II Select from I through V, which correspond to the Goldmann’s stimulus sizes I through V. ⑤ Fixation loss ON Select ON to stop the current examination when a fixation loss takes place during the examination. Select OFF to perform no fixation loss examination with blind spot stimulation. You can re–set the blind spot during an examination only. (P. 79) ⑥ False – positive reaction ON To perform the false – positive reaction examination (ON)/Not to perform (OFF) ⑦ False – negative reaction ON To perform the false – positive reaction examination (ON)/Not to perform (OFF) ⑧ Stimulus color White You can select one from four colors of white, blue, green, and red. ⑨ Background color White You can select one from two colors of white and yellow. When the background color is set to yellow, the background intensity becomes 100 cd/m2. ⑩ Fixation Center: Only one point at the center of the dome is set as the fixation target. Aux: 4 points at a position of 8.75 degrees from the center of the dome are set as the fixation target. When a patient has a visual field defect in the macular area and cannot see the target at the center, select Aux and tell the patient to see the center of the 4 points. You can set the intensity of the fixation target by moving the slider on the right upward or downward. 43 ⑪ Gaze monitor ON Activate or deactivate the gaze monitor function (P.95). ⑫ Pupil diameter ON Activate or deactivate the pupil diameter measurement function. ※ The pupil diameter measurement result is a reference value. ⑬ AP–340 When you press this button, the size, presentation time, and color of the stimulus are set to those which most closely approximate the settings in automatic perimeters KOWA AP-340 and AP-125. 【Screening / Supra Parameter】 The values provided with the asterisk mark () are set by default for screening. ① Intensity Set the method of determining the level of the normal sensitivity curve which is used as the standard for intensity of the stimulus. By Age: The values of the normal sensitivity curve for each age are automatically set based on the input date of birth. Pre – Test: The thresholds of the 4 points that are at a position of about 12.7 degrees from the center of the dome are checked at the beginning of an examination. The normal sensitivity curve is determined by the response result. Optional: You can set a value in the range of 0 through 50 dB. When you press [Optional], [Change] below it becomes effective. When you press [Change], the numeric value input dialog appears. Then, you can input a value. The normal sensitivity curve is determined with the set value as a reference. ② Zone 4 Select from 2, 3, and 4. ③ Reference value P–value Select p–value or 5 dB. P–value can be selected only for Center #1 or Center #2 examination. ④ Quantify Scotoma OFF Select ON/OFF. If you select ON, be sure to make Quick ON/OFF (P.40) setting as well. 44 4 Preparation for examinations 4.8. Each Examination Program 4.8.1. Screening The screening examination programs include Standard, Precision, Center, Periphery, Glaucoma, Hemianopia, Center #1, and Center #2. Since each program is provided with the quick mode except for Center #1 and Center #2 programs, 14 programs are available for screening examinations. Screening examination Program Standard Quick Precision Quick Center Quick Periphery Quick Examination Area and Points Examination Time [min.] Within 60° 83 points 3 to 5 Within 40° 64 points 2 to 4 Within 70° 140 points 5 to 8 Within 60° 93 points 3 to 5 Within 30° 82 points 3 to 5 Within 30° 69 points 3 to 4 30° to 70° 58 points 2 to 3 30° to 60° 24 points 1 to 2 Summary General screening, at the first exam, Glaucoma and Hemianopsia Middle to end stage glaucoma Hemianopsia Glaucoma Retinal disease To grasp the progression of the middle stage glaucoma, etc. Bjerrum area, contain nasal step Within 50° 117 points 4 to 6 Within 30° 72 points 3 to 4 Within 60° 53 points 2 to 3 Within 50° 31 points 1 to 2 Center #1 Within 30° 76 points 3 to 5 Normal, Glaucoma, Regional disease, Brain disorder Center #2 Within 30° 54 points 2 to 3 Normal, Glaucoma, Regional disease, Brain disorder Glaucoma Quick Hemianopia Quick Early detection of glaucoma Early to middle stage glaucoma Hemianopia * Examination Time applies to the examination conducted with four zones. When the examination is conducted in two or three zones, the examination time is shortened. However, it may be long if Quantify scotoma is executed. Screening – Standard (Reference value:P–value) 45 1 Examination method The Screening examination adopts the method of dividing the sensitivity of a patient at each point into two or more steps (zones). The number of zones can be selected from 2, 3, and 4. The presented stimulus intensity for dividing the sensitivity into zones varies with the setting of the reference value (5 dB or p–value) (See the table below). The reference value “p” is available only for Center #1 and Center #2 examinations. All the screening examination programs use the same examination method except for the examination points. The examination points are arranged differently between the normal mode and the quick mode. The quick mode provides a rougher point arrangement, but the examination time is shorter. Stimulus intensity by setting of number of zones and reference value [dB] Zone Stimulus intensity Reference value Standard 5dB Normal values for each age – 5dB P–value the intensity that total deviation becomes p=5% Stimulation 1 Stimulation 2 2 3 4 5dB The normal values for each age – 10dB P–value the intensity that total deviation becomes p=1% 5dB P–value 10000asb(0dB) (Maximum) ① In case of examination with 4 zones and reference value 5 dB The first stimulus is presented with the intensity 5 dB lower than the normal sensitivity curve value at each examination point: Standard. The stimulus is presented twice at the points without any response from the patient. Next, for the points where the patient cannot see the stimulus, the stimulus is presented with the intensity 5 dB lower than the first intensity: Stimulation 1. Finally, for the points where the patient still cannot see the stimulus, the stimulus is uniformly presented with 10,000 asb (0 dB): Simulation 2. Then, the examination finishes. ② In case of examination with 2 zones and reference value p–value The first stimulus is presented with the intensity of “p=5%” at each examination point: Standard. For the points without any response from the patient, the stimulus is presented again. Then, the examination finishes. When the reference value is 5 dB, the intensity lowered by 5 dB means the intensity 5 dB brighter (about three times). When the reference value is p–value, the intensity of “p=5%” shows the following: for example, if the patient is “X”years-old and the intensity of “p=5% for the “X”–years–old people at an examination point is “Y” dB, “less than 5% of the “X”–years–old healthy people cannot see the stimulus with the intensity of “Y” dB at the examination point.” When the patient cannot respond to the stimulus of “p=Z%,” it is considered that the abnormality degree becomes higher as the value of “Z” is smaller. Therefore, when the p–value is used as the reference value, zone dividing can be performed based on the database of normal visual fields of healthy people. When the “Quantify scotoma” is set to ON during the parameter setting, the threshold examination is performed for the points that have been classified as the relative scotoma as a result of screening (the points where the patient could not see the stimulus with the Standard intensity in two zones or the points where the patient could not see the stimulus with the Standard Intensity, but could see it with Stimulation 2 intensity in three zones). As a result of the threshold examination, the loss from the normal value is quantified in units of dB. (For details on the threshold examination, see “4.8.3 Threshold”) Screening – Glaucoma (Quantify scotoma: ON) 46 4 Preparation for examinations ※ Normal Sensitivity Curve The normal sensitivity curve is a visual field map of a person with a normal visual field. The sensitivity differs in individuals and by ages in people, however, the sensitivity distribution (the shape of a visual field) is almost the same. If a visual field is abnormal (if the sensitivity drops partially), the relative scotoma appears in the normal sensitivity curve in the Screening examination. superior 上 60 temporal 耳 100 60 nasal 鼻 Sensitivity [dB] 感度[dB] Sensitivity [dB] 70 inferior 下 視野角[°] Visual angle [degrees] Visual angle [degrees] Sectional view of the macular area and the Mariotte blind spot(Left eye, Temporal–Nasal) Sensitivity [dB] Sensitivity distribution of a normal visual field (Left eye) Normal sensitivity curve Standard Stimulus 1 Stimulus 2 Visual angle [degrees] Intensity of the Presented Stimulus in Screening Examination (Zones: 4, Reference value: 5dB, Mariotte blind spot: Omitted) Intensity of the Presented Stimulus in Screening Examination. For the point where the patient could not see the stimulus, the ● mark is given. 2 Parameter setting ① Common parameter You can set the following parameters: Presentation time, presentation interval, stimulus size, blind spot size, fixation loss, false–positive reaction, false– negative reaction, stimulus color, background color, fixation, gaze monitor, pupil diameter measurement, and AP– 340 ② Screening parameter You can set the following parameters: Intensity, Zone, Reference value, Quantify scotoma 47 4.8.2. Supra There are 6 kinds of examination programs, Standard・Macula・Mariotte・Optional・D–Test・Esterman Both Supra Examination Program Program Examination Area and Points Examination Time [min.] Summary Standard Within 60° 83 points 3 to 5 General Group examination (Glaucoma exam, etc.) Macula Within 10° 21 points 1 to 2 Abnormal visual field in the macular area Optic nerve disease Mariotte Within 10°around the blind spot, 21 points 1 to 2 To grasp the tendency of Mariotte’s blind spot to enlarge in the early stage glaucoma Optional Within 80° select from 331 points 1 to 18 An examiner selects the quadrant, Regional disease, brain disorder D–Test Within 60° 139 points 4 to 6 General Esterman Within 80° 120 points Both 3 to 5 General Group examination Example of supra examination result screen 1 Examination method The Supra examination adopts the 2-zone method dividing the sensitivity of each point into 2 steps. (3–zone method for D–Test only.) Unlike the Screening examination, the normal sensitivity curve is not used, and all the points are examined at the same intensity. The intensity is set during the parameter setting. When you select Macula, the fixation target is automatically set to the 4 points at the lower center. In the Optional site examination, the examination point is selected before an examination. 2 Parameter setting Common parameter You can set the following parameters: Presentation time, Presentation interval, Stimulus Size, Blind spot size, Fixation Loss, False – positive reaction, False – negative reaction, Stimulus color, Background color, Fixation Target, Gaze monitor, Pupil diameter measurement, AP–340 However, if you select Macula, the fixation target is automatically set to the 4 points at the lower center disabling gaze monitoring and pupil diameter measurement. ① 48 Supra parameter Intensity Optional (31dB) When you press [Change], the numeric value in put dialog appears to allow you to input the intensity value. 4 Preparation for examinations 3 About Esterman Both When the Esterman Both examination program is used, examinations are performed with the chin rest moved fully to the right and the face placed on the left portion of the chin rest. Any corrective lens is not used. If a patient wears glasses daily, perform examinations with the glasses on. In Esterman Both, the examination parameters are set as shown in the table below. Parameter Setting Presentation time 400 ms Stimulus size III Fixation loss OFF Stimulus color Background color White White Gaze monitor OFF Pupil diameter OFF Intensity 10 dB You cannot change the examination parameters other than the presentation time, presentation interval, false-positive reaction, false-negative reaction, and fixation. Esterman Both displays “Esterman score [%] (No. of responses/Total of points)” in the lower right of the result screen. Esterman score [%] The Esterman score [%] is calculated by the following equation: (Esterman score [%]) = (No. of responses) / (Total of points) x 100 49 ② 4.8.3. Threshold There are 6 kinds of examination programs, Center 1, Center 2, Meridian, Macula 1, Macula 2, and Periphery Threshold Examination Program Program Examination Area and Points Center 1 6 to 8 Within 30° 76 points Super Quick 4 to 6 Within 30° 54 points S Quick Macula 1 Within 50° 14 points Within 5° 21 points 2 to 3 2 to 4 2 to 3 Within 10° 68 points Quick 7 to 12 5 to 7 Periphery 7 to 12 30° to 60° Quick 2 to 4 68 points 5 to 7 Example of threshold examination result display 50 General, Glaucoma, Regional disease, Brain disorder 2 to 3 Quick Macula 2 General, Glaucoma, Regional disease, Brain disorder 6 to 10 Quick 1 Meridian 3 to 6 2 to 4 Center 2 Quick 2 Summary 8 to 14 Quick 1 Quick 2 Examination Time [min.] Detailed examination by combining with other programs Abnormal visual field in the macular area Optic nerve disease Abnormal visual field in the macular area Optic nerve disease End stage glaucoma Whole visual field (Used together with the Center threshold) 4 Preparation for examinations 1 Examination method An examination is performed by making measurements up to the threshold of each examination point with the varied intensity of the stimulus. For the Meridian threshold examination, a meridian to be examined is first selected. When you select Macula, the fixation target is automatically set to the 4 points at the lower center. The programs other than the Meridian have the quick mode. The Center 1 and 2 have 3 kinds of quick mode (Quick 1, Quick 2, and Super quick), while the Macula and Periphery have one quick mode (Quick). In the quick mode of the Screening examination, fewer points are examined by the same examination method as the normal mode, while in the Threshold examination, the threshold determining method is changed to reduce the examination time instead of changing the number of points to be examined. In the case of the initial examination, the initial intensity at each point is determined based on the age of the patient. For the second and subsequent examinations, it is determined based on the previous examination result. It is also determined based on the previous examination result when the current examination is Threshold – Center 1 (2) and the examination of Screening – Center #1 (#2) with p–value as the reference value has been carried out in the past. ① Normal (Quick OFF) : All Thresholds Examination The threshold is determined by 4dB-2dB Bracketing strategy. First, a stimulus with an intensity assumed to be visible to the patient is selected from the normal sensitivity curve and presented. When the patient makes a response, the stimulus is decreased by 4 dB. If the patient responds, the intensity is decreased by 4 dB until the patient cannot see it. Then, the intensity is increased by 2 dB until the patient responds, which will be the threshold. If the patient cannot see the stimulus at first, the intensity is increased by 4 dB until the patient responds. If the stimulus is seen, the intensity is decreased by 2 dB until the patient cannot see it. When the patient cannot see it, the intensity is increased by 2 dB until the patient responds, which will be the threshold. ② Center 1 , Center 2 : Quick 1 Macula 1 , Macula 2 , Periphery : Quick The examination time is reduced to about 60% of that of Normal mode. It is effective for patients who cannot stand the Normal mode. The Bracketing strategy is used in principle, though the intensity is not increased or decreased by 2 dB. The intensity is changed by 3 dB (2dB in part), not 4 dB. If it is found that the examination result of a point is exceptionally different from that of other points upon completion of examination on all points, re-examination may be performed on the point only. ③ Quick 2 The examination time is reduced to about 40% of that of Normal mode. It is effective for screening. The method is the same as the Quick 1 in principle, though the points of high sensitivity will be examined roughly. The stimulus to be presented is changed during the examination depending on the response from a patient to reduce the examination time. Super quick The examination time is reduced to about 25% of that of Normal mode. It is effective for screening. The method is the same as the Quick 2 in principle, though it is more specialized in detecting glaucomatous visual field defect. This mode examines around the Bjerrum area, nasal step, fovea, and the blind spot especially. It is effective for early detection of the early to middle stage glaucoma at short times. However, the areas other than those above are examined roughly, so a very small scotoma may not be detected. 2 Fovea Examination The Fovea examination can be performed in the Center 1, 2, and Isopter + Threshold. If you set the Fovea examination to ON, the threshold of the fovea is examined at the beginning of the Threshold examination. The fixation target is automatically set to the 4 points at the lower center. After the Fovea examination, the fixation target returns to the center, and the Threshold examination starts. 3 Parameter setting You can set the following parameters: Presentation time, presentation interval, stimulus size, blind spot size, fixation loss, false – positive reaction, false – negative reaction, stimulus color, background color, fixation, gaze monitor, pupil diameter measurement, and AP–340 However, if you select Macula 1, the fixation target is automatically set to the 4 points at the lower center, disabling gaze monitoring and pupil diameter measurement. 51 Is o p t e r There are 4 types of programs: the program to examine the isopter only and the programs combined with Screening Center, Screening Center #1, and Threshold Center #1, respectively, to examine the peripheral field and center field at the same time. Isopter Examination Program Program Examination Area and Points Examination Time [min.] Summary To grasp the shape of a visual field as an isopter (equal sensitivity curve) Standard Within 80° 12 – 18 directions 2 to 4 + Screening 1 Within +30° 82 points 7 to 10 Within +30° 69 points 2 to 4 Within +30° 76 points 7 to 10 Quick + Screening 2 + Threshold Quick 1 To grasp the peripheral visual field shape and the result of the Screening within the central 30°simultaneously. 10 to 18 Within +30° 76 points 8 to 12 Quick 2 5 to 10 Super quick 4 to 8 To grasp the shape of a visual field as an isopter (equal sensitivity curve) ※ Examination Time applies to the case in which there are two isopters when an examination is performed automatically. ※ Isopter + Screening 1, Isopter + Screening 2, and Isopter + Threshold are available only when the isopter examination is performed automatically. ※ The Fovea examination can be performed in the Isopter + Threshold. Example of isopter examination result screen 52 4 Preparation for examinations 1 Examination method A stimulus with the single intensity is moved along the meridian. The points with responses from the patient are connected to grasp the shape of the patient’s visual field as an isopter. 2 Parameter setting You can set the following parameters: False–positive reaction, False–negative reaction, Stimulus color, Background color, Fixation Target, AP–340 3 Isopter setting When you select Isopter in the Program Change dialog, [Isopter] in the lower left becomes selectable. When you press [Isopter], the Isopter dialog appears to allow you to change the parameter values dedicated to the isopter examination program. The values provided with the asterisk mark () are set by default for screening. ① Test Auto: Examination is automatically performed according to the other set parameters. Manual: The location and direction of moving the stimulus can be set manually. Auto + Manual: Examination is performed automatically first, and then manually. When you select “Manual,” the examination can be conducted on up to five isopters and up to 36 directions for each isopter. * You cannot select “Manual” for Isopter + Screening 1, Isopter + Screening 2, or Isopter + Threshold. ② Start 1 When you select “Periphery 80” or “Center 30,” the movement of the stimulus is centripetal (moving from the periphery toward the center). Periphery 80: Examination starts from the outermost angle in each direction. Center 30: Examination starts from 30° in each direction. * You cannot select “Center 30” for Isopter + Screening 1, Isopter + Screening 2, or Isopter + Threshold. ③ Goal Center: When there is no response from the patient, the examination in the current direction finishes at the center. Center/Goal: When you select “Manual” or “Auto + Manual”, [Center] switches to [Center/Goal]. When there is no response from the patient, the examination in the current direction finishes at the center or goal depending on whether the direction toward the center has been selected with (Start + Direction) or (Start + Goal), respectively. Maximum: When there is no response from the patient, the stimulus passes through the center to move to the maximum range available for examination, and the examination in the current direction finishes. ④ Start 2 The default is “OFF.” When you select “Blind spot,” the examination is automatically started from the blind spot after the examination specified by Start 1 is completed. The parameters set for Start 1 are also applied to Start 2 in the same way. However, only “Stimulus (Size/Intensity)” can be set individually for Start 1 and Start 2. * You cannot select “Blind spot” for Isopter + Screening 1, Isopter + Screening 2, or Isopter + Threshold. ⑤ Interval Standard (12 lines): Meridians on both sides at a distance of 5° from horizontal and vertical meridians, 45° – 225° meridians, and 135° – 315° meridians 45°(8 lines) 20°(18 lines) 30°(12 lines) 53 ⑥ Shift The default is “OFF.” When there are two or more isopters and you set “Shift” to “ON,” the examination start direction is shifted by the angle half the interval for each isopter and the same examination start direction is set for every other isopter. When “Shift” is “OFF,” the same examination start direction is set for all isopters. When “Shift” is “ON,” you can select whether to shift the examination start direction for even – numbered isopters or odd – numbered isopters. ⑦ Order Standard: Beginning at the superior nasal side, the left eye is examined clockwise and the right eye is examined counterclockwise. Random: Examination is performed in a random order for each meridian. Manual: The stimulus presenting order can be set arbitrarily. * You cannot select “Manual” for Isopter + Screening 1, Isopter + Screening 2, or Isopter + Threshold. ⑧ Stimulus speed The default is “5/3.” Select one from 3 [°/sec], 5 [°/sec], and 5/3. When you select “5/3,” the stimulus moves at a speed of 3°/sec within 30° from the center and of 5°/sec in the rage of 30° or more from the center. Stimulus (Size/Intensity) *I/4e, *I/2e All types of stimulus (size/intensity) registered for Start 1 and Start 2 (only with “Blind spot” set) are shown in the “Stimulus” area. If you select “Blind spot” for Start 2, “I/4e” and “I/2e” are registered for Start 1 and no value is registered for Start 2 by default. Start 1 initial settings 54 Start 2 initial settings 4 Preparation for examinations Stimulus registration method i. Select the type of the start point to register: Start 1 or Start 2. (Start 2 can be selected only if “Blind spot” is set in Start 2.) ii. Select the intermediate filter (a, b, c, d, or e), intensity (1, 2, 3, or 4), and size (I, II, IV, or V) of the stimulus to be registered. iii. Press [Register], and the stimulus is registered at the selected start point. Example) To register “I/3e” for Start 2 i. Select Start 2. ii. Select “e” for the intermediate file, “3” for the intensity, and “I” for the size. iii. Press [Register]. iv. “I/3e” is added to the registered stimulus. Press Stimulus deletion method i. Select the type of the start point to delete: Start 1 or Start 2. (Start 2 can be selected only if “Blind spot” is set in Start 2.) ii. Select the stimulus to delete from the “Stimulus” area. iii. Press [Delete], and the selected stimulus is deleted. Example) To delete “I/2e” for Start 1 in the above settings i. Select Start 1. ii. Select “I/2e” iii. Press [Delete], and the selected stimulus is deleted. Press iv. “I/2e” is deleted from the registered stimulus. 4 Other When there is no response from the patient up to the end of the examination, “×” is displayed. When “Test” is set to “Auto” and there are multiple isopters, the examination is performed beginning with the stimulus which is easily visible to the patient. When “Test” is set to “Auto” and there are multiple isopters, the examination start position is determined based on the examination result if the isopter is the second or subsequent one and there is an examination result in the same examination direction. 55 4.8.4. Custom There are 7 kinds of examination programs, Circle threshold, 1 point Threshold, Quadrant threshold, Optional threshold ○, Optional threshold#, Optional Screening ○, Optional Screening #. The programs provided with symbol ○ or # in their names allow you to select the position of the examination points. Each symbol shows the point arrangement of the stimulus to be selected. The program provided with symbol ○ allows you to select one from the stimuli with the examination points arranged concentrically while the one with symbol # allows you to select one from the stimuli with the examination points arranged in a rectangular pattern. Custom examination program Program Examination Area and Points Examination Time [min.] Summary Circle threshold Within 30° 20 points 3 to 4 1 point threshold Within 30° 76 points *** Quadrant threshold Within 30° 19 points 3 to 4 Examination through a dialog with a patient is available Optional threshold○ Within 80°select from 331 points 1 to 73 An examiner selects the quadrant, Regional disease, brain disorder Optional threshold# Within 30°select from 76 points 1 to 17 Optional screening○ Within 80°select from 331 points 1 to 4 Optional Screening# Within 30°select from 76 points 1 to 18 1 Detailed examination by combining with other programs Manual examination Examination method The programs other than those of the 1 point threshold examination perform an examination for which the position of the stimulus can be arbitrarily set in the applicable method. The examination method is the same as for the threshold examination and screening examination. The 1 point threshold examination is performed manually through dialog with the patient. The threshold center 1 examination is carried out during interactive dialog with a patient in the same way as an examination with the Goldmann perimeter. If, after completing the examination, the result of a point is exceptionally different from that of other points, re-examination may only be performed on that point. 2 Parameter setting You can set the following parameters: Presentation time, presentation interval, stimulus size, blind spot size, fixation loss, false – positive reaction, false – negative reaction, stimulus color, background color, fixation, gaze monitor, pupil diameter measurement, and AP-340. However, the presentation time and presentation interval are not available for the 1 point threshold examination. For optional screening ○ and optional screening #, the following parameters are also available in addition to the above ones: Intensity, Zone, Reference value, Quantify Scotoma 56 4 Preparation for examinations 4.9. Perimetry examination with fundus images In perimetry examination with fundus images, the visual field is examined with a fundus image displayed on the screen. By overlapping the fundus image and the perimetry result, you can grasp the correspondence between the two. The understanding of whether the abnormal development of the two corresponds with each other or the abnormality of which one precedes the other will help to make the diagnosis. Custom – Optional threshold# (Perimetry examination fundus images) When you select any of the following examinations, you can perform the perimetry examination fundus images. Threshold – Macula 2 Custom – Optional threshold○ Custom – Optional threshold# Custom – Optional screening○ Custom – Optional screening# 57 You can make settings for fundus images as shown below. When you select an examination program with the perimetry examination fundus images available and press [Fundus] on the input screen, the file selection dialog appears as shown below. Example of fundus image file selection dialog When you select a fundus image file to be used, a fundus image appears. To cancel the selection, press [Fundus] again. The fundus image on the right side of [Fundus] shown in the lower center disappears to cancel the current file selection. To re–select the fundus image file, cancel the file selection once and then select the file again. ※ Performing perimetry at the points corresponding to the fundus image will cause the point correspondence to be clearer. Therefore, for the fundus image perimetry, it is recommended to use either program of Custom–Optional threshold○ and Custom–Optional screening○ which allow you to arbitrarily choose examination points and provide a shorter stimulus presentation interval. ※ The fundus image is automatically displayed upside down to fit to the perimetry. ※ The selectable fundus image file formats are BMP (*.bmp) and JPEG (*.jpg) of VGA (640 × 480) or higher resolution. When you press [Test] after selecting the fundus image file, you will proceed with the coordinate setting and examination point selection on the examination screen in this order. (P. 87) When you press [Safety Remove Hardware], a list of devices connected to the USB connector is shown. Select the devices and press “Stop” to safely remove the devices. (P. 69.) 58 4 Preparation for examinations 4.10. Configuration settings When you press [Setting], the Configuration dialog appears. You can make various settings in this dialog. [Setting] is not available during examination. Configuration dialog When you press [OK] in the Configuration dialog upon completion of settings, the new settings are reflected. When you press [Cancel], the dialog is closed without any settings changed. 1 Version of the software Shows the version of the software. 2 Destination to save data Shows the destination to save data. 3 Backup data Shows the destination to save backup data. Data backup is automatically executed upon power shut down. When you press [Setting], you can change the destination to save backup data. Select a drive other than C drive and data drives. If C drive or a data drive is specified as the backup destination, no data backup is performed. 59 4 Display of both eyes When displaying the examination results of both eyes side by side (P. 101), you can select the sides to display the results of the right eye and left eye. The default is “Left/Right.” 5 No. of displayed names You can select the number of names to be displayed. The default is “1” 6 Normal eye database Select the normal eye database to be used for analyzing and displaying the measurement results on other perimeter such as KOWA AP–6000. The default is “AP–7000” AP–7000 Regardless of the model on which measurement was made, analysis is executed with the normal eye database of KOWA AP–7000. Each model Analysis is executed with the normal eye database implemented in the model on which measurement was made. 7 Artifact When the Threshold – Center 1 or Isopter + Threshold examination is performed with this parameter set to “ON,” the MD, PSD, and Classification is calculated in consideration of artifacts such as eyelids, and a corrective lens holder is shown and printed in parentheses beside the conventional values. In order to reduce the influence of the artifact, the values are calculated from the examination points indicated in the diagram on the right excluding the points for one complete circumference. The points on the nasal side are not excluded because they are important points for diagnosing glaucomatous visual field changes. The default is “OFF” 8 Adapt position to fundus Select “ON” to correct the examination points set prior to the examination according to the blind spot position which was detected in the fundus perimetry. The default is “ON.” 9 Vision chart You can select the vision display mode from the decimal visual acuity, logMAR visual acuity, and fraction visual acuity (20ft, 60ft). The default is “Decimal.” 60 4 Preparation for examinations For the items shown below, when you press the applicable button, the corresponding dialog appears. When you press [OK] upon completion of the item setting, the dialog is closed. Then, press [OK] in the Configuration dialog, and the new setting is reflected. When you press [Cancel] the dialog is closed with the setting unchanged. 10 Export destination Select the export destination, file format, file name, and content of the examination result. The selectable file name formats are as follows. Format1(Data File) FT + serial number +.jpg or .pdf Format2(VK Export) ID_Date_Time_Directions_Type_SER.EXT Item ID Date Time Description Detail YYYYMMDD (Y : Year, M : Month, D : Date) HHMMSS (H : Hour, M : Minute, S : Second) 8 characters *Year, Month, and Day are shown in the order as specified. Patient ID Directions R (Right), L(Left) 6–byte characters 1–byte characters Type Perimetry Two 2–byte characters or nine 1–byte characters SER Data serial number * 1–byte characters .EXT .jpg or .pdf 4–byte characters Format 3(MDR) Same as Format 2 excluding that “Direction” and “Type” are placed in reverse order and “SER” is specified as “01.” The selectable output contents are as follows. Grayscale TDP value: p–value map of total deviation PDP value: p–value map of pattern deviation Print: Same as the print format ※ For the threshold examinations, the item names are shown. For other examinations, only the examination result part is shown. 61 11 Mark You can change the screening mark and grayscale mark. Screening [ 1 ] Kowa automatic perimeter “KOWA AP–3000” and “KOWA AP–5000” (earlier version) [ 2 ] Standard setting Scale [1] Kowa automatic perimeter “KOWA AP–5000” (later version)and “KOWA AP–6000” (earlier version) [2] Kowa automatic perimeter “KOWA AP–3000” and “KOWA AP–5000” (earlier version) [3] standards setting Luminance [Print] You can adjust the grayscale brightness for printing. 12 Print You can make setting for printout. Size Set the print size of the examination result for a single eye or both eyes. Regardless of a single eye or both eyes, select one from A4, A5, and A6. The print size set here applies to printing of the examination result for each eye. Therefore, for example, if A5 is set to print the examination result of both eyes, the examination result of both eyes is printed in A4 size (A5 x 2). The default is A5 for both [Single eye] and [Both]. * The print size setting is not applied to other printing styles described later (Chronological change, Multi – display, and the like). Header / Footer You can set whether or not to add a header and/or footer to the printout. The default is “OFF.” To set the header or footer, select “ON” and touch the corresponding text input box to open the input dialog. Date Set whether or not to print the date. The default is “OFF” 62 4 Preparation for examinations 13 Chronological changes You can select two graphs to display chronological changes from the following 12 items. MD [Center] PSD [Macula] Quadrant TD [Macula] PSD [Center] AGIS Classification VFI CIGTS Anderson MD [Macula] Quadrant TD [Center] Boxplot With Graph3,4 set to [ON], you can add other two graphs to display chronological changes. You can select the items from the 12 items above. Graph 3 and Graph 4 are shown when you press [Switch graph] during display of Graph 1 and Graph 2 on the chronological change screen. You cannot set the same item for Graph 1 and Graph 2 and for Graph 3 and Graph 4, respectively. 63 14 VK You can link settings to Kowa filing system “KOWA VK Series. (See “8 Link with KOWA VK Series”) Link To link up with “KOWA VK Series,” select [ON]. Drive Specify the data drive. Database Select the database type. When the KOWA VK database is MSDE, you need to set an SQL server. If you select [MSDE], set the server name and server type. Press [VK Write] to execute data write to KOWA VK. Date format Export Destination (P. 61) 64 4 Preparation for examinations 15 Link with other manufacturer’s equipment You can make settings for a link with other manufacturer’s equipment. Link To link up with other manufacturer’s equipment, select [ON]. Destination Specify the destination. This dialog allows you to perform the following 2 types of operations: ① Browsing the results of examinations executed on KOWA AP–7000 from another manufacturer’s filing system KOWA AP–7000 outputs an examination result file (images and text) to the link destination upon completion of the examination. Reading the output file from the other manufacturer’s filing system enables the examination results of KOWA AP–7000 to be browsed in that filing system. ② Transferring patient information from other manufacturer’s filing system to KOWA AP–7000 When a patient information file (test) is output from another manufacturer’s filing system to the link destination, KOWA AP–7000 the patient information is transferred. If KOWA AP–7000 has an examination result of the patient corresponding to the transferred information, the [Result] screen appears to show the latest examination result. If KOWA AP–7000 has no examination result of the patient, the [Input] screen appears. However, the above linked operations are not available when an examination is in progress on KOWA AP–7000. ※ Examination result file in (1) above 1)Image file The content and file name are the same as those in 13 Export Destination described above. However, the file type is fixed to JPG format. You can change the settings for the file from the [External output] dialog. 2)Text file The file name is the same as 1) above and is given txt as the extension. The content is as follows. [“ID,” “Name,” “Date of birth,” “Examined eye,” “Distant correction value,” “Near correction method,” “Near correction value,” “Naked vision,” “Corrected vision,” “Examination program name”] Item ID Name Date of birth Description Character string consisting of no more than 32alphanumeric characters Character string consisting of no more than 32alphanumeric characters Examination eye Correction method 0/1 0:L, 1:R Numeric of 0 to 5 0: Lens, 1: Glasses, 2: Contact lens, 3: IOL, 4: Non Sph/Cyl/Axis (sign:"+" or " – ") Sph: (sign)(Numeric value) Numeric value:0 to 20 Cyl: (sign)( Numeric value) Numeric value:0 to 10 Axis: (Numeric value) Numeric value:0 to 180 Numeric Correction value Character string of 8 numbers Visual Acuity Examination Character string program name No data is input to the items which are not filled in. Example: No item is filled in except “1” in ID (examination: “Threshold – Center”) "1","","","","//","","//","","","Threshold – Center" (“/” is input to “Corrected value” even if not filled in.) Example 001 Kowa Ichiro 19430220 (February 20, 1943) 1.2 Threshold, center(quick1) 65 ※ Patient information file in (2) above The file name is ap5.tmp. The file content is [“ID,” ”Name,” ”Date of birth”]. The content of each item is the same as that in the text file of the examination result file in (1). 16 Voices and buzzers. You can make settings for voices and buzzers. You can specify whether or not to activate the voices and buzzers individually. You can check the sound of the voice or buzzer by pressing [Test]. You can also control the volume level of the voices and buzzers and check the currently set volume level by pressing [Test]. 66 4 Preparation for examinations 17 The early stage Threshold You can set the initial display format of threshold examination results. For details about f the format, see “6.6 Analysis of Threshold Examination Result”. Color allows you to set the grayscale display to “Gray” or “Color.” With “Quick1 after the second times” set to “ON,” a message prompting to select an algorithm appears when an examination starts if Quick2 or Super quick is selected for the second or subsequent threshold center examination. 18 Card reader You can make settings for a card reader. 67 19 Analysis display You can specify whether or not to display the analysis result for each item when the threshold examination result is displayed. For details about the format, see “6.6 Analysis of Threshold Examination Result”. 20 Date You can set the date and specify the display format of the date and time. 21 Combination with database You can combine a database stored on another Kowa automatic perimeter. Select the file folder of the database to be combined. 68 4 Preparation for examinations 22 Check the intensity You can specify whether to enable or disable the intensity check on the examination screen and the yellow background intensity check during startup. If you set Background [Yellow] to “OFF,” you cannot set the background for examinations to “Yellow.” 23 ID You can make settings for ID input. When Prohibit [No ID] is “ON,” no patient information is registered and no examination can be performed if no ID is entered. When Prohibit [No ID] is “OFF,” patient information can be registered as “No ID” if no ID is entered. If fixed number of digits + 0 padding is set to “ON,” the number of digits for IDs can be fixed to a specified value. (0 is added on the left of IDs.) You can select “Alignment” to unify the number of digits of the IDs which are already registered. For Input, you can specify whether to open the ID input dialog available for numeric value or for input of both numbers and characters. 69 24 Safely Remove Hardware A list of devices connected to the USB connector is shown. Press [Refresh] to update the device list. When you press the row of the device you wish to remove, the row is selected and shown in orange. Then, you can press [Stop] to safely remove the selected device. Press [Close] to finish safe removal of hardware. 70 4 Preparation for examinations 4.11. Preparation for patients and alignment of examined eyes After entering the patient information, setting the examination program and parameters, and positioning the corrective lens in the holder if needed, prepare the patient for the examination. 4.11.1. Setting a corrective lens Set a corrective lens adjusted for the eye to be examined. ① Set up the corrective lens holder near the chin rest in the dome. ② Insert an astigmatic lens to the dome side of the corrective lens holder, and adjust the axis degree. ③ Insert a spherical lens to the chin rest side of the corrective lens holder. 71 4.11.2. Explanation for patients First, provide a relevant explanation about the examination to a patient. The patient’s comprehension of the examination influences the reliability of the examination result. Tell the patients the following matters especially. An examination is performed in a dark room, one eye is examined at a time. The eye not to be examined is covered. The patient is seated, puts the chin on the chin rest, place the forehead against the head rest to prevent the face from moving during an examination, and have an examination. Adjust the height of patient’s chair and motor–operated optical bench’s top panel while confirming with the patient so that the patient can be examined in a comfortable position. The patient takes the examination with the response button in hand. Tell the patient not to touch any devices other than the response button. While looking at the orange light (fixation target) at the center of the dome, press the button each time you see a round white light (stimulus) around the center. Demonstrate the examination by practice. Keep looking at the orange light at the center during the examination. If you do not keep looking at the orange light, the buzzer may sound and the orange light may blink. (In the case the fixation light is at the center.) Your may blink your eyes during the examination. However, do not close your eyes for long. Even a person with good eyesight may sometimes be unable to see the round white lights. If you cannot see any lights for a long time during the examination, do not worry, but surely press the button when you see a light again. You may feel like the fixation target has moved or the background light intensity is changed. If you do so, it is not unusual. Even if you feel the background is dark, press the response button when you recognize the light. The examination time may take long depending on the examination program and patient’s response. Please encourage the patient by, for example, talk about the progress status of the current examination. Since any examination can be interrupted, tell the patient what to do if the patient wants to stop the examination. If the patient keeps pressing the button, the current examination is interrupted. 4.11.3. Preparation for patients Following the explanation to the patient, prepare the patient for the examination. Cover the patient’s eye not to be examined. Insufficient covering will adversely affect the reliability of the examination results. Completely cover the eye and confirm it with the patient. If you use an eye patch, tape it onto the eyebrow to prevent a string of the eye patch from entering the visual field of the examined eye. If the eyelid of the examined eye partially covers the pupil, lift the eyelid and keep it up with tape. Use care not to lift the eyelid too much to blink. If the eyelid covers a part of the pupil, the upper visual field may occasionally be unable to be examined correctly. Upon completion of covering the unexamined eye, seat the patient to face this instrument. When the instrument is normally used, the correct relative position of the patient, operator, and instrument is as shown in the diagram below. That is, the patient confronts the dome’s opening while the operator confronts the touch panel. Remove the headbands from the instrument when not used. When the instrument is normally used, the correct relative position of the patient, operator, and instrument 72 4 Preparation for examinations 4.11.4. Alignment of an Eye to be examined After preparing the patient for the examination, align the position of the examined eye. Make sure that the chin rest and head rest are cleaned. If a corrective lens is required, be sure to set it in the corrective lens holder before the patient places his/her chin on the chin rest. When examining the left eye, instruct the patient to place the chin on the right side chin rest. When examining the right eye, instruct the patient to place the chin on the left side chin rest. Next, confirm that the patient’s head is in the stable state with the chin on the chin rest and the forehead placed against the head rest. At that time, adjust the height of patient’s chair and motor–operated optical bench’s top panel so that the patient can be examined in a comfortable position. After confirming that the patient is in the stable position, use left and right head bands to keep the head position stable. For right eye examination For left eye examination Use the chin rest move buttons in the lower left of the touch panel to move the chin rest up, down, left, or right, and adjust the pupil’s center of the examined eye with the center of the white cross hairs on the eye fixation monitor. Be careful not to catch the patient’s hand or finger between the chin rest and the main body of the instrument. A caution message appears during operation with the chin placed on the chin rest. Tell the patient to look at the orange light at the center of the dome. (In the case the fixation light is at the center.) For the patient who needs a corrective lens, adjust the lens holder to provide a distance of about 12 mm between the top of the lens and the top of the cornea. When adjusting the corrective lens holder, use care to prevent the lens from coming into contact with the patient’s eye and eyelashes. 73 5. Examination 5.1. Operations available with the examination screen When you press [Test] in the menu button area after completion of settings and preparations, the examination screen appears. The examination screen allows you to perform the operation from the examination start to the examination completion. Examination screen (before examination start) Examination screen (during examination) 74 5 Examination The examination screen allows you to perform the following operations. Turns ON when a selection program of examination point is executed. Allow a patient to practice before an examination is started. (P.76 5.2.1 Practice) Start an examination. Resume the currently interrupted examination. Temporarily interrupt the current examination. Complete the current examination. Change examination parameter values. (P.43 4.7.2 Examination parameter setting) Available before examination start and during examination interruption, but not available during examination. Make settings for voices before and during examination. (P.66 4.10 Configuration settings) The sub power switch and Setting button are not available when the examination screen is open. 75 5.2. Operational procedure in examination The operation flow of the examination from start to completion is as shown after “5.2.1 Practice.” In the following examination programs, it is necessary to select examination points before starting the examination. Threshold – Meridian Supra – Optional Custom – Circle threshold, Quadrant threshold, Optional threshold○, Optional threshold#, Optional Screening ○, Optional Screening# For details on these programs, see “5.3 Programs requiring examination point selection”. For details on the manual examinations “Custom – 1 point threshold” and “Isopter examination (Test: Manual, Order: Manual),” see “5.3.5 Fundus perimetry”. 5.2.1. Practice When you press [Practice], a stimulus is presented in the dome, so that you can show how the stimulus is presented to the patient before the actual examination. The practice takes about 30 seconds. To cancel the practice, press [Practice] again. When there is a response from the response button, the response mark appears in the upper left of the screen. You can move the chin rest during the practice. If two or more stimuli are selected for an isopter examination, pressing [Practice] will open the stimulus selection dialog box. Select the stimulus to use, press [OK], and the practice starts. Practice:Isopter stimulus selection 76 5 Examination 5.2.2. Examination Start When you press [Start] after the patient adapts to the luminance in the dome (guideline: 1 to 2 min. after the patient is seated in front of the dome), the pre–exam setting is performed as described below, and then, the examination starts. 1 Gaze monitor setting If the gaze monitor function (P. 95) is set to ON by the applicable parameter setting, the operation of acquiring the pupil position of the examined eye is performed before the examination. This operation is not executed if fixation is set to AUX or the current examination program is Threshold – Macula 1 or Supra – Macula. Perform the pupil position acquiring operation according to the given messages and voices. When the pupil position acquisition start message appears, ask the patient to look at the fixation target at the center of the dome, confirm the eye fixation on the eye fixation monitor, and press [OK]. Next, instruct the patient to gaze at the fixation target which will be lit in the lower left from the center of the dome. Confirm the fixation on the eye fixation monitor, and press [OK]. Again, ask the patient to look at the fixation target at the center of the dome, confirm the fixation on the eye fixation monitor, and press [OK]. Upon acquisition of the pupil position of the examined eye, the examination is started. If the operation fails in pupil position acquisition, a message appears as shown on the right. The pupil position acquisition failure can be caused by fixation loss, eyelashes, eyelid ptosis, opacity of the middle translucency body, small pupil, dirt on the corrective lens, reflection of the corrective lens, and the like. To retry the acquisition, confirm the eye fixation, and then press [OK]. Not to retry the acquisition, press [Cancel]. When you press [Cancel], the gaze monitor function for this examination is deactivated. 2 Diameter measurement setting If the pupil diameter measurement function is set to ON in the applicable parameter setting, the operation of measuring the pupil diameter of the examined eye is performed before the examination. Operate according to the given messages and voices. The measurement result is automatically input as patient information. You can check it in patient input dialog 2 of the input screen. (P. 36) The pupil diameter measurement result is a reference value. 77 3 Blind spot position setting If the fixation loss is set to ON in the applicable parameter setting, setting the blind spot for the patient can be performed. The blind spot position setting will be required to confirm the fixation loss. (P. 96) The blind spot position setting is not executed in the 1 point threshold examination and isopter examination. The blind spot position setting operation determines the position of the blind spot based on the response from the patient to the stimulation at a position adjacent to the blind spot. You can change the blind spot size through parameter setting. The operation from the blind spot setting to examination start is automatically executed as a series of steps. 4 Other pre-exam setting If the patient’s chin is not firmly placed on the chin rest when [Start] is pressed, the examined eye confirmation message appears as shown on the right. Confirm that the patient’s chin is surely on the chin rest and the examined eye is displayed above the patient data on the right side of the examination screen, and then, press [Cancel]. To manually set the examined eye, press [OK], select the examined eye, and then, press [OK]. If the examination is executed only in the range where the examination points are at a position of 30° or more, any examination with a corrective lens is not required. In this case, if the lens holder is set, the message “Put back the lens frame.” appears. When you put the lens holder back and press [OK], the examination is started. At the start of isopter examination with Start 1: Periphery 80 78 5 Examination 5.2.3. During Examination After the examination has started, occasionally check the eye fixation monitor to see whether the patient is gazing at the center of the dome. If the examined eye becomes out of place, move the chin rest and align the pupil’s center of the examined eye with the center of the white cross-hairs on the eye fixation monitor. In addition, since the examination takes a long time depending on the examination program, pay due attention to the patient’s condition during the examination. The stimulus presentation point on the screen is shown by an orange dot every time the stimulus is presented. During blind spot stimulus (fixation loss check), false–positive reaction examination, or false-negative reaction examination, those applicable characters are changed to orange in the lower right of the screen. For the points where the examination is completed, the result is displayed according to the examination. During the examination, the remaining number of points is shown in the lower right of the examination screen. Since the examination takes time depending on the examination program, tell the patient about it to grasp the progress status of the examination, for example, when you have finished half of the examination. To stop the examination, press [Stop]. If the patient wants to pause to resume the examination, press [Start]. To cancel the examination, press [Finish]. The patient should keep pushing the response button. When the patient releases the button, the examination is resumed. To change the stimulus presentation interval, ON/OFF status of reliability indexes (fixation loss, false–positive reaction, and false–negative reaction), blind spot resetting, or fixation target type during the examination, press [stop] to interrupt the examination, and press [Parameter] to make the desired changes. ※If fixation loss is OFF, Fixation loss is not ON during the examination. Note that you cannot change the examined eye during the examination. During threshold examination 79 When using a corrective lens and the examination point is within central 30° and more than 30° from the center, the area within central 30° is examined first. After finishing the area within 30°, the examination stops and a dialog stating, “Put back the lens frame.” appears. When you press [OK], the current examination is temporarily stopped. After confirmation of fixation, it resumes when you press [Start]. Even if the stimulus is moved in both ranges within 30° from the center, and more than 30° during the isopter examination with, for example, “Start 1” set to “Periphery 80,” no message will appear concerning the corrective lens. A meridian is shown at every 10° in the background of the perimetry coordinates and the meridian at 30° from the center is shown in pink circle. Use this line as a guide and set a corrective lens when necessary. Center 30° During Isopter examination(start1:Periphery80) 5.2.4. Completion of an Examination Upon completion of the examination, the screen switches to the examination result display. The examination result is automatically saved. Tell the patient that the examination is finished, remove the head bands, and let the patient relax. The examination result screen allows you to display and print the examination results, and change the examination result display. (See“6 Display, Print, and Analysis of Examination Results”) Upon completion of the isopter examination, the isopter is automatically plotted. When it is difficult to automatically plot the isopter during auto + manual examination, the screen goes to the one that allows you to manually plot the isopter. Select the points to plot one by one in order. To perform an examination on another patient, press [Input] to return to the base menu. 80 5 Examination 5.3. Programs requiring examination point selection The following examination programs require examination points to be selected before the examination starts. 5.3.1. Threshold – Meridian examination The examination point selection screen for the Threshold – Meridian examination is as follows. Select the meridian to examine, and press [Start]. During the examination, the examination result screen graphically shows a distribution of the threshold values on the selected meridian. Before Threshold–Meridian examination After Threshold–Meridian examination 81 5.3.2. Custom–Circle Threshold examination The examination point selection screen for the Custom–Circle threshold examination is as follows. Select the circle to examine, and press [Start]. During the examination, the examination result screen graphically shows a distribution of the threshold values on the selected circumference of circle. Custom–Circle Threshold examination After Circle Threshold examination 82 5 Examination 5.3.3. Quadrant Threshold examination The examination point selection screen for the quadrant threshold examination is as shown below. Select the quadrant to examine, and press [Start]. You cannot select two or more quadrants. If you select the second quadrant, the already selected quadrant is deselected. Before Quadrant Threshold examination 83 5.3.4. Optional examination The following examinations allow you to arbitrarily select examination points. Supra–Optional Custom–Optional threshold○ Custom–Optional threshold# Custom–Optional screening○ Custom–Optional screening# Supra–Optional (Custom–Optional threshold, and ○Custom–Optional screening ○: Same arrangement) Custom–Optional threshold# (Custom–Optional screening #: Same arrangement) 84 5 Examination You can make selections by a rectangular tool or lariat tool. The rectangular tool is effective to select all the stimuli in a certain area. The lariat tool is effective to finely select the stimulus. Both can choose two or more areas. Rectangular tool procedure ① ④ ① Select [Rectangle]. ② Touch the start point. ③ While touching, move the input pen. ④ Release the input pen. ⑤ Press [OK]. ③ ② ⑤ ⑥ The selected points are shown as ●. ⑥ 85 lariat tool procedure ① ③ ① Select [Lariat]. ② Touch the start point. ③ While touching, move the input pen. ④ Release the input pen. ⑤ Press [OK]. ④ ⑤ ② ⑥ The selected points are shown as ●. Use the same procedure to select the already selected points, press [Delete] in the dialog, and press [OK], and the already selected examination points are deselected. ※ You can use the rectangular tool and lariat tool in combination. ※ In the optional examination, [Save] appears. If you register a program with this button, the selected examination point positions are also saved. 86 5 Examination 5.3.5. Fundus perimetry When you press [Test] after selecting the fundus image on the input screen (P. 57), the operation proceeds to the coordinate setting on the fundus image and the examination point selection, in this order. The coordinate setting and examination point selection are performed in the following procedure. ④ ① ① Touch the fovea. ② Touch the blind spot. ③ Fine-tune the fovea and blink ② spot positions, respectively. ④ Press [OK]. (Press [Cancel] to return.) ③ ⑤ ⑤ Select rectangle or lariat tool. ⑥ Select the examination points in the same way as in the optional examination. ⑦ Press [Save] to save the examination points in the advance entry list. ※ If the fovea and blind spot positions are set in Threshold – Macula 2, the examination points are automatically determined. ※ If the perimetry coordinates are determined on the fundus image, the display range of the fundus image becomes the maximum examination range. ※ When “Change fundus perimetry presentation position” is ON (P. 60), the position of the examination points is corrected after the actual blind spot position is detected. 87 5.4. Manual examination 5.4.1. 1 point threshold examination Point being examined Intensity adjustment buttons Point examined already 1 point threshold examination The examination is executed in the following procedure. ① Press the button of a point to be examined. ② The examination point enters the selected state. In the dome, a stimulus with an intensity of 50 dB is presented at the point. ③ When you press any of the intensity adjustment buttons on the right side, the numeric value of the examination point is changed. In the dome, a stimulus with an intensity of the displayed value [dB] is presented. During the examination, change the stimulus intensity with the intensity adjustment buttons and have a dialog with the patient, for example, asking “Can you see this?” or “How about this?” to proceed with the examination to determine the threshold of the point. ④ Upon determination of the threshold, press [Set]. The point is recorded as an already examined point with its threshold value. ⑤ Repeat the steps ① through ④ to determine the threshold of each point. ①Before exam 88 ②Select stimulus ③Adjust intensity ④Determine and record threshold 5 Examination 5.4.2. 1 Isopter examination (Manual) Examination:Manual The manual examination of the isopter examination is executed as described below. Prior to specifying the examination point, select the intensity, size, and speed of the stimulus. Delete button Intensity/ Size selection Stimulus speed selection Stimulus moving method selection Isopter examination (Manual) If you select [Enlarge] before selecting the start position, the screen display range is enlarged by 30° toward the center. The button cannot be selected while the stimulus is moving. 89 Up to 5 isopters can be examined including the automatic examination. If you try to perform the examination with the 6th stimulus, the following message appears, disabling the examination. Max. Number of isopters ① Moving method: “Start + Direction” Press [Start + Direction] to set the stimulus moving method. Touch the examination start position. It should be within the examination available range (in the range where the meridian is shown on the perimetry axis). Upon determination of the examination start position, a maximum of 9 direction buttons appear with the start position at the center. Press the button of the direction to move the stimulus. When you press the central button, the stimulus moves toward the center of the dome. If you have selected [Center/Goal] for the goal position setting in the Isopter dialog, the moving stimulus stops at the center. If you have selected [Maximum], the stimulus passes through the center to move to the maximum range available for the current examination until the examination finishes. (P. 52.) Moving direction button displayed after start position selected 90 Moving toward the center, resulting in a response 5 Examination ② Moving method: “Start + Goal” Press [Start + Goal] to set the stimulus moving method. Touch the examination start position. Then, select one point (goal) in the moving direction. If you have selected [Center/Goal] for the goal position setting in the Isopter dialog, the stimulus stops at the goal. If you have selected [Maximum], the stimulus passes through the goal to move to the maximum range available for the examination until the examination in the current direction finishes. (P. 52.) To cancel the start point, press [×]. Goal selection screen after start selection ③ Deletion of examination results You can delete the results of an examination executed manually during the examination. Press [Delete] button and select the examination point you wish to delete. A confirmation message appears. Press [OK] to delete the examination result. To cancel the deletion, press [Cancel]. ※ You cannot delete any result of the examination that has been executed automatically. If you wish to carry out the examination again at particular points after automatic examination, perform the re-test of each point (P. 122) ※ While the [Delete] button is active, you cannot perform any examination. To continue the examination after deleting the examination result, press [Delete] again to deactivate the [Delete] button and proceed with the examination. Confirmation message for examination result deletion 91 92 5 Examination If you activate deletion of the examination result during manual examination of auto + manual examination, the examination results which cannot be deleted (the results of automatic examination) are grayed out. In case the [Delete] button is activated during manual examination of auto + manual examination ④ Completion of examination When you press [Finish] during a manual examination, the examination is finished. The results of a manual examination are automatically connected, but can also be manually connected. Upon completion of the examination, the following confirmation message appears. Confirmation message for manually connecting examination results When you press [OK], the lines connected automatically are erased to open a screen for manually connecting the lines. When you press [Cancel], the lines connected automatically become the final examination result. However, if some points that are not automatically connected are still remaining, the display transitions to a screen for manually connecting the lines. 93 Lines which are connected as an isopter are only for stimuli with which a manual examination has been executed. Select the specified stimulus points in order of connection. When a connected line becomes a closed curve, it is fixed as the examination result. If you press [OK] according to the number of unconnected point, the line is fixed as the examination result. When you press [Cancel], the connected lines are erased in sequence. Type of connected points Manual connection selection screen for manual examination 2 Order: Manual For the isopter examination, the order of presenting a stimulus can be manually determined. To set the presentation order, change the isopter parameters in the program change dialog. (P. 53) Press a button adjacent to a meridian that you wish to examine, and the stimulus begins to move. Each time the examination of a single stimulus is completed, the isopter examination is stopped. When the next stimulus is selected, it begins to move. Isopter examination screen (Start 1: Periphery 80, Order: Manual) 94 5 Examination 5.5. Fovea threshold examination (Fovea examination) In 3 examinations of Threshold – Center 1, Threshold – Center 2, and Isopter + Threshold, the fovea examination can be carried out. If you set the fovea examination to ON during program selection, the fovea examination is performed in the following procedure when the threshold examination is started. ① When you press [Start], the following message appears: “The fovea is examined first. The fixation target is at the 4 points at the lower center.” In the dome, the fixation target moves to the 4 points at lower center. Then, instruct the patient to look at the center of the 4 points. When you press [OK], the fovea examination begins. ② Upon determination of the fovea threshold, the following message appears: “The fixation target is the selected one. Next, the threshold examination starts.” In the dome, the fixation target goes back to the selected position (Center or Auxiliary). Then, instruct the patient to look at the selected fixation target. When you press [OK], the examination enters the stopped state before the start of the threshold (isopter) examination. Confirm the position of the examined eye on the eye fixation monitor, and press [Start] to proceed with the examination. 5.6. The eye fixation of a patient Perimetry presupposes the eye fixation of a patient. The eye fixation is very significant for improving the reliability of the examination. The eye fixation of a patient is checked through the eye fixation monitor by the examiner. Proceed with the examination by checking the eye fixation of the patient using the white cross hairs on the eye fixation monitor as a reference. If the eye fixation is insufficient, encourage the patient and keep trying to achieve sufficient fixation. Check whether the patient can see the fixation target and that the unexamined eye is firmly covered. It may occasionally be effective for stable fixation to interrupt the examination and give the patient a break. 5.7. Gaze monitor Gaze monitor is a function for evaluating fixation misalignment of the examined eye each time the stimulus is presented. Combined use with the fixation loss check using blind spot stimulation will improve the examination reliability. The degree of fixation misalignment evaluated by the gaze monitor function is shown in the following graphic form during examination and in the examination result. 0° Fixation check fails. Time In the examination with the gaze monitor function set to ON, the graph showing the evaluation result of the gaze monitor function extends to the right each time the stimulus is presented. The fixation misalignment is shown up to 10° on the scale in the upward direction. (The fixation misalignment of more than 10° is shown as 10°.) The red line below the graph indicates that the fixation check has failed. The fixation check failure can be caused by blinking, eyelashes, eyelid ptosis, examined eye’s misalignment, dirt on the corrective lens, reflection of the corrective lens, and the like. To set the gaze monitor function to OFF, press [Stop] to interrupt the examination, and then press [Parameter] to change the gaze monitor function setting. You cannot set the gaze monitor function to ON during an examination. 95 5.8. Examination Reliability The reliability of an examination can be tested by 3 indices below. 5.8.1. Fixation Loss (Heijl-Krakau Method, H-K Method) When the blind spot is being stimulated, the characters of “Fixation loss” are shown in orange in the lower right of the examination screen. If a fixation loss occurs, the fixation target flashes twice and a voice message for alerting is given. In the lower right of the screen, the fixation loss status and result are shown in units of percentage and in the format of Number of blind spot responses/Number of blind spot stimulations. As the value of Number of blind spot responses/Number of blind spot stimulations, that is, the fixation loss rate is increased, the reliability of the examination result is decreased. If the value reaches 20% or more, the fixation loss rate is shown in orange and XX appears on the left. XX also appears on the left of the percentage indication when printed. If a fixation loss occurs frequently, the instrument automatically checks the position of the blind spot again. Check the following in case of frequent fixation losses during the examination: Check the patient’s fixation through the eye fixation monitor. If the patient is not fixated, pause the examination and instruct the patient to be properly fixated. Check the position of the patient’s eye through the eye fixation monitor. If the eye is not aligned, align the eye with the fixation target again by stopping the examination and adjusting the chin rest. Check that the eye not being examined is properly covered. If it is not properly covered, the patient can see the stimulus of the blind spot. The instrument may detect fixation loss frequently even though the things above are checked. In this case, tell the patient not to worry about blinking of the fixation target in case of a fixation loss. Deactivate the buzzer for the fixation loss or interrupt the examination and deactivate the fixation loss function, and then, proceed with the examination by checking the fixation loss through the eye fixation monitor only. For the evaluation of the fixation loss, fixation monitoring by the examiner through the eye fixation monitor and the result of the gaze monitor function can also be used as reference. 5.8.2. False-positive Reaction The motor to change a stimulus is moved at a fixed interval and not to present a stimulus. If a patient responds to the movement or sound of the motor and pushes the button even though he/she does not see a stimulus, the number of responses increases. When the false – positive reaction examination is in progress, the characters of “False – positive reaction” are shown in orange in the lower right of the examination screen. The progress status and result of the false – positive reaction examination are shown in units of percentage and in the format of Number of responses/Number of examinations in the lower right of the screen. As the value of “Number of responses/Number of examinations” increases, the reliability of the examination result is reduced. If the value reaches 33% or more, the false-positive reaction value is shown in orange and XX appears on the left. In addition, XX also appears on the left of the percentage indication when printed. 5.8.3. False-negative Reaction A stimulus may be presented in brighter intensity at a point the patient has already responded. If a patient is asleep or lazy, the percentage increases, and this cannot be checked by the other reliability tests. When the false – negative reaction examination is in progress, the characters of “False – negative reaction” are shown in orange in the lower right of the examination screen. The progress status and result of the false – negative reaction examination are shown in units of percentage and in the format of Number of nonresponses/Number of examinations in the lower right of the screen. As the value of “Number of nonresponses/Number of examinations” is increased, the reliability of the examination result is reduced. If the value reaches 33% or more, the false-negative reaction value is shown in orange and XX appears on the left. In addition, XX also appears on the left of the percentage indication when printed. 96 6 Display, Print, and Analysis of Examination Results 6. Display, Print, and Analysis of Examination Results 6.1. Operation available with the result screen Upon completion of the examination, the display automatically switches to the examination result display screen. If you use [Open] to load a past examination result or if you press the menu button [Result] when entering the patient information containing the saved examination result, the display is switched to the examination result display screen and the most recent examination result is shown on the screen. The result screen can provide various methods of display, analysis, and printing of the examination results, which can be used for such purposes as diagnosis, progression monitoring, or informed consent, etc. Examination result screen 97 The examination result screen allows you to perform the following operations: Load the patient information and past examination results from the patient ID list. (P.28 4.3 Loading patient information by [Open List]) Print the examination results. (P.100 6.3 Print) Display the examination results of both eyes side by side on the screen. (P.101 6.4 Both eyes) Display the examination results with the same ID in multi – display mode. (P.104 6.5 6.5Multi) Display and switch the analysis result. (P.109 6.6 Analysis of Threshold Examination Result) Retest the examination result being displayed. (P.124 6.10 Editing of patient information) Edit and check the patient information of the examination result being displayed. The editing procedure is the same as in “4.4 Patient information input” (P.30) Make necessary settings. (P.59 4.10 Configuration settings) 98 6 Display, Print, and Analysis of Examination Results 6.2. Examination result switchover and list display The [Examination result switchover] button and [Result count] button (Order of displayed results/Total of results) are displayed above the patient information on the right of the examination result screen. Press [Review] to display the previous examination result of the patient with the same ID or press [View] to display the next examination result. When you press the [Result count] button, the examinations performed with the same ID are listed. You can select and display an arbitrary examination result from this list. The operation method is the same as described in “4.3 Loading patient information by [Open List]”. These operations are common to the examination result screens. Examination result changeover buttons Result count button 99 6.3. Print If a printer (available separately) is connected to this instrument, you can print an examination result. For details on the printer connection, see “2.2 connecting an external device”. When you press [Print] in the upper left of the screen, the specified examination result is printed. The printout is as shown in the diagram below. The upper portion shows the examination program name, patient information, reliability indexes, examination conditions, and the like while the lower portion shows the examination result. When you carry out the examination result analysis described in “6.6 Analysis of Threshold Examination Result” and press [Print], the examination result is printed in each analysis result format. Example of printout (all items) 100 6 Display, Print, and Analysis of Examination Results 6.4. Both eyes If both eyes of the same ID are examined on the same day, or examined before with the same program, you can display the results of the eyes side-by-side by pressing [Combination]. [Combination] becomes active when an examination result of an eye satisfying the previously mentioned conditions is available in addition to the examination result of an eye being displayed,. When you press [Combination] again, the screen returns to the display of a single eye. In this case, the screen shows the result of the most recent examination. To display the specific examination result of either eye, click the display area of the examination result and press [Combination], or double click the display area of the examination result. If you select a specific result, the text stating the left or right eye in the upper area of the result window will turn to red (normally, it is white). For setting the display arrangement of both eyes (left – right or right – left), see “4.10 Configuration settings”. If an examination is interrupted, the examination results of both eyes cannot be displayed at the same time. When you press [Analysis] during simultaneous display of examination results of both eyes, the result display of both eyes is switched to other at the same time. (See “6.6 Analysis of Threshold Examination Result”) Combination of both eyes result display screen 101 Combine the examination results of both eyes If the examination parameters for both eyes to be displayed are the same, you can combine the examination results of both eyes. Example of the combined result Press [Combination] to display the combined result as shown above. Press [Print] to print the combined result. Press [OK] to close the combined result display. Note that you cannot save any combined result. [Combination] appears only when it is possible to combine the examination results. Otherwise, it is not displayed. The combination conditions are as follows. Program Screening, Supra, Threshold, Isopter ※ Threshold – Meridian and Supra – Optional are excluded. Parameter The following parameters shall have the same values. 1) Stimulus Size, Stimulus Presentation Time, Background Intensity, Stimulus Color 2) Fixation target (Threshold – Macula 1 only) 3) Screening: Intensity (Pre Test is not available), Zone, Reference value, Quantify Scotoma, Quick 4) Supra: Intensity 5) Threshold: Fovea 6) Isopter: Auto (Manual not available), Start 2 (OFF only), Interval (Standard [12 lines] and 45 [8 lines] only) No. of isopters 102 6 Display, Print, and Analysis of Examination Results The examination results are combined in the following method. Threshold For the examination points common to both eyes, the examination results of the more sensitive eye are adopted. Left Right Combined result Screening For the examination points available only for either one eye, the examination results with those points available are adopted. Left Right Combined result Isopter In the isopter examination, the examination points of the same stimulus, which are not the actual examination results, are connected by a black line for convenience sake. Left Right Combined result 103 6.5. Multi You can press [Multi] to divide the screen into a maximum of 4 display areas and show a different examination result of the same ID in each display area. The examination results are chronologically displayed in the upper left, upper right, lower left, and lower right in this order. You can press [Multi] again to return to the normal display mode. In this case, the examination result displayed immediately before the multi – display was performed is shown on the screen. To display a specific examination result, touch once the display area of the concerned examination result to select it and press [Multi] or consecutively touch it twice. If the specific examination result is selected, the examination result number above the examination result is shown in orange (usually in green). Each time you press [Switch eye], the examined eye to display changes in the order of [Both eyes] → [L] → [R]. The Supra Esterman Both examination result is shown for all examined eyes displayed. When you press [Analysis] during multi – display mode, the display of the result for which the analysis result can be shown is switched. (See “6.6 Analysis of Threshold Examination Result”.) You can select the examination results and press [Multi] during multi-display mode to perform multi-display of the selected results only. To return to the previous multi-display mode, press [Multi] again. Multi-display 104 6 Display, Print, and Analysis of Examination Results 6.5.1. Comparing examination results The multi – display screen allows you to compare 2 examination results of the same program for the same eye. Comparing examination results display The comparison result and 2 examination results to be compared are chronologically displayed on the left and right sides of the comparison screen, respectively. Press [Print] to print the comparison result. Press [OK] to close the comparison result display. Note that you cannot save any comparison result. [Comparison] appears only when it is possible to compare the examination results. Otherwise, it is not displayed. The following examination programs are available for the comparison. Screening :Standard, Intensity, Center, Periphery, Glaucoma, V.Meridian, Center #1, Center #2 Supra :Standard, Macula, Mariotte Threshold Isopter :Center 1, Center 2, Macula 1, Macula 2, Periphery :Isopter, + Screening 1, + Screening 2, +Threshold(except isopter) A comparison cannot be performed with the result of an examination that was not completed. 105 Use the following procedure to compare the examination results: ① Press [Comparison]. ② The examination result numbers available for the comparison are shown in green. Those unavailable for the comparison are grayed out. Select the first examination result. The color of the selected examination result number turns orange. To cancel the selected examination result, select it again. Comparable Cannot be compared The examination results which can be compared with the one selected in step are shown in green. Select the second examination result. Selected Comparable with selected result The comparison screen appears. The comparison results of the examinations are displayed as shown on the next page. 106 6 Display, Print, and Analysis of Examination Results Comparing Screening examination and Supra examination results The description of the marks displayed at each point on the comparison display is as follows: ○:The sensitivity is better than the previous examination results. ・:The sensitivity has not changed compared to the previous examination results. ●:The sensitivity is lower than the previous examination results. Comparing Threshold examination results On the comparison display, the difference of the sensitivity (dB) will be displayed in a value. If the sensitivity point has decreased, the value showing difference of the sensitivity (dB) will be shown in white. 107 6.5.2. Combine the examination results For the examination results of the same eye with the same ID, you can combine the central visual field examination result and peripheral visual field examination result or the central visual field examination result and isopter examination result to grasp the whole visual field. Combine the examination results The following examination programs are available for combination. Screening – Center and Screening – Periphery Threshold – Center 1 and Threshold – Periphery Isopter and Screening Center (Isopter + Screening1) Isopter and Screening Center #1 (Isopter + Screening2) Isopter and Threshold – Center 1 Combination cannot be performed with the result of the examination which was not completed. The combination procedure is the same as “6.5.1 Comparing examination results”. When you press [Save], the combination result is saved. If you try to execute another operation without saving the combination result, the following message appears: When you press [OK], the combination result is not saved, and the operation you would like to execute can be performed. When you press [Cancel], the message box is closed and the display returns to the combination result screen. 108 6 Display, Print, and Analysis of Examination Results 6.6. Analysis of Threshold Examination Result You can analyze the examination results of Threshold – Center 1, Center 2, Macula 1, Macula 2, Periphery, and Isopter + Threshold examinations. Total deviation, pattern deviation, and analysis indexes are displayed when the following examination conditions are satisfied: Date of birth is input. Presentation time: Standard (0.2 sec.) Examination was performed to Background color:White the end. Stimulus color:White Program:threshold Stimulus size: III Only when the stimulus size is different, the total deviation and pattern deviation are displayed as a reference value. When you press [Analysis] during display of the examination result, the method of analyzing the results changes in the order shown below. You can press [Setting] to set the initial value in “The early stage Threshold” (P. 67). For Threshold – Center 1, Threshold – Center 2, Threshold – Macula 2, and Isopter + Threshold Threshold ↓ Scale(Gray) ↓ 3D(Gray) ↓ Kowa pack 1 (Gray) ↓ Kowa pack 2(Gray) All (Color) Kowa pack 2(Color) ↑ Kowa pack 1(Color) ↑ 3D(Color) ↑ Scale(Color) ↑ Threshold All (Gray) For Threshold – Macula, Periphery Threshold ↓ Scale(Gray) ↓ Kowa pack 1(Gray) Kowa pack 1(Color) ↑ Scale(Color) ↑ Threshold The analysis items to be displayed vary depending on the analysis method as shown in the table below. (○: Displayed, – : Not displayed) Sum of Total Pattern Bebie analysis Analysis Method Threshold Scale 3D Quadrant/ deviation deviation curve indexes Whole ○ Threshold – – – – – – – Scale – ○ – – – – 3D – – ○ – – – Kowa pack 1(*) ○ ○ – – ○ ○ Kowa pack 2 – – ○ ○ ○ ○ ○ All – ○ ○ ○ ○ * For Threshold – Macula 1 and Threshold – Periphery Kowa pack 1, the threshold, scale, total curve are displayed. – – – – ○ ○ ○ ○ ○ ○ deviation, and Bebie You can press [Print] to print the currently displayed examination result. For analysis of the result of an interrupted examination, only Value and Scale are available. ※ When the date of birth of a patient is not entered, the result analysis of the patient can only be displayed in Value and Scale. To display other analysis methods, touch the [Input Data] to enter the date of birth. Then, display the examination result again and press the [Analysis] you want. ※ In fundus perimetry, it is possible to display only numeric values for a threshold examination while it is also possible to display the total deviation for Custom – Optional threshold○ and Custom – Optional threshold# examinations only. 109 The list of Threshold–Center1 examination results is shown below. Value + Scale is Threshold–Periphery examination results. 110 Numeric displayed Kowa pack 1 (Gray)※Threshold – Periphery Scale (Gray) Scale (Color) 3D (Gray) 3D (Color) 6 Display, Print, and Analysis of Examination Results Kowa pack 1 (Gray) Kowa pack 2 (Color) 111 Mariotte blind spot Program name Total value of each quadrant Analyze method ② Bebie curve Scale ① Threshold Total value of whole Analysis Reliability Total deviation Total deviation p-value Meaning of p-value mark Gaze monitor All (Gray) Pattern deviation Pattern deviation p-value Each analysis is shown below. It is explained with the result of All (gray). 112 Correspondence of color / gray of Scale to Threshold Value 6 Display, Print, and Analysis of Examination Results 6.6.1. Threshold The measured sensitivity [dB] of each point is displayed. The higher the value, the higher the sensitivity, which means the patient can see a stimulus of lower intensity. For example, the patient was able to see the stimulus of 28dB at the point of ① of the upper center, and 30dB at ② of the upper center. Therefore, the sensitivity in ② is higher than that in ① The total of each quadrant and the total of the whole are also displayed (P. 117). 6.6.2. Scale Scale shows the distribution of thresholds visually. The correspondence between the threshold and the scale is shown in the lower right. In gray scale, the darker point means the sensitivity is low, and the brighter point means the sensitivity is high. In color scale, the point in warm colors means the sensitivity is low, and the point in cold colors means the sensitivity is high. For example, it is found that the sensitivity is exceptionally reduced near the Mariotte blind spot: Point of 15°on the ear side and 3° on the lower side. The value at this point is “0” in the example. However, the position and the size of the blind spot may vary by individuals, so the sensitivity at this point may not be low or the sensitivity of the point (X=15°, Y=3°) above this point may be also low. 6.6.3. 3D 3D analysis can be displayed and printed for Threshold – Center 1, Center 2, Macula 1, Macula 2, Isopter + Threshold examinations. Thresholds are displayed 3-dimensionally to show the distribution more clearly. The relation between the sensitivity and color is the same as Scale. You can change the inclination by the up/down buttons in the right. 6.6.4. Total deviation The difference between the measured threshold of each point and the normal sensitivity curve of the patient’s age is displayed. Total deviation[dB] =Measured threshold [dB] – Normal sensitivity curve [dB] For example, the patient is 68-years-old (displayed on the upper screen), and the sensitivity at ① is 4dB lower than that of the normal people of age 68. In the same manner, the sensitivity at ② is 2dB lower. The p-value is provability variable showing the degree of abnormality of total deviation at each point. There are 4 kinds of p-values, 5%, 2%, 1%, and 0.5%. For example, “p<0.5%” is shown in ①. This means that less than 0.5% of the normal 68-years-old people have –4dB as the total deviation at the point ①, which is rather abnormal. No p-value is displayed in ②, which means that the total deviation at this point is within the normal range. The 2 points around the blind spot is excluded because the deviation may vary widely depending on the individual position and size of the optic disc. 113 6.6.5. Pattern deviation The difference between the measured sensitivity curve and the normal sensitivity curve is displayed. The local visual field defect can be shown clearly. The normal visual field pattern of the patient’s sensitivity is estimated, and the difference between the measured threshold at each point and the estimated visual field pattern is shown. Pattern deviation[dB] = Measured threshold [dB] – Estimated normal visual field pattern [dB] The p-value is the provability variable showing the degree of abnormality of pattern deviation at each point. The same kind of p-value as the total deviation is used. The pattern deviation at the 2 points around the blind spot is excluded because the deviation may vary widely depending on the individual position and size of the optic disc. Normal sensitivity curve Sensitivity [dB] Estimated normal visual field pattern Measured threshold Total deviation Pattern deviation Total Deviation and Pattern Deviation 6.6.6. Bebie curve All the values of total deviation excluding the 2 points around the blind spot are arranged in descending order and shown as a curve. The black dotted line shows the Bebie curve when all the values of total deviation are 0 (the entire measured threshold is the same as the normal sensitivity curve), while the red curve shows all the points of p-value 5% of total deviation in descending order. The values of all the examined points are displayed, so the difference between each point is easy to understand. The examination points of the Bebie curve and the curve of p-value 5% (red curve) do not correspond with each other, because they are arranged in descending order. Therefore, if the p-value of total deviation at all the points is not less than 5%, the Bebie curve and the curve of p-value 5% (red curve) may cross with each other. 114 6 Display, Print, and Analysis of Examination Results 6.6.7. MD (Mean Deviation) MD refers to an average value of the total deviation. Overall average visual field defect is displayed. When the value is negative, or the value is less, the visual field is lower than the normal sensitivity curve. The p-value is the provability variable showing the degree of abnormality of MD. There are 5 kinds of p-values, 10%, 5%, 2%, 1%, and 0.5%. For example, in “All (gray)”, MD is –1.97dB marked by “p<5%. This means that the measured sensitivity curve is 1.97dB lower in average than the normal sensitivity curve of normal 68-years-old people, and less than 5% of normal 68-yearsold people have such value. When “Artifact” of [Setting] is ON, the value with “Artifact” considered is shown in [ ]. (P. 60) 6.6.8. PSD (Pattern Standard Deviation) PSD refers to a standard deviation of the total deviation (however, with weighting given for each examination point). The deviation of the measured sensitivity curve from the normal visual field pattern is displayed. The larger the value, the larger the deviation. The p-value is the provability variable showing the degree of abnormality of PSD. The same kind of p-value as MD is used. For example, in “All (gray)”, 3.18 marked by “p<5%”. This means the deviation of the measured threshold from the normal value of 68-years-old people is 3.18, and less than 5% of normal 68-years-old people have such value. When “Artifact” of [Setting] is ON, the value with “Artifact” considered is shown in [ ]. (P. 60) 6.6.9. GHT (Glaucoma Hemifield Test) GHT detects a pattern of a local visual field defect typical to glaucoma and evaluates the significance of a glaucomatous visual field defect. As shown in the diagram, the examination points for Threshold – Center 1 examination are classified into 10 sectors and a pattern deviation is scored and compared in the corresponding sector above and below the horizontal meridian. The scores are evaluated as one of the following 6 types. ① Out of normal range Sore difference of at least one pair of corresponding sectors is p<1%. Total score of at least one pair of corresponding sectors is p<0.5%. ② Boundary zone Score difference of at least one pair of corresponding sectors is p<3%. ③ Boundary zone & overall sensitivity reduction Judgment is Boundary zone and sensitivity is p<0.5%. ④ Overall sensitivity reduction Sensitivity is p<0.5%. ⑤ Exceptionally high sensitivity Sensitivity is p≥99.5%. ⑥ Within normal range Not applicable to any of the above cases Blind spot Sector of GHT Do not use GHT for assessment of any disease other than glaucoma. 115 6.6.10. Anderson’s Criteria When one or more of the three criteria in the table below are satisfied, the symptom is judged as an early glaucomatous visual field defect. On the screen, a satisfying item is shown on an orange background while an unsatisfying item is shown on a white background. PSD (Pattern Standard Deviation) p<5% GHT (Glaucoma Hemifield Test) Out of normal range PD (Pattern Deviation) Each of consecutive 3 points has p<5% and one of them is lower by p <1% or more (*). * 3 points needed to coincide with travel of NFL and be judged by a doctor. For possible consecutive 3 points, a symbol at pattern deviation p–value is displayed in an enclosure of an orange color. In “Threshold –Center 1” and “Isopter + Threshold” examinations, the target is the examination points excluding those on the outer – most circumference. 6.6.11. Anderson With reference to MD, total deviation p–value, and center sensitivity, the severity of glaucoma is classified into 3 levels of early, moderate, and severe. early moderate severe MD(Mean Deviation) >– 6dB <–12dB No. of points with total deviation p–value<5% <25% 18 points or less for Threshold – Center 1 12 points or less for Threshold – Center 2 >50% 38 points or less for Threshold – Center 1 27 points or less for Threshold – Center 2 No. of points with total deviation p–value<1% <10 points Sensitivity within central 5° All points ≥ 15dB One or more criteria for “early defect” are satisfied and any criteria for “severe defect” are not satisfied. >20 points One or more points have 0 dB or there are points with less than 15 dB in sectors above and below the horizontal meridian. 6.6.12. AGIS (The Advanced Glaucoma Intervention Study) The AGIS score is a visual field assessment method used in clinical trial AGIS. The degree of abnormality in the nasal – side visual field, upper half visual field, and lower half visual field is scored with use of the total deviation and calculated into a total value, which is referred to as the AGIS score (0 to 20). As the score is larger, the sensitivity is lower. Symptom progression judgment with AGIS is defined to check whether the results of three consecutive visual field examinations show a score increase by 4 or more points. 6.6.13. CIGTS (The Collaborative Initial Glaucoma Treatment study) The CIGTS score is a visual field assessment method used in clinical trial CIGTS. Taking continuity of scotoma into consideration, the degree of abnormality in the visual field is scored into a value with use of the total deviation p–value, which is referred to as the CIGTS score (0 to 20). As the score is larger, the sensitivity is lower. Symptom progression judgment with CIGTS is defined to check whether the score is worsened by 3 or more in comparison with the score on the base line. 116 6 Display, Print, and Analysis of Examination Results 6.6.14. VFI (Visual Field Index) The VFI is an index which is conscious of patient’s QOV (Quality of Vision) and shown in units of percentage. It is 100% when the visual field is normal; it is 0% when the visual field is completely lost. The pattern deviation p–value (total deviation p–value when MD is –20dB or less) is used to show the result of each examination point in the range of 0 to 100%, weight for each examination point, and then calculate the score into a VFI value. 6.6.15. Classification From the examination result of the center threshold, the degree of glaucomatous visual field disorder is classified into the following 8 levels. I/II/IIIa/IIIb/IVa/IVb/IVc/V As the level goes from the left to the right, the visual field disorder is more advanced. When “Artifact” of [setting] is ON, the value with “Artifact” considered is shown in [ ]. (P. 60) 6.6.16. Total of Quadrant/Whole For 4 quadrants of upper nasal side, lower nasal side, upper ear side, and lower ear side, the total value of thresholds of each quadrant and the total value of whole thresholds are displayed. Even if no error is found in p–value of the total deviation or pattern deviation, carefully watching the thresholds allows you, for example, to compare the quadrants of the upper and lower nasal sides to find a difference, which may imply an early symptom of glaucoma and the like. When “Artifact” of [setting] is ON, the value with “Artifact” considered is shown in [ ]. (P. 60) * The point with threshold<0 is calculated as –2. 【Reference book】 ・Ophthalmology practice 15 perimeters bunko-do-. ・A Visual Field Index for Calculation of Glaucoma Rate of Progression. Am J Ophthalmol 145:343–353, 2008 ・Advanced Glaucoma Intervention Study. 2: Visual field test scoring and reliability. Ophthalmology 101: 1445–1455, 1994 ・Gillespie, BW et al : The Collaborative Initial Glaucoma Treatment Study : Baseline Visual Field and Test – Retest Variability. Invest Ophthalmol Vis Sci 44: 2613–2620, 2003 ・Asman, P et al: Glaucoma Hemifield Test: Automated Visual Field Evaluation. Arch Ophthalmol 110: 812–819, 1992 117 6.7 Fundus perimetry examination result display An enlargement function is provided for displaying fundus perimetry examination results. It allows a section of the examination result image to be enlarged. Use the following procedure: ① Press [Enlarge]. ② While keeping it in contact with the screen, move the input pen to specify the range of enlargement. * When you release the input pen, the selected area is enlarged. * Press [Enlarge] again to return to the previous display. 118 6 Display, Print, and Analysis of Examination Results 6.8. Isopter examination result display The result display of the Isopter – Standard examination is provided with the “Paint out Scotoma” function and the “Enlarge” function. 6.8.1. Paint out Scotoma This function allows you to paint out the closed curve of the examination results using the color of the stimulus. The procedure is as follows. ③ Press [Scotoma] to activate this function. ④ Touch the inside of the closed curve to be painted out. * If you touch the common area, priority is given to the area lower than the touched position. To erase the paint, activate the function and touch the painted area. The information of the painted area is saved. Paint out Scotoma 119 6.8.2. Enlarge You can press [Enlarge] to enlarge the central area (up to the displayed visual angle of 30°). When you press [Enlarge] during enlarged display, the screen returns to the previous display mode. Enlarge of the Isopter examination 120 6 Display, Print, and Analysis of Examination Results 6.9. Re–Test You can perform the same examination as one which is currently showing on the screen. When you press [Re-Test] during display of the examination result, the re–test selection dialog box appears. Re–test selection dialog box There are 2 types of re–test. One is “re–test of all points” which allows you to execute the examination again from the beginning under the same examination conditions. The other is “re–test of each point” which allows you to execute again a part of an examination concerning a result of the examination. When you press [Cancel], the re–test selection dialog box is closed. 6.9.1. Re–test of all points When you press [Reset all points] in the re–test selection dialog box, an examination is conducted at all points with the same conditions as those used for the examination result currently shown on the screen. After transition to the examination screen, the examination is conducted in the usual procedure. The re–test of all points uses the same patient information as that used for the displayed execution result. If there is any change to correction, visual acuity, and the like, press [Input] to return to the input screen and press [Edit Data] to update the patient information. 121 6.9.2. Re–test of each point When you press an examination point displayed in the re–test selection dialog box, the point is selected and enclosed by an orange circle. To deselect the selected point, press the point again. The point is deselected and the red circuit disappears. When you press [Remove selection], all the selected points are deselected at one time. When you select a re–test point and press [OK], the display goes to the screen for performing examination only at the selected points with the same examination conditions as those for the examination result shown on the previous screen. If the examination selected for re–test is actually incomplete, the selected points and previously unexamined points are subject to re–test. When you press [OK] without selecting any examination point, only the previously unexamined points are subject to re– test. ※ Re–test of each point is not available for the Threshold – Meridian examination, Custom –Circle threshold examination, and Custom – 1 point threshold examination. If the examination date of the previous examination result differs from the date of re-test (this day), the following message appears. Press [OK] to proceed to the examination screen. Press [Cancel] to return to the re-test selection. ※ 122 6 Display, Print, and Analysis of Examination Results For the isopter examination, re–test of each point is available for the examination of which result was obtained automatically. Regardless of the Auto + Manual and Auto examinations, re–test of each point is carried out with the Auto + Manual examination program. Upon completion of automatic examination, the display changes to the manual examination screen, so that you can additionally execute a manual examination. When re–test of each point is executed with the Auto + Manual examination program, the examination results (results of the manual examination) which are not available for re–test are grayed out. For example, in the diagram shown below, assume that you are trying to perform re–test of each point for the results of the examination which was executed with the conditions of Auto, Start 1, “Periphery 80,” I/4e and I/2e, and with the conditions of Manual, I/3e, and 6 points. The points examined manually are grayed out and cannot be selected. Example of trying to select re–test points for re–test with Auto + Manual examination program 123 6.10. Editing of patient information When you press [Edit Date], the patient information editing dialog appears as shown in the diagram below. This dialog allows you to edit the patient information for the examination result currently displayed on the screen. The updated name, date of birth, and sex are applied to all examination results with the same ID. Other updated items in the patient information are applied to the currently displayed examination result. The procedure is the same as that described in “4.4 Patient information input” (P.30). Patient information editing dialog If the ID to which you will change is already registered for another patient, the following message appears: Repeated ID message Select whether or not to change the original patient information with the destination ID, press [OK], and the examination result is moved to the destination ID. When you press [Cancel], the display returns to the examination result screen without changing the ID. 124 6 Display, Print, and Analysis of Examination Results MEMO 125 7. Chronological change 7.1. Operations available with the chronological change screen The chronological change screen enables the examination result analysis indexes to be graphically displayed as chronological data. This facilitates you to grasp the chronological changes of examined eyes. In addition, the results of the examination result analysis can be displayed in chronological order. When the following conditions are met, the chronological changes can be displayed: Date of birth is input. Examination is completed to the end. Examination program is Threshold – Center 1, Threshold – Center 2, Threshold – Macula 2, or Isopter + Threshold. * For the chronological change display of the Isopter + Threshold examination program, only the threshold examination part is applicable. When you press [Chart] in the menu button area, the display switches to the chronological change screen. Or the examination results other than those listed above, [Chart] cannot be pressed. Chronological change display 126 7 Chronological change The chronological change screen allows you to perform the following operations. Print the chronological change in graph form. (P.128 7.2 Print) Toggle between graphic display and data display. (P.133 7.4 Data display) Change the eye of which data is displayed. (P.134 7.5 Changing over the examined eye for display) Emphasize an arbitrary period of time. (P.135 7.6 Graph emphasizing) Toggle between single page display and scrollable display. (P.136 7.7 Scrollable display) Toggle between grayscale mode and color mode for data display. (P.133 7.4 Data display) Display selected data as base data at the leftmost position. (P. 133) Make various settings. (P.59 4.10 Configuration settings) 127 7.2. Print When a printer (separately available) is currently connected, the chronological change being displayed can be printed. For the connection with a printer, see “2.2 connecting an external device.” When you press [Print] in the upper left of the screen, the chronological change being displayed is printed. The printout is as shown in the diagram below. The patient information (ID, Name, and Date of birth) is shown in the upper portion and the chronological change is shown in the lower portion. Example of printout 128 7 Chronological change 7.3. Graph displays The chronological change screen displays two different graphs with the following 12 analysis indexes per screen at the same time. You can select which graphs to display by pressing [Setting] and [Chart] (P. 62) When Graph3,4 is set to [ON] in the Chart dialog, two other graphs can be added to display chronological changes. Graph3 and Graph4 are shown when you press [Switch graph] during display of Graph1 and Graph2 MD[Center] PSD[Center] VFI MD[Macula] PSD[Macula] AGIS CIGTS Quadrant TD[Macula] Quadrant TD[Macula] Classification Anderson Boxplot All graphs have the date and time of examination on the horizontal axis. Thus, the rightmost plot is the newest result. The distance between plots on the horizontal axis is relatively determined from the date and time of examination. An item assigned to the vertical axis varies with the graph. However, in any graph, the analysis result is better for a plot in the upper position. When you touch a plot in a graph, the information of the corresponding examination is shown as in the diagram below. When you consecutively touch a plot, the display switches over to the result screen which displays the examination result. Information of the corresponding examination 129 1 MD [Center] and MD [Macula] The MD [Center] and MD [Macula] graphs show the chronological change graph and MD forecast as illustrated in the diagram above. The chronological change graph shows the MD value, p=5%, and p=1% by using a dashed line. The area below Caution MD is shown in yellow. The Caution MD value can be changed with [Setting] (P.63). linear regression For MD, PSD, and VFI graphs, if the regression of the examination result is statistically significant, a linear approximation is shown by use of a dashed line. The linear regression [dB/year], its statistical significance, and 95% confidence interval are shown below the patient information on the right side of the screen. The statistical significance (p<○%) indicates whether the regression is significant or not. If the regression is zero, that is, there is no change in a series of visual fields of the concerned patient, the statistical significance is not shown. If the regression is significant, that is, a series of visual fields of the concerned patient change significantly from the viewpoint of statistics, the statistical significance (p<○%) is shown. This indicates that the visual field change is significant with a probability of (100 –○) %. ○ is 5 or 1. ① The MD of the left eye in the diagram on the right shows a significant decrease with a probability of 99% and its decreasing rate of –1.88 to –0.70 [dB/year] (–1.29±0.59) with 95% certainty. ② The VFI of the right eye in the diagram on the right shows a significant decrease with a probability of 99% and its decreasing rate of –7.00 to –2.8 [dB/year] (–4.90±2.10) with 95% certainty. The linear regression [dB/year] is shown when the number of examination results of the eye is 5 or more. The MD linear regression is known as “MD slope” which is one of the indexes of the visual field change. The regression caused by aging is about –0.1 [dB/year]. If the MD exceptionally decreases from this value, it may be recognized to have a critical change. “Significance of the linear regression” indicates whether a series of visual field changes are statistically significant or not, but does not show that the concerned patient has some disease with significance. MD forecast When the linear regression of MD is displayed, an MD forecast graph calculated from the linear regression is shown. The value in brackets on the horizontal axis indicates the age of the concerned patient. This graph can be used to forecast the MD value for a specified age in the case where the MD will change along with the current regression. The area below the “Caution MD” value set in “4.10 Configuration settings” is shown in yellow. For the VFI, a forecast graph is also displayed in the same way. 130 7 Chronological change 2 PSD [Center] and PSD [Macula] The PSD [Center] and PSD [Macula] graphs are as shown above. In the graphs, the PSD value 0, p=5%, and p=1% are shown by dashed lines. 3 VFI In the VFI graph, the chronological change and VFI forecast are shown as in the diagram above. In addition, the linear regression and VFI forecast are also shown in the same way as MD. 4 AGIS, CIGTS In the AGIS and CIGTS graphs are as shown above. The vertical axis indicates each score. 131 5 Quadrant TD [Center], Quadrant TD [Macula] The graphs of quadrant TD [Center] and quadrant TD [Macula] are as shown above. 6 Stage, Anderson The Stage and Anderson graph are as shown above. The vertical axis indicates each score. The Anderson graph is classified into three stages of Early, Moderate, and Severe from the top in this order. 7 Boxplot maximum value 85th percentile median value 15th percentile minimum value Boxplot A boxplot graph is as shown above. In this graph, five values of the total deviation in each examination result are represented by a single plot as shown in the diagram on the right. 132 7 Chronological change 7.4. Data display You can press [Switch graph] to toggle between graph display mode and data display mode. In the data display mode, the examination information, scale, threshold, total deviation p–value, pattern deviation p– value, and Bebie curve of each examination result are arranged in a vertical row and displayed in chronological order. This display method allows you to easily grasp the change of each information item. The rightmost examination result is the newest. You can slide the scroll bar in the lower portion of the screen to change the display range. Alternatively, you can change the display area by sliding the scroll bar while touching the examination result display area. In addition, when you consecutively touch a single examination result, the screen switches over to the result screen for displaying the examination result. Data display When you press [Color] during data display, the scale indication of the examination result is changed over between grayscale mode and color mode. If you press [Base] and select the examination result while data is being displayed, the selected result is fixed at the leftmost position. 133 7.5. Changing over the examined eye for display You can press [Switch eye] to change over the examined eye for displaying the graphs and data. Each time you press [Switch eye], the examined eye for display is changed in the order of Changing over the examined eye (display of left eye only) 134 (Both eyes) → [L] → [R]. 7 Chronological change 7.6. Graph emphasizing In the graph display mode, data in a specified period of time can be emphasized. In particular, the MD [Center], MD [Macula], and VFI graphs allow you to specify a period of time and highlight the linear regression in the specified period. This function is useful, for example, when checking whether the changed treatment is effective or not. The content and display conditions of the linear regression to be emphasized are the same as for MD [Center], MD [Macula], and VFI. The MD forecast is calculated from the MD and VFI linear regressions in the last period of the VFI forecast. You can make settings for emphasizing in the upper graph only. When you set emphasizing in the upper graph, emphasizing is also executed in the lower graph in the same way. Use the following procedure to set emphasizing. ① Press [Emphasize] to turn it ON. ⑦ Touch the start point of the period to be emphasized in the upper graph. ⑧ Touch the end point of the period to be emphasized in the upper graph. ② ③ Graph emphasizing When you press [Cancel], emphasizing is cancelled. 135 7.7. Scrollable display You can press [Scroll] to toggle between single – page display mode and scrollable display mode. The scrollable display mode allows you to change the display range by sliding the scroll bar in the lower portion of the screen. 1 page display Scrollable display When you press [1 page], the scrollable display mode is cancelled and the single – page display mode becomes active. 136 7 Chronological change 7.8. Sorting the examination results You can sort the results based on the artifact and reliability index during the graphic display of the chronological change. When you press [Artifact], it turns on and the graph of the examination result analysis index with the artifact is taken into consideration. Each time you press [Artifact], it is toggled between ON and OFF. When you press [Reliability], it turns on and a graph is displayed excluding the examination results in which any of the reliability indexes (fixation loss, false – positive reaction, and false – negative reaction) is equal to or more than the reference value (20% or 33%). Each time you press [Reliability], it is toggled between ON and OFF. You can operate [Artifact] and [Reliability] individually, and also set both to ON at the same time. [Artifact] OFF, [Reliability] OFF [Artifact] ON, [Reliability] ON While an MD or VFI graph is being displayed, you can select [Exception]. When you press [Exception] and specify an examination point which you wish to exclude, the excluded point is reflected in the MD and VFI linear regressions. [Exception] OFF [Exception] ON 137 8. Link with KOWA VK Series This instrument can perform the following functions by linking up with KOWA filing system “VK Series.” For changing the settings to link up with KOWA VK Series, contact Kowa or your Kowa dealer. 8.1. Automatic saving of perimetry results into Kowa VK Series As well as being automatically saved to the database of this instrument upon completion of an examination, the examination result is also automatically saved to KOWA VK Series. In this case, the examination result images are saved to the VK system while the MD and PSD values are saved to the applicable numeric processing software only when the performed examination is Threshold – Center 1, Threshold – Center 2, or Isopter + Threshold. This allows you to compare the perimetry result with other examination results, being useful for diagnosis and informed consent. For example, since the VK system displays a fundus image and a perimetry result side by side as shown below, you can easily grasp their correspondence. You can thereby understand whether the appearance of abnormality coincides between the fundus image and the examination result or which abnormality precedes the other, which can be utilized for diagnosis. Multi – display of fundus image and perimetry result on VK equipment ※ If you set the output content to “Print” (P. 59), the images generated during a threshold examination are saved to the VK system in all display formats. ※ If the performed fundus perimetry is Custom – Optional threshold ○ or Custom – Optional threshold #, the numeric value of an image to be saved to the VK system is the total deviation. 138 8 Link with KOWA VK Series 8.2. Simplifying the patient information input operation If you have not yet performed any examination with KOWA AP–7000, but have already input patient information to the KOWA VK Series system, you can read the information from KOWA VK Series to skip the information input operation on KOWA AP–7000. The patient information can be read from KOWA VK Series through the input screen in the following three methods: 1 ID input In the ID input dialog, enter the patient ID which does not exist in KOWA AP–7000 but exists in KOWA VK Series. Press [OK], and then, the patient information (ID, name, date of birth, and sex) corresponding to the input ID is read and enters the input state. If any examination result of near or distant correction exists under the same ID as above in numeric processing software, the most recent result is also read and input. If an ID with any examination result is input, the most recent examination result corresponding to the ID is displayed. 2 Patient information input If you enter an ID in the patient information input dialog which exists in VK, the patient information (ID, name, date of birth, and sex) corresponding to the input ID is read and enters the input state. If any examination result of near or distant correction exists under the same ID as above in numeric processing software, the most recent result is also read and input. 3 Advance entry list When you press [Registration List], an advance entry list in the KOWA VK equipment is displayed. Select the patient to examine, press [OK], and the patient information (ID, name, date of birth, and sex) is read and enters the input state. If any examination result of near or distant correction exists under the same ID as above in numeric processing software, the most recent result is also read and input. If an ID with any examination result is available is input, the most recent examination result corresponding to the ID is displayed. 8.3. Selecting perimetry examination fundus images Fundus images saved in VK equipment can be used for fundus perimetry on KOWA AP–7000. Use the following procedure: ① Input the applicable ID which exists in KOWA VK Series. ② When you press [Fundus], the fundus images saved with the input patient ID in VK equipment are displayed. ③ Select the fundus image to use for the fundus perimetry, press [OK], and the fundus image is set. 139 9. Maintenance and inspection The automatic perimeter is a precision instrument and neglect of daily maintenance and inspection may affect the imaging results. Please read this section carefully in order to use this instrument correctly and safely. 9.1. Daily maintenance Close the application of the main body when finished (See “4.1 Switching on and off the instrument”) and place the dust cover over the instrument. If it will not be used for a long period, unplug the instrument from the power outlet for safety. When the instrument has not been used for a long period of time, confirm if any errors exist for each setting of this instrument. 9.2. Daily inspection (Inspection items for the user) Inspect this instrument in accordance with “KOWA AP–7000 daily inspection table” below. If any abnormality is found during daily inspection and cannot be solved by the maintenance described in this document, contact Kowa or your Kowa dealer for specific detail. KOWA AP–7000 daily inspection table Inspection items 140 Procedure Acceptability criteria Plates and labels Visually verify that plates and labels are readily readable and not contaminated. Plates and labels are readable Exterior, Dome Visually verify that exterior components have no flaw, crack, deformation or rust. There is no flaw, crack, deformation or rust. Power supply cable Visually verify that there is no flaw or damage. There is no flaw or damage. Connecting power supply Visually verify that the power supply cable is directly and independently connected to the commercial power supply. Power supply cable is directly and independently connected to the commercial power supply. Touch panel Verify that the patient information input dialog appears when you start the instrument and press [Edit Data] on the input screen using the input pen. Patient information input dialog appears. Stimulus presentation Verify that a stimulus is presented in the dome when you start the instrument and press [Practice] on the examination screen. Stimulus is presented. Response button Verify that the response mark appears in the upper left of the examination screen when you start the instrument and push the response button in the state where the examination screen is open. Response mark appears in the upper left of the screen. Chin rest Verify that the chin rest moves up, down, left, or right when you press the upward, downward, leftward, or rightward chin rest move button, respectively, after starting the instrument. Chin rest smoothly moves to the intended direction. Examined eye Verify that “L” or “R” is shown when you place your hand on the right side or left side of the chin rest, respectively, after starting the instrument. Indication of the examined eye is changed in the upper left of the examination screen. Eye fixation monitor Verify that your hand is displayed on the eye fixation monitor when you place your hand below the head rest after starting the instrument. Your hand is displayed on the eye fixation monitor. Date and time Start the instrument and verify that the correct date and time are shown in the lower right of the touch panel. Date and time are correct. 9 Maintenance and inspection 9.3. Regular inspection (Maintenance inspection items for the vendor) In order to use this instrument safely over its useful life, we recommend you to have it inspected annually. For the content and cost of the inspection, contact Kowa or your Kowa dealer. <Inspection items> ・ Exterior ・ Applied parts ・ Stimulus presentation function ・ Eye fixation monitoring function ・ Background intensity ・ Operations and functions of the components ・ Electrical safety test ・ Battery ・ Software version 9.4. Disinfect Wipe the forehead rest, head bands, chin rest and response button with rubbing alcohol as soon as a patient completes the examination. Do not sterilize. 9.5. Cleaning the exterior and the touch panel When the exterior of this instrument other than described above is dirty, follow the steps below to clean it. 1) Wipe the surface with firmly squeezed dampened soft cloth. 2) Wipe off the obstinate dirt with soft cloth, after dampening it in water or lukewarm water with diluted small amount of neutral detergent and firmly squeezing it. *Do not use solvents such as thinner and benzene for cleaning the exterior. When the touch panel is dirty, clean according to the following steps: 1) Wipe the touch panel with a soft cloth after dampening in water and firmly squeezing it. 2) Lightly wipe the touch panel with a dry and soft cloth before the surface becomes completely dry. *Do not wipe the entire surface at once. Finish area by area. Water drops leave spots when they are dried. Caution Prohibitory Use only a wet cloth for cleaning the exterior. Do not wipe with solvents such as benzene, thinner, or ether. Otherwise, it may cause discoloration and/or deterioration. 141 9.6. Projection lamp replacement Be sure to wear anti–static gloves or the like when replacing lamps. ① Turn off the power switch and remove the power supply cable from the outlet. ② Rotate the stud counterclockwise using a flathead screwdriver or equivalent, and remove the projection lamp cover. ③ Confirm that the lamp unit has no heat, and disconnect the connector. ④ Unscrew the upper portion of the projection lamp unit to lift up the lamp unit, and the projection lamp appears. 142 9 Maintenance and inspection ⑤ Pull out the projection lamp, and attach a new lamp. If you touch the bulb of the projection lamp with your bare hand when pulling out the lamp, the oil of your hand will adhere to the bulb and may cause it to burn and blacken the surface which will reduce the light quality. Be sure to wear gloves or the like when replacing the lamp. ⑥ Return and firmly screw the projection lamp unit to the original position. ⑦ Reconnect the connector. ⑧ Reattach the projection lamp cover, and rotate the stud clockwise to firmly fix the cover. Upon completion of replacement, turn on the power, and perform an examination to confirm that the stimulus is correctly projected. If the luminance is uneven in a stimulus, it may become even when the projection lamp is pulled out by 1 to 2 mm from the position where the lamp is fully inserted. Warning Unplug Warning Unplug Warning High-Voltage Warning High-Voltage When replacing a new projection lamp, be sure to turn OFF the power switch before unplugging from the power outlet. Otherwise, there is a risk of electrical shock. Do not replace the projection light bulb immediately after use. When replacing the flash tube or projection light bulb, be sure to turn OFF the power switch and unplug it from the power outlet, and wait for 30 minutes or more. Prohibitory Do not touch the projection lamp bulb or the flash lamp bulb with your bare hand. Otherwise, the lamp may have reduced light intensity or operating life. Prohibitory Do not touch any unit other than the lamp unit when replacing the projection lamp bulb. Otherwise, there is a risk of bodily injury or malfunction. Caution Caution 143 9.7. Fuse Replacement Before checking the blowout of a fuse, make sure to check the following: 1) The power supply cable is properly connected. 2) Confirm that the power lamp is lit in orange (STANDBY) when the power switch is turned to on. If the power is not turned on even if the items above are checked, check the fuse. When you inspect or replace a fuse, be sure to wear anti-static gloves or the like. Do not use bare hands. Otherwise, the fuse life may be shortened. Turn OFF the power switch and unplug the instrument from the power outlet. ② Turn the fuse holder at the power supply counterclockwise with a flathead screwdriver. ③ Pull the fuse and check whether the fuse has blown. ④ If the fuse has blown, replace it with a new one. Make sure that the fuse type and rating are correct. ⑤ Place the fuse holder. ⑥ Connect the power supply cable to the power outlet. ① Warning Unplug Warning Obligatory Warning High-Voltage When replacing the fuse, make sure the main power is turned OFF and the instrument is unplugged from the power outlet. If the fuse holder cover is removed without unplugging the instrument, electrical shock or burn may occur. Use a designated fuse only. Using an undesignated fuse may cause the instrument to malfunction or cause a fire. 9.8. List of consumables The following is a list of consumables used on this instrument. Please contact Kowa or your Kowa dealer for purchase or any inquiry. It is recommended that you always stock the Projection lamp and the fuse for replacement. Part name Purchase order number Projection lamp OSRAM 64602 Fuse 0218005.MXP (T5A L250V) 9.9. Backup of examination result data Data backup is automatically carried out when the power is turned off. (See “4.10 Configuration settings.”) For the backup destination, select a drive other than C drive and different from the data drive. If C drive or data drive is specified as the backup destination, no data backup is performed. 9.10. Repair of the instrument If there is a need to return your KOWA AP–7000 to the manufacturer for repair or maintenance, please contact Kowa or your Kowa dealer. 144 9 Maintenance and inspection MEMO 145 10. Troubleshooting Start up, exit Message 146 Cause and Remedies No Database file Please confirm the data drive and the network, etc. ● Leave the message on the left being displayed. First, confirm that the network components (LAN cable, hubs, etc.) are surely connected and normally operating to establish a healthy network. Next, confirm that a personal computer, hard disk drive, USB flash drive, etc. specified as the data save destination are surely connected and operating normally. If any of these components are not correctly connected or operating normally, return to the normal state and then select [Search again] in the message dialog box. ● If you are not sure about the cause, select [Cancel], check the network environment and data save destination, and then, restart the instrument. ● If no abnormality is found in the network environment and data save destination or the same message still appears after removal of the abnormality, contact Kowa or your Kowa dealer. No serial communication available. ● Cannot open the file ● Data drive has a fault. Contact Kowa or your Kowa dealer. Database repair will begin ● Database check and rebuilding are automatically executed. Please wait for a while. Initializing KOWA AP-7000... Wait for a while with a cup of coffee. ● Initialization is being performed. Please wait for a while. ● If the base menu screen does not appear after 5 min. or more, turn off the power, and then restart the instrument. Cannot initialize the motor ● Motor cannot be initialized. Turn off the power, and then restart the instrument. If the same message still appears, contact Kowa or your Kowa dealer. Cannot set the background intensity ● A head band may be obstructing the sensor in the dome. Take the head band out of the dome and restart the instrument. ● If nothing is obstructing the sensor, the intensity of the background lamp is reduced. If the lamp is lit, it is not necessary to replace it immediately. However, it is recommended to replace the lamp as soon as possible. ● If the background lamp is off, contact Kowa or your Kowa dealer. Cannot set the stimulus intensity ● A head band may be obstructing the sensor in the dome. Take the head band out of the dome, and restart the instrument. ● If nothing is obstructing the sensor, the intensity of the projection lamp is reduced. If the lamp is lit, it is not necessary to replace it immediately. However, it is recommended to replace the lamp as soon as possible. ● If the projection lamp is off, immediately replace it with a new one. ● If the same message still appears after lamp replacement, the possible causes include dirt on the sensor and/or lens and disconnected lines. Contact Kowa or your Kowa dealer. Darken the room ● Luminance in the dome cannot be set. The room is deemed to be too bright to use the instrument. Darken the room and press [OK]. Confirm the date. Date【○○○○ – ×× – △△ ●●:▲ ▲】 When the date is not correct ● Check the current date and time being displayed. ● If the current date and time are incorrect, press [Date] to open the date setting dialog, and then set the correct date and time (P. 68). ● Even if the current date and time are correct, this message may appear when the power is turned on immediately after it is turned off. A communication error has occurred inside the instrument. Contact Kowa or your Kowa dealer. 10 Troubleshooting Message Cause and Remedies Cannot run camera viewer ● The camera for eye fixation monitoring has an error. Restart the instrument. If the same message still appears after the restart, contact Kowa or your Kowa dealer. Cannot back up The Archive drive data is larger than the Data drive data. Please make sure that the Data and Archive data are being saved to the correct destination. ● Check for the current data save destination and data content. If there is no problem with the data save destination and data content, change the backup media or backup destination. The remained memory of the drive is less than 5% ● This message appears when the remaining free space of the data save drive is less than 5 % at the time of KOWA AP–7000 startup or search result save. Input screen Message The ID is not entered The date of birth is not entered Part of the date of birth is not entered The ID and the date of birth are not entered Input again. Cause and Remedies ● [Search] has been pressed with ID and Date of birth left blank or incomplete on the input screen. Properly input the ID and Date of birth on the input screen. ● If “Prohibit No ID” is set to OFF in the Configuration dialog, you can press [Cancel] to proceed with the examination. However, in this case, the quality of the examination will be reduced and some analysis functions will be unavailable. Delete the selected data? Delete all data of the selected ID? ● [Delete] has been pressed to delete the examination results from the patient ID list or all lists selected in the dialog opened by [Open List]. Press [OK] to delete or [Cancel] not to delete. Axis is not input. ● [OK] has been pressed with Cyl (Cylindrical diopter power) input and while Axis (Axis degree) was not entered in the Correction value input dialog for the patient information. ● Enter a value in the Axis input box or clear the value in the Cyl input box, and press [OK]. Cyl is not input. ● [OK] has been pressed with Axis (Axis power) input while Cyl (Cylindrical diopter degree) was not entered in the Correction value input dialog for the patient information. ● Enter a value in the Cyl input box or clear the value in the Axis input box, and press [OK]. The image is broken. Cannot display. There is insufficient memory for displaying the image This is not displayable bmp format Cannot assign the bitmap memory ● The image file selected to set a fundus image on the input screen cannot be read. Select another image file. Reactivate the application to set it effectively ● Settings have been made to link up with a card reader or filing system KOWA VK Series. Restart the instrument to allow the changed settings to take effect. 147 Examination screen Message Darken the room Cannot recognize the patient's eye. Please make sure that the chin is placed correctly on the chin rest. Do you want to manually select the patient's eye? Failed to acquire the pupil position Do you wish to proceed with acquisition from the beginning? The fovea is examined first. The fixation target is the 4 points at the lower center. Next, the threshold examination starts (Next, the Isopter examination starts) The fixation target is the selected one Put back the lens frame. Please switch eyes Select the point examined again Next, the screening examination starts (Next, the threshold examination starts) The examined eye is incompatible with the fundus image Maximum number of isopters reached 148 Cause and Remedies ● The room is deemed to be too bright to perform an examination. Adjust the luminance of the room to be the same as that when the instrument is started. ● [Start] has been pressed when the patient’s chin does not yet come into contact with the chin rest. Confirm that the patient’s chin is surely placed on the chin rest. ● Press [OK] to manually specify the eye to be examined. Press [Cancel] to close the message box. ● There is a failure in the gaze monitor setting. ● Pupil position acquisition failure can be caused by eyelashes, eyelid ptosis, opacity of the middle translucency body, and small pupil. ● To retry the acquisition, confirm the eye fixation, and then press [OK]. To not to retry, press [Cancel]. ● If you press [Cancel], the gaze monitor function will be deactivated for this examination. ● [Start] has been pressed on the examination screen at the time of the examination startup with the fovea examination set to ON. The fixation target is automatically moved to 4 points at the lower center. Press [OK] to start the fovea examination. ● Fovea examination has been completed with the fovea examination set to ON. The fixation target is automatically returned to the original location. Press [OK] to start the threshold (isopter) examination. ● This message appears when the lens holder is set for the periphery examination (more than 30°) or upon completion of center examination with the lens holder set in the program consisting of both center (within 30°) and periphery examinations. Thus, be sure to fold the lens holder backward. ● In the program consisting of both center and periphery examinations, the stimulus is normally presented in random order. However, when the lens holder is set, the periphery examination is carried out upon completion of the center examination. Therefore, this message appears after the center examination is completed. ● An attempt has been made to re–test an eye other than the one examined previously. Check the eye to be examined: left or right. ● [OK] has been pressed without examined points selected for re– testing. Select the points to be re–tested. ● Isopter examination has been completed during the Isopter + Screening (threshold) examination program. Press [OK] to start the screening (threshold) examination. ● During the perimetry coordinate setting on a fundus image for fundus perimetry, the positions of the fovea and opti disc have been reversed in comparison to the actual examined eye. Check whether the examined eye matches the fundus image. In addition, check whether the examined eye is left or right. ● An attempt has been made to start the Isopter – Manual examination with 6 types of stimulus. Up to 5 types of stimuli can be selected for an isopter examination. To perform an examination with 6 or more types of stimuli, complete one examination with some types of stimuli once, and then, perform another examination with the other types of stimuli. 10 Troubleshooting Result screen Message The combined data is not saved. Continue operation? The data has been properly copied The remained memory of the drive is less than 5% Cause and Remedies ● An attempt has been made to change over the screen to another without saving the result of data combination. To save the combined data, press [Cancel] and [Save] in this order. To not save, press [OK] and proceed with the operation. ● Data read has been normally completed from Kowa automatic perimeter “AP–6000,” “AP–5000,” or “AP–3000” to “AP–7000.” ● This message appears when the remaining free space of the data save drive is less than 5% at the time of software startup or examination result save. Database, Network error Message Cause and Remedies Network connection error Network drive has been shut down. Could not connect to the network If you proceed there will be no link to the VK (any) database. Cannot open the database ● The database or network is abnormal in some way. Select [OK] to save the data locally. If the database or network is restored when the instrument is started next time, the locally saved data can be coupled to the conventional data. ● Select [Cancel] to end KOWA AP–7000. If the examination continues, the results will be saved in the local folder separately from previous data. 149 11. Specification Stimulus Presentation Method Projection Stimulus Color White, Blue, Green, Red Stimulus Size GoldmannⅠ, Ⅱ, Ⅲ, Ⅳ, Ⅴ Maximum Stimulus Intensity 3,183 cd/m2 (10,000 Asb):White Stimulus Presentation Time 0.2 sec. Stimulus Presentation Interval 0.6~3.3 sec. (automatically adjusted) Background intensity *Automatic light adjustment White : 10 cd/m2 ( 31.5 Asb) Yellow :100 cd/m2 ( 314.2 Asb) Examination distance 300 mm Measurement range 80° External Interface USB, Ethernet Fixation Target Orange LED Center 1 point, Auxiliary 4 point, Fovea examination 4 point Eye Fixation Monitoring Heijl – Krakau method, Eye fixation monitor, Gaze monitor Printout USB-connected printer [separately available] Operation Screen Touch panel color LCD monitor Data save Built-in flash memory Operation Support Oral instruction Chin Rest Operation Motor-driven Power Source AC100 – 230 V 50/60 Hz Power Supply AC100V:200 VA AC230V:200 VA Weight 26 kg Dimensions 730(W)×430(D)×700(H) mm Operating Environmental Conditions Environmental temperature :10 to 35℃ Relative humidity :30 to 90% Compliance standard IEC 60601–1:2005 IEC 60601–1–2:2007 ISO12866:1999 + Amd.1:2008 ISO15004–1:2006 Safety standard and classification According to the type of protection against electric shock (Class I device) According to the degree of protection against electric shock (Type B applied part) According to the type of protection against ingress of water as detailed in the current edition of IEC 60529. (IPX0) According to the degree of safety of application in the presence of a flammable anaesthetic mixture with air or with oxygen or nitrous oxide. (Equipment not suitable for use in the presence of a flammable anesthetic mixture with air or with oxygen or nitrous oxide) According to the mode of operation. (continuous operation) 150 11 Specification < Examination Screening Program Standard / Precision / Center / Periphery / Glaucoma / V.Meridian / Center #1 / Center#2 Method 2zone, 3zone, 4zone, Quantify Scotoma Intensity step : 5dB / provability variable (p–value) Quick mode is available Program Standard, Macula, Mariotte / Optional, D–Test, Esterman Both Method Same intensity 2 zone Program Center 1 / Center 2 / Meridian / Macula1 / Macula2 / Periphery Method All Threshold, Quick1, Quick2, Super quick Program Standard, Isopter + Screening 1, Isopter+ Screening 2, Isopter + Threshold Method Auto, Manual Custom Program Circle threshold / 1 point threshold / Quadrant threshold / Optional threshold# / Optional threshold○ / Screening# / Screening○ Perimetry on fundus Perimetry combined fundus image. Fovea examination It is available in the Threshold Center examination (Threshold – Center 1, Center 2, Isopter + Threshold). Supra Threshold Isopter (Kinetic) Analysis Analysis for Threshold Each examination Gray/Color Scale, 3D display (Hill of Vision), Total value, Total value of quadrant, Glaucoma staging (8 steps), GHT, Anderson’s Criteria, Anderson, AGIS, CIGTS, VFI, Total deviation, Pattern deviation, MD (Mean Deviation), PSD (Pattern Standard Deviation), Bebie Curve (Total deviation, Pattern deviation, MD, and PSD are shown with actually measured values and p-values.) Chronological changes All analysis data (Scale, Threshold, Total deviation p–value, Pattern deviation p–value , Bebie Curve) Graphically displays (MD, PSD, VFI, AGIS, CIGTS, Quadrant TD, Classification , Anderson, Boxplot) Supporting visual field defect grade determination The examination results in the remaining visual field, visual efficiency, rate of vision loss and each direction are displayed. Comparing Comparisons can be made between results of the Threshold, Screening, or Supra examination executed twice. Combination Center and Periphery examinations can be combined in Threshold and Screening examinations. Isopter examination can be combined with Threshold Center or Screening Center examination. Display Both eyes Results of the examination of both eyes of the same patient executed on the same day are displayed side by side. Multi Results of the examination executed four times (both eyes/either eye) of the same patient are displayed side by side. Patient Information ID, Name, Date of birth, Sex, Correction, Visual Acuity , Diagnosis , Doctor, Comment Normal eye database Ver.1.0.0.0 issued on 2011/06/09 [Age range] 20s to 70s [Samples] 612 persons [Criteria] Questioning, visual acuity, reflection, eye pressure, visual field, and fundus Database Database Patient ID list display, All list display, Search function, ID extraction function Data save Built – in flash memory Capacity: For approx. 20,000 patients (40,000 examinations) Patent United States Patent No. 7325925, 7475987, 7475988, and 7658496 151 12. Technical information 12.1. Examination points of each examination program The following shows the arrangement and quantity of examination points for each examination program when the right eye is subject to examination and the maximum coordinate value is 80°. 12.1.1. Screening Standard:83 points Standard (Quick):64 points Intensity:140 points Intensity (Quick):93 points Center:82 points Center (Quick):69 points Periphery:58 points Periphery (Quick):24 points Glaucoma:117 points Glaucoma (Quick):72 points V.Meridian:53 points V.Meridian (Quick):31 points ※ The examination points of Center#1 and Center#2 programs are arranged in the same way as Threshold – Center 1 and Threshold – Center 2, respectively. 152 12 Technical information 12.1.2. Supra Macula:21 points Mariotte:21 points Select from optional:331 points D–Test:139 points Esterman Both : 120 points ※ Standard is same as Screening-Standard. 12.1.3. Threshold Center 1:76 points Center 2:54 points Meridian:14 points Periphery:68 points Macula 2:68 points P ※ Macula1 is same as Supra-Macula. 153 154 12 Technical information 12.1.4. Isopter (Start:Periphery) Isopter (Interval:Standard):12 directions Isopter (Interval:45°):8 directions Isopter (Interval:20°):18 directions Isopter (Interval:30°):12 directions ※ Examination point of Isopter + Screening 1, +Screening 1, +Threshold is add to placed examination point of Screening – Center, Center #1, Threshold – Center 1 each other. 12.1.5. Custom Circle threshold:20 points Optional threshold : 568 points ※ 1-point threshold, Quadrant threshold is same as Threshold Center1. ※ Optional threshold○, Optional Screening○ is same as Supra-Optional. ※ Optional screening # is same as Optional threshold #. 155 12.2. Stimulus Intensity and Size 12.2.1. Stimulus Intensity table Intensity [dB] Intensity [asb] Intensity [dB] Intensity [asb] Goldmann 0 1 10,000 26 25 1d 7,943 27 20 1c 2 6,310 28 16 1b 3 5,012 29 13 1a 4 3,981 30 10 5 3,162 31 7.9 6 2,512 32 6.3 7 1,995 33 5.0 8 1,585 34 4.0 Goldmann 9 1,259 35 3.2 10 1,000 4e 36 2.5 11 794 4d 37 2.0 12 631 4c 38 1.6 13 501 4b 39 1.3 14 398 4a 40 1.0 15 316 3e 41 0.79 16 251 3d 42 0.63 17 200 3c 43 0.50 18 158 3b 44 0.40 19 126 3a 45 0.32 20 100 2e 46 0.25 21 79 2d 47 0.20 22 63 2c 48 0.16 23 50 2b 49 0.13 24 40 2a 50 0.10 25 32 1e 12.2.2. Stimulus Size 156 Goldmann Area [mm2] Diameter [mm] Ⅰ 0.25 0.56 Visual angle [degrees] 0.11 Ⅱ 1 1.13 0.22 Ⅲ 4 2.26 0.43 Ⅳ 16 4.51 0.86 Ⅴ 64 9.03 1.72 12 Technical information 12.3. Spectrum distribution of luminous source Spectrum distribution of stimulus luminous source 300 400 500 600 700 800 900 1000 1100 1200 1300 1400 1500 1600 1700 [nm] Spectrum distribution of background light’s luminous source (white) 300 400 500 600 700 800 900 1000 1100 1200 1300 1400 1500 1600 1700 [nm] Spectrum distribution of background light’s luminous source (yellow) 300 400 500 600 700 800 900 1000 1100 1200 1300 1400 1500 1600 1700 [nm] 157 MEMO 158 13 Electromagnetic compatibility (IEC 60601-1-2) < 13. Electromagnetic compatibility (IEC 60601-1-2) This instrument is a medical electrical instrument. Medical electrical instruments require special care and are subject to electromagnetic compatibility (EMC) standards. The following section describes the EMC and precautions regarding this instrument. When installing or using this instrument, read the description carefully and follow the directions described. (The EMC of this instrument was tested based on IEC 60601-1-2.) 1. Please note that portable (or mobile) type radio frequency communication devices (RF communications instrument) may adversely affect this instrument resulting in malfunctioning. 2. The electromagnetic compatibility (EMC) of this instrument was tested with the options and accessories shown below. Since using an option or accessory other than those specified may cause malfunctioning of this instrument due to interferences of external device or cause malfunctioning of external device, use only the options or accessories specified for this instrument. 100V power supply cable:KP300VCTF3X1.25SQKS16A:3m Personal computer: CE Marking and VCCI approved personal computer USB cable (Type A―B):2m 3. This instrument is not designed to be used adjacent to an external instrument or placing one on top of another. Therefore, do not apply such use. Nevertheless, if such use is inevitable, it is necessary to monitor constantly to make sure the instrument is functioning normally after such use has been adopted. 4. Accessories and options used with this instrument are tested for EMC when combined with instrument below. Since usage with an instrument other than that specified may cause malfunctioning of this instrument due to interferences of other devices or cause malfunctioning of other devices, do not use any instrument other than specified below. Option 1:Personal computer: CE Marking and VCCI approved personal computer 5. We specified the functions listed in the table blow as the basic performance of this instrument to determine EMC of this instrument. Function Essential performance Stimulus presentation Instrument operation functions Camera image display Touch panel functions Display without disturbance 159 Guidance and manufacturer’s declaration - electromagnetic emissions KOWA AP–7000 is intended for use in the electromagnetic environment specified below. The customer or the user of KOWA AP–7000 should assure that it is used in such an environment. Emissions test Compliance Electromagnetic environment - guidance RF emissions CISPR 11 Group 1 KOWA AP–7000 uses RF energy only for its internal function. Therefore, its RF emissions are very low and are not likely to cause any interference in nearby electronic instrument. RF emissions CISPR 11 Class B KOWA AP–7000 is acceptable in all types of facilities without any limitation to the electrical supply network connected to KOWA AP–7000. Harmonic emissions IEC 61000 – 3 – 2 Class A Voltage fluctuations/ flicker emissions IEC 61000-3-3 Complies Guidance and manufacturer’s declaration - electromagnetic immunity KOWA AP–7000 is intended for use in the electromagnetic environment specified below. The customer or the user of KOWA AP–7000 should assure that it is used in such an environment. Immunity test IEC 60601 test level Compliance level Electromagnetic environment - guidance Electrostatic discharge(ESD) IEC 61000-4-2 ±6kV contact ±8kV air ±6kV contact ±8kV air Floors should be wood, concrete or ceramic tile. If floors are covered with synthetic material, the relative humidity should be at least 30%. Electrical fast transient/burst IEC 61000-4-4 ±2kV for power supply lines ±1kV for input/output lines ±2kV for power supply lines Mains power quality should be that of a typical commercial or hospital environment. Surge ±1kV differential mode ±2kV common mode ±1kV differential mode ±2kV common mode Mains power quality should be that of a typical commercial or hospital environment. <5% UT (>95% dip in UT) for 0.5 cycle <5% UT (>95% dip in UT) for 0.5 cycle 40% UT (60% dip in UT) for 5 cycles 40% UT (60% dip in UT) for 5 cycles Mains power quality should be that of a typical commercial or hospital environment. If the user of KOWA AP–7000 requires continued operation during power mains interruptions, it is recommended that KOWA AP–7000 be powered from an uninterruptible power supply. 70% UT (30% dip in UT) for 25 cycles 70% UT (30% dip in UT) for 25 cycles <5% UT (>95% dip in UT) for 5 sec <5% UT (>95% dip in UT) for 5 sec IEC 61000-4-5 Voltage dips, short interruptions and voltage variations on power supply input lines IEC 61000-4-11 Power frequency (50/60Hz) magnetic field IEC 61000-4-8 3 A/m 3 A/m Power frequency magnetic fields should be at levels characteristic of a typical location in a typical commercial or hospital environment. NOTE UT is the a.c. mains voltage prior to application of the test level. 160 13 Electromagnetic compatibility (IEC 60601-1-2) < Guidance and manufacturer’s declaration - electromagnetic immunity KOWA AP–7000 is intended for use in the electromagnetic environment specified below. The customer or the user of KOWA AP–7000 should assure that it is used in such an environment. Immunity test IEC 60601 test level Compliance level Electromagnetic environment– guidance Portable and mobile RF communications instrument should be used no closer to any part of KOWA AP–7000, including cables, than the recommended separation distance calculated from the equation applicable to the frequency of the transmitter. Recommended separation distance d=1.2 √ P Conducted RF IEC 61000-4-6 EN 61000-4-6 Radiated RF IEC 61000-4-3 EN 61000-4-3 3 Vrms 150 kHz to 80 MHz 3 Vrms 3 V/m 80 MHz to 2.5 GHz d=1.2 √ P 80 MHz to 800 MHz d=2.3 √ P 800 MHz to 2.5 GHz Where P is the maximum output power rating of the transmitter in watts (W) according to the transmitter manufacturer and d is the recommended separation distance in metres (m). 3 V/m Field strengths from fixed RF transmitters, as determined by an electromagnetic site surveya, should be less than the compliance level in each frequency rangeb. Interference may occur in the vicinity of instrument marked with the following symbol: NOTE1 At 80MHz and 800MHz, the higher frequency range applies. NOTE2 These guidelines may not apply in all situations. Electromagnetic propagation is affected by absorption and reflection from structures, objects and people. a b Field strengths from fixed transmitters, such as base stations for radio (cellular/cordless) telephones and land mobile radios, amateur radio, AM and FM radio broadcast and TV broadcast cannot be predicted theoretically with accuracy. To assess the electromagnetic environment due to fixed RF transmitters, an electromagnetic site survey should be considered. If the measured field strength in the location in which KOWA AP–7000 is used exceeds the applicable RF compliance level above, KOWA AP–7000 should be observed to verify normal operation. If abnormal performance is observed, additional measures may be necessary, such as reconfiguring or relocating KOWA AP–7000 Over the frequency range 150kHz to 80MHz, field strengths should be less than 3 V/m. Recommended separation distances between portable and mobile RF communications instrument and KOWA AP–7000 KOWA AP–7000 is intended for use in an electromagnetic environment in which radiated RF disturbances are controlled. The customer or the user of KOWA AP–7000 can help prevent electromagnetic interference by maintaining a minimum distance between portable and mobile RF communications instrument (transmitters) and KOWA AP–7000 as recommended below, according to the maximum output power of the communications instrument. Separation distance according to frequency of transmitter (m) Rated maximum output power of transmitter W 150kHz 〜 80MHz d=1.2 √ P 80MHz 〜 800MHz d=1.2 √ P 800MHz 〜 2.5GHz d=2.3 √ P 0.01 0.12 0.12 0.23 0.1 0.37 0.37 0.74 1 1.2 1.2 2.3 10 3.7 3.7 7.4 100 12 12 23 For transmitters rated at a maximum output power not listed above, the recommended separation distance d in metres (m) can be estimated using the equation applicable to the frequency of the transmitter, where P is the maximum output power rating of the transmitter in watts (W) according to the transmitter manufacturer. NOTE1 80MHz and 800MHz, the separation distance for the higher frequency range applies. NOTE2 These guidelines may not apply in all situations. Electromagnetic propagation is affected by absorption and reflection from structures, objects and people. 161 World Sales Headquarters 4-14, Nihonbashi-honcho 3-chome, Chuo-ku, Tokyo 103-8433 Japan Phone : 81(3)3279-7639 Facsimile : 81(3)3279-7541 URL : http://www.kowa.co.jp/e-life/ 20001 So.Vermont Ave. Torrance, CA 90502, U.S.A Phone : 1(310)327-1913 Facsimile : 1(310)327-4177 URL : http://www.kowa-usa.com/ Hamamatsu Factory 3-1, Shinmiyakoda 1-chome, kitaku, Hamamatsu city, Shizuoka Pref., 431-2103 Japan © 2011 Kowa Company, Ltd. All rights reserved. FT10 V1.2K 111121 Printed in Japan