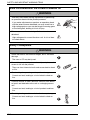
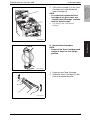
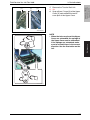
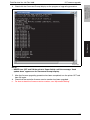
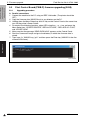
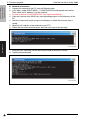
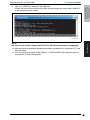
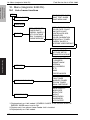
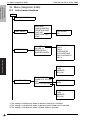
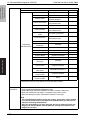
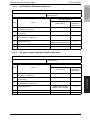
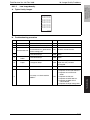
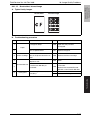
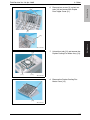
1
SERVICE MANUAL
FIELD SERVICE
®
magicolor 2400W/2430 DL/2450
magicolor 2400W
magicolor 2430 DL
magicolor 2450
®
®
®
FIELD SERVICE
Use of this manual should be strictly supervised to
avoid disclosure of confidential information.
Printed in Japan
4139-7991-21
0504XXXX
2006.02 Ver.4.0
© 2006 KONICA MINOLTA BUSINESS TECHNOLOGIES, INC.
2006.02
Ver. 4.0
SAFETY AND IMPORTANT WARNING ITEMS
SAFETY AND IMPORTANT WARNING ITEMS
Read carefully the Safety and Important Warning Items described below to understand
them before doing service work.
IMPORTANT NOTICE
Because of possible hazards to an inexperienced person servicing this product as well as
the risk of damage to the product, KONICA MINOLTA BUSINESS TECHNOLOGIES, INC.
(hereafter called the KMBT) strongly recommends that all servicing be performed only by
KMBT-trained service technicians.
Changes may have been made to this product to improve its performance after this Service
Manual was printed. Accordingly, KMBT does not warrant, either explicitly or implicitly, that
the information contained in this Service Manual is complete and accurate.
The user of this Service Manual must assume all risks of personal injury and/or damage to
the product while servicing the product for which this Service Manual is intended.
Therefore, this Service Manual must be carefully read before doing service work both in the
course of technical training and even after that, for performing maintenance and control of
the product properly.
Keep this Service Manual also for future service.
DESCRIPTION ITEMS FOR DANGER,
WARNING AND CAUTION
In this Service Manual, each of three expressions “
DANGER”, “
WARNING”, and
“
CAUTION” is defined as follows together with a symbol mark to be used in a limited
meaning.
When servicing the product, the relevant works (disassembling, reassembling, adjustment,
repair, maintenance, etc.) need to be conducted with utmost care.
DANGER: Action having a high possibility of suffering death or serious injury
WARNING: Action having a possibility of suffering death or serious injury
CAUTION: Action having a possibility of suffering a slight wound, medium
trouble, and property damage
Symbols used for safety and important warning items are defined as follows:
:Precaution when servicing the
product.
:Prohibition when servicing the
product.
:Direction when servicing the
product.
General
precaution
Electric hazard High temperature
General
prohibition
Do not touch
with wet hand
Do not
disassemble
General
instruction
Unplug
Ground/Earth
S-1
SAFETY AND IMPORTANT WARNING ITEMS
SAFETY WARNINGS
[1] MODIFICATIONS NOT AUTHORIZED BY KONICA MINOLTA
BUSINESS TECHNOLOGIES, INC.
KONICA MINOLTA brand products are renowned for their high reliability. This reliability is
achieved through high-quality design and a solid service network.
Product design is a highly complicated and delicate process where numerous mechanical,
physical, and electrical aspects have to be taken into consideration, with the aim of arriving
at proper tolerances and safety factors. For this reason, unauthorized modifications involve
a high risk of degradation in performance and safety. Such modifications are therefore
strictly prohibited. the points listed below are not exhaustive, but they illustrate the reasoning behind this policy.
Prohibited Actions
DANGER
• Using any cables or power cord not specified by KMBT.
• Using any fuse or thermostat not specified by KMBT.
Safety will not be assured, leading to a risk of fire and
injury.
• Disabling fuse functions or bridging fuse terminals with
wire, metal clips, solder or similar object.
• Disabling relay functions (such as wedging paper between
relay contacts)
• Disabling safety functions (interlocks, safety circuits, etc.)
Safety will not be assured, leading to a risk of fire and
injury.
• Making any modification to the product unless instructed
by KMBT
• Using parts not specified by KMBT
S-2
SAFETY AND IMPORTANT WARNING ITEMS
[2] POWER PLUG SELECTION
In some countries or areas, the power plug provided with the product may not fit wall outlet
used in the area. In that case, it is obligation of customer engineer (hereafter called the CE)
to attach appropriate power plug or power cord set in order to connect the product to the
supply.
Power Cord Set or Power Plug
WARNING
• Use power supply cord set which meets the following
criteria:
- provided with a plug having configuration intended for
the connection to wall outlet appropriate for the product's rated voltage and current, and
kw
- the plug has pin/terminal(s) for grounding, and
- provided with three-conductor cable having enough current capacity, and
- the cord set meets regulatory requirements for the area.
Use of inadequate cord set leads to fire or electric shock.
• Attach power plug which meets the following criteria:
- having configuration intended for the connection to wall
outlet appropriate for the product's rated voltage and
current, and
- the plug has pin/terminal(s) for grounding, and
- meets regulatory requirements for the area.
Use of inadequate cord set leads to the product connecting to inadequate power supply (voltage, current capacity,
grounding), and may result in fire or electric shock.
• Conductors in the power cable must be connected to terminals of the plug according to the following order:
• Black or Brown:
L (line)
• White or Light Blue:
N (neutral)
• Green/Yellow:
PE (earth)
Wrong connection may cancel safeguards within the
product, and results in fire or electric shock.
S-3
SAFETY AND IMPORTANT WARNING ITEMS
[3] CHECKPOINTS WHEN PERFORMING ON-SITE SERVICE
KONICA MINOLTA brand products are extensively tested before shipping, to ensure that all
applicable safety standards are met, in order to protect the customer and customer engineer (hereafter called the CE) from the risk of injury. However, in daily use, any electrical
equipment may be subject to parts wear and eventual failure. In order to maintain safety
and reliability, the CE must perform regular safety checks.
1.
Power Supply
Connection to Power Supply
WARNING
• Check that mains voltage is as specified.
Connection to wrong voltage supply may result in fire or
electric shock.
• Connect power plug directly into wall outlet having same
configuration as the plug.
Use of an adapter leads to the product connecting to
inadequate power supply (voltage, current capacity,
grounding), and may result in fire or electric shock.
If proper wall outlet is not available, advice the customer
to contact qualified electrician for the installation.
• Plug the power cord into the dedicated wall outlet with a
capacity greater than the maximum power consumption.
If excessive current flows in the wall outlet, fire may
result.
• If two or more power cords can be plugged into the wall
outlet, the total load must not exceed the rating of the wall
outlet.
If excessive current flows in the wall outlet, fire may
result.
• Make sure the power cord is plugged in the wall outlet
securely.
Contact problems may lead to increased resistance,
overheating, and the risk of fire.
• Check whether the product is grounded properly.
If current leakage occurs in an ungrounded product, you
may suffer electric shock while operating the product.
Connect power plug to grounded wall outlet.
S-4
kw
SAFETY AND IMPORTANT WARNING ITEMS
Power Plug and Cord
WARNING
• When using the power cord set (inlet type) that came with
this product, make sure the connector is securely inserted
in the inlet of the product.
When securing measure is provided, secure the cord with
the fixture properly.
If the power cord (inlet type) is not connected to the product securely, a contact problem may lead to increased
resistance, overheating, and risk of fire.
• Check whether the power cord is not stepped on or
pinched by a table and so on.
Overheating may occur there, leading to a risk of fire.
• Check whether the power cord is damaged. Check
whether the sheath is damaged.
If the power plug, cord, or sheath is damaged, replace
with a new power cord (with plug and connector on each
end) specified by KMBT. Using the damaged power cord
may result in fire or electric shock.
• Do not bundle or tie the power cord.
Overheating may occur there, leading to a risk of fire.
• Check whether dust is collected around the power plug
and wall outlet.
Using the power plug and wall outlet without removing
dust may result in fire.
• Do not insert the power plug into the wall outlet with a wet
hand.
The risk of electric shock exists.
• When unplugging the power cord, grasp the plug, not the
cable.
The cable may be broken, leading to a risk of fire and
electric shock.
S-5
SAFETY AND IMPORTANT WARNING ITEMS
Wiring
WARNING
• Never use multi-plug adapters to plug multiple power cords
in the same outlet.
If used, the risk of fire exists.
• When an extension cord is required, use a specified one.
Current that can flow in the extension cord is limited, so
using a too long extension cord may result in fire.
Do not use an extension cable reel with the cable taken
up. Fire may result.
2.
Installation Requirements
Prohibited Installation Places
WARNING
• Do not place the product near flammable materials or volatile materials that may catch fire.
A risk of fire exists.
• Do not place the product in a place exposed to water such
as rain.
A risk of fire and electric shock exists.
When not Using the Product for a long time
WARNING
• When the product is not used over an extended period of
time (holidays, etc.), switch it off and unplug the power
cord.
Dust collected around the power plug and outlet may
cause fire.
S-6
SAFETY AND IMPORTANT WARNING ITEMS
Ventilation
CAUTION
• The product generates ozone gas during operation, but it
will not be harmful to the human body.
If a bad smell of ozone is present in the following cases,
ventilate the room.
a. When the product is used in a poorly ventilated room
b. When taking a lot of copies
c. When using multiple products at the same time
Stability
CAUTION
• Be sure to lock the caster stoppers.
In the case of an earthquake and so on, the product may
slide, leading to a injury.
Inspection before Servicing
CAUTION
• Before conducting an inspection, read all relevant documentation (service manual, technical notices, etc.) and
proceed with the inspection following the prescribed procedure, using only the prescribed tools. Do not make any
adjustment not described in the documentation.
If the prescribed procedure or tool is not used, the product may break and a risk of injury or fire exists.
• Before conducting an inspection, be sure to disconnect
the power plugs from the product and options.
When the power plug is inserted in the wall outlet, some
units are still powered even if the POWER switch is
turned OFF. A risk of electric shock exists.
• The area around the fixing unit is hot.
You may get burnt.
S-7
SAFETY AND IMPORTANT WARNING ITEMS
Work Performed with the Product Powered On
WARNING
• Take every care when making adjustments or performing
an operation check with the product powered.
If you make adjustments or perform an operation check
with the external cover detached, you may touch live or
high-voltage parts or you may be caught in moving gears
or the timing belt, leading to a risk of injury.
• Take every care when servicing with the external cover
detached.
High-voltage exists around the drum unit. A risk of electric shock exists.
Safety Checkpoints
WARNING
• Check the exterior and frame for edges, burrs, and other
damage.
The user or CE may be injured.
• Do not allow any metal parts such as clips, staples, and
screws to fall into the product.
They can short internal circuits and cause electric shock
or fire.
• Check wiring for squeezing and any other damage.
Current can leak, leading to a risk of electric shock or
fire.
• Carefully remove all toner remnants and dust from electrical parts and electrode units such as a charging corona
unit.
Current can leak, leading to a risk of product trouble or
fire.
• Check high-voltage cables and sheaths for any damage.
Current can leak, leading to a risk of electric shock or
fire.
S-8
SAFETY AND IMPORTANT WARNING ITEMS
Safety Checkpoints
WARNING
• Check electrode units such as a charging corona unit for
deterioration and sign of leakage.
Current can leak, leading to a risk of trouble or fire.
• Before disassembling or adjusting the write unit (P/H unit)
incorporating a laser, make sure that the power cord has
been disconnected.
The laser light can enter your eye, leading to a risk of
loss of eyesight.
• Do not remove the cover of the write unit. Do not supply
power with the write unit shifted from the specified mounting position.
The laser light can enter your eye, leading to a risk of
loss of eyesight.
• When replacing a lithium battery, replace it with a new lithium battery specified in the Parts Guide Manual. Dispose
of the used lithium battery using the method specified by
local authority.
Improper replacement can cause explosion.
• After replacing a part to which AC voltage is applied (e.g.,
optical lamp and fixing lamp), be sure to check the installation state.
A risk of fire exists.
• Check the interlock switch and actuator for loosening and
check whether the interlock functions properly.
If the interlock does not function, you may receive an
electric shock or be injured when you insert your hand in
the product (e.g., for clearing paper jam).
• Make sure the wiring cannot come into contact with sharp
edges, burrs, or other pointed parts.
Current can leak, leading to a risk of electric shock or
fire.
S-9
SAFETY AND IMPORTANT WARNING ITEMS
Safety Checkpoints
WARNING
• Make sure that all screws, components, wiring, connectors, etc. that were removed for safety check and maintenance have been reinstalled in the original location. (Pay
special attention to forgotten connectors, pinched cables,
forgotten screws, etc.)
A risk of product trouble, electric shock, and fire exists.
Handling of Consumables
WARNING
• Toner and developer are not harmful substances, but care
must be taken not to breathe excessive amounts or let the
substances come into contact with eyes, etc. It may be
stimulative.
If the substances get in the eye, rinse with plenty of water
immediately. When symptoms are noticeable, consult a
physician.
• Never throw the used cartridge and toner into fire.
You may be burned due to dust explosion.
Handling of Service Materials
CAUTION
• Unplug the power cord from the wall outlet.
Drum cleaner (isopropyl alcohol) and roller cleaner (acetone-based) are highly flammable and must be handled
with care. A risk of fire exists.
• Do not replace the cover or turn the product ON before
any solvent remnants on the cleaned parts have fully
evaporated.
A risk of fire exists.
S-10
SAFETY AND IMPORTANT WARNING ITEMS
Handling of Service Materials
CAUTION
• Use only a small amount of cleaner at a time and take
care not to spill any liquid. If this happens, immediately
wipe it off.
A risk of fire exists.
• When using any solvent, ventilate the room well.
Breathing large quantities of organic solvents can lead to
discomfort.
S-11
SAFETY AND IMPORTANT WARNING ITEMS
[4] Laser Safety
• This is a digital machine certified as a Class 1 laser product. There is no possibility of
danger from a laser, provided the machine is serviced according to the instruction in this
manual.
4.1
Internal Laser Radiation
semiconductor laser
Maximum power of the laser diode
10 mW
Maximum average radiation power (*)
7.5 µW
Wavelength
775-800 nm
*at laser aperture of the Print Head Unit
• This product employs a Class 3b laser diode that emits an invisible laser beam. The laser
diode and the scanning polygon mirror are incorporated in the print head unit.
• The print head unit is NOT A FIELD SERVICEABLE ITEM. Therefore, the print head unit
should not be opened under any circumstances.
Laser Aperture of
the Print Head Unit
This figure shows
the view inside the
Top Cover.
4139safe004c0
S-12
SAFETY AND IMPORTANT WARNING ITEMS
U.S.A., Canada
(CDRH Regulation)
• This machine is certified as a Class 1 Laser product under Radiation Performance Standard according to the Food, Drug and Cosmetic Act of 1990. Compliance is mandatory
for Laser products marketed in the United States and is reported to the Center for
Devices and Radiological Health (CDRH) of the U.S. Food and Drug Administration of
the U.S. Department of Health and Human Services (DHHS). This means that the device
does not produce hazardous laser radiation.
• The label shown on page S-16 indicates compliance with the CDRH regulations and
must be attached to laser products marketed in the United States.
.
CAUTION
• Use of controls, adjustments or performance of procedures other than those
specified in this manual may result in hazardous radiation exposure.
semiconductor laser
Maximum power of the laser diode
10 mW
Wavelength
775-800 nm
All Areas
CAUTION
• Use of controls, adjustments or performance of procedures other than those
specified in this manual may result in hazardous radiation exposure.
semiconductor laser
Maximum power of the laser diode
10 mW
Wavelength
775-800 nm
Denmark
ADVARSEL
• Usynlig laserstråling ved åbning, når sikkerhedsafbrydere er ude af funktion.
Undgå udsættelse for stråling. Klasse 1 laser produkt der opfylder IEC60825-1
sikkerheds kravene.
halvlederlaser
Laserdiodens højeste styrke
10 mW
bølgelængden
775-800 nm
S-13
SAFETY AND IMPORTANT WARNING ITEMS
Finland, Sweden
LUOKAN 1 LASERLAITE
KLASS 1 LASER APPARAT
VAROITUS!
• Laitteen käyttäminen muulla kuin tässä käyttöohjeessa mainitulla tavalla saattaa altistaa käyttäjän turvallisuusluokan 1 ylittävälle näkymättömälle lasersäteilylle.
puolijohdelaser
Laserdiodin suurin teho
10 mW
aallonpituus
775-800 nm
VARNING!
• Om apparaten används på annat sätt än i denna bruksanvisning specificerats,
kan användaren utsättas för osynlig laserstrålning, som överskrider gränsen
för laserklass 1.
halvledarlaser
Den maximala effekten för laserdioden
10 mW
våglängden
775-800 nm
VARO!
• Avattaessa ja suojalukitus ohitettaessa olet alttiina näkymättomälle lasersäteilylle. Älä katso säteeseen.
VARNING!
• Osynlig laserstråining när denna del är öppnad och spärren är urkopplad.
Betrakta ej stråien.
Norway
ADVERSEL
• Dersom apparatet brukes på annen måte enn spesifisert i denne bruksanvisning, kan brukeren utsettes för unsynlig laserstrålning, som overskrider grensen
for laser klass 1.
halvleder laser
S-14
Maksimal effekt till laserdiode
10 mW
bølgelengde
775-800 nm
SAFETY AND IMPORTANT WARNING ITEMS
4.2
Laser Safety Label
• A laser safety label is attached to the inside of the machine as shown below.
4139safe001c0
S-15
SAFETY AND IMPORTANT WARNING ITEMS
4.3
Laser Caution Label
• A laser caution label is attached to the outside of the machine as shown below.
A. magicolor 2400W
4139safe005e0
4139safe006e0
S-16
SAFETY AND IMPORTANT WARNING ITEMS
B. magicolor 2430 DL
4139safe007e0
4139safe008e0
S-17
SAFETY AND IMPORTANT WARNING ITEMS
2
C. magicolor 2450
4139P0E501DA
4139P0E502DA
S-18
SAFETY AND IMPORTANT WARNING ITEMS
4.4
PRECAUTIONS FOR HANDLING THE LASER EQUIPMENT
• When laser protective goggles are to be used, select ones with a lens conforming to the
above specifications.
• When a disassembly job needs to be performed in the laser beam path, such as when
working around the printerhead and PC Drum, be sure first to turn the printer OFF.
• If the job requires that the printer be left ON, take off your watch and ring and wear laser
protective goggles.
• A highly reflective tool can be dangerous if it is brought into the laser beam path. Use
utmost care when handling tools on the user’s premises.
• The Print Head is not to be disassembled or adjusted in the field. Replace the Unit or
Assembly including the Control Board. Therefore, remove the Laser Diode, and do not
perform Control Board trimmer adjustment.
S-19
SAFETY AND IMPORTANT WARNING ITEMS
WARNING INDICATIONS ON THE MACHINE
Caution labels shown are attached in some areas on/in the machine.
When accessing these areas for maintenance, repair, or adjustment, special care should
be taken to avoid burns and electric shock.
or
or
High temperature
High voltage
4139safe009c0
S-20
SAFETY AND IMPORTANT WARNING ITEMS
High voltage
4139safe010c0
CAUTION:
• You may be burned or injured if you touch any area that you are advised not to
touch by any caution label. Do not remove caution labels. If any caution label has
come off or become dirty and therefore the caution cannot be read, contact our
Service Office.
S-21
SAFETY AND IMPORTANT WARNING ITEMS
S-22
SERVICE MANUAL
FIELD SERVICE
magicolor 2400W
magicolor 2430 DL
magicolor 2450
®
®
®
Main Unit
2006.02
Ver. 4.0
After publication of this service manual, the parts and mechanism may be subject to change for
improvement of their performance.
Therefore, the descriptions given in this service manual may not coincide with the actual machine.
When any change has been made to the descriptions in the service manual, a revised version will be
issued with a revision mark added as required.
Revision mark:
• To indicate clearly a section revised, show 1 to the left of the revised section.
A number within 1 represents the number of times the revision has been made.
• To indicate clearly a section revised, show 1 in the lower outside section of the corresponding page.
A number within 1 represents the number of times the revision has been made.
NOTE
Revision marks shown in a page are restricted only to the latest ones with the old ones deleted.
• When a page revised in Ver. 2.0 has been changed in Ver. 3.0:
The revision marks for Ver. 3.0 only are shown with those for Ver. 2.0 deleted.
• When a page revised in Ver. 2.0 has not been changed in Ver. 3.0:
The revision marks for Ver. 2.0 are left as they are.
2006/2
4.0
3
2
Adding the descriptions of magicolor 2430 DL
2005/4
3.0
2
Adding the descriptions of magicolor 2450
2004/10
2.0
2004/09
1.0
1
—
Issue of the first edition
Date
Service manual Ver.
Revision mark
Adding the descriptions of magicolor 2430 DL
Descriptions of revision
CONTENTS
General
1.
System configuration............................................................................................... 1
2.
Product specifications ............................................................................................. 3
Type ...................................................................................................................... 3
2.2
Functions .............................................................................................................. 4
2.3
Maintenance ......................................................................................................... 5
2.4
Machine Specifications ......................................................................................... 5
2.5
Operating Environment......................................................................................... 5
2.6
Controller .............................................................................................................. 5
General
2.1
magicolor 2400W
magicolor 2430 DL
magicolor 2450
Field Service Ver. 4.0 Feb. 2006
Maintenance
Maintenance items................................................................................................ 7
3.1.1
Parts to be replaced by users (CRUs) .......................................................... 7
3.1.2
Parts to be replaced by Service Engineers (FRUs) ...................................... 8
Maintenance parts ................................................................................................ 9
3.3
Concept of parts life............................................................................................ 10
3.4
Maintenance procedure (Periodic parts check) .................................................. 11
3.4.1
Pick-up Roller.............................................................................................. 11
3.4.2
Separation Pad ........................................................................................... 13
3.4.3
PH Window ................................................................................................. 13
3.4.4
Toner Cartridge (C/M/Y/Bk)......................................................................... 14
3.4.5
Drum Cartridge ........................................................................................... 17
3.4.6
2nd Transfer Roller...................................................................................... 18
3.4.7
Transfer Belt Unit......................................................................................... 19
3.4.8
Fusing Unit.................................................................................................. 20
4.
Service tool ........................................................................................................... 23
4.1
Consumable Parts .............................................................................................. 23
4.1.1
Toner Cartridge (TC) (as an individual part) ............................................... 23
4.1.2
Drum Cartridge ........................................................................................... 23
4.1.3
Maintenance Kit .......................................................................................... 23
Firmware upgrade ................................................................................................. 24
5.1
Print Control Board (PWB-P) firmware upgrading (2400W/2430 DL)................. 24
5.1.1
5.2
Upgrading procedure .................................................................................. 24
Print Control Board (PWB-P) firmware upgrading (2450)................................... 26
5.2.1
Upgrading procedure .................................................................................. 26
i
Appendix
5.
Adjustment / Setting
3.2
Maintenance
Periodic check ......................................................................................................... 7
3.1
Troubleshooting
3.
Field Service Ver. 4.0 Feb. 2006
Disassembly/adjustment prohibited items .......................................................... 30
6.2
Disassembly/assembly list (other parts) ............................................................. 31
6.3
Disassembly/assembly procedure...................................................................... 32
Maintenance
Adjustment / Setting
Troubleshooting
Appendix
Other ..................................................................................................................... 30
6.1
General
magicolor 2400W
magicolor 2430 DL
magicolor 2450
6.
6.3.1
Rear Panel .................................................................................................. 32
6.3.2
Rear Cover.................................................................................................. 32
6.3.3
Left Cover ................................................................................................... 33
6.3.4
Right Cover ................................................................................................. 34
6.3.5
Paper Take-up Cover .................................................................................. 34
6.3.6
Front Cover ................................................................................................. 34
6.3.7
Control Panel (PWB-OP) ............................................................................ 35
6.3.8
USB Board (PWB-USB).............................................................................. 36
6.3.9
Print Control Board (PWB-P) ...................................................................... 36
6.3.10
Mechanical Control Board (PWB-A) ........................................................... 41
6.3.11
Power Unit (PU) .......................................................................................... 43
6.3.12
High Voltage Unit (HV)................................................................................ 46
6.3.13
Waste Toner Near Full Detection Board (PWB-C) ...................................... 47
6.3.14
PH Unit ....................................................................................................... 48
6.3.15
Paper Pick-up Unit ...................................................................................... 51
6.3.16
Main Motor (M1) ......................................................................................... 52
6.3.17
Power Supply Cooling Fan Motor (M4) ....................................................... 52
6.3.18
Ventilation Fan Motor (M6).......................................................................... 53
6.3.19
Fusing Motor (M7) ...................................................................................... 54
6.3.20
Developing Motor (M3) ............................................................................... 54
6.3.21
Rack Motor (M2) ......................................................................................... 55
6.3.22
Tray1 Paper Pick-up Solenoid (SL1) ........................................................... 56
6.3.23
Registration Roller Solenoid (SL2) ............................................................. 56
6.3.24
Pressure/Retraction Solenoid/Cleaning Blade (SL3).................................. 57
6.3.25
Pressure/Retraction Solenoid /2nd Image Transfer (SL4) .......................... 57
6.3.26
Temperature/Humidity Sensor (HS1) .......................................................... 58
6.3.27
AIDC Sensor (AIDC)................................................................................... 59
6.3.28
Torque limiter .............................................................................................. 60
6.3.29
Hard Disk (Option) ...................................................................................... 61
Adjustment/Setting
7.
How to use the adjustment section ....................................................................... 63
8.
Description of the Control Panel (magicolor 2400W) ............................................ 64
8.1
ii
Control Panel Display ......................................................................................... 64
8.1.2
List of Status Messages .............................................................................. 65
8.1.3
Cancel Key .................................................................................................. 66
8.2
Service Support Tools ........................................................................................ 67
8.2.1
Details of Service Support Tools ................................................................. 67
8.2.2
Compatible OS............................................................................................ 67
8.2.3
High altitude support ................................................................................... 67
8.2.4
White spots/void areas in high-density areas.............................................. 68
8.2.5
Consumables expected life display ............................................................. 68
8.2.6
Consumables counter reset ........................................................................ 69
8.2.7
RoHS sensor support.................................................................................. 71
Description of the Control Panel (magicolor 2430 DL) .......................................... 72
Control Panel Display ......................................................................................... 72
9.1.1
Basic Screen............................................................................................... 72
9.1.2
Warning Screen .......................................................................................... 72
9.1.3
Error display ................................................................................................ 72
9.1.4
Caution Display ........................................................................................... 73
9.2
List of Control Panel Messages .......................................................................... 74
9.2.1
Normal state messages .............................................................................. 74
9.2.2
Caution messages ...................................................................................... 74
9.2.3
Minor error messages ................................................................................. 74
9.2.4
Error messages........................................................................................... 75
9.2.5
Serious error messages.............................................................................. 75
9.2.6
Malfunction messages ................................................................................ 76
9.3
Maintenance
9.1
Adjustment / Setting
9.
Canceling a Print Job ......................................................................................... 77
Menu (magicolor 2430 DL).................................................................................... 78
10.1 List of menu functions......................................................................................... 78
10.2 SPECIAL PAGES................................................................................................ 79
10.2.1
PRINT CONFIG PAGE................................................................................ 79
10.2.2
PRINT TEST PAGES .................................................................................. 79
10.2.3
PRINT MENU MAP ..................................................................................... 79
Troubleshooting
10.
LED Indicator .............................................................................................. 64
General
8.1.1
magicolor 2400W
magicolor 2430 DL
magicolor 2450
Field Service Ver. 4.0 Feb. 2006
10.3 LANGUAGE ........................................................................................................ 79
10.4 ENGINE .............................................................................................................. 80
REPLACE TONER ...................................................................................... 80
10.4.2
TONER EMPTY .......................................................................................... 80
10.4.3
ENERGY SAVER ........................................................................................ 81
10.4.4
AUTO CONTINUE....................................................................................... 81
10.4.5
TRAY CHAINING ........................................................................................ 81
iii
Appendix
10.4.1
Field Service Ver. 4.0 Feb. 2006
magicolor 2400W
magicolor 2430 DL
magicolor 2450
10.4.6
ENGINE SERVICE ..................................................................................... 81
10.5 NETWORK ......................................................................................................... 85
General
10.5.1
DHCP:XX / BOOTP:XX............................................................................... 85
10.5.2
IP ADDRESS .............................................................................................. 85
10.5.3
SUBNET MASK .......................................................................................... 85
10.5.4
GATEWAY................................................................................................... 85
10.5.5
MAC ADDRESS.......................................................................................... 85
10.5.6
HTTP .......................................................................................................... 86
10.5.7
SNMP ......................................................................................................... 86
10.5.8
FORCED MODES ...................................................................................... 86
Maintenance
10.6 CONSUMABLE USAGE..................................................................................... 86
10.6.1
BLACK TONER........................................................................................... 86
10.6.2
CYAN TONER............................................................................................. 86
10.6.3
MAGENTA TONER ..................................................................................... 87
10.6.4
YELLOW TONER ....................................................................................... 87
10.6.5
DRUM CARTRIDGE ................................................................................... 87
Adjustment / Setting
10.7 DIRECT PRINT .................................................................................................. 87
11.
10.7.1
IMAGE QUALITY ........................................................................................ 87
10.7.2
PAPER SIZE ............................................................................................... 87
10.7.3
MEDIA TYPE .............................................................................................. 87
10.7.4
LAYOUT ...................................................................................................... 88
10.7.5
BRIGHTNESS ............................................................................................ 88
10.7.6
SHARPNESS.............................................................................................. 88
10.7.7
AUTO ROTATE............................................................................................ 88
Description of the Control Panel (magicolor 2450) ............................................... 89
Troubleshooting
11.1 Control Panel Display ......................................................................................... 89
11.1.1
Basic Screen............................................................................................... 89
11.1.2
Caution display ........................................................................................... 89
11.1.3
Error display................................................................................................ 89
11.1.4
Malfunction screen...................................................................................... 90
Appendix
11.2 List of Control Panel Messages.......................................................................... 91
11.2.1
Standard status messages ......................................................................... 91
11.2.2
Caution messages ...................................................................................... 91
11.2.3
Error messages .......................................................................................... 92
11.2.4
Malfunction messages ................................................................................ 93
11.3 Cancelling a Print Job ........................................................................................ 93
12.
Menu (magicolor 2450) ......................................................................................... 94
12.1 List of menu functions ........................................................................................ 94
iv
12.3.1
MENU MAP................................................................................................. 97
12.3.2
CONFIGURATION ...................................................................................... 97
12.3.3
STATISTICS PAGE...................................................................................... 97
12.3.4
FONT LIST.................................................................................................. 97
12.3.5
DIRECTORY LIST....................................................................................... 98
12.3.6
DEMO ......................................................................................................... 98
12.4 PAPER MENU .................................................................................................... 98
12.4.1
INPUT TRAY ............................................................................................... 98
12.4.2
DUPLEX.................................................................................................... 101
12.4.3
ORIENTATION .......................................................................................... 101
12.4.4
PAGE RECOVERY.................................................................................... 101
12.5 QUALITY MENU ............................................................................................... 101
12.5.1
REPLACE TONER .................................................................................... 101
12.5.2
TONER OUT ACTION............................................................................... 102
12.5.3
AIDC ......................................................................................................... 102
12.5.4
DENSITY CONTROL ................................................................................ 102
12.6 INTERFACE MENU .......................................................................................... 103
12.6.1
ETHERNET............................................................................................... 103
12.6.2
USB........................................................................................................... 105
12.6.3
PARALLEL ................................................................................................ 106
12.6.4
ACTIVE I/F ................................................................................................ 106
General
Entering the password ................................................................................ 96
Maintenance
12.2.1
12.3 PRINT MENU ..................................................................................................... 97
Adjustment / Setting
12.2 PROOF/PRINT MENU........................................................................................ 96
magicolor 2400W
magicolor 2430 DL
magicolor 2450
Field Service Ver. 4.0 Feb. 2006
12.7 SYSTEM DEFAULT MENU............................................................................... 106
12.7.2
COLOR MODE ......................................................................................... 106
12.7.3
EMULATIONS ........................................................................................... 107
12.7.4
STARTUP OPTIONS................................................................................. 108
12.7.5
DATE & TIME ............................................................................................ 109
12.7.6
ENERGY SAVER ...................................................................................... 109
12.7.7
ENERGY SAVER MGT ............................................................................. 109
12.7.8
SECURITY................................................................................................ 110
12.7.9
CAPTURE PRT JOB................................................................................. 110
12.7.10 FORMAT ................................................................................................... 110
12.7.11 RESTORE/SAVE ...................................................................................... 111
12.7.12 SAVE CUSTOM ........................................................................................ 111
12.8 LANGUAGE MENU .......................................................................................... 111
v
Troubleshooting
PRINT QUALITY ....................................................................................... 106
Appendix
12.7.1
Field Service Ver. 4.0 Feb. 2006
magicolor 2400W
magicolor 2430 DL
magicolor 2450
12.9 ENVIRONMENT MENU ................................................................................... 112
13.
12.9.1
ALTITUDE SETUP.................................................................................... 112
12.9.2
TRANSFER VOLTAGE ............................................................................. 113
12.9.3
DUPLEX DENSITY................................................................................... 113
Service Mode (magicolor 2400W)....................................................................... 114
13.1 Service Mode entry procedure ......................................................................... 114
13.1.1
14.
Toner Cartridge removal mode ................................................................. 114
Service Mode (magicolor 2430 DL) .................................................................... 115
General
14.1 Service/Service person mode entry procedure ................................................ 115
14.2 List of Service Mode menu functions ............................................................... 115
Maintenance
14.3 Settings/adjustments in Service/Service person mode functions..................... 116
15.
14.3.1
RESTORE FACTORY DEFAULT............................................................... 116
14.3.2
SERVICE PERSON SRU USAGE ............................................................ 119
14.3.3
RESET CONTROLLER ............................................................................ 119
14.3.4
RESET COUNTER TRANSFER BELT ..................................................... 119
14.3.5
RESET COUNTER FUSER UNIT ............................................................ 119
14.3.6
RESET COUNTER TRANSFER ROLLER ............................................... 119
Service Menu (magicolor 2450) .......................................................................... 120
15.1 Service menu entry procedure ......................................................................... 120
Adjustment / Setting
15.2 List of Service Menu Functions ........................................................................ 120
15.3 Settings/adjustments in Service Menu functions.............................................. 121
15.3.1
SRU .......................................................................................................... 121
Troubleshooting
16.
Jam Display......................................................................................................... 123
16.1 Misfeed display ................................................................................................. 123
Troubleshooting
16.2 Misfeed Display Resetting Procedure .............................................................. 125
16.3 Sensor layout.................................................................................................... 125
Appendix
16.4 Solution ............................................................................................................ 126
17.
16.4.1
Initial check items ..................................................................................... 126
16.4.2
Misfeed at paper feed section................................................................... 126
16.4.3
Misfeed at 2nd transfer section................................................................. 127
16.4.4
Misfeed at fusing section .......................................................................... 128
16.4.5
Misfeed at exit section .............................................................................. 129
16.4.6
Undefined misfeed .................................................................................... 129
Error Codes......................................................................................................... 130
17.1 Trouble code ..................................................................................................... 130
vi
17.1.1
Indication of the Error indicator (magicolor 2400W) ................................. 130
17.1.2
Indication of the LCD display (magicolor 2430 DL)................................... 131
Indication of the LCD display (magicolor 2450) ........................................ 131
17.1.4
Trouble code list ........................................................................................ 131
17.2 How to reset...................................................................................................... 133
17.3 Solution............................................................................................................. 134
17.3.1
04: Mechanical Control Board malfunction ............................................... 134
17.3.2
05: Flash ROM malfunction....................................................................... 134
17.3.3
08: Main Motor malfunction....................................................................... 134
17.3.4
08: Ventilation Fan Motor malfunction ....................................................... 135
17.3.5
0C: Power Supply Cooling Fan Motor malfunction.................................... 135
17.3.6
10: Polygon Motor malfunction.................................................................. 136
17.3.7
12: Laser malfunction................................................................................ 136
17.3.8
14: 2nd image transfer pressure/retraction failure..................................... 137
17.3.9
15: Cleaning Blade pressure/retraction failure .......................................... 138
General
17.1.3
magicolor 2400W
magicolor 2430 DL
magicolor 2450
Field Service Ver. 4.0 Feb. 2006
17.3.11 17: Rack rotation failure ............................................................................ 139
17.3.12 18: Heating Roller warm-up failure............................................................ 139
17.3.13 19: Abnormally low Heating Roller temperature ....................................... 139
Maintenance
17.3.10 16: Transfer Belt rotation failure ................................................................ 138
17.3.14 1A: Abnormally high Heating Roller temperature...................................... 139
17.3.16 21: Faulty OHP Sensor ............................................................................. 140
17.3.17 23: Faulty Waste Toner Near Full Detection Board ................................... 140
18.
Power Supply Errors............................................................................................ 141
18.1 Machine is not energized at all (PU operation check) ...................................... 141
18.2 Control panel indicators do not light ................................................................. 141
Adjustment / Setting
17.3.15 1B: Faulty Thermistor................................................................................ 139
18.3 Fusing heaters do not operate.......................................................................... 142
Miscellaneous Errors........................................................................................... 143
19.1 List of miscellaneous malfunctions ................................................................... 143
19.2 Fatal error engine I/F ........................................................................................ 144
19.3 ROM error......................................................................................................... 144
19.4 SDRAM error .................................................................................................... 145
19.5 Fatal error EEPROM......................................................................................... 145
Troubleshooting
19.
19.6 Fatal error data decompression ........................................................................ 146
19.7 Fatal error non-supported engine ..................................................................... 146
19.9 Controller internal error..................................................................................... 147
19.10 Fatal error DBE ................................................................................................. 147
19.11 Fatal error video transfer................................................................................... 148
19.12 Fatal print spooler error .................................................................................... 148
20.
Image Quality Problems ...................................................................................... 149
vii
Appendix
19.8 Fatal error AIDC Sensor ................................................................................... 147
Field Service Ver. 4.0 Feb. 2006
General
magicolor 2400W
magicolor 2430 DL
magicolor 2450
20.1 Solution ............................................................................................................ 149
20.1.1
White lines in FD, white bands in FD, colored lines in FD,
and colored bands in FD........................................................................... 149
20.1.2
White lines in CD, white bands in CD, colored lines in CD,
and colored bands in CD .......................................................................... 150
20.1.3
Uneven density in FD................................................................................ 151
20.1.4
Uneven density in CD ............................................................................... 152
20.1.5
Low image density .................................................................................... 153
20.1.6
Gradation reproduction failure .................................................................. 154
20.1.7
Foggy background .................................................................................... 155
20.1.8
Poor color reproduction............................................................................. 156
20.1.9
Void areas, white spots ............................................................................. 157
20.1.10 Colored spots............................................................................................ 158
20.1.11 Blurred image ........................................................................................... 159
Maintenance
20.1.12 Blank copy, black copy .............................................................................. 160
20.1.13 Incorrect color image registration ............................................................. 161
20.1.14 Poor fusing performance, offset................................................................ 162
20.1.15 Brush effect, blurred image....................................................................... 163
20.1.16 Back marking ............................................................................................ 164
Adjustment / Setting
20.1.17 Uneven pitch ............................................................................................. 165
Appendix
21.
Parts layout drawing............................................................................................ 167
21.1 Main Unit .......................................................................................................... 167
21.2 Lower Feeder Unit (option) ............................................................................... 170
Appendix
Troubleshooting
21.3 Duplex Option (option)...................................................................................... 171
viii
22.
Connector layout drawing ................................................................................... 172
23.
Timing chart ........................................................................................................ 173
Field Service Ver. 4.0 Feb. 2006
1. System configuration
1.
magicolor 2400W
magicolor 2430 DL
magicolor 2450
General
System configuration
A. magicolor 2400W
General
[1]
[2]
4139fs1501c0
[1]
Main Unit
[2]
Dust Cover
B. magicolor 2430 DL
[1]
[5]
[4]
[2]
[3]
4139fs1502c0
[1]
Duplex Option
[4]
256 MB/512 MB DIMM
[2]
Dust Cover
[5]
Main Unit
[3]
Lower Feeder Unit
1
1. System configuration
Field Service Ver. 4.0 Feb. 2006
magicolor 2400W
magicolor 2430 DL
magicolor 2450
C. magicolor 2450
[6]
[5]
[1]
General
[4]
[2]
[3]
4139F1C501DA
2
2
[1]
Duplex Option
[4]
128 MB/256 MB/512 MB DIMM
[2]
Dust Cover
[5]
HDD Option
[3]
Lower Feeder Unit
[6]
Main Unit
Field Service Ver. 4.0 Feb. 2006
Type
Type
2
Desktop full-color laser beam printer
Printing System
Semiconductor laser and electrostatic image transfer to plain paper
Exposure System
2 laser diodes and polygon mirror
PC Drum Type
OPC (organic photo conductor)
Photoconductor
Cleaning
Blade cleaning system
Print Density
600 x 600 dpi
magicolor 2400W
2
magicolor 2400W
magicolor 2430 DL
magicolor 2450
2.1
Product specifications
Paper Feeding System magicolor 2430 DL/
magicolor 2450
General
2.
2. Product specifications
One-way system (Tray 1: 200 sheets)
One-way system (Tray 1: 200 sheets)
* Expandable to a two-way system by adding an
optional Lower Feeder Unit.
Developing System
Single-element developing system
Charging System
DC comb electrode Scorotron system
Image Transfer
System
Intermediate transfer belt system
Paper Separating
System
Curvature separation + Charge-neutralizing system
Fusing System
Roller fusing
Paper Exit System
Face down (Output Tray capacity: 200 sheets)
3
magicolor 2400W
magicolor 2430 DL
magicolor 2450
2. Product specifications
2.2
2
Field Service Ver. 4.0 Feb. 2006
Functions
Warm-up Time
(at ambient temperature of 23°C/73.4°F
and rated source
voltage)
magicolor 2400W/
magicolor 2430 DL
magicolor 2450
Plain paper
General
System Speed
Average: 49 seconds
110 V to 127 V area
Average: 52 seconds
220 V to 240 V area
Average: 55 seconds
126.78 mm/second
63.39 mm/second
OHP film
42.26 mm/second
Full Color
1-sided: 21 seconds
Monochrome
1-sided: 12 seconds
Full Color
1-sided: 21 seconds
2-sided: 33 seconds
Monochrome
1-sided: 12 seconds
2-sided: 24 seconds
Full Color
1-sided: 21 seconds
2-sided: 32 seconds
Monochrome
1-sided: 12 seconds
2-sided: 26 seconds
magicolor 2430 DL
magicolor 2450
2
magicolor 2400W
2
Average: 45 seconds
220 V to 240 V area
Thick stock
magicolor 2400W
First-Page-Out Time
(Plain Paper)
110 V to 127 V area
Print Speed
(Plain Paper)
Custom Paper Sizes
Full Color
1-sided: 5 pages/minute
Monochrome
1-sided: 20 pages/minute
Full Color
1-sided: 5 pages/minute
2-sided: 5 pages/minute
Monochrome
1-sided: 20 pages/minute
2-sided: 11.4 pages/minute
magicolor 2430 DL/
magicolor 2450
Paper width: 92 to 216 mm (3.6" to 8.5")
Paper length: 148 to 356 mm (5.9" to 14")
• Plain Paper (60 to 90 g/m2 / 16 to 24 lb)
• Transparencies
Media Types
2
•
•
•
•
•
•
Thick stock (91 to 163 g/m2/ 25 to 40 lb)
Postcards
Envelopes
Letterhead
Label stock
Glossy stock
Tray Capacities
Plain paper and letterhead
Transparencies, thick stock, postcards, labels stock,
and glossy stock
Envelopes
Hard Disk
Option (magicolor 2450 only)
40 GB
:200 sheets
:50 sheets
:10 sheets
Lower Feeder Unit: Only plain paper and recycled paper weighing 60 to 90 g/m2
(16 to 24 lb) can be loaded.
Duplex Option:
Only plain paper and recycled paper weighing 60 to 90 g/m2
(16 to 24 lb) can be fed through the unit.
☞ For details, see the Service Manual for each option.
4
Field Service Ver. 4.0 Feb. 2006
Maintenance
Machine Durability
2.4
magicolor 2400W
magicolor 2430 DL
magicolor 2450
2.3
2. Product specifications
200,000 prints or 5 years, whichever comes first
Machine Specifications
Power Requirements AC 110 to 127 V
Voltage: AC 220 to 240 V
1100 W
Dimensions
430 mm (W) x 395 mm (D) x 341 (H) mm
16.9" (W) x 15.6" (D) x 13.4" (H)
Weight
Approximately 19.6 kg (43.9 lb) (excluding the Dust Cover)
Operating Noise
During standby : 35 dB (A) or less
During printing : 53 dB (A) or less
2.5
General
Frequency: 50/60 Hz ± 3 Hz
Max Power
Consumption
Operating Environment
Temperature
10° to 35° C / 50° to 95° F (with a fluctuation of 10° C / 18° F or less per hour)
Humidity
15% to 85% (with a fluctuation of 20% or less per hour)
2.6
Controller
A. magicolor 2400W
CPU
Naltec N4-Chip
Standard Memory
32 MB
Interface
USB 1.1/2.0 (High-Speed) compliant
Printer Driver
GDI Printer Driver
OS Compatibility
Windows 98SE/Me/2000/XP
B. magicolor 2430 DL
CPU
ARM9 130 MHz
Standard Memory
32 MB
Interfaces
Printer Drivers
OS Compatibility
USB 1.1/2.0, 10Base-T/100Base-TX (IEEE 802.3) Ethernet
Windows
Windows GDI-based driver/PageScope Raster Language
Mac
OS 9
Raster-based driver/PageScope Raster Language
Mac
OS X
CUPS 1.15 or later/GhostScript (for Mac OS X10.2 only)/
PageScope Raster Language
Linux
CUPS 1.15 or later/GhostScript/PageScope Raster Language
Windows 98SE/NT4.0/Me/2000/Server 2003/XP, Mac OS 9.04/X10.2 or later,
Linux Red Hat 8.0 or later/SuSE 8.1 or later
5
2. Product specifications
Field Service Ver. 4.0 Feb. 2006
magicolor 2400W
magicolor 2430 DL
magicolor 2450
C. magicolor 2450
CPU
freescale MPC8220i (300 MHz)
Standard Memory
256 MB
Interfaces
10 Base-T/100 Base-TX (IEEE 802.3) Ethernet
USB Revision 2.0/1.1
IEEE1284
General
Printer Drivers
OS Compatibility
Windows
Windows NT4.0//2000/Server 2003/XP PostScript driver, Windows 98SE/NT4.0/Me/2000/Server 2003/XP PPDs, PCL XL
driver
Mac
OS 9
PPD
Mac
OS X
PPD + PDE
Linux
PPD for CUPS
Windows 98SE/Me/NT4.0 (SP6 or later)/2000 (SP4 or later)/XP (SP1 or later)/
Server 2003
Mac OS 9 (9.1 or later/Mac OS X (10.2 or later)
Mac OS X Server (10.2 or later)
RedHat Linux 9.0.1, SuSE Linux 8.2 (CUPS 1.1.15 or later)
NetWare 4/5/6
NOTE
• These specifications are subject to change without notice.
2
6
Field Service Ver. 4.0 Feb. 2006
3. Periodic check
3.
magicolor 2400W
magicolor 2430 DL
magicolor 2450
Maintenance
Periodic check
3.1
Maintenance items
3.1.1
Parts to be replaced by users (CRUs)
No Classification
Part name
Number of
prints
Toner Cartridge *
(TC Y/TC M/TC C)
1,500
Toner Cartridge **
(TC Y/TC M/TC C/ TC K)
4,500
Clean Replace
Description
1
Monochrome
45,000
(MP ***)
2
Drum Cartridge
Maintenance
Monochrome
10,000
Processing
section
(1P/J****)
Full Color
11,250
(MP ***)
Full Color
7,500
(1P/J****)
3
4
PH Window
Tray1
paper pick-up Pick-up Roller
section
When a
malfunction
occurs
When a
malfunction
occurs
2 *
: The Toner Cartridges shipped with the magicolor 2400W/2430 DL have a life expectancy of 1,500 printed pages.
**
: The Toner Cartridge shipped with the magicolor 2450 have a life expectancy of
4,500 printed pages.
*** : Continuous printing
**** : 1 page/job
7
3. Periodic check
magicolor 2400W
magicolor 2430 DL
magicolor 2450
3.1.2
Field Service Ver. 4.0 Feb. 2006
Parts to be replaced by Service Engineers (FRUs)
No Classification
Part name
Number of
prints
Clean Replace
Description
Monochrome
135,000
(MP *)
Monochrome
45,000
(1P/J**)
1
Image
Transfer
section
Transfer Belt Unit
Full Color
33,700
(MP *)
Full Color
22,500
(1P/J**)
Maintenance
Standard
Mode ***
36,800
2
3
Fusing
section
2nd Transfer Roller
120,000
Fusing Unit
120,000
* : Continuous printing
** : 1 page/job
*** : Printed under the following conditions;
monochrome = 3 pages/job; color = 2 pages/job; monochrome-to-color ratio = 2/3
8
Field Service Ver. 4.0 Feb. 2006
Maintenance parts
magicolor 2400W
magicolor 2430 DL
magicolor 2450
3.2
3. Periodic check
• To ensure that the machine produces good prints and to extend its service life, it is recommended that the maintenance jobs described in this schedule be carried out as
instructed.
• Replace with reference to the numeric values displayed on the Life Counter.
• Maintenance conditions are based on A4 or Letter, Standard mode, and Preheat OFF.
Classification
1
Part name
Quantity
Standard-Capacity
Toner Cartridge *
(TC Y/TC M/TC C)
1
1,500
☞ 14
High-Capacity
Toner Cartridge **
(TC Y/TC M/TC C/ TC K)
1
4,500
☞ 14
Monochrome
45,000
(MP ***)
Processing
section
2
Actual durable
Ref. page in
Description
cycle
this manual
Monochrome
10,000
Drum Cartridge
1
(1P/J****)
Full Color
11,250
(MP ***)
Maintenance
No
☞ 17
Full Color
7,500
(1P/J****)
Monochrome
135,000
(MP *)
Monochrome
45,000
(1P/J***)
3
Image
Transfer
section
Transfer Belt Unit
1
Full Color
33,700
(MP *)
☞ 19
Full Color
22,500
(1P/J***)
Standard
Mode ****
36,800
4
5
Fusing
section
2nd Transfer Roller
1
120,000
☞ 18
Fusing Unit
1
120,000
☞ 20
2 *
: The Toner Cartridges shipped with the magicolor 2400W/2430 DL have a life expectancy of 1,500 printed pages.
**
: The Toner Cartridge shipped with the magicolor 2450 have a life expectancy of
4,500 printed pages.
*** : Continuous printing
**** : 1 page/job
***** : Printed under the following conditions;
monochrome = 3 pages/job; color = 2 pages/job; monochrome-to-color ratio = 2/3
9
magicolor 2400W
magicolor 2430 DL
magicolor 2450
3. Periodic check
3.3
Field Service Ver. 4.0 Feb. 2006
Concept of parts life
Drum Cartridge
Fusing Unit
2nd Transfer
Roller
Transfer Belt
Unit
Toner Cartridge
C,M,Y,K *
Description
Near Life Value
The period of time during which the Main Motor is
36,000 prints
energized is counted.
The number of printed pages is counted.
-
120,000 prints
The number of printed pages is counted.
-
120,000 prints
-
135,000 prints
1,200 prints
1,500 prints**
3,600 prints
4,500 prints**
The period of time during which the Main Motor is
rotated and the number of printed pages are both
counted.
The number of printed pages compared with the
dot counter value, whichever reaches the life
specifications value, is detected.
Life Value
45,000 prints
Maintenance
* Standard-Capacity Toner Cartridges (C,M,Y), High-Capacity Toner Cartridges (C,M,Y,K).
** In the Status Display menu you can specify whether to continue or stop printing when
there is a toner empty condition.
A. Conditions for Life Specifications Values
• The life specification values represent the number of pages printed or figures equivalent
to it when the given conditions (see the table below) are met. They may be more or less
depending on the machine operating conditions of each individual user.
Item
Print condition
Description
Monochrome: 3 consecutive prints; color: 2 consecutive prints
Paper size
A4 or Letter
Color ratio
Black to Color = 2 to 3
Image density
C/W ratio = 5% for each color
10
Maintenance procedure (Periodic parts check)
magicolor 2400W
magicolor 2430 DL
magicolor 2450
3.4
3. Periodic check
NOTE
• The alcohol referred to in the following procedures is isopropyl alcohol.
3.4.1
Pick-up Roller
4139fs2538c0
[1]
[1]
A. Cleaning Procedure
1. Open the Top Cover.
2. Remove the Drum Cartridge.
☞ 17
NOTE
• Position the removed drum cartridge as shown in the illustration at
the left.
• Be sure to keep the drum cartridge
horizontal and place it where it will
not become dirty.
• Do not leave the drum cartridge
removed for more than 15 minutes,
and do not place the removed drum
cartridge in a location where it will
be exposed to direct light (such as
sunlight).
3. Using a soft cloth dampened with
alcohol, wipe the Pick-up Roller [1]
clean of dirt.
4139fs2501c0
11
Maintenance
Field Service Ver. 4.0 Feb. 2006
Field Service Ver. 4.0 Feb. 2006
magicolor 2400W
magicolor 2430 DL
magicolor 2450
3. Periodic check
4139fs2538c0
Maintenance
[1]
[1]
4139fs2509c0
12
B. Removal Procedure
1. Open the Top Cover.
2. Remove the Drum Cartridge.
☞ 17
NOTE
• Position the removed drum cartridge as shown in the illustration at
the left.
• Be sure to keep the drum cartridge
horizontal and place it where it will
not become dirty.
• Do not leave the drum cartridge
removed for more than 15 minutes,
and do not place the removed drum
cartridge in a location where it will
be exposed to direct light (such as
sunlight).
3. Remove the Pick-up Roller [1].
3.4.2
3. Periodic check
Separation Pad
A.
1.
☞
2.
[2]
Removal Procedure
Remove the Paper Pick-up Unit.
51
Unlock tabs [1] and remove the Separation Pad [2].
magicolor 2400W
magicolor 2430 DL
magicolor 2450
Field Service Ver. 4.0 Feb. 2006
[1]
4139fs2065c1
Maintenance
3. Unhook the spring [3].
[3]
4139fs2066c1
3.4.3
PH Window
[1]
A.
1.
2.
☞
3.
Cleaning Procedure
Open the Top Cover.
Remove the Drum Cartridge.
17
Using a soft cloth dampened with
alcohol, wipe the PH window [1]
clean of dirt.
4139fs2508c0
13
magicolor 2400W
magicolor 2430 DL
magicolor 2450
3. Periodic check
3.4.4
Field Service Ver. 4.0 Feb. 2006
Toner Cartridge (C/M/Y/Bk)
A. Removal Procedure
(1) magicolor 2400W
1. Check the color of the Toner Cartridge to be replaced on the control
panel.
2. Press the TONER ROTATE key.
3. Open the Top Cover.
4. Open the Front Cover [1] and make
sure that the specific Toner Cartridge
to be replaced is in the front.
[1]
4139fs2502c0
Maintenance
[2]
[3]
5. Hold onto the handle [2] of the Toner
Cartridge, pull it and remove the
Toner Cartridge [3].
NOTE
• To remove and replace the Toner
Cartridge of any given color, use
“Replace Toner Cartridge” available
from the Service mode.
☞ For details, see “Adjustment/
Setting.”
4139fs2503c0
[1]
14
4139fs2502c0
(2) magicolor 2430 DL
1. Check the color of the Toner Cartridge to be replaced on the control
panel.
2. Select ENGINE -> REPLACE
TONER from the menu and select
the Toner Cartridge of the specific
color of toner to be replaced.
☞ For details, see “Adjustment/
Setting.”
3. Open the Top Cover.
4. Open the Front Cover [1] and make
sure that the specific Toner Cartridge
to be replaced is in the front.
3. Periodic check
[2]
[3]
5. Hold onto the handle [2] of the Toner
Cartridge, pull it and remove the
Toner Cartridge [3].
NOTE
• To remove and replace the Toner
Cartridge of any given color, use
“Replace Toner Cartridge” available
from the Service mode.
☞ For details, see “Adjustment/
Setting.”
magicolor 2400W
magicolor 2430 DL
magicolor 2450
Field Service Ver. 4.0 Feb. 2006
B. Reinstallation Procedure
NOTE
• Do not let the Toner Cartridge stand
upright or keep it in that upright
position.
4139fs2506c0
1. Prepare a new Toner Cartridge.
2. Shake the Toner Cartridge [1] a few
times to distribute the toner.
[1]
4139fs2534c0
15
Maintenance
4139fs2503c0
3. Periodic check
Field Service Ver. 4.0 Feb. 2006
magicolor 2400W
magicolor 2430 DL
magicolor 2450
3. Remove the Protective Cover [2].
[2]
4139fs2504c0
Maintenance
4. Aligning the shaft [3] on both sides of
the Toner Cartridge with the rails in
the machine, install the Toner Cartridge [4].
[4]
[3]
4139fs2505c0
5. Press down on the Toner Cartridge
[5] until it snaps into place.
6. Close the Front Cover.
7. Close the Top Cover.
[5]
4139fs2537c0
16
3.4.5
3. Periodic check
Drum Cartridge
[2]
A. Replacement Procedure
1. Open the Top Cover.
2. Hold onto the handle [2] of the Drum
Cartridge [1] and slowly lift the Drum
Cartridge out of the machine.
magicolor 2400W
magicolor 2430 DL
magicolor 2450
Field Service Ver. 4.0 Feb. 2006
[1]
4139fs2538c0
NOTE
• Position the removed drum cartridge as shown in the illustration at
the left.
• Be sure to keep the drum cartridge
horizontal and place it where it will
not become dirty.
• Do not leave the drum cartridge
removed for more than 15 minutes,
and do not place the removed drum
cartridge in a location where it will
be exposed to direct light (such as
sunlight).
3. To reinstall, reverse the order of
removal.
17
Maintenance
4139fs2507c0
magicolor 2400W
magicolor 2430 DL
magicolor 2450
3. Periodic check
3.4.6
Field Service Ver. 4.0 Feb. 2006
2nd Transfer Roller
[3]
[1]
[2]
A.
1.
2.
☞
3.
Replacement Procedure
Open the Top Cover.
Remove the Drum Cartridge.
17
Remove the 2nd Transfer Roller
Assy [3] as follows. While pushing
the levers [2] of the holders [1]
located on both sides, pull the holders [1] to the front.
NOTE
• Use care not to lose the two springs
of the 2nd Transfer Roller Assy.
They can easily come off.
[2]
Maintenance
4139fs2516c0
4. Remove the conductive material [4],
gear [5], two springs [6], two holders
[7], and two collars [8].
5. To reinstall, reverse the order of
removal.
[6]
[5]
[7]
[8]
[8]
[6]
[4]
[7]
4139fs2523c0
NOTE
• When the 2nd Transfer Roller is replaced with a new one, it is necessary to reset
the maintenance counter.
For details of how to reset the maintenance counter, see “Adjustment/Setting.”
18
Transfer Belt Unit
A. Replacement Procedure
1. Open the Top Cover.
2. Disconnect the connector [1].
Precaution for Reconnecting the
Connector
• Make sure that the connector is
connected in the correct direction.
[1]
4139fs2002c0
3. Remove two shoulder screws [2].
Maintenance
3.4.7
3. Periodic check
magicolor 2400W
magicolor 2430 DL
magicolor 2450
Field Service Ver. 4.0 Feb. 2006
[2]
[2]
4139fs2003c1
19
Field Service Ver. 4.0 Feb. 2006
magicolor 2400W
magicolor 2430 DL
magicolor 2450
3. Periodic check
[3]
Maintenance
4139fs2004c0
4. Remove the Transfer Belt Unit [3].
NOTE
• When replacing the Transfer Belt
Unit, use care not to touch the surface of the belt. A scratchy or dirty
belt could result in image problems.
5. To reinstall, reverse the order of
removal.
Precaution for Replacing the Transfer
Belt Unit
• After replacing the Transfer Belt
Unit, from the Status Display menu,
select [Printer] → [Power On Test]
and execute image stabilization
control function.
NOTE
• When the Transfer Belt Unit is replaced with a new one, it is necessary to reset the
maintenance counter.
For details of how to reset the maintenance counter, see “Adjustment/Setting.”
3.4.8
Fusing Unit
NOTE
• Before replacing the Fusing Unit, ensure that it has had time to cool down.
A.
1.
☞
2.
☞
3.
[2]
Replacement Procedure
Remove the Rear Cover.
32
Remove the Left Cover.
33
Disconnect two connectors (PJ6A,
PJ7A) [2] from the Mechanical Control Board [1].
[1]
4139fs2005f0
4. Disconnect the two connectors [4]
(black and white) of the Fusing
Safety Switch [3].
[4]
[3]
4139fs2006c1
20
[6]
[5]
5. Remove the Transfer Belt Unit.
☞ 19
6. Snap off two C-rings [6] of the Upper
Cover [5] and unhook the two fulcrum pins of the Upper Cover.
4139fs2007c0
NOTE
• When the fulcrum pins of the Upper
Cover are unhooked, the springs of
the Upper Cover can be unhooked.
If the springs are unhooked, make
sure to reinstall them in the correct
direction. See the illustration on the
left.
4139fs2521c0
21
Maintenance
[5]
3. Periodic check
magicolor 2400W
magicolor 2430 DL
magicolor 2450
Field Service Ver. 4.0 Feb. 2006
Field Service Ver. 4.0 Feb. 2006
magicolor 2400W
magicolor 2430 DL
magicolor 2450
3. Periodic check
7. Swing open the Fusing Unit gear
cover [7].
[7]
4139fs2008c0
8. Remove two screws [9] from the
Fusing Unit [8].
Maintenance
[8]
[9]
4139fs2009c2
[10]
4139fs2010c1
22
9. Remove the Fusing Unit [10].
10. To reinstall, reverse the order of
removal.
Precaution for Reinstalling the Fusing
Unit
• Make sure that the docking gear
shaft of the Fusing Unit fits in the
hole of the Fusing Frame.
• When reinstalling the Left Cover
after reinstalling the Fusing Unit,
make sure that the harness of the
Fusing Unit is located below the rib
of the Left Cover.
☞ 33
Field Service Ver. 4.0 Feb. 2006
4.1
4.1.1
Service tool
magicolor 2400W
magicolor 2430 DL
magicolor 2450
4.
4. Service tool
Consumable Parts
Toner Cartridge (TC) (as an individual part)
Part name
Life expectancy
Standard-Capacity Toner Cartridge - Yellow (Y)
1,500 prints
Standard-Capacity Toner Cartridge - Magenta (M)
1,500 prints
Standard-Capacity Toner Cartridge - Cyan (C)
1,500 prints
High-Capacity Toner Cartridge - Black (K)
4,500 prints
High-Capacity Toner Cartridge - Yellow (Y)
4,500 prints
High-Capacity Toner Cartridge - Magenta (M)
4,500 prints
High-Capacity Toner Cartridge - Cyan (C)
4,500 prints
☞ For the predetermined conditions, see 10.
NOTE
expectancy of 1,500 printed pages.
• The Toner Cartridges shipped with the magicolor 2450 have a life expectancy of
4,500 printed pages.
4.1.2
Drum Cartridge
Part name
Life expectancy
Monochrome 45,000 prints
(MP *)
Monochrome 10,000 prints
Drum Cartridge
(1P/J**)
Full Color 11,250 prints
(MP *)
Full Color 7,500 prints
(1P/J**)
* : Continuous printing
** : 1 page/job
☞ For the predetermined conditions, see 10.
4.1.3
Maintenance Kit
A Maintenance Kit is not available.
23
Maintenance
2 • The Toner Cartridges shipped with the magicolor 2400W/2430 DL have a life
5.
2
5.1
Field Service Ver. 4.0 Feb. 2006
Firmware upgrade
Print Control Board (PWB-P) firmware upgrading
(2400W/2430 DL)
5.1.1
Upgrading procedure
1. Connect the machine to the PC using an Ethernet cable. (The printer should be ON.)
2. In the Menu, select SPECIAL PAGES → PRINT CONFIG PAGE and execute the function. Then, check the IP address [1] of the machine.
☞ For how to execute “PRINT CONFIG PAGE,” see “Adjustment/Setting.”
[1]
Maintenance
magicolor 2400W
magicolor 2430 DL
magicolor 2450
5. Firmware upgrade
4139fs2541c0
3. Copy the firmware data and upgrading program to any directory on the PC.
4. Start the Command Prompt and go to the directory in which the firmware data is
stored.
5. Execute the “flashupdate” command to start the transfer of firmware data.
(The screen shown below indicates that the firmware data resides on the C drive.)
4138fs2539e0
Data to be upgraded
Command
Application
flashupdate -r XXX.XXX.XXX.XXX ******.z
BOOT
flashupdate -b XXX.XXX.XXX.XXX ******.flt
XXX.XXX.XXX.XXX : IP address of the machine
******
: Firmware data file name
24
Field Service Ver. 4.0 Feb. 2006
5. Firmware upgrade
Maintenance
magicolor 2400W
magicolor 2430 DL
magicolor 2450
6. Check with the Command Prompt display on the progress of upgrading procedure.
4138fs2540e0
NOTE
• NEVER turn OFF and ON the printer’s Power Switch until the message “flash
update done” appears on the Command Prompt display.
7. After the firmware upgrading procedure has been completed, turn the printer OFF and
then ON again.
8. Check that the controller firmware version number has been upgraded.
☞ For how to check the firmware version number, see “Adjustment/Setting.”
25
5.2
5.2.1
Field Service Ver. 4.0 Feb. 2006
Print Control Board (PWB-P) firmware upgrading (2450)
Upgrading procedure
A. Parallel connections
1. Connect the machine to the PC using an IEEE 1284 cable. (The printer should be
OFF.)
2. Copy the firmware data (XXXXXX.sys) to any directory on the PC.
3. Holding down the Menu Select key and UP key on the Control Panel at the same time,
turn ON the printer’s Power Switch.
4. For each of the following functions, select YES using the ← or → key and press the
Menu Select key: “UPDATE PRINTER,” “REPLACE CODE,” “REPLACE ALL FONT,”
and “UPDATE NOW.”
5. Make sure that the message “SEND DATA NOW” appears on the Control Panel.
6. Start the Command Prompt and go to the directory in which the firmware data is
stored.
7. Type “copy_/b_XXXXXX.sys_lpt1:” and then press the Enter key (XXXXXX is the firmware data file name).
Maintenance
magicolor 2400W
magicolor 2430 DL
magicolor 2450
5. Firmware upgrade
4139F2E508DA
2
26
Field Service Ver. 4.0 Feb. 2006
5. Firmware upgrade
Maintenance
magicolor 2400W
magicolor 2430 DL
magicolor 2450
8. Check the message on the Control Panel and make sure that “IDLE” is displayed.
4139F2E509DA
NOTE
Do not turn the printer’s Power Switch OFF or ON while the firmware is upgrading.
9. Print a Configuration Page (PRINT MENU → CONFIGURATION) and check the firmware version to verify the upgrade.
27
2
Maintenance
magicolor 2400W
magicolor 2430 DL
magicolor 2450
5. Firmware upgrade
Field Service Ver. 4.0 Feb. 2006
B. Network connections
1. Connect the machine to the PC using an Ethernet cable.
2. In the Menu, select PRINT MENU → CONFIGURATION and execute the function.
Then, check the IP address [1] of the machine.
☞ For how to execute “CONFIGURATION,” see “Adjustment/Setting.”
3. Copy the firmware data (XXXXX.ps) and upgrading program to any directory on the
PC.
4. Start the Command Prompt and go to the directory in which the firmware data is
stored.
5. Specify the IP address of the machine to start FTP.
6. Check the user name and then press the Enter key to go to the next step.
4139F2E510DA
7. Using the “bin” command, set the file transfer mode to the binary transfer.
8. Type the hash command.
4139F2E511DA
2
28
Field Service Ver. 4.0 Feb. 2006
5. Firmware upgrade
magicolor 2400W
magicolor 2430 DL
magicolor 2450
9. Type “put_XXXXX.ps” and press the Enter key.
If there are two or more firmware data files involved, repeat the same steps (XXXXXX
is the firmware data file name).
4139F2E512DA
Maintenance
NOTE
Do not turn the printer’s Power Switch OFF or ON while the firmware is upgrading.
10. After the firmware upgrading procedure has been completed, turn the printer OFF and
then ON again.
11. Print a Configuration Page (PRINT MENU → CONFIGURATION) and check the firmware version to verify the upgrade.
29
2
magicolor 2400W
magicolor 2430 DL
magicolor 2450
6. Other
6.
6.1
Field Service Ver. 4.0 Feb. 2006
Other
Disassembly/adjustment prohibited items
A. Paint-socked screws
NOTE
• Paint-locked screws show that the assembly or unit secured can only be adjusted
or set at the factory and should not be adjusted, set, or removed in the field.
B. Red-painted screws
Maintenance
NOTES
• When the screws are removed, the red paint is coated on the points where readjustment is required.
• Once a red-painted screw is removed or loosened, you should make the adjustment. Accordingly, check the adjustment items in this manual and make the necessary adjustments. Note that when two or more screws are used on the part in
question, only one representative screw may be marked with red paint.
C. Variable resistors on the board
NOTE
• Do not turn the variable resistors on the boards for which no adjusting instructions are given in the “Adjustment/Setting” section.
D. Removal of PWBs
NOTES
• When removing a circuit board or other electrical component, refer to “Handling of
PWBs” and follow the corresponding removal procedures.
• The removal procedures given in the following sections omit the removal of connectors and screws securing the circuit board support or circuit board.
• Where it is absolutely necessary to touch the ICs and other electrical components
on the board, be sure to ground your body first.
30
Field Service Ver. 4.0 Feb. 2006
Section
Ref.Page
☞ 34
2
Right Cover
☞ 34
3
Left Cover
☞ 33
Rear Cover
☞ 32
5
Rear Panel
☞ 32
6
Paper Take-up Cover
☞ 34
7
Print Control Board
☞ 36
8
Mechanical Control Board
☞ 41
9
Waste Toner Near Full Detection Board
☞ 47
Power Unit
☞ 43
11
High Voltage Unit
☞ 46
12
Control Panel
☞ 35
13
USB Board *
☞ 36
14
PH Unit
☞ 48
Paper Pick-up Unit
☞ 51
16
Main Motor
☞ 52
17
Developing Motor
☞ 54
18
Rack Motor
☞ 55
19
Power Supply Cooling Fan Motor
☞ 52
20
Ventilation Fan Motor
☞ 53
21
Fusing Motor
☞ 54
22
Tray1 Paper Pick-up Solenoid
☞ 56
Registration Roller Solenoid
☞ 56
24
Pressure/Retraction Solenoid /Cleaning Blade
☞ 57
25
Pressure/Retraction Solenoid /2nd Image Transfer
☞ 57
26
Temperature/Humidity Sensor
☞ 58
27
AIDC Sensor
☞ 59
28
Torque Limiter
☞ 60
29
Hard Disk**
☞ 61
4
10
15
23
2
Part name
Front Cover
1
Exterior parts
Boards and etc.
Units
Other Parts
magicolor 2400W
magicolor 2430 DL
magicolor 2450
No
Disassembly/assembly list (other parts)
Maintenance
6.2
6. Other
* magicolor 2430 DL only
** magicolor 2450 only
31
magicolor 2400W
magicolor 2430 DL
magicolor 2450
6. Other
6.3
Field Service Ver. 4.0 Feb. 2006
Disassembly/assembly procedure
6.3.1
Rear Panel
[2]
[1]
Maintenance
6.3.2
1. Remove the screw [1] and the Rear
Panel [2].
4139fs2012c2
Rear Cover
1. Remove the Rear Panel.
☞ 32
2. Remove four screws [1] and the
Rear Cover [2].
[1]
[2]
[1]
32
4139fs2013c1
6.3.3
6. Other
Left Cover
1. Open the Top Cover.
2. Remove two screws [1].
3. Unlock two tabs [2] and remove the
Left Cover [3].
[1]
magicolor 2400W
magicolor 2430 DL
magicolor 2450
Field Service Ver. 4.0 Feb. 2006
[3]
4139fs2014c1
[4]
[5]
[5]
[4]
NOTE
• When installing the Left Cover,
make sure that the harness [4] of
the Fusing Unit is located below the
rib [5] of the Left Cover.
And after installing the Left Cover,
make sure that the harness [4] of
the Fusing Unit is located below the
rib [5] of the Left Cover at the location shown on the left.
• Use care not to break the tabs during removal and reinstallation of the
Left Cover.
4139fs2549c0
33
Maintenance
[2]
magicolor 2400W
magicolor 2430 DL
magicolor 2450
6. Other
6.3.4
Field Service Ver. 4.0 Feb. 2006
Right Cover
[1]
[3]
1. Open the Top Cover.
2. Remove two screws [1].
3. Unlock two tabs [2] and remove the
Right Cover [3].
[2]
4139fs2015c2
6.3.5
Paper Take-up Cover
1. Open the Paper Take-up Cover.
2. Push in the right and left holders [1]
and remove the Paper Take-up
Cover [2].
Maintenance
[1]
[2]
4139fs2016c0
6.3.6
Front Cover
[2]
[1]
[1]
4139fs2017c1
34
1.
2.
☞
3.
☞
4.
☞
5.
Open the Top Cover.
Remove the Right Cover.
34
Remove the Left Cover.
34
Remove the Paper Take-up Cover.
34
Remove four screws [1] and the
Front Cover [2].
NOTE
• When removing and reinstalling the
Front Cover, use care not to touch
the Developing Roller of the Toner
Cartridge.
6. Other
NOTE
Precautions for Remounting the Front
Cover
1. When remounting the Front Cover,
make sure that the two tabs in
section A are properly fitted in
position.
2. When tightening the screws, make
sure that there is no clearance
between the machine frame and
Front Cover (in section B).
If there is any clearance, tighten
the screws, while pressing the
machine frame.
magicolor 2400W
magicolor 2430 DL
magicolor 2450
Field Service Ver. 4.0 Feb. 2006
6.3.7
Control Panel (PWB-OP)
1. Open the Top Cover.
2. Remove four screws [1] and the
Control Panel Protective Cover [2].
[1]
[2]
[1]
4139fs2514c0
[3]
[4]
3. Disconnect the connector [3] and
remove the Control Panel [4].
4139fs2515c0
35
Maintenance
4139F2C513DA
magicolor 2400W
magicolor 2430 DL
magicolor 2450
6. Other
6.3.8
Field Service Ver. 4.0 Feb. 2006
USB Board (PWB-USB)
1. Remove the Right Cover.
☞ 34
2. Remove one screw [1] and the USB
Board Assy [2].
[1]
[2]
[1]
4139fs2535c0
[3]
[6]
Maintenance
[3]
3. Remove two screws [3] and the
Earth cable [5].
4. Disconnect one connector [4] and
remove the USB Board Assy [6].
[4]
[5]
4139fs2540c0
6.3.9
Print Control Board (PWB-P)
(1)
1.
☞
2.
☞
3.
[2]
[1]
[1]
4139fs2071c1
36
magicolor 2400W
Remove the Rear Cover.
32
Remove the Left Cover.
33
Remove five screws [1] and the interface protective cover [2].
6. Other
4. Disconnect all connectors from the
Print Control Board [3].
[3]
magicolor 2400W
magicolor 2430 DL
magicolor 2450
Field Service Ver. 4.0 Feb. 2006
4139fs2517c0
5. Remove six screws [4].
Maintenance
[4]
[4]
4139fs2518c0
6. Disconnect the connector (PJ103P)
[5] connected to the Mechanical
Control Board and remove the Print
Control Board [6].
[5]
[6]
4139fs2519c0
37
6. Other
Field Service Ver. 4.0 Feb. 2006
(2)
1.
☞
2.
☞
3.
magicolor 2400W
magicolor 2430 DL
magicolor 2450
[1]
[1]
magicolor 2430 DL
Remove the Rear Cover.
32
Remove the Left Cover.
33
Remove two screws [1].
4139fs2544c0
Maintenance
4. Disconnect one connector [2].
[2]
4139fs2545c0
[3]
5. Remove four screws [3] and Print
Control Board protective shield [4].
[4]
[3]
38
4139fs2546c0
6. Other
6. Disconnect all connectors from the
Print Control Board [5].
[5]
magicolor 2400W
magicolor 2430 DL
magicolor 2450
Field Service Ver. 4.0 Feb. 2006
4139fs2547c0
[6]
7. Remove six screws [6].
8. Disconnect the connector (PJ103P)
[7] connected to the Mechanical
Control Board and remove the Print
Control Board [8].
Maintenance
[7]
[8]
[6]
4139fs2548c0
(3)
1.
☞
2.
☞
3.
2
[1]
magicolor 2450
Remove the Rear Cover.
32
Remove the Left Cover.
33
Remove five screws [1].
[1]
4139F2C502AA
39
6. Other
Field Service Ver. 4.0 Feb. 2006
magicolor 2400W
magicolor 2430 DL
magicolor 2450
4. Disconnect one connector [2].
[2]
4139F2C503AA
5. Remove six screws [3] and Print
Control Board protective shield [4].
[3]
Maintenance
[4]
4139F2C504AA
6. Disconnect all connectors from the
Print Control Board [5].
[5]
4139F2C505AA
40
[7]
6. Other
[6]
[8]
7. Remove six screws [6].
8. Disconnect the connector (PJ103P)
[7] connected to the Mechanical
Control Board and remove the Print
Control Board Assy [8].
magicolor 2400W
magicolor 2430 DL
magicolor 2450
Field Service Ver. 4.0 Feb. 2006
[6]
4139F2C506AA
Maintenance
9. Remove the three screws [9] and
Print Control Board.
[9]
4139F2C507AA
6.3.10
Mechanical Control Board (PWB-A)
1. Remove the Rear Cover.
☞ 32
2. Disconnect all connectors and flat
cables from the Mechanical Control
Board [1].
[1]
4139fs2018c0
41
6. Other
Field Service Ver. 4.0 Feb. 2006
magicolor 2400W
magicolor 2430 DL
magicolor 2450
3. Remove four screws [2].
[2]
[2]
4139fs2019c0
4. Disconnect the connector (PJ1A) [3]
connected to the Print Control Board
and remove the Mechanical Control
Board [4].
Maintenance
[4]
[3]
4139fs2520c0
5. Remove Parameter Chip (PJ26) [5] from the Mechanical Control Board.
NOTE
• When the Mechanical Control Board (PWB-A) has been replaced, be sure to
remount Parameter Chip (PJ26). Remove Parameter Chip (PJ26) from the old
Mechanical Control Board and mount it on the new Mechanical Control Board.
[5]
4139fs2020c2
42
6. Other
NOTE
• When mounting Parameter Chip
(PJ26), align the notches (indicated
by “A” in the illustration).
A
A
magicolor 2400W
magicolor 2430 DL
magicolor 2450
Field Service Ver. 4.0 Feb. 2006
4138fs2544c0
Power Unit (PU)
[1]
[2]
[3]
1. Remove the Mechanical Control
Board.
☞ 41
2. Remove the Print Control Board.
☞ 36
3. Disconnect the two connectors [2]
(red and black) of the Fusing Safety
Switch [1] and remove the wire from
the two wiring saddles [3].
4139fs2021c1
4. Remove two screws [5] from the
Power Switch Assy [4] and remove
the wire from the wiring saddle [6].
NOTE
• One of the two screws is used to
secure the Power Switch Assy to
the High Voltage Unit.
[6]
[5]
[4]
4139fs2074c1
43
Maintenance
6.3.11
6. Other
Field Service Ver. 4.0 Feb. 2006
magicolor 2400W
magicolor 2430 DL
magicolor 2450
5. Disconnect two connectors [7] of the
Power Switch.
[7]
4139fs2023c1
Maintenance
6. Remove a screw [8] and remove the
Power Supply Cooling Fan Motor
Cover [9].
[9]
[8]
4139fs2073c1
7. Unlock three tabs [10] and remove
the Power Supply Cooling Fan Motor
Assy [11].
[11]
[10]
[10]
4139fs2536c0
44
6. Other
8. Remove the Harness Protective Seal
[12].
magicolor 2400W
magicolor 2430 DL
magicolor 2450
Field Service Ver. 4.0 Feb. 2006
[12]
[13]
[14]
[13]
9. Remove six screws [13] and pull the
Power Unit Assy [14] to the front as
shown on the left.
NOTE
• Do not pull the Power Unit Assy
hard, as a number of harnesses are
connected to it.
4139fs2024c2
[16]
[16]
[15]
10. Disconnect four connectors [16] from
the Power Unit [15].
11. Remove three screws [17], two
PWBs Holders [18] and the Power
Unit [15].
[17]
[18]
4139fs2026c1
45
Maintenance
4139fs2075c1
magicolor 2400W
magicolor 2430 DL
magicolor 2450
6. Other
6.3.12
Field Service Ver. 4.0 Feb. 2006
High Voltage Unit (HV)
1. Remove the Left Cover.
☞ 33
2. Remove four screws [1].
[1]
[1]
4139fs2027c0
3. Disconnect two connectors [2] and
remove the High Voltage Unit [3].
[2]
Maintenance
[3]
4139fs2028c0
Precautions for Reinstallation of the
High Voltage Unit
• Make sure that the High Voltage
Unit fits into the tab [4] at the location shown on the left.
• During the reinstallation procedure,
make sure that the high voltage terminal is not deformed or left loose.
[4]
4139fs2029c0
46
Waste Toner Near Full Detection Board (PWB-C)
[1]
1. Remove the High Voltage Unit.
☞ 46
2. Remove the screw [1], unlock the tab
[2], and remove the wiring saddle [3].
Then, remove the shield [4].
[2]
Precaution for Reinstallation
• When reinstalling the shield, make
sure that no part of the harness is
wedged in the mechanism.
[4]
[3]
4139fs2030c1
3. Unlock three tabs [5] and remove the
Waste Toner Near Full Detection
Board [6].
[5]
[6]
[5]
Maintenance
6.3.13
6. Other
magicolor 2400W
magicolor 2430 DL
magicolor 2450
Field Service Ver. 4.0 Feb. 2006
4139fs2031c1
4. Disconnect the connector [8] of the
Waste Toner Near Full Detection
Board [7].
[8]
[7]
4139fs2032c1
47
magicolor 2400W
magicolor 2430 DL
magicolor 2450
6. Other
Field Service Ver. 4.0 Feb. 2006
6.3.14
PH Unit
NOTE
• Do not replace the PH Unit while the machine is turned ON.
The laser beam that may be emitted can blind you.
Maintenance
• Do not attempt to disassemble or adjust the PH Unit.
The laser beam that may be emitted can blind you.
1.
☞
2.
☞
3.
☞
4.
☞
Remove the Rear Cover.
32
Remove the Right Cover.
34
Remove the Left Cover.
33
Remove the Front Cover.
34
5. Disconnect the connector (PJ20) [2]
and the flat cable (PJ19) [3] from the
Mechanical Control Board [1].
[3]
[1]
[2]
4139fs2033c2
6. Disconnect the connector (PJ107)
from the Print Control Board [4].
[4]
4139fs2522c0
48
6. Other
[5]
7. Press the Rack Release Lever [5]
and then rotate the Rack [6] so that
the Toner Cartridge [7] is moved to a
position, at which the Toner Cartridge can be easily removed.
NOTE
• When rotating the Rack, use care
not to touch the Developing Roller.
magicolor 2400W
magicolor 2430 DL
magicolor 2450
Field Service Ver. 4.0 Feb. 2006
[7]
4139fs2034c1
8. Hold onto the handle, pull it and
remove the Toner Cartridge [8].
9. Repeat steps 7 and 8 to remove all
Toner Cartridges.
[8]
4139fs2035c0
4139fs2538c0
10. Remove the Drum Cartridge.
☞ 17
NOTE
• Position the removed drum cartridge as shown in the illustration at
the left.
• Be sure to keep the drum cartridge
horizontal and place it where it will
not become dirty.
• Do not leave the drum cartridge
removed for more than 15 minutes,
and do not place the removed drum
cartridge in a location where it will
be exposed to direct light (such as
sunlight).
49
Maintenance
[6]
6. Other
Field Service Ver. 4.0 Feb. 2006
magicolor 2400W
magicolor 2430 DL
magicolor 2450
11. Remove the PH Unit Cover/Right [9],
Left [10].
NOTE
• Through the hole [11] at the location shown on the left, push the tab
of the PH Unit Cover and remove
the PH Unit Cover.
• Note the connector connected to
the PH Unit Cover/Right. Use care
not to pull the unit with an excessive force, so you don’t break the
wire.
Maintenance
[9]
[11]
[10]
4139fs2036c1
12. Press the Rack Release Lever and
turn the Rack so that the screw on
the PH Unit can be accessed
through the hole in the machine
frame.
13. Remove three screws [12] and the
PH Unit [13].
[13]
[12]
[12]
4139fs2037c2
Precautions for Reinstallation of the
PH Unit
• When reinstalling the PH Unit, make
sure that you insert the lever [14] of
the PH shutter into the lever of the
machine [15].
[14]
[15]
50
4139fs2539c0
Field Service Ver. 4.0 Feb. 2006
Remove the Rear Cover.
32
Remove the Right Cover.
34
Remove the Left Cover.
33
Remove the High Voltage Unit and Shield.
See the removal procedure steps 1 to 2 of “Tray1 Paper Pick-up Solenoid” on p. 56.
Remove the Rack Drive Assy.
See the removal procedure steps 1 to 3 of “Developing Motor” on p. 54.
[1]
6. Remove the Ventilation Fan Motor.
☞ 53
7. Remove one screw [1], unlock two
tabs [2] and remove the Ventilation
Fan Duct [3].
[3]
Maintenance
1.
☞
2.
☞
3.
☞
4.
☞
5.
☞
Paper Pick-up Unit
magicolor 2400W
magicolor 2430 DL
magicolor 2450
6.3.15
6. Other
[2]
4139fs2077c1
8. Lay the main body of the printer on
its back.
9. Remove five screws [4].
[4]
[4]
4139fs2063c3
51
magicolor 2400W
magicolor 2430 DL
magicolor 2450
6. Other
Field Service Ver. 4.0 Feb. 2006
10. Unhook two dowels [5] and remove
the Paper Pick-up Unit [6].
[6]
[5]
4139fs2064c3
6.3.16
Main Motor (M1)
Maintenance
[1]
[2]
1. Remove the Right Cover.
☞ 34
2. Disconnect the connector [2],
remove four screws [1] and Main
Motor [3].
[1]
[1]
[3]
6.3.17
4139fs2038c2
Power Supply Cooling Fan Motor (M4)
[1]
[2]
4139fs2039c0
52
1. Remove the Right Cover.
☞ 34
2. Disconnect the connector (PJ4A) [2]
from the Mechanical Control Board
[1].
6. Other
3. Unlock tabs and remove the Power
Supply Cooling Fan Motor [3].
magicolor 2400W
magicolor 2430 DL
magicolor 2450
Field Service Ver. 4.0 Feb. 2006
[3]
4139fs2040c1
Ventilation Fan Motor (M6)
1. Remove the Right Cover.
☞ 34
2. Disconnect the connector [2] of the
Ventilation Fan Motor [1] and remove
the harness from the wiring saddle
[3].
[1]
[2]
[3]
4139fs2041c1
3. Unlock tabs and remove the Ventilation Fan Motor [4].
[4]
4139fs2042c1
53
Maintenance
6.3.18
magicolor 2400W
magicolor 2430 DL
magicolor 2450
6. Other
6.3.19
Field Service Ver. 4.0 Feb. 2006
Fusing Motor (M7)
[5]
[1]
1. Remove the Right Cover.
☞ 34
2. Remove two screws [1] and the connector [2].
3. Remove the harness [3] from the wiring saddle [4] and then remove the
Fusing Motor [5].
[3]
[2]
[4]
6.3.20
4139fs2043c1
Developing Motor (M3)
1. Remove the Front Cover.
☞ 34
2. Remove the screw [1] and the Safety
Switch Assy [2].
Maintenance
[1]
[2]
4139fs2044c1
Precautions for Reinstallation of the
Safety Switch Assy
• Check that the switch is actuated
with the Front Cover and the Upper
Cover closed.
• Make sure that the distance
between the switch lever and
switch case (with the switch in the
actuated position) falls within the
specified range.
Specifications: 0.1 to 1.0 mm
4139fs2068c2
54
Field Service Ver. 4.0 Feb. 2006
6. Other
magicolor 2400W
magicolor 2430 DL
magicolor 2450
3. Remove four screws [5] and the
Rack Drive Assy [6].
[5]
[6]
[5]
4139fs2046c0
4. Remove two screws [7], disconnect
the connector [8], and remove the
Developing Motor [9].
Maintenance
[7]
[9]
[8]
4139fs2047c0
6.3.21
Rack Motor (M2)
[1]
[3]
[2]
[1]
1. Remove the Rack Drive Assy.
☞ See the removal procedure steps 1
to 3 of “Developing Motor” on p. 54.
2. Remove two screws [1], disconnect
the connector [2], and remove the
Rack Motor [3].
4139fs2048c1
55
magicolor 2400W
magicolor 2430 DL
magicolor 2450
6. Other
6.3.22
Field Service Ver. 4.0 Feb. 2006
Tray1 Paper Pick-up Solenoid (SL1)
[1]
1. Remove the High Voltage Unit.
☞ 46
2. Remove one screw [1], unlock the
tab [2], and remove the wiring saddle
[3]. Then, remove the shield [4].
[2]
Precaution for Reinstallation
• When reinstalling the shield, make
sure that no part of the harness is
wedged in the mechanism.
[4]
[3]
4139fs2030c1
Maintenance
3. Remove the screw [5] and the Tray1
Paper Pick-up Solenoid [6].
[5]
[6]
4139fs2050c0
6.3.23
Registration Roller Solenoid (SL2)
1. Remove the Right Cover.
☞ 34
2. Remove the Power Supply Cooling
Fan Motor Assy.
☞ 43
3. Disconnect the connector, remove
the screw [1], and remove the Registration Roller Solenoid [2].
[2]
[1]
56
4139fs2051c1
6. Other
Precaution for Reinstallation
• Reinstall the solenoid so that the
clearance between the gear of the
registration roller clutch and flapper
falls within the specified range.
Specifications: 1.0 ± 0.2 mm
magicolor 2400W
magicolor 2430 DL
magicolor 2450
Field Service Ver. 4.0 Feb. 2006
4139fs2067c1
Pressure/Retraction Solenoid/Cleaning Blade (SL3)
[1]
1. Remove the Right Cover.
☞ 34
2. Remove the screw [1], disconnect
the connector [2], and remove the
Pressure/Retraction Solenoid/Cleaning Blade [3].
[3]
[2]
6.3.25
4139fs2052c1
Pressure/Retraction Solenoid /2nd Image Transfer (SL4)
[1]
1. Remove the Right Cover.
☞ 34
2. Remove the Power Supply Cooling
Fan Motor Assy.
☞ 43
3. Disconnect the connector [2] from
the Pressure/Retraction Solenoid /
2nd Image Transfer [1].
[2]
4139fs2054c2
57
Maintenance
6.3.24
Field Service Ver. 4.0 Feb. 2006
magicolor 2400W
magicolor 2430 DL
magicolor 2450
6. Other
4. Remove the mylar sheet.
5. Remove the screw [3] and the Pressure/Retraction Solenoid /2nd Image
Transfer [4].
[4]
[3]
4139fs2055c1
6.3.26
Temperature/Humidity Sensor (HS1)
1. Remove the Front Cover.
☞ 34
2. Remove the C-clip [1].
Maintenance
[1]
4139fs2056c0
3. Remove the Tray1 [2].
NOTE
• Use care not to lose the two
springs.
• Be careful not to damage the
actuator of the Tray1 Paper Empty
Sensor.
[2]
4139fs2057c0
58
6. Other
4. Disconnect the connector [3] and
remove the Temperature/Humidity
Sensor [4].
[3]
[4]
magicolor 2400W
magicolor 2430 DL
magicolor 2450
Field Service Ver. 4.0 Feb. 2006
4139fs2533c0
AIDC Sensor (AIDC)
1. Remove the Transfer Belt Unit.
☞ 19
2. Remove two screws [1] and the
AIDC Sensor protective cover [2].
[1]
Maintenance
6.3.27
[2]
4139fs2061c0
3. Disconnect the connector [3] and
remove the AIDC Sensor [4].
[3]
[4]
4139fs2062c0
59
magicolor 2400W
magicolor 2430 DL
magicolor 2450
6. Other
6.3.28
Field Service Ver. 4.0 Feb. 2006
Torque limiter
A.
1.
☞
2.
Removal Procedure
Remove the Paper Pick-up Unit.
51
Remove the screw [1] and the Paper
Pick-up Clutch.
3. Disassemble the Paper Pick-up
Clutch and remove the torque limiter
[2].
[2]
[1]
4139fs2512c0
[1]
Maintenance
[2]
4139fs2513c0
[3]
B. Reinstallation Procedure
NOTE
• There are five slots provided in the
coupling gear [1] of the Paper Pickup Clutch. These slots are for
adjusting the position of the Pickup Roller.
When the torque limiter [2] is reinstalled, it is necessary to adjust the
position of the coupling gear [1]
and torque limiter [2] so that any
paper take-up failure can be prevented.
1. Install the Paper Pick-up Clutch [3].
2. Turn the Paper Pick-up Clutch [3] in
the direction of the arrow shown on
the left until it is engaged with the
solenoid and stopped.
4139fs2530c0
[4]
4139fs2531c0
60
3. If the Pick-up Roller [4] tilts in the
clockwise direction, turn the coupling
gear of the Paper Pick-up Clutch in
the direction of A and reassemble
the Paper Pick-up Clutch.
6. Other
[5]
4. If the Pick-up Roller [5] tilts in the
counterclockwise direction, turn the
coupling gear of the Paper Pick-up
Clutch in the direction of B and reassemble the Paper Pick-up Clutch.
magicolor 2400W
magicolor 2430 DL
magicolor 2450
Field Service Ver. 4.0 Feb. 2006
4139fs2532c0
6.3.29
Hard Disk (Option)
[2]
[1]
1. Remove the Rear Panel.
☞ 32
2. Pull out and remove the Hard Disk
[1].
NOTE
• Do not remove the Hard Disk with
great force, as connector [2] is connected to it.
4139F2C501DA
61
Maintenance
2
Maintenance
magicolor 2400W
magicolor 2430 DL
magicolor 2450
6. Other
62
Field Service Ver. 4.0 Feb. 2006
Blank Page
7. How to use the adjustment section
Adjustment/Setting
7.
How to use the adjustment section
• This section contains detailed information on the adjustment items and procedures for
this machine.
• Throughout this section, the default settings are indicated by boldface.
magicolor 2400W
magicolor 2430 DL
magicolor 2450
Field Service Ver. 4.0 Feb. 2006
A. Advance Checks
• Before attempting to solve the customer’s problem, the following advance checks must
be made:
B. Precautions for Service Jobs
1. Unplug the machine’s power cord before starting a service job procedure.
2. If it is unavoidably necessary to service the machine with its power turned ON, use the
utmost care not to get caught in the Scanner Cables or gears of the Exposure Unit.
3. Use special care when handling the Fusing Unit, which can be extremely hot.
4. The Developing Unit has a strong magnetic field. Keep watches and measuring instruments away from it.
5. Take care not to damage the PC Drum with a tool or similar device.
6. Do not touch IC pins with your bare hands.
63
Adjustment / Setting
1. Does the power supply voltage meet the specifications?
2. Is the power supply is properly grounded?
3. Does the machine share a power supply with any other machine that draws a large current intermittently (for example, an elevator or air conditioner that generates electrical
noise)?
4. Is the installation site level and environmentally appropriate (for example, away from
high temperatures, high humidity, direct sunlight, direct ventilation, etc.?
5. Does the original have a problem that may cause a defective image?
6. Is the density properly selected?
7. Is the correct media being used for printing?
8. Are the units, parts, and supplies used for printing (developer, PC Drum, etc.) properly
replenished and replaced when they reach the end of their useful service life?
9. Is there an adequate supply of toner in the toner cartridges?
magicolor 2400W
magicolor 2430 DL
magicolor 2450
8. Description of the Control Panel (magicolor 2400W)
8.
Field Service Ver. 4.0 Feb. 2006
Description of the Control Panel (magicolor 2400W)
8.1
Control Panel Display
• The Control Panel contains six LED indicators and two keys, the Rotate Toner key and
the Cancel key.
[1]
[2]
[4]
[5]
[3]
Adjustment / Setting
4139fs3501c0
[1]
Ready indicator
[4]
Toner indicators
[2]
Error indicator
[5]
Rotate Toner key
[3]
Cancel key
8.1.1
LED Indicator
• Each of the LED indicators provides five different types of signals. A specific printer condition is indicated by the combination of these signal types.
Signal
Off
On
Slow blinking
64
Description
• Off at all times
• On at all times
• 1 blink every 2 seconds
Blinking
• 1 blink per second
Rapid blinking
• 2 blinks per second
8.1.2
8. Description of the Control Panel (magicolor 2400W)
List of Status Messages
• The combinations of ON, OFF, and/or blinking states of the Ready indicator, Error indicator, and Toner indicators represent specific conditions of the printer.
A. Normal state messages
Ready indicator
(green)
Error indicator
(orange)
Off
Off
On
Off
On
On
Rapid blinking
On
Rapid blinking
Off
Blinking
Off
Slow blinking
Off
magicolor 2400W
magicolor 2430 DL
magicolor 2450
Field Service Ver. 4.0 Feb. 2006
Description
• Power off.
• Ready to print.
• Initializing (power on).
• Canceling a job.
• Toner Cartridge change mode
• Warming up.
• Calibrating.
• Processing data.
• Printing.
• Energy Saver mode.
B. Caution messages
Ready
indicator
(green)
Error
indicator
(orange)
-
-
-
-
On
On
Rapid
blinking
Rapid
blinking
On
Slow blinking
-
• The Drum Cartridge will soon run out.
On
Blinking
-
• The Drum Cartridge is empty.
Toner
indicators
Description
Adjustment / Setting
Slow blinking • The Toner Cartridge will soon run out.
• The Toner Cartridge is empty.
• The Toner Cartridge is not a genuine KONICA
MINOLTA Toner Cartridge or not the correct type.
C. Error messages
Ready indicator
(green)
Blinking
Error indicator
(orange)
Blinking
Description
• Communication Error.
A communication error of some kind has occurred in
the USB interface.
• Video Under-run.
• No media (during printer standby)
• A media jam has occurred.
Off
Blinking
☞ For troubleshooting procedures, see “Troubleshooting.”
• A Toner Cartridge or the Drum Cartridge is not
installed properly.
Off
On
• The Front Cover or Top Cover is open.
65
8. Description of the Control Panel (magicolor 2400W)
magicolor 2400W
magicolor 2430 DL
magicolor 2450
Ready indicator
(green)
Error indicator
(orange)
Field Service Ver. 4.0 Feb. 2006
Description
• No media (during a print cycle)
Rapid blinking alternately
• Media is not loaded in the tray specified by the printer
driver.
• Media of the size specified by the printer driver is not
loaded in the tray.
• Media size error
• Waiting for a proof print.
D. Malfunction messages
Ready indicator
(green)
Error indicator
(orange)
Off
Rapid blinking
8.1.3
Description
• A malfunction has occurred.
☞ For details of malfunction messages and troubleshooting procedures, see “Troubleshooting.”
Cancel Key
• The Cancel key can be used to cancel a print job. It also allows that specific print job to
be resumed after the error has been eliminated.
Adjustment / Setting
A. Cancelling a print job
• The currently processing print job can be canceled.
1. While data is being processed or printed (the green Ready indicator is blinking), hold
down the Cancel key for more than 5 seconds.
2. Release the Cancel key after both indicators light up. The current print job has now
been cancelled.
B. Continuing a print job after an error message
The print job can be resumed after an error of any of the following types has been
eliminated:
• When there is no more media in the tray
• When media of a different format than that set in the printer driver was fed into the printer
1.
2.
3.
4.
66
Check that one of the above errors has occurred.
Perform the remedial action according to the error.
Press the Cancel key to reinitiate media feeding.
The print job continues.
Field Service Ver. 4.0 Feb. 2006
Service Support Tools
8.2.1
magicolor 2400W
magicolor 2430 DL
magicolor 2450
8.2
8. Description of the Control Panel (magicolor 2400W)
Details of Service Support Tools
• The following is a list of the different types of Service Support Tools.
No.
Name
Ref. Page
1
High altitude support
☞ 67
2
White spots/void areas on high density areas
☞ 68
3
Consumables expected life display
☞ 68
4
Consumables counter reset
☞ 69
5
RoHS sensor support
☞ 71
8.2.2
Compatible OS
• Windows XP, 2000, 98SE
NOTE
• Before using the Service Support Tools on Windows 98SE, the DLL file
(msvbvm60.dll) must be copied to the “C:\Windows\System32” directory.
High altitude support
Function
• Optimizes the image by varying the output value of the developing bias when an
image problem occurs as affected by the atmospheric pressure at high altitudes.
Use
• When an image problem (uneven density) occurs in an environment of low atmospheric pressure at high altitudes.
Setting
/procedure
• The available setting options are as follows.
1.
2.
3.
4.
5.
6.
Setting Options
Developing Bias Value
Default
No offset
-1(Lower)
100 V
High Altitude
200 V
+1(Higher)
300 V
Adjustment / Setting
8.2.3
Connect the printer to the PC.
Execute the “HighAltitude.exe” Service Support Tool.
Click “Status” to check the current setting.
Click High Altitude, -1, or +1 to make the appropriate setting.
Click “Status” again to make sure that the setting has been correctly changed.
Turn the Power Switch OFF and then ON again.
67
magicolor 2400W
magicolor 2430 DL
magicolor 2450
8. Description of the Control Panel (magicolor 2400W)
8.2.4
White spots/void areas in high-density areas
Function
• Adjusts image characteristics according to user requirements for each type of media
by varying the second transfer voltage.
Use
• When an image problem (void areas, white spots) occurs due to the characteristics of
the type of media being used.
To give preference to the image quality of fine line drawing
:Void Area+1, Void Area+2
To give preference to the image quality of solid images
:White Spot+1, White Spot+2
Setting
/procedure
1.
2.
3.
4.
5.
6.
7.
8.
8.2.5
Adjustment / Setting
Field Service Ver. 4.0 Feb. 2006
Connect the printer to the PC.
Execute the “LineDrawEffect.exe” Service Support Tool.
Select the type of media for which adjustments are to be made.
Click “Status” to check the current setting.
Click to select either Void Area+1 or White Spot+1.
Click “Status” again to make sure that the setting has been correctly changed.
Execute a test print and check for the correct image.
If good effects are not obtained, change the setting to either Void Area+2 or White
Spot+2.
9. Turn the Power Switch OFF and then ON again.
Consumables expected life display
Function
• Displays the expected remaining life (as a percentage) of the 2nd Transfer Roller,
Transfer Belt Unit, and Fusing Unit.
Use
• For checking the remaining life of the 2nd Transfer Roller, Transfer Belt Unit, and Fusing Unit.
Setting
/procedure
1. Connect the printer to the PC.
2. Execute the “CounterDisplay.exe” Service Support Tool.
3. Check the counter for each consumable.
4139fs3519e0
68
Field Service Ver. 4.0 Feb. 2006
Consumables counter reset
magicolor 2400W
magicolor 2430 DL
magicolor 2450
8.2.6
8. Description of the Control Panel (magicolor 2400W)
A. 2nd Transfer Roller
Function
• Resets the counter for the 2nd Transfer Roller.
Use
• When the 2nd Transfer Roller has been replaced with a new one.
Setting
/procedure
1. Connect the printer to the PC.
NOTE
• At this time, make sure that the Upper Cover of the printer is open.
2. Execute the “SecondTransferRoller.exe” Service Support Tool.
4139fs3509c0
3. Click “Status” to check the current counter reading.
4139fs3520e0
Adjustment / Setting
4. Click “Yes” to reset the counter.
4139fs3521e0
* To quit the function without resetting the counter, click “No” or “End.”
5. Click “Status” again to make sure that the counter has been correctly reset.
4139fs3522e0
6. Close the Upper Cover of the printer.
69
magicolor 2400W
magicolor 2430 DL
magicolor 2450
8. Description of the Control Panel (magicolor 2400W)
Field Service Ver. 4.0 Feb. 2006
B. Transfer Belt Unit
Function
• Resets the counter for the Transfer Belt Unit.
Use
• When the Transfer Belt Unit has been replaced with a new one.
Setting
/procedure
1. Connect the printer to the PC.
NOTE
• At this time, make sure that the Upper Cover of the printer is open.
2. Execute the “TransferBelt.exe” Service Support Tool.
4139fs3513c0
3. Click “Status” to check the current counter reading.
4139fs3523e0
Adjustment / Setting
4. Click “Yes” to reset the counter.
4139fs3524e0
* To quit the function without resetting the counter, click “No” or “End.”
5. Click “Status” again to make sure that the counter has been correctly reset.
4139fs3525e0
6. Close the Upper Cover of the printer.
70
Field Service Ver. 4.0 Feb. 2006
Function
• Sets supportability of the Temperature/Humidity Sensor (HS1) for RoHS.
Use
• When the Temperature/Humidity Sensor has been replaced with a new one.
Sensor supporting RoHS
: Yes
Sensor not supporting RoHS : No
Setting
/procedure
1.
2.
3.
4.
5.
6.
magicolor 2400W
magicolor 2430 DL
magicolor 2450
RoHS sensor support
Connect the printer to the PC.
Execute the “HumiditySensor.exe” Service Support Tool.
Click “Status” to check the current setting.
Click to select “Yes” or “No” as necessary.
Click “Status” again to make sure that the setting has been correctly changed.
Turn the Power Switch OFF and then ON again.
Adjustment / Setting
8.2.7
8. Description of the Control Panel (magicolor 2400W)
71
magicolor 2400W
magicolor 2430 DL
magicolor 2450
9. Description of the Control Panel (magicolor 2430 DL)
9.
9.1
9.1.1
Field Service Ver. 4.0 Feb. 2006
Description of the Control Panel (magicolor 2430 DL)
Control Panel Display
Basic Screen
• The Basic Screen is the Initialization Screen that displays when warmup is complete or
when you exit from the configuration menu.
4138fs3506e0
9.1.2
Warning Screen
Adjustment / Setting
• This screen appears when a malfunction occurs that can be taken care of by the user.
4139F4E503DA
9.1.3
Error display
• This display appears when an error occurs that requires a service technician.
4138fs3508e0
72
9.1.4
9. Description of the Control Panel (magicolor 2430 DL)
Caution Display
• A caution display appears when an event occurs that requires user intervention, but does
not interrupt printing.
magicolor 2400W
magicolor 2430 DL
magicolor 2450
Field Service Ver. 4.0 Feb. 2006
Adjustment / Setting
4138fs3509e0
73
9. Description of the Control Panel (magicolor 2430 DL)
magicolor 2400W
magicolor 2430 DL
magicolor 2450
9.2
Field Service Ver. 4.0 Feb. 2006
List of Control Panel Messages
9.2.1
Normal state messages
• Normal state messages are displayed on the upper line of the LCD.
Message
READY
3
Description
• Ready to print.
PROCESSING
• Processing data.
PRINTING
• Printing.
WARMING UP
• Warming up.
CALIBRATING
• Calibrating.
ENERGY SAVER
• Energy Saver mode.
CANCELLING JOB
• Canceling a job.
IMAGING
• An image for direct print is being rendered.
9.2.2
Caution messages
• Caution messages are displayed on the lower line of the LCD.
Message
Adjustment / Setting
SIZE MISMATCH
Description
• The correct size media is not loaded in any of the trays (only when AUTO
CONTINUE is set to ON).
DRUM LOW
• The Drum Cartridge will soon run out.
X TONER LOW
• The specified color Toner Cartridge will soon run out.
TRAY 2 EMPTY
• No media in Tray 2 (only when an optional Lower Feeder Unit is installed).
TRAY 1 EMPTY
• No media in Tray 1.
* The higher the message in the above list, the higher the priority.
9.2.3
Minor error messages
Message
3
Description
INCORRECT CARTRIDGE
XX
• The Toner Cartridge is not a genuine KONICA MINOLTA Toner Cartridge or
not the correct type.
DRUM CARTRIDGE
END OF LIFE
• The Drum Cartridge is empty.
TONER EMPTY
X
• The specified color Toner Cartridge is empty.
* The higher the message in the above list, the higher the priority.
74
9.2.4
9. Description of the Control Panel (magicolor 2430 DL)
Error messages
Message
Description
MEDIA JAM
XXXX
• A media jam has occurred at the specified location.
☞ For troubleshooting procedures, see “Troubleshooting” or the relevant Service Manual of the option concerned.
PUT MEDIA:TRAY 1
“MEDIA”
• The type of the media set in the printer driver differs from that of the media
loaded in the specified tray.
PUT MEDIA:TRAY X
“SIZE”
• The size of the media set in the printer driver differs from that of the media
loaded in the specified tray.
• The specified tray has run out of media while media was being fed from it.
DRAWER OPEN
TRAY 2
• Tray 2 is not installed or is not correctly adjusted.
magicolor 2400W
magicolor 2430 DL
magicolor 2450
Field Service Ver. 4.0 Feb. 2006
* The higher the message in the above list, the higher the priority.
Serious error messages
Message
3
Description
ERROR
AIDC SENSOR
• The AIDC Sensor has developed a malfunction of some sort.
ILLEGAL ERROR
DUPLEX
• A 2-sided print cycle has been run using a type or size of media not appropriate for 2-sided printing.
ERROR
MEMORY OVERFLOW
• The volume of data to be printed exceeds the permissible amount of data to
be processed by the machine memory.
ERROR
VIDEO UNDERRUN
• The volume of data to be printed exceeds the permissible amount of data to
be transferred in the machine.
COVER OPEN
FRONT
• The Front Cover of the machine is open.
COVER OPEN
DUPLEX
• The Duplex Option door is open.
DRUM CARTRIDGE
NOT ATTACHED
• The Drum Cartridge is not installed.
X TONER
NOT INSTALLED
• The specified color Toner Cartridge is not installed properly.
DRUM CARTRIDGE
END OF LIFE
• The Drum Cartridge has reached its service life due to the Waste Toner Box
being full.
TONER LIFE END
XXXX
• The specified color Toner Cartridge has run out (only when ENGINE/TONER
EMPTY is set to STOP).
TONER LIFE END
XXXX
• The specified color Toner Cartridge has run out completely or exceeded its
(with the Error indicaservice life.
tor lit up steadily)
TRAY 2
NOT ATTACHED
• The specified tray is not installed, but it is set in the printer driver.
DUPLEX UNIT
NOT ATTACHED
• The Duplex Option is not installed, but 2-sided printing is specified in the
printer driver.
SIZE/TYPE ERROR
DUPLEX
• The media size or type loaded in the machine is not appropriate for 2-sided
printing.
75
Adjustment / Setting
9.2.5
magicolor 2400W
magicolor 2430 DL
magicolor 2450
9. Description of the Control Panel (magicolor 2430 DL)
Message
SIZE/TYPE ERROR
Field Service Ver. 4.0 Feb. 2006
Description
• The correct media size or type is not loaded in, or being fed through, the
machine.
* The higher the message in the above list, the higher the priority.
9.2.6
Malfunction messages
☞ For details of malfunction messages and troubleshooting procedures, see “Troubleshooting.”
Message
ERROR
CONTROLLER
Description
• A fault has occurred in the controller.
ERROR
• There is a connection fault between the Mechanical Control Board (PWB-A)
ENGINE INTERFACE
and the Print Control Board (PWB-P).
ERROR
COMMUNICATION
• A communications error has occurred in the USB or Ethernet interface.
FATAL ERROR
CODE: XXX
• The Engine or Controller is faulty.
Adjustment / Setting
* The higher the message in the above list, the higher the priority.
76
9.3
9. Description of the Control Panel (magicolor 2430 DL)
Canceling a Print Job
• A print job being processed or printed can be canceled by pressing the Cancel key.
1. If the Cancel key is pressed while a print job is being printed, a message appears on
the Control Panel.
2. Select the job to be canceled by using the right or left arrow key and then press the
Menu Select key.
Panel Display
CURRENT JOB
ALL JOBS
magicolor 2400W
magicolor 2430 DL
magicolor 2450
Field Service Ver. 4.0 Feb. 2006
Description
Cancels the job being currently printed.
Cancels all jobs the machine has so far
received but has not yet finished printing.
,1$%#0%'.
%744'06,1$
Adjustment / Setting
4138fs3510e0
77
magicolor 2400W
magicolor 2430 DL
magicolor 2450
10. Menu (magicolor 2430 DL)
Field Service Ver. 4.0 Feb. 2006
10. Menu (magicolor 2430 DL)
10.1 List of menu functions
MENU
PRINT CONFIG PAGE
PRINT TEST PAGES
PRINT MENU MAP
SPECIAL PAGES
LANGUAGE
ENGINE
REPLACE TONER
TONER EMPTY
ENERGY SAVER *1
AUTO CONTINUE
TRAY CHAINING *2
ENGINE SERVICE
TOTAL FACE COUNT
COLOR FACE COUNT
BW FACE COUNT
CONTROLLER VER.
ENGINE VER.
COLOR CALIBRATION
REMOVE/ALL TONER
ENERGY SAVER *3
RESTORE USER DEFAULT
Adjustment / Setting
DUPLEX DENSITY
ALTITUDE SETUP
TRANSFER VOLTAGE
NETWORK
DHCP:XX BOOTP:XX
IP ADDRESS
SUBNET MASK
GATEWAY
MAC ADDRESS
HTTP
SNMP
FORCED MODES
CONSUMABLE USAGE
BLACK TONER
CYAN TONER
MAGENTA TONER
YELLOW TONER
DRUM CARTRIDGE
DIRECT PRINT
IMAGE QUALITY
PAPER SIZE
MEDIA TYPE
LAYOUT
BRIGHTNESS
SHARPNESS
AUTO ROTATE
*1 Displayed only on 110V models if “ENERGY SAVER” in the ENGINE/SERVICE/
ENERGY SAVER menu is set to ON.
*2 Displays only if an optional Lower Feeder Unit is installed.
*3 Displayed only on 110V models.
78
Field Service Ver. 4.0 Feb. 2006
10. Menu (magicolor 2430 DL)
10.2.1
PRINT CONFIG PAGE
Function
• Prints a configuration page.
Use
• To check configuration of the machine. The following items can be checked:
Consumables information
Number of pages printed to date
Installed options
Amount of memory installed
Firmware version
Network settings
Engine settings
10.2.2
Select PRINT CONFIG PAGE and press the Menu Select key.
PRINT TEST PAGES
Function
• Prints a test page.
Use
• To test printing.
Setting
/procedure
• Select PRINT TEST PAGE and press the Menu Select key.
10.2.3
PRINT MENU MAP
Function
• Prints a menu map.
Use
• To check the available menu settings.
Setting
/procedure
• Select PRINT MENU MAP and press the Menu Select key.
Adjustment / Setting
Setting
/procedure
magicolor 2400W
magicolor 2430 DL
magicolor 2450
10.2 SPECIAL PAGES
10.3 LANGUAGE
Function
• Sets the language of the Control Panel display.
Use
• To change the language of the Control Panel display.
• The default setting varies according to the voltage of the printer.
Setting/
procedure
• The default setting is ENGLISH (110V and 220V printers) or JAPANESE (100V printers).
“ENGLISH”
PORTUGUESE
FRENCH
SPANISH
GERMAN
CZECH
ITALIAN
“JAPANESE”
79
10. Menu (magicolor 2430 DL)
Field Service Ver. 4.0 Feb. 2006
magicolor 2400W
magicolor 2430 DL
magicolor 2450
10.4 ENGINE
10.4.1
REPLACE TONER
A. REPLACE TONER/(color)
Function
• Moves a specific color Toner Cartridge to the appropriate position to allow it to be
replaced.
Use
• To allow a Toner Cartridge to be replaced.
Setting
/procedure
1. Select REPLACE TONER and the specific color of toner to be replaced.
2. The rack rotates to bring the specified color Toner Cartridge to the replacement position. When the rack has stopped moving, the message “OPEN DOOR/REPLACE
TONER (color)” appears on the display.
3. Open the Upper Cover and replace the Toner Cartridge.
☞ For the Toner Cartridge replacement procedures, see “Maintenance.”
4. Close the Upper Cover. The initial screen will then reappear.
Adjustment / Setting
B. REPLACE TONER/ALL
Function
• Moves each Toner Cartridge to the appropriate position, one by one, to allow all of
the Toner Cartridges to be replaced with new ones.
Use
• To allow all of the Toner Cartridges to be replaced.
Setting
/procedure
1. Select REPLACE TONER/ALL.
2. The rack rotates to bring the first color Toner Cartridge to the replacement position.
When the rack has finished moving, the message “OPEN DOOR/REPLACE TONER
C” appears on the display.
3. Open the Upper Cover and replace the Toner Cartridge.
☞ For the Toner Cartridge replacement procedures, see “Maintenance.”
4. Close the Upper Cover. Then, the message “OPEN DOOR/REPLACE TONER K”
appears on the display.
5. Repeating the same steps, replace all Toner Cartridges with new ones.
NOTE
• The Toner Cartridges are to be replaced in the order of C -> K -> Y -> M.
6. Close the Upper Cover. The initial screen will then reappear.
10.4.2
TONER EMPTY
Function
• Specifies whether to stop or continue printing when a toner empty condition is
detected.
Use
• To permit printing upon a toner empty condition.
Setting
/procedure
• The default setting is STOP.
3
“STOP”
CONTINUE
• When “STOP” is selected
The print cycle is stopped when the toner consumption rate becomes 0%.
The message shown on the control panel reads “TONER LIFE END.”
Only the orange LED stays lit up steadily.
• When “CONTINUE” is selected
A print cycle can be carried out even when the toner consumption rate becomes
0%.
The message shown on the control panel reads “TONER LIFE END.”
Both the green and orange LEDs blink.
The print cycle is stopped after 6K printed pages have been produced.
The message shown on the control panel reads “TONER LIFE END.”
Only the orange LED stays lit up steadily.
80
10.4.3
Function
10. Menu (magicolor 2430 DL)
ENERGY SAVER
• Sets the amount of time after the last job was printed or the last key operated before
the machine enters Energy Saver mode.
• Energy Saver mode is automatically canceled when any of the following operations is
performed:
The Machine is restarted.
A print job is received.
Any key on the Control Panel is pressed.
The Front Cover or Top Cover is opened and closed.
Use
• To change the amount of time before the machine enters Energy Saver mode.
Setting
/procedure
• The default setting is 30 MINUTES.
15 MINUTES
“30 MINUTES”
60 MINUTES
magicolor 2400W
magicolor 2430 DL
magicolor 2450
Field Service Ver. 4.0 Feb. 2006
120 MINUTES *
* displayed only on the model for the Americas.
NOTE
• This menu is displayed only on 110V models when ENGINE/SERVICE/
ENERGY SAVER is set to ON.
AUTO CONTINUE
Function
• Enables or disables printing when the size of the media loaded in the tray does not
match that of the print data.
Use
• To print data on the media loaded in the tray if the media loaded in the tray does not
match that of the print data.
Setting
/procedure
• The setting can be changed during printing.
• The default setting is ON.
“ON”
10.4.5
OFF
TRAY CHAINING
Function
• Allows a print cycle to continue without interruption when the current tray runs out of
paper during the print cycle by automatically reselecting Tray 2, in which the paper of
the same size and the same type is loaded.
• The setting is enabled when the optional Lower Feeder Unit is installed.
Use
• To continue printing from a second tray when the first tray runs out of paper.
Setting/proce- • The setting can be changed during printing.
dure
• The default setting is ON.
“ON”
10.4.6
OFF
ENGINE SERVICE
A. TOTAL FACE COUNT
Function
• Displays the total number of pages printed to date.
Use
• To identify the total number of printed pages.
B. COLOR FACE COUNT
Function
• Displays the total number of pages printed in color.
Use
• To identify the total number of color pages printed.
81
Adjustment / Setting
10.4.4
magicolor 2400W
magicolor 2430 DL
magicolor 2450
10. Menu (magicolor 2430 DL)
Field Service Ver. 4.0 Feb. 2006
C. BW FACE COUNT
Function
• Displays the total number of monochrome pages printed to date.
Use
• To identify the total number of monochrome pages printed.
D. CONTROLLER VER.
Function
• Displays the version of the controller firmware currently installed.
Use
• To help determine whether the controller firmware needs to be upgraded.
• To identify the controller firmware version when the Print Control Board is replaced.
E. ENGINE VER.
Function
• Displays the version of printer engine firmware currently installed.
Use
• To identify the printer engine firmware version when the Mechanical Control Board is
replaced.
Adjustment / Setting
F. COLOR CALIBRATION
Function
• Executes color calibration.
Use
• To calibrate the engine when there are print image quality problems.
• To calibrate the engine when the Transfer Belt Unit and Transfer Roller are replaced
with new ones.
Setting
/procedure
1. Select COLOR CALIBRATION and press the Menu Select key.
2. The COLOR CALIBRATION is executed and, when it is completed, the initial screen
reappears.
G. REMOVE/ALL TONER
Function
• Moves each color Toner Cartridge to the appropriate replacement position, one by
one, to allow all of the Toner Cartridges to be removed.
Use
• To allow all of the Toner Cartridges to be removed.
Setting
/procedure
1. Select REMOVE/ALL TONER.
2. The rack rotates to bring the first color Toner Cartridge to the replacement position.
When the rack stops moving, the message “OPEN DOOR/REMOVE TONER C”
appears on the display.
3. Open the Upper Cover and remove the Toner Cartridge.
☞ For the Toner Cartridge removal procedures, see “Maintenance.”
4. Close the Upper Cover. Then, the message “OPEN DOOR/REMOVE TONER K”
appears on the display.
5. Repeating the same steps, remove the remaining Toner Cartridges.
NOTE
• The Toner Cartridges are to be removed in the order of C -> K -> Y -> M.
6. Close the Upper Cover. The initial screen will then reappear.
82
Field Service Ver. 4.0 Feb. 2006
10. Menu (magicolor 2430 DL)
Function
• Selects whether to use Energy Saver or not.
Use
• To enable or disable Energy Saver.
Setting
/procedure
• The default setting is ON.
I.
“ON”
magicolor 2400W
magicolor 2430 DL
magicolor 2450
H. ENERGY SAVER
NOTE
• This menu is displayed only on 110V models.
OFF
RESTORE USER DEFAULT
Function
• Resets the ENERGY SAVER, AUTO CONTINUE, TRAY CHAINING, DUPLEX
DENSITY, ALTITUDE SETUP and TRANSFER VOLTAGE values to their factory
default settings.
• Resets the administrator password to its factory default setting.
Use
• To reset the ENERGY SAVER, AUTO CONTINUE, TRAY CHAINING, DUPLEX DENSITY, ALTITUDE SETUP, and TRANSFER VOLTAGE menus and administrator password to their factory default settings.
Setting
/procedure
1. Select RESTORE USER DEFAULT and press the Menu Select key.
2. This initializes the setting values of the functions involved are reset to their factory
default values, and the Engine/Service menu reappears.
Function
• Adjusts the T/C ratio control level when a faulty image density occurs due to changes
in weather or environment.
Use
• To adjust the T/C ratio changes to compensate for changes in the user's operating
environment during 2-sided printing.
Setting
/procedure
• The default setting is 0.
1. With RESTORE USER DEFAULT selected, hold down the T key for 2 seconds or
more.
2. With DUPLEX DENSITY selected, press the < or > key as necessary to select the
appropriate density level value.
Adjustment range: -3 to +3
3. Press the Menu/Select key to accept the new density level setting.
83
Adjustment / Setting
J. DUPLEX DENSITY
magicolor 2400W
magicolor 2430 DL
magicolor 2450
10. Menu (magicolor 2430 DL)
Field Service Ver. 4.0 Feb. 2006
K. ALTITUDE SETUP
Function
• Optimizes the image by varying the output value of the developing bias when an
image problem occurs as affected by the atmospheric pressure in high altitudes.
Use
• To adjust the developing bias when an image problem (uneven density) occurs in an
environment of low atmospheric pressure at high altitudes.
Setting
/procedure
• The default setting is 0.
1. With RESTORE USER DEFAULT selected, hold down the down key for 2 seconds or
more.
2. Select ALTITUDE SETUP using the < or > key and press the Menu/Select key.
3. In ALTITUDE SETUP, press the < or > key as necessary to select the appropriate
altitude setting value.
Adjustment range: 0 to 3
Setting Value
Developing Bias Value
0
No offset
1
100 V
2
200 V
3
300 V
4. Press the Menu/Select key to accept the new setting.
NOTE
• After changing this setting, be sure to run COLOR CALIBRATION (ENGINE Æ
ENGINE SERVICE menu).
Adjustment / Setting
L. TRANSFER VOLTAGE
Function
• Adjusts image characteristics according to user requirements for each type of media
by varying the second transfer voltage.
Use
• To adjust the second transfer voltage when an image problem (void areas, white
spots) occurs due to the characteristics of the type of media being used.
If white spots occur, decrease the 2nd transfer voltage
(adjust in the minus direction).
If void areas occurs, increase the 2nd transfer voltage
(adjust in the plus direction).
Setting
/procedure
• The default setting is 0.
1. With RESTORE USER DEFAULT selected, hold down the down key for 2 seconds or
more.
2. Select TRANSFER VOLTAGE using the < or > key and press the Menu/Select key.
3. In TRANSFER VOLTAGE, press the < or > key as necessary to select the appropriate voltage value.
Adjustment range: -3 to +3
Setting Value
Voltage Value
Setting Value
Voltage Value
-3
-600 V
+1
+200 V
-2
-400 V
+2
+400 V
-1
-200 V
+3
+600 V
0
0V
4. Press the Menu/Select key to accept the new voltage setting.
84
10. Menu (magicolor 2430 DL)
10.5 NETWORK
10.5.1
Function
DHCP:XX / BOOTP:XX
• DHCP
: Automatically acquires an IP address from the DHCP server, if there is one
in the network, and specifies whether to load other network information.
• BOOTP : Automatically acquires an IP address from BOOTP and specifies whether
to load other network information.
Use
• To automatically acquire an IP address and load other network information.
Setting
/procedure
• Turn “ON” either DHCP or BOOTP or “OFF” both.
• The default setting is DHCP: ON / BOOTP: OFF.
magicolor 2400W
magicolor 2430 DL
magicolor 2450
Field Service Ver. 4.0 Feb. 2006
“DHCP:ON / BOOTP:OFF”DHCP:OFF / BOOTP:ON DHCP:OFF / BOOTP:OFF
10.5.2
IP ADDRESS
Function
• Sets the IP address of the printer on the network.
Use
• To enter the printer’s IP address.
Setting
/procedure
• Enter the IP address using the up, down, right, and left arrow keys.
• The default setting is “192.168.1.2.”
NOTE
• Before manually setting the IP address, turn OFF DHCP and BOOTP in the
NETWORK → DHCP:XX/BOOTP:XX menu.
Function
SUBNET MASK
• Sets the subnet mask of the printer used on the network.
Use
• To enter the printer’s subnet mask.
Setting
/procedure
• Enter the subnet mask using the up, down, right, and left arrow keys.
• The default setting is “255.255.255.0.”
NOTE
• Before manually setting the subnet mask, turn OFF DHCP and BOOTP in the
NETWORK → DHCP:XX/BOOTP:XX menu.
10.5.4
Function
GATEWAY
• Sets the gateway address of the printer used on the network.
Use
• To enter the printer’s gateway address.
Setting/
procedure
• Enter the gateway address using the up, down, right, and left arrow keys.
• The default setting is “192.168.1.1.”
NOTE
• Before manually setting the gateway address, turn OFF DHCP and BOOTP in
the NETWORK → DHCP:XX/BOOTP:XX menu.
10.5.5
MAC ADDRESS
Function
• Displays the Ethernet hardware address of the printer.
Use
• To display the printer’s Ethernet hardware address.
Setting
/procedure
• The address is displayed only and cannot be altered.
85
Adjustment / Setting
10.5.3
magicolor 2400W
magicolor 2430 DL
magicolor 2450
10. Menu (magicolor 2430 DL)
10.5.6
Field Service Ver. 4.0 Feb. 2006
HTTP
Function
• Specifies whether to access PageScope Web Connection and to use the IPP protocol or not.
Use
• To specify whether to use IPP and access PageScope Web Connection.
Setting
/procedure
• The machine must be restarted after the setting has been changed.
• The default setting is ON.
ON
10.5.7
SNMP
Function
• Specifies whether to use the SNMP protocol or not.
Use
• To specify whether to use SNMP.
Setting
/procedure
• The machine must be restarted after the setting has been changed.
• The default setting is ON.
ON
10.5.8
Adjustment / Setting
OFF
OFF
FORCED MODES
Function
• Sets the network speed, duplex mode, and negotiation of the printer if it is connected
to the network via a network hub.
Use
• To set the printer’s network speed, duplex mode, and negotiation.
• The default setting of “AUTO/AUTO/ON” usually presents no problem. If special settings are made for a network hub in the printer setup environment, however, the settings must be changed to match those on the network side.
Setting
/procedure
• Settings
Network speed (SPEED): AUTO, 100Mbps, 10Mbps
Duplex mode (DUP): AUTO, Full-duplex mode, Half-duplex mode
Negotiation (NEG.): ON, OFF
• The default setting is AUTO/AUTO/ON.
AUTO/AUTO/ON AUTO/FULL/ON AUTO/HALF/ON 100M/AUTO/ON
100M/FULL/ON 100M/FULL/OFF 100M/HALF/ON 100M/HALF/OFF
10M/AUTO/ON 10M/FULL/ON
10M/FULL/OFF 10M/HALF/ON
10M/HALF/OFF
10.6 CONSUMABLE USAGE
10.6.1
BLACK TONER
Function
• Displays the remaining life of the Toner Cartridge (K) as a percentage.
Use
• To monitor the amount of life remaining in the Toner Cartridge (K).
10.6.2
CYAN TONER
Function
• Displays the remaining life of the Toner Cartridge (C) as a percentage.
Use
• To monitor the amount of life remaining in the Toner Cartridge (C).
86
Field Service Ver. 4.0 Feb. 2006
Function
Use
10.6.4
MAGENTA TONER
• Displays the remaining life of the Toner Cartridge (M) as a percentage.
• To monitor the amount of life remaining in the Toner Cartridge (M).
YELLOW TONER
Function
• Displays the remaining life of the Toner Cartridge (Y) as a percentage.
Use
• To monitor the amount of life remaining in the Toner Cartridge (Y).
10.6.5
magicolor 2400W
magicolor 2430 DL
magicolor 2450
10.6.3
10. Menu (magicolor 2430 DL)
DRUM CARTRIDGE
Function
• Displays the remaining life of the Drum Cartridge as a percentage.
Use
• To monitor the amount of life remaining in the Drum Cartridge.
10.7 DIRECT PRINT
IMAGE QUALITY
Function
• Sets the output resolution for Camera Direct Photo Printing.
Use
• To change the output resolution for Camera Direct Photo Printing.
• The output resolution for each setting is as follows.
DRAFT
: 600 dpi x 600 dpi
NORMAL : 600 dpi x 1200 dpi
FINE
: 600 dpi x 2400 dpi
NOTE
• To select Normal and Fine mode, an additional 128 MB of memory needs to be
installed. Only Draft mode is available with the printer’s base memory.
Setting
/procedure
10.7.2
Function
• The default setting is DRAFT.
“DRAFT”
NORMAL
FINE
PAPER SIZE
• Sets the paper size for Camera Direct Photo Printing.
Use
• To change the paper size for Camera Direct Photo Printing.
Setting
/procedure
• The default setting is A4 or LETTER.
LETTER
A4
A5
STATEMENT
J-POSTCARD
NOTE
• LETTER is the default setting for the Americas, and A4 is the default setting for
all other regions.
10.7.3
Function
MEDIA TYPE
• Sets the type of media for Camera Direct Photo Printing.
Use
• To change the media type for Camera Direct Photo Printing.
Setting
/procedure
• The default setting is PLAIN PAPER.
“PLAIN PAPER”
THICK STOCK
GLOSSY
POSTCARD
LABELS
87
Adjustment / Setting
10.7.1
magicolor 2400W
magicolor 2430 DL
magicolor 2450
10. Menu (magicolor 2430 DL)
10.7.4
Field Service Ver. 4.0 Feb. 2006
LAYOUT
Function
• Sets the number of images printed on one page for Camera Direct Photo Printing.
Use
• To specify the number of Camera Direct Photo Printing images to be printed on each
sheet.
Setting
/procedure
• The default setting is 1-UP.
1
“1-UP”
4-UP
10.7.5
2
3
4
6-UP
2
3-UP
2
3
1
2
3
4
5
6
8-UP
1
2
3
4
5
6
7
8
BRIGHTNESS
Function
• Changes the color density of the printed image for Camera Direct Photo Printing.
Use
• To make a Camera Direct Photo Printing image brighter.
Setting
/procedure
• The default setting is OFF.
10.7.6
Adjustment / Setting
1
1
1
2-UP
ON
“OFF”
SHARPNESS
Function
• Changes sharpness of the printed image for Camera Direct Photo Printing.
Use
• To make a printed Camera Direct Photo Printing image look sharper by emphasizing
its outlines.
Setting
/procedure
• The default setting is OFF.
10.7.7
ON
“OFF”
AUTO ROTATE
Function
• Rotates the image 90 degree in the clockwise direction for Camera Direct Photo
Printing.
Use
• To print the Camera Direct Photo Printing image in portrait format.
Setting
/procedure
• The default setting is OFF.
ON
“OFF”
NOTE
• This option is available only when DIRECT PRINT → LAYOUT is set to “1-UP”
or “4-UP.”
88
Field Service Ver. 4.0 Feb. 2006
11. Description of the Control Panel (magicolor 2450)
magicolor 2400W
magicolor 2430 DL
magicolor 2450
11. Description of the Control Panel (magicolor 2450)
11.1 Control Panel Display
11.1.1
Basic Screen
• The Basic Screen is the Initialization Screen that displays when warmup is complete or
when you exit from the configuration menu.
4139F3E501DA
11.1.2
Caution display
Adjustment / Setting
• A caution display appears when an event occurs that requires user intervention, but does
not affect printing.
4139F3E502DA
11.1.3
Error display
• This display appears when an error occurs that can be taken care of by the user.
4139F3E503DA
89
2
magicolor 2400W
magicolor 2430 DL
magicolor 2450
11. Description of the Control Panel (magicolor 2450)
11.1.4
Field Service Ver. 4.0 Feb. 2006
Malfunction screen
• This screen appears when a malfunction occurs that requires a service technician.
Adjustment / Setting
4139F3E504DA
2
90
Field Service Ver. 4.0 Feb. 2006
11. Description of the Control Panel (magicolor 2450)
11.2.1
magicolor 2400W
magicolor 2430 DL
magicolor 2450
11.2 List of Control Panel Messages
Standard status messages
• Normal state messages are displayed on the upper line of the LCD.
Message
Description
IDLE
• Ready to print.
PROCESSING
• Processing data.
PRINTING
• Printing.
WARMING UP
• Warming up.
CALIBRATING
• Calibrating.
Whenever you replace a toner cartridge or reboot the printer after making an
environmental change, the printer automatically pauses to do an Automatic
Image Density Control (AIDC) cycle. This process is provided to make reliable printer operation with optimum output quality possible.
ENERGY SAVER
• Energy Saver mode.
CANCELLING JOB
• Canceling a job.
COPYING
(XXX/XXX)
• The machine is copying with the collating function.
PRINTING
(XXX/XXX)
• The machine is printing with the collating function.
INITIALIZING
• The printer is being initialized.
MAGICOLOR 2450
STARTING SYSTEM
• The printer is starting up.
11.2.2
Adjustment / Setting
FIRMWARE UPDATE
• The firmware is being updated.
WRITING IMAGE
Caution messages
Message
CANNOT ROTATE
CARTRIDGE
DISK NEAR FULL
Description
• A problem occurred while the toner cartridge carousel was rotating.
• The hard disk is nearly full.
• The specified color of toner cartridge is empty.
X EMPTY
NOTE
• Appears when QUALITY MENU → TONER OUT ACTION is set to
“CONTINUE.”
X INCORRECT
• The specified color of toner cartridge is not a genuine KONICAMINOLTA
toner cartridge or not the correct type.
X TONER LOW
• The specified color of toner cartridge is low and should be replaced within
200 pages at 5% coverage of Letter/A4 pages.
OPC DRUM LOW
• The drum cartridge will soon run out.
OPC DRUM OUT
• The drum cartridge is empty.
TRAY 2 OPEN
(When the Ready
indicator is lit)
• Tray 2 is not installed or not fully inserted into the printer.
MEDIA MISMATCH
• The media type set in the printer driver is different from the type of media
loaded.
91
2
magicolor 2400W
magicolor 2430 DL
magicolor 2450
11. Description of the Control Panel (magicolor 2450)
Message
Field Service Ver. 4.0 Feb. 2006
Description
• The media size set in the printer driver is different from the size media loaded
in Tray1.
PAPER MISMATCH
11.2.3
NOTE
• Appears when PAPER MENU → INPUT TRAY → AUTO CONTINUE is
SEt to “OFF.”
Error messages
Message
FATAL ERROR
Description
• The AIDC Sensor has developed a malfunction of some sort.
DISK ERROR
• The hard disk is full or damaged.
DISK FULL
• The hard disk is full.
DUPLEX UNIT
PANEL OPEN
• The Duplex Option cover is open.
• The specified color of toner cartridge is empty.
REPLACE X TONER
ERROR LOADING
IMAGE
NOTE
• This message appears when QUALITY MENU → TONER OUT ACTION
is set to “STOP.”
• An error occurred while the system image was being scanned.
FIRMWARE UPDATE
• An error occurred while the firmware was being initialized.
FOMAT ERROR
Adjustment / Setting
FIRMWARE UPDATE
• The downloaded system image is corrupted or the version is incorrect.
INVALID IMAGE
MAIN UNIT
COVER OPEN
• The Front Cover of the machine is open.
OPC DRUM
MISSING
• The Drum Cartridge is not installed.
PAPER JAM
XXXX
• A media jam has occurred at the specified location.
☞ For troubleshooting procedures, see “Troubleshooting” or the relevant Service Manual of the option concerned.
PUT “SIZE” “TYPE”
IN ANY TRAY
• The media type set in the printer driver is different from the type of media
loaded into the specified tray.
• The paper size set from the printer driver is different from the size of paper
loaded in Tray 1.
PUT “SIZE” “TYPE”
IN TRAY 1
NOTE
• This message appears when PAPER MENU → INPUT TRAY → TRAY 1
MODE is set to “CASSETTE.”
• The paper size set from the printer driver is different from the size of paper
loaded in Tray 2.
PUT “SIZE” “TYPE”
IN TRAY 2
2
NOTE
• This message appears when PAPER MENU → INPUT TRAY → AUTO
CONTINUE is set to “OFF.”
REPLACE OPC
DRUM
• The drum cartridge is empty.
X TONER
MISSING
• The specified color of toner cartridge is not installed.
92
Field Service Ver. 4.0 Feb. 2006
Malfunction messages
magicolor 2400W
magicolor 2430 DL
magicolor 2450
11.2.4
11. Description of the Control Panel (magicolor 2450)
☞ For details of malfunction messages and troubleshooting procedures, see
“Troubleshooting.”
Message
Description
FIRMWARE UPDATE
• Data cannot be written since the flash memory is damaged.
WRITING ERROR
SERVICE CALL XX
• The Engine or controller is faulty.
11.3 Cancelling a Print Job
• A print job being processed or printed can be cancelled by pressing the Cancel key.
1. If the Cancel key is pressed while a print job is being printed, a message appears on
the Control Panel.
2. Select the job to be cancelled using the right or left arrow key and press the Menu
Select key.
Panel Display
CURRENT
ALL
Description
Cancels the job being currently printed.
Cancels all jobs the machine has so far
received but has not yet finished printing.
Adjustment / Setting
,1$%#0%'.
%744'06
4139F3E505DA
93
2
Field Service Ver. 4.0 Feb. 2006
12. Menu (magicolor 2450)
12.1 List of menu functions
MENU
PROOF/PRINT MENU *1
PRINT MENU
MENU MAP
CONFIGURATION
STATISTICS PAGE
FONT LIST
DIRECTORY LIST
DEMO
PAPER MENU
INPUT TRAY
DUPLEX *3
ORIENTATION
PAGE RECOVERY
Adjustment / Setting
magicolor 2400W
magicolor 2430 DL
magicolor 2450
12. Menu (magicolor 2450)
POSTSCRIPT
PCL
TRAY 1 MODE
TRAY 1
TRAY 2
CUSTOM SIZE
AUTO CONTINUE
TRAY CHAINING *2
MAP *2
BLACK
CYAN
MAGENTA
YELLOW
QUALITY MENU
REPLACE TONER
TONER OUT ACTION
AIDC
DENSITY CONTROL
REQUEST AIDC
MODE
BLACK
CYAN
MAGENTA
YELLOW
*1 This setting is available only when an optional Hard Disk is installed.
*2 This setting is available only when an optional Lower Feeder Unit is installed.
*3 This setting is available only when a Duplex Option is installed.
2
94
12. Menu (magicolor 2450)
MENU
TCP/IP
IPX/SPX
ETHERTALK
ETHERNET SPEED
PS PROTOCOL
SYSTEM DEFAULT
ENABLE
JOB TIMEOUT
ENABLE
DHCP/BOOTP
IP ADDRESS
DEFAULT ROUTER
SUBNET MASK
ENABLE HTTP
ENABLE AUTO IP
FRAME TYPE
NAME
NAME2
NETZONE
NETZONE2
JOB TIMEOUT
PRINT QUALITY
COLOR MODE
EMULATIONS
STARTUP OPTIONS
DATE & TIME *1
ENERGY SAVER
ENERGY SAVER MGT *2
SECURITY
CAPTURE PRT JOB *1
FORMAT
RESTORE/SAVE
DEFAULT
AUTO DEFAULT
POSTSCRIPT
PCL
Adjustment / Setting
INTERFACE
MENU
ETHERNET
USB
PARALLEL
ACTIVE I/F
magicolor 2400W
magicolor 2430 DL
magicolor 2450
Field Service Ver. 4.0 Feb. 2006
START PAGE
SYSSTART *1
CONFIG
FORMAT FLASH
FORMAT DISK *1
RESTORE FACTORY
SAVE CUSTOM
RESTORE CUSTOM
SERVICE MENU
LANGUAGE MENU
ENVIRONMENT MENU
*1 This setting is available only when an optional Hard Disk is installed.
*2 This menu item appears only on 110 V units.
95
2
magicolor 2400W
magicolor 2430 DL
magicolor 2450
12. Menu (magicolor 2450)
Field Service Ver. 4.0 Feb. 2006
12.2 PROOF/PRINT MENU
• With this menu item, print jobs that were set to be saved on the hard disk by using Job
Retention on the Basic tab of the printer driver can be printed or deleted.
NOTE
• This setting is available only when an optional hard disk drive is installed.
MENU
PROOF/PRINT MENU *1
"User name"
SECURED
"Job name"
PROOF/PRINT
"Job name"
PRINT
DELETE
PRINT
PIN
XXXX *2
PIN
XXXX *2
COPIES
DELETE
PRINT/HOLD
"Job name"
STORED
"Job name"
PRINT
PRINT
COPIES
DELETE
DELETE
COPIES
COPIES
4139fs3526e0
Adjustment / Setting
*1: If no jobs have been stored on the hard disk, NO STORED JOBS appears.
*2: In order to print or delete a secured job, enter the four-digit password specified from the
printer driver. For details on entering the password, refer to “Entering the password.”
12.2.1
Entering the password
• In order to print or delete a secured job, the four-digit password specified from the printer
driver must be entered. Follow the procedure described below.
1. Press the Up and Down keys to increase or decrease the first digit of the password.
2. Press the Right key to move the cursor to the next digit.
3. Press the Up and Down keys to increase or decrease the second digit of the password.
4. Continue these steps until all four digits of the password are specified.
5. Press the Menu/Select key.
The PRINT/DELETE selection screen appears.
NOTE
• If an incorrect password is entered, INVALID ENTRY appears and the screen for
entering the password appears again.
2
96
Field Service Ver. 4.0 Feb. 2006
12. Menu (magicolor 2450)
12.3.1
MENU MAP
Function
• Prints the menu map.
Use
• To check the available menu settings.
Setting
/procedure
• Select MENU MAP and press the Menu Select key.
12.3.2
CONFIGURATION
Function
• Prints the configuration page.
Use
• To check configuration of the machine. The following items can be checked:
Printer Information
Printer Interfaces
INSTALLED OPTIONS
PAPER SETTINGS
Setting
/procedure
12.3.3
magicolor 2400W
magicolor 2430 DL
magicolor 2450
12.3 PRINT MENU
• Select CONFIGURATION and press the Menu Select key.
STATISTICS PAGE
Function
• Prints the statistics page.
Use
• To check the consumable status and the usage of the machine, such as the number
of pages printed.
12.3.4
• Select STATISTICS PAGE and press the Menu Select key.
Adjustment / Setting
Setting
/procedure
FONT LIST
A. POSTSCRIPT
Function
• Prints a list of PostScript fonts.
Use
• To check the available PostScript fonts.
Setting
/procedure
• Select FONT LIST→POSTSCRIPT and press the Menu Select key.
B. PCL
Function
• Prints a PCL fonts.
Use
• To check the available PCL fonts.
Setting
/procedure
• Select FONT LIST→PCL and press the Menu Select key.
97
2
magicolor 2400W
magicolor 2430 DL
magicolor 2450
12. Menu (magicolor 2450)
12.3.5
Field Service Ver. 4.0 Feb. 2006
DIRECTORY LIST
Function
• Prints a directory list of the hard disk and flash.
Use
• To check the files saved on the hard disk and in flash.
Setting
/procedure
• Select DIRECTORY LIST and press the Menu Select key.
12.3.6
NOTE
• This menu item appears only if the optional hard disk drive is installed.
DEMO
Function
• Prints the demo page.
Use
• To print a demo page.
Setting
/procedure
• Select DEMO and press the Menu Select key.
12.4 PAPER MENU
12.4.1
INPUT TRAY
Adjustment / Setting
A. TRAY 1 MODE
Function
• When printing from Tray 1, selects whether the media size and media type set in the
printer driver or the MEDIA SIZE and MEDIA TYPE settings set by selecting PAPER
MENU → INPUT TRAY → TRAY 1 in the control panel have priority.
Use
• If AUTO is selected, to specify that the printer driver settings have priority during
printing.
• If CASSETTE is selected, to specify that printing is performed when the printer driver
settings and the control panel settings are all the same.
Setting
/procedure
• The default setting is AUTO.
“AUTO”
CASSETTE
B. TRAY 1
(1) MEDIA SIZE
2
Function
• Specifies the size of the media loaded in Tray 1.
Use
• To specify the size of the media loaded in Tray 1.
Setting
/procedure
• The default setting for North America is LETTER.
The default setting for all other regions is A4.
• The media sizes available are as follows.
98
LETTER
LEGAL
EXECTIVE
A4
A5
B5(JIS)
GOVT LETTER
STATEMENT
FOOLSCAP
FOLIO
SP FOLIO
UK QUARTO
GOVT LEGAL
16K
KAI 16
32K
ENV C5
ENV C6
ENV DL
ENV MONARCH
ENV CHOU#3
ENV CHOU#4
B5(ISO)
ENV #10
ENV YOU#4
JPOST
JPOST-D
CUSTOM
Field Service Ver. 4.0 Feb. 2006
12. Menu (magicolor 2450)
Function
magicolor 2400W
magicolor 2430 DL
magicolor 2450
(2) MEDIA TYPE
• Specifies the setting for the type of media loaded in Tray 1.
Use
• To specify the type of media loaded in Tray 1.
Setting
/procedure
• The default setting is PLAIN PAPER.
“PLAIN PAPER” THICK
LABEL
POSTCARD
TRANSPARENCY
ENVELOPE
LETTERHEAD
GLOSSY
C. TRAY 2
(1) MEDIA SIZE
Function
• Specifies the size of the media loaded in Tray 2.
Use
• To specify the size of the media loaded in Tray 2.
Setting
/procedure
• The default setting for North America is LETTER.
The default setting for all other regions is A4.
LETTER
A4
(2) MEDIA TYPE
Function
• Specifies the setting for the type of media loaded in Tray 2.
Use
• To specify the type of media loaded in Tray 2.
Setting
/procedure
• The default setting is PLAIN PAPER.
PLAIN PAPER
LETTERHEAD
Function
• Specifies the width of the custom-sized paper in Tray 1.
Use
• To specify the width of the custom-sized media in Tray 1.
Setting
/procedure
• On the model for North America, the settings appear in inches and the menu item
appears as WIDTH(IN). On the models for all other regions, the settings appear in
millimeters and the menu item appears as WIDTH(MM).
• The default setting is 92.0 mm (3.62 in.).
Adjustment / Setting
D. CUSTOM
(1) WIDTH
92.0 to 216.0 mm (3.62 to 8.50 in.)
(2) LENGTH
Function
• Specifies the length of the custom-sized paper in Tray 1.
Use
• To specify the length of the custom-sized media in Tray 1.
Setting
/procedure
• On the model for North America, the settings appear in inches and the menu item
appears as LENGTH(IN). On the models for all other regions, the settings appear in
millimeters and the menu item appears as LENGTH(MM).
• The default setting is 148.0 mm (5.83 in.).
148.0 to 356.0 mm (5.83 to 14.02 in.)
99
2
magicolor 2400W
magicolor 2430 DL
magicolor 2450
12. Menu (magicolor 2450)
Field Service Ver. 4.0 Feb. 2006
E. AUTO CONTINUE
Function
• Enables or disables printing when the size of the media loaded in the tray does not
match that of the print data.
Use
• To print data on the media loaded in the tray of the media loaded in the tray does not
match that of the print data.
Setting
/procedure
• The default setting is ON.
“ON”
OFF
F. TRAY CHAINING
Function
• Allows a print cycle to continue without interruption when the current tray runs out of
media during the print cycle by automatically reselecting another tray, in which the
media of the same size and the same type is loaded.
Use
• To allow media to be pulled from another tray when the media in the first tray runs
out.
Setting
/procedure
• The default setting is ON.
“ON”
OFF
NOTE
• This setting is available only when an optional Lower Feeder Unit is installed.
Adjustment / Setting
G. MAP
(1) MODE
Function
• Selects whether or not the Tray Mapping function is used.
Use
• To specify whether trays are mapped.
Setting
/procedure
• The default setting is ON.
“ON”
OFF
(2) LOGICAL TRAY0-9
Function
• Specifies whether jobs received from another manufacturer's printer driver are
printed using Tray 1 or Tray 2.
Use
• To specify the media source for print jobs using another manufacturer’s printer driver.
Setting
/procedure
• Only the default for LOGICAL TRAY 2 is PHYSICAL TRAY 2. PHYSICAL TRAY 1 is
the default for all trays other than LOGICAL TRAY 2.
PHYSICAL TRAY 1
2
100
PHYSICAL TRAY 2
Field Service Ver. 4.0 Feb. 2006
DUPLEX
Function
• Selects whether or not the duplex print function is used.
Use
• To use the duplex print function.
magicolor 2400W
magicolor 2430 DL
magicolor 2450
12.4.2
12. Menu (magicolor 2450)
OFF
: Duplex printing is not possible.
LONG EDGE : The pages will be printed on both sides of the paper for long-edge
binding.
SHORT EDGE : The pages will be printed on both sides of the paper for shortedge binding.
Setting
/procedure
• The default setting is OFF.
“OFF”
LONG EDGE
SHORT EDGE
NOTE
• This setting is available only when a Duplex Option is installed.
Function
ORIENTATION
• Specifies the orientation of the media.
Use
• To change the orientation of the media.
Setting
/procedure
• The default setting is PORTRAIT.
12.4.4
“PORTRAIT”
LANDSCAPE
PAGE RECOVERY
Function
• Selects whether or not the page is printed again after recovering from a media
misfeed.
Use
• To specify the point from which printing should continue after a media misfeed.
Adjustment / Setting
12.4.3
ON : The page that was misfeed is printed again.
OFF : Printing continues with the next page without reprinting the misfed page.
Setting
/procedure
• The default setting is ON.
“ON”
OFF
12.5 QUALITY MENU
12.5.1
REPLACE TONER
A. BLACK/CYAN/MAGENTA/YELLOW
Function
• Moves the specified color of Toner Cartridge into replacement position, so it can be
replaced.
Use
• To replace the specified color of Toner Cartridge.
Setting
/procedure
1. Select QUALITY MENU→TONER and the specific color of toner to be replaced.
2. The rack rotates to bring the specified color of Toner Cartridge to the replacement
position. When the rack stops moving, the message “OPEN DOOR AND REPLACE
(color) TONER” appears on the display.
3. Open the Upper Cover and replace the Toner Cartridge.
☞ For the Toner Cartridge replacement procedures, see “Maintenance.”
4. Close the Upper Cover. The initial screen will then reappear.
101
2
magicolor 2400W
magicolor 2430 DL
magicolor 2450
12. Menu (magicolor 2450)
12.5.2
Field Service Ver. 4.0 Feb. 2006
TONER OUT ACTION
Function
• Specifies whether to stop or continue printing when a toner empty condition is
detected.
Use
• To select to permit printing upon a toner empty condition.
Setting
/procedure
• The default setting is STOP.
12.5.3
“STOP”
CONTINUE
AIDC
A. REQUEST AIDC
Function
• Executes image adjustments.
Use
• To calibrate the engine when there are print image quality problems.
• To calibrate the engine when the Transfer Belt Unit and Transfer Roller are replaced
with new ones.
Setting
/procedure
• The default setting is NO.
YES
“NO”
• If YES is selected, image adjustments are performed.
Adjustment / Setting
B. MODE
Function
• Applies the image adjustments
Use
• If ON is selected, to apply the image adjustments.
• If OFF is selected, to not apply image adjustments.
Setting
/procedure
• The default setting is ON.
12.5.4
“ON”
OFF
DENSITY CONTROL
A. BLACK/CYAN/MAGENTA/YELLOW
2
Function
• Adjusts the density of the toner to one of five levels.
Use
• To vary the density of the printed image.
Setting
/procedure
• The default setting is 3.
102
1 to 5
Field Service Ver. 4.0 Feb. 2006
12. Menu (magicolor 2450)
12.6.1
magicolor 2400W
magicolor 2430 DL
magicolor 2450
12.6 INTERFACE MENU
ETHERNET
A. TCP/IP
(1) ENABLE
Function
• Sets whether to enable or disable TCP/IP.
Use
• To disable TCP/IP.
Setting
/procedure
• The default setting is YES.
“YES”
NO
(2) DHCP/BOOTP
Function
• Automatically acquires an IP address from the DHCP or BOOTP server, if there is
one in the network, and specifies whether to load other network information.
Use
• To automatically acquire an IP address and load other network information.
Setting
/procedure
• The default setting is YES.
“YES”
NO
Function
• Sets the IP address of the printer on the network.
Use
• To enter the printer’s IP address.
Setting
/procedure
• Enter the IP address using the up, down, right, and left arrow keys.
• The default setting is “192.168.1.2.”
Adjustment / Setting
(3) IP ADDRESS
NOTE
• When the printer’s IP address is set manually, DHCP/BOOTP is automatically
set to OFF.
(4) DEFAULT ROUTER
Function
• Sets the IP address of the router if one is on the network.
Use
• To enter the IP address of the router.
Setting
/procedure
• Enter the IP address using the up, down, right, and left arrow keys.
• The default setting is “192.168.1.2.”
(5) SUBNET MASK
Function
• Sets the subnet mask of the printer used on the network.
Use
• To enter the printer subnet mask.
Setting
/procedure
• Enter the subnet mask using the up, down, right, and left arrow keys.
• The default setting is “0.0.0.0.”
103
2
magicolor 2400W
magicolor 2430 DL
magicolor 2450
12. Menu (magicolor 2450)
Field Service Ver. 4.0 Feb. 2006
(6) ENABLE HTTP
Function
• Specifies whether or not HTTP is used.
Use
• To specify whether HTTP is used.
ON : the Web page provided in the printer by the built-in HTTP server is enabled.
OFF: the Web page cannot be used.
Setting
/procedure
• The machine must be restarted after the setting has been changed.
• The default setting is ON.
“ON”
OFF
(7) ENABLE AUTO IP
Function
• Selects whether or not the IP address is automatically acquired when DHCP/BOOTP,
PING, and ARP are not functioning or when there is no response.
Use
• To automatically acquire an IP address when DHCP/BOOTP, PING, and ARP are not
functioning or when there is no response.
Setting
/procedure
• The default setting is YES.
“YES”
NO
Adjustment / Setting
B. IPX/SPX
(1) FRAME TYPE
Function
• Sets the Ethernet frame type.
Use
• To specify the Ethernet frame type for transmission.
Setting
/procedure
• The default setting is Auto.
“Auto”
802.2
802.3
ETHER II
SNAP
C. ETHERTALK
(1) NAME
Function
• Specifies the first part of the name of the printer on the Macintosh EtherTalk (AppleTalk) network, so it can be “found.”
Use
• To set the Printer name displayed on the Macintosh EtherTalk (AppleTalk) network.
• The printer name can contain a maximum of 16 characters.
Setting
/procedure
• The default setting is magicolor 2450.
(2) NAME 2
Function
• Specifies the second part of the name of the printer on the Macintosh EtherTalk
(AppleTalk) network, so it can be “found.”
Use
• To set the Printer name displayed on the Macintosh EtherTalk (AppleTalk) network.
• The printer name can contain a maximum of 16 characters.
Setting
/procedure
2
104
• The default setting is NULL.
Field Service Ver. 4.0 Feb. 2006
12. Menu (magicolor 2450)
Function
• Specifies the first part of the Macintosh EtherTalk zone name.
Use
• To set the Zone name on Macintosh EtherTalk (AppleTalk) network where the printer
is located.
• The zone name can contain a maximum of 16 characters.
Setting
/procedure
• The default setting is ✱.
magicolor 2400W
magicolor 2430 DL
magicolor 2450
(3) NETZONE
(4) NETZONE 2
Function
• Specifies the second part of the Macintosh EtherTalk zone name.
Use
• To set the Zone name connected with Macintosh EtherTalk (AppleTalk) network
where the printer is located.
• The zone name can contain a maximum of 16 characters.
Setting
/procedure
• The default setting is NULL.
D. ETHERNET SPEED
Function
• Specifies the transmission speed for the network and the transmission method for bidirectional transmission.
Use
• To set the specific network speed and the transmission method.
Setting
/procedure
• The default setting is Auto.
“Auto”
10 Full Duplex
100 Full Duplex
100 Half Duplex
10 Half Duplex
Adjustment / Setting
NOTE
• Make sure to turn the Power Switch OFF and ON again after changing the network speed.
E. PS PROTOCOL
Function
• Selects whether PostScript jobs are received in the binary format or the quoted
format.
Use
• To transmit PostScript data in quoted format.
Setting
/procedure
• The default setting is BINARY.
12.6.2
“BINARY”
QUOTED BINARY
USB
A. ENABLE
Function
• Specifies whether to enable or disable USB.
Use
• To disable USB.
Setting
/procedure
• The default setting is YES.
“YES”
NO
105
2
magicolor 2400W
magicolor 2430 DL
magicolor 2450
12. Menu (magicolor 2450)
Field Service Ver. 4.0 Feb. 2006
B. JOB TIMEOUT
Function
• Specifies the length of time until the print job being received is timed out when the
USB interface is being used.
Use
• To set the amount of time before a print job sent to the USB interface times out.
Setting
/procedure
• The default setting is 60 (seconds).
12.6.3
0 to 999
PARALLEL
A. JOB TIMEOUT
Function
• Specifies the length of time until the print job being received is timed out when the
parallel interface is being used.
Use
• To set the amount of time before a print job sent to the parallel interface times out.
Setting
/procedure
• The default setting is 30 (seconds).
Adjustment / Setting
12.6.4
0 to 999
ACTIVE I/F
Function
• Sets the interface to be used.
Use
• To set the interface to be used.
Setting
/procedure
• The default setting is ETHERNET.
“ETHERNET”
PARALLEL
12.7 SYSTEM DEFAULT MENU
12.7.1
Function
• Selects the image quality for prints.
Use
• To change the image quality setting.
Setting
/procedure
• The default setting is HIGH.
12.7.2
2
PRINT QUALITY
“HIGH”
STANDARD
COLOR MODE
Function
• Specifies whether printing is in full color or grayscale.
Use
• To select color or grayscale printing.
Setting
/procedure
• The default setting is COLOR.
106
“COLOR”
GRAYSCALE
Field Service Ver. 4.0 Feb. 2006
EMULATIONS
magicolor 2400W
magicolor 2430 DL
magicolor 2450
12.7.3
12. Menu (magicolor 2450)
A. DEFAULT
Function
• Specifies the printer control language.
Use
• To change the printer control language.
• If AUTOMATIC is selected, the printer automatically selects the printer control language from the data stream.
Setting
/procedure
• The default setting is AUTOMATIC.
“AUTOMATIC”
POSTSCRIPT
PCL5
PCL XL HEX DUMP PDF
B. AUTO DEFAULT
Function
• Selects the printer description language when it cannot be identified from the data.
Use
• To set the printer control language to be used when it cannot be automatically identified from the print job.
Setting
/procedure
• The default setting is AUTOMATIC.
“AUTOMATIC”
PCL5
POSTSCRIPT
C. POSTSCRIPT
(1) ERROR PAGE
• Sets whether or not an error page is printed when a PostScript error occurs.
Use
• To specify whether an error page should be printed if a PostScript error occurs.
Setting
/procedure
• The default setting is ON.
“ON”
OFF
Adjustment / Setting
Function
D. PCL
(1) LINE TERMINATION
Function
• Sets the CR/LF mapping for line termination in the PCL language.
Use
• To change the CR/LF mapping.
Setting
/procedure
• The default setting is CR=CR LF=CRLF.
“CR=CR LF=CRLF”
CR=CRLF LF=LF
CR=CR LF=LF
CR=CRLF LF=CRLF
(2) FONT
<PITCH SIZE>
Function
• Sets the font pitch size in the PCL language when not specified by the printer driver.
Use
• To set the font pitch size in the PCL language when it cannot be specified by the
printer driver during printing from Windows DOS, etc.
Setting
/procedure
• The default setting is 1000.
44 to 9999
107
2
magicolor 2400W
magicolor 2430 DL
magicolor 2450
12. Menu (magicolor 2450)
Field Service Ver. 4.0 Feb. 2006
<FONT NUMBER>
Function
• Sets the font in the PCL language when not specified by the printer driver.
Use
• To use when the printer driver cannot specify the font during printing from Windows
DOS, etc.
The font numbers that appear correspond to the PCL font list.
☞ For details on printing the font list, refer to FONT LIST on page 97.
Setting
/procedure
• The default setting is 0.
0 to 32767
<POINT SIZE>
Function
• Sets the font size in the PCL language when not specified by the printer driver.
Use
• To set the font size in the PCL language when it cannot be specified by the printer
driver during printing from Windows DOS, etc.
Setting
/procedure
• The default setting is 1200.
400 to 99975
<SYMBOL SET>
• Sets the font symbol set in the PCL language when not specified by the printer driver.
Use
• To use when the font symbol set cannot be specified by the printer driver during printing from Windows DOS, etc.
Setting
/procedure
• The default setting is PC8.
Adjustment / Setting
Function
12.7.4
• The font symbol set available for setting are as follows.
PC8, DESKTOP, ISO4, ISO6, ISO11, ISO15, ISO17, ISO21, ISO60, ISO69,
ISOL1, ISOL2, ISOL5, ISOL6, ISOL9, LEGAL, MATH8, MCTEXT, MSPUBL,
PC775, PC850, PC852, PC8DN, PC8TK, PC1004, PIFONT, PSMATH,
PSTEXT, ROMAN8, VNINTL, VNMATH, VNUS, WIN30, WINBALT, WINL1,
WINL2, WINL5, WIN31J, GB2312, ARABIC8, HPWARA, PC864ARA,
HEBREW7, ISOHEB, HEBREW8, PC862HEB, ISOCYR, PC866CYR, WINCYR, PC866UKR, GREEK8, WINGRK, PC851GRK, PC8GRK, ISOGRK
STARTUP OPTIONS
A. STATUP PAGE
Function
• Selects whether or not a startup page is printed when the printer is turned on.
Use
• To specify whether a startup page is printed.
YES: The startup page is printed when the printer is turned on.
NO : The startup page is not printed.
Setting
/procedure
2
108
• The default setting is NO.
YES
“NO”
Field Service Ver. 4.0 Feb. 2006
12. Menu (magicolor 2450)
Function
• Selects whether or not the PostScript format definitions file is applied when the
printer is turned on.
Use
• To specify whether to apply the PostScript format definitions file.
magicolor 2400W
magicolor 2430 DL
magicolor 2450
B. SYSSTART
YES: The PostScript format definitions file is applied.
NO : The PostScript format definitions file is not applied.
Setting
/procedure
12.7.5
• The default setting is NO.
YES
“NO”
DATE & TIME
Function
• Sets the TOD (time-of-day) clock on the hard disk.
Use
• To adjust the TOD clock on the hard disk.
• The settings appear in the following order: year, month, day:hour, minutes, seconds.
NOTE
• This menu item appears only if an optional hard disk installed.
Function
T
ENERGY SAVER
• Specifies the length of time before the machine enters Energy Saver mode after the
last print is received or the last key operated.
Use
• To set the amount of time before the machine enters Energy Saver mode.
Setting
/procedure
• The default setting is 30 MINUTES.
15 MINUTES
“30 MINUTES”
1 HOUR
Adjustment / Setting
12.7.6
1. Select “DATE & TIME.”
2. Using ▲, ▼, , and
keys, enter the time-of-day, and day, month, and year.
3. Accept the date and time setting using the Menu Select key.
T
Setting
/procedure
2 HOURS *
* Displayed only on the model for the 110 V models.
NOTE
• This setting is available only when SYSTEM DEFAULT→ ENERGY SAVER MGT
is set to “ON.”
12.7.7
Function
ENERGY SAVER MGT
• Sets whether the printer should go into Energy Saver mode when not printing or processing a print job and when the Control Panel is not being used.
Use
• To specify whether Energy Saver mode is to be used.
Setting
/procedure
• The default setting is ON.
“ON”
OFF
NOTE
• This menu item is available only on the 110 V model.
109
2
magicolor 2400W
magicolor 2430 DL
magicolor 2450
12. Menu (magicolor 2450)
12.7.8
Field Service Ver. 4.0 Feb. 2006
SECURITY
A. CONFIG
(1) ENABLE
Function
• Selects whether or not the menus are protected with a password.
Use
• To protect all menus with a password.
Setting
/procedure
• The default setting is OFF.
“OFF”
ON
(2) SET PASSWORD
Function
• Sets the password for displaying the menus.
Use
• To set the password for protecting the menus.
NOTE
• The specified password is applied only if SECURITY → CONFIG → ENABLE is
set to “ON.”
Setting
/procedure
Adjustment / Setting
12.7.9
1. Select “SET PASSWORD.”
2. Enter the 8-digit password.
3. Accept the password setting using the Menu Select key.
CAPTURE PRT JOB
Function
• Selects whether or not received print jobs are saved on the hard disk.
Use
• When an error occurs, to help you analyze the cause of the error according to the
print job data.
OFF : The print jobs are not saved on the hard disk.
ON
: The received print jobs are saved on the hard disk without being printed.
PRINT : The received print jobs are printed and saved on the hard disk.
NOTE
This menu item appears only if an optional hard disk is installed.
Setting
/procedure
12.7.10
• The default setting is OFF.
“OFF”
ON
PRINT
FORMAT
A. FORMAT FLASH
Function
• Selects whether or not to initialize the flash RAM.
Use
• To initialize the flash RAM.
Setting
/procedure
• The default setting is NO.
“NO”
If YES is selected, the flash RAM is initialized.
2
110
YES
Field Service Ver. 4.0 Feb. 2006
12. Menu (magicolor 2450)
Function
• Selects whether or not to initialize the hard disk.
Use
• Initializes the hard disk.
magicolor 2400W
magicolor 2430 DL
magicolor 2450
B. FORMAT DISK
NOTE
• This menu item appears only if an optional hard disk is installed.
Setting
/procedure
• The default setting is NO.
“NO”
YES
If YES is selected, the hard disk is initialized.
12.7.11
RESTORE/SAVE
A. RESTORE FACTORY
Function
• Selects whether or not all menu items are reset to their factory default settings.
Use
• To return the current settings to their factory default settings.
Setting
/procedure
• The default setting is NO.
“NO”
YES
If YES is selected, all menu items are reset to their initial settings.
SAVE CUSTOM
Function
• Selects whether or not all changed menu settings are saved.
Use
• To save the custom settings.
Setting
/procedure
• The default setting is NO.
“NO”
Adjustment / Setting
12.7.12
YES
If YES is selected, all changes are saved.
A. RESTORE CUSTOM
Function
• Selects whether or not menu items are reverted to the previously saved settings.
Use
• To revert the settings to the previously saved settings.
Setting
/procedure
• The default setting is NO.
“NO”
YES
If YES is selected, the menu items are reverted to the previously saved settings.
12.8 LANGUAGE MENU
Function
• Sets the language of the Control Panel display.
Use
• To change the language of the Control Panel display.
• The default setting varies according to the applicable marketing area.
Setting
/procedure
ENGLISH
CESKY
FRANCAIS
DEUTSCH
ESPANOL
ITALIANO
PORTUGES
111
2
magicolor 2400W
magicolor 2430 DL
magicolor 2450
12. Menu (magicolor 2450)
Field Service Ver. 4.0 Feb. 2006
12.9 ENVIRONMENT MENU
<Procedure to enter the ENVIRONMENT MENU>
• At the top level (Idle status), press the ▲ key for 3 to 4 seconds. Then go into the menu
and press left arrow key. The ENVIRONMENT MENU appears.
12.9.1
ALTITUDE SETUP
Function
• Optimizes the image by varying the output value of the developing bias when an
image problem occurs due to the atmospheric pressure at high altitudes.
Use
• To adjust the developing when an image problem (uneven density) occurs in an environment of low atmospheric pressure in places such as at high altitudes.
Setting
/procedure
• The default setting is 0.
1. Call the ENVIRONMENT MENU to the menu screen.
2. Select ALTITUDE SETUP using the < or > key and press the Menu/Select key.
3. In ALTITUDE SETUP, press the < or > key as necessary to select the appropriate
altitude setting value.
Adjustment range: 0 to 3
Setting Value
Developing Bias Value
0
No offset
1
100 V
2
200 V
3
300 V
4. Press the Menu/Select key to accept the new setting.
Adjustment / Setting
NOTE
• After the setting has been changed, be sure to run REQUEST AIDC (QUALITY
MENU).
2
112
Field Service Ver. 4.0 Feb. 2006
TRANSFER VOLTAGE
Function
• Adjusts image characteristics according to user requirements for each type of media
by varying the second transfer voltage.
Use
• To adjust the second transfer voltage when an image problem (void areas, white
spots) occurs due to the characteristics of the type of media being used.
If white spots occur, decrease the 2nd transfer voltage
(adjust in the minus direction).
If void areas occurs, increase the 2nd transfer voltage
(adjust in the plus direction).
Setting
/procedure
• The default setting is 0.
1. Call the ENVIRONMENT MENU to the menu screen.
2. Select TRANSFER VOLTAGE using the < or > key and press the Menu/Select key.
3. In TRANSFER VOLTAGE, press the < or > key as necessary to select the appropriate voltage value.
Adjustment range: -3 to +3
Setting Value
Voltage Value
Setting Value
Voltage Value
-3
-600 V
+1
+200 V
-2
-400 V
+2
+400 V
-1
-200 V
+3
+600 V
0
0V
magicolor 2400W
magicolor 2430 DL
magicolor 2450
12.9.2
12. Menu (magicolor 2450)
4. Press the Menu/Select key to accept the new voltage setting.
DUPLEX DENSITY
Function
• Adjusts the T/C ratio control level when a faulty image density occurs due to changes
in weather or environment.
Use
• To adjust the T/C ratio changes to compensate for changes in the user's operating
environment during 2-sided printing.
Setting
/procedure
• The default setting is 0.
1. Call the ENVIRONMENT MENU to the menu screen.
2. With DUPLEX DENSITY selected, press the < or > key as necessary to select the
appropriate density level value.
Adjustment range: -3 to +3
3. Press the Menu/Select key to accept the new density level setting.
113
Adjustment / Setting
12.9.3
2
magicolor 2400W
magicolor 2430 DL
magicolor 2450
13. Service Mode (magicolor 2400W)
Field Service Ver. 4.0 Feb. 2006
13. Service Mode (magicolor 2400W)
13.1 Service Mode entry procedure
NOTE
• Ensure appropriate security for the Service Mode entry procedure. It should
NEVER be given to any unauthorized person.
13.1.1
Toner Cartridge removal mode
• This mode is used for manually removing and/or replacing a specific color of Toner Cartridge or all four Toner Cartridges.
Adjustment / Setting
A. Procedure
1. Hold down the Cancel key for 10 seconds or longer.
2. With the Cancel key held down, hold down the Rotate Toner key for 10 seconds or
longer.
3. When all LED indicators are blinking rapidly, release the Cancel and Rotate Toner keys.
4. Hold down the Rotate Toner key for another 10 seconds or longer.
5. The cyan Toner Cartridge moves into the proper position, so it can be removed.
6. Remove the cyan Toner Cartridge, if necessary.
7. Open and close the Upper Cover. Each time you do this, another Toner Cartridge
moves into the proper position, so it can be removed in this order: cyan, black, yellow,
magenta.
114
14. Service Mode (magicolor 2430 DL)
14. Service Mode (magicolor 2430 DL)
14.1 Service/Service person mode entry procedure
NOTE
• Ensure appropriate security for the Service/Service Person mode entry procedure.
It should NEVER be given to any unauthorized person.
Procedure
In the configuration menu, display “ENGINE SERVICE” and press the T key.
Using the
key, display the “TOTAL FACE COUNT” menu.
Hold down the Menu Select key and the T key at the same time for 2 seconds or more.
When “SERVICE/SERVICE PERSON” displays, press the T key.
T
A.
1.
2.
3.
4.
magicolor 2400W
magicolor 2430 DL
magicolor 2450
Field Service Ver. 4.0 Feb. 2006
B. Exiting
• Press the Cancel key.
14.2 List of Service Mode menu functions
Adjustment / Setting
SERVICE
SERVICE PERSON
RESTORE FACTORY DEFAULT
SERVICE PERSON SRU USAGE
RESET CONTROLLER
RESET COUNTER TRANSFER BELT
RESET COUNTER FUSER UNIT
RESET COUNTER TRANSFER ROLLER
115
magicolor 2400W
magicolor 2430 DL
magicolor 2450
14. Service Mode (magicolor 2430 DL)
Field Service Ver. 4.0 Feb. 2006
14.3 Settings/adjustments in Service/Service person mode
functions
14.3.1
RESTORE FACTORY DEFAULT
Function
• Reinitializes the settings to their factory defaults.
Use
• To return the current settings to the factory default settings.
• Use this as the last resort before replacing the board when taking remedial steps for
a malfunction.
• The following table lists the items to be reinitialized and their default values.
NOTE
• Some items can be reset after being reinitialized while others cannot be.
A. Items that cannot be reset after reinitialization
Item
Factory Default Value
Ref. Page
Color
0
-
B/W
0
-
Total
0
-
Color
0
-
B/W
0
-
Total
0
-
Counter : Transfer Roller
0
-
Counter : Transfer Belt Unit
0
-
Counter : Fusing Unit
0
-
Counter:
Main Unit
Adjustment / Setting
Counter:
Duplex *1
*1 When the Duplex Option is installed
116
B. Items that can be reset after reinitialization
Item
Factory Default Value
Ref. Page
SPECIAL PAGES/
PRINT CONFIG PAGE
NO
☞ 79
SPECIAL PAGES/
PRINT TEST PAGES
NO
☞ 79
SPECIAL PAGES/PRINT
MENU MAP
NO
☞ 79
LANGUAGE
ENGLISH
☞ 79
ENERGY SAVER MGMT
(only on the model for the Americas)
ON
☞ 81
ENERGY SAVER
30 MINUTES
☞ 81
ENGINE TONER EMPTY
STOP
☞ 80
AUTO CONTINUE
ON
☞ 81
CHAINING TRAY
ON
☞ 81
DUPLEX DENSITY
0
☞ 83
ALTITUDE SETUP
0
☞ 84
TRANSFER VOLTAGE
0
☞ 84
IP ADDRESS
192.168.1.2
☞ 85
SUBNET MASK
255.255.255.0
☞ 85
GATEWAY
192.168.1.1
☞ 85
DHCP:XX / BOOTP:XX
DHCP:ON / BOOTP:OFF
☞ 85
HTTP
ON
☞ 86
SNMP
ON
☞ 86
FORCED MODES
AUTO/AUTO/ON
☞ 86
IMAGE QUALITY
DRAFT
☞ 87
PAPER SIZE
A4 or Letter
☞ 87
MEDIA TYPE
PLAIN PAPER
☞ 87
LAYOUT
1-UP
☞ 88
BRIGHTNESS
OFF
☞ 88
SHARPNESS
OFF
☞ 88
AUTO ROTATE
OFF
☞ 88
DIRECT PRINT
Adjustment / Setting
Use
14. Service Mode (magicolor 2430 DL)
magicolor 2400W
magicolor 2430 DL
magicolor 2450
Field Service Ver. 4.0 Feb. 2006
117
magicolor 2400W
magicolor 2430 DL
magicolor 2450
14. Service Mode (magicolor 2430 DL)
Field Service Ver. 4.0 Feb. 2006
Use
Item
Factory Default Value
Ref. Page
Admin. Password
administrator
-
Refresh Rate
30 seconds
-
Contact Name
KONICA MINOLTA
Customer Support
-
Contact Information
http://printer.
konicaminolta.com/
-
http://pagescope.com/
-
http://printer.
konicaminolta.com/
-
Product Help URL
Corporate URL
Supplies and Acceshttp://www.q-shop.com/
sories
Online Help URL
Adjustment / Setting
PageScope
Web Connection
http://printer.
konicaminolta.com/
-
Auto IP
DHCP
-
WINS/NetBIOS
Resolution
Checked
-
NetBIOS Name
MC2430DLXXXXXX *2
-
Domain/Workgroup
WORKGROUP
-
Use DHCP for WINS
Checked
-
Primary WINS
grayed out/disabled
-
Secondary WINS
grayed out/disabled
-
Rendezvous Service
Discovery
Checked
-
Rendezvous Config
Printer Name
KONICA MINOLTA
magicolor 2430 DL
-
Rendezvous Config
Host Name
MC2430DLXXXXXX *2
-
IPP Config
Printer Name
magicolor 2430 DL
-
IPP Config
Printer Location
Blank
-
*2 XXXXXX are the low-order 6 digits of the printer MAC address.
Setting
/procedure
1.
2.
3.
4.
5.
Take note of the current setting.
Enter the SERVICE/SERVICE PERSON mode.
Select RESTORE FACTORY DEFAULT and press the Menu Select key.
When the initialization procedure is completed, restart the machine.
Make the settings that were valid before initialization once again.
NOTE
• The reinitialization procedure resets the settings and counter values backed
up in the parameter chip on the Mechanical Control Board. Use utmost care
whenever executing reinitialization.
• After the reinitialization has been executed, be sure to replace all Toner Cartridges, 2nd Transfer Roller, Transfer Belt Unit, Fusing Unit, and Drum Cartridge with new ones.
118
Field Service Ver. 4.0 Feb. 2006
Function
SERVICE PERSON SRU USAGE
• Displays the remaining life of the Transfer Belt, Transfer Roller, and Fusing Unit.
Use
• To check the remaining life of the maintenance service parts.
Setting
/procedure
1. Enter Service Mode.
2. Select SERVICE PERSON SRU USAGE and press the Menu Select key.
3. Select the desired unit using the right and left arrow keys.
14.3.3
RESET CONTROLLER
Function
• Resets the controller.
Use
• To return the controller to its initial condition.
Setting
/procedure
1.
2.
3.
4.
14.3.4
magicolor 2400W
magicolor 2430 DL
magicolor 2450
14.3.2
14. Service Mode (magicolor 2430 DL)
Enter Service Mode.
Select RESET CONTROLLER and press the Menu Select key.
This automatically restarts the machine and the initial
screen reappears.
RESET COUNTER TRANSFER BELT
Function
• Resets the counter value of the Transfer Belt Unit.
Use
• To reset the Transfer Belt Unit counter after the Transfer Belt Unit is replaced.
Setting
/procedure
1. Enter Service Mode.
2. Select RESET COUNTER TRANSFER BELT UNIT and press the Menu Select key.
3. This resets the counter and the Engine/Service menu reappears.
RESET COUNTER FUSER UNIT
Function
• Resets the counter value of the Fusing Unit.
Use
• To reset the Fusing Unit counter after the Fusing Unit is replaced.
Setting
/procedure
1. Enter Service Mode.
2. Select RESET COUNTER FUSER UNIT and press the Menu Select key.
3. This resets the counter and the Engine/Service menu reappears.
14.3.6
Adjustment / Setting
14.3.5
RESET COUNTER TRANSFER ROLLER
Function
• Resets the counter value of the Transfer Roller.
Use
• To reset the Transfer Roller counter after the Transfer Roller is replaced.
Setting
/procedure
1. Enter Service Mode.
2. Select RESET COUNTER TRANSFER ROLLER and press the Menu Select key.
3. This resets the counter and the Engine/Service menu reappears.
119
Field Service Ver. 4.0 Feb. 2006
15. Service Menu (magicolor 2450)
15.1 Service menu entry procedure
NOTE
• Ensure appropriate security for the Service menu entry procedure. It should
NEVER be given to any unauthorized person.
T
T
A. Procedure
1. Select “SERVICE MENU” and press the Menu Select key.
2. Press the Menu Select key twice. Then, using ▲, ▼, , and
word. (The default password is “KM2450.”)
3. Press the Menu Select key and
key.
B. Exiting
• Press ▲ key to return to the initial screen.
15.2 List of Service Menu Functions
SERVICE MENU
Adjustment / Setting
SERVICE PASSWORD
SRU
2
120
TRANSFER BELT
FUSER UNIT
TRANSFER ROLLER
REMOVE ALL
T
magicolor 2400W
magicolor 2430 DL
magicolor 2450
15. Service Menu (magicolor 2450)
keys, enter the pass-
Field Service Ver. 4.0 Feb. 2006
15. Service Menu (magicolor 2450)
15.3.1
magicolor 2400W
magicolor 2430 DL
magicolor 2450
15.3 Settings/adjustments in Service Menu functions
SRU
A. TRANSFER BELT
Function
• Resets the counter value of the Transfer Belt Unit.
Use
• To reset the Transfer Belt Unit counter when the Transfer Belt Unit is replaced.
Setting
/procedure
1. Enter the Service menu.
2. Select “TRANSFER BELT.”
3. Select “YES” and press the Menu Select key.
B. FUSER UNIT
Function
• Resets the counter value of the Fusing Unit.
Use
• To reset the Fusing Unit counter when the Fusing Unit is replaced.
Setting
/procedure
1. Enter the Service menu.
2. Select “FUSER UNIT.”
3. Select “YES” and press the Menu Select key.
Function
• Resets the counter value of the Transfer Roller.
Use
• To reset the Transfer Roller counter when the Transfer Roller is replaced.
Setting
/procedure
1. Enter the Service menu.
2. Select “TRANSFER ROLLER.”
3. Select “YES” and press the Menu Select key.
Adjustment / Setting
C. TRANSFER ROLLER
D. REMOVE ALL
Function
• Moves each color Toner Cartridge to the appropriate replacement position, one by
one, to allow all of the Toner Cartridges to be removed.
Use
• To allow all of the Toner Cartridges to be removed.
Setting
/procedure
1. Enter the Service menu.
2. Select “REMOVE ALL.”
3. The rack rotates to bring the first color Toner Cartridge to the replacement position.
When the rack stops moving, the message “OPEN DOOR/REMOVE TONER C”
appears on the display.
4. Open the Upper Cover and remove the Toner Cartridge.
☞ For the Toner Cartridge removal procedures, see “Maintenance.”
5. Close the Upper Cover. Then, the message “OPEN DOOR/REMOVE TONER K”
appears on the display.
6. Repeating the same steps, remove all Toner Cartridges.
NOTE
• The Toner Cartridges are to be removed in the order of C -> K -> Y -> M.
7. Close the Upper Cover. The initial screen will then reappear.
121
2
Field Service Ver. 4.0 Feb. 2006
magicolor 2400W
magicolor 2430 DL
magicolor 2450
15. Service Menu (magicolor 2450)
Adjustment / Setting
Blank Page
122
16. Jam Display
Troubleshooting
16. Jam Display
16.1 Misfeed display
• When a media misfeed occurs, the printer shows the corresponding media misfeed status by means of the Error indicator on the control panel or LCD display.
magicolor 2400W
magicolor 2430 DL
magicolor 2450
Field Service Ver. 4.0 Feb. 2006
A. Indication given by the Error indicator (magicolor 2400W)
• The Error indicator blinks once a second.
☞ For details of the Error indicator, see “Adjustment/Setting.”
4139fs4502c0
NOTE
• Details of the misfeed location are given in the Status Display on the PC connected to the printer.
4138fs4505e0
Display
(magicolor 2430 DL only)
Misfeed Location
Misfeed processing
location
Action
MEDIA JAM
TRAY 1
Paper take-up section Top Cover, Front Cover ☞ 126
MEDIA JAM
TRANSFER ROLLER
Transfer section
Top Cover
☞ 127
☞ 128
☞ 129
☞ See Lower Feeder
MEDIA JAM
FUSER
Fusing section
Top Cover
Exit section
Top Cover
MEDIA JAM
TRAY 2
Lower Feeder Unit
Tray 2
Paper take-up section
MEDIA JAM
DUPLEX LOWER
Duplex Option paper
feed section
MEDIA JAM
DUPLEX UPPER
Duplex Option paper
conveyance section
Duplex Option Door
Unit Service Manual.
☞ See Duplex Option
Service Manual.
123
Troubleshooting
B. Indication given by the LCD display (magicolor 2430 DL)
• When a media misfeed occurs, a message is displayed on the Control Panel.
☞ For details of the Error indicator, see “Adjustment/Setting.”
magicolor 2400W
magicolor 2430 DL
magicolor 2450
16. Jam Display
Field Service Ver. 4.0 Feb. 2006
C. Indication given by the LCD display (magicolor 2450)
• When a media misfeed occurs a message is displayed on the Control Panel.
☞ For details of the Error indicator, see “Adjustment/Setting.”
4139F4E502DA
Display
(magicolor 2450 only)
Misfeed Location
Misfeed processing
location
Action
Paper take-up section Top Cover, Front Cover ☞ 126
PAPER JAM
TRANSFER
Transfer section
Top Cover
☞ 127
PAPER JAM
FUSER
Fusing section
Top Cover
☞ 128
PAPER JAM
EXIT
Exit section
Top Cover
☞ 129
PAPER JAM
TRAY 2
Lower Feeder Unit
Tray 2
paper take-up section
☞ See Lower Feeder
PAPER JAM
DUPLEX
Duplex Option paper
feed/conveyance
section
☞ See Duplex Option
Troubleshooting
PAPER JAM
TRAY 1
124
Duplex Option Door
Unit Service Manual.
Service Manual.
Field Service Ver. 4.0 Feb. 2006
16. Jam Display
magicolor 2400W
magicolor 2430 DL
magicolor 2450
16.2 Misfeed Display Resetting Procedure
• Open the relevant cover, clear the sheet of misfed media, and close the cover.
16.3 Sensor layout
[1]
[2]
[3]
[5]
4139fs4508c0
[1]
Exit Sensor
PC7
[4]
Duplex Paper Loop Sensor
PC10 DU
[2]
Fusing Paper Loop Sensor
PC8
[5]
Registration Sensor
PC1
[3]
Duplex Transport Sensor
PC12 DU
125
Troubleshooting
[4]
magicolor 2400W
magicolor 2430 DL
magicolor 2450
16. Jam Display
Field Service Ver. 4.0 Feb. 2006
16.4 Solution
16.4.1
Initial check items
• When a media misfeed occurs, check the following:
Check Item
Action
Does the media meet product specifications?
Change the media.
Is the media curled, wavy, or damp.
Change the media.
Instruct the user in correct media storage.
Is a foreign object present along the media path, or is
the media path deformed or worn?
Clean or change the media path.
Are the Paper Separator Fingers dirty, deformed, or
worn?
Clean or change the defective Paper Separator Finger.
Are the rolls/rollers dirty, deformed, or worn?
Clean or change the defective roll/roller.
Are the Edge Guide and Trailing Edge Stop at the correct position to accommodate paper?
Set as necessary.
Are the actuators operational?
Correct or change the defective actuator.
16.4.2
Misfeed at paper feed section
A. Detection Timing
Type
Detection of
misfeed at Paper
feed section
Description
The leading edge of the paper does not block the Registration Sensor (PC1) even
after the lapse of a predetermined period of time after the Tray1 Paper Pick-up
Solenoid has been energized.
B. Action
Relevant Electrical Parts
Registration Sensor (PC1)
Tray1 Paper Pick-up Solenoid (SL1)
Mechanical Control Board (PWB-A)
Troubleshooting
WIRING DIAGRAM
Step
126
Action
Control Signal
Location
(Electrical
Component)
1
Initial check items.
-
-
2
Check the PWB-A connector for proper connection and correct as necessary.
-
-
PWB-A PJ12A-3 (ON)
2-C
HV PJ2HV-2 (REM)
4-A
-
-
3
PC1 sensor check.
4
SL1 operation check.
5
Change PWB-A.
16.4.3
16. Jam Display
Misfeed at 2nd transfer section
A. Detection Timing
Type
Detection of
misfeed at 2nd
transfer section
Detection of paper
left in 2nd transfer
section
Description
The paper does not unblock the Registration Sensor (PC1) even after the lapse of
a predetermined period of time after the Registration Roller Solenoid (SL2) has
been deenergized.
magicolor 2400W
magicolor 2430 DL
magicolor 2450
Field Service Ver. 4.0 Feb. 2006
The Fusing Paper Loop Sensor (PC8) is not blocked by the paper that has moved
past the position, at which the sensor is blocked.
The Registration Sensor (PC1) is blocked when the Power Switch is turned ON, a
cover is opened and closed, or a misfeed or malfunction is reset.
The Fusing Paper Loop Sensor (PC8) is blocked when the Power Switch is turned
ON, a cover is opened and closed, or a misfeed or malfunction is reset.
B. Action
Relevant Electrical Parts
Registration Sensor (PC1)
Fusing Paper Loop Sensor (PC8)
Registration Roller Solenoid (SL2)
Mechanical Control Board (PWB-A)
WIRING DIAGRAM
Action
Control Signal
Location
(Electrical
Component)
1
Initial check items.
-
-
2
Check the PWB-A connector for proper connection and correct as necessary.
-
-
3
PC1 sensor check.
PWB-A PJ12A-3 (ON)
2-C
4
PC8 sensor check.
PWB-A PJ14A-6 (ON)
2-A
5
SL2 operation check.
PWB-A PJ11A-4 (REM)
2-C
6
Change PWB-A.
-
-
Troubleshooting
Step
127
magicolor 2400W
magicolor 2430 DL
magicolor 2450
16. Jam Display
16.4.4
Field Service Ver. 4.0 Feb. 2006
Misfeed at fusing section
A. Detection Timing
Type
Detection of
misfeed at fusing
section
Description
The paper does not block the Exit Sensor (PC7) even after the lapse of a predetermined period of time after the Registration Roller Solenoid (SL2) has been
energized.
The Exit Sensor (PC7) is unblocked within a predetermined period of time after it
has been blocked by the paper.
The Main Motor, Polygon Motor, and Rack Motor are energized even after the
lapse of a predetermined period of time after paper information has been created.
Detection of paper The Exit Sensor (PC7) is blocked when the Power Switch is turned ON, a cover is
left in fusing section opened and closed, or a misfeed or malfunction is reset.
B. Action
Relevant Electrical Parts
Exit Sensor (PC7)
Registration Roller Solenoid (SL2)
Mechanical Control Board (PWB-A)
Print Control Board (PWB-P)
WIRING DIAGRAM
Troubleshooting
Step
128
Action
Control Signal
Location
(Electrical
Component)
1
Initial check items.
-
-
2
Check the PWB-P connector for proper connection and correct as necessary.
-
-
3
Check the PWB-A connector for proper connection and correct as necessary.
-
-
4
PC7 sensor check.
5
SL2 operation check.
6
7
PWB-A PJ6A-3 (ON)
2-D
PWB-A PJ11A-4 (REM)
2-C
Change PWB-P.
-
-
Change PWB-A.
-
-
16.4.5
16. Jam Display
Misfeed at exit section
A. Detection Timing
Type
Description
Detection of
misfeed at exit
section
The Exit Sensor (PC7) is not unblocked even after the lapse of a predetermined
period of time after it has been blocked by the paper.
Detection of paper
left in exit section
The Exit Sensor (PC7) is blocked when the Power Switch is turned ON, a cover is
opened and closed, or a misfeed or malfunction is reset.
magicolor 2400W
magicolor 2430 DL
magicolor 2450
Field Service Ver. 4.0 Feb. 2006
B. Action
Relevant Electrical Parts
Exit Sensor (PC7)
Mechanical Control Board (PWB-A)
WIRING DIAGRAM
Step
Action
Control Signal
Location
(Electrical
Component)
1
Initial check items.
-
-
2
Check the PWB-A connector for proper connection and correct as necessary.
-
-
3
PC7 sensor check.
4
SL2 operation check.
5
Change PWB-A.
16.4.6
PWB-A PJ6A-3 (ON)
2-D
PWB-A PJ11A-4 (REM)
2-C
-
-
Undefined misfeed
A. Detection Timing
Type
Detection of
undefined misfeed
Description
Conflicting settings are made in the printer driver.
Relevant Electrical Parts
Print Control Board (PWB-P)
Mechanical Control Board (PWB-A)
WIRING DIAGRAM
Step
Action
Control Signal
Location
(Electrical
Component)
1
Check printer driver settings.
-
-
2
Check the PWB-P connector for proper connection and correct as necessary.
-
-
3
Check the PWB-A connector for proper connection and correct as necessary.
-
-
4
Change PWB-P.
-
-
5
Change PWB-A.
-
-
129
Troubleshooting
B. Action
magicolor 2400W
magicolor 2430 DL
magicolor 2450
17. Error Codes
Field Service Ver. 4.0 Feb. 2006
17. Error Codes
17.1 Trouble code
• When a malfunction occurs, the printer shows the corresponding trouble status by
means of the Error indicator on the control panel or LCD display.
17.1.1
Indication of the Error indicator (magicolor 2400W)
• The CPU circuit of the printer performs a self-diagnostics procedure. If a faulty condition
is encountered, the Error indicator blinks twice a second.
☞ For details of the Error indicator, see “Adjustment/Setting”.
4139fs4502c0
Troubleshooting
A. Check the Trouble Code
• If trouble status is displayed by the Error indicator, the corresponding trouble code can be
checked in the Status Display on the PC connected to the printer.
4139fs4504e0
130
17.1.2
17. Error Codes
Indication of the LCD display (magicolor 2430 DL)
• The printer’s CPU performs a self-diagnostics function that, on detecting a malfunction,
gives the corresponding trouble code and maintenance call mark on the Control Panel.
magicolor 2400W
magicolor 2430 DL
magicolor 2450
Field Service Ver. 4.0 Feb. 2006
4139F4E503DA
2 17.1.3
Indication of the LCD display (magicolor 2450)
• The printer’s CPU performs a self-diagnostics function that, on detecting a malfunction,
gives the corresponding trouble code and maintenance call mark on the Control Panel.
4139F4E501DA
Code
Trouble code list
Item
04
Mechanical Control Board
malfunction
05
Flash ROM malfunction
Detection Timing
• Communications with the M/C expansion IO G/A (IC on
the Mechanical Control Board) are not properly carried
out.
• Firmware upgrading has failed.
• The Motor Lock signal remains HIGH for a predetermined consecutive period of time while the Main Motor
remains energized.
08
Main Motor malfunction
0B
Ventilation Fan Motor malfunction
• The Fan Motor Lock signal remains HIGH for a predetermined consecutive period of time while the Ventilation Fan Motor remains energized.
0C
Power Supply Cooling Fan Motor
malfunction
• The Fan Motor Lock signal remains HIGH for a predetermined consecutive period of time while the Power
Supply Cooling Fan Motor remains energized.
0F
Duplex Cooling Fan Motor
malfunction
• The Fan Motor Lock signal remains HIGH for a predetermined consecutive period of time while the Power
Supply Cooling Fan Motor remains energized.
☞ For details, see the Duplex Option Service Manual.
• The Motor Lock signal remains LOW for a predetermined consecutive period of time while the Main Motor
remains deenergized.
131
Troubleshooting
17.1.4
magicolor 2400W
magicolor 2430 DL
magicolor 2450
17. Error Codes
Code
10
12
Field Service Ver. 4.0 Feb. 2006
Item
Polygon Motor malfunction
Laser malfunction
Detection Timing
• A LOW Motor Lock signal is not detected even after the
lapse of a predetermined period of time after the Polygon Motor has been started.
• The Motor Lock signal remains HIGH for a predetermined consecutive period of time while the Polygon
Motor remains energized.
• The SOS signal is not detected within a predetermined
period of time after the output of a laser has been
started.
• The SOS signal is never detected in the image area.
• The state of the Retraction Position Sensor/2nd Image
Transfer is not changed from the unblocked to blocked
state even after the lapse of a predetermined period of
time during predrive.
14
2nd image transfer pressure
/retraction failure
• The Retraction Position Sensor/2nd Image Transfer is
in the unblocked state even after the lapse of a predetermined period of time during predrive.
• The Retraction Position Sensor/2nd Image Transfer is
not blocked (roller in the retracted position) within a predetermined period of time after the retraction sequence
of the 2nd Transfer Roller has been started.
• The Retraction Position Sensor/2nd Image Transfer is
not unblocked (roller in the pressed position) within a
predetermined period of time after the pressure
sequence of the 2nd Transfer Roller has been started.
• The state of the Retraction Position Sensor/Cleaning
Blade is not changed from the blocked to unblocked
state even after the lapse of a predetermined period of
time during predrive.
Cleaning Blade pressure
/retraction failure
Troubleshooting
15
• The Retraction Position Sensor/Cleaning Blade is in the
blocked state even after the lapse of a predetermined
period of time during predrive.
• The Retraction Position Sensor/Cleaning Blade is not
unblocked (blade in the retracted position) within a predetermined period of time after the retraction sequence
of the Cleaning Blade has been started.
• The Retraction Position Sensor/Cleaning Blade is not
blocked (blade in the pressed position) within a predetermined period of time after the pressure sequence of
the Cleaning Blade has been started.
16
132
Transfer Belt rotation failure
• The Belt Positioning Sensor does not detect the Transfer Belt position detection hole a second time even after
the lapse of a predetermined period of time after it has
detected one while the Transfer Belt is rotated.
Code
Item
17. Error Codes
Detection Timing
• The Rack Positioning Sensor is in the blocked state
when the Rack Motor remains deenergized.
• The Rack Positioning Sensor is not blocked a second
time even after the lapse of a predetermined period of
time after it has been blocked once while the Rack
Motor remains energized.
17
Rack rotation failure
magicolor 2400W
magicolor 2430 DL
magicolor 2450
Field Service Ver. 4.0 Feb. 2006
• The Rack Positioning Sensor is unable to detect the
deceleration control position after the lapse of a given
period of time after the Rack Motor has started while
the Rack Motor is turning.
3
18
Heating Roller warm-up failure
• The Thermistor does not detect a predetermined temperature value even after the lapse of a predetermined
period of time after the current warm-up cycle has been
started and the current warm-up cycle is thus not completed.
19
Abnormally low Heating Roller
temperature
• The temperature detected by the Thermistor remains
lower than a predetermined value for a predetermined
period of time.
1A
Abnormally high Heating Roller
temperature
• The temperature detected by the Thermistor is a predetermined value or higher for a predetermined period of
time.
1B
Faulty Thermistor
• The condition of a temperature rise of less than 1°C
extends continuously for a predetermined period of
time that begins when the warm-up cycle is started.
21
Faulty OHP Sensor
• It is determined that the OHP Sensor is faulty through a
check made at the end of the predrive.
23
Faulty Waste Toner Near Full
Detection Board
• It is determined that the LED and photoreceiver are
faulty through a check made when a new Drum Cartridge is detected.
24
Faulty Fusing Thermistor Resistor
• The Heater Lamp remains ON for a predetermined
consecutive period of time.
Trouble related to security
• Contact the responsible people of KONICA MINOLTA
when not returning in power switch OFF/ON.
29
2A
2B
2C
17.2 How to reset
• To reset the printer after a malfunction has occurred, turn the Power Switch OFF and
then ON again.
133
Troubleshooting
• The count value of the edge of ON signal of the Rack
Positioning Sensor during each developing positions
are not a predetermined value while the Rack Motor is
turning.
magicolor 2400W
magicolor 2430 DL
magicolor 2450
17. Error Codes
Field Service Ver. 4.0 Feb. 2006
17.3 Solution
17.3.1
04: Mechanical Control Board malfunction
Relevant Electrical Parts
Mechanical Control Board (PWB-A)
WIRING DIAGRAM
Step
Action
Control Signal
Location
(Electrical
Component)
1
Check the PWB-A connector for proper connection and correct as necessary.
-
-
2
Change PWB-A.
-
-
17.3.2
05: Flash ROM malfunction
Relevant Electrical Parts
Mechanical Control Board (PWB-A)
WIRING DIAGRAM
Step
Action
Control Signal
Location
(Electrical
Component)
1
Check the PWB-A connector for proper connection and correct as necessary.
-
-
2
Change PWB-A.
-
-
17.3.3
08: Main Motor malfunction
Relevant Electrical Parts
Troubleshooting
Main Motor (M1)
Mechanical Control Board (PWB-A)
Power Unit (PU)
WIRING DIAGRAM
Step
134
Action
Control Signal
Location
(Electrical
Component)
1
Check the M1 connector for proper connection
and correct as necessary.
-
-
2
Check M1 for proper drive coupling and correct
as necessary.
-
-
3
Check the PWB-A connector for proper connection and correct as necessary.
-
-
4
M1 operation check.
PWB-A PJ8A-5 (REM)
PWB-A PJ8A-8 (LOCK)
2-G∼H
5
Change PWB-A.
-
-
6
Change PU.
-
-
Field Service Ver. 4.0 Feb. 2006
08: Ventilation Fan Motor malfunction
magicolor 2400W
magicolor 2430 DL
magicolor 2450
17.3.4
17. Error Codes
Relevant Electrical Parts
Ventilation Fan Motor (M6)
Mechanical Control Board (PWB-A)
Power Unit (PU)
WIRING DIAGRAM
Step
Action
Control Signal
Location
(Electrical
Component)
1
Check the M6 connector for proper connection
and correct as necessary.
-
-
2
Check the fan for possible overload and correct
as necessary.
-
-
3
Check the PWB-A connector for proper connection and correct as necessary.
-
-
4
M6 operation check.
PWB-A PJ10A-1 (REM)
PWB-A PJ10A-3 (LOCK)
2-H
5
Change PWB-A.
-
-
6
Change PU.
-
-
17.3.5
0C: Power Supply Cooling Fan Motor malfunction
Relevant Electrical Parts
Power Supply Cooling Fan Motor (M4)
Mechanical Control Board (PWB-A)
Power Unit (PU)
WIRING DIAGRAM
Action
Control Signal
Location
(Electrical
Component)
1
Check the M4 connector for proper connection
and correct as necessary.
-
-
2
Check the fan for possible overload and correct
as necessary.
-
-
3
Check the PWB-A connector for proper connection and correct as necessary.
-
-
4
M4 operation check.
PWB-A PJ4A-1 (REM)
PWB-A PJ4A-3 (LOCK)
7-D
5
Change PWB-A.
-
-
6
Change PU.
-
-
Troubleshooting
Step
135
magicolor 2400W
magicolor 2430 DL
magicolor 2450
17. Error Codes
17.3.6
Field Service Ver. 4.0 Feb. 2006
10: Polygon Motor malfunction
Relevant Electrical Parts
PH Unit
Mechanical Control Board (PWB-A)
WIRING DIAGRAM
Step
Action
Control Signal
Location
(Electrical
Component)
-
-
1
Check the cable and connector for proper connection and correct as necessary.
2
Change PH Unit.
-
-
3
Change PWB-A.
-
-
17.3.7
12: Laser malfunction
Relevant Electrical Parts
PH Unit
Mechanical Control Board (PWB-A)
WIRING DIAGRAM
Troubleshooting
Step
136
Action
Control Signal
Location
(Electrical
Component)
-
-
1
Check the cable and connector for proper connection and correct as necessary.
2
Change PH Unit.
-
-
3
Change PWB-A.
-
-
Field Service Ver. 4.0 Feb. 2006
14: 2nd image transfer pressure/retraction failure
magicolor 2400W
magicolor 2430 DL
magicolor 2450
17.3.8
17. Error Codes
Relevant Electrical Parts
Retraction Position Sensor /2nd Image Transfer
Mechanical Control Board (PWB-A)
(PC5)
Pressure/Retraction Solenoid /2nd Image Transfer
(SL4)
Main Motor (M1)
WIRING DIAGRAM
Step
Action
Control Signal
Location
(Electrical
Component)
Check the M1 connector for proper connection
and correct as necessary.
-
-
2
Check M1 for proper drive coupling and correct
as necessary.
-
-
3
Check the SL4 connector for proper connection
and correct as necessary.
-
-
4
Check the PWB-A connector for proper connection and correct as necessary.
-
-
5
PC5 sensor check.
PWB-A PJ14A-3 (ON)
2-G
6
SL4 operation check.
PWB-A PJ11A-2 (REM)
2-G
7
M1 operation check.
PWB-A PJ8A-5 (REM)
PWB-A PJ8A-8 (LOCK)
2-G∼H
8
Change PWB-A.
-
-
Troubleshooting
1
137
magicolor 2400W
magicolor 2430 DL
magicolor 2450
17. Error Codes
17.3.9
Field Service Ver. 4.0 Feb. 2006
15: Cleaning Blade pressure/retraction failure
Relevant Electrical Parts
Retraction Position Sensor /Cleaning Blade (PC6) Mechanical Control Board (PWB-A)
Pressure/Retraction Solenoid /Cleaning Blade
(SL3)
Main Motor (M1)
WIRING DIAGRAM
Step
Action
Control Signal
Location
(Electrical
Component)
1
Check the M1 connector for proper connection
and correct as necessary.
-
-
2
Check M1 for proper drive coupling and correct
as necessary.
-
-
3
Check the SL3 connector for proper connection
and correct as necessary.
-
-
4
Check the PWB-A connector for proper connection and correct as necessary.
-
-
5
PC6 sensor check.
PWB-A PJ9A-11 (ON)
2-F
6
SL3 operation check.
PWB-A PJ10-5 (REM)
2-F
7
M1 operation check.
PWB-A PJ8A-5 (REM)
PWB-A PJ8A-8 (LOCK)
2-G∼H
8
Change PWB-A.
-
-
17.3.10
16: Transfer Belt rotation failure
Relevant Electrical Parts
Belt Positioning Sensor (PC4)
Image Transfer Belt Unit
Mechanical Control Board (PWB-A)
WIRING DIAGRAM
Troubleshooting
Step
138
Action
Control Signal
Location
(Electrical
Component)
-
-
1
Check the PWB-A connector for proper connection and correct as necessary.
2
PC4 sensor check.
PWB-A PJ9A-8 (ON)
2-E
3
Change Transfer Belt Unit.
-
-
4
Change PWB-A.
-
-
Field Service Ver. 4.0 Feb. 2006
17: Rack rotation failure
magicolor 2400W
magicolor 2430 DL
magicolor 2450
17.3.11
17. Error Codes
Relevant Electrical Parts
Rack Motor (M2)
Rack Positioning Sensor (PC3)
Mechanical Control Board (PWB-A)
WIRING DIAGRAM
Step
Action
Control Signal
Location
(Electrical
Component)
1
Check the M2 connector for proper connection
and correct as necessary.
-
-
2
Check M2 for proper drive coupling and correct
as necessary.
-
-
3
Check the PWB-A connector for proper connection and correct as necessary.
-
-
4
PC3 sensor check.
PWB-A PJ5A-11 (ON)
4-C
5
M2 operation check.
PWB-A PJ5A-1∼4
(Pulse Output)
4-B
6
Change PWB-A.
-
-
17.3.12
18: Heating Roller warm-up failure
17.3.13
19: Abnormally low Heating Roller temperature
17.3.14
1A: Abnormally high Heating Roller temperature
17.3.15
1B: Faulty Thermistor
Relevant Electrical Parts
Fusing Unit
Mechanical Control Board (PWB-A)
Power Unit (PU)
Action
Control Signal
Location
(Electrical
Component)
1
Check the Fusing Unit for correct installation
(whether it is secured in position).
-
-
2
Check the Fusing Unit, PU, and PWB-A for
proper connection and correct as necessary.
-
-
3
Check the lever of the Safety Switch and correct
as necessary.
-
-
4
Change the Fusing Unit.
-
-
5
Change PWB-A.
-
-
6
Change PU.
-
-
139
Troubleshooting
WIRING DIAGRAM
Step
17. Error Codes
magicolor 2400W
magicolor 2430 DL
magicolor 2450
17.3.16
Field Service Ver. 4.0 Feb. 2006
21: Faulty OHP Sensor
Relevant Electrical Parts
OHP Sensor (PC2A)
Mechanical Control Board (PWB-A)
WIRING DIAGRAM
Step
Control Signal
Location
(Electrical
Component)
-
-
PWB-A PJ12A-6 (ON)
2-D
-
-
Action
1
Check the PWB-A connector for proper connection and correct as necessary.
2
PC2A sensor check.
3
Change PWB-A.
17.3.17
23: Faulty Waste Toner Near Full Detection Board
Relevant Electrical Parts
Waste Toner Near Full Detection Board (PWB-C)
Drum Cartridge
Mechanical Control Board (PWB-A)
WIRING DIAGRAM
Control Signal
Location
(Electrical
Component)
Check the PWB-C connector for proper connection and correct as necessary.
-
-
2
Check the PWB-A connector for proper connection and correct as necessary.
-
-
3
Change the Drum Cartridge.
-
-
4
Change PWB-C.
-
-
5
Change PWB-A.
-
-
Step
Action
1
Troubleshooting
3
140
Field Service Ver. 4.0 Feb. 2006
18. Power Supply Errors
magicolor 2400W
magicolor 2430 DL
magicolor 2450
18. Power Supply Errors
18.1 Machine is not energized at all (PU operation check)
Relevant Electrical Parts
Power Switch
Mechanical Control Board (PWB-A)
Step
Power Unit (PU)
Check Item
1
Is the power source voltage being applied to
CN1 on PU?
2
Are fuses (F1 and F2) on PU conducting?
3
Are DC24 V and DC5 V being applied to PJ2A
on the Mechanical Control Board?
Location
(Electrical
Component)
Result
7-C
NO
4-E
Action
Check wiring from
power outlet to PG1 to
CN1.
NO
Change PU.
NO
Change PU.
YES
Change PWB-A.
18.2 Control panel indicators do not light
Relevant Electrical Parts
Step
Check Item
Power Unit (PU)
Location
(Electrical
Component)
Result
7-C
NO
Action
Check wiring from
power outlet to PG1 to
CN1.
1
Is the power source voltage being applied to
CN1 on PU?
2
Are fuses (F1 and F2) on PU conducting?
-
NO
Change PU.
3
Is PJ104P on PWB-P properly connected?
8-G
NO
Reconnect.
4
Is PJ10P on PWB-OP properly connected?
9-A
NO
Reconnect.
YES
Change PWB-OP.
Change PWB-P.
Troubleshooting
Print Control Board (PWB-P)
Control Panel (PWB-OP)
141
magicolor 2400W
magicolor 2430 DL
magicolor 2450
18. Power Supply Errors
Field Service Ver. 4.0 Feb. 2006
18.3 Fusing heaters do not operate
Relevant Electrical Parts
Safety Switch (S2)
Fusing Unit
Troubleshooting
Step
142
Power Unit (PU)
Check Item
Location
(Electrical
Component)
Result
NO
1
Is the power source voltage being applied to
CN1 on PU?
The Top Cover and Front Cover should in
closed position at this time.
7-C
2
Is the power source voltage being applied to
CN2 on PU?
7-B
Action
Check wiring from
power outlet to PG1 to
CN1.
YES
Change the Fusing Unit.
NO
Change PU.
19. Miscellaneous Errors
19. Miscellaneous Errors
19.1 List of miscellaneous malfunctions
Message
in the Status Display
Fatal Error Engine I/F
• A communication error of some sort has occurred in the USB interface.
ROM Error
• A controller ROM error has been detected.
SDRAM Error
• An SDRAM read or write error has been detected.
Fatal Error EEPROM
• Writing to the parameter chip has failed.
Fatal Error Data
Decompression
• Data decompression has failed due to an error in print data.
Fatal Error Non-Supported
Engine
• A connection is made to an unsupported engine controller.
Fatal Error AIDC Sensor
• An error has occurred in the AIDC Sensor.
Controller Internal Error
• A control error has been detected in the printer.
Fatal Error DBE
• There is an abnormal condition at N4DBE (DBE: Dual Beam Embedded) on the Print Control Board.
Fatal Error Video Transfer
• It failed to write data while transferring printed data.
Fatal Print Spooler Error
• Communication error with the printed data.
Troubleshooting
3
Description
magicolor 2400W
magicolor 2430 DL
magicolor 2450
Field Service Ver. 4.0 Feb. 2006
143
19. Miscellaneous Errors
Field Service Ver. 4.0 Feb. 2006
magicolor 2400W
magicolor 2430 DL
magicolor 2450
19.2 Fatal error engine I/F
Relevant Electrical Parts
Print Control Board (PWB-P)
Mechanical Control Board (PWB-A)
WIRING DIAGRAM
Step
3
Action
Control Signal
Location
(Electrical
Component)
1
Turn OFF the Power Switch, wait for 10 sec. or
more, and turn ON the Power Switch.
-
-
2
Check the USB cable for proper connection and
correct as necessary.
-
-
3
Check the PWB-P connector for proper connection and correct as necessary.
-
-
4
Check the PWB-A connector for proper connection and correct as necessary.
-
-
5
Change PWB-P.
-
-
6
Change PWB-A.
-
-
19.3 ROM error
Relevant Electrical Parts
Print Control Board (PWB-P)
WIRING DIAGRAM
Step
Troubleshooting
3
144
Action
Control Signal
Location
(Electrical
Component)
1
Turn OFF the Power Switch, wait for 10 sec. or
more, and turn ON the Power Switch.
-
-
2
Check the PWB-P connector for proper connection and correct as necessary.
-
-
3
Change PWB-P.
-
-
Field Service Ver. 4.0 Feb. 2006
19. Miscellaneous Errors
magicolor 2400W
magicolor 2430 DL
magicolor 2450
19.4 SDRAM error
Relevant Electrical Parts
Mechanical Control Board (PWB-A)
Print Control Board (PWB-P)
WIRING DIAGRAM
Step
3
Action
Control Signal
Location
(Electrical
Component)
1
Turn OFF the Power Switch, wait for 10 sec. or
more, and turn ON the Power Switch.
-
-
2
Check the PWB-A connector for proper connection and correct as necessary.
-
-
3
Check the PWB-P connector for proper connection and correct as necessary.
-
-
4
Change PWB-A.
-
-
5
Change PWB-P.
-
-
19.5 Fatal error EEPROM
Relevant Electrical Parts
Mechanical Control Board (PWB-A)
Print Control Board (PWB-P)
Parameter Chip
WIRING DIAGRAM
3
Action
Control Signal
Location
(Electrical
Component)
1
Turn OFF the Power Switch, wait for 10 sec. or
more, and turn ON the Power Switch.
-
-
2
Check the PWB-A connector for proper connection and correct as necessary.
-
-
3
Check Parameter Chip (PJ26) on PWB-A for
proper connection and correct as necessary.
-
-
4
Check the PWB-P connector for proper connection and correct as necessary.
-
-
5
Change the Parameter Chip.
-
-
6
Change PWB-A.
-
-
7
Change PWB-P.
-
-
Troubleshooting
Step
145
19. Miscellaneous Errors
Field Service Ver. 4.0 Feb. 2006
magicolor 2400W
magicolor 2430 DL
magicolor 2450
19.6 Fatal error data decompression
Relevant Electrical Parts
Print Control Board (PWB-P)
WIRING DIAGRAM
Step
3
Action
Control Signal
Location
(Electrical
Component)
1
Turn OFF the Power Switch, wait for 10 sec. or
more, and turn ON the Power Switch.
-
-
2
Check the PWB-P connector for proper connection and correct as necessary.
-
-
3
Change PWB-P.
-
-
19.7 Fatal error non-supported engine
Relevant Electrical Parts
Mechanical Control Board (PWB-A)
Print Control Board (PWB-P)
WIRING DIAGRAM
Step
Troubleshooting
3
146
Action
Control Signal
Location
(Electrical
Component)
1
Turn OFF the Power Switch, wait for 10 sec. or
more, and turn ON the Power Switch.
-
-
2
Check to see if PWB-A is compatible with the
printer.
-
-
3
Check the PWB-A connector for proper connection and correct as necessary.
-
-
4
Check the PWB-P connector for proper connection and correct as necessary.
-
-
5
Change PWB-A.
-
-
6
Change PWB-P.
-
-
Field Service Ver. 4.0 Feb. 2006
19. Miscellaneous Errors
magicolor 2400W
magicolor 2430 DL
magicolor 2450
19.8 Fatal error AIDC Sensor
Relevant Electrical Parts
AIDC Sensor (AIDC)
Mechanical Control Board (PWB-A)
WIRING DIAGRAM
Step
3
Action
Control Signal
Location
(Electrical
Component)
1
Turn OFF the Power Switch, wait for 10 sec. or
more, and turn ON the Power Switch.
-
-
2
Check the AIDC connector for proper connection
and correct as necessary.
-
-
3
Check the PWB-A connector for proper connection and correct as necessary.
-
-
4
AIDC sensor check.
-
-
5
Change AIDC.
6
Change PWB-A.
-
-
19.9 Controller internal error
Relevant Electrical Parts
Print Control Board (PWB-P)
WIRING DIAGRAM
Step
Action
Control Signal
Location
(Electrical
Component)
1
Check the PWB-P connector for proper connection and correct as necessary.
-
-
2
Change PWB-P.
-
-
Troubleshooting
19.10 Fatal error DBE
Relevant Electrical Parts
Print Control Board (PWB-P)
WIRING DIAGRAM
Step
3
Action
Control Signal
Location
(Electrical
Component)
1
Turn OFF the Power Switch, wait for 10 sec. or
more, and turn ON the Power Switch.
-
-
2
Check the PWB-P connector for proper connection and correct as necessary.
-
-
3
Change PWB-P.
-
-
147
19. Miscellaneous Errors
Field Service Ver. 4.0 Feb. 2006
magicolor 2400W
magicolor 2430 DL
magicolor 2450
19.11 Fatal error video transfer
Relevant Electrical Parts
Print Control Board (PWB-P)
WIRING DIAGRAM
Step
3
Action
Control Signal
Location
(Electrical
Component)
1
Turn OFF the Power Switch, wait for 10 sec. or
more, and turn ON the Power Switch.
-
-
2
Check the PWB-P connector for proper connection and correct as necessary.
-
-
3
Change PWB-P.
-
-
19.12 Fatal print spooler error
Relevant Electrical Parts
Print Control Board (PWB-P)
WIRING DIAGRAM
Step
Troubleshooting
3
148
Action
Control Signal
Location
(Electrical
Component)
1
Turn OFF the Power Switch, wait for 10 sec. or
more, and turn ON the Power Switch.
-
-
2
Check the PC and the Printer for proper connection, and correct as necessary.
-
-
3
Change PWB-P.
-
-
Field Service Ver. 4.0 Feb. 2006
20. Image Quality Problems
magicolor 2400W
magicolor 2430 DL
magicolor 2450
20. Image Quality Problems
20.1 Solution
20.1.1
White lines in FD, white bands in FD, colored lines in FD, and colored
bands in FD
A. Typical faulty images
White lines in FD
White bands in FD
Colored lines in FD
4036fs4022c0
4036fs4021c0
Colored bands in FD
4036fs4023c0
4036fs4024c0
B. Troubleshooting procedure
Section
1
2
Check Item
Result
Are there scratches or lines evident on the photo conductor surface?
YES
Replace the Drum Cartridge.
YES
Clean.
3
Is the connector or contact terminal of the Drum Cartridge connected properly?
NO
Clean the contact terminal or
reconnect the connector.
4
Is the connector or contact terminal of the PH Unit connected
properly?
NO
Clean the contact terminal or
reconnect the connector.
5
Is the window surface dirty?
YES
Clean.
6
Is the Transfer Belt dirty with fingerprints or oil?
YES
Clean.
Is the Transfer Belt dirty or
scratched?
YES
Wipe the surface clean of dirt with
a soft cloth.
Replace the scratched Transfer
Belt with a new Transfer Belt Unit.
Is the 2nd Transfer Roller dirty or
scratched?
YES
Replace the 2nd Transfer Roller.
Is there a foreign object in the
paper path?
YES
Remove the foreign object.
Is the Fusing Entrance Guide
Plate dirty or scratched?
YES
Clean.
Replace the Fusing Unit.
11
Is the Separation Claw dirty?
YES
Replace the Fusing Unit.
12
Have steps 1-11 eliminated the
problem?
NO
Replace the Toner Cartridge.
→ Replace the PH Unit.
7
Drum Cartridge Is the outside dirty?
Action
PH Unit
Transfer Belt Unit
8
9
10
Paper path
Fusing Unit
149
Troubleshooting
Step
magicolor 2400W
magicolor 2430 DL
magicolor 2450
20. Image Quality Problems
20.1.2
Field Service Ver. 4.0 Feb. 2006
White lines in CD, white bands in CD, colored lines in CD, and colored
bands in CD
A. Typical faulty images
White lines in CD
White bands in CD
Colored lines in CD
4036fs4026c0
4036fs4025c0
Colored bands in CD
4036fs4028c0
4036fs4027c0
B. Troubleshooting procedure
Step
Section
1
2
Check Item
Result
Are there scratches or lines evident on the photo conductor surface?
YES
Replace the Drum Cartridge.
Drum Cartridge Is the outside dirty?
3
Action
YES
Clean.
Is the connector or contact terminal of the Drum Cartridge connected properly?
NO
Clean the contact terminal or
reconnect the connector.
4
Toner Cartridge
Is the developing bias contact terminal in good contact?
NO
Clean the contact terminal or
check the terminal position.
5
PH Unit
Is the connector or contact terminal of the PH Unit connected
properly?
NO
Clean the contact terminal or
reconnect the connector.
Is the Transfer Belt dirty or
scratched?
YES
Wipe the surface clean of dirt with
a soft cloth.
Replace the scratched Transfer
Belt with a new Transfer Belt Unit.
Is the 2nd Transfer Roller dirty or
scratched?
YES
Replace the 2nd Transfer Roller.
Is there a foreign object in the
paper path?
YES
Remove the foreign object.
Is the Fusing Entrance Guide
Plate dirty or scratched?
YES
Clean.
10
Is the Separation Claw dirty.
YES
Replace the Fusing Unit.
11
Have steps 1-10 eliminated the
problem?
NO
Replace the Power Unit.
6
Troubleshooting
Transfer Belt Unit
7
8
9
150
Paper path
Fusing Unit
Field Service Ver. 4.0 Feb. 2006
Uneven density in FD
magicolor 2400W
magicolor 2430 DL
magicolor 2450
20.1.3
20. Image Quality Problems
A. Typical faulty images
4036fs4043c0
4036fs4044c0
4036fs4045c0
B. Troubleshooting procedure
Step
1
Section
Check Item
Are there scratches or lines evident on the photo conductor surDrum Cartridge face?
YES
Action
Replace the Drum Cartridge.
Is the outside dirty?
YES
Clean.
Is the window surface dirty?
YES
Clean.
Is the Transfer Belt dirty or
scratched?
YES
Wipe the surface clean of dirt with
a soft cloth.
Replace the scratched Transfer
Belt with a new Transfer Belt Unit.
5
Is the terminal dirty?
YES
Clean.
6
Is the 2nd Transfer Roller dirty or
scratched?
YES
Replace the 2nd Transfer Roller.
7
Have steps 1-6 eliminated the
problem?
NO
Replace the Toner Cartridge.
→ Replace the PH Unit.
→ Replace High Voltage Unit.
3
PH Unit
4
Transfer Belt Unit
Troubleshooting
2
Result
151
magicolor 2400W
magicolor 2430 DL
magicolor 2450
20. Image Quality Problems
20.1.4
Field Service Ver. 4.0 Feb. 2006
Uneven density in CD
A. Typical faulty images
4036fs4046c0
4036fs4047c0
B. Troubleshooting procedure
Step
1
Section
Troubleshooting
Result
Action
YES
Replace the Drum Cartridge.
2
Is the outside dirty?
YES
Clean.
3
Is the contact on the rail of the
Transfer Belt Unit in good contact
with the mating part?
NO
Check or correct contact.
4
Is the Transfer Belt dirty with fingerprints or oil?
YES
Clean.
5
Is the Transfer Belt dirty or
scratched?
YES
Wipe the surface clean of dirt with
a soft cloth.
Replace the scratched Transfer
Belt with a new Transfer Belt Unit.
6
Is the terminal dirty?
YES
Clean.
7
Is the 2nd Transfer Roller dirty or
scratched?
YES
Replace the 2nd Transfer Roller.
8
Have steps 1-7 eliminated the
problem?
NO
Replace the Toner Cartridge.
→ Replace High Voltage Unit.
Transfer Belt Unit
152
Check Item
Are there scratches or lines evident on the photo conductor surDrum Cartridge face?
Field Service Ver. 4.0 Feb. 2006
Low image density
magicolor 2400W
magicolor 2430 DL
magicolor 2450
20.1.5
20. Image Quality Problems
A. Typical faulty images
ABCDE
ABCDE
ABCDE
ABCDE
ABCDE
4036fs4036c0
B. Troubleshooting procedure
1
2
3
Section
Check Item
Drum Cartridge Is the outside dirty?
PH Unit
Is the window surface dirty?
Is the contact on the rail of the
Transfer Belt Unit in good contact
Transfer Belt Unit with the mating part?
4
Result
Action
YES
Clean.
YES
Clean.
NO
Check or correct contact.
Is the contact dirty?
YES
Clean.
5
2nd Transfer
Roller
Is the contact dirty?
YES
Clean.
6
Paper
Is the paper damp?
YES
Replace the paper with new
paper that has just been
unwrapped.
7
AIDC Sensor
Is the sensor dirty?
YES
Clean.
NO
Replace the Toner Cartridge.
→ Replace the Transfer Belt Unit.
→ Replace the 2nd Transfer
Roller.
→ Replace the PH Unit.
→ Replace the AIDC Sensor.
→ Replace the Mechanical
Control Board.
→ Replace the High Voltage Unit.
8
Have steps 1-7 eliminated the
problem?
153
Troubleshooting
Step
magicolor 2400W
magicolor 2430 DL
magicolor 2450
20. Image Quality Problems
20.1.6
Field Service Ver. 4.0 Feb. 2006
Gradation reproduction failure
A. Typical faulty images
4036fs4048c0
4036fs4049c0
B. Troubleshooting procedure
Step
1
2
PH Unit
3
AIDC Sensor
Troubleshooting
4
154
Section
Check Item
Drum Cartridge Is the outside dirty?
Result
YES
Action
Clean.
Is the window surface dirty?
YES
Clean.
Is the sensor dirty?
YES
Clean.
Have steps 1-3 eliminated the
problem?
NO
Replace the Toner Cartridge.
→ Replace the PH Unit.
→ Replace the AIDC Sensor.
→ Replace the High Voltage Unit.
Field Service Ver. 4.0 Feb. 2006
Foggy background
magicolor 2400W
magicolor 2430 DL
magicolor 2450
20.1.7
20. Image Quality Problems
A. Typical faulty images
ABCD
ABCD
ABCD
ABCD
ABCD
4036fs4030c0
B. Troubleshooting procedure
Section
1
2
5
Toner Cartridge
PH Unit
6
7
8
Result
YES
Replace the Drum Cartridge.
Drum Cartridge Is the outside dirty?
3
4
Check Item
Are there scratches or lines evident on the photo conductor surface?
AIDC Sensor
Action
YES
Clean.
Is the connector or contact terminal of the Drum Cartridge connected properly?
NO
Clean the contact terminal or
reconnect the connector.
Is the developing bias contact terminal in good contact?
NO
Clean the contact terminal or
check the terminal position.
Is the connector or contact terminal of the PH Unit connected
properly?
NO
Clean the contact terminal or
reconnect the connector.
Is the window surface dirty?
YES
Clean.
Is the sensor dirty?
YES
Clean.
Have steps 1-7 eliminated the
problem?
NO
Replace the Toner Cartridge.
→ Replace the PH Unit.
→ Replace the AIDC Sensor.
Troubleshooting
Step
155
magicolor 2400W
magicolor 2430 DL
magicolor 2450
20. Image Quality Problems
20.1.8
Field Service Ver. 4.0 Feb. 2006
Poor color reproduction
A. Typical faulty images
4138fs4503c0
B. Troubleshooting procedure
Step
1
2
3
Troubleshooting
4
156
Section
Paper
Check Item
Is the paper damp?
Transfer Belt Unit Is the terminal dirty?
AIDC Sensor
Is the sensor dirty?
Have steps 1-3 eliminated the
problem?
Result
Action
YES
Replace the paper with new
paper that has just been
unwrapped.
YES
Clean.
YES
Clean.
NO
Replace the Transfer Belt Unit.
→ Replace the AIDC Sensor.
→ Replace the Mechanical
Control Board.
→ Replace the High Voltage Unit.
Field Service Ver. 4.0 Feb. 2006
Void areas, white spots
magicolor 2400W
magicolor 2430 DL
magicolor 2450
20.1.9
20. Image Quality Problems
A. Typical faulty images
Void areas
White spots
4036fs4050c0
4036fs4051c0
B. Troubleshooting procedure
Step
1
Section
Check Item
Are there scratches or lines evident on the photo conductor surDrum Cartridge face?
Result
Action
YES
Replace the Drum Cartridge.
Is the outside dirty?
YES
Clean.
3
Is the Transfer Belt dirty with fingerprints or oil?
YES
Clean.
4
Is the Transfer Belt dirty or
scratched?
YES
Wipe the surface clean of dirt with
a soft cloth.
Replace the scratched Transfer
Belt with a new Transfer Belt Unit.
5
Is the 2nd Transfer Roller dirty or
scratched?
YES
Replace the 2nd Transfer Roller.
6
Is the ground terminal connected
properly?
NO
Correct.
7
Is there a foreign object in the
paper path?
YES
Remove the foreign object.
8
Is the Fusing Entrance Guide
Plate dirty or scratched?
YES
Clean or replace.
9
Have steps 1-8 eliminated the
problem?
NO
Replace the Toner Cartridge.
Transfer Belt Unit
Paper path
Troubleshooting
2
157
magicolor 2400W
magicolor 2430 DL
magicolor 2450
20. Image Quality Problems
20.1.10
Field Service Ver. 4.0 Feb. 2006
Colored spots
A. Typical faulty images
Colored spots
AA
4036fs4052c0
B. Troubleshooting procedure
Step
Section
1
Action
NO
Replace the Drum Cartridge.
Drum Cartridge Are there scratches or lines evident on the photo conductor surface?
YES
Replace the Drum Cartridge.
3
Is the Transfer Belt dirty with fingerprints or oil?
YES
Clean.
Is the Transfer Belt dirty or
scratched?
YES
Wipe the surface clean of dirt with
a soft cloth.
Change a scratched Transfer Belt
for a Transfer Belt Unit.
Is the 2nd Transfer Roller dirty or
scratched?
YES
Replace the 2nd Transfer Roller.
Transfer Belt Unit
5
6
Paper path
Is there a foreign object in the
paper path?
YES
Remove the foreign object.
7
Fusing Unit
Is the Fusing Roller dirty or
scratched?
YES
Replace the Fusing Unit.
Have steps 1-7 eliminated the
problem?
NO
Replace the Toner Cartridge.
8
Troubleshooting
Result
2
4
158
Check Item
Are the spots in a single color?
Field Service Ver. 4.0 Feb. 2006
Blurred image
magicolor 2400W
magicolor 2430 DL
magicolor 2450
20.1.11
20. Image Quality Problems
A. Typical faulty images
Blurred image
4036fs4031c0
B. Troubleshooting procedure
Section
1
PH Unit
2
3
Check Item
Is the window surface dirty?
Drum Cartridge Is the outside dirty?
Have steps 1-2 eliminated the
problem?
Result
YES
Action
Clean.
YES
Clean.
NO
Replace the Toner Cartridge.
→ Replace the PH Unit.
Troubleshooting
Step
159
magicolor 2400W
magicolor 2430 DL
magicolor 2450
20. Image Quality Problems
20.1.12
Field Service Ver. 4.0 Feb. 2006
Blank copy, black copy
A. Typical faulty images
Blank print
Black print
4036fs4038c0
4036fs4039c0
B. Troubleshooting procedure
Step
Result
Action
Does a blank print occur?
YES
2
Is the gear of the Drum Cartridge
drive mechanism installed properly?
NO
Check or correct the drive transmitting section or replace the
Drum Cartridge.
3
Drum Cartridge Is the charge corona voltage contact or photo conductor ground
contact of the Drum Cartridge
connected properly?
NO
Check, clean, or correct the contact.
Is the connector connected properly?
NO
Reconnect.
Have steps 1-4 eliminated the
problem?
NO
Replace the High Voltage Unit.
→ Replace the Mechanical Control Board.
→ Replace the PH Unit.
4
5
Troubleshooting
Check Item
Check the PH Unit connector for
proper connection.
1
160
Section
Image check
High Voltage
Unit
Field Service Ver. 4.0 Feb. 2006
Incorrect color image registration
magicolor 2400W
magicolor 2430 DL
magicolor 2450
20.1.13
20. Image Quality Problems
A. Typical faulty images
AA
4036fs4032c0
B. Troubleshooting procedure
Step
Section
Check Item
Result
Action
YES
Clean.
2
Is the Transfer Belt dirty or
scratched?
YES
Wipe the surface clean of dirt with
a soft cloth.
Replace the scratched Transfer
Belt with a new Transfer Belt Unit.
3
Is the drive coupling to the
machine dirty?
YES
Clean.
4
Is the 2nd Transfer Roller dirty or
scratched?
YES
Replace the 2nd Transfer Roller.
5
Is the Drum Cartridge installed in
position?
NO
Reinstall the Drum Cartridge.
6
Is the photo conductor
scratched?
YES
Replace the Drum Cartridge.
7
Have steps 1-6 eliminated the
problem?
NO
Replace the PH Unit.
→ Replace the Mechanical
Control Board.
Transfer Belt Unit
Drum Cartridge
Troubleshooting
1
Is the Transfer Belt dirty with fingerprints or foreign matter?
161
magicolor 2400W
magicolor 2430 DL
magicolor 2450
20. Image Quality Problems
20.1.14
Field Service Ver. 4.0 Feb. 2006
Poor fusing performance, offset
A. Typical faulty images
Poor fusing performance
Offset
CF
CF
CF
4036fs4059c0
4036fs4060c0
B. Troubleshooting procedure
Step
Troubleshooting
Check Item
Result
Action
1
Paper
Does the paper being used conform to specifications?
2
Fusing Unit
Are the fuser separator levers in
the correct position?
NO
Correct.
Have steps 1-2 eliminated the
problem?
NO
Replace the Fusing Unit.
→ Replace the Mechanical
Control Board.
3
162
Section
NO
Replace the paper.
Field Service Ver. 4.0 Feb. 2006
Brush effect, blurred image
magicolor 2400W
magicolor 2430 DL
magicolor 2450
20.1.15
20. Image Quality Problems
A. Typical faulty images
Brush effect
Blurred image
4036fs4061c0
4036fs4031c0
B. Troubleshooting procedure
Step
Section
Check Item
Result
Action
YES
2
Does the paper being used conform to specifications?
NO
Replace the paper.
3
Are there scratches or lines eviDrum Cartridge dent on the photo conductor surface?
YES
Replace the Drum Cartridge.
4
Is the Transfer Belt dirty with fingerprints or oil?
YES
Clean.
Is the Transfer Belt dirty or
scratched?
YES
Wipe the surface clean of dirt with
a soft cloth.
Replace the scratched Transfer
Belt with a new Transfer Belt Unit.
YES
Clean.
NO
Replace the Fusing Unit.
1
Paper
Transfer Belt Unit
5
6
Fusing Unit
Is the Fusing Entrance Guide
Plate dirty?
Troubleshooting
Is the paper damp?
Replace the paper with new
paper that has just been
unwrapped.
163
magicolor 2400W
magicolor 2430 DL
magicolor 2450
20. Image Quality Problems
20.1.16
Field Service Ver. 4.0 Feb. 2006
Back marking
A. Typical faulty images
AA
4036fs4062c0
4036fs4063c0
B. Troubleshooting procedure
Step
Section
Action
Remove the foreign object.
Is the Fusing Entrance Guide
Plate dirty or scratched?
YES
Clean or replace.
3
Is the Fusing Roller scratched or
dirty?
YES
Replace the Fusing Unit.
4
Is the Transfer Belt dirty with fingerprints or foreign matter?
YES
Clean.
5
Is the 2nd Transfer Roller dirty or
scratched?
YES
Replace the 2nd Transfer Roller.
6
Have steps 1-5 eliminated the
problem?
NO
Replace the Transfer Belt Unit.
→ Replace the High Voltage Unit.
Paper path
2
Fusing Unit
Transfer Belt Unit
Troubleshooting
Result
YES
1
164
Check Item
Is there a foreign object in the
paper path?
Field Service Ver. 4.0 Feb. 2006
Uneven pitch
magicolor 2400W
magicolor 2430 DL
magicolor 2450
20.1.17
20. Image Quality Problems
A. Typical faulty images
4138fs4507c0
B. Troubleshooting procedure
Step
1
2
Section
Check Item
Is the Toner Cartridge for each
Toner Cartridge color of toner installed in position?
PH Unit
Result
Action
NO
Reinstall.
NO
Secure it in position.
YES
Clean or replace the Toner Cartridge.
Is the photo conductor dirty,
scratched, or worn?
YES
Replace the Drum Cartridge.
Is the PH Unit secured in position
with the fixing screw?
Is the drive mechanism of the
Toner Cartridge Toner Cartridge dirty or damaged?
4
Drum Cartridge
5
2nd Transfer
Roller
Are the 2nd Transfer Roller and
drive mechanism dirty, deformed,
or worn?
YES
Replace the 2nd Transfer Roller.
6
Fusing Unit
Are the rollers and drive mechanism of the Fusing Unit dirty,
scratched, deformed, or worn?
YES
Replace the Fusing Unit.
Have steps 1-6 eliminated the
problem?
NO
Replace the Transfer Belt Unit.
7
Troubleshooting
3
165
Troubleshooting
magicolor 2400W
magicolor 2430 DL
magicolor 2450
20. Image Quality Problems
166
Field Service Ver. 4.0 Feb. 2006
Field Service Ver. 4.0 Feb. 2006
21. Parts layout drawing
magicolor 2400W
magicolor 2430 DL
magicolor 2450
Appendix
21. Parts layout drawing
21.1 Main Unit
[8]
[1]
[7]
[2]
[6]
[3]
[5]
[4]
4139fs5507c0
[1]
Power Unit (PU)
[5]
High Voltage Unit (HV)
[2]
Control Panel (PWB-OP)
[6]
Waste Toner Near Full Detection Board
(PWB-C)
[3]
USB Board (PWB-USB) *
[7]
Print Control Board (PWB-P)
[4]
PH Unit (PH)
[8]
Mechanical Control Board (PWB-A)
Appendix
2 * Only for the magicolor 2430 DL and magicolor 2450
167
magicolor 2400W
magicolor 2430 DL
magicolor 2450
21. Parts layout drawing
Field Service Ver. 4.0 Feb. 2006
[1]
[2]
[10]
[3]
[9]
[4]
[5]
[6]
[7]
[8]
4139fs5502c0
Fusing Motor (M7)
[6]
Rack Motor (M2)
[2]
Pressure/Retraction Solenoid /Cleaning
Blade (SL3)
[7]
Registration Roller Solenoid (SL2)
[3]
Main Motor (M1)
[8]
Tray1 Paper Pick-up Solenoid (SL1)
[4]
Ventilation Fan Motor (M6)
[9]
Power Supply Cooling Fan Motor (M4)
[5]
Developing Motor (M3)
[10]
Pressure/Retraction Solenoid /2nd Image
Transfer (SL4)
Appendix
[1]
168
21. Parts layout drawing
magicolor 2400W
magicolor 2430 DL
magicolor 2450
Field Service Ver. 4.0 Feb. 2006
[1]
[14]
[13]
[12]
[2]
[11]
[3]
[10]
[9]
[8]
[4]
[7]
[6]
[5]
[1]
Retraction Position Sensor /Cleaning Blade
(PC6)
[8]
Fusing Paper Loop Sensor (PC8)
[2]
Safety Switch (S2)
[9]
Registration Sensor (PC1)
[3]
Rack Positioning Sensor (PC3)
[10]
Belt Positioning Sensor (PC4)
[4]
Temperature/ humidity Sensor (HS1)
[11]
Fusing Safety switch (S3)
[5]
Tray1 Paper Empty Sensor (PC9)
[12]
Exit Sensor (PC7)
[6]
OHP Sensor (PC2A)
[13]
Retraction Position Sensor /2nd Image
Transfer (PC5)
[7]
Power Switch (S1)
[14]
AIDC Sensor (AIDC)
Appendix
4139fs5503c0
169
magicolor 2400W
magicolor 2430 DL
magicolor 2450
21. Parts layout drawing
Field Service Ver. 4.0 Feb. 2006
21.2 Lower Feeder Unit (option)
[1]
[2]
[3]
4056fs5501c0
Lower Feeder Board (PWB-F PF)
[2]
Tray Set Detecting Switch (S4 PF)
Appendix
[1]
1
170
[3]
Lower Feeder Paper Pick-up Solenoid
(SL7 PF)
Field Service Ver. 4.0 Feb. 2006
21. Parts layout drawing
magicolor 2400W
magicolor 2430 DL
magicolor 2450
21.3 Duplex Option (option)
[1]
[8]
[2]
[7]
[3]
[6]
[4]
[5]
4057fs5501c0
Duplex Reverse Motor (M9 DU)
[5]
[2]
Duplex Door Sensor (PC11 DU)
[6]
Duplex Paper Loop Sensor (PC10 DU)
Duplex Board (PWB-A DU)
[3]
Duplex Transport Motor (M8 DU)
[7]
Duplex Transport Sensor (PC12 DU)
[4]
Duplex Registration Solenoid (SL6 DU)
[8]
Duplex Cooling Fan Motor (M10 DU)
Appendix
[1]
171
1
magicolor 2400W
magicolor 2430 DL
magicolor 2450
22. Connector layout drawing
Field Service Ver. 4.0 Feb. 2006
22. Connector layout drawing
Description
Number of Pin
c Possible to confirm by removing external cover.
1 Not possible to confirm by removing external cover.
[1]
[7]
[2]
[3]
[6]
[4]
[5]
4139fs5504c0
CN No.
Location
No.
CN No.
Location
[1]
CN3
2-F
[5]
CN7
2-G
[2]
CN2
2-H
[6]
CN6
2-C
[3]
CN5
2-G
[7]
CN4
2-A
[4]
CN1
2-E∼F
Appendix
No.
172
Field Service Ver. 4.0 Feb. 2006
23. Timing chart
magicolor 2400W
magicolor 2430 DL
magicolor 2450
23. Timing chart
Color A4
Fusing Motor (M7)
Main Motor (M1)
Rack Motor (M2)
Developing
Motor (M3)
Developing Bias/Y
Developing Bias/M
Developing Bias/C
Developing Bias/K
TOD
2nd Image
Transfer Bias
2nd Image Transfer
Pressure/Retraction
Transfer Belt
Cleaner Retraction
1st Image
Transfer Bias
Registration
Roller Sensor (PC1)
Registration
Roller Solenoid (SL2)
Fusing Paper Loop
Sensor (PC8)
Exit Sensor (PC7)
Appendix
4139fs5506e0
173
Field Service Ver. 4.0 Feb. 2006
magicolor 2400W
magicolor 2430 DL
magicolor 2450
23. Timing chart
Appendix
Blank Page
174
SERVICE MANUAL
FIELD SERVICE
Lower Feeder Unit
2005.04
Ver. 2.0
After publication of this service manual, the parts and mechanism may be subject to change for
improvement of their performance.
Therefore, the descriptions given in this service manual may not coincide with the actual machine.
When any change has been made to the descriptions in the service manual, a revised version will be
issued with a revision mark added as required.
Revision mark:
• To indicate clearly a section revised, show 1 to the left of the revised section.
A number within 1 represents the number of times the revision has been made.
• To indicate clearly a section revised, show 1 in the lower outside section of the corresponding page.
A number within 1 represents the number of times the revision has been made.
NOTE
Revision marks shown in a page are restricted only to the latest ones with the old ones deleted.
• When a page revised in Ver. 2.0 has been changed in Ver. 3.0:
The revision marks for Ver. 3.0 only are shown with those for Ver. 2.0 deleted.
• When a page revised in Ver. 2.0 has not been changed in Ver. 3.0:
The revision marks for Ver. 2.0 are left as they are.
2005/04
2.0
—
Change format
2004/09
1.0
—
Issue of the first edition
Date
Service manual Ver.
Revision mark
Descriptions of revision
CONTENTS
General
1.
Product specifications ............................................................................................. 1
1.1
Type ...................................................................................................................... 1
1.2
Paper type ............................................................................................................ 1
Machine specifications.......................................................................................... 1
1.4
Operating environment ......................................................................................... 1
General
1.3
Maintenance
2.
Lower Feeder Unit
Field Service Ver. 2.0 Apr. 2005
Periodic check ......................................................................................................... 3
2.1
Maintenance procedure (Periodic parts check) .................................................... 3
2.1.1
Pick-up Roller................................................................................................ 3
3.1
Disassembly/Adjustment prohibited items ............................................................ 4
3.2
Disassembly/Assembly list (Other parts) .............................................................. 5
3.3
Disassembly/Assembly procedure........................................................................ 5
3.3.1
Lower Feeder Unit......................................................................................... 5
3.3.2
Tray ............................................................................................................... 6
3.3.3
Lower Feeder Rear Cover............................................................................. 6
3.3.4
Lower Feeder Paper Pick-up Unit ................................................................. 6
3.3.5
Lower Feeder Board (PWB-A PF)................................................................. 8
3.3.6
Lower Feeder Paper Pick-up Solenoid (SL7 PF) .......................................... 8
3.3.7
Tray Set Detecting Switch (S4 PF)................................................................ 9
Troubleshooting
4.
Jam Display ........................................................................................................... 11
4.1
Misfeed Display................................................................................................... 11
4.2
Misfeed Display Resetting Procedure................................................................. 11
4.3
Sensor layout ...................................................................................................... 12
4.3.1
4.4
magicolor 2430 DL (mounted with the Lower Feeder Unit and
Duplex Unit) ................................................................................................ 12
Solution............................................................................................................... 13
4.4.1
Initial Check Items....................................................................................... 13
4.4.2
Misfeed at Tray 2 paper feed section .......................................................... 13
i
Maintenance
Other ....................................................................................................................... 4
Troubleshooting
3.
Troubleshooting
Maintenance
General
Lower Feeder Unit
Field Service Ver. 2.0 Apr. 2005
Blank Page
ii
Field Service Ver. 2.0 Apr. 2005
1. Product specifications
Product specifications
1.1
Type
Name
Add-on 500-sheet paper feed cassette
Type
Front-loading type
Installation
Desk type
Document Alignment
Center
1.2
General
1.
Lower Feeder Unit
General
Paper type
Paper Size
A4/Letter
Paper Type
• Plain paper: 60 to 90 g/m2 (16 to 24 lb)
• Recycled paper: 60 to 90 g/m2 (16 to 24 lb)
Capacity
1.3
500 sheets
Machine specifications
Power Requirements
DC 24 V ± 10 % (supplied from the main unit)
DC 5 V ± 5 %
Max. Power
Consumption
12 W
Dimensions
430 (W)× 500 (D)× 138 (H) mm
16.9" (W) × 19.6" (H) × 5.4" (D)
Weight
Approx. 4.6 kg (10.1 lb)
1.4
Operating environment
Temperature
10 to 35° C / 50 to 95° F (with a fluctuation of 10° C / 18° F or less per hour)
Humidity
15 % to 85 % (with a fluctuation of 20 %/h)
NOTE
• These specifications are subject to change without notice.
1
Field Service Ver. 2.0 Apr. 2005
General
Lower Feeder Unit
1. Product specifications
Blank Page
2
Field Service Ver. 2.0 Apr. 2005
2. Periodic check
2.
Lower Feeder Unit
Maintenance
Periodic check
2.1
Maintenance procedure (Periodic parts check)
NOTE
• The alcohol described in the cleaning procedure is isopropyl alcohol.
Pick-up Roller
[1]
[1]
A. Cleaning procedure
1. Remove the Lower Feeder Unit from
the main unit.
2. Wipe the Pick-up Roller [1] clean of
dirt using a soft cloth dampened with
alcohol.
Maintenance
2.1.1
4056fs2501c0
B. Removal procedure
1. Remove the Lower Feeder Unit from
the main unit.
2. Remove two Pick-up Rollers [1].
[1]
4056fs2502c0
3
3. Other
Lower Feeder Unit
3.
3.1
Field Service Ver. 2.0 Apr. 2005
Other
Disassembly/Adjustment prohibited items
A. Paint-locked Screws
NOTE
• Paint-locked screws show that the assembly or unit secured can only be adjusted
or set at the factory and should not be adjusted, set, or removed in the field.
B. Red Painted Screws
NOTES
• When the screws are removed, the red paint is coated on the points where readjustment is required.
• Once the red painted screw is removed or loosened, you should make the adjustment. Accordingly check the adjustment items in the operation manual and make
the necessary adjustment. Note that when two or more screws are used on the
part in question, only one representative screw may be marked with red paint.
Maintenance
C. Variable Resistors on Board
NOTE
• Do not turn the variable resistors on boards for which no adjusting instructions
are given in Adjustment/Setting.
D. Removal of PWBs
NOTES
• When removing a circuit board or other electrical component, refer to “Handling of
PWBs” and follow the corresponding removal procedures.
• The removal procedures given in the following omit the removal of connectors and
screws securing the circuit board support or circuit board.
• Where it is absolutely necessary to touch the ICs and other electrical components
on the board, be sure to ground yourself.
4
Field Service Ver. 2.0 Apr. 2005
Disassembly/Assembly list (Other parts)
No
Section
1
-
2
3
Exterior parts
4
Unit
5
Board and etc
6
7
3.3
3.3.1
Others
Part name
Lower Feeder Unit
3.2
3. Other
Ref. page
Lower Feeder Unit
☞ 5
Tray
☞ 6
Lower Feeder Unit Rear Cover
☞ 6
Lower Feeder Paper Pick-up Unit
☞ 6
Lower Feeder Board
☞ 8
Lower Feeder Paper Pick-up Solenoid
☞ 8
Lower Feeder Paper Size Switch
☞ 9
Disassembly/Assembly procedure
Lower Feeder Unit
Maintenance
NOTE
• Whenever removing or reinstalling the Lower Feeder Unit, be sure first to unplug
the power cord of the printer from the power outlet.
1. Lift the printer main body and then
remove the Lower Feeder Unit [1]
from the printer.
[1]
4056fs2504c0
5
3. Other
Lower Feeder Unit
3.3.2
Field Service Ver. 2.0 Apr. 2005
Tray
1. Remove the Lower Feeder Unit from
the main unit.
2. Slide out the Tray [1].
[1]
4056fs2503c0
3.3.3
Lower Feeder Rear Cover
1. Slide out the Tray.
☞ 6
2. Remove four screws [1], and remove
the Lower Feeder Unit Rear Cover
[2].
Maintenance
[1]
[1]
[1]
3.3.4
[2]
4056fs2505c0
Lower Feeder Paper Pick-up Unit
1. Remove the Lower Feeder Unit Rear
Cover.
☞ 6
2. Unlock two tabs [1] and remove the
Cover [2].
[2]
[1]
6
4056fs2003c1
Field Service Ver. 2.0 Apr. 2005
3. Other
Lower Feeder Unit
3. Remove the Actuator [3].
[3]
4056fs2004c0
4. Remove one screw [4] and the metal
plate [5].
Maintenance
[4]
[5]
4056fs2005c0
5. Remove five screws [6] and the
Lower Feeder Paper Pick-up Unit [7].
[6]
[6]
[7]
[6]
[6]
4056fs2006c1
7
3. Other
Lower Feeder Unit
3.3.5
Field Service Ver. 2.0 Apr. 2005
Lower Feeder Board (PWB-A PF)
1. Remove the Lower Feeder Paper
Pick-up Unit.
☞ 6
2. Disconnect two connectors [1] from
the Lower Feeder Board.
3. Remove one screw [2] and the PWB
Protective Cover [3].
[1]
[3]
[1]
[2]
4056fs2001c1
4. Remove two screws [4] and the
Lower Feeder Board [5].
Maintenance
[4]
[5]
3.3.6
4056fs2002c1
Lower Feeder Paper Pick-up Solenoid (SL7 PF)
1. Remove the Lower Feeder Paper
Pick-up Unit.
☞ 6
2. Disconnect one connector [1].
3. Remove one screw [2] and the Protective Cover [3].
[2]
[3]
[1]
4056fs2008c0
8
3. Other
[4]
[3]
4056fs2009c1
Tray Set Detecting Switch (S4 PF)
1. Remove the Lower Feeder Paper
Pick-up Unit.
☞ 6
2. Unlock two tabs [1], disconnect one
connector [2] and remove the Tray
Set Detecting Switch [3].
[2]
[1]
4056fs2007c0
9
Maintenance
3.3.7
4. Remove one screw [3] and the
Lower Feeder Paper Pick-up Solenoid [4].
Lower Feeder Unit
Field Service Ver. 2.0 Apr. 2005
Field Service Ver. 2.0 Apr. 2005
Maintenance
Lower Feeder Unit
3. Other
Blank Page
10
Field Service Ver. 2.0 Apr. 2005
4. Jam Display
4.
4.1
Lower Feeder Unit
Troubleshooting
Jam Display
Misfeed Display
• When a paper misfeed occurs a message is displayed on the Control Panel.
4537fs4503e0
Display
MEDIA JAM
TRAY 2
4.2
Misfeed location
Tray 2 paper feed section
Misfeed clearing location
Tray 2
Ref. page
☞ 13
Misfeed Display Resetting Procedure
Troubleshooting
• Open the relevant door, clear the sheet of misfed paper, and close the door.
11
Lower Feeder Unit
4. Jam Display
4.3
4.3.1
Field Service Ver. 2.0 Apr. 2005
Sensor layout
magicolor 2430 DL (mounted with the Lower Feeder Unit and Duplex Unit)
[1]
[2]
[3]
Troubleshooting
[5]
[4]
4139fs4508c0
12
[1]
Exit Sensor
PC7
[4]
Duplex Paper Loop Sensor
PC10 DU
[2]
Fusing Paper Loop Sensor
PC8
[5]
Registration Sensor
PC1
[3]
Duplex Transport Sensor
PC12 DU
Field Service Ver. 2.0 Apr. 2005
4.4.1
Solution
Lower Feeder Unit
4.4
4. Jam Display
Initial Check Items
• When a paper misfeed occurs, first check the following initial check items.
Check Item
Action
Does the paper meet product specifications?
Change the paper.
Is paper curled, wavy, or damp.
Change the paper.
Instruct the user in correct paper storage.
Is a foreign object present along the paper path, or is the
Clean or change the paper path.
paper path deformed or worn?
Are the Paper Separator Fingers dirty, deformed, or
worn?
Clean or change the defective Paper Separator Finger.
Are the rolls/rollers dirty, deformed, or worn?
Clean or change the defective roll/roller.
Are the Edge Guide and Trailing Edge Stop at the correct position to accommodate the paper?
Set as necessary.
Are the actuators found operational when checked for
correct operation?
Correct or change the defective actuator.
4.4.2
Misfeed at Tray 2 paper feed section
A. Detection Timing
Description
B. Action
Relevant Electrical Parts
Registration Sensor (PC1)
Lower Feeder Paper Pick-up Solenoid (SL7 PF)
Mechanical Control Board (PWB-A)
WIRING DIAGRAM
Step
Action
Control Signal
Location
(Electrical
Component)
1
Check the initial check items.
-
-
2
Check the PWB-A connector for proper connection and correct as necessary.
-
-
3
Check the PC1 sensor.
PWB-A PJ12A-3 (ON)
2-C
(Main Unit)
4
Check SL7 PF for correct operation.
PWB-A PF
PJ22A PF-2 (REM)
4-E
5
Change PWB-A.
-
-
13
Troubleshooting
Type
Detection of misThe leading edge of the paper does not block the Registration Sensor (PC1) even
feed at Tray 2 paper after the lapse of a predetermined period of time after the Lower Feeder Paper
feed section
Pick-up Solenoid (SL7 PF) has been energized.
Field Service Ver. 2.0 Apr. 2005
Lower Feeder Unit
4. Jam Display
Troubleshooting
Blank Page
14
SERVICE MANUAL
FIELD SERVICE
Duplex Option
2005.04
Ver. 2.0
After publication of this service manual, the parts and mechanism may be subject to change for
improvement of their performance.
Therefore, the descriptions given in this service manual may not coincide with the actual machine.
When any change has been made to the descriptions in the service manual, a revised version will be
issued with a revision mark added as required.
Revision mark:
• To indicate clearly a section revised, show 1 to the left of the revised section.
A number within 1 represents the number of times the revision has been made.
• To indicate clearly a section revised, show 1 in the lower outside section of the corresponding page.
A number within 1 represents the number of times the revision has been made.
NOTE
Revision marks shown in a page are restricted only to the latest ones with the old ones deleted.
• When a page revised in Ver. 2.0 has been changed in Ver. 3.0:
The revision marks for Ver. 3.0 only are shown with those for Ver. 2.0 deleted.
• When a page revised in Ver. 2.0 has not been changed in Ver. 3.0:
The revision marks for Ver. 2.0 are left as they are.
Adding the descriptions of magicolor 2450 and
2005/4
2.0
1
change format
2004/10
1.0
—
Issue of the first edition
Date
Service manual Ver.
Revision mark
Descriptions of revision
Field Service Ver. 2.0 Apr. 2005
General
1.
Product specifications ............................................................................................. 1
1.1
Type ...................................................................................................................... 1
1.2
Paper type ............................................................................................................ 1
Machine specifications.......................................................................................... 1
1.4
Operating environment ......................................................................................... 1
General
1.3
Maintenance
2.
Duplex Option
CONTENTS
Periodic check ......................................................................................................... 3
2.1
Maintenance procedure (Periodic parts check) .................................................... 3
2.1.1
Transport Roller............................................................................................. 3
3.1
Disassembly/Adjustment prohibited items ............................................................ 4
3.2
Disassembly/Assembly list (Other parts) .............................................................. 5
3.3
Disassembly/Assembly procedure........................................................................ 5
3.3.1
Duplex Option ............................................................................................... 5
3.3.2
Right Cover ................................................................................................... 7
3.3.3
Duplex Board (PWB-A DU) ........................................................................... 8
3.3.4
Duplex Cooling Fan Motor (M10 DU) ............................................................ 9
3.3.5
Duolex Transport Motor (M8 DU) ................................................................ 12
3.3.6
Duplex Reverse Motor (M9 DU) .................................................................. 12
3.3.7
Duplex Registration Solenoid (SL6 DU)...................................................... 13
Troubleshooting
4.
Jam Display ........................................................................................................... 15
4.1
List of Display Messages .................................................................................... 15
4.2
Misfeed Display Resetting Procedure................................................................. 15
4.3
Sensor layout ...................................................................................................... 16
4.3.1
4.4
magicolor 2430 DL (mounted with the Lower Feeder Unit and
Duplex Unit) ................................................................................................ 16
Solution............................................................................................................... 17
4.4.1
Initial Check Items....................................................................................... 17
4.4.2
Misfeed at Duplex Unit reverse drive/storage section ................................. 17
4.4.3
Misfeed at Duplex Unit paper feed section.................................................. 18
5.
Error Codes ........................................................................................................... 19
5.1
Trouble code ....................................................................................................... 19
5.1.1
Indication of the Error indicator (magicolor 2400W).................................... 19
i
Maintenance
Other ....................................................................................................................... 4
Troubleshooting
3.
Field Service Ver. 2.0 Apr. 2005
Duplex Option
5.1.2
5.1.3
Indication of the LCD display (magicolor 2450) .......................................... 20
5.1.4
Trouble code list .......................................................................................... 20
5.2
Solution .............................................................................................................. 21
5.2.1
Troubleshooting
Maintenance
General
6.
ii
Indication of the LCD display (magicolor 2430 DL)..................................... 20
0F: Duplex Cooling Fan Motor malfunction................................................. 21
Miscellaneous Malfunctions .................................................................................. 22
6.1
List of miscellaneous malfunctions ..................................................................... 22
6.2
ILLEGAL ERROR DUPLEX................................................................................ 22
Field Service Ver. 2.0 Apr. 2005
1. Product specifications
Product specifications
1.1
Type
Name
Duplex Option
Type
Switchback and Circulating Duplex Unit
Installation
Mounted on the right side door of main unit
Reversing System
Exit Roller switchback
Conveyance system
Rubber roller + driven rolls
Document Alignment
Center
1.2
General
1.
Duplex Option
General
Paper type
Paper Size
A4/Letter
Paper Type
• Plain paper: 60 to 90 g/m2 (16 to 24 lb)
• Recycled paper: 60 to 90 g/m2 (16 to 24 lb)
1.3
Machine specifications
Power Requirements
DC 24 V ± 10 % (supplied from the main unit)
DC 5 V ± 5 % (supplied from the main unit)
Max. Power
Consumption
42 W
Dimensions
370 (W) × 153 (D) × 327 (H) mm
14.6" (W) × 6.0" (D) × 12.9" (H)
Weight
Approx. 2.3 kg (5.1 lb)
1.4
Operating environment
Temperature
10 to 35° C / 50 to 95° F (with a fluctuation of 10° C / 18° F or less per hour)
Humidity
15 % to 85 % (with a fluctuation of 20 %/h)
NOTE
• These specifications are subject to change without notice.
1
Field Service Ver. 2.0 Apr. 2005
General
Duplex Option
1. Product specifications
Blank Page
2
Field Service Ver. 2.0 Apr. 2005
2. Periodic check
2.
2.1
Duplex Option
Maintenance
Periodic check
Maintenance procedure (Periodic parts check)
NOTE
• The alcohol described in the cleaning procedure is isopropyl alcohol.
Transport Roller
[1]
A. Cleaning procedure
1. Open the Duplex Door.
2. Using a soft cloth dampened with
alcohol, wipe the Transport Roller [1]
clean of dirt.
Maintenance
2.1.1
4057fs2501c0
3
3. Other
Duplex Option
3.
3.1
Field Service Ver. 2.0 Apr. 2005
Other
Disassembly/Adjustment prohibited items
A. Paint-locked Screws
NOTE
• Paint-locked screws show that the assembly or unit secured can only be adjusted
or set at the factory and should not be adjusted, set, or removed in the field.
B. Red Painted Screws
NOTE
• When the screws are removed, the red paint is coated on the points where readjustment is required.
• Once the red painted screw is removed or loosened, you should make the adjustment. Accordingly check the adjustment items in the operation manual and make
the necessary adjustment. Note that when two or more screws are used on the
part in question, only one representative screw may be marked with red paint.
Maintenance
C. Variable Resistors on Board
NOTE
• Do not turn the variable resistors on boards for which no adjusting instructions
are given in Adjustment/Setting.
D. Removal of PWBs
NOTES
• When removing a circuit board or other electrical component, refer to “Handling of
PWBs” and follow the corresponding removal procedures.
• The removal procedures given in the following omit the removal of connectors and
screws securing the circuit board support or circuit board.
• Where it is absolutely necessary to touch the ICs and other electrical components
on the board, be sure to ground yourself.
4
Field Service Ver. 2.0 Apr. 2005
Disassembly/Assembly list (Other parts)
No
Section
1
-
Part name
Ref. page
Duplex Option
☞ 5
2
Exterior parts
Right Cover
☞ 7
3
Board and etc.
Duplex Board
☞ 8
4
Duplex Cooling Fan Motor
☞ 9
5
Duolex Transport Motor
☞ 12
Duplex Reverse Motor
☞ 12
7
Duplex Registration Solenoid
☞ 13
3.3
Disassembly/Assembly procedure
6
3.3.1
Others
Duplex Option
3.2
3. Other
Duplex Option
Maintenance
NOTE
• Whenever removing or reinstalling the Duplex Unit, be sure first to unplug the
power cord of the printer from the power outlet.
A. Removal Procedure
1. Open the Duplex Option Door.
2. Turn the two locking knobs [1] to
unlock the Duplex Option.
[1]
4057fs2502c0
3. Remove the Duplex Option [2].
[2]
4057fs2503c0
5
Duplex Option
3. Other
Field Service Ver. 2.0 Apr. 2005
B. Reinstall Procedure
1. Open the Duplex Unit Door [1] and
turn the two locking knobs [2] to
unlock the Duplex Unit.
[2]
[1]
4057fs2504c0
2. Mount the Duplex Unit [3] onto the
printer main body.
Maintenance
[3]
[3]
4057fs2505c0
6
3. Other
3. Turn the two locking knobs [4] to lock
the Duplex Unit into position.
NOTE
• When locking the Duplex Unit into
position, be sure to hold the unit
with a hand and, at the same time,
press it up against the printer main
body.
[4]
Duplex Option
Field Service Ver. 2.0 Apr. 2005
[5]
NOTE
• After the Duplex Unit has been
locked into position, check that the
two locking knobs are in the correct
locked position.
4. Close the Duplex Option Door [5].
4057fs2507c0
3.3.2
Right Cover
1. Remove one screw [1], unlock three
tabs [2] and remove the Right Cover
[3].
[2]
[3]
[1]
4057fs2508c0
7
Maintenance
4057fs2506c0
3. Other
Duplex Board (PWB-A DU)
Duplex Option
3.3.3
Field Service Ver. 2.0 Apr. 2005
1. Remove the Right Cover.
☞ 7
2. Remove one screw [1] and the
Duplex Board Cover [2].
[2]
[1]
4057fs2509c0
3. Disconnect all connectors from the
Duplex Board [3].
Maintenance
[3]
4057fs2510c0
4. Remove three screws [4] and the
Duplex Board [5].
[4]
[4]
[5]
8
4057fs2511c0
Field Service Ver. 2.0 Apr. 2005
Duplex Option
Duplex Cooling Fan Motor (M10 DU)
1. Remove the Right Cover.
☞ 7
2. Open the Duplex Door [1] and disconnect the connector [2].
[2]
[1]
Maintenance
3.3.4
3. Other
4057fs2516c0
3. Remove one screw [3].
[3]
4057fs2517c0
9
3. Other
Field Service Ver. 2.0 Apr. 2005
Maintenance
Duplex Option
[4]
[4]
[5]
4057fs2518c0
5. Remove one screw [6], unlock one
tab [7] and remove the Harness
Cover [8].
[6]
[7]
10
4. Unhook the two dowel pins [4] and
remove the Duplex Unit Door [5].
[8]
4057fs2519c0
3. Other
6. Remove two screws [9], unlock two
tabs [10] and remove the Duplex
Door Upper Cover [11].
[10]
Duplex Option
Field Service Ver. 2.0 Apr. 2005
[9]
4057fs2520c0
7. Unlock four tabs [12] and remove the
Duplex Cooling Fan Motor Assy [13].
[12]
[12]
[13]
4057fs2521c0
8. Remove the Duplex Cooling Fan
Motor Cover [14].
[14]
4057fs2522c0
11
Maintenance
[11]
3. Other
Field Service Ver. 2.0 Apr. 2005
[15]
Duplex Option
9. Unlock three tabs [15] and remove
the Duplex Cooling Fan Motor [16].
[15]
3.3.5
[16]
4057fs2523c0
Duolex Transport Motor (M8 DU)
1. Remove the Right Cover.
☞ 7
2. Remove two screws [1] and disconnect the connector [2].
3. Remove the harness from the harness holder [3] and then remove the
Duplex Transport Motor [4].
[1]
Maintenance
[3]
[2]
3.3.6
[4]
Duplex Reverse Motor (M9 DU)
[3]
[2]
12
4057fs2512c0
1. Remove the Right Cover.
☞ 7
2. Remove two screws [1], disconnect
the connector [2], and remove the
Duplex Reverse Motor [3].
[1]
[1]
4057fs2513c0
Field Service Ver. 2.0 Apr. 2005
1.
☞
2.
3.
[3]
[2]
[1]
Remove the Right Cover.
7
Disconnect the connector [1].
Remove one screw [2] and the Protective Cover [3].
Duplex Option
Duplex Registration Solenoid (SL6 DU)
4057fs2514c0
4. Remove the Duplex Registration
Solenoid [4].
[4]
Maintenance
3.3.7
3. Other
4057fs2515c0
13
Field Service Ver. 2.0 Apr. 2005
Maintenance
Duplex Option
3. Other
Blank Page
14
Field Service Ver. 2.0 Apr. 2005
4. Jam Display
4.
4.1
Duplex Option
Troubleshooting
Jam Display
List of Display Messages
• When a paper misfeed occurs a message is displayed on the Control Panel.
4538fs4503e0
Display
Misfeed location
MEDIA JAM
DUPLEX LOWER
Duplex Unit reverse drive/storage
section
MEDIA JAM
DUPLEX UPPER
Duplex Unit paper feed section
4.2
Misfeed clearing location
Ref. page
☞ 17
Duplex Unit Door
☞ 18
Misfeed Display Resetting Procedure
Troubleshooting
• Open the relevant door, clear the sheet of misfed paper, and close the door.
15
4. Jam Display
Duplex Option
4.3
4.3.1
Field Service Ver. 2.0 Apr. 2005
Sensor layout
magicolor 2430 DL (mounted with the Lower Feeder Unit and Duplex Unit)
[1]
[2]
[3]
Troubleshooting
[5]
[4]
4139fs4508c0
16
[1]
Exit Sensor
PC7
[4]
Duplex Paper Loop Sensor
PC10 DU
[2]
Fusing Paper Loop Sensor
PC8
[5]
Registration Sensor
PC1
[3]
Duplex Transport Sensor
PC12 DU
Field Service Ver. 2.0 Apr. 2005
4.4.1
Solution
Duplex Option
4.4
4. Jam Display
Initial Check Items
• When a paper misfeed occurs, first check the following initial check items.
Check Item
Action
Does the paper meet product specifications?
Change the paper.
Is paper curled, wavy, or damp.
Change the paper.
Instruct the user in correct paper storage.
Is a foreign object present along the paper path, or is the
Clean or change the paper path.
paper path deformed or worn?
Are the Paper Separator Fingers dirty, deformed, or
worn?
Clean or change the defective Paper Separator Finger.
Are the rolls/rollers dirty, deformed, or worn?
Clean or change the defective roll/roller.
Are the Edge Guide and Trailing Edge Stop at the correct position to accommodate the paper?
Set as necessary.
Are the actuators found operational when checked for
correct operation?
Correct or change the defective actuator.
4.4.2
Misfeed at Duplex Unit reverse drive/storage section
A. Detection Timing
Description
B. Action
Relevant Electrical Parts
Duplex Transport Sensor (PC12 DU)
Duolex Transport Motor (M8 DU)
Duplex Reverse Motor (M9 DU)
Duplex Board (PWB-A DU)
Mechanical Control Board (PWB-A)
WIRING DIAGRAM
Step
Action
1
Initial check items.
2
Check the PC12 DU sensor.
3
Control Signal
Location
(Electrical
Component)
-
-
PWB-A DU PJ5A DU-3 (ON)
3-C
Check M8 DU for correct operation.
PWB-A DU
PJ2A DU-1~4 (pulse)
5~6-C
4
Check M9 DU for correct operation.
PWB-A DU
PJ2A DU-5~8 (pulse)
5~6-C~D
5
Change PWB-A DU.
-
-
6
Change PWB-A.
-
-
17
Troubleshooting
Type
Detection of misThe Duplex Transport Sensor (PC12 DU) is not unblocked even after the lapse of
feed at Duplex Unit
a predetermined period of time after the Duplex Reverse Motor (M9 DU) has been
reverse drive/storenergized for reverse drive.
age section
4. Jam Display
Duplex Option
4.4.3
Field Service Ver. 2.0 Apr. 2005
Misfeed at Duplex Unit paper feed section
A. Detection Timing
Type
Description
The Duplex Paper Loop Sensor (PC10 DU) is not unblocked even after the lapse
of a predetermined period of time after a Duplex paper feed sequence has been
started.
The Duplex Paper Loop Sensor (PC10 DU) is not blocked even after the lapse of
Detection of misfeed at Duplex Unit a predetermined period of time after a Duplex paper feed sequence has been
paper feed section started.
The Duplex Transport Sensor (PC12 DU) is not blocked even after the lapse of a
predetermined period of time after a Duplex paper feed sequence has been
started.
B. Action
Relevant Electrical Parts
Duplex Paper Loop Sensor (PC10 DU)
Duplex Transport Sensor (PC12 DU)
Duolex Transport Motor (M8 DU)
Duplex Board (PWB-A DU)
Mechanical Control Board (PWB-A)
WIRING DIAGRAM
Troubleshooting
Step
18
Action
Control Signal
Location
(Electrical
Component)
1
Initial check items.
-
-
2
Check the PC10 DU sensor.
PWB-A DU PJ3A DU-3 (ON)
3-G
3
Check the PC12 DU sensor.
PWB-A DU PJ5A DU-3 (ON)
3-C
PWB-A DU
PJ2A DU-1~4 (pulse)
5~6-C
4
Check M8 DU for correct operation.
5
Change PWB-A DU.
-
-
6
Change PWB-A.
-
-
Field Service Ver. 2.0 Apr. 2005
5.1
Error Codes
Duplex Option
5.
5. Error Codes
Trouble code
• When a malfunction occurs, the printer shows the corresponding trouble status by
means of the Error indicator on the control panel or LCD display.
5.1.1
Indication of the Error indicator (magicolor 2400W)
• The CPU circuit of the printer performs a self-diagnostics procedure. If a faulty condition
is encountered, the Error indicator blinks twice a second.
☞ For details of the Error indicator, see “Adjustment/Setting”.
4139fs4502c0
Troubleshooting
A. Check the Trouble Code
• If trouble status is displayed by the Error indicator, the corresponding trouble code can be
checked with the Status Display of the PC connected to the printer.
4139fs4504e0
19
5. Error Codes
Duplex Option
5.1.2
Field Service Ver. 2.0 Apr. 2005
Indication of the LCD display (magicolor 2430 DL)
• The printer’s CPU performs a self-diagnostics function that, on detecting a malfunction,
gives the corresponding trouble code and maintenance call mark on the Control Panel.
4139F4E503DA
1 5.1.3
Indication of the LCD display (magicolor 2450)
• The printer’s CPU performs a self-diagnostics function that, on detecting a malfunction,
gives the corresponding trouble code and maintenance call mark on the Control Panel.
Troubleshooting
4139F4E501DA
5.1.4
Code
0F
20
Trouble code list
Item
Duplex Cooling Fan Motor
malfunction
Detection Timing
• The Fan Motor Lock signal remains HIGH for a predetermined consecutive period of time while the Power
Supply Cooling Fan Motor remains energized.
Field Service Ver. 2.0 Apr. 2005
5.2.1
Solution
Duplex Option
5.2
5. Error Codes
0F: Duplex Cooling Fan Motor malfunction
Relevant Electrical Parts
Duplex Cooling Fan Motor (M10 DU)
Duplex Board (PWB-A DU)
WIRING DIAGRAM
Action
Control Signal
Location
(Electrical
Component)
1
Check the M10 connector for proper connection
and correct as necessary.
-
-
2
Check the fan for possible overload and correct
as necessary.
-
-
3
Check the PWB-A DU connector for proper connection and correct as necessary.
-
-
4
M10 DU operation check.
-
-
Troubleshooting
Step
21
6. Miscellaneous Malfunctions
Duplex Option
6.
6.1
Field Service Ver. 2.0 Apr. 2005
Miscellaneous Malfunctions
List of miscellaneous malfunctions
Message
ILLEGAL ERROR
DUPLEX
6.2
Description
• The Duplex Unit is not mounted.
• A 2-sided print cycle is run using the type and size of paper that are not good
for 2-sided printing.
ILLEGAL ERROR DUPLEX
Relevant Electrical Parts
Duplex Board (PWB-A DU)
Mechanical Control Board (PWB-A)
Print Control Board (PWB-P)
WIRING DIAGRAM
Troubleshooting
Step
22
Action
Control signal
Location
(electrical
component)
1
Check the printer driver settings.
-
-
2
Check the PWB-A DU connector for proper connection and correct as necessary.
-
-
3
Check the PWB-A connector for proper connection and correct as necessary.
-
-
4
Check the PWB-P connector for proper connection and correct as necessary.
-
-
5
Change PWB-A DU.
-
-
6
Change PWB-P.
-
-
7
Change PWB-A.
-
-
SERVICE MANUAL
FIELD SERVICE
®
magicolor 2400W/2430 DL/2450
magicolor 2400W
magicolor 2430 DL
magicolor 2450
®
®
®
FIELD SERVICE
Use of this manual should be strictly supervised to
avoid disclosure of confidential information.
Printed in Japan
4139-7991-21
0504XXXX
2006.01 Ver.3.1
© 2006 KONICA MINOLTA BUSINESS TECHNOLOGIES, INC.
2006.01
Ver. 3.1