1
System
Operating Manual
FUTRO L series
Congratulations on your purchase of an innovative
product from Fujitsu.
Latest information about our products, useful tips, updates etc. is available
on our website: "http://www.fujitsu.com/fts/"
You can find driver updates at: "http://support.ts.fujitsu.com/download"
Should you have any technical questions, please contact:
•
our Hotline/Service Desk (see Service Desk list or from the Internet at:
"http://support.ts.fujitsu.com/contact/servicedesk")
• Your sales partner
• Your sales office
We hope you enjoy using your new Fujitsu system!
Published by / Contact address in the EU
Fujitsu Technology Solutions GmbH
Mies-van-der-Rohe-Straße 8
80807 Munich, Germany
"http://www.fujitsu.com/fts/"
Copyright
© Fujitsu Technology Solutions GmbH 2013. All rights reserved.
Publication Date
04/2013
Order No.: A26361-K1062-Z320-1-8N19, edition 1
FUTRO L series
Operating Manual
Deutsch
3
English
23
Français
43
Español
63
日本語
83
简体中文
103
Remarks
Information on the product description meets the design specifications of Fujitsu and
is provided for comparison purposes. Several factors may cause the actual results to
differ. Technical data is subject to change without prior notification. Fujitsu rejects any
responsibility with regard to technical or editorial mistakes or omissions.
Trademarks
Fujitsu, the Fujitsu logo and FUTRO are registered trademarks of Fujitsu Limited or its
subsidiaries in the United States of America and other countries.
Kensington and K-Slot are registered trademarks of ACCO Brands.
Microsoft and Windows are trademarks or registered trademarks of the Microsoft
Corporation in the United States and/or other countries.
Teradici and PCoIP are trademarks of the Teradici Corporation in the United
States of America and/or other countries.
All other trademarks specified here are the property of their respective owners.
Copyright
No part of this publication may be copied, reproduced or translated without
the prior written consent of Fujitsu.
No part of this publication may be saved or transferred by any electronic means
without the written approval of Fujitsu.
Inhalt
Deutsch - 1
Inhalt
Deutsch
FUTRO L series . . . . . . . . . . . . . . . . . . . . . . . . . . . . . . . . . . . . . . . . . . . . . . . . . . . . . . . . . . . . . . . . . . . . . . . .
CELSIUS Workstation . . . . . . . . . . . . . . . . . . . . . . . . . . . . . . . . . . . . . . . . . . . . . . . . . . . . . . . . . . . . . . . . . . .
FUTRO L series Portal . . . . . . . . . . . . . . . . . . . . . . . . . . . . . . . . . . . . . . . . . . . . . . . . . . . . . . . . . . . . . . . . . .
Gültigkeit der Beschreibung . . . . . . . . . . . . . . . . . . . . . . . . . . . . . . . . . . . . . . . . . . . . . . . . . . . . . . . . . . . . . .
Darstellungsmittel . . . . . . . . . . . . . . . . . . . . . . . . . . . . . . . . . . . . . . . . . . . . . . . . . . . . . . . . . . . . . . . . . . . . . . .
Systemvoraussetzungen . . . . . . . . . . . . . . . . . . . . . . . . . . . . . . . . . . . . . . . . . . . . . . . . . . . . . . . . . . . . . . . . .
3
3
3
3
4
4
Wichtige Hinweise . . . . . . . . . . . . . . . . . . . . . . . . . . . . . . . . . . . . . . . . . . . . . . . . . . . . . . . . . . . . . . . . . . . . .
Sicherheitshinweise . . . . . . . . . . . . . . . . . . . . . . . . . . . . . . . . . . . . . . . . . . . . . . . . . . . . . . . . . . . . . . . . . . . . .
CE-Kennzeichnung . . . . . . . . . . . . . . . . . . . . . . . . . . . . . . . . . . . . . . . . . . . . . . . . . . . . . . . . . . . . . . . . . . . . .
FCC Class B Compliance Statement . . . . . . . . . . . . . . . . . . . . . . . . . . . . . . . . . . . . . . . . . . . . . . . . . . . . .
Lieferinhalt auspacken und überprüfen . . . . . . . . . . . . . . . . . . . . . . . . . . . . . . . . . . . . . . . . . . . . . . . . . . . .
Energie sparen, Entsorgung und Recycling . . . . . . . . . . . . . . . . . . . . . . . . . . . . . . . . . . . . . . . . . . . . . . . .
Gerät reinigen . . . . . . . . . . . . . . . . . . . . . . . . . . . . . . . . . . . . . . . . . . . . . . . . . . . . . . . . . . . . . . . . . . . . . . . . . .
Stellplatz auswählen . . . . . . . . . . . . . . . . . . . . . . . . . . . . . . . . . . . . . . . . . . . . . . . . . . . . . . . . . . . . . . . . . . . .
Anschlüsse und Bedienelemente . . . . . . . . . . . . . . . . . . . . . . . . . . . . . . . . . . . . . . . . . . . . . . . . . . . . . . . .
Vorderseite . . . . . . . . . . . . . . . . . . . . . . . . . . . . . . . . . . . . . . . . . . . . . . . . . . . . . . . . . . . . . . . . . . . . . . . . .
Rückseite (FUTRO L420) . . . . . . . . . . . . . . . . . . . . . . . . . . . . . . . . . . . . . . . . . . . . . . . . . . . . . . . . . . . .
Rückseite (FUTRO L620) . . . . . . . . . . . . . . . . . . . . . . . . . . . . . . . . . . . . . . . . . . . . . . . . . . . . . . . . . . . .
Statusanzeigen . . . . . . . . . . . . . . . . . . . . . . . . . . . . . . . . . . . . . . . . . . . . . . . . . . . . . . . . . . . . . . . . . . . . .
5
5
5
6
7
8
9
9
10
10
11
12
12
Anschluss und Inbetriebnahme des FUTRO L series Portals . . . . . . . . . . . . . . . . . . . . . . . . . . . .
Bedienung des EIN/AUS-Schalters . . . . . . . . . . . . . . . . . . . . . . . . . . . . . . . . . . . . . . . . . . . . . . . . . . . . . . .
Aktivierung des Stromsparmodus . . . . . . . . . . . . . . . . . . . . . . . . . . . . . . . . . . . . . . . . . . . . . . . . . . . . . . . . .
Auflösung . . . . . . . . . . . . . . . . . . . . . . . . . . . . . . . . . . . . . . . . . . . . . . . . . . . . . . . . . . . . . . . . . . . . . . . . . . . . . .
Gerät an das Netzwerk (LAN) anschließen . . . . . . . . . . . . . . . . . . . . . . . . . . . . . . . . . . . . . . . . . . . . . . . .
Externe Geräte anschließen . . . . . . . . . . . . . . . . . . . . . . . . . . . . . . . . . . . . . . . . . . . . . . . . . . . . . . . . . . . . .
Monitor anschließen . . . . . . . . . . . . . . . . . . . . . . . . . . . . . . . . . . . . . . . . . . . . . . . . . . . . . . . . . . . . . . . . .
USB-Tastatur anschließen . . . . . . . . . . . . . . . . . . . . . . . . . . . . . . . . . . . . . . . . . . . . . . . . . . . . . . . . . . .
USB-Maus anschließen . . . . . . . . . . . . . . . . . . . . . . . . . . . . . . . . . . . . . . . . . . . . . . . . . . . . . . . . . . . . . .
PCoIP-Verbindung herstellen . . . . . . . . . . . . . . . . . . . . . . . . . . . . . . . . . . . . . . . . . . . . . . . . . . . . . . . . .
Netzadapter anschließen . . . . . . . . . . . . . . . . . . . . . . . . . . . . . . . . . . . . . . . . . . . . . . . . . . . . . . . . . . . .
Externe Geräte an die USB-Anschlüsse anschließen . . . . . . . . . . . . . . . . . . . . . . . . . . . . . . . . . . .
13
13
13
13
13
14
14
15
15
15
16
17
Problemlösungen und Tipps . . . . . . . . . . . . . . . . . . . . . . . . . . . . . . . . . . . . . . . . . . . . . . . . . . . . . . . . . . .
18
Technische Daten . . . . . . . . . . . . . . . . . . . . . . . . . . . . . . . . . . . . . . . . . . . . . . . . . . . . . . . . . . . . . . . . . . . . . .
Netzadapter . . . . . . . . . . . . . . . . . . . . . . . . . . . . . . . . . . . . . . . . . . . . . . . . . . . . . . . . . . . . . . . . . . . . . . . . . . . .
19
20
Fujitsu
3
2 - Deutsch
Inhalt
4
Fujitsu
FUTRO L series
Deutsch - 3
FUTRO L series
FUTRO L series besteht aus zwei unterschiedlichen Portalen und zwei optionalen
CELSIUS RemoteAccess-Karten.
FUTRO L420 und L620 können als besonders dünner Client in einer VDI-Umgebung oder als
PCoIP®-Portal mit Remoteverbindung an eine mit einer CELSIUS RemoteAccess-Host-Karte
ausgestatteten CELSIUS-Workstation eingesetzt werden.
Die Remoteverbindungs-Lösung basiert auf PCoIP®-Technologie, durch die die Kommunikation
zwischen den CELSIUS RemoteAccess-Karten und den FUTRO L-Portalen sichergestellt wird.
Die PCoIP®-Technologie (PCoverIP®) ermöglicht eine schnelle und effiziente
Verbindungseinrichtung. Anwendungen und Funktionen können vor Ort
uneingeschränkt eingebunden werden.
CELSIUS Workstation
Die CELSIUS-Workstation stellt einen zentralen Hauptcomputer dar. Ihr Betriebssystem wird
auf diesem Hauptcomputer installiert. Benutzerabhängige Funktionen und Anwendungen
werden auf der CELSIUS-Workstation ausgeführt.
Der Benutzer kann leicht mit PCoIP® auf die CELSIUS-Workstation zugreifen, als
ob sie sich in der Nähe der Monitore befinden würde.
FUTRO L series Portal
Bei dem FUTRO L series Portal handelt es sich um einen extrem dünnen Client, der zusammen
mit einem angeschlossenen Monitor die Anwendungen und Funktionen reproduzieren kann,
die auf einer entfernt verbundenen CELSIUS-Workstation ausgeführt werden.
Sie können lokal mit dem FUTRO L series Portal arbeiten und weitere Peripheriegeräte anschließen.
Gültigkeit der Beschreibung
Die vorliegende Beschreibung gilt für folgende Systeme:
•
•
FUTRO L420
FUTRO L620
Fujitsu
5
4 - Deutsch
FUTRO L series
Darstellungsmittel
kennzeichnet Hinweise, bei deren Nichtbeachtung Ihre Gesundheit, die
Funktionsfähigkeit Ihres Geräts oder die Sicherheit Ihrer Daten gefährdet
sind. Die Gewährleistung erlischt, wenn Sie durch Nichtbeachtung dieser
Hinweise Defekte am Gerät verursachen
kennzeichnet wichtige Informationen für den sachgerechten Umgang mit
dem Gerät
►
kennzeichnet einen Arbeitsschritt, den Sie ausführen müssen
kennzeichnet ein Resultat
Diese Schrift
Diese Schrift
kennzeichnet Informationen, die von einem Programm am Bildschirm
ausgegeben werden, z. B.: Die Installation ist abgeschlossen!
kennzeichnet
•
"Diese Schrift"
Begriffe und Texte in einer Softwareoberfläche, z. B.: Klicken Sie auf
Speichern.
• Namen von Programmen oder Dateien, z. B. Windows oder setup.exe.
kennzeichnet
•
•
Abc
Diese Schrift
Querverweise auf einen anderen Abschnitt z. B. "Sicherheitshinweise"
Querverweise auf eine externe Quelle, z. B. eine Webadresse: Lesen
Sie weiter auf "http://www.fujitsu.com/fts"
• Namen von CDs, DVDs sowie Bezeichnungen und Titel von anderen
Materialien, z. B.: "CD/DVD Drivers & Utilities" oder Handbuch
"Sicherheit"
kennzeichnet eine Taste auf der Tastatur, z. B: F10
kennzeichnet Begriffe und Texte, die betont oder hervorgehoben werden,
z. B.: Gerät nicht ausschalten
Systemvoraussetzungen
•
•
•
•
•
6
eine freie PCIe-Schnittstelle für die CELSIUS RemoteAccess-Karte (optional)
eine USB-Maus
eine USB-Tastatur
ein VGA/DVI- oder DisplayPort-Monitor
eine Netzwerkverbindung
Fujitsu
Wichtige Hinweise
Deutsch - 5
Wichtige Hinweise
Wichtige Hinweise
Hinweise
In diesem Kapitel finden Sie unter anderem Sicherheitshinweise, die Sie beim
Umgang mit Ihrem Gerät unbedingt beachten müssen.
Sicherheitshinweise
Hinweis
Sicherheitshinweise
Beachten Sie die Sicherheitshinweise im Handbuch "Sicherheit/Regularien"
und die nachfolgenden Sicherheitshinweise.
Beachten Sie beim Aufstellen und beim Betrieb des Geräts die Hinweise für die
Umgebungsbedingungen im Kapitel "Technische Daten", Seite 19 - Deutsch und das
Kapitel "Anschluss und Inbetriebnahme des FUTRO L series Portals", Seite 13 - Deutsch.
Achtung, Bauteile im System können hohe Temperaturen annehmen.
Die in dieser Anleitung beschriebenen Tätigkeiten dürfen nur mit
besonderer Sorgfalt durchgeführt werden.
Reparaturen am Gerät dürfen nur von autorisiertem Fachpersonal durchgeführt werden.
Durch unsachgemäße Reparaturen können Gefahren für den Benutzer (elektrischer
Schlag, Energiegefahr, Brandgefahr) bzw. Sachschäden am Gerät entstehen.
Betreiben Sie das Gerät nur bei geschlossenem Gehäuse.
Netzleitung und Netzadapter:
Die mitgelieferte Netzleitung entspricht den Anforderungen des Landes, in
dem Sie das Gerät gekauft haben. Achten Sie darauf, dass die Netzleitung
für das Land zugelassen ist, in dem sie verwendet wird.
Die Netzleitung des Netzadapters darf nur dann an eine Steckdose angeschlossen
sein, wenn das Gerät angeschlossen ist.
Benutzen Sie den Netzadapter nicht für andere Geräte.
Benutzen Sie nur den für das Gerät vorgesehenen Netzadapter, siehe
Kapitel "Technische Daten", Seite 19 - Deutsch.
Versichern Sie sich, dass die Stromaufnahme des Netzadapters nicht höher ist
als die des Stromnetzes, an das Sie den Netzadapter anschließen.
Ein-/Ausschalter trennen das Gerät nicht von der Netzspannung. Zur vollständigen
Trennung von der Netzspannung müssen Sie den Netzstecker aus der Steckdose ziehen.
CE-Kennzeichnung
Dieses Gerät erfüllt in der ausgelieferten Ausführung die Anforderungen der
EG-Richtlinien 2004/108/EG "Elektromagnetische Verträglichkeit", 2006/95/EG
"Niederspannungsrichtlinie" und 2009/125/EG "Ökodesign-Richtlinie".
Fujitsu
7
6 - Deutsch
Wichtige Hinweise
FCC Class B Compliance Statement
DOC (INDUSTRY CANADA) NOTICES
Notice to Users of Radios and Television:
This class B digital apparatus complies with Canadian ICES-003.
The following statement applies to the products covered in this manual, unless otherwise specified
herein. The statement for other products will appear in the accompanying documentation.
NOTE:
This equipment has been tested and found to comply with the limits for a "Class B" digital
device, pursuant to Part 15 of the FCC rules and meets all requirements of the Canadian
Interference-Causing Equipment Standard ICES-003 for digital apparatus. These limits are
designed to provide reasonable protection against harmful interference in a residential installation.
This equipment generates, uses and can radiate radio frequency energy and, if not installed
and used in strict accordance with the instructions, may cause harmful interference to radio
communications. However, there is no guarantee that interference will not occur in a particular
installation. If this equipment does cause harmful interference to radio or television reception,
which can be determined by turning the equipment off and on, the user is encouraged to
try to correct the interference by one or more of the following measures:
•
•
•
Reorient or relocate the receiving antenna.
Increase the separation between equipment and the receiver.
Connect the equipment into an outlet on a circuit different from that to
which the receiver is connected.
• Consult the dealer or an experienced radio/TV technician for help.
Fujitsu is not responsible for any radio or television interference caused by unauthorized
modifications of this equipment or the substitution or attachment of connecting cables and
equipment other than those specified by Fujitsu. The correction of interferences caused by such
unauthorized modification, substitution or attachment will be the responsibility of the user.
The use of shielded I/O cables is required when connecting this equipment to any and all optional
peripheral or host devices. Failure to do so may violate FCC and ICES rules.
8
Fujitsu
Wichtige Hinweise
Deutsch - 7
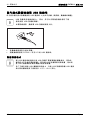
Lieferinhalt auspacken und überprüfen
Zur Lieferung des FUTRO L series Portals gehören:
•
•
•
•
•
•
►
►
►
►
ein FUTRO L420-Portal für zwei Bildschirme oder ein FUTRO L620-Portal für vier Bildschirme
Ein Netzadapter mit Netzkabel
ein Netzadapter mit Netzleitung
ein Quick Start Guide "FUTRO L420 / L620"
zwei mehrsprachige Handbücher "Sicherheit/Regularien"
ein Beiblatt "Informationsblatt zu Helpdesk und Garantie"
Packen Sie alle Teile aus.
Prüfen Sie den Verpackungsinhalt auf sichtbare Transportschäden.
Prüfen Sie, ob die Lieferung mit den Angaben auf dem Lieferschein übereinstimmt.
Informieren Sie unverzüglich Ihre Verkaufsstelle, wenn Sie Transportschäden oder
Unstimmigkeiten zwischen Verpackungsinhalt und Lieferschein feststellen.
Wir empfehlen Ihnen, die Originalverpackung der Geräte nicht wegzuwerfen. Bewahren
Sie die Originalverpackung für einen eventuellen Transport auf.
Fujitsu
9
8 - Deutsch
Wichtige Hinweise
Energie sparen, Entsorgung und Recycling
DVDDrivers
Recycling
Energiesparen
Entsorgung
DVDUser
Documentation
&Utilities
Informationen zu diesen Themen finden Sie im Kapitel "Aktivierung des Stromsparmodus",
Seite 13 - Deutsch, auf der Recovery-DVD oder auf unseren Internetseiten
("http://www.fujitsu.com/fts/about/fts/environment-care/").
Angaben zur "Ökodesign-Richtlinie":
Die auf der EU Ökodesign-Richtlinie (2009/125/EG) basierende Verordnung 1275/2008
legt Anforderungen an den Stromverbrauch elektrischer und elektronischer Haushaltsund Bürogeräte im Bereitschafts- und im Aus-Zustand fest.
Generell sind alle FUTRO Thin Client Produkte für einen energieeffizienten Betrieb
und geringe Standby-Verluste entwickelt. Kunden- und betriebssytem-spezifische
Anforderungen, die für einen optimalen Betrieb im Vordergrund stehen, können dabei im
Widerspruch zu den Anforderungen der o.g. Verordnung sein.
Für administrative Zwecke, wie z.B. die Fernwartung von Systemen, ist die Funktion "Wake-on-Lan"
(WoL) für unsere Kunden unabdingbar und ist deshalb eine Standardwerkseinstellung. Durch
die aktive WoL-Funktion erhöht sich der Ruhestrom und die max. zulässige Leistungsaufnahme
im Off-Modus kann dadurch geringfügig überschritten sein. Durch Deaktivierung der
WoL-Funktion werden die gesetzlichen Anforderungen eingehalten. Zur Vorgehensweise
siehe Kapitel "Aktivierung des Stromsparmodus", Seite 13 - Deutsch.
Der Energiesparmodus (ACPI S4 Save-to-disk), der von vielen aktuellen Mobile– und
Desktop‑Systemen bekannt ist, steht bei den Embedded Betriebssystem aus technischen
Gründen nicht zur Verfügung. Dadurch ist es nicht möglich, Geräte mit diesem
Betriebssystem automatisch in den Off-Modus zu versetzen.
Das Betriebssystem eines Thin Clients ist auf einem Flashspeicher mit optimierter Größe abgelegt
und wird nach abgeschlossener Konfiguration beim Kunden mit einem Schreibschutz versehen.
Dadurch wird verhindert, dass durch häufiges Beschreiben eines Flashspeichers, wie z.B. beim
Update des Swapfiles im Betriebssystem oder durch andere Applikationen, die Datensicherheit
gefährdet wird. Jeder Flashspeicher lässt nur eine begrenzte Anzahl von Schreibzyklen zu. Sowohl
der aktivierte Schreibschutz als auch die zur Verfügung stehende, limitierte Flashspeicherkapazität
schließen die Möglichkeit zur Aktivierung des Energiesparmodus (ACPI S4) aus.
10
Fujitsu
Wichtige Hinweise
Deutsch - 9
Gerät reinigen
Systemeinheit,sieheGerät
Wiedertransport
Transport
Gerät
Schalten Sie das Gerät und alle daran angeschlossenen Geräte aus und
ziehen Sie den Netzstecker aus der Steckdose.
Der Gehäuseinnenraum des Geräts darf nur von autorisiertem
Fachpersonal gereinigt werden.
Verwenden Sie für die Reinigung kein Scheuerpulver und keine Kunststoff
lösenden Reinigungsmittel (Alkohol, Verdünnung oder Acethon).
Auf keinen Fall das Gerät nass reinigen! Durch eindringendes Wasser können
erhebliche Gefahren für den Anwender entstehen (z. B. Stromschlag).
Achten Sie darauf, dass keine Flüssigkeit in das Innere der Geräte gelangt.
Reinigen Sie die druck- und kratzempfindliche Oberfläche des Monitors nur
mit einem weichen, leicht angefeuchteten Tuch.
Die Gehäuseoberfläche können Sie mit einem trockenen Tuch reinigen. Bei starker
Verschmutzung können Sie ein feuchtes Tuch benutzen, das Sie in Wasser mit mildem
Spülmittel getaucht und gut ausgewrungen haben.
Tastatur und Maus können Sie außen mit Desinfektionstüchern reinigen.
Stellplatz auswählen
Netzadapter
Gerät
Stellplatzauswählen
Bevor Sie Ihr Gerät aufstellen, sollten Sie einen geeigneten Platz für das Gerät
auswählen. Befolgen Sie dabei die folgenden Hinweise:
•
•
•
•
•
•
•
•
Fujitsu
Stellen Sie das Gerät auf eine stabile, ebene, rutschfeste Oberfläche. Beachten
Sie dabei, dass die Gummifüße des Geräts Rückstände auf bestimmten
empfindlichen Oberflächen zurücklassen können.
Halten Sie andere Objekte mindestens 100 mm / 3,93 inch vom Gerät und dem
Netzadapter entfernt, um ausreichende Lüftung sicherzustellen.
Halten Sie andere Objekte mindestens 300 mm / 11,81 inch von der Oberseite
des Geräts entfernt, um ausreichende Lüftung sicherzustellen.
Verdecken Sie niemals die Lüftungsschlitze des Geräts.
Setzen Sie das Gerät keinen extremen Witterungsbedingungen aus. Schützen
Sie das Gerät vor Schmutz, Feuchtigkeit und Wärme.
Setzen Sie das Gerät niemals horizontal ein.
Verwenden Sie es stets in senkrechter Position.
Verwenden Sie das Gerät nie in Räumen ohne angemessene Lüftung.
Falls Ihr Gerät mit einem Standfuß geliefert worden ist, setzen Sie
diesen Standfuß zum Betrieb des Geräts ein.
11
10 - Deutsch
Wichtige Hinweise
Anschlüsse und Bedienelemente
Anschlüsse
In diesem Kapitel werden die einzelnen Hardware-Komponenten Ihres Geräts vorgestellt. Sie
erhalten eine Übersicht über die Anschlüsse und Bedienelemente des Geräts. Machen Sie
sich mit diesen Elementen vertraut, bevor Sie mit dem Gerät arbeiten.
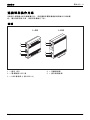
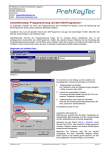
Vorderseite
L 420
1
2
3
4
5
1 = Sitzungs-LED
2 = EIN/AUS-Schalter und LED
3 = USB-Anschlüsse (2x USB 2.0)
12
L 620
1
2
3
4
5
4 = Kopfhöreranschluss
5 = Mikrofonanschluss
Fujitsu
Wichtige Hinweise
Deutsch - 11
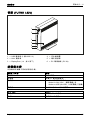
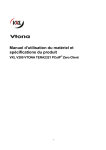
Rückseite (FUTRO L420)
1
2
3
4
5
6
7
1
2
3
4
=
=
=
=
USB-Anschlüsse (2x USB 2.0)
LAN-Anschluss
DVI-Anschluss 1 (DVI-D)
DVI-Anschluss 2 (DVI-I)
Fujitsu
5 = Lautsprecher-Anschluss
6 = Gleichspannungsbuchse (DC IN)
7 = Security Lock
13
12 - Deutsch
Wichtige Hinweise
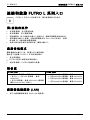
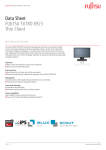
Rückseite (FUTRO L620)
1
2
3
4
5
6
1 = USB-Anschlüsse (2x USB 2.0)
2 = LAN-Anschluss
3 = DisplayPorts (1-4 von oben nach unten)
4 = Security Lock
5 = Lautsprecher-Anschluss
6 = Gleichspannungsbuchse (DC IN)
Statusanzeigen
Dieses Gerät verfügt über zwei unterschiedliche Statusanzeigen.
EIN/AUS-LED
Leuchtet grün
Blinkt grün
Leuchtet gelb
Blinkt gelb
Sitzungs-LED
Leuchtet grün
Aus
14
Erklärung
Gerät ist eingeschaltet
Host-PC in Energiesparmodus
• Client-Standbymodus ist aktiv
• Wake-on-Lan (WoL) oder Wake-on-USB
(WoUSB) ist aktiviert
Einrichtung für WoUSB oder Client fährt herunter
Erklärung
Gerät ist mit PCoIP verbunden
Keine Verbindung zu PCoIP
Fujitsu
Anschluss und Inbetriebnahme des FUTRO L series Portals
Deutsch - 13
Anschluss und Inbetriebnahme des
FUTRO L series Portals
Notebook
Inbetriebnahme
Anschluss
Zur Erstinbetriebnahme Ihres FUTRO L series Portals beachten Sie
die mitgelieferten Sicherheitshinweise.
Bedienung des EIN/AUS-Schalters
► Drücken Sie kurz auf den EIN/AUS-Schalter, um das Gerät einzuschalten.
► Halten Sie den Schalter gedrückt, um das Gerät auszuschalten.
► Wenn das Gerät eingeschaltet ist, sich aber nicht in einer Sitzung mit einem Host-PC
befindet, tippen Sie den Schalter kurz an, um eine neue Sitzung einzuleiten.
► Ist das Gerät mit einem Host-PC verbunden, tippen Sie den Schalter kurz an, um die
Zero Client-Systemsteuerung aufzurufen, in der Optionen, wie Verbindungstrennung
oder eine Hardwareabschaltung des Host-PCs zur Verfügung stehen.
► Gehen Sie wie in der Bedienungsanleitung Ihres Betriebssystems vor,
um den Host-PC auszuschalten.
Aktivierung des Stromsparmodus
Wenn der verbundene Host-PC ausgeschaltet ist, blinkt die EIN/AUS-LED grün
Gehen Sie zur Aktivierung des Energiesparmodus bei der FUTRO L series folgendermaßen vor:
► Halten Sie den EIN/AUS-Schalter gedrückt.
Der FUTRO wird in den sparsamsten Energiesparmodus versetzt.
► Drücken Sie den EIN/AUS-Schalter kurz, um FUTRO erneut zu starten.
Auflösung
FUTRO L420
• 1-2 DVI-Monitore: bis zu 1920x1200
• 1 DVI- + 1 VGA- Monitor: bis zu 1920x1200
• 1 DVI-Monitor: bis zu 2560x1600 (erfordert
optionalen Dual Link-DVI-Adapter)
FUTRO L620
• 1-4 DisplayPort-Monitore: bis zu 1920x1200
• 1-2 DisplayPort-Monitore: bis zu 2560x1600
• 1-2 DisplayPort-Monitore: bis zu 1920x1200
+ 1 DisplayPort-Monitor: bis zu 2560x1600
Gerät an das Netzwerk (LAN) anschließen
LAN
► Schließen Sie das Ethernet-Kabel an den RJ45-LAN-Anschluss an.
Fujitsu
15
14 - Deutsch
Anschluss und Inbetriebnahme des FUTRO L series Portals
Externe Geräte anschließen
Lesen Sie die Dokumentation zum externen Gerät, bevor Sie es anschließen.
Außer bei USB-Geräten müssen die Netzstecker gezogen sein, wenn
Sie externe Geräte anschließen!
Bei Gewitter dürfen Sie Leitungen weder stecken noch lösen.
Fassen Sie beim Lösen einer Leitung immer am Stecker an. Ziehen
Sie nicht an der Leitung!
Halten Sie beim Anschließen oder Lösen von Leitungen die nachfolgend
beschriebene Reihenfolge ein.
Monitor anschließen
Während einer PCoIP-Verbindung: Stellen Sie sicher, dass das FUTRO Portal an
den selben Monitoranschluss an der Host-PC-Karte angeschlossen ist.
► Befolgen Sie die Anweisungen in der Bildschirmanleitung zur Vorbereitung
des Monitors (z. B. Kabel anschließen).
► Schließen Sie das Datenkabel an den Monitoranschluss des Geräts an.
► Schließen Sie das Netzkabel des Monitors an eine geerdete Steckdose an.
Monitor
16
Fujitsu
Anschluss und Inbetriebnahme des FUTRO L series Portals
Deutsch - 15
USB-Tastatur anschließen
Verwenden Sie nur die mitgelieferte Tastaturleitung.
Anschließen
USB-Anschluss
► Stecken Sie den rechteckigen Stecker der Tastaturleitung in die rechteckige Buchse
an der Unterseite oder an der Rückseite der Tastatur.
► Stecken Sie den flachen rechteckigen USB-Stecker der Tastaturleitung in
einen USB-Anschluss des Geräts.
USB-Anschluss
USB-Maus anschließen
► Schließen Sie die USB-Maus an einen USB-Anschluss des Geräts an.
USB-Maus anschließen
USB-Anschluss
PCoIP-Verbindung herstellen
Ihr FUTRO L series Portal ist vorkonfiguriert, um direkt an eine CESLIUS RemoteAccess-Hostkarte
angeschlossen zu werden, kann aber ebenso für den Einsatz eines Drittherstellerprodukts
konfiguriert werden, zum Beispiel VMware View, um eine Verbindung zu virtuellen Desktops
oder zu CELSIUS RemoteAccess-Hostkarten herzustellen.
Direkte Verbindung zur Hostkarte
Um eine direkte Verbindung zur Hostkarte herzustellen, gehen Sie wie folgt vor:
► Schalten Sie Ihre CELSIUS Workstation mit der CELSIUS RemoteAccess-Hostkarte ein.
► Schalten Sie das FUTRO L series Portal und die angeschlossenen Anzeigegeräte ein.
► Stellen Sie sicher, dass sich das FUTRO L series Portal im selben Netzwerk
wie die CELSIUS RemoteAccess-Hostkarte befindet.
► Warten Sie, bis das Dialogfeld Verbindung auf dem Bildschirm erscheint.
► Um fortzufahren, klicken Sie auf Verbinden.
► Warten Sie, bis die Meldung Hosts werden gesucht, bitte warten... ausgeblendet wird.
Eine Liste von verfügbaren Hosts wird angezeigt.
► Wählen Sie die CELSIUS RemoteAccess-Hostkarte, zu der Sie eine Verbindung
herstellen möchten, und klicken Sie auf OK.
Der Bildschirm der CELSIUS-Workstation wird angezeigt und die Sitzungs-LED
des FUTRO L series auf der Frontblende leuchtet grün und zeigt eine
erfolgreiche PCoIP-Verbindung an.
Weitere Informationen zu den Verbindungsmöglichkeiten PCoIP oder VDI finden sich
im Internet unter "http://www.fujitsu.com/fts/support".
Fujitsu
17
Anschluss und Inbetriebnahme des FUTRO L series Portals
16 - Deutsch
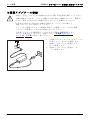
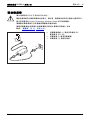
Netzadapter anschließen
Netzadapter
Betriebsbereitschaftherstellen
Beachten Sie die Sicherheitshinweise im beigefügten Handbuch "Sicherheit".
Die mitgelieferte Netzleitung entspricht den Anforderungen des Landes, in
dem Sie das Gerät gekauft haben. Achten Sie darauf, dass die Netzleitung
für das Land zugelassen ist, in dem sie verwendet wird.
Benutzen Sie nur den mitgelieferten und von Fujitsu Technology Solutions
GmbH zugelassenen Netzadapter.
Die Netzleitung des Netzadapters darf nur dann an eine Steckdose angeschlossen
sein, wenn das Gerät am Netzadapter angeschlossen ist.
Versichern Sie sich, dass die Stromaufnahme des Netzadapters nicht höher ist
als die des Stromnetzes, an das Sie den Netzadapter anschließen (siehe Kapitel
"Technische Daten", "Netzadapter", Seite 20 - Deutsch).
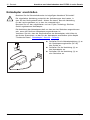
► Schließen Sie die Netzadapterleitung (1) an
die Gleichspannungsbuchse (DC IN)
des Geräts an.
► Schließen Sie die Netzleitung (2) an
den Netzadapter an.
► Schließen Sie die Netzleitung (3) an
eine Steckdose an.
3
2
1
18
Fujitsu
Anschluss und Inbetriebnahme des FUTRO L series Portals
Deutsch - 17
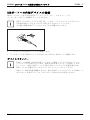
Externe Geräte an die USB-Anschlüsse anschließen
Geräte
ExterneGeräte
USB-Anschluss
USB-Geräte
An die USB-Anschlüsse können Sie eine Vielzahl externer Geräte anschließen
(z. B. Drucker, Scanner, Modem oder Tastatur).
USB-Geräte sind hot-plug-fähig. Daher können die Leitungen von USB-Geräten
bei eingeschaltetem Gerät angeschlossen und gelöst werden.
Weitere Informationen finden Sie in der Dokumentation zu den USB-Geräten.
► Schließen Sie die Datenleitung an das externe Gerät an.
► Schließen Sie die Datenleitung an einen USB-Anschluss Ihres FUTRO L series Portals an.
Gerätetreiber
Die externen USB-Geräte, die an die USB-Anschlüsse angeschlossen werden,
erfordern keine eigenen Treiber, da die erforderliche Software bereits im Betriebssystem
enthalten ist. Falls das externe USB-Gerät dennoch spezielle Software erfordert, muss
diese vom dem USB-Gerät beiliegenden Datenträger installiert werden.
Um Datenübertragung über USB nicht zu beeinträchtigen, darf das Kabel vom externen
USB-Gerät zum, USB-Anschluss Ihres Geräts nicht länger als 3 m / 118,11 inch sein.
Fujitsu
19
18 - Deutsch
Problemlösungen und Tipps
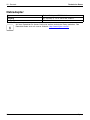
Problemlösungen und Tipps
Ursache
Die CELSIUS RemoteAccess-Hostkarte wird
nicht vom FUTRO L series Portal erkannt.
Die Funktion zum sicheren Entfernen von
USB-Geräten kann nicht ausgeführt werden.
Muss ich die die CELSIUS-Workstation
herunterfahren, wenn ich das FUTRO L series
Portal installieren möchte?
20
Korrekturmaßnahmen
► Netzwerkanschluss prüfen.
► Sicherstellen, dass der Router eingeschaltet
ist.
► Beenden Sie alle Programme, die
möglicherweise auf das Laufwerk zugreifen.
Bei dem FUTRO L series Portal handelt
es sich um ein "Plug & Play"-Gerät. Sie
können es jederzeit anschließen – selbst bei
eingeschaltetem Computer.
Fujitsu
Technische Daten
Deutsch - 19
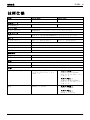
Technische Daten
Allgemeines
Prozessor
Elektrische Kennwerte
Maximaler Energieverbrauch
Audio
Soundchip
Netzwerk
LAN
Anschlüsse
Monitoranschluss
Mikrofonanschluss
Kopfhöreranschluss
Lautsprecheranschluss
USB-Anschluss
Umgebungsbedingungen
Klimaklasse (3K2)
Klimaklasse (2K2)
Temperatur
Betrieb (3K2)
Transport (2K2)
Abmessungen
Breite x Tiefe x Höhe
FUTRO L420
TERA 2321 PCoIP-Prozessor
FUTRO L620
TERA 2140 PCoIP-Prozessor
19 W
22 W
High Definition Audio Controller Interface
10/100/1000 Base T-Netzwerkkabel an RJ45-Anschluss
2 Anschlüsse, DVI-D, DVI-I
3,5 mm Mono-Klinkenbuchse
4 Anschlüsse, DisplayPort
3,5 mm Stereo-Klinkenbuchse
3,5 mm Stereo-Klinkenbuchse
4 x USB 2.0
DIN IEC 721 part 3-3
DIN IEC 721 part 3-2
10 °C ... 35 °C / 50 °F ... 95 °F
-25 °C ... 60 °C / -13 °F ... 140 °F
45 mm x 130 mm x 150 mm /
•
1,77 inch x 5,11 inch x 5,90 inch
•
Gewicht
ca. 630 g / 1,38 lbs
•
•
Fujitsu
mit Fuß:
80 mm x 133 mm x 186 mm /
3,15 inch x 5,22 inch x
7,32 inch
ohne Fuß:
45 mm x 133 mm x 183 mm /
1,76 inch x 5,22 inch x
7,20 inch
mit Fuß:
860 g / 1,89 lbs
ohne Fuß:
ca. 790 g / 1,74 lbs
21
20 - Deutsch
Technische Daten
Netzadapter
Typ
Eingang
Ausgang
Delta AC-Adapter ADP-36JH A
AC 100-240 V; 1,0 A; 50-60 Hz; Class II
DC 12 V; 3 A
Auf dem Datenblatt für dieses Gerät sind weitere technische Daten enthalten. Das
Datenblatt findet sich auf unserer Website "http://www.fujitsu.com/fts".
22
Fujitsu
Contents
English - 1
Contents
English
FUTRO L series . . . . . . . . . . . . . . . . . . . . . . . . . . . . . . . . . . . . . . . . . . . . . . . . . . . . . . . . . . . . . . . . . . . . . . . .
CELSIUS Workstation . . . . . . . . . . . . . . . . . . . . . . . . . . . . . . . . . . . . . . . . . . . . . . . . . . . . . . . . . . . . . . . . . . .
FUTRO L series Portal . . . . . . . . . . . . . . . . . . . . . . . . . . . . . . . . . . . . . . . . . . . . . . . . . . . . . . . . . . . . . . . . . .
Validity of the Reference Manual . . . . . . . . . . . . . . . . . . . . . . . . . . . . . . . . . . . . . . . . . . . . . . . . . . . . . . . . .
Notational conventions . . . . . . . . . . . . . . . . . . . . . . . . . . . . . . . . . . . . . . . . . . . . . . . . . . . . . . . . . . . . . . . . . .
System requirements . . . . . . . . . . . . . . . . . . . . . . . . . . . . . . . . . . . . . . . . . . . . . . . . . . . . . . . . . . . . . . . . . . . .
3
3
3
3
4
4
Important notes . . . . . . . . . . . . . . . . . . . . . . . . . . . . . . . . . . . . . . . . . . . . . . . . . . . . . . . . . . . . . . . . . . . . . . . .
Safety notes . . . . . . . . . . . . . . . . . . . . . . . . . . . . . . . . . . . . . . . . . . . . . . . . . . . . . . . . . . . . . . . . . . . . . . . . . . . .
CE marking . . . . . . . . . . . . . . . . . . . . . . . . . . . . . . . . . . . . . . . . . . . . . . . . . . . . . . . . . . . . . . . . . . . . . . . . . . . .
FCC Class B Compliance Statement . . . . . . . . . . . . . . . . . . . . . . . . . . . . . . . . . . . . . . . . . . . . . . . . . . . . .
Unpacking and checking the delivery . . . . . . . . . . . . . . . . . . . . . . . . . . . . . . . . . . . . . . . . . . . . . . . . . . . . .
Energy saving, disposal and recycling . . . . . . . . . . . . . . . . . . . . . . . . . . . . . . . . . . . . . . . . . . . . . . . . . . . .
Cleaning the device . . . . . . . . . . . . . . . . . . . . . . . . . . . . . . . . . . . . . . . . . . . . . . . . . . . . . . . . . . . . . . . . . . . . .
Selecting a location . . . . . . . . . . . . . . . . . . . . . . . . . . . . . . . . . . . . . . . . . . . . . . . . . . . . . . . . . . . . . . . . . . . . .
Ports and operating elements . . . . . . . . . . . . . . . . . . . . . . . . . . . . . . . . . . . . . . . . . . . . . . . . . . . . . . . . . . .
Front . . . . . . . . . . . . . . . . . . . . . . . . . . . . . . . . . . . . . . . . . . . . . . . . . . . . . . . . . . . . . . . . . . . . . . . . . . . . . . .
Rear (FUTRO L420) . . . . . . . . . . . . . . . . . . . . . . . . . . . . . . . . . . . . . . . . . . . . . . . . . . . . . . . . . . . . . . . . .
Rear (FUTRO L620) . . . . . . . . . . . . . . . . . . . . . . . . . . . . . . . . . . . . . . . . . . . . . . . . . . . . . . . . . . . . . . . . .
Status indicators . . . . . . . . . . . . . . . . . . . . . . . . . . . . . . . . . . . . . . . . . . . . . . . . . . . . . . . . . . . . . . . . . . . .
5
5
5
6
7
8
8
9
10
10
11
12
12
Connection and initial startup of the FUTRO L series Portal . . . . . . . . . . . . . . . . . . . . . . . . . . . .
ON/OFF switch operation . . . . . . . . . . . . . . . . . . . . . . . . . . . . . . . . . . . . . . . . . . . . . . . . . . . . . . . . . . . . . . . .
Activating power-saving mode . . . . . . . . . . . . . . . . . . . . . . . . . . . . . . . . . . . . . . . . . . . . . . . . . . . . . . . . . . .
Resolution . . . . . . . . . . . . . . . . . . . . . . . . . . . . . . . . . . . . . . . . . . . . . . . . . . . . . . . . . . . . . . . . . . . . . . . . . . . . . .
Connecting the device to the network (LAN) . . . . . . . . . . . . . . . . . . . . . . . . . . . . . . . . . . . . . . . . . . . . . . .
Connecting external devices . . . . . . . . . . . . . . . . . . . . . . . . . . . . . . . . . . . . . . . . . . . . . . . . . . . . . . . . . . . . .
Connecting a monitor . . . . . . . . . . . . . . . . . . . . . . . . . . . . . . . . . . . . . . . . . . . . . . . . . . . . . . . . . . . . . . . .
Connecting a USB keyboard . . . . . . . . . . . . . . . . . . . . . . . . . . . . . . . . . . . . . . . . . . . . . . . . . . . . . . . . .
Connecting a USB mouse . . . . . . . . . . . . . . . . . . . . . . . . . . . . . . . . . . . . . . . . . . . . . . . . . . . . . . . . . . . .
Establishing a PCoIP connection . . . . . . . . . . . . . . . . . . . . . . . . . . . . . . . . . . . . . . . . . . . . . . . . . . . . .
Connecting the mains adapter . . . . . . . . . . . . . . . . . . . . . . . . . . . . . . . . . . . . . . . . . . . . . . . . . . . . . . . .
Connecting external devices to the USB ports . . . . . . . . . . . . . . . . . . . . . . . . . . . . . . . . . . . . . . . . .
13
13
13
13
13
14
14
15
15
15
16
17
Troubleshooting and tips . . . . . . . . . . . . . . . . . . . . . . . . . . . . . . . . . . . . . . . . . . . . . . . . . . . . . . . . . . . . . .
18
Technical specification . . . . . . . . . . . . . . . . . . . . . . . . . . . . . . . . . . . . . . . . . . . . . . . . . . . . . . . . . . . . . . . . .
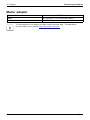
Mains adapter . . . . . . . . . . . . . . . . . . . . . . . . . . . . . . . . . . . . . . . . . . . . . . . . . . . . . . . . . . . . . . . . . . . . . . . . . .
19
20
Fujitsu
23
2 - English
24
Contents
Fujitsu
FUTRO L series
English - 3
FUTRO L series
The FUTRO L series consists of two different portals and two optional CELSIUS RemoteAccess cards.
The FUTRO L420 and L620 can be used either as an ultra thin client in a VDI
environment or as a PCoIP® portal with remote connection to a CELSIUS workstation
equipped with a CELSIUS RemoteAccess host card.
The remote access solution is based on PCoIP® technology, with which communication between
the CELSIUS RemoteAccess cards and the FUTRO L Portals is ensured.
The PCoIP® (PCoverIP®) technology enables efficient and fast setup of the connection.
Applications and functions can be implemented locally without limitation.
CELSIUS Workstation
The CELSIUS Workstation forms a central main computer. Your operating system is installed on this
main computer. User-dependent functions and applications are run by the CELSIUS Workstation.
The user can easily access the CELSIUS Workstation via PCoIP®, as if it
were located close to the monitors.
FUTRO L series Portal
The FUTRO L series Portal is an ultra thin client which, together with a connected monitor, can
reproduce those applications and functions which are run on a remote CELSIUS Workstation.
You can work locally with the FUTRO L series Portal and connect further peripheral devices.
Validity of the Reference Manual
This Reference Manual is valid for the following systems:
•
•
FUTRO L420
FUTRO L620
Fujitsu
25
4 - English
FUTRO L series
Notational conventions
Pay particular attention to text marked with this symbol. Failure to observe
these warnings could pose a risk to health, damage the device or lead
to loss of data. The warranty will be invalidated if the device becomes
defective through failure to take notice of this warning.
indicates important information for the proper use of the device
►
indicates an activity that must be performed in the order shown
indicates a result
This style
indicates information that is displayed on the screen by a program, e.g.:
Installation is complete!
indicates
"This style"
• terms and text used in a software interface, e.g.: Click on Save.
• Names of programs or files, e.g. Windows or setup.exe.
indicates
This style
•
•
Abc
This style
cross-references to another section, e.g. "Safety information"
cross-references to an external source, e.g. a web address: For more
information, go to"http://www.fujitsu.com/fts"
• names of CDs, DVDs and titles or designations for other materials, e.g.:
"CD/DVD Drivers & Utilities" or "Safety" manual
indicates a key on the keyboard, e.g: F10
indicates terms and text that are emphasized or highlighted, e.g.: Do not
switch off the device
System requirements
•
•
•
•
•
26
one free PCIe port for the CELSIUS RemoteAccess card (optional)
a USB mouse
a USB keyboard
VGA/DVI or DisplayPort monitor
a network connection
Fujitsu
Important notes
English - 5
Important notes
Notes
Importantnotes
In this chapter you will find information regarding safety which it is essential to
take note of when working with your device.
Safety notes
Note
Safetynotes
Please follow the safety notes provided in the "Safety/Regulations" manual
as well as the safety notes given below.
When installing and operating the device, please observe the notes on ambient
conditions in "Technical specification", Page 19 - English and the instructions in
"Connection and initial startup of the FUTRO L series Portal", Page 13 - English.
Caution, components in the system can get very hot.
The activities described in these instructions must always be
performed with the greatest care.
Repairs to the device must only be carried out by qualified technicians. Incorrect
repairs could put the user at great risk (electric shock, hazardous energy emissions,
risk of fire) or cause serious damage to the equipment.
Operate the device only with the casing closed.
Power cable and mains adapter:
The supplied power cable conforms to the requirements of the country in
which you purchased your device. Make sure that the power cable is approved
for use in the country in which you intend to use it.
The mains adapter’s power cable should only be connected to a mains
socket if the device is connected.
Do not use the mains adapter for other devices.
Use only the mains adapter which is intended for use with the device, see
chapter "Technical specification", Page 19 - English.
Make sure that the rated current of the mains adapter is not higher than that of
the power system to which you connect the mains adapter.
ON/OFF switches do not disconnect the device from the mains voltage. To completely
disconnect the mains voltage, remove the power plug from the power socket.
CE marking
The shipped version of this device complies with the requirements of EU directives
2004/108/EC "Electromagnetic compatibility", 2006/95/EC "Low voltage directive"
and 2009/125/EC "Ecodesign directive".
Fujitsu
27
6 - English
Important notes
FCC Class B Compliance Statement
DOC (INDUSTRY CANADA) NOTICES
Notice to Users of Radios and Television:
This class B digital apparatus complies with Canadian ICES-003.
The following statement applies to the products covered in this manual, unless otherwise specified
herein. The statement for other products will appear in the accompanying documentation.
NOTE:
This equipment has been tested and found to comply with the limits for a "Class B" digital
device, pursuant to Part 15 of the FCC rules and meets all requirements of the Canadian
Interference-Causing Equipment Standard ICES-003 for digital apparatus. These limits are
designed to provide reasonable protection against harmful interference in a residential installation.
This equipment generates, uses and can radiate radio frequency energy and, if not installed
and used in strict accordance with the instructions, may cause harmful interference to radio
communications. However, there is no guarantee that interference will not occur in a particular
installation. If this equipment does cause harmful interference to radio or television reception,
which can be determined by turning the equipment off and on, the user is encouraged to
try to correct the interference by one or more of the following measures:
•
•
•
Reorient or relocate the receiving antenna.
Increase the separation between equipment and the receiver.
Connect the equipment into an outlet on a circuit different from that to
which the receiver is connected.
• Consult the dealer or an experienced radio/TV technician for help.
Fujitsu is not responsible for any radio or television interference caused by unauthorized
modifications of this equipment or the substitution or attachment of connecting cables and
equipment other than those specified by Fujitsu. The correction of interferences caused by such
unauthorized modification, substitution or attachment will be the responsibility of the user.
The use of shielded I/O cables is required when connecting this equipment to any and all optional
peripheral or host devices. Failure to do so may violate FCC and ICES rules.
28
Fujitsu
Important notes
English - 7
Unpacking and checking the delivery
Delivery of the FUTRO L series Portal includes:
•
•
•
•
•
•
►
►
►
►
one FUTRO L420 dual display portal or FUTRO L620 quad display portal
one mains adapter with mains cable
one mains adapter with mains cable
one "FUTRO L420 / L620" quick start guide
two multi-lingual "Safety/Regulations" manuals
one "Service Desk & Warranty Information" supplement
Unpack all the components.
Check the contents for any visible damage which may have occurred during transportation.
Check that the delivery conforms to the details in the delivery note.
Notify your local sales outlet immediately if you find any transport damage or that
the delivery does not correspond to the delivery note.
We recommend that you do not discard the original packing material of the equipment.
Keep the original packaging material, in case you need to transport the equipment again.
Fujitsu
29
8 - English
Important notes
Energy saving, disposal and recycling
Drivers&
Recycling
Energysaving
Disposal
User
DocumentationDVD
UtilitiesDVD
You can find information on these subjects in chapter "Activating power-saving
mode", Page 13 - English, on the Recovery DVD or on our website
("http://www.fujitsu.com/fts/about/fts/environment-care/").
Information on "Eco design directive":
Regulation 1275/2008, based on the EU Eco-design Directive (2009/125/EU),
defines requirements for the power consumption of electrical and electronic domestic
and office devices in stand-by and off mode.
In general, all FUTRO thin client products have been developed for energy-efficient
operation and low stand-by losses. Due to customer-specific and operating system-specific
requirements, which are the priority for optimal operation, some system settings are
necessary which deviate from the above-mentioned directive.
For administrative purposes, such as remote maintenance of systems, the "Wake-on-Lan"
(WoL) function is indispensable for our customers and is therefore a default setting.
Activation of the WoL function slightly increases the idle current and the max. permissible
power draw in the Off mode can thus be slightly exceeded. By deactivating the WoL
function, it is possible to comply with the legal requirements. Please see chapter "Activating
power-saving mode", Page 13 - English for the procedure.
The energy saving mode (ACPI S4 Save-to-disk), which is familiar from many current mobile
and desktop systems, is not available in the embedded operating systems for technical reasons.
Therefore, it is not possible to switch devices with this operating system automatically into Off mode.
The operating system of a thin client is stored on a flash memory with optimised size and is provided
with write protection after configuration has been completed by the customer. This prevents data
security from being put at risk through frequent writing to a flash memory, such as when updating
the Swapfiles in the operating system or through other applications. Every flash memory permits
only a limited number of write cycles. Both the activated write protection and the available, limited
flash memory capacity rule out the possibility of activating energy saving mode (ACPI S4).
Cleaning the device
System unit,see Device
Retransportation
Transportation
Device,
Turn off all power and equipment switches and disconnect the power
plug from the mains outlet.
Do not clean any interior parts yourself, leave this job to a service technician.
Do not use any cleaning agents that contain abrasives or may corrode
plastic (alcohol, thinner or acetone).
Never clean the device with water! Water entering into the device could
present a serious risk to users (e.g. electric shock).
Ensure that no liquid enters the system.
The surface of the monitor is sensitive to pressure and scratches. Clean
it only using a soft, slightly moistened cloth.
The surface can be cleaned with a dry cloth. If particularly dirty, use a cloth that has been
moistened in mild domestic detergent and then carefully wrung out.
Use disinfectant wipes to clean the keyboard and the mouse.
30
Fujitsu
Important notes
English - 9
Selecting a location
Selectinga location
Mainsadapter
Device
Select a suitable location for the device before setting it up. Follow
the instructions below when doing so:
•
•
•
•
•
•
•
•
Fujitsu
Place the device on a stable, flat, non-slippery surface. Please note that the
rubber feet of the device may mark certain types of delicate surfaces.
Keep other objects at least 100 mm / 3.93 inch from the device and its
mains adapter to ensure adequate ventilation.
Keep other objects at least 300 mm / 11.81 inch from the top away
from the device to ensure adequate ventilation.
Never cover the ventilation slots of the device.
Do not expose the device to extreme environmental conditions. Protect
the device against dust, humidity, and heat.
Do not use the device horizontally.
Always use the device in a vertical position.
Do not use the device in rooms without adequate ventilation.
If your system is delivered with a foot, make sure this foot is
used for operating the system.
31
10 - English
Important notes
Ports and operating elements
Ports
This chapter presents the individual hardware components of your device. This will provide
you with an overview of the ports and operating elements on the device. Please familiarise
yourself with these components before starting to work with your device.
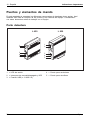
Front
L 420
1
2
3
4
5
1 = Session LED
2 = ON/OFF switch and LED
3 = USB ports (2x USB 2.0)
32
L 620
1
2
3
4
5
4 = Headphones port
5 = Microphone port
Fujitsu
Important notes
English - 11
Rear (FUTRO L420)
1
2
3
4
5
6
7
1
2
3
4
=
=
=
=
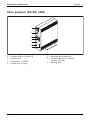
USB ports (2x USB 2.0)
LAN port
DVI port 1 (DVI-D)
DVI port 2 (DVI-I)
Fujitsu
5 = Loudspeaker port
6 = DC input connector (DC IN)
7 = Security Lock
33
12 - English
Important notes
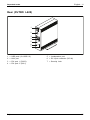
Rear (FUTRO L620)
1
2
3
4
5
6
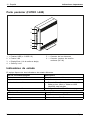
1 = USB ports (2x USB 2.0)
2 = LAN port
3 = DisplayPorts (1-4 from top to bottom)
4 = Security Lock
5 = Loudspeaker port
6 = DC input connector (DC IN)
Status indicators
This device has two different status indicators.
ON/OFF LED
Solid green
Flashing green
Solid yellow
Flashing yellow
Session LED
Solid green
Off
34
Description
Unit is powered on
Host PC in low power state
• Client standby power is active
• Wake-on-Lan (WoL) or Wake-on-USB
(WoUSB) is enabled
Setting up for WoUSB or Client is powering down
Description
Unit is connected to PCoIP
No connection to PCoIP
Fujitsu
Connection and initial startup of the FUTRO L series Portal
English - 13
Connection and initial startup of the
FUTRO L series Portal
Notebook
Gettingstarted
Port
Please take note of the supplied safety notes for the first-time setup
of your FUTRO L series Portal.
ON/OFF switch operation
► To turn the device on, briefly press the ON/OFF switch.
► To turn the device off, press and hold the switch.
► When the device is on and not in a session with a host PC, briefly press
the switch to start a new session.
► When connected to a host PC, briefly press to access the Zero Client Control Panel with
options to disconnect or force a hard power down of the host PC.
► To switch the host PC off, proceed as described in the documentation of your operating system.
Activating power-saving mode
When the connected host PC is shut down, the ON/OFF LED flashes green.
To activate power-saving mode, please proceed as follows with the FUTRO L series:
► Press and hold the ON/OFF switch.
The FUTRO is put into the lowest energy saving mode.
► To restart the FUTRO, press the ON/OFF switch briefly.
Resolution
FUTRO L420
• 1-2 DVI monitors: up to 1920x1200
• 1 DVI + 1 VGA monitors: up to 1920x1200
• 1 DVI monitor: up to 2560x1600 (requires
optional Dual Link DVI adapter)
FUTRO L620
• 1-4 DisplayPort monitors: up to 1920x1200
• 1-2 DisplayPort monitors: up to 2560x1600
• 1-2 DisplayPort monitors: up to 1920x1200
+ 1 DisplayPort monitor: up to 2560x1600
Connecting the device to the network (LAN)
LAN
► Plug the Ethernet cable into the RJ45 LAN port.
Fujitsu
35
Connection and initial startup of the FUTRO L series Portal
14 - English
Connecting external devices
Read the documentation on the external device before connecting it.
With the exception of USB devices, always remove all power plugs
before connecting external devices!
Do not connect or disconnect cables during a thunderstorm.
Always take hold of the actual plug when disconnecting a cable. Never pull the cable!
Connect and disconnect the cables in the order described below.
Connecting a monitor
During a PCoIP connection: Make sure that the FUTRO Portal is connected
to the same monitor port on the host PC card.
► Follow the instructions contained in the monitor manual to prepare the monitor
for operation (e.g. connecting cables).
► Plug the data cable into the monitor port of the device.
► Plug the monitor power cable into the grounded mains outlet.
Monitor
36
Fujitsu
Connection and initial startup of the FUTRO L series Portal
English - 15
Connecting a USB keyboard
Use only the keyboard cable supplied.
Connecting
USBport
► Plug the rectangular connector of the keyboard cable into the rectangular socket
on the underside or on the rear of the keyboard.
► Insert the flat rectangular USB plug of the keyboard cable into a USB port of the device.
USBport
Connecting a USB mouse
► Connect the USB mouse to one of the USB ports on the device.
Connectinga USBmouse
USBport
Establishing a PCoIP connection
Your FUTRO L series Portal is pre-configured to connect directly to a CELSIUS RemoteAccess
host card, but can be configured to use a third party connection broker, such as VMware
View, to connect to virtual desktops or CELSIUS RemoteAccess host cards.
Direct connection to host card
To establish a direct connection to the host card, proceed as follows:
► Power on your CELSIUS Workstation with CELSIUS RemoteAccess host card.
► Power on the FUTRO L series Portal and the connected displays.
► Ensure that the FUTRO L series Portal is on the same network as the
CELSIUS RemoteAccess host card.
► Wait until the Connect dialog appears on the screen.
► Click on Connect to proceed.
► Wait until the message Discovering hosts, please wait... disappears.
A list of available hosts is displayed.
► Select the CELSIUS RemoteAccess host card to which you wish to connect and click on OK.
The CELSIUS Workstation screen is displayed and the FUTRO L series Session LED on
the front panel will turn green indicating a successful PCoIP connection.
For further information concerning the PCoIP or VDI connection possibilities, visit
the Internet at "http://www.fujitsu.com/fts/support".
Fujitsu
37
Connection and initial startup of the FUTRO L series Portal
16 - English
Connecting the mains adapter
Mainsadapter
Preparingforoperation
Observe the safety precautions in the enclosed "Safety" manual.
The supplied power cable conforms to the requirements of the country in
which you purchased your device. Make sure that the power cable is approved
for use in the country in which you intend to use it.
Use only the mains adapter supplied with the device and approved
by Fujitsu Technology Solutions GmbH.
The mains adapter’s power cable should only be connected to a mains socket
if the device is connected to the mains adapter.
Make sure that the rated current of the mains adapter is not higher than that
of the mains supply to which you connect the mains adapter (see chapter
"Technical Data", "Mains adapter", Page 20 - English).
► Connect the mains adapter cable (1) to
the DC jack (DC IN) of the device.
► Connect the power cable (2) to the
mains adapter.
► Plug the power cable (3) into a mains outlet.
3
2
1
38
Fujitsu
Connection and initial startup of the FUTRO L series Portal
English - 17
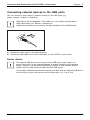
Connecting external devices to the USB ports
Devices
Externaldevices
USBport
USBdevices
You can connect a wide range of external devices to the USB ports (e.g.
printer, scanner, modem or keyboard).
USB devices are hot-pluggable. This means you can connect and disconnect
USB cables while your device is switched on.
Additional information can be found in the documentation for the USB devices.
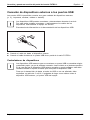
► Connect the data cable to the external device.
► Connect the data cable to one of the USB ports of your FUTRO L series Portal.
Device drivers
The external USB devices you connect to the USB ports usually require no
driver of their own, as the required software is already included in the operating
system. However, if the external USB device requires its own software, please
install it from the data carrier provided with the USB device.
To ensure the USB data transmission capacity, the cable from the external USB device
to the USB port of your device must not be longer than 3 m / 118.11 inch.
Fujitsu
39
18 - English
Troubleshooting and tips
Troubleshooting and tips
Cause
CELSIUS RemoteAccess host card is not
recognised by the FUTRO L series Portal.
Corrective measures
► Check the network connection.
► Ensure that the router is switched on.
The function to safely remove USB devices
► Close all programs that might access the
cannot be run.
drive.
Do I have to power down the CELSIUS
The FUTRO L series Portal is a "Plug & Play"
Workstation when I want to install the FUTRO L device. You can install it whenever you like –
series Portal?
even while the computer is switched on.
40
Fujitsu
Technical specification
English - 19
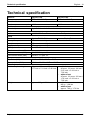
Technical specification
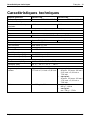
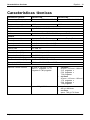
General
Processor
Electrical data
Maximum power consumption
Audio
Sound chip
Network
LAN
Ports
Monitor port
Microphone port
Headphone port
Loudspeaker port
USB port
Environmental conditions
Environment class (3K2)
Environment class (2K2)
Temperatur
Operation (3K2)
Transportation (2K2)
Dimensions
Width x Depth x Height
FUTRO L420
TERA 2321 PCoIP processor
FUTRO L620
TERA 2140 PCoIP processor
19 W
22 W
High Definition Audio Controller Interface
10/100/1000 Base-T network cable to RJ45 port
2 ports, DVI-D, DVI-I
3.5 mm mono mini jack
3.5 mm stereo mini jack
3.5 mm stereo mini jack
4 x USB 2.0
4 ports, DisplayPort
DIN IEC 721 part 3-3
DIN IEC 721 part 3-2
10 °C ... 35 °C / 50 °F ... 95 °F
-25 °C ... 60 °C / -13 °F ... 140 °F
45 mm x 130 mm x 150 mm /
•
1.77 inch x 5.11 inch x 5.90 inch
•
Weight
approx. 630 g / 1.38 lbs
•
•
Fujitsu
with foot:
80 mm x 133 mm x 186 mm /
3.15 inch x 5.22 inch x
7.32 inch
without foot:
45 mm x 133 mm x 183 mm /
1.76 inch x 5.22 inch x
7.20 inch
with foot:
860 g / 1.89 lbs
without foot:
approx. 790 g / 1.74 lbs
41
20 - English
Technical specification
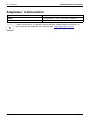
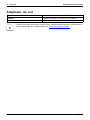
Mains adapter
Type
Input
Output
Delta AC-Adapter ADP-36JH A
AC 100-240 V; 1.0 A; 50-60 Hz; Class II
DC 12 V; 3 A
The data sheet for this device provides further technical data. The data sheet
can be found on our website "http://www.fujitsu.com/fts".
42
Fujitsu
Sommaire
Français - 1
Sommaire
Français
FUTRO série L . . . . . . . . . . . . . . . . . . . . . . . . . . . . . . . . . . . . . . . . . . . . . . . . . . . . . . . . . . . . . . . . . . . . . . . . .
Station de travail CELSIUS . . . . . . . . . . . . . . . . . . . . . . . . . . . . . . . . . . . . . . . . . . . . . . . . . . . . . . . . . . . . . .
Portail FUTRO série L . . . . . . . . . . . . . . . . . . . . . . . . . . . . . . . . . . . . . . . . . . . . . . . . . . . . . . . . . . . . . . . . . . .
Validité de la description . . . . . . . . . . . . . . . . . . . . . . . . . . . . . . . . . . . . . . . . . . . . . . . . . . . . . . . . . . . . . . . . .
Symboles . . . . . . . . . . . . . . . . . . . . . . . . . . . . . . . . . . . . . . . . . . . . . . . . . . . . . . . . . . . . . . . . . . . . . . . . . . . . . .
Matériel requis . . . . . . . . . . . . . . . . . . . . . . . . . . . . . . . . . . . . . . . . . . . . . . . . . . . . . . . . . . . . . . . . . . . . . . . . . .
3
3
3
3
4
4
Remarques importantes . . . . . . . . . . . . . . . . . . . . . . . . . . . . . . . . . . . . . . . . . . . . . . . . . . . . . . . . . . . . . . .
Consignes de sécurité . . . . . . . . . . . . . . . . . . . . . . . . . . . . . . . . . . . . . . . . . . . . . . . . . . . . . . . . . . . . . . . . . . .
Marquage CE . . . . . . . . . . . . . . . . . . . . . . . . . . . . . . . . . . . . . . . . . . . . . . . . . . . . . . . . . . . . . . . . . . . . . . . . . . .
FCC Class B Compliance Statement . . . . . . . . . . . . . . . . . . . . . . . . . . . . . . . . . . . . . . . . . . . . . . . . . . . . .
Déballage et contrôle du contenu de la livraison . . . . . . . . . . . . . . . . . . . . . . . . . . . . . . . . . . . . . . . . . . .
Economie d’énergie, élimination et recyclage . . . . . . . . . . . . . . . . . . . . . . . . . . . . . . . . . . . . . . . . . . . . . .
Nettoyer l’appareil . . . . . . . . . . . . . . . . . . . . . . . . . . . . . . . . . . . . . . . . . . . . . . . . . . . . . . . . . . . . . . . . . . . . . . .
Sélectionner un emplacement . . . . . . . . . . . . . . . . . . . . . . . . . . . . . . . . . . . . . . . . . . . . . . . . . . . . . . . . . . . .
Ports et éléments de commande . . . . . . . . . . . . . . . . . . . . . . . . . . . . . . . . . . . . . . . . . . . . . . . . . . . . . . . . .
Face avant . . . . . . . . . . . . . . . . . . . . . . . . . . . . . . . . . . . . . . . . . . . . . . . . . . . . . . . . . . . . . . . . . . . . . . . . .
Face arrière (FUTRO L420) . . . . . . . . . . . . . . . . . . . . . . . . . . . . . . . . . . . . . . . . . . . . . . . . . . . . . . . . . .
Face arrière (FUTRO L620) . . . . . . . . . . . . . . . . . . . . . . . . . . . . . . . . . . . . . . . . . . . . . . . . . . . . . . . . . .
Voyants d’état . . . . . . . . . . . . . . . . . . . . . . . . . . . . . . . . . . . . . . . . . . . . . . . . . . . . . . . . . . . . . . . . . . . . . . .
5
5
5
6
7
8
9
9
10
10
11
12
12
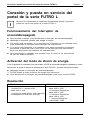
Raccordement et mise en service de votre portail FUTRO série L . . . . . . . . . . . . . . . . . . . . . . .
Utilisation de l’interrupteur Marche/Arrêt . . . . . . . . . . . . . . . . . . . . . . . . . . . . . . . . . . . . . . . . . . . . . . . . . .
Activation du mode économie d’énergie . . . . . . . . . . . . . . . . . . . . . . . . . . . . . . . . . . . . . . . . . . . . . . . . . . .
Résolution . . . . . . . . . . . . . . . . . . . . . . . . . . . . . . . . . . . . . . . . . . . . . . . . . . . . . . . . . . . . . . . . . . . . . . . . . . . . . .
Connecter l’appareil au réseau (LAN) . . . . . . . . . . . . . . . . . . . . . . . . . . . . . . . . . . . . . . . . . . . . . . . . . . . . .
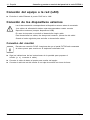
Raccordement de périphériques . . . . . . . . . . . . . . . . . . . . . . . . . . . . . . . . . . . . . . . . . . . . . . . . . . . . . . . . . .
Branchement du moniteur . . . . . . . . . . . . . . . . . . . . . . . . . . . . . . . . . . . . . . . . . . . . . . . . . . . . . . . . . . . .
Raccordement du clavier USB . . . . . . . . . . . . . . . . . . . . . . . . . . . . . . . . . . . . . . . . . . . . . . . . . . . . . . . .
Raccordement de la souris USB . . . . . . . . . . . . . . . . . . . . . . . . . . . . . . . . . . . . . . . . . . . . . . . . . . . . . .
Etablissement d’une connexion PCoIP . . . . . . . . . . . . . . . . . . . . . . . . . . . . . . . . . . . . . . . . . . . . . . . .
Raccorder l’adaptateur d’alimentation . . . . . . . . . . . . . . . . . . . . . . . . . . . . . . . . . . . . . . . . . . . . . . . . .
Raccordement de périphériques aux ports USB . . . . . . . . . . . . . . . . . . . . . . . . . . . . . . . . . . . . . . . .
13
13
13
13
14
14
14
15
15
15
16
17
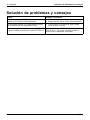
Analyse des problèmes et conseils . . . . . . . . . . . . . . . . . . . . . . . . . . . . . . . . . . . . . . . . . . . . . . . . . . . . .
18
Caractéristiques techniques . . . . . . . . . . . . . . . . . . . . . . . . . . . . . . . . . . . . . . . . . . . . . . . . . . . . . . . . . . .
Adaptateur d’alimentation . . . . . . . . . . . . . . . . . . . . . . . . . . . . . . . . . . . . . . . . . . . . . . . . . . . . . . . . . . . . . . . .
19
20
Fujitsu
43
2 - Français
44
Sommaire
Fujitsu
FUTRO série L
Français - 3
FUTRO série L
Le FUTRO série L se compose de deux portails et de deux cartes CELSIUS RemoteAccess en option.
Les FUTRO L420 et L620 peuvent être utilisés comme des clients particulièrement minces
dans un environnement VDI ou comme portail PCoIP® avec connexion à distance à une
station de travail CELSIUS équipée d’une carte hôte CELSIUS RemoteAccess.
La solution de connexion à distance est basée sur la technologie PCoIP® qui assure la
communication entre les cartes CELSIUS RemoteAccess et les portails FUTRO L.
La technologie PCoIP® (PCoverIP®) permet d’établir la connexion de manière rapide et efficace.
Les applications et fonctions peuvent être intégrées localement de manière illimitée.
Station de travail CELSIUS
La station de travail CELSIUS joue le rôle d’ordinateur de supervision central. Votre système
d’exploitation est installé sur cet ordinateur de supervision. Les fonctions et applications
dépendant de l’utilisateur sont exécutées sur la station de travail CELSIUS.
Au moyen de PCoIP®, l’utilisateur peut accéder facilement à la station de travail
CELSIUS comme si elle se trouvait à proximité des moniteurs.
Portail FUTRO série L
Le portail FUTRO série L est un client extrêmement mince qui, avec un moniteur
connecté, peut reproduire les applications et fonctions exécutées sur une station
de travail CELSIUS connectée à distance.
Vous pouvez travailler localement sur le portail FUTRO série L et connecter d’autres périphériques.
Validité de la description
La présente description concerne les systèmes suivants :
•
•
FUTRO L420
FUTRO L620
Fujitsu
45
4 - Français
FUTRO série L
Symboles
signale des consignes à respecter impérativement pour votre propre
sécurité, celle de votre périphérique et celle de vos données. La garantie
ne s’applique plus dès l’instant où vous endommagez le périphérique en
ne respectant pas ces consignes.
signale des informations importantes permettant d’utiliser le périphérique
de façon appropriée.
►
signale une action à exécuter.
signale un résultat.
Cette police
Cette police
signale des informations émises par un programme sur l’écran, par
exemple : L’installation est terminée !
signale
•
"Cette police"
des concepts et des textes dans une interface logicielle, par exemple :
Cliquez sur Enregistrer
• des noms de programmes ou de fichiers, comme Windows ou setup.exe
signale
•
•
Abc
Cette police
des liens vers d’autres sections, par exemple "Consignes de sécurité"
des liens vers une source externe, comme une adresse Web : Visitez
de nouveau le site "http://www.fujitsu.com/fts"
• des noms de CD et de DVD, ainsi que des désignations et des titres
d’autres matériels, par exemple : "CD Drivers & Utilities" (Pilotes de CD
et utilitaires) ou manuel "Sécurité"
signale une touche du clavier, par exemple : F10
signale des concepts et des textes que l’on souhaite souligner ou mettre en
évidence, par exemple : Ne pas éteindre le périphérique
Matériel requis
•
•
•
•
•
46
une interface PCIe libre pour la carte CELSIUS RemoteAccess (option)
Souris USB
Clavier USB
un moniteur VGA/DVI ou DisplayPort
une connexion réseau
Fujitsu
Remarques importantes
Français - 5
Remarques importantes
Remarques importantes
Ce chapitre contient des instructions de sécurité que vous devez respecter
impérativement en utilisant votre appareil.
Consignes de sécurité
Sécurité
Consignesdesécurité
Respectez les consignes de sécurité suivantes ainsi que celles indiquées
dans le manuel "Sécurité/règles".
Lors de la mise en place et pendant l’utilisation de l’appareil, respectez les
consignes relatives aux conditions ambiantes dans le chapitre "Caractéristiques
techniques", Page 19 - Français et dans le chapitre "Raccordement et mise en
service de votre portail FUTRO série L", Page 13 - Français.
Attention : certains composants du système peuvent atteindre des températures élevées.
Les opérations décrites dans le présent manuel d’utilisation doivent
être effectuées avec le plus grand soin.
Cet appareil ne doit être réparé que par un personnel spécialisé et autorisé. Toute
intervention inadaptée présente des risques pour l’utilisateur (électrocution, risque
de transfert d’énergie, risque d’incendie) ou de dommages à l’appareil.
N’utilisez l’appareil que lorsque le boîtier est fermé.
Câble secteur et adaptateur d’alimentation :
Le câble secteur fourni avec l’appareil répond aux exigences du pays dans
lequel vous avez acheté l’appareil. Assurez-vous que ce câble secteur est
autorisé dans le pays dans lequel vous l’utilisez.
Le câble secteur de l’adaptateur d’alimentation ne doit être branché sur une
prise de courant que lorsque l’appareil est déjà raccordé.
N’utilisez pas l’adaptateur d’alimentation pour d’autres appareils.
Utilisez uniquement l’adaptateur d’alimentation prévu pour l’appareil, voir chapitre
"Caractéristiques techniques", Page 19 - Français.
Assurez-vous que la puissance absorbée de l’adaptateur d’alimentation ne dépasse pas
celle du circuit électrique sur lequel vous branchez l’adaptateur d’alimentation.
Les interrupteurs Marche/Arrêt n’isolent pas l’appareil de la tension secteur. Pour une
séparation complète, vous devez débrancher la fiche secteur de la prise de courant.
Marquage CE
Tel qu’il est livré, cet appareil est conforme aux directives CE 2004/108/CE "Compatibilité
électromagnétique", 2006/95/CE "Basse tension" et 2009/125/CE "Eco-conception".
Fujitsu
47
6 - Français
Remarques importantes
FCC Class B Compliance Statement
DOC (INDUSTRY CANADA) NOTICES
Notice to Users of Radios and Television:
Cet appareil numérique de classe B respecte la norme canadienne ICES-003.
The following statement applies to the products covered in this manual, unless otherwise specified
herein. The statement for other products will appear in the accompanying documentation.
NOTE:
This equipment has been tested and found to comply with the limits for a "Class B" digital
device, pursuant to Part 15 of the FCC rules and meets all requirements of the Canadian
Interference-Causing Equipment Standard ICES-003 for digital apparatus. These limits are
designed to provide reasonable protection against harmful interference in a residential installation.
This equipment generates, uses and can radiate radio frequency energy and, if not installed
and used in strict accordance with the instructions, may cause harmful interference to radio
communications. However, there is no guarantee that interference will not occur in a particular
installation. If this equipment does cause harmful interference to radio or television reception,
which can be determined by turning the equipment off and on, the user is encouraged to
try to correct the interference by one or more of the following measures:
•
•
•
Reorient or relocate the receiving antenna.
Increase the separation between equipment and the receiver.
Connect the equipment into an outlet on a circuit different from that to
which the receiver is connected.
• Consult the dealer or an experienced radio/TV technician for help.
Fujitsu is not responsible for any radio or television interference caused by unauthorized
modifications of this equipment or the substitution or attachment of connecting cables and
equipment other than those specified by Fujitsu. The correction of interferences caused by such
unauthorized modification, substitution or attachment will be the responsibility of the user.
The use of shielded I/O cables is required when connecting this equipment to any and all optional
peripheral or host devices. Failure to do so may violate FCC and ICES rules.
48
Fujitsu
Remarques importantes
Français - 7
Déballage et contrôle du contenu de la livraison
La fourniture du portail FUTRO série L comprend :
•
•
•
•
•
•
►
►
►
►
un portail FUTRO L420 pour deux écrans ou un portail FUTRO L620 pour quatre écrans
Un adaptateur d’alimentation avec cordon d’alimentation
un adaptateur d’alimentation avec câble
un guide de démarrage rapide "FUTRO L420 / L620"
deux manuels multingues "Sécurité/Instructions"
un supplément "Helpdesk et Garantie"
Déballez les différents éléments.
Vérifez si le contenu de l’emballage présente des dommages apparents dus au transport.
Vérifiez si la livraison correspond aux données figurant sur le bon de livraison.
Si vous constatez des dommages dus au transport ou des divergences entre le contenu de
l’emballage et le bon de livraison, informez-en immédiatement votre point de vente.
Nous vous conseillons de ne pas jeter l’emballage d’origine des appareils. Conservez
l’emballage d’origine, il pourra vous servir lors d’un transport ultérieur.
Fujitsu
49
8 - Français
Remarques importantes
Economie d’énergie, élimination et recyclage
Economie d’énergie
Elimination
DVDDocumentationutilisateur
DVDPilotesetutilitaires
Recyclage
Pour plus d’informations sur ces questions, veuillez vous reporter au chapitre "Activation du
mode économie d’énergie", Page 13 - Français sur le DVD de récupération ou sur notre
site Internet ("http://www.fujitsu.com/fts/about/fts/environment-care/").
Informations concernant la "Eco-conception" :
Le règlement 1275/2008 en application de la directive européenne sur l’éco-conception
(2009/125/CE) fixe des exigences concernant les consommation électrique des appareils
domestiques et équipements de bureau électriques et électroniques en mode veille ou arrêt.
D’une manière générale, tous les produits FUTRO Thin Client sont conçus pour fonctionner
d’une manière efficiente en énergie et avec de faibles pertes en mode veille. Les exigences
spécifiques au client et au système d’exploitation, qui sont essentielles pour un fonctionnement
optimal, peuvent être en contradiction avec les exigences du règlement ci-dessus.
A des fins d’administration, comme l’entretien à distance des systèmes, la fonction "Wake-on-Lan"
(WoL) est indispensable pour nos clients et constitue donc un réglage usine par défaut. L’activation
de la fonction WoL entraîne une légère augmentation du courant de repos. La puissance absorbée
maximale admissible en mode OFF peut être de ce fait légèrement dépassée. La désactivation
de la fonction WoL permet de respecter les exigences légales. Pour la marche à suivre, se
reporter au chapitre "Activation du mode économie d’énergie", Page 13 - Français.
Le mode économie d’énergie (ACPI S4 Save-to-disk), connu de nombreux systèmes portables
et de bureau actuels, n’est pas disponible dans le système d’exploitation de type Embedded
(incorporé) pour des raisons techniques. Il n’est donc pas possible de placer automatiquement
en mode OFF les appareils équipés de ce système d’exploitation.
Le système d’exploitation d’un Thin Client est enregistré dans une mémoire Flash de taille
optimale et doté d’une protection en écriture une fois la configuration par le client terminée.
Ceci empêche que la sécurité des données soit compromise par de fréquentes écritures sur
une mémoire Flash, en cas par ex. de mise à jour du Swapfiles dans le système d’exploitation
ou par d’autres applications. Chaque mémoire Flash n’autorise qu’un nombre limité de cycles
d’écriture. Tant la protection en écriture activée que la capacité de mémoire Flash limitée
disponible excluent la possibilité d’activation du mode économie d’énergie (ACPI S4).
50
Fujitsu
Remarques importantes
Français - 9
Nettoyer l’appareil
Unité logique,voir Appareil
Transportrépété
Transport
Appareil
Mettez hors tension l’appareil et tous les équipements branchés et déconnectez
la fiche secteur de la prise de courant.
Le nettoyage de l’intérieur de l’appareil ne doit être effectué que
par des techniciens autorisés.
N’utilisez pas de poudre abrasive ni de solvant attaquant les matières
plastiques (alcool, diluant ou acétone).
Ne lavez en aucun cas l’appareil à l’eau ! Toute infiltration peut entraîner
des dangers pour l’utilisateur (p. ex. électrocution).
Evitez toute infiltration de liquide à l’intérieur de l’appareil.
Pour nettoyer la surface du moniteur, sensible aux pressions des doigts et
aux griffures, utilisez un chiffon doux légèrement humide.
Vous pouvez nettoyer la surface du boîtier avec un chiffon sec. S’il est très sale, vous pouvez utiliser
un chiffon humide, trempé dans un mélange d’eau et détergent délicat pour vaisselle et bien essoré.
Vous pouvez nettoyer le clavier et la souris avec des lingettes désinfectantes.
Sélectionner un emplacement
Adaptateurd’alimentation
Appareil
Sélectionnerunemplacement
Avant de mettre votre appareil en place, choisissez un emplacement adéquat.
Suivez pour cela les consignes suivantes :
•
•
•
•
•
•
•
•
Fujitsu
Posez l’appareil sur une surface plane, stable et antidérapante. N’oubliez
pas que les pieds en caoutchouc de l’appareil peuvent laisser des
résidus sur certaines surfaces sensibles.
Tenez les autres objets à au moins 100 mm / 3,93 inch de l’appareil et de
l’adaptateur d’alimentation pour permettre une ventilation suffisante.
Tenez les autres objets à au moins 300 mm / 11,81 inch de la face supérieure
de l’appareil pour permettre une ventilation suffisante.
Ne couvrez jamais les ouïes de ventilation de l’appareil.
Ne soumettez pas l’appareil à des conditions atmosphériques extrêmes.
Protégez l’appareil de la saleté, de l’humidité et de la chaleur.
N’utilisez jamais l’appareil à l’horizontale.
Utilisez-le toujours en position verticale.
N’utilisez jamais l’appareil dans des locaux insuffisamment ventilés.
Si votre appareil a été fourni avec un pied, utilisez ce pied.
51
10 - Français
Remarques importantes
Ports et éléments de commande
Ports
Dans ce chapitre seront présentés les différents composants matériels de votre appareil. Vous
obtiendrez un aperçu des ports et des éléments de commande de l’appareil. Familiarisez-vous
avec ces différents éléments avant de travailler avec l’appareil.
Face avant
L 420
1
2
3
4
5
1 = LED de session
2 = Interrupteur Marche/Arrêt et LED
3 = Ports USB (2 USB 2.0)
52
L 620
1
2
3
4
5
4 = Port écouteurs
5 = Port microphone
Fujitsu
Remarques importantes
Français - 11
Face arrière (FUTRO L420)
1
2
3
4
5
6
7
1
2
3
4
=
=
=
=
Ports USB (2 USB 2.0)
Port LAN
Port DVI 1 (DVI-D)
Port DVI 2 (DVI-I)
Fujitsu
5 = Prise haut-parleur
6 = Prise de tension continue (DC IN)
7 = Security Lock
53
12 - Français
Remarques importantes
Face arrière (FUTRO L620)
1
2
3
4
5
6
1 = Ports USB (2 USB 2.0)
2 = Port LAN
3 = DisplayPorts (1-4 de haut en bas)
4 = Security Lock
5 = Prise haut-parleur
6 = Prise de tension continue (DC IN)
Voyants d’état
Cet appareil dispose de deux voyants d’état.
Marche/Arrêt–LED
S’allume en vert
Clignote en vert
S’allume en jaune
Clignote en jaune
Session-LED
S’allume en vert
Arrêt
54
Description
L’appareil est sous tension
PC hôte en mode économie d’énergie
• Le mode veille client est actif
• Wake-on-Lan (WoL) ou Wake-on-USB
(WoUSB) est activé
La configuration pour WoUSB ou Client s’arrête
Description
L’appareil est connecté à PCoIP
Pas de connexion à PCoIP
Fujitsu
Raccordement et mise en service de votre portail FUTRO série L
Français - 13
Raccordement et mise en service de
votre portail FUTRO série L
Notebook
Miseenservice
Port
Pour la première mise en service de votre portail FUTRO série L,
respectez les consignes de sécurité fournies.
Utilisation de l’interrupteur Marche/Arrêt
► Appuyez brièvement sur l’interrupteur Marche/Arrêt afin de mettre l’appareil sous tension.
► Maintenez l’interrupteur enfoncé pour mettre l’appareil hors tension.
► Lorsque l’appareil est sous tension mais ne se trouve pas dans une session avec un PC
hôte, appuyez brièvement sur l’interrupteur pour démarrer une nouvelle session.
► Si l’appareil est connecté à un PC hôte, appuyez brièvement sur l’interrupteur pour
accéder au panneau de commande Zero Client dans lequel vous trouverez des
options comme la déconnexion ou l’arrêt du PC hôte.
► Procédez comme indiqué dans le manuel d’utilisation de votre système
d’exploitation pour mettre hors tension le PC hôte.
Activation du mode économie d’énergie
Lorsque le PC hôte connecté est hors tension, la LED Marche/Arrêt clignote en vert.
Pour activer le mode économie d’énergie du FUTRO série L, procédez comme suit :
► Maintenez enfoncé l’interrupteur Marche/Arrêt.
Le FUTRO passe dans le mode d’économie d’énergie maximale.
► Appuyez brièvement sur l’interrupteur Marche/Arrêt pour redémarrer le FUTRO.
Résolution
FUTRO L420
• 1-2 moniteurs DVI : jusqu’à 1920x1200
• 1 moniteur DVI + 1 VGA : jusqu’à 1920x1200
• 1 moniteur DVI : jusqu’à 2560x1600
(nécessite l’adaptateur DVI Dual Link en
option)
Fujitsu
FUTRO L620
• 1-4 moniteurs DisplayPort : jusqu’à
1920x1200
• 1-2 moniteurs DisplayPort : jusqu’à
2560x1600
• 1-2 moniteurs DisplayPort : jusqu’à
1920x1200
+ 1 moniteur DisplayPort : jusqu’à
2560x1600
55
14 - Français
Raccordement et mise en service de votre portail FUTRO série L
Connecter l’appareil au réseau (LAN)
LAN
► Branchez le câble Ethernet au port LAN RJ45.
Raccordement de périphériques
Lisez la documentation relative au périphérique avant de le brancher.
A l’exception des périphériques USB, il est impératif de retirer les fiches secteur
lorsque vous branchez des périphériques externes !
Evitez de brancher ou de débrancher des câbles par temps d’orage.
Lorsque vous débranchez un câble, tenez-le toujours par sa fiche.
Ne tirez jamais sur le câble !
Lorsque vous branchez ou débranchez des câbles, respectez l’ordre indiqué ci-dessous.
Branchement du moniteur
Pendant une connexion PCoIP : Assurez-vous que le portail FUTRO est branché
sur le même port moniteur sur la carte du PC hôte.
► Suivez les instructions du manuel d’utilisation du moniteur pour la préparation
du moniteur (le branchement des câbles par ex.).
► Branchez le câble de données sur le port moniteur de l’appareil.
► Branchez le cordon d’alimentation du moniteur sur une prise de courant reliée à la terre.
Moniteur
56
Fujitsu
Raccordement et mise en service de votre portail FUTRO série L
Français - 15
Raccordement du clavier USB
Utilisez uniquement le câble du clavier fourni.
Raccorder
PortUSB
► Branchez la fiche rectangulaire du câble du clavier dans la prise rectangulaire située
sur la face inférieure ou sur la face arrière du clavier.
► Branchez la fiche USB rectangulaire et plate du câble de clavier dans un port USB de l’appareil.
Fiche USB
Raccordement de la souris USB
► Raccordez la souris USB à l’un des ports USB de l’appareil.
Fiche USB
RaccordementdelasourisUSB
Etablissement d’une connexion PCoIP
Votre portail FUTRO série L est préconfiguré pour être directement connecté à une
carte hôte CELSIUS RemoteAccess, mais peut être aussi configuré pour utiliser un
produit de tiers, par exemple VMware View, afin d’établir une connexion avec des
bureaux virtuels ou des cartes hôtes CELSIUS RemoteAccess.
Connexion directe à la carte hôte
Pour établir une connexion directe à la carte hôte, procédez comme suit :
► Mettez sous tension votre station de travail CELSIUS avec la carte hôte CELSIUS RemoteAccess.
► Mettez sous tension le portail FUTRO série L et les périphériques d’affichage connectés.
► Assurez-vous que le portail FUTRO série L se trouve sur le même réseau
que la carte hôte CELSIUS RemoteAccess.
► Attendez que la boîte de dialogue Lien s’affiche à l’écran.
► Pour continuer, cliquez sur Relier.
► Attendez que le message Les hôtes sont recherchés, attendez... disparaisse.
Une liste d’hôtes disponibles s’affiche.
► Sélectionnez la carte hôte CELSIUS RemoteAccess avec laquelle vous souhaitez
établir une connexion et cliquez sur OK.
L’écran de la station de travail CELSIUS s’affiche et la LED de session du FUTRO série
L s’allume en vert sur le panneau frontal pour indiquer qua la connexion PCoIP a été établie.
Pour plus d’informations sur les possibilités de connexion PCoIP ou VDI, cliquez
sur "http://www.fujitsu.com/fts/support".
Fujitsu
57
Raccordement et mise en service de votre portail FUTRO série L
16 - Français
Raccorder l’adaptateur d’alimentation
Préparer lamise enservice
Adaptateurd’alimentation
Respectez également les consignes de sécurité figurant dans le manuel "Sécurité" ci-joint.
Le câble secteur livré avec l’appareil répond aux exigences du pays dans
lequel vous avez acheté l’appareil. Assurez-vous que ce câble secteur est
autorisé dans le pays dans lequel vous l’utilisez.
Utilisez l’adaptateur d’alimentation fourni et autorisé par Fujitsu
Technology Solutions GmbH.
Ne branchez pas l’adaptateur d’alimentation sur une prise de courant avant
d’avoir raccordé l’appareil à l’adaptateur d’alimentation.
Assurez-vous que la puissance absorbée de l’adaptateur d’alimentation ne dépasse
pas celle du circuit électrique sur lequel vous branchez l’adaptateur d’alimentation (voir
chapitre "Caractéristiques techniques", "Adaptateur d’alimentation", Page 20 - Français).
► Raccordez le câble de l’adaptateur
d’alimentation (1) à la prise de tension
continue (DC IN) de l’appareil.
► Raccordez le câble secteur (2) à
l’adaptateur d’alimentation.
► Branchez le câble secteur (3) sur
une prise de courant.
3
2
1
58
Fujitsu
Raccordement et mise en service de votre portail FUTRO série L
Français - 17
Raccordement de périphériques aux ports USB
Appareils
Périphériques
PortUSB
AppareilsUSB
Vous pouvez raccorder aux ports USB un grand nombre de périphériques (p.
ex. imprimante, scanner, modem ou clavier).
Les périphériques USB supportent le branchement à chaud (hot-plug). Par
conséquent, les câbles des périphériques USB peuvent être branchés et
débranchés sans qu’il soit nécessaire d’éteindre l’appareil.
Vous trouverez d’autres informations dans la documentation fournie
avec les périphériques USB.
► Raccordez le câble de données au périphérique.
► Branchez le câble de données sur l’un des ports USB de votre portail CELSIUS série L.
Pilotes
Les périphériques USB que vous branchez sur les ports USB n’ont en général besoin
d’aucun pilote propre puisque le logiciel nécessaire est déjà intégré au système
d’exploitation. Si toutefois le périphérique USB externe nécessite un logiciel spécial,
vous devrez l’installer à partir du support de données fourni avec le périphérique.
Pour ne pas affecter la transmission des données par le port USB, la
longueur du câble du périphérique USB externe au port USB de votre
appareil ne doit pas dépasser 3 m / 118,11 inch.
Fujitsu
59
18 - Français
Analyse des problèmes et conseils
Analyse des problèmes et conseils
Cause
La carte hôte CELSIUS RemoteAccess n’est
pas reconnue par votre portail FUTRO série L.
Mesures correctives
► Vérifiez la connexion réseau.
► Vérifiez que le routeur est sous tension.
La fonction de retrait sûr des périphériques USB ► Fermez tous les programmes susceptibles
d’accéder au lecteur.
ne peut pas être exécutée.
Dois-je éteindre la station de travail CELSIUS
Le portail FUTRO série L est un appareil "Plug &
avant d’installer le portail FUTRO série L ?
Play". Vous pouvez le connecter à tout moment,
même lorsque l’ordinateur est sous tension.
60
Fujitsu
Français - 19
Caractéristiques techniques
Caractéristiques techniques
Aspects généraux
FUTRO L420
FUTRO L620
Processeur
Processeur TERA 2321 PCoIP Processeur TERA 2140 PCoIP
Données électriques
19 W
22 W
Consommation électrique
maximale
Audio
Puce sonore
Interface de contrôleur audio haute définition
Réseau
LAN
Câble réseau 10/100/1000 Base T sur port RJ45
Ports
Port moniteur
2 ports, DVI-D, DVI-I
4 ports, DisplayPort
Port microphone
Jack mono 3,5 mm
Port écouteurs
Jack stéréo 3,5 mm
Port haut-parleurs
Jack stéréo 3,5 mm
Fiche USB
4 x USB 2.0
Conditions d’environnement
Classe climatique (3K2)
Classe climatique (2K2)
Temperatur
Fonctionnement (3K2)
Transport (2K2)
Dimensions
Largeur x profondeur x
hauteur
DIN IEC 721 partie 3-3
DIN IEC 721 partie 3-2
10 °C ... 35 °C / 50 °F ... 95 °F
-25 °C ... 60 °C / -13 °F ... 140 °F
•
45 mm x 130 mm x 150 mm /
1,77 inch x 5,11 inch x 5,90 inch
•
Poids
env. 630 g / 1,38 lb
•
•
Fujitsu
avec pied:
80 mm x 133 mm x 186 mm /
3,15 inch x 5,22 inch x
7,32 inch
sans pied:
45 mm x 133 mm x 183 mm /
1,76 inch x 5,22 inch x
7,20 inch
avec pied:
860 g / 1,89 lb
sans pied:
env. 790 g / 1,74 lb
61
20 - Français
Caractéristiques techniques
Adaptateur d’alimentation
Type
Entrée
Sortie
Adaptateur d’alimentation Delta ADP-36JH A
CA 100-240 V ; 1,0 A ; 50-60 Hz ; Classe II
DC 12 V ; 3 A
La fiche technique de cet appareil contient d’autres caractéristiques techniques. La
fiche technique est disponible sur notre site Web "http://www.fujitsu.com/fts".
62
Fujitsu
Contenido
Español - 1
Contenido
Español
Serie FUTRO L . . . . . . . . . . . . . . . . . . . . . . . . . . . . . . . . . . . . . . . . . . . . . . . . . . . . . . . . . . . . . . . . . . . . . . . . .
CELSIUS Workstation . . . . . . . . . . . . . . . . . . . . . . . . . . . . . . . . . . . . . . . . . . . . . . . . . . . . . . . . . . . . . . . . . . .
Portal de la serie FUTRO L . . . . . . . . . . . . . . . . . . . . . . . . . . . . . . . . . . . . . . . . . . . . . . . . . . . . . . . . . . . . . .
Validez de la descripción . . . . . . . . . . . . . . . . . . . . . . . . . . . . . . . . . . . . . . . . . . . . . . . . . . . . . . . . . . . . . . . .
Símbolos . . . . . . . . . . . . . . . . . . . . . . . . . . . . . . . . . . . . . . . . . . . . . . . . . . . . . . . . . . . . . . . . . . . . . . . . . . . . . . .
Requisitos del sistema . . . . . . . . . . . . . . . . . . . . . . . . . . . . . . . . . . . . . . . . . . . . . . . . . . . . . . . . . . . . . . . . . .
3
3
3
3
4
4
Indicaciones importantes . . . . . . . . . . . . . . . . . . . . . . . . . . . . . . . . . . . . . . . . . . . . . . . . . . . . . . . . . . . . . .
Indicaciones de seguridad . . . . . . . . . . . . . . . . . . . . . . . . . . . . . . . . . . . . . . . . . . . . . . . . . . . . . . . . . . . . . . .
Marcado CE . . . . . . . . . . . . . . . . . . . . . . . . . . . . . . . . . . . . . . . . . . . . . . . . . . . . . . . . . . . . . . . . . . . . . . . . . . . .
FCC Class B Compliance Statement . . . . . . . . . . . . . . . . . . . . . . . . . . . . . . . . . . . . . . . . . . . . . . . . . . . . .
Desembalaje y verificación del contenido del suministro . . . . . . . . . . . . . . . . . . . . . . . . . . . . . . . . . . . .
Ahorro de energía, eliminación y reciclaje . . . . . . . . . . . . . . . . . . . . . . . . . . . . . . . . . . . . . . . . . . . . . . . . .
Limpieza del equipo . . . . . . . . . . . . . . . . . . . . . . . . . . . . . . . . . . . . . . . . . . . . . . . . . . . . . . . . . . . . . . . . . . . . .
Selección del emplazamiento . . . . . . . . . . . . . . . . . . . . . . . . . . . . . . . . . . . . . . . . . . . . . . . . . . . . . . . . . . . .
Puertos y elementos de mando . . . . . . . . . . . . . . . . . . . . . . . . . . . . . . . . . . . . . . . . . . . . . . . . . . . . . . . . . .
Parte delantera . . . . . . . . . . . . . . . . . . . . . . . . . . . . . . . . . . . . . . . . . . . . . . . . . . . . . . . . . . . . . . . . . . . . .
Parte posterior (FUTRO L420) . . . . . . . . . . . . . . . . . . . . . . . . . . . . . . . . . . . . . . . . . . . . . . . . . . . . . . .
Parte posterior (FUTRO L620) . . . . . . . . . . . . . . . . . . . . . . . . . . . . . . . . . . . . . . . . . . . . . . . . . . . . . . .
Indicadores de estado . . . . . . . . . . . . . . . . . . . . . . . . . . . . . . . . . . . . . . . . . . . . . . . . . . . . . . . . . . . . . . .
5
5
5
6
7
8
9
9
10
10
11
12
12
Conexión y puesta en servicio del portal de la serie FUTRO L . . . . . . . . . . . . . . . . . . . . . . . . . .
Funcionamiento del interruptor de encendido/apagado . . . . . . . . . . . . . . . . . . . . . . . . . . . . . . . . . . . . .
Activación del modo de ahorro de energía . . . . . . . . . . . . . . . . . . . . . . . . . . . . . . . . . . . . . . . . . . . . . . . .
Resolución . . . . . . . . . . . . . . . . . . . . . . . . . . . . . . . . . . . . . . . . . . . . . . . . . . . . . . . . . . . . . . . . . . . . . . . . . . . . .
Conexión del equipo a la red (LAN) . . . . . . . . . . . . . . . . . . . . . . . . . . . . . . . . . . . . . . . . . . . . . . . . . . . . . . .
Conexión de los dispositivos externos . . . . . . . . . . . . . . . . . . . . . . . . . . . . . . . . . . . . . . . . . . . . . . . . . . . .
Conexión del monitor . . . . . . . . . . . . . . . . . . . . . . . . . . . . . . . . . . . . . . . . . . . . . . . . . . . . . . . . . . . . . . . .
Conexión del teclado USB . . . . . . . . . . . . . . . . . . . . . . . . . . . . . . . . . . . . . . . . . . . . . . . . . . . . . . . . . . .
Conexión del ratón USB . . . . . . . . . . . . . . . . . . . . . . . . . . . . . . . . . . . . . . . . . . . . . . . . . . . . . . . . . . . . .
Establecimiento de una conexión PCoIP . . . . . . . . . . . . . . . . . . . . . . . . . . . . . . . . . . . . . . . . . . . . . .
Conexión del adaptador de red . . . . . . . . . . . . . . . . . . . . . . . . . . . . . . . . . . . . . . . . . . . . . . . . . . . . . . .
Conexión de dispositivos externos a los puertos USB . . . . . . . . . . . . . . . . . . . . . . . . . . . . . . . . . .
13
13
13
13
14
14
14
15
15
15
16
17
Solución de problemas y consejos . . . . . . . . . . . . . . . . . . . . . . . . . . . . . . . . . . . . . . . . . . . . . . . . . . . . .
18
Características técnicas . . . . . . . . . . . . . . . . . . . . . . . . . . . . . . . . . . . . . . . . . . . . . . . . . . . . . . . . . . . . . . .
Adaptador de red . . . . . . . . . . . . . . . . . . . . . . . . . . . . . . . . . . . . . . . . . . . . . . . . . . . . . . . . . . . . . . . . . . . . . . .
19
20
Fujitsu
63
2 - Español
64
Contenido
Fujitsu
Serie FUTRO L
Español - 3
Serie FUTRO L
La serie FUTRO L consta de dos portales diferentes y dos tarjetas CELSIUS RemoteAccess
opcionales.
FUTRO L420 y L620 pueden utilizarse como Client especialmente delgado en un entorno
VDI o como portal PCoIP® con conexión remota a una estación de trabajo CELSIUS
equipada con una tarjeta host CELSIUS RemoteAccess.
La solución de acceso remoto se basa en una tecnología PCoIP® que está garantizada gracias a
la comunicación entre las tarjetas CELSIUS RemoteAccess y los portales FUTRO L.
La tecnología PCoIP® permite una configuración de conexión rápida y eficaz. Las aplicaciones
y funciones pueden implementarse localmente sin limitación.
CELSIUS Workstation
La estación de trabajo CELSIUS constituye un ordenador principal central. El sistema
operativo se instala en este ordenador principal. Las aplicaciones y funciones que dependen
del usuario son ejecutadas por la estación de trabajo CELSIUS.
El usuario puede acceder fácilmente con PCoIP® a la estación de trabajo CELSIUS
como si estuviera situada junto a los monitores.
Portal de la serie FUTRO L
El portal de la serie FUTRO L es un Client especialmente delgado que, junto a
un monitor conectado, puede reproducir aquellas aplicaciones y funciones que se
ejecutan en una estación de trabajo CELSIUS remota.
Es posible trabajar localmente con el portal de la serie FUTRO L y conectar otros periféricos.
Validez de la descripción
La presente descripción es válida para los siguientes sistemas:
•
•
FUTRO L420
FUTRO L620
Fujitsu
65
4 - Español
Serie FUTRO L
Símbolos
Identifica indicaciones que deben tenerse en cuenta. Si no las observa,
puede poner en peligro su salud, deteriorar el dispositivo o sufrir una
pérdida de datos. La garantía vencerá, si se daña el dispositivo por no
observar estas indicaciones
Destaca información importante para el correcto manejo del dispositivo
►
Señala una operación que debe realizar
Señala un resultado
Este tipo de letra
marca la información que da un programa en pantalla, p. ej.: La
instalación ha concluido
marca
"Este tipo de letra"
• textos de los botones de los programas, p. ej.: Haga clic en Guardar.
• Nombres de programas o archivos, p. ej. Windows o setup.exe.
marca
Este tipo de
letra
•
•
Abc
Este tipo de letra
Referencias a otras secciones, p. ej."Indicaciones de seguridad"
Referencias a una fuente de información externa, p. ej., una dirección
de una página web: Para más información "http://www.fujitsu.com/fts"
• Nombres de CD, DVD y denominaciones y títulos de otros materiales,
como p. ej.: "CD/DVD Drivers & Utilities" o el manual "Seguridad"
indica una tecla del teclado, p. ej.: F10
marca conceptos y textos que deben acentuarse o resaltarse, p. ej.: No
apagar el dispositivo
Requisitos del sistema
•
•
•
•
•
66
un interfaz PCIe libre para la tarjeta CELSIUS RemoteAccess (opcional)
un ratón USB
un teclado USB
un monitor VGA/DVI o DisplayPort
una conexión de red
Fujitsu
Indicaciones importantes
Español - 5
Indicaciones importantes
Indicaciones
Indicacionesimportantes
En este capítulo encontrará las instrucciones de seguridad que debe tener en
cuenta para el manejo de su equipo.
Indicaciones de seguridad
Indicación
Indicacionesdeseguridad
Es imprescindible que tenga en cuenta las indicaciones de seguridad del manual
"Seguridad/Normativa" y las indicaciones de seguridad siguientes.
Al colocar el equipo y durante el servicio, tenga en cuenta las instrucciones
referentes a las condiciones ambientales del capítulo "Características técnicas",
Página 19 - Español y del capítulo "Conexión y puesta en servicio del
portal de la serie FUTRO L", Página 13 - Español.
¡Atención! Los diferentes elementos del sistema pueden alcanzar altas temperaturas.
Las actividades que se describen en estas instrucciones solo pueden
llevarse a cabo con especial cuidado.
Las reparaciones del equipo solo debe llevarlas a cabo personal técnico
autorizado. Las reparaciones inadecuadas del mismo pueden exponer al usuario
a graves peligros (descargas eléctricas, peligro de energía eléctrica, peligro
de incendio) o bien provocar desperfectos en el equipo.
Utilice el equipo únicamente con la caja cerrada.
Cable de red y adaptador de red:
El cable de alimentación adjunto satisface las normas del país donde se
ha comprado el equipo. Asegúrese de que el cable de alimentación está
homologado en el país donde desea utilizarlo.
El cable de alimentación del adaptador de red solo puede enchufarse a una caja
de enchufe con toma a tierra cuando el equipo esté ya conectado.
No utilice el adaptador de red para otros equipos.
Utilice solo el adaptador de red previsto para este equipo, véase el capítulo
"Características técnicas", Página 19 - Español.
Asegúrese de que el consumo de energía del adaptador de red no supere al de
la red eléctrica donde piensa conectar el adaptador de red.
El botón de conexión/desconexión no permite una desconexión absoluta de la
tensión de red. Para lograr una desconexión completa de la tensión de red, debe
desenchufar el cable de alimentación de la caja de enchufe.
Marcado CE
Este aparato, en la versión suministrada, cumple todos los requisitos de las directivas
de la CE 2004/108/CE "Compatibilidad electromagnética", 2006/95/CE "Directiva sobre
baja tensión" y 2009/125/CE "Directiva sobre diseño ecológico".
Fujitsu
67
6 - Español
Indicaciones importantes
FCC Class B Compliance Statement
DOC (INDUSTRY CANADA) NOTICES
Notice to Users of Radios and Television:
This class B digital apparatus complies with Canadian ICES-003.
The following statement applies to the products covered in this manual, unless otherwise specified
herein. The statement for other products will appear in the accompanying documentation.
NOTE:
This equipment has been tested and found to comply with the limits for a "Class B" digital
device, pursuant to Part 15 of the FCC rules and meets all requirements of the Canadian
Interference-Causing Equipment Standard ICES-003 for digital apparatus. These limits are
designed to provide reasonable protection against harmful interference in a residential installation.
This equipment generates, uses and can radiate radio frequency energy and, if not installed
and used in strict accordance with the instructions, may cause harmful interference to radio
communications. However, there is no guarantee that interference will not occur in a particular
installation. If this equipment does cause harmful interference to radio or television reception,
which can be determined by turning the equipment off and on, the user is encouraged to
try to correct the interference by one or more of the following measures:
•
•
•
Reorient or relocate the receiving antenna.
Increase the separation between equipment and the receiver.
Connect the equipment into an outlet on a circuit different from that to
which the receiver is connected.
• Consult the dealer or an experienced radio/TV technician for help.
Fujitsu is not responsible for any radio or television interference caused by unauthorized
modifications of this equipment or the substitution or attachment of connecting cables and
equipment other than those specified by Fujitsu. The correction of interferences caused by such
unauthorized modification, substitution or attachment will be the responsibility of the user.
The use of shielded I/O cables is required when connecting this equipment to any and all optional
peripheral or host devices. Failure to do so may violate FCC and ICES rules.
68
Fujitsu
Indicaciones importantes
Español - 7
Desembalaje y verificación del contenido
del suministro
Junto con el portal de la serie FUTRO L se entrega lo siguiente:
•
•
•
•
•
•
►
►
un portal FUTRO L420 para dos pantallas o un portal FUTRO L620 para cuatro pantallas
Un adaptador de red con cable de red
un adaptador de red con cable de alimentación
una Quick Start Guide "FUTRO L420/L620"
dos manuales multilingües "Seguridad/Normativa"
un suplemento "Hoja informativa para Helpdesk y Garantía"
Desembale todos los elementos.
Verifique el contenido del suministro y asegúrese de que no se han producido
daños visibles debidos al transporte.
► Compruebe que los elementos suministrados coinciden con los datos de la nota de entrega.
► Si detecta daños de transporte o diferencias entre el contenido del suministro y la
nota de entrega, informe inmediatamente a su distribuidor.
Le recomendamos que guarde el material de embalaje original. Guarde el material
de embalaje original por si lo necesita para el transporte.
Fujitsu
69
8 - Español
Indicaciones importantes
Ahorro de energía, eliminación y reciclaje
Ahorro deenergía
Eliminación
DVDDrivers
Reciclaje
DVDUser
Documentation
&Utilities
Puede encontrar más información sobre este tema en el capítulo "Activación del modo
de ahorro de energía", Página 13 - Español, del DVD Recovery o en nuestras páginas
de Internet ("http://www.fujitsu.com/fts/about/fts/environment-care/").
Datos de "Directiva sobre diseño ecológico":
La normativa 1275/2008, basada en la directiva de diseño ecológico de la UE (2009/125/CE),
establece el consumo de energía eléctrica y de los equipos electrónicos de uso doméstico
y de oficina cuando están en modo preparado y desactivado.
Por lo general todos los productos FUTRO Thin Client se han desarrollado para conseguir un
uso eficiente de la energía y bajo consumo en el modo Standby. Los requisitos de la normativa
mencionada anteriormente pueden contradecir los requisitos específicos del cliente y del
sistema operativo prioritarios a la hora de garantizar un funcionamiento óptimo.
Por razones administrativas, como p. ej. el mantenimiento a distancia de los sistemas, la
función "Wake-on-Lan" (WoL) es indispensable para nuestros clientes y por ello es un ajuste de
fábrica estándar. Mediante la función WoL activa se incrementará la corriente de reposo y se
sobrepasará ligeramente el consumo máximo permitido en el modo Off. Desactivando la función
WoL pueden cumplirse los requisitos legales. Para una descripción detallada del procedimiento,
véase el apartado "Activación del modo de ahorro de energía", Página 13 - Español.
El modo de ahorro de energía (ACPI S4 Save-to-disk), que es conocido por muchos
sistemas Mobile y de escritorio actuales, no está disponible en los sistemas operativos
embebidos por razones técnicas. De esta manera no es posible activar equipos con
este sistema operativo automáticamente en el modo Off.
El sistema operativo de un Thin Client se almacena en una memoria Flash de tamaño optimizado y
contará con protección contra escritura una vez finalizada la configuración por parte del cliente. De
ese modo se evita que si la memoria Flash se escribe frecuentemente, como p. ej. al actualizar
Swapfiles en el sistema operativo o mediante otras aplicaciones, la seguridad de los datos pueda
verse perjudicada. Las memorias Flash solo admiten un número limitado de ciclos de escritura.
Tanto la protección de escritura activada como la capacidad de la memoria Flash limitada y
disponible excluyen la posibilidad de activar el modo de ahorro de energía (ACPI S4).
70
Fujitsu
Indicaciones importantes
Español - 9
Limpieza del equipo
Unidadcentral,véase Equipo
Nuevotransporte
Transporte
Equipo
Desconecte el equipo y todos los dispositivos conectados al mismo y desenchufe
también el cable de alimentación de la caja de enchufe.
El interior de la caja del equipo debe ser limpiado exclusivamente por personal cualificado.
No utilice para la limpieza polvos para fregar ni detergentes que disuelvan
material plástico (alcohol, disolvente o acetona).
No lave el equipo con un paño empapado. Si penetra agua se puede exponer
al usuario a graves peligros (p. ej. descargas eléctricas).
Evite que penetren líquidos en el interior de la caja.
La superficie de la pantalla del monitor, que es sensible a la presión y puede rayarse,
solo puede limpiarse con un paño suave y ligeramente humedecido.
Para la limpieza de la superficie de la caja es suficiente un paño seco. Si la suciedad es mayor,
emplee un paño humedecido en agua con un detergente suave y bien escurrido.
Para la limpieza del teclado y del ratón se pueden utilizar paños desinfectantes.
Selección del emplazamiento
Adaptador dered
Equipo
Seleccióndelemplazamiento
Antes de instalar el equipo, se debe elegir un lugar adecuado para colocarlo.
Para ello, siga las indicaciones siguientes:
•
•
•
•
•
•
•
•
Fujitsu
Coloque el equipo sobre una superficie plana, estable y antideslizante.
Tenga en cuenta que los pies de goma del equipo pueden dejar
marcas en ciertas superficies delicadas.
Mantenga otros objetos alejados 100 mm/3,93 pulgadas como mínimo del equipo
y del adaptador de red para garantizar una ventilación adecuada.
Mantenga otros objetos alejados 300 mm/11,81 pulgadas como mínimo de la
parte superior del equipo para garantizar una ventilación adecuada.
No cubra nunca las ranuras de ventilación del equipo.
No exponga el equipo a condiciones climáticas extremas. Proteja el equipo
de la suciedad, la humedad y el calor excesivo.
No coloque nunca el equipo en sentido horizontal.
Utilícelo siempre en posición vertical.
No utilice el equipo nunca en habitaciones sin la ventilación adecuada.
En caso de que el equipo se haya suministrado con un pie de apoyo,
coloque el pie de apoyo para el funcionamiento del equipo.
71
10 - Español
Indicaciones importantes
Puertos y elementos de mando
Puertos
En este apartado se muestran los diferentes componentes de hardware de su equipo. Aquí
obtendrá una vista de conjunto de los puertos y los controles del equipo. Familiarícese
con estos elementos antes de trabajar con el equipo.
Parte delantera
L 420
1
2
3
4
5
1 = LED de sesión
2 = Interruptor de encendido/apagado y LED
3 = Puertos USB (x 2 USB 2.0)
72
L 620
1
2
3
4
5
4 = Puerto para auriculares
5 = Puerto para micrófono
Fujitsu
Español - 11
Indicaciones importantes
Parte posterior (FUTRO L420)
1
2
3
4
5
6
7
1
2
3
4
=
=
=
=
Puertos USB (x 2 USB 2.0)
Puerto LAN
Puerto DVI 1 (DVI-D)
Puerto DVI 2 (DVI-I)
Fujitsu
5 = Conector de los altavoces
6 = Conector hembra de tensión
continua (DC IN)
7 = Security Lock
73
12 - Español
Indicaciones importantes
Parte posterior (FUTRO L620)
1
2
3
4
5
6
1
2
3
4
=
=
=
=
Puertos USB (x 2 USB 2.0)
Puerto LAN
DisplayPorts (1-4 de arriba a abajo)
Security Lock
5 = Conector de los altavoces
6 = Conector hembra de tensión
continua (DC IN)
Indicadores de estado
El equipo dispone de dos indicadores de estado diferentes.
LED de encendido/apagado
Se ilumina en verde
Parpadea en verde
Descripción
El equipo está encendido
Parpadea en amarillo
Ordenador host en modo de ahorro de energía
• El modo Client Standby está activo
• Wake-on-Lan (WoL) o Wake-on-USB
(WoUSB) está activado
La configuración WoUSB o Client se apaga
LED de sesión
Se ilumina en verde
Apagado
Descripción
Equipo conectado con PCoIP
Sin conexión con PCoIP
Se ilumina de amarillo
74
Fujitsu
Conexión y puesta en servicio del portal de la serie FUTRO L
Español - 13
Conexión y puesta en servicio del
portal de la serie FUTRO L
Puesta enservicio
Conexión
Ordenadorportátil
Observe las indicaciones de seguridad suministradas durante la primera
puesta en servicio del portal de la serie FUTRO L.
Funcionamiento del interruptor de
encendido/apagado
► Para encender el equipo, pulse brevemente el interruptor de encendido/apagado.
► Mantenga el interruptor pulsado para apagar el equipo.
► Si el equipo está encendido y no se encuentra en una sesión con un ordenador host,
pulse brevemente el interruptor para comenzar una nueva sesión.
► Si el equipo está conectado a un ordenador host, pulse brevemente el interruptor
para activar el panel de control Zero Client con las opciones para desconectar o
forzar una desconexión de hardware del ordenador host.
► Para desconectar el ordenador host proceda como se indica en las instrucciones
de uso del sistema operativo.
Activación del modo de ahorro de energía
Si se ha apagado el ordenador host conectado, el LED de encendido/apagado parpadea en verde.
Para activar el modo de ahorro de energía de la serie FUTRO L proceda del siguiente modo:
► Mantenga pulsado el interruptor de encendido/apagado.
FUTRO pasará al modo de ahorro de energía más económico.
► Pulse brevemente el interruptor de encendido/apagado, para volver a iniciar FUTRO.
Resolución
FUTRO L420
• 1-2 monitores DVI: hasta 1920 x 1200
• 1 monitor DVI + 1 monitor VGA:
hasta 1920 x 1200
• 1 monitor DVI: hasta 2560 x 1600 (requieren
un adaptador DVI Dual Link opcional)
Fujitsu
FUTRO L620
• 1-4 monitores DisplayPort:
hasta 1920 x 1200
• 1-2 monitores DisplayPort:
hasta 2560 x 1600
• 1-2 monitores DisplayPort:
hasta 1920 x 1200
+ 1 monitor DisplayPort:
hasta 2560 x 1600
75
14 - Español
Conexión y puesta en servicio del portal de la serie FUTRO L
Conexión del equipo a la red (LAN)
LAN
► Enchufe el cable Ethernet al puerto RJ45 de la LAN.
Conexión de los dispositivos externos
Lea la documentación correspondiente al dispositivo externo antes de conectarlo.
¡Los cables de alimentación deben estar desconectados cuando conecte
dispositivos externos (excepto dispositivos USB)!
En caso de tormenta no enchufe ni desenchufe ningún cable.
Para desenchufar los cables, tire siempre del conector. ¡Nunca tire del cable!
Guarde el orden siguiente para enchufar o desenchufar cables.
Conexión del monitor
Durante una conexión PCoIP: Asegúrese de que el portal FUTRO está conectado
al mismo puerto para monitor en la tarjeta del ordenador host.
► Siga las indicaciones de las instrucciones de la pantalla para preparar el
monitor (p. ej. conectar el cable).
► Conecte el cable de datos al puerto para monitor del equipo.
► Conecte el cable de red del monitor a una caja de enchufe con toma de tierra.
Monitor
76
Fujitsu
Conexión y puesta en servicio del portal de la serie FUTRO L
Español - 15
Conexión del teclado USB
Utilice únicamente el cable de teclado suministrado.
Puerto USB
conexión
► Enchufe el conector rectangular del cable del teclado en el conector hembra
rectangular de la parte inferior o posterior del teclado.
► Introduzca el conector USB (plano y rectangular) del cable del teclado
en un puerto USB del equipo.
PuertoUSB
Conexión del ratón USB
► Conecte el ratón USB a un puerto USB del equipo.
Conexióndelratón USB
PuertoUSB
Establecimiento de una conexión PCoIP
Su portal de la serie FUTRO L está preconfigurado para poder conectarse directamente a una tarjeta
host CELSIUS RemoteAccess pero puede configurarse para utilizar un producto de terceros del tipo
VMware View para conectarse a escritorios virtuales o tarjetas host CELSIUS RemoteAccess.
Conexión directa a una tarjeta host
Para establecer una conexión directa con la tarjeta host proceda de la siguiente manera:
► Conecte CELSIUS Workstation con la tarjeta host CELSIUS RemoteAccess.
► Conecte el portal de la serie FUTRO L y los equipos visualizadores conectados.
► Asegúrese de que el portal de la serie FUTRO L se encuentra en la misma red
que la tarjeta de host CELSIUS RemoteAccess.
► Espere hasta que aparezca en la pantalla el cuadro de diálogo Conexión.
► Para continuar, haga clic en Conexión.
► Espere hasta que desaparezca el mensaje Detectando hosts, espere....
Se mostrará una lista de hosts disponibles.
► Seleccione la tarjeta de host CELSIUS RemoteAccess a la que desea
conectarse y haga clic en OK.
Se mostrará la pantalla de la estación de trabajo CELSIUS y el LED de sesión
de la serie FUTRO L en el panel central se ilumina en verde indicando que
PCoIP ha podido conectarse correctamente.
Podrá encontrar más información relativa a las posibilidades de conexión PCoIP o
VDI en internet en "http://www.fujitsu.com/fts/support".
Fujitsu
77
Conexión y puesta en servicio del portal de la serie FUTRO L
16 - Español
Conexión del adaptador de red
Preparación
Adaptador
dered
paraelfuncionamiento
Tenga en cuenta las indicaciones de seguridad incluidas en el manual "Seguridad".
El cable de alimentación adjunto satisface las normas del país donde se
ha comprado el equipo. Asegúrese de que el cable de alimentación está
homologado en el país donde desea utilizarlo.
Utilice únicamente el adaptador de red suministrado y homologado
por Fujitsu Technology Solutions GmbH.
El cable de alimentación del adaptador de red solo puede enchufarse a una caja
de enchufe cuando el equipo esté ya conectado al adaptador de red.
Asegúrese de que el consumo de energía del adaptador de red no supere el de
la red eléctrica donde piensa conectar el adaptador de red (véase el capítulo
"Características técnicas", "Adaptador de red", Página 20 - Español).
► Conecte el cable del adaptador de
red (1) al conector hembra de tensión
continua (DC IN) del equipo.
► Enchufe el cable de alimentación (2)
al adaptador de red.
► Enchufe el cable de alimentación (3)
a una toma de corriente.
3
2
1
78
Fujitsu
Conexión y puesta en servicio del portal de la serie FUTRO L
Español - 17
Conexión de dispositivos externos a los puertos USB
Puerto USB externos
Dispositivos
USB
Los puertos USB le permitirán conectar una gran variedad de dispositivos externos
(p. ej., impresora, escáner, módem o teclado).
Los dispositivos USB pueden conectarse y desconectarse durante el servicio.
Por esta razón, pueden conectarse y desconectarse los cables de los
dispositivos USB estando el equipo en servicio.
Encontrará más información en la documentación de los dispositivos USB.
► Conecte el cable de datos al dispositivo externo.
► Conecte el cable de datos a un puerto USB de su portal de la serie FUTRO L.
Controladores de dispositivos
Los dispositivos USB externos que se conectan a un puerto USB no necesitan ningún
controlador propio, ya que el software necesario viene incluido en el sistema operativo.
En el caso de que el dispositivo USB externo necesite su propio software, este debe
instalarse desde el soporte de datos que acompaña al dispositivo USB.
Para que la transmisión de datos a través de USB no se vea afectada, debe
emplearse un cable de 3 m/118,11 pulgadas de largo como máximo entre el
dispositivo USB externo y el puerto USB del equipo.
Fujitsu
79
18 - Español
Solución de problemas y consejos
Solución de problemas y consejos
Causa
El portal de la serie FUTRO L no reconoce la
tarjeta host CELSIUS RemoteAccess.
Medidas correctoras
► Compruebe la conexión de red.
► Asegúrese de que el router esté conectado.
No se puede realizar con seguridad la función
► Cierre todos los programas que puedan
para desconectar los dispositivos USB.
tener acceso a la red.
¿Debo apagar la estación de trabajo CELSIUS El portal de la serie FUTRO L es un dispositivo
si deseo instalar el portal de la serie FUTRO L? "Plug & Play". Se puede conectar siempre,
incluso con el ordenador encendido.
80
Fujitsu
Español - 19
Características técnicas
Características técnicas
Información general
Procesador
Características eléctricas
Consumo de energía máximo
Audio
Chip de sonido
Red
LAN
Puertos
Puerto para monitor
FUTRO L420
Procesador TERA 2321 PCoIP
FUTRO L620
Procesador TERA 2140 PCoIP
19 W
22 W
High Definition Audio Controller Interface
Cable de red Base T 10/100/1000 al puerto RJ45
2 puertos, DVI-D, DVI-I
4 puertos, DisplayPort
Puerto para micrófono
Puerto para auriculares
Conector de altavoz
enchufe hembra mono de 3,5 mm
enchufe hembra estéreo de 3,5 mm
enchufe hembra estéreo de 3,5 mm
Puerto USB
Condiciones ambientales
Clase de clima (3K2)
4 x USB 2.0
DIN IEC 721 parte 3-3
Clase de clima (2K2)
Temperatura
Durante el servicio (3K2)
Transporte (2K2)
Dimensiones
DIN IEC 721 parte 3-2
Anchura x fondo x altura
45 mm x 130 mm x 150
mm/1,77 pulgadas x 5,11
pulgadas x 5,90 pulgadas
10 °C ... 35 °C/50 °F ... 95 °F
-25 °C ... 60 °C/-13 °F ... 140 °F
•
•
Peso
aprox. 630 g/1,38 libras
•
•
Fujitsu
con base:
80 mm x 133 mm x 186 mm/
3,15 pulgadas x
5,22 pulgadas x
7,32 pulgadas
sin base:
45 mm x 133 mm x 183 mm/
1,76 pulgadas x
5,22 pulgadas x
7,20 pulgadas
con base:
860 g/1,89 libras
sin base:
aprox. 790 g/1,74 libras
81
20 - Español
Características técnicas
Adaptador de red
Tipo
Entrada
Salida
Adaptador de CA Delta ADP-36JH A
100-240 V de CA; 1,0 A; 50-60 Hz; Class II
12 V de CC; 3 A
La ficha técnica de este equipo contiene más características técnicas. La ficha técnica
puede encontrarse en nuestra página web "http://www.fujitsu.com/fts".
82
Fujitsu
目次
日本語 - 1
目次
日本語
FUTRO L シリーズ . . . . . . . . . . . . . . . . . . . . . . . . . . . . . . . . . . . . . . . . . . . . . .
CELSIUS ワークステーション . . . . . . . . . . . . . . . . . . . . . . . . . . . . . . . . . . . . . . .
FUTRO L シリーズ Portal . . . . . . . . . . . . . . . . . . . . . . . . . . . . . . . . . . . . . . . . . . . .
リファレンスマニュアルの有効性 . . . . . . . . . . . . . . . . . . . . . . . . . . . . . . . . . . . .
表記規則 . . . . . . . . . . . . . . . . . . . . . . . . . . . . . . . . . . . . . . . . . . . . . . . . . . .
システム要件 . . . . . . . . . . . . . . . . . . . . . . . . . . . . . . . . . . . . . . . . . . . . . . . .
3
3
3
3
4
4
重要事項 . . . . . . . . . . . . . . . . . . . . . . . . . . . . . . . . . . . . . . . . . . . . . . . . . . .
安全性に関する諸注意 . . . . . . . . . . . . . . . . . . . . . . . . . . . . . . . . . . . . . . . . . . .
CEマーク . . . . . . . . . . . . . . . . . . . . . . . . . . . . . . . . . . . . . . . . . . . . . . . . . . .
FCC Class B Compliance Statement . . . . . . . . . . . . . . . . . . . . . . . . . . . . . . . . . . . . . .
製品の解梱とチェック . . . . . . . . . . . . . . . . . . . . . . . . . . . . . . . . . . . . . . . . . . .
省エネ、廃棄、リサイクル . . . . . . . . . . . . . . . . . . . . . . . . . . . . . . . . . . . . . . . .
デバイスを掃除する . . . . . . . . . . . . . . . . . . . . . . . . . . . . . . . . . . . . . . . . . . . .
場所の選択 . . . . . . . . . . . . . . . . . . . . . . . . . . . . . . . . . . . . . . . . . . . . . . . . . .
ポートと操作の要点 . . . . . . . . . . . . . . . . . . . . . . . . . . . . . . . . . . . . . . . . . . . . . .
前面 . . . . . . . . . . . . . . . . . . . . . . . . . . . . . . . . . . . . . . . . . . . . . . . . . . . .
背面 (FUTRO L420) . . . . . . . . . . . . . . . . . . . . . . . . . . . . . . . . . . . . . . . . . . . . . .
背面 (FUTRO L620) . . . . . . . . . . . . . . . . . . . . . . . . . . . . . . . . . . . . . . . . . . . . . .
ステータスインジケータ . . . . . . . . . . . . . . . . . . . . . . . . . . . . . . . . . . . . . . .
5
5
5
6
7
8
8
9
10
10
11
12
12
FUTRO L シリーズ Portal の接続と初期セットアップ . . . . . . . . . . . . . . . . . . . . . . . . .
オン/オフ スイッチの操作 . . . . . . . . . . . . . . . . . . . . . . . . . . . . . . . . . . . . . . . .
省エネモードのアクティブ化 . . . . . . . . . . . . . . . . . . . . . . . . . . . . . . . . . . . . . .
解像度 . . . . . . . . . . . . . . . . . . . . . . . . . . . . . . . . . . . . . . . . . . . . . . . . . . . . .
ネットワーク (LAN) へのデバイスの接続 . . . . . . . . . . . . . . . . . . . . . . . . . . . . . . .
外付けデバイスの取り付け . . . . . . . . . . . . . . . . . . . . . . . . . . . . . . . . . . . . . . . .
モニターの取り付け . . . . . . . . . . . . . . . . . . . . . . . . . . . . . . . . . . . . . . . . . .
USBキーボードの取り付け . . . . . . . . . . . . . . . . . . . . . . . . . . . . . . . . . . . . . .
USBマウスの取り付け . . . . . . . . . . . . . . . . . . . . . . . . . . . . . . . . . . . . . . . . .
PCoIP 接続の確立 . . . . . . . . . . . . . . . . . . . . . . . . . . . . . . . . . . . . . . . . . . . .
主電源アダプターの接続 . . . . . . . . . . . . . . . . . . . . . . . . . . . . . . . . . . . . . . .
USBポートへの外部デバイスの接続 . . . . . . . . . . . . . . . . . . . . . . . . . . . . . . . . .
13
13
13
13
13
14
14
15
15
15
16
17
問題の解決策とヒント . . . . . . . . . . . . . . . . . . . . . . . . . . . . . . . . . . . . . . . . . . . 18
技術仕様 . . . . . . . . . . . . . . . . . . . . . . . . . . . . . . . . . . . . . . . . . . . . . . . . . . . 19
主電源アダプター . . . . . . . . . . . . . . . . . . . . . . . . . . . . . . . . . . . . . . . . . . . . . . 20
Fujitsu
83
2 - 日本語
84
目次
Fujitsu
FUTRO L シリーズ
日本語 - 3
FUTRO L シ リ ー ズ
FUTRO L シリーズには 2 つの異なるポータルと、オプションで 2 枚の CELSIUS
RemoteAccess カ ー ド が備 わ っ てい ま す 。
FUTRO L420 および L620 は、VDI 環境のウルトラシンクライアントとして、また
は CELSIUS RemoteAccess ホストカードを備えた CELSIUS ワークステーションへリ
モート接続する PCoIP® ポータルとして使用できます。
リモートアクセスソリューションは、CELSIUS RemoteAccess カードと FUTRO L Portal と
の接続を保証する PCoIP® テクノロジーを基礎としています。
PCoIP® (PCoverIP®) テクノロジーを使用すれば、接続を効率よく素早くセットアップでき
ます。 アプリケーションや機能は、ローカルで無制限に実装可能です。
CELSIUS ワークステーション
CELSIUS ワークステーションは、中央メインコンピュータを形成します。 お使いのオペレー
ティングシステムは、このメインコンピュータにインストールされています。 ユーザーに依存
しない機能やアプリケーションは、CELSIUS ワークステーションで実行されます。
ユーザーは、PCoIP® を介して CELSIUS ワークステーションに簡単に (まるでワークステー
ションがモニターのすぐそばにあるかのように) アクセスできます。
FUTRO L シ リーズ Portal
FUTRO L シリーズ Portal はウルトラシンクライアントであり、接続されているモ
ニターと連携して、リモートの CELSIUS ワークステーション上で実行されている
アプリケーションや機能を再現することができます。
FUTRO L シリーズ Portal とローカルに連携し、他の周辺デバイスに接続することができます。
リファレンスマニュアルの有効性
このリファレンスマニュアルは、以下のシステムに対応しています。
•
•
FUTRO L420
FUTRO L620
Fujitsu
85
4 - 日本語
FUTRO L シリーズ
表記規則
この記号がついた文章には特にご注意ください。 これらの警告に気づか
ずにいると、健康へのリスク、デバイスの損傷、データの損失につなが
ることがあります。 保証は、デバイスの故障がこの警告に注意を払わな
かったことに起因する場合、無効となります。
デバイスの適切な使用についての重要な情報であることを示します。
►
アクティビティが表示された順番で行われなければならないことを
示します。
結果を示します。
このスタイル
はプログラムによって画面に表示された情報であることを示します。
例: Installation is complete!
このスタイル
は
•
•
「このスタイル」
ソフトウェアインターフェイスで使用される術語や文章を示します。
例: 「Save」をクリックします
プログラムやファイルの名前を示します。例: Windowsまたは
setup.exe
は
•
•
•
他のセクションとの相互参照を示します。例:「安全性に関する
情報」
ウェブアドレスなど、外部ソースへの相互参照を示します。例: 詳
細は「http://www.fujitsu.com/fts」をご覧ください。
CD や DVD の名前、その他の資料のタイトルや名前。例: 「CD/DVDド
ライバとユーティリティ」または「安全性」マニュアル
Abc
キーボードのキーを示します。例: F10
このスタイル
は強調または強調表示される術語や文章を示します。例: デバイス
のスイッチを切らないでください
システム要件
•
•
•
•
•
86
CELSIUS RemoteAccess カード用の空き PCIe ポート 1 つ (オプション)
USB マ ウ ス
USB キ ー ボ ー ド
VGA/DVI ま た は DisplayPort モ ニ タ ー
ネットワーク接続
Fujitsu
重要事項
日本語 - 5
重要事項
重項
事
要事項
この章 では 、安全 性に 関す る情報 をお 届けし ます 。デバ イス で作業 する
場 合に 備えて 書き 留めて おい てくだ さい 。
安全性に関する諸注意
安意
注
全 性に 関 す る 諸 注 意
「安全性/規則」マニュアルに記載されている安全性に関する諸注意、お
よび下記の安全性に関する諸注意に従ってください。
デバイスを取り付けたり操作する際には、「技術仕様」, ページ 19 - 日本語
の周辺条件についての注意と「FUTRO L シリーズ Portal の接続と初期セッ
トアップ」, ページ 13 - 日本語 の指示に従ってください。
システムのコンポーネントは非常に熱くなることがあるのでご注意ください。
これらの手順で説明された処置は、十分慎重に行ってください。
デバイスの修理を行うことができるのは、資格のある技術者のみです。 修理の仕
方を誤ると、ユーザーにとって大きなリスク (感電、エネルギー放出の危険、火事
のリスク等)となったり、機器に深刻な損傷を与える恐れがあります。
デバイスは、ケーシングを閉じた状態でのみ操作してください。
電 力ケ ー ブル と 主電 源ア ダ プタ ー :
付属の電源ケーブルは、デバイスを購入した国の規定に準拠しています。 電源ケー
ブルが、使用する国における規格に対応していることを確認してください。
デバイスを主電源アダプターに接続する場合、主電源コンセントには主電源
アダプターの電源ケーブル以外は接続しないでください。
他のデバイス用の主電源アダプターを使用しないでください。
本デバイスに使用できる設計の主電源アダプターのみを使ってください。
「技術仕様」, ページ 19 - 日本語の章をご覧ください。
主電源アダプターの定格電流が、接続先の電力システムの定格電流
より高くないことを確認してください。
オン/オフスイッチを使用してもデバイスの主電源は遮断されません。 主電源を完
全に遮断にするには、電源プラグを電源ソケットから抜いてください。
CE マ ー ク
このデバイスの出荷されたバージョンは、EU指令 2004/108/EC 「電磁環境両立性」、2006/95/EC
「低電圧指令」、および 2009/125/EC 「エコデザイン指令」 の条項に準拠しています。
Fujitsu
87
6 - 日本語
重要事項
FCC Class B Compliance Statement
DOC (INDUSTRY CANADA) NOTICES
Notice to Users of Radios and Television:
This class B digital apparatus complies with Canadian ICES-003.
The following statement applies to the products covered in this manual,
unless otherwise specified herein. The statement for other products will
appear in the accompanying documentation.
NOTE:
This equipment has been tested and found to comply with the limits for a "Class B" digital
device, pursuant to Part 15 of the FCC rules and meets all requirements of the Canadian
Interference-Causing Equipment Standard ICES-003 for digital apparatus. These limits are
designed to provide reasonable protection against harmful interference in a residential
installation. This equipment generates, uses and can radiate radio frequency energy and,
if not installed and used in strict accordance with the instructions, may cause harmful
interference to radio communications. However, there is no guarantee that interference will
not occur in a particular installation. If this equipment does cause harmful interference to
radio or television reception, which can be determined by turning the equipment off and on, the
user is encouraged to try to correct the interference by one or more of the following measures:
•
•
•
Reorient or relocate the receiving antenna.
Increase the separation between equipment and the receiver.
Connect the equipment into an outlet on a circuit different from that
to which the receiver is connected.
• Consult the dealer or an experienced radio/TV technician for help.
Fujitsu is not responsible for any radio or television interference caused by unauthorized
modifications of this equipment or the substitution or attachment of connecting cables and
equipment other than those specified by Fujitsu. The correction of interferences caused by such
unauthorized modification, substitution or attachment will be the responsibility of the user.
The use of shielded I/O cables is required when connecting this equipment to any and all
optional peripheral or host devices. Failure to do so may violate FCC and ICES rules.
88
Fujitsu
重要事項
日本語 - 7
製品の解梱とチェック
FUTRO L シリーズ Portal の配達物は次のとおりです。
•
•
•
•
•
•
►
►
►
►
FUTRO L420 2 画面ディスプレイポータルまたは FUTRO L620 4 画面ディスプレイポータル x1
主電源 ケーブ ル付き 主電源 アダプ ター x1
主電源 ケーブ ル付き 主電源 アダプ ター x1
「FUTRO L420 / L620」 クイックスタートガイド x1
多言語版 「Safety/Regulations」 マニュアル x2
「Service Desk & Warranty Information」 付録 x1
すべての部品を解梱します。
輸送中に発生した恐れのある損傷がないか、内容物を目視で確認します。
受領書の詳細と届いたものが一致することを確認します。
輸送中の損傷を見つけた場合、または受領書と納品物が一致していないことが判
明した場合は、地元の小売店へ直ちに連絡してください。
装置に元々付属していた梱包材は捨てないことをお勧めします。 元の梱包材は、
機器を再度輸送する必要が生じた場合のために取っておいてください。
Fujitsu
89
8 - 日本語
重要事項
省エネ、廃棄、リサイクル
廃ー
省
リ
ド
ユ
棄ザ
エ
サ
ラ
ネー
イ
バ
ク &ユ
マ
ルニ
ーュ
テア
ィル
リDVD
テ ィ DVD
これらの件に関する情報は、「省エネモードのアクティブ化」, ページ 13 - 日本語の章、リカバリー
DVD、または弊社ウェブサイト (「http://www.fujitsu.com/fts/about/fts/environment-care/」)
をご覧ください。
「エコデザイン指令」に関する情報:
EUエコデザイン指令に基づき、1275/2008規制では、スタンバイ時およびオフモード時の家
庭および職場での電気および電子デバイスの消費電力要件が規定されています。
一般的に、すべてのFUTROシンクライアント製品は、エネルギー効率の良い運転と低
スタンバイロスを目指して開発されています。 最適な運転のためには最優先事項で
あるお客様固有の要件およびオペレーティングシステム固有の要件により、上記指令
から派生した、いくつかのシステム設定が必要になります。
システムのリモートメンテナンスといった管理を行うためには、「Wake-on-LAN」 (WoL) 機能は、
当社のお客様にとって不可欠であるため、デフォルトの設定となっています。 WoL 機能をアク
ティブ化するとアイドル電流が多少増加するため、オフモード時の最大許容電力を若干超える恐
れがあります。 WoL 機能を非アクティブにすれば、法的要件に順守することが可能です。 手順に
ついては、「省エネモードのアクティブ化」, ページ 13 - 日本語の章を参照してください。
現在の多くのモバイルシステムやデスクトップシステムでよく使われている省エネモー
ド (ACPI S4 ディスクに保存) は、技術的な理由により、組み込みオペレーティングシ
ステムでは使用できません。 そのため、このオペレーティングシステムを搭載してい
るデバイスをオフモードに自動的に切り替えることはできません。
シンクライアントのオペレーティングシステムは、最適化されたサイズのフラッシュメモリ
に保存され、お客様による構成が完了した後で書き込み保護付きで提供されます。 これによ
り、オペレーティングシステムまたは他のアプリケーションを介して Swapfiles を更新する場合
など、フラッシュメモリへの頻繁な書き込みによりデータセキュリティをリスクにさらすの
を防いでいます。 各フラッシュメモリでは、許可される書き込みサイクル数を制限していま
す。 書き込み保護をアクティブにするだけでなく、使用可能なフラッシュメモリ容量も制限
することで、省エネモード (ACPI S4) がアクティブ化しないように防いでいます。
デバイスを掃除する
デス
移
再
シ
バテ
動
移
イム
動
スユ
, ニ ッ ト 、デ バイ ス 点 検
全て の電 源と 装 置の スイ ッチ を切 り、 主電 源 コン セン トか ら電
源プラグを外してください。
内部をお客様自身が掃除することはおやめください。専門のサー
ビス担当にお任せください。
研磨剤の入った洗剤またはプラスチックを腐食させる可能性のある洗剤を使
わないでください (アルコール、シンナー、アセトン等)。
デバイスを水で洗うことは絶対におやめください。 デバイスに水が入ると、
ユーザーに対して深刻なリスクとなることがあります(感電等)。
システムに水分が入らないようご注意ください。
モニターの表面は、圧力に弱く、傷がつきやすくなります。 柔らか
い、軽く濡らした布でのみ拭いてください。
表面は、乾いた布で拭くことができます。 汚れがひどい場合は、薄めの家庭
用洗剤で湿らせ固く絞った布を使ってください。
キーボードやマウスの掃除には殺菌効果のあるウェットティッシュを使ってください。
90
Fujitsu
重要事項
日本語 - 9
場所の選択
場電
デ
主
所源
バ
のア
イ
選ダ
ス
択プ タ ー
セットアップの前に、デバイスに適した場所を選択してください。 そ
の際には、以下の指示に従ってください。
•
•
•
•
•
•
•
•
Fujitsu
デバイスは、安定した平らな滑らない面上に配置してください。 デバイスのゴム
製の脚は、特定のタイプのデリケートな表面に跡を残すことがあります。
十分な換気を確保するため、デバイスと主電源アダプターから他のも
のを100 mm / 3.93インチ以上離してください。
十分な換気を確保するため、デバイスから他のものを300 mm /
11.81イン チ 以上 離し て くだ さ い。
デバイスの換気スロットを決して塞がないでください。
極限的な状況にデバイスをさらさないでください。 埃、湿気、
熱からデバイスを保護してください。
デバイスは水平方向で使用しないでください。
デバイスは必ず垂直方向で使用してください。
十分な換気がなされていない部屋ではデバイスを使用しないでください。
フット付きのシステムが配達された場合は、必ずこのフットを使
用してシステムを操作してください。
91
10 - 日本語
重要事項
ポートと操作の要点
ポート
この章では、デバイスの個々のハードウェアのコンポーネントを説明します。 デバイ
ス上のポートと操作の要点のまとめとしてご利用ください。 デバイスで作業を開始
する前にこれらのコンポーネントについて理解してください。
前面
L 420
1
2
3
4
5
1 = セ ッ シ ョ ン LED
2 = オン/オフ スイッチと LED
3 = USBポート (2x USB 2.0)
92
L 620
1
2
3
4
5
4 = ヘッドフォンポート
5 = マイクロフォンポート
Fujitsu
重要事項
日本語 - 11
背 面 (FUTRO L420)
1
2
3
4
5
6
7
1
2
3
4
=
=
=
=
USBポート (2x USB 2.0)
LAN ポ ー ト
DVI ポート 1 (DVI-D)
DVI ポート 2 (DVI-I)
Fujitsu
5 = スピ ーカ ーポー ト
6 = DC 入力コネクター (DC IN)
7 = セキュリティロック
93
12 - 日本語
重要事項
背 面 (FUTRO L620)
1
2
3
4
5
6
1 = USBポート (2x USB 2.0)
2 = LAN ポ ー ト
3 = DisplayPorts (上下 1~4 台)
4 = セキュリティロック
5 = スピ ーカー ポー ト
6 = DC 入力コネクター (DC IN)
ステータスインジケータ
このデバイスには 2 つの異なるステータスインジケータが備わっています。
オン/オフ LED
説明
緑色に点灯
ユニットの電源が入っています
緑色に点滅
ホスト PC が低電力状態です
黄色に点灯
•
•
黄色に点滅
クライアントのスタンバイ電源がアクティ
ブです
Wake-on-Lan (WoL) または Wake-on-USB
(WoUSB) が有効です
WoUSB の設定中、またはクライアントの電源オ
フ中
セッション-LED
説明
緑色に点灯
Off
ユニットが PCoIP に接続されています
94
PCoIP に接続されていません
Fujitsu
FUTRO L シリーズ Portal の接続と初期セットアップ
日本語 - 13
FUTRO L シリーズ Portal の接続と
初期セットアップ
ポー
最
ノ
初ト
のブ
作ッ
業ク
FUTRO L シリーズ Portal の初めてのセットアップに関して記載されてい
る安全性に関する諸注意に注意してください。
オン/オフ スイッチの操作
►
►
►
►
►
デバイスをオンにするには、オン/オフスイッチを短く押してください。
デバイスをオフにするには、スイッチを押したままにしてください。
デバイスがオンになっており、ホスト PC とのセッション中である場合には、ス
イッチを短く押すと新しいセッションが開始します。
ホスト PC に接続されているときに短く押すと、ホスト PC を切断したり、ハードパワーダウン
を強制できるオプションが表示された Zero Client コントロールパネルにアクセスできます。
ホスト PC のスイッチをオフにするには、お使いのオペレーティングシス
テムのマニュアルの記載に従ってください。
省エネモードのアクティブ化
接続されているホスト PC がシャットダウンすると、オン/オフ LED が緑色に点滅します。
省エネモードをアクティブにするには、FUTRO L シリーズにて次の操作を行います。
►
►
オ ン /オ フ ス イ ッ チ を 押 し 続 け ま す 。
FUTRO が 最低省エネ モードに 移行します 。
FUTRO を再起動するには、オン/オフスイッチを短く押してください。
解像度
FUTRO L420
FUTRO L620
•
•
•
•
1~2台の DVI モニター: 最大 1920x1200
1台の DVI + 1台の VGA モニター: 最大
1920x1200
1台の DVI モニター: 最大 2560x1600 (オ
プションの Dual Link DVI アダプターが必
要です)
1~4台の DisplayPort モニター:
最大 1920x1200
• 1~2台の DisplayPort モニター:
最大 2560x1600
• 1~2台の DisplayPort モニター:
最大 1920x1200
+ 1台の DisplayPort モニター:
最大 2560x1600
ネットワーク (LAN) へのデバイスの接続
LAN
►
イーサネットケーブルを RJ45 LAN ポートに差し込みます。
Fujitsu
95
14 - 日本語
FUTRO L シリーズ Portal の接続と初期セットアップ
外付けデバイスの取り付け
取り付け前に外付けデバイスのマニュアルをお読みください。
USBデバイスを除き、外付けデバイスを取り付ける前にはすべての
電 源 プ ラグ を 必ず 抜 いて く ださ い 。
雷雨の時には、ケーブルを接続したり、抜いたりしないでください。
ケーブルを外す時には必ずプラグそのものをしっかりと握ってくださ
い。 ケーブルの部分を引張らないでください。
ケーブルは、以下の順序で接続および抜線してください。
モニターの取り付け
PCoIP 接続時: FUTRO Portal がホスト PC カードと同じモニターポー
トに接続されていることを確認します。
►
モニターのマニュアルに記載されている手順に従って、モニターを操作す
る準備 (ケーブルの接続など) を行います。
データケーブルをデバイスのモニターポートに差し込みます。
接地された電源コンセントにモニターの電力ケーブルをつないでください。
モニター
►
►
96
Fujitsu
FUTRO L シリーズ Portal の接続と初期セットアップ
日本語 - 15
USB キ ー ボ ー ド の 取 り 付 け
付属のキーボードケーブル以外は使わないでください。
USBり
取
ポ付
ーけ
ト
►
►
キーボードケーブルの四角のコネクターをキーボードの裏側または背面
の四角のソケッ トに差し込んでく ださい。
キーボードケーブルの平型USBプラグをデバイスのUSBポートに差し込みます。
USB ポ ー ト
USB マ ウ ス の 取 り 付 け
►
USBマウスをデバイスのいずれかのUSBポートに接続します。
USB ポ
マー
ウト
スの取り付け
PCoIP 接 続 の 確 立
FUTRO L シリーズ Portal は、CELSIUS RemoteAccess ホストカードに直接接続するように事前に構
成されていますが、VMware View といったサードパーティの接続ブローカーを使用して、仮想デス
クトップや CELSIUS RemoteAccess ホストカードに接続するよう構成することもできます。
ホストカードに直接接続する
ホストカードへの直接接続を確立するには、次の手順に従います。
►
CELSIUS RemoteAccess ホ スト カ ード を搭 載 した CELSIUS ワ ーク ス テー
ションの電源をオンにします。
► FUTRO L シリーズ Portal と接続されているディスプレイの電源をオンにします。
► FUTRO L シリ ーズ Portal が CELSIUS RemoteAccess ホストカ ードと同じ
ネットワーク上 にあることを確認 します。
► Connect ダイアログが画面に表示されるまでお待ちください。
► Connect をク リ ック し て、 続 行し ま す。
► Discovering hosts, please wait... というメッセージが消えるまで待ちます。
使 用可能なホストの一覧 が表示されます。
► 接続対象の CELSIUS RemoteAccess ホストカードを選択し、OK をクリックします。
CELSIUS Workstation (CELSIUS ワークステーション) 画面が表示され、PCoIP 接続に成功した
ことを表す、前面パネルの FUTRO L シリーズセッション LED が緑色に点灯します。
PCoIP または VDI 接続の可能性については、インターネット (「http://www.fujitsu.com/fts/support」)
をご覧ください。
Fujitsu
97
16 - 日本語
FUTRO L シリーズ Portal の接続と初期セットアップ
主電源アダプターの接続
操電
主
作源
すア
るダ
準プ
備ター
同封の 「安全」 マニュアルに記載された安全に関する注意事項に順守してください。
付属の電源ケーブルは、デバイスを購入した国の規定に準拠しています。 電源ケー
ブルが、使用する国における規格に対応していることを確認してください。
Fujitsu Technology Solutions GmbH が承認する、デバイスに付属の主
電源アダプターのみを使用してください。
デバイスを主電源アダプターに接続する場合、主電源コンセントには主電源
アダプターの電源ケーブル以外は接続しないでください。
主電源アダプターの定格電流が、つなぐ先の主電源の定格電流より高く
ないことを確かめてください (「技術データ」「主電源アダプター」,
ページ 20 - 日本語 の章をご覧ください)。
►
►
►
3
主電源アダプターケーブル (1) をデバイス
の DC ジャック (DC IN) に接続します。
電源ケーブル (2) を主電源アダプ
ターに接続します。
電源ケーブル (3) を主電源コンセ
ントに接続します。
2
1
98
Fujitsu
FUTRO L シリーズ Portal の接続と初期セットアップ
日本語 - 17
USBポートへの外部デバイスの接続
USBバ
外
デ
部
デイ
ポ
デ
バス
ー
バ
イイ
ト
スス
USBポートには、さまざまな外付けデバイス (プリンター、スキャナー、モデ
ム、キーボードなど) を接続することができます。
USBデバイスはホットプラグ対応です。 つまり、デバイスのスイッチが入ってい
る状態でUSBケーブルをつないだり抜いたりできるということです。
その他の情報はUSBデバイスのマニュアルに記載されています。
►
►
データケーブルを外付けデバイスに接続します。
データケーブルを FUTRO L シリーズ Portal のいずれかの USB ポートに接続します。
デバイスドライバー
USBポートに接続した外付けUSBデバイスは、必要なソフトウェアがオペレーティ
ングシステムに含まれているため、通常はそれ自身のドライバを必要としませ
ん。 しかし、外付けUSBデバイスにそれ自身のソフトウェアが必要な場合には、
USBデバイスに付属するデータキャリアからインストールしてください。
USB のデータ転送容量を確保するには、外付けUSBデバイスからデバイスのUSBポート
までのケーブル長が3メートル / 118.11インチ以内でなければなりません。
Fujitsu
99
18 - 日本語
問題の解決策とヒント
問題の解決策とヒント
原因
是正策
CELSIUS RemoteAccess ホストカードがFUTRO L シ ►
リーズ Portal で認識されません。
►
USB デバイスを安全に取り外す機能が実行で
きません。
►
ネットワーク接続を確認してください。
ルーターのスイッチが入っていることを
確認してください。
ドライブにアクセスする可能性のあるすべ
てのプログラムを閉じてください。
FUTRO L シリーズ Portal をインストールするた FUTRO L シリーズ Portal は、「プラグアンド
めには、CELSIUS ワークステーションの電源を プレイ」デバイスです。 お好きな時に (コン
切る必要がありますか。
ピュータのスイッチがオンになっているときで
も) インストール可能です。
100
Fujitsu
技術仕様
日本語 - 19
技術仕様
全体
FUTRO L420
FUTRO L620
プロセッサ
TERA 2321 PCoIP プロセッサ
TERA 2140 PCoIP プロセッサ
19 W
22 W
電気的データ
最大消費電力
オーディオ
サウンドチップ
高解像度オーディオコントローラインターフェイス
ネットワーク
LAN
RJ45 ポート用 10/100/1000 Base-T ネットワークケーブル
ポート
モニターポート
2 ポート、DVI-D、DVI-I
マイクロフォンポート
3.5 mm モノミニジャック
ヘッドフォンポート
3.5 mm ステレオミニジャック
スピーカーポート
3.5 mm ステレオミニジャック
4 x USB 2.0
USBポート
4 ポート、DisplayPort
環境条件
環境クラス (3K2)
DIN IEC 721パート 3-3
環境クラス (2K2)
DIN IEC 721パート 3-2
温度
作動(3K2)
10 °C ... 35 °C / 50 °F ... 95 °F
移動(2K2)
-25 °C ... 60 °C / -13 °F ... 140 °F
寸法
幅 x 奥行き x 高さ
45 mm x 130 mm x 150 mm
/ 1.77インチ x 5.11インチ x
5.90インチ
•
•
重さ
約630 g / 1.38 lbs
•
•
Fujitsu
スタンド付き:
80 mm x 133 mm x 186 mm /
3.15インチ x 5.22インチ x
7.32インチ
スタンドなし:
45 mm x 133 mm x 183 mm /
1.76インチ x 5.22インチ x
7.20インチ
スタンド付き:
860 g / 1.89 lbs
スタンドなし:
約790 g / 1.74 lbs
101
20 - 日本語
技術仕様
主電源アダプター
タイプ
デルタACアダプター ADP-36JH A
入力
AC 100-240 V、1.0 A、50-60 Hz、クラス II
DC 12 V、3 A
出力
このデバイスのデータシートには、より詳細な技術データが記載されています。 デー
タシートは当社ウェブサイト(「http://www.fujitsu.com/fts」)をご覧ください。
102
Fujitsu
刷次
简体中文 - 1
刷次
简体中文
FUTRO L 系列 . . . . . . . . . . . . . . . . . . . . . . . . . . . . . . . . . . . . . . . . . . . . . . . . . . . . . . . . . . . . . . . . . . . . .
CELSIUS 工作站 . . . . . . . . . . . . . . . . . . . . . . . . . . . . . . . . . . . . . . . . . . . . . . . . . . . . . . . . . . . . . . . . . . .
FUTRO L 系列入口 . . . . . . . . . . . . . . . . . . . . . . . . . . . . . . . . . . . . . . . . . . . . . . . . . . . . . . . . . . . . . . . . .
適用說明 . . . . . . . . . . . . . . . . . . . . . . . . . . . . . . . . . . . . . . . . . . . . . . . . . . . . . . . . . . . . . . . . . . . . . . . . .
圖示 . . . . . . . . . . . . . . . . . . . . . . . . . . . . . . . . . . . . . . . . . . . . . . . . . . . . . . . . . . . . . . . . . . . . . . . . . . . . .
系統先決條件 . . . . . . . . . . . . . . . . . . . . . . . . . . . . . . . . . . . . . . . . . . . . . . . . . . . . . . . . . . . . . . . . . . . . .
3
3
3
3
4
4
重要指示 . . . . . . . . . . . . . . . . . . . . . . . . . . . . . . . . . . . . . . . . . . . . . . . . . . . . . . . . . . . . . . . . . . . . . . . . .
5
安全指示 . . . . . . . . . . . . . . . . . . . . . . . . . . . . . . . . . . . . . . . . . . . . . . . . . . . . . . . . . . . . . . . . . . . . . . . . .
5
CE 標誌 . . . . . . . . . . . . . . . . . . . . . . . . . . . . . . . . . . . . . . . . . . . . . . . . . . . . . . . . . . . . . . . . . . . . . . . . . .
5
FCC Class B Compliance Statement . . . . . . . . . . . . . . . . . . . . . . . . . . . . . . . . . . . . . . . . . . . . . . . . . . . . .
6
拆開並檢查所提供的物品 . . . . . . . . . . . . . . . . . . . . . . . . . . . . . . . . . . . . . . . . . . . . . . . . . . . . . . . . . . .
7
節能、處理與回收利用 . . . . . . . . . . . . . . . . . . . . . . . . . . . . . . . . . . . . . . . . . . . . . . . . . . . . . . . . . . . . .
7
清理設備 . . . . . . . . . . . . . . . . . . . . . . . . . . . . . . . . . . . . . . . . . . . . . . . . . . . . . . . . . . . . . . . . . . . . . . . . .
8
選擇安放位置 . . . . . . . . . . . . . . . . . . . . . . . . . . . . . . . . . . . . . . . . . . . . . . . . . . . . . . . . . . . . . . . . . . . . .
8
連接埠和操作元素 . . . . . . . . . . . . . . . . . . . . . . . . . . . . . . . . . . . . . . . . . . . . . . . . . . . . . . . . . . . . . . . . . . . . . .
9
前端 . . . . . . . . . . . . . . . . . . . . . . . . . . . . . . . . . . . . . . . . . . . . . . . . . . . . . . . . . . . . . . . . . . . . . . . . . .
9
背面 (FUTRO L420) . . . . . . . . . . . . . . . . . . . . . . . . . . . . . . . . . . . . . . . . . . . . . . . . . . . . . . . . . . . . . . . . . 10
背面 (FUTRO L620) . . . . . . . . . . . . . . . . . . . . . . . . . . . . . . . . . . . . . . . . . . . . . . . . . . . . . . . . . . . . . . . . . 11
狀態指示燈 . . . . . . . . . . . . . . . . . . . . . . . . . . . . . . . . . . . . . . . . . . . . . . . . . . . . . . . . . . . . . . . . . . . . 11
連接和啟動 FUTRO L 系列入口 . . . . . . . . . . . . . . . . . . . . . . . . . . . . . . . . . . . . . . . . . . . . . . . . . . . . . . 12
開/關鈕的操作 . . . . . . . . . . . . . . . . . . . . . . . . . . . . . . . . . . . . . . . . . . . . . . . . . . . . . . . . . . . . . . . . . . . . . 12
啟動省電模式 . . . . . . . . . . . . . . . . . . . . . . . . . . . . . . . . . . . . . . . . . . . . . . . . . . . . . . . . . . . . . . . . . . . . . 12
解析度 . . . . . . . . . . . . . . . . . . . . . . . . . . . . . . . . . . . . . . . . . . . . . . . . . . . . . . . . . . . . . . . . . . . . . . . . . . . 12
將設備連接網路 (LAN) . . . . . . . . . . . . . . . . . . . . . . . . . . . . . . . . . . . . . . . . . . . . . . . . . . . . . . . . . . . . . . . . . . 12
連接外接式設備 . . . . . . . . . . . . . . . . . . . . . . . . . . . . . . . . . . . . . . . . . . . . . . . . . . . . . . . . . . . . . . . . . . . 13
連接監視器 . . . . . . . . . . . . . . . . . . . . . . . . . . . . . . . . . . . . . . . . . . . . . . . . . . . . . . . . . . . . . . . . . . . . 13
連接 USB 鍵盤 . . . . . . . . . . . . . . . . . . . . . . . . . . . . . . . . . . . . . . . . . . . . . . . . . . . . . . . . . . . . . . . . . 14
連接 USB 滑鼠 . . . . . . . . . . . . . . . . . . . . . . . . . . . . . . . . . . . . . . . . . . . . . . . . . . . . . . . . . . . . . . . . . 14
建立 PCoIP 連線 . . . . . . . . . . . . . . . . . . . . . . . . . . . . . . . . . . . . . . . . . . . . . . . . . . . . . . . . . . . . . . . 14
連接變壓器 . . . . . . . . . . . . . . . . . . . . . . . . . . . . . . . . . . . . . . . . . . . . . . . . . . . . . . . . . . . . . . . . . . . . 15
將外接式設備連接到 USB 連接埠 . . . . . . . . . . . . . . . . . . . . . . . . . . . . . . . . . . . . . . . . . . . . . . . . . 16
疑難排解與提示 . . . . . . . . . . . . . . . . . . . . . . . . . . . . . . . . . . . . . . . . . . . . . . . . . . . . . . . . . . . . . . . . . . .
17
技術數據 . . . . . . . . . . . . . . . . . . . . . . . . . . . . . . . . . . . . . . . . . . . . . . . . . . . . . . . . . . . . . . . . . . . . . . . . .
變壓器 . . . . . . . . . . . . . . . . . . . . . . . . . . . . . . . . . . . . . . . . . . . . . . . . . . . . . . . . . . . . . . . . . . . . . . . . . . .
18
19
Fujitsu
103
2 - 简体中文
104
刷次
Fujitsu
FUTRO L 系列
简体中文 - 3
FUTRO L 系 列
FUTRO L 系列包含兩個不同的入口和兩個選購的 CELSIUS RemoteAccess 主機卡。
FUTRO L420 和 L620 可作為相當精簡的 Client 安裝於 VDI 環境中,或是作為 PCoIP® 入口
透過遠端連線安裝於配備 CELSIUS RemoteAccess 主機卡的 CELSIUS 工作站。
遠端連線方法是以 PCoIP® 技術為基礎,透過該項技術可確保 CELSIUS RemoteAccess
主 機 卡 與 FUTRO L 入 口 之 間 的 通 訊 。
PCoIP® 技術 (PCoverIP®) 實現了快速、有效率的連線能力。 應用程式與功能可就地安裝不受限制。
CELSIUS 工 作 站
CELSIUS 工作站代表中央主電腦。 您的作業系統將安裝在這部主電腦上。 使用者相
關的功能和應用程式則會在 CELSIUS 工作站上執行。
使用者可輕鬆透過 PCoIP® 存取 CELSIUS 工作站,就像身在監視器附近一般。
FUTRO L 系 列 入 口
FUTRO L 系列入口是極精簡的 Client,能夠利用連接的監視器重現遠端連線的
CELSIUS 工作站上所執行的應用程式和功能。
您可以在本機上使用 FUTRO L 系列入口進行工作,並連接更多週邊設備。
適用說明
上述說明適用於下列系統:
•
•
FUTRO L420
FUTRO L620
Fujitsu
105
4 - 简体中文
FUTRO L 系列
圖示
表示未注意此指示,可能危害建康、設備功能或資料安全。 若因未注意此
指示而導致設備損壞,則保固失效
表示不當使用設備的重要資訊
►
表示您必須執行的操作步驟。
表示結果
此字型
表示從程式輸出至顯示器上的資訊,例如: 安裝完成!
此字型
表示
•
•
“此字型”
軟體介面中的詞彙和內容,例如: 按下 儲存 。
程式或檔案的名稱,例如 Windows 或 setup.exe。
表示
•
•
•
其他章節的交互參照,例如“安全指示”
外部來源的交互參照,例如網址: 另請參閱 “http://www.fujitsu.com/fts”
CD、DVD 的名稱,以及其他文件的名稱和標題,例如: “CD/DVD 驅
動程式和公用程式”或“安全”手冊
Abc
表示鍵盤上的按鍵,例如: F10
此字型
表示強調或醒目提示的詞彙和內容,例如: 設備未關閉
系統先決條件
•
•
•
•
•
106
一個可用的 PCIe 連接埠,用於 CELSIUS RemoteAccess 主機卡 (選購)
一 個 USB 滑 鼠
一 個 USB 鍵 盤
一 部 VGA/DVI 或 DisplayPort 監 視 器
網路連線
Fujitsu
重要指示
简体中文 - 5
重要指示
重示
指
要指示
本章除了其他安全指示之外,還提供處理設備時務必注意的指示。
安全指示
安示
指
全指示
請注意“安全/規範”手冊中的安全指示和以下安全指示。
在安裝和操作設備時,請注意 “技術數據”, 頁 18 - 简体中文 中的環境條件說
明和 “連接和啟動 FUTRO L 系列入口”, 頁 12 - 简体中文。
請注意 ,系統中 的配件可 能溫度很 高。
務必特別小心執行此說明中所述的動作。
設備的維修只能由授權的專業人員執行。 不當維修可能對使用者造成危
險 (電擊、供電危險、火災危險) 以及造成設備損壞。
關閉主機殼後,才可操作設備。
電源線和變壓器:
隨附的電源線符合購買當地的法規要求。 請注意,電源線僅可用於設備使用所在地。
變壓器的電源線僅可於設備接妥時連接插座。
請勿將變壓器用於其他設備。
僅使用設備專屬的變壓器,請參閱 “技術數據”, 頁 18 - 简体中文。
請確認變壓器的耗電量未超過變壓器所連接主電源的耗電量。
切勿利用開/關鈕切斷設備的電源電壓。 若要完全切斷電源電壓,
必須從插座上拔下電源插頭。
CE 標 誌
本出售設備的規格符合 2004/108/EG “電磁相容性”、2006/95/EG “低電壓規
範 ” 和 2009/125/EG “環保設計規範” 的規定。
Fujitsu
107
6 - 简体中文
重要指示
FCC Class B Compliance Statement
DOC (INDUSTRY CANADA) NOTICES
Notice to Users of Radios and Television:
This class B digital apparatus complies with Canadian ICES-003.
The following statement applies to the products covered in this manual, unless otherwise specified
herein. The statement for other products will appear in the accompanying documentation.
NOTE:
This equipment has been tested and found to comply with the limits for a "Class B" digital
device, pursuant to Part 15 of the FCC rules and meets all requirements of the Canadian
Interference-Causing Equipment Standard ICES-003 for digital apparatus. These limits are
designed to provide reasonable protection against harmful interference in a residential installation.
This equipment generates, uses and can radiate radio frequency energy and, if not installed
and used in strict accordance with the instructions, may cause harmful interference to radio
communications. However, there is no guarantee that interference will not occur in a particular
installation. If this equipment does cause harmful interference to radio or television reception,
which can be determined by turning the equipment off and on, the user is encouraged to
try to correct the interference by one or more of the following measures:
•
•
•
Reorient or relocate the receiving antenna.
Increase the separation between equipment and the receiver.
Connect the equipment into an outlet on a circuit different from that to
which the receiver is connected.
• Consult the dealer or an experienced radio/TV technician for help.
Fujitsu is not responsible for any radio or television interference caused by unauthorized
modifications of this equipment or the substitution or attachment of connecting cables and
equipment other than those specified by Fujitsu. The correction of interferences caused by such
unauthorized modification, substitution or attachment will be the responsibility of the user.
The use of shielded I/O cables is required when connecting this equipment to any and all optional
peripheral or host devices. Failure to do so may violate FCC and ICES rules.
108
Fujitsu
重要指示
简体中文 - 7
拆開並檢查所提供的物品
FUTRO L 系 列 入 口 供 貨 內 容 包 括 :
•
•
•
•
•
•
►
►
►
►
一部 FUTRO L420 入口,可供兩部顯示器使用,或是一部 FUTRO L620
入口,可供四部顯示器使用
一個變壓器,含電源線
一個變壓器,含電源線
一本 快速 入門 指南 “FUTRO L420 / L620”
兩本“安全/規範”多語言手冊
一份“服務台 與保固相關 資訊”的補充 資料頁
拆除所有零件的包裝。
檢查包裝內物品是否存在運送時造成的明顯損壞。
檢查供貨是否與貨單上的說明一致。
如果您確定有運送造成的損壞或內含物品與貨單不一致,請您立即通知當地的銷售店。
建議您保留設備的原始包裝。 保留原始包裝以便可能需要運送時使用。
節能、處理與回收利用
處收
節
回
DVD驅
DVD使
理 利用
能
動
用者
程說
式明
和文
公用
件程 式
有關這些主題的資訊,可在復原 DVD 或網頁 (“http://www.fujitsu.com/fts/about/fts/environment-care/”)
上 的“啟動省電模式”, 頁 12 - 简体中文找到。
“Ökodesign-Richtlinie”的相關資訊:
以 EU 環保設計準則 (2009/125/EG) 為基礎的規範 1275/2008 定義了家用和辦公室
電子和電器設備於待機與關閉狀態下耗電量的相關規定。
一般來說,所有 FUTRO Thin Client 產品都是以高能源效率的操作與極低待命耗電量的目標進行開
發。 為依照客戶與作業系統專屬需求,以便呈現出最佳操作性能,可能與上述規範的需求有所牴觸。
基於管理目的,例如從遠端維修系統,“Wake-on-Lan” (WoL,網路開機) 功能對於客戶而言為必要,
因此為標準原廠設定。 啟動 WoL 功能時,在關閉模式下閉路電流會稍為增加,且稍為超過允許的
最大耗電量。 關閉 WoL 功能時則符合規範。 相關程序請參閱“啟動省電模式”, 頁 12 - 简体中文。
許多新款行動設備和桌上型系統皆可識別的節能模式 (ACPI S4 Save-to-disk),基於技術緣故無法
於內嵌式作業系統上使用。 因此採用這類作業系統的設備無法自動進入關閉模式。
精簡用戶端的作業系統另存於具有最佳化大小的 Flash 記憶體上,並且於客戶完成組態設定後
進行防寫保護。 如此可避免因經常寫入 Flash 記憶體 (例如作業系統中的Swapfiles更新),或因
其他應用程式,而危及資料安全。 每個 Flash 記憶體的寫入週期次數都會受到限制。 啟動的
寫入保護與可供使用的受限 Flash 記憶體容量,都會阻止啟動節能模式 (ACPI S4)。
Fujitsu
109
8 - 简体中文
重要指示
清理設備
設統
運
退
系
備 單 元 ,請 參 閱 設 備
送
回
關閉設備及其所有與之相連的設備,並將電源插頭從插座上拔出。
設備主機殼內室只可由授權的專業人員清理。
清潔時不得使用去污粉和可溶解塑膠的清潔劑 (酒精、稀釋劑或丙酮)。
在任何情況下都不得將設備弄濕!水分滲入可能會對使用者造成巨大危險 (比如電擊)。
注意勿讓液體流入設備內部。
僅可使用稍微沾濕的軟布清潔對於壓力和刮傷十分敏感的監視器表面。
主機殼表面可用乾布清潔。如果有特別髒的地方,您可使用沾有溫和洗滌劑的濕抹布小心清潔。
您可用消毒抹布清理鍵盤和滑鼠。
選擇安放位置
選壓
設
變
擇器
備
安 放 位置
在您放置設備之前,應先為設備選擇適當的位置。 請遵循下列指示進行:
•
•
•
•
•
•
•
•
110
將設備放在穩固、平坦的防滑表面上。 請注意,設備的橡膠支腳
可能在 某些 敏感的 表面上 留下 痕跡。
其 他物 品 至少 與 設備 和 變壓 器 之間 保 持 100 公 釐 / 3.93 英吋
距離,以確保有足夠的通風。
其他物品至少與設備頂部之間保持 300 公釐 / 11.81 英吋距離,以確保有足夠的通風。
設備通風口務必保持暢通。
切勿將設備暴露在極端氣候條件下。 避免設備髒污、受潮和處於高溫環境下。
切勿以水平方向安裝設備。
一律採用直立位置安裝設備。
請 勿 在通 風 不 良的 室 內 使用 設 備。
若您的設備隨附底座,請安裝底座以操作設備。
Fujitsu
重要指示
简体中文 - 9
連接埠和操作元素
連接埠
本章將介紹設備中的各個硬體元件。 您將獲得有關設備連接埠和操作元素的概
述。 請先熟悉這些元素,再使用設備執行工作。
前端
L 420
1
2
3
4
5
1 = 組 件 LED
2 = 開/關 鈕和 LED 燈
3 = USB 連接埠 (2 個 USB 2.0)
Fujitsu
L 620
1
2
3
4
5
4 = 耳機連接埠
5 = 麥克風連接埠
111
10 - 简体中文
重要指示
背 面 (FUTRO L420)
1
2
3
4
5
6
7
1
2
3
4
=
=
=
=
112
USB 連接埠 (2 個 USB 2.0)
LAN 連 接 埠
DVI 連接埠 1 (DVI-D)
DVI 連接埠 2 (DVI-I)
5 = 喇叭連接埠
6 = DC 電源插座 (DC IN)
7 = 安全鎖裝置
Fujitsu
重要指示
简体中文 - 11
背 面 (FUTRO L620)
1
2
3
4
5
6
1 = USB 連接埠 (2 個 USB 2.0)
2 = LAN 連 接 埠
3 = DisplayPort (1-4,從上到下)
4 = 安全鎖裝置
5 = 喇叭連接埠
6 = DC 電源插座 (DC IN)
狀態指示燈
本設備採用兩種不同的狀態指示燈。
開/關 LED 燈
說明
亮綠燈
設備已開啟
閃綠燈
主機 PC 處於節能模式
亮黃燈
•
•
閃黃燈
WoUSB 或 Client 的功能關閉
Client 待命模式作用中
Wake-on-Lan (WoL,網路開機) 或
Wake-on-USB (WoUSB,USB 開機) 已啟動
組件 LED
說明
亮綠燈
設備與 PCoIP 連線
熄滅
未與 PCoIP 連線
Fujitsu
113
12 - 简体中文
連接和啟動 FUTRO L 系列入口
連接和啟動 FUTRO L 系列入口
連記
啟
筆
接型電腦
動
FUTRO L 系列入口初始運行時,請注意隨附的安全指示。
開/關鈕的操作
►
►
►
►
►
短按開/關鈕,即可開啟設備。
按住開關鈕,即可關閉設備。
若設備開啟,但不是處於主機 PC 的組件內,請輕按開關鈕起始新組件。
若設 備與 主機 PC 連線 , 可輕 按開 關鈕 呼 叫 Zero Client 控 制台 ,選 擇
將 主 機 PC 中 斷 連 線 或 關 閉 硬 體 。
依照作業系統的操作說明書所述,關閉主機 PC。
啟動省電模式
關閉連線的主機 PC 時,開 /關 LED 會閃綠燈
請依照下述啟動 FUTRO L 系列的節能模式:
►
►
按住開/關鈕。
FUTRO 將 進 入 最 節 省 的 節 能 模 式 。
短 按開 / 關 鈕, FUTRO 就會 再 次 啟 動 。
解析度
FUTRO L420
•
•
•
FUTRO L620
1-2 部 DVI 監視器: 最高 1920x1200
•
1 部 DVI + 1 部 VGA 監視器: 最高
•
1920x1200
•
1 部 DVI 監視器: 最高 2560x1600 (需要選
購的 Dual Link DVI 介面卡)
1-4 部 DisplayPort 監視器: 最高 1920x1200
1-2 部 DisplayPort 監視器: 最高 2560x1600
1-2 部 DisplayPort 監視器: 最高 1920x1200
+ 1 部 DisplayPort 監視器: 最高 2560x1600
將 設 備 連 接 網 路 (LAN)
LAN
►
114
將乙太網路纜線連接 至 RJ45 LAN 連接埠。
Fujitsu
連接和啟動 FUTRO L 系列入口
简体中文 - 13
連接外接式設備
在連接外接式設備前,請詳讀外接式設備的說明文件。
除了 USB 設備外,連接其他外接式設備時,務必拔掉電源插頭!
雷暴雨期間不得插入或拔除導線。
拔除導線時,請務必手握插頭。 切勿直接拉導線!
連接或拔除導線時,請遵守以下所述的順序。
連接監視器
與 PCoIP 連線時: 請確認 FUTRO 入口本身的監視器連接埠與主機 PC 卡連接。
►
►
►
遵循顯示器說明書中的指示,將監視器準備就緒 (例如連接纜線)。
將 數 據 線連 接 至 設備 的 監 視 器連 接 埠 。
將監 視器 的電源 線連 接至 接地 的插座 上。
監視器
Fujitsu
115
14 - 简体中文
連接和啟動 FUTRO L 系列入口
連 接 USB 鍵 盤
只使用隨附的鍵盤線。
USB連
連
接 接埠
►
►
將鍵盤線的矩形插頭插入鍵盤底面或背面的矩形插座中。
將鍵盤線的矩形 USB 平插頭插入設備的 USB 連接埠中。
USB連 接 埠
連 接 USB 滑 鼠
►
將 USB 滑鼠 接 到設 備 的 USB 連 接 埠。
連 接 USB滑
USB連
接 埠鼠
建 立 PCoIP 連 線
FUTRO L 系列入口會預先設定與 CESLIUS RemoteAccess 主機卡直接連接,但是也可以使用協力
廠商產品 (例如 VMware View) 建立與虛擬桌面或 CELSIUS RemoteAccess 主機卡的連線。
直接連接主機卡
若要建立與主機卡的直接連線,請依照下述執行:
►
►
►
►
►
►
開啟配備 CELSIUS RemoteAccess 主機卡的 CELSIUS 工作站。
開啟 FUTRO L 系列入口與連接的顯示設備。
確認 FUTRO L 系列入口與 CELSIUS RemoteAccess 主機卡位於相同網路中。
稍 等直 到 顯 示 器上 顯 示 連 線 對 話 方 塊。
按下連線繼續進行。
稍等直到出現 正在搜尋主機,請稍候 ...訊息。
可用主機的清單將會顯示。
► 選擇您要建立連線的 CELSIUS RemoteAccess 主機卡,然後按下 確定 。
CELSIUS 工作站的顯示器將會 顯示,且前面板上的 FUTRO L 系列組件
LED 燈會 亮綠燈, 表示 PCoIP 連 線成功。
有關 PCoIP 或 VDI 連線選項的詳細資訊,可在下列網站找到:“http://www.fujitsu.com/fts/support”。
116
Fujitsu
連接和啟動 FUTRO L 系列入口
简体中文 - 15
連接變壓器
建壓
變
立器
可 操作 狀 態
請注意隨附的“安全”手冊中的安全指示。
隨附的電源線符合購買設備當地的要求。 請注意,電源線為使用所在國家/地區所認可。
僅可使用隨附的 Fujitsu Technology Solutions GmbH 認可的變壓器。
變壓器的電源線僅可於設備連接變壓器時連接插座。
請確認變壓器的耗電量未超過變壓器所連接主電源的耗電量 (“技術
數據 ”, “變壓 器”, 頁 19 - 简体 中文 )。
►
►
►
將變壓器導線 (1) 連接到設備的 DC
電源插座 (DC IN)。
將電源線 (2) 連接到變壓器。
將電源線 (3) 連接到插座。
3
2
1
Fujitsu
117
16 - 简体中文
連接和啟動 FUTRO L 系列入口
將外接式設備連接到 USB 連接埠
USB設
USB連
外
設
接 式接
備
備
設埠
備
您可將多個外接式設備連接到 USB 連接埠 上(比如印表機、掃描器、數據機或鍵盤)。
USB 設 備具有熱插拔能力。 因此,您 可以在開啟設備的情況下連
接 和 拔 除 USB 設 備 的 導 線 。
如需詳細資訊,請參閱 USB 設備的說明文件。
►
►
將數據線連接到外接式設備。
將數據線連接到 FUTRO L 系列入口的 USB 連接埠。
設備驅動程式
與 USB 連接埠相連的外接 USB 設備不需要單獨的驅動程式,因為作
業系統中已包含所需的軟體。 若外接 USB 設備需要特殊軟體,則必須
從 USB 設備隨附的資料媒體安裝這些軟體。
為了不損及透過 USB 傳輸資料的能力,外接 USB 設備與設備 USB 連接
埠之間的纜線長度不得超過 3 公尺 / 118.11 英吋。
118
Fujitsu
疑難排解與提示
简体中文 - 17
疑難排解與提示
原因
解決故障
FUTRO L 系列入口無法辨識 CELSIUS
RemoteAccess 主機卡。
►
►
請檢查連接埠。
請確認路由器已開啟。
無法執行從 USB 設備安全移除的功能。
►
請結束可能存取硬碟的所有程式。
安裝 FUTRO L 系列入口時,是否必須將
CELSIUS 工作站關機?
FUTRO L 系列入口是“隨插即用”的設備。 您可
以在電腦開機時隨時自行連接該設備。
Fujitsu
119
18 - 简体中文
技術數據
技術數據
一般資訊
FUTRO L420
FUTRO L620
處理器
TERA 2321 PCoIP 處理器
TERA 2140 PCoIP 處理器
19 W
22 W
電性值
最大能源消耗
音訊
音效晶片
高解析度音訊控制器介面
網路
LAN
10/100/1000 Base T 網路線 (於 RJ45 連接埠上)
連接埠
監視器連接埠
2 個連接埠,DVI-D 和 DVI-I
麥克風連接埠
3.5 mm 單聲道插孔
耳機連接埠
3.5 mm 立體聲插孔
喇叭連接埠
3.5 mm 立體聲插孔
USB 連接埠
4 個 USB 2.0
4 個連接埠,DisplayPort
環境條件
氣候等級 (3K2)
DIN IEC 721 第 3-3 部分
氣候等級 (2K2)
DIN IEC 721 第 3-2 部分
溫度
運行 (3K2)
10 °C ... 35 °C/50 °F...95 °F
運送 (2K2)
-25 °C ... 60 °C/-13 °F...140 °F
尺寸
寬x深x高
45 公釐 x 130 公釐 x 150 公釐 / •
1.77 英吋 x 5.11 英吋 x
5.90 英吋
•
重量
約 630 公克 / 1.38 磅
•
•
120
含底座:
80 公釐 x 133 公釐 x
186 公釐 /
3.15 英吋 x 5.22 英吋 x 7.32
英吋
不含底座:
45 公釐 x 133 公釐 x
183 公釐 /
1.76 英吋 x 5.22 英吋 x
7.20 英吋
含底座:
860 公克 / 1.89 磅
不含底座:
約 790 公克 / 1.74 磅
Fujitsu
技術數據
简体中文 - 19
變壓器
類型
Delta AC 變壓器 ADP-36JH A
輸入
AC 100-240 V;1.0 A;50-60 Hz;第 II 級
輸出
DC 12 V;3 A
設備的 資料表內 包含更多 技術數據 。 資 料表可在 我們的網 站上找
到 : “http://www.fujitsu.com/fts”。
Fujitsu
121