1
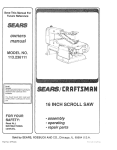
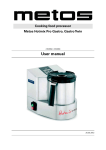
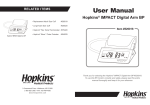
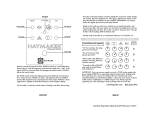
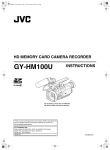
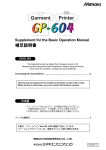
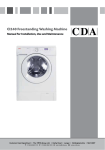
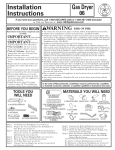
DD-30 Digital Drum
Bedienungsanleitung
00025211
Version 01/2013
Inhaltsverzeichnis
Sicherheitshinweise!
3
Stromversorgung!
3
Anschlüsse!
3
Aufbauort!
4
Elektrische Interferenzen!
4
Reinigung!
4
Handhabung!
4
Beschreibung des Gerätes !
5
Vorderseite!
5
Anschlüsse an der Rückseite!
5
Aufbau!
Stromversorgung!
6
6
Anschlüsse !
7
Kopfhörer!
7
Abspielen des Demo-Songs!
7
Spielen eines Rhythmus!
8
Spielen auf den Pads!
8
Lernen einer Lektion!
9
Technische Spezifikationen!
9
Liste der Percussion-Kits!
10
Liste der Rhythmen!
11
Demo-Song!
11
Sicherheitshinweise
FCC-Bestimmungen für die USA
Das Gerät wurde getestet und im Einklang mit den Beschränkungen für Klasse B Geräte
(Teil 15 der FCC-Bestimmungen) befunden. Diese Richtlinien schützen den Anwender vor
gefährlichen Interferenzen. Das Gerät generiert Radiowellen und strahlt sie ab, was
gefährlich sein kann, wenn das Gerät nicht in Übereinstimmung mit den Vorgaben
installiert und benutzt wird. Sollte dieses Gerät Ihren Radio- oder Fernsehempfang stören,
was durch an- und abschalten des Geräts überprüft werden kann, können Sie mit
folgenden Maßnahmen für Abhilfe sorgen:
- Stellen Sie die Empfangsantenne anders oder an einem anderen Ort auf.
- Vergrößern Sie den Abstand zwischen Gerät und Receiver.
- Verbinden Sie das Gerät mit einem anderen Stromkreis.
- Ersuchen Sie Ihren Händler oder einen Radio-Fernsehtechniker um Hilfe.
Bitte lesen Sie die folgenden Hinweise sorgfältig, bevor Sie das Gerät in Betrieb
nehmen und bewahren Sie die Bedienungsanleitung auf.
Bitte beachten Sie, dass dieses Produkt durch starke elektromagnetische Interferenzen
gestört werden kann. In einem solchen Fall können Sie das Gerät auf die
Werkseinstellungen zurücksetzen (Reset). Eine Beschreibung zu diesem Vorgang finden
Sie in dieser Bedienungsanleitung. Wenn die normalen Funktionen des Gerätes trotz des
Resets nicht wieder hergestellt werden können, sollten Sie das Gerät etwas weiter von der
Störungsstelle entfernt benutzen.
Stromversorgung
Bitte verbinden Sie das Netzteil nur mit einer Steckdose, die die vorgeschriebene
Spannung aufweist.
Trennen Sie das Netzteil von der Steckdose, wenn Sie das Instrument nicht benutzen.
Gleiches gilt auch bei Gewitter.
Anschlüsse
Bevor Sie das Instrument mit anderen Geräten verbinden, schalten Sie bitte zuerst alle
Geräte aus. Dies hilft, Fehlfunktionen und/oder Schäden an anderen Geräten
vorzubeugen.
Aufbauort
Um Verformung, Verfärbung oder ernsthafte Schäden zu vermeiden, sollten Sie das
Instrument folgenden Dingen nicht aussetzen:
• Sonnenlicht
• hohen Temperaturen (z.B. einer Heizung oder tagsüber im Auto)
• übermäßiger Feuchtigkeit
• übermäßigem Staub
• starken Vibrationen.
Elektrische Interferenzen
Dieses Instrument enthält digitale Schaltkreise und kann Interferenzen verursachen wenn
es zu nahe an Radio- oder Fernsehempfängern steht. Wenn dies passiert stellen Sie das
Instrument etwas weiter weg von solchen Geräten.
Reinigung
Sie können das Gerät mit einem trockenen weichen Tuch reinigen. Benutzen Sie niemals
Reinigungsmittel wie Alkohol oder Lösungsmittel und verwenden Sie keine mit
Chemikalien getränkten Reinigungstücher.
Handhabung
• Wenden Sie keine Gewalt im Umgang mit Reglern, Steckern oder anderen Teilen des
Gerätes.
• Lassen Sie kein Papier oder irgendwelche Gegenstände in das Gerät gelangen. Sollte
dies passieren, trennen Sie es bitte von der Steckdose und lassen Sie das Instrument
von einer qualifizierten Werkstatt überprüfen.
• Trennen Sie alle Steckverbindungen bevor Sie das Gerät bewegen.
Panel
Description
Beschreibung
des Gerätes
Vorderseite
Front
Panel
8
6
7
9
10
1
2
8
3
4
DEMO1. POWER ON/OFF
Start or stop
demo song.
Startplaying
or stopthe
playing.
1. POWER ON/OFF: AN-/Ausschalter
TEMPO+/2. VOLUME +/2. VOLUME +/-: Lautstärkeregler
Increase/decrease
volume.
Increase/decrease
tempo value.
6
5
7
9
10
6. DEMO
Start or stop playing the demo song.
7. TEMPO+/Increase/decrease tempo value.
3. KIT +/-: Erhöht oder vermindert die Kit-Nummer
+/-1-7: Auswahlknöpfe für die Rhythmen
START3. KIT4.
8. START
Increase/decrease
kit
number.
Start rhythm
play.
Start rhythm play.
5. +/-: Erhöht oder vermindert die Rhythmus-Nummer
6. DEMO: Startet oder stoppt den Demo-Song
STOP 4. 1~7
9. STOP
7.
TEMPO
+/-: Erhöht
oder
vermindert das Tempo
Number
buttons [1~7]
for rhythm
selection.
Stop rhythm
play.
Stop rhythm play.
8. START: Startet einen Rhythmus
5. [+/-]9. STOP: Stoppt einen Rhythmus
10. LESSON
0. LESSON
rhythm number.
Go into lesson mode.
Go into Increase/decrease
lesson
mode.
10. LESSON: Versetzt das Gerät in den Lernmodus
an der Rückseite
RearAnschlüsse
Panel
11. Headphone jack
This stereo jack is used to connect headphone.
12. DC jack
12
Connect 11
the included
DC 9V power adaptor.
11. Buchse für den Anschluss eines Stereo-Kopfhörers
12. Anschluss für das Netzteil
4
11
12
ntend
panel
t.
nit.
in
nal
ment.
sible.
will
aline,
the
ent to
nded
e
unit
ht
one
em or
Aufbau
Stromversorgung
Setup
Setup
Ihr Digital Drum kann sowohl mit Batterien als auch mit Netzteil betrieben werden. Bitte
folgen Sie den unten stehenden Anleitungen entsprechend der Stromquelle, die Sie
nutzen
möchten.
Power
Supply
Setup
Power Supply
Your Digital Drum will run either from batteries or power adaptor.
Follow1.
theBetrieb
instructions
below
according
to the power source you intend
mit
einem
Netzteil
to use. Your Digital Drum will run either from batteries or power adaptor.
Verbinden
das eine
destoNetzteil
deryou
Buchse
Follow the Sie
instructions
belowEnde
according
the powermit
source
intend an
to
use.
Rückseite des Instruments und das andere mit einer
Usingder
an AC-Adaptor
Connect
the power adaptor to the DC IN jack located on the rear panel
Steckdose.
an AC-Adaptor
of the unit,Using
and plug
the AC power adaptor into an AC power outlet.
Connect the power adaptor to the DC IN jack located on the rear panel
of the unit, and plug the AC power adaptor into an AC power outlet.
Using Batteries
1. Open the battery compartment cover on the underside of the unit.
Using Batteries
2. Batteriebetrieb
1. Open the battery compartment cover on the underside of the unit.
2. Insert six “C” size, R-14, SUM-2 or equivalent batteries. When
inserting the batteries, be careful to follow the polarity marking in
2. Insert six “C” size, R-14,
SUM-2Sie
or equivalent
batteries. When
the illustration.
Öffnen
die Abdeckung
des Batterieschachts
inserting the batteries, be careful to follow the polarity marking in
des Gerätes.
the illustration.
3. Close the battery compartment securely.
Note:
an der Unterseite
3. Close the battery compartment securely.
Power will be automatically drawn from the AC adaptor if an optional
Note:
AC adaptor
is connected while batteries
are Sie
installed
in theBatterien,
instrument.
Legen
sechs
Power will be automatically drawn from the AC adaptor if an optional
Größe
C, R-14,
SUM-2inein
AC adaptor is connected
while batteries
are installed
the instrument.
Caution:
und beachten Sie bitte die Polarisation der Batterein,
It is recommended that you replace worn batteries as soon as possible.
Caution:
in nebenstehender
Zeichnung
dargestellt
ist.
When die
battery
voltage drops, the display
will dim and/or
the sound will
It is recommended
youreplace
replacethe
worn
batteries
asasoon as possible.
become distorted.
When this that
occurs,
batteries
with
When
battery
display
complete set
of six
new voltage
batteriesdrops,
of thethe
same
type.will dim and/or the sound will
Schließen
Sie dieWhen
Abdeckung
Batterieschachtes
become distorted.
this occurs,des
replace
the batteries with a
complete
set
of
six
new
batteries
of
the
same
type. (alkaline,
NEVER
mix
old
and
new
batteries,
different
types
of
batteries
wieder.
magnesium, etc ), batteries by different makers, or batteries from the
NEVER
old and
new Misuse
batteries,
different
of batteries
same maker
but ofmix
different
types.
may
cause types
the instrument
to (alkaline,
become hot,
result in fire,
battery leakage.
magnesium,
etc or
), batteries
by different makers, or batteries from the
same
maker but ofSie!
different types. Misuse may cause the instrument to
Bitte
beachten
Also, to prevent
damage
due in
to fire,
battery
leakage,
remove all the
become
hot, result
or battery
leakage.
Auch
Batterien
wird
der Strom vom
batteries
fromwenn
the instrument
wheneingelegt
it is not to besind,
used for
an extended
periodangeschlossen
of time.
in an unused
will also
looseall the
Also,Batteries
to preventleft
damage
due to instrument
battery leakage,
remove
ist.
their power
overtime.
batteries
from the instrument when it is not to be used for an extended
period of time. Batteries left in an unused instrument will also loose
Vorsicht!
their power overtime.
Netzteil bezogen, wenn eines
Wir empfehlen, verbrauchte Batterien so bald wie möglich zu ersetzen. Wenn die
Batteriespannung abfällt, kann das Display dunkler werden und/oder der Sound verzerrt
werden. Wenn dies passiert, ersetzen Sie bitte den kompletten Batteriesatz durch sechs
neue des gleichen Typs.
Connections
Connections
Connections
Using
Headphones
Mischen
Sie niemals alte und neue Batterien und verwenden Sie nicht unterschiedliche
Batterietypen
(Alkali,
Magnesium,
etc.),
auch nicht gleiche
Using
Headphones
An optional
set of stereo
headphones
can be connected
to the
Headphones
jack located
the rear panel. When
a pair
of
Hersteller
oder on
verschiedene
Typen
gleicher
Hersteller. All
headphones
is
connected
to
the
jack,
the
internal
speakers
of
the
unit
An
optional
set
of
stereo
headphones
can
be
connected
to the
sichoffdas
Instrument
aufheizt
oder dieorBatterien
auslaufen.
will switchHeadphones
automatically,
perfect for
lateanight
jack located
on private
the rearpractice
panel. When
pair of
playing. If headphones
you want to use
an
external
sound
system,
the
headphone
is connected to the jack, the internal speakers of the unit
jack can also
be used
connect the digital
to a stereo
system
or night
will switch
offtoautomatically,
perfectdrum
for private
practice
or late
mixing console.
playing. If you want to use an external sound system, the headphone
jack can also be used to connect the digital drum to a stereo system or
mixing console.
Batterien unterschiedlicher
dies kann dazu führen, dass
their power overtime.
Anschlüsse
Connections
Using Headphones
Kopfhörer
optional set of stereo headphones can be connected to the
SieAn
können
optional Kopfhörer an der entsprechenden
Headphones jack located on the rear panel. When a pair of
Buchse
an der
Rückseite
Wenn Sie
headphones
is connected
to thedes
jack,Gerätes
the internalanschließen.
speakers of the unit
will
switch
off
automatically,
perfect
for
private
practice
or
late
night
dies tun, werden die internen Lautsprecher des Instruments
playing. If you want to use an external sound system, the headphone
automatisch
stumm
Dasdrum
ist to
perfekt,
jack can also be
used togeschaltet.
connect the digital
a stereo wenn
system Sie
or spät
mixing
console.
in der Nacht oder ganz in Ruhe üben möchten. Sie können an
der Kopfhörerbuchse auch ein externes Soundsystem oder einen
Mischer anschließen, wenn Sie dies möchten.
Abspielen des Demo-Songs
Playing
the the
Demo
Song
Playing
Demo
Song
Ihr Digital Drum kommt mit
einem Demo-Song,
Ihnen all seine
Möglichkeiten vorführen
Playing
theumDemo
Song
zu können.
Playing the Demo Song
Playing the Demo Song
1. Schalten
Sie das Gerät an. Die Kontrolllampe „Tempo“ leuchtet
1.
Your Digital
Drum
comes
with
a demo
for showing
the you the
Your
Digital
Drum
comes
withsong
a demo
song for you
showing
possibilities
of drum. To
playback
the demothe
song,
follow
instructions
possibilities
of drum.
To playback
demo
song,
follow instructions
below : below :
Your Digital Drum comes with a demo song for showing you the
possibilities of drum. To playback the demo song, follow instructions
below
: with a demo song for showing you the
Turn on
the
power
Your
Digital
Drum
comes
1. Turn on the power
[POWER]
switch
on.
Then
indicator
[Tempo]
lights
on.instructions
of
drum.
To
playback
the demo
song,
follow
auf. Turn thepossibilities
1
Turn the [POWER] switch
on.
Then
indicator
[Tempo]
lights on.
1
below :
1. Your
TurnDigital
on theDrum
powercomes with a demo song for showing you the
possibilities
of drum. switch
To playback
the demo
song,
follow lights
instructions
Turn the [POWER]
on. Then
indicator
[Tempo]
on.
2. Start the
song
2. DEMO
Start the
DEMObelow
song :
Turn
on
the
power
Press [1.
DEMO]
button,
then
the
demo
song
starts
playing
[ DEMO] button, then the demo song starts playing
Starten
SiePress
denthe
Demo-Song,
Sie
DEMO
drücken.
immediately.
Turn
[POWER]
on. Then
indicator
[Tempo]
lights on.Der
1
2. Startswitch
the indem
DEMO
song
immediately.
Yoursofort
Digital
Drum
with
aflash
demo
song
for
showing
yousong
1.
Turn
on
the
power
Meanwhile
indicators
ofcomes
drum
pads
following
demo
playing
, the
Song
wird
abgespielt.
blinken
diestarts
Press
[ Währenddessen
DEMO]
button,
the
demo
Meanwhile
indicators
of
drum
pads
flashthen
following
demo
playing
, playing
possibilities
of
drum.immediately.
To
playback
the
song,
follow
and the
indicator
flashes
once
perdemo
measure.
Turn
[POWER]
switch
on.
Theninstructions
indicator [Tempo] lights on.
2.[Tempo]
Startthe
the
DEMO
song
and
[Tempo]
flashes
once
per
measure.
Kontrolllampen
der
Padsindicator
undthedie
Tempo-Leuchte
blinkt
im
belowPress
:
Meanwhile
indicators
of
drum
pads
flash
[ DEMO] button, then the demo song starts playing following demo playing ,
Takt.
and
thethe
[Tempo]
3. Volume3. adjusting
immediately.
2.
Start
DEMOindicator
song flashes once per measure.
Volume
adjusting
Meanwhile
indicators
of adjusted
drum
pads
flash
following
demo song
playing
, playing
1. Turn
the
power
Volume
ofVolume
theondemo
song
can
be
by
pressing
Press
[
DEMO]
button,
then
the demo
starts
of the demo song can be adjusted
by buttons
pressing
buttons
andand
the[POWER]
[Tempo]
indicator
flashes
once
per
measure.
[VOLUME+]
[VOLUME-].
The adjusting
default
volume
value
is 5.value
Itlights
canis 5.
immediately.
Turn
the
switch
on.
Then
indicator
[Tempo]
on.It can
1
3. Volume
[VOLUME+]
and
[VOLUME-].
The
default
volume
be adjusted
from
0 to from
8. Volume
increases
or decreases
1pads
level
Meanwhile
indicators
of drum
flash
following
demo
playing ,
Volume
of
the
demo
song
can
be
adjusted
by
pressing
buttons
be
adjusted
0
to
8.
Volume
increases
or
decreases
1
level
Sie können
die Lautstärke
mit
Hilfe
der
Tasten
VOLUME
+ und
- anpassen.
Die
when [VOLUME+]
or [VOLUME-]
pressed
and
the
[Tempo]
indicator
flashes
once per
measure.
[VOLUME+]
and once.
[VOLUME-].
The default
volume
value
Volume
adjusting
when
or [VOLUME-]
pressed
once.
2.3.Start
the[VOLUME+]
DEMO
song
3 is 5. It can
3
Werkseinstellung
ist
5.
Sie
können
die
Lautstärke
zwischen
0
und
8
einstellen.
be
adjusted
from
0
to
8.
Volume
increases
or
decreases
1
level
Volume
of thebutton,
demo song
adjusted
by pressing
buttons
Press
[ DEMO]
then can
the be
demo
song starts
playing
when
[VOLUME+]
or [VOLUME-]
pressed
[VOLUME+]VOLUME-Taste
and
[VOLUME-].
Theverändert
default
volume
value
is 5.once.
It can1.
4. Tempo
adjusting
3.
Volume
adjusting
Jedes
Drücken
den
Wert
um
4.immediately.
Tempoder
adjusting
be adjusted
fromcan
0Volume
to
8.
Volume
increases
orcan
decreases
1 level
Tempo of
the
demo
song
be
adjusted
by
pressing
buttons
of
the
demo
song
be
adjusted
Meanwhile
indicators
of
drum
pads
flash
following
demo
playing
4
Tempo of the demo song can be adjusted by pressing buttonsby ,pressing buttons
when
[VOLUME+]
or
[VOLUME-]
pressed
once. The
[TEMPO+]
and
It[VOLUME+]
can
be
adjusted
from
and
defaulttovolume value is 5. It3can
and
the [TEMPO-].
[Tempo]
flashes
once
per40BPM
measure.
4. indicator
Tempo
adjusting
[TEMPO+]
and
[TEMPO-].
It can
be[VOLUME-].
adjusted
fromto40BPM
240BPM. 240BPM.
When [TEMPO+]
andadjusted
[TEMPO-]
pressed
at
the
be
from
0song
to 8.can
Volume
increases
decreases
1 level
of the
demo
besame
adjusted
byorpressing
buttons
When Tempo
[TEMPO+]
and
[TEMPO-]
pressed
at the same
time, the
demo
song
would
play
at
its
default
tempo.
when
[VOLUME+]
or
[VOLUME-]
pressed
once.
Sie können
das
Tempo
des
Songs
nach
Ihren
Wünschen
in
einem
Bereich
von
4.
Tempo
adjusting
[TEMPO+]
and
[TEMPO-].
It
can
be
adjusted
from
40BPM
to
time, the
demo song would play at its default tempo.
3. Volume
adjusting
Tempo
of
the
demo
song
can
be
adjusted
by
pressing
buttons
240BPM.
When
[TEMPO+]
and
[TEMPO-]
pressed
at
the
same
40 BPM bis
240ofBPM
einstellen.
Wenn
Siebydie
Tasten
TEMPO + und Volume
the demo
song can be
adjusted
pressing
buttons
[TEMPO+]
and4.
[TEMPO-].
It The
cansong
be adjusted
from
time,
the demo
would
play
at40BPM
its default
tempo.
5. Stop the
DEMO
song
Tempo
adjusting
and
[VOLUME-].
default
volume
value
is 5.toIt can
5.[VOLUME+]
Stop
the
DEMO
song
gleichzeitig
drücken,
wird
das
Tempo
auf
den
ursprünglichen
Wert zurückgesetzt.
240BPM.
When
[TEMPO+]
and
[TEMPO-]
pressed
at
the
same
Press [ DEMO
]
or
[STOP]
button
to
stop
the
DEMO
song.
Tempo
of
the
demo
song
can
be
adjusted
by
5
bePress
adjusted
from] 0orto[STOP]
8. Volume
increases
or decreases
1 level pressing buttons
[ DEMO
button
toitsstop
the
DEMO
song.
time,
the
demo
song
would
play
at
default
tempo.
andpressed
[TEMPO-].
It can be adjusted from 40BPM
when [VOLUME+]
or[TEMPO+]
[VOLUME-]
once.
5 to 5
5. Stop
the DEMO
song
3
240BPM.
When
and [TEMPO-]
the same
Press
[ DEMO
] or[TEMPO+]
[STOP] button
to stop thepressed
DEMO at
song.
time, the demo song would play at its default tempo.
5.
Stop
the
DEMO
song
4. Tempo
Sie können
den adjusting
Demo-Song stoppen, indem Sie entweder DEMO oder STOP
Press [ DEMO ] or [STOP] button to stop the DEMO song.
Tempo
of the demo song can be adjusted by pressing buttons
drücken.
5
5. Stop theIt DEMO
[TEMPO+] and [TEMPO-].
can be song
adjusted from 40BPM to
Press [ DEMO
] or [STOP]
buttonattothe
stop
the DEMO song.
240BPM. When [TEMPO+]
and [TEMPO-]
pressed
same
time, the demo song would play at its default tempo.
Playing the Demo Song
2.
3.
4.
5.
5. Stop the DEMO song
Press [ DEMO ] or [STOP] button to stop the DEMO song.
5
5
1
1
2
2
2
3
3
4
2
4
5
5
5
4
5
5
Playing a Rhythm
Playing a Rh
Spielen eines Rhythmus
Playing
PlayingaaRhythm
Rhythm
Playing
a Rh
Ihr Digital Drum verfügt über 49 verschiedene Rhythmen, die Sie als Begleitung
1.
Your Digital Drum features 49 different rhythms that can be used to
provide accompaniment. Select one of the rhythms and listen to it.
Your Digital Drum features 49 different rhythms that can be used to
provide
accompaniment.
Select
rhythms
and listen to it.
Selecting
Rhythm
Your Digital
Drum afeatures
49 different rhythms
thatone
canofbethe
used
to
verwenden
können.
Wählen
Sie
einen
davon
aus
und
hören Sie ihn an:
Your
Digital
features
different
rhythms
that listen
can
beto
used
provide
accompaniment.
Select 49
one
of the rhythms
and
it. to
There
areDrum
two methods
for
selecting
a rhythm.
provide
accompaniment.
Select
of[ the
and
listen In
to that
it. can be used to
1.
Selecting
aDrum
+ ]one
- ] torhythms
Method1:
Press
buttons
[Rhythm
and
select
rhythms.
this
Your
Digital
features
49
different
rhythms
method,
rhythms
are
selected
in
circle.
There
are
two
methods
for
selecting
a
rhythm.
provide
accompaniment.
Select
one
of
the
rhythms
and listen to it.
1. Sie
haben azwei
Möglichkeiten, einen Rhythmus auszuwählen.
1. Selecting
Rhythm
1
+
]
Method1:
Press
buttons
[
]
and
[
to
select
rhythms.
In this
1.
Selecting
a
Rhythm
There areSie
two methods
for selecting
a rhythm.
Entweder
benutzen
die
Tasten
+
und
um
immer
einen
Method2:
Use
the
Number
buttons
to
type
the
two-digit
code
of
the
method,
rhythms
are
selected
in
circle.
TherePress
are two
a rhythm.
Method1:
buttons
[ + ]for
and
[ - ] to select
rhythms. In this
1.methods
Selecting
aselecting
Rhythm
1
Rhythm
within
seconds
,+
then
the
will bedes
Rhythmus
weiterzugehen
oder
Sie
geben
dierhythm
Nummer
Method1:
Press
buttons
] and
[ - ]corresponding
to
select
rhythms.
In this
method,
rhythms
are2There
selected
circle.
are[ in
two
methods
for
selecting
a rhythm.
Method2:
Use
the
Number
buttons
to
type
the
two-digit
code
of
the
selected.
On
upper
front
panel,
each
song's
number
and
name
can
1
method, rhythms
are selected
in circle.
Method1:
Press
buttons [ + ] Nummer
and [ - ] to select
gewünschten
Rhythmus
als
zweistellige
ein. rhythms.
Eine In this
within
2 seconds
, then
the
corresponding
be found.
1
Method2:
Use theRhythm
Number
buttons
to are
typeselected
the
two-digit
code of the rhythm will be
method,
rhythms
in
circle.
Übersicht
über2Use
Namen
und
Nummern
der
Rhythmen
selected.
Onwill
upper
front
panel,
song's
number
name can
The
Rhythm's
default
return
once
you
select
awill
different
Method2:
the Number
buttons
to
type
theeach
two-digit
code
offinden
the and Sie
1
Rhythm
within
seconds
, Kit
then
the
corresponding
rhythm
be
found.
.within
Rhythm
im Anhang
dieser
Bedienungsanleitung.
2front
seconds
then
the
corresponding
rhythm
selected.
On
upperbe
panel,, Use
eachthe
song's
number
and
can
Method2:
Number
buttons
toname
typewill
thebe
two-digit code of the
The
Rhythm's
default
Kit
will, then
return
once
select
different
selected. On upper
front within
panel,
song's
number
andyou
name
canarhythm
be found.
Rhythm
2each
seconds
the
corresponding
will be
.
Rhythm
be found. defaultselected.
The Rhythm's
Kit will return
oncefront
you select
different
On upper
panel, aeach
song's number and name can
2. Press
[START]default
button
The. Rhythm's
Kit will return once you select a different
be found.
Rhythm
2
The
selected
rhythm
starts
playing.
of drum
flash
TheDer
Rhythm's
defaultIndicators
Kit willRhythmus
return
oncepads
you
select
a different die
2. Drücken
Sie .START.
ausgewählte
wird
abgespielt;
Rhythm
2.
Press
[START]
button
following rhythm playing. The [Tempo] indicator flashes once per
. leuchten
Rhythm
Kontrolllampen
der
Pads
entsprechend
dem
Rhythmus
auf und die
The
selected
rhythm starts
playing. Indicators
of drum
pads flash
2. Pressmeasure.
[START] button
2
following
rhythm
The
[Tempo]
indicator
2. selected
Press [START]
button
Tempo-Anzeige
blinkt
dem
Takt.
The
rhythm
startsentsprechend
playing. playing.
Indicators
of drum
pads
flash flashes once per
2
measure.
following
rhythm
playing.
[Tempo]
indicator
flashes
once
perflash
The selected
rhythm
starts
playing.
Indicators
of drum
pads
2.
PressThe
[START]
button
3. Volume
adjusting
3
measure.
following
rhythm
playing.
The
[Tempo]
indicator
flashes
once
per
The
selected
rhythm
starts
playing.
Indicators
of
drum
pads
flash
Volume of rhythm can be adjusted by pressing buttons [VOLUME+]
measure.
following
rhythm
[Tempo]
3. Volume
adjusting
and
[VOLUME-].
Volume
can be playing.
adjustedThe
from
0 to 8. indicator flashes once per
3
measure.
Volume
of rhythm
can beder
adjusted
by pressing
buttons
3. Sie
können
die Lautstärke
mit Hilfe
Tasten
VOLUME
+ [VOLUME+]
und VOLUME
- in
3. Volume
adjusting
3
and0be
[VOLUME-].
Volume
canbuttons
be adjusted
from 0 to 8.
Volume
of rhythm
can
adjusted
by
pressing
[VOLUME+]
3. Tempo
Volume
adjusting
einem
Bereich
von
bis
8 anpassen.
3
4.
adjusting
and [VOLUME-].
Volume
can
be
adjusted
from
0
to
8.
3.
Volume
adjusting
Volume
of
rhythm
can
be
adjusted
by
pressing
buttons
[VOLUME+]
3
Tempo of the rhythm can be adjusted by pressing buttons
4
Volume
ofcan
rhythm
can
pressing
buttons
and [VOLUME-].
Volume
be adjusted
from
0 to by
8.from
4.and
Tempo
adjusting
[TEMPO+]
[TEMPO-].
Tempo
canbebeadjusted
adjusted
40BPM
to [VOLUME+]
and
[VOLUME-].
Volume
can
be
adjusted
from
0
to
8.
4. Tempo
adjusting Tempo of the rhythm can be adjusted by pressing buttons
240BPM.
[TEMPO+]
andRhythmus
[TEMPO-].
Tempo
can
bethe
adjusted
to
4. SieTempo
können
das
Tempo
nach
Ihren
Wünschen
in einem
Bereich
[TEMPO+]
and
[TEMPO-]
pressed
at the
same
time,
rhythmfrom 40BPM
of the
rhythm
can
bedes
adjusted
by pressing
buttons
4. IfTempo
adjusting
4
240BPM.
would
play
at
its
default
tempo.
[TEMPO+]
and
[TEMPO-].
Tempo
can
be
adjusted
from
40BPM
to
4.
Tempo
adjusting
the 240
rhythm
can be
adjusted by pressing
buttons
von 40Tempo
BPMofbis
BPM
einstellen.
Wenn
Sie
die
Tasten
TEMPO
+
und
4
If [TEMPO+]
and
[TEMPO-]
pressed
at
the40BPM
same time,
the rhythm
240BPM.
Tempo of the
rhythm
can
adjusted
by
pressing
[TEMPO+] and
[TEMPO-].
Tempo
can
bebe
adjusted
from
tobuttons
gleichzeitig
drücken,
wird
das
Tempo
auf
denthe
ursprünglichen
Wert zurückgesetzt.
would
playpressed
at
its default
If 5.
[TEMPO+]
and [TEMPO-]
at the tempo.
same
time,
rhythm
[TEMPO+]
and
[TEMPO-].
Tempo
can
be adjusted from 40BPM
to
240BPM.
Stop
rhythm
playing
wouldIf play
at its default
tempo. pressed at the same time, the rhythm
240BPM.
[TEMPO+]
and
[TEMPO-]
Press [STOP] button to stop rhythm playing.
[TEMPO+]
and [TEMPO-] pressed at the same time, the rhythm
would play5.
at Stop
itsIfdefault
tempo.
rhythm
playing
5
would
play
at
its default
tempo.
Press
[STOP]
button
to stop
rhythm playing.
5. Stop
rhythm playing
5. Um
das
Playback
zu
stoppen,
drücken
Sie
bitte
STOP.
5
Press
[STOP]
button
to stop rhythm playing.
5. Stop
rhythm
playing
Stop rhythm
5
Press [STOP]5.button
to stop playing
rhythm playing.
Press [STOP] button to stop rhythm playing.
5
2
2
4
4
5
Playing
the Pads
Playing
the Pads
Spielen auf den Pads
Das Digital Drum verfügt über 26 Kits. Ein Verzeichnis finden Sie im Anhang.
This Digital Drum has
kits. Drum has 26 kits.
This26
Digital
1. Drücken
Sie diea kit
Tasten KIT + oder KIT - um ein Kit (0-26) auszuwählen. Wenn
1. Selecting
1. Selecting a kit
Sie die Kits
oder [KIT+]
26Press
erreicht
Warnton.
Press0buttons
or [KIT-]
tohaben,
increase
or decrease
kit
number
in
buttons
[KIT+]
or ertönt
[KIT-]
to ein
increase
or decrease
kit number in
1
1
1~26 range. A warning
when
kit number
1~26 voice
range.sounds
A warning
voice
sounds reaches
when kit number reaches
bottom number (1)bottom
or top number
number (1)
(26).
or top number (26).
2. Sie können
die
Lautstärke
Hilfe der Tasten VOLUME + und VOLUME - in
2. Volume
adjusting
2. Volumemit
adjusting
Volume
of
pads
can
be
adjusted
pressing
buttons
einem Bereich von 0 Volume
bis 8 anpassen.
of padsby
can
be adjusted
by [VOLUME+]
pressing buttons [VOLUME+] 2
and [VOLUME-]. Itand
can[VOLUME-].
be adjustedItfrom
8.
can 0betoadjusted
from 0 to 8.
2
Then you can playThen
padsyou
withcan
selected
kit freely.
play pads
with selected kit freely.
Learning
a Lesson
Learning
a Lesson
7
Volume of pads can be adjusted by pressing buttons [VOLUME+]
It can
be adjusted
from 0 to 8.
Then youand
can[VOLUME-].
play pads with
selected
kit freely.
2
Then you can play pads with selected kit freely.
Lernen einer Lektion
Learning
a Lesson
Learning
a
Lesson
Learning
a
Lesson
Learning a Lesson
Learning a Lesson
Learning a Lesson
Die Lernfunktion des Digital Drum lässt den Spieler einen Rhythmus erlernen und spielen,
indem dieser den Kontrollleuchten
der Pads folgt.
This Digital Drum’s lesson function let the player learn and play a
This Digital Drum’s lesson function let the player learn and play a
rhythm
by following
drum indicators
flashing.
This
Digital
let the
player
and play a
rhythm by following
drum
indicators
flashing.
This Digital
Drum’s
lessonDrum’s
functionlesson
let thefunction
player learn
and
play learn
a
rhythm
by
following
drum
indicators
flashing.
rhythm by following
drum
indicators
flashing.
New
1
This Digital
Drum’s
lessonStarting
functionalet
theLesson
player learn and play a
Starting
aeiner
New
Lesson
Beginn
neuen
Lektion
1.
Press
the
[LESSON]
Starting
a
New
Lesson button
rhythm
by
following
drum
indicators
flashing.
1. Press the
[LESSON]
button
Starting
a New
Lesson
The
LESSON
indicator
light on.
This Digital Drum’s
lesson
function
letbutton
the player
learn and play a
1. light
Press
[LESSON]
The LESSON
indicator
on.the
1.
Press
the
[LESSON]
button
rhythm
by
following
drum
indicators
flashing.
1
Starting
a
New
Lesson
1. Drücken The
SieLESSON
LESSON;
die entsprechenden
The LESSON
indicator light on. Kontrolllampe leuchtet auf.
indicator light on.
1.
Press the [LESSON] button
2.
Selecting a rhythm
2. Selecting
a rhythm
Starting
a New Lesson
The LESSON
indicator
light
on. a
Select
rhythm
you want to learn. Its corresponding kit 2
is also
2. Selecting
aIts
rhythm
Select a2.
to learn.
corresponding kit is also
Selecting
rhythm
1.rhythm
Pressyou
the awant
[LESSON]
button
selected
automatically.
Select
a
rhythm
you
want
to
learn.
Its
corresponding
kit
is
also
2
selected automatically.
Select
a rhythm
you want
to learn.
Its Sie
corresponding
is also
The den
LESSON
indicator
light
on.den
2. 2.
Wählen
Sie
aus,
erlernenkitmöchten;
selected
automatically.
Selecting
a rhythm Rhythmus
selected automatically.
2
Note1:
Select
a rhythm you want
learn.automatisch
Its correspondingmit
kit is
also
das
entsprechende
Kittowird
dazu
Note1:
Refer
to
page
7
for
rhythm
selecting
method
2. Selecting
aNote1:
rhythm
selected
automatically.
Refer
to page
7 forHilfe
rhythm
selecting
method
ausgewählt.
zur
Auswahl
finden
Sie
im Kapitel
„Spielen
2
Note1:
Select a rhythm
want7 to
Its selecting
corresponding
kit is also
Refer you
to page
forlearn.
rhythm
method
Refer
to
page
7
for
rhythm
selecting
method
eines Rhythmus“.
selected automatically.
Note1:
Note2:
Note2:
Refer to page 7 for rhythm
selecting
method
Refer
to page
11 kit link about current selected rhythm.
Refer to page
11 kit link Note2:
about current selected rhythm.
Note2:
Note1:
Refer to page 11 kit link about current selected rhythm.
page 11
7 for
rhythm
selecting
Refer to page
kit Selecting
link about
currentmethod
selected rhythm.
3.
a kit
3
3.3.Note2:
Sie
können
oder ein
Selecting
a kit nun entweder mit dem automatisch gewählten Kit spielen
Refer to page 11 kit link
about
current
selected
rhythm.
Press
buttons
[ KIT+
] or [ KIT- ] to select a kit you want to play with.
3.
Selecting
a
kit
Press
buttons
[
KIT+
]
or
[
KIT]
to
select
a
kit
you
want
to
play
with.
3
anderes
auswählen.
Hilfe
dazu
finden
Sie
im
Kapitel
„Spielen
aufkit.den
Pads“.
Note2:
3.
Selecting
a kitPress
Youbuttons
can
also make
and
use aa kit
rhythm’s
default
] no
or [change
KIT] to
select
you want
to play
with.
You can also make no change
and use[ aKIT+
rhythm’s
default
kit.
Refer
to page
11You
link
current
selected
Press
buttons
[kitKIT+
or
[ KIT] tono
select
a kitrhythm.
youuse
want
to play with.
can]about
also
make
change
and
a rhythm’s
default kit.3
3. Selecting
a kit
You can
also] make
nolearning
and
useyou
a rhythm’s
default
kit.
Press buttons
[ KIT+
or Start
[ KIT]change
to select
a kit
want to play
with.
4.
4. Start
learning
4
3
You can
also makea4.
no
change
and
use abutton.
rhythm’s default kit.
3. Selecting
kitStart
Press
[START]
learning
4. Drücken
Sie button.
START.
Der
Ton
ist ]stummgeschaltet,
lediglich
dieof Kontrolllampen
Press [START]
4.
Start
Rhythm’s
drum
part
is
muted,
but
the
indication
lights
each
pad
Presslearning
buttonsPress
[ KIT+
]
or
[
KITto
select
a
kit
you
want
to
play
with.
[START]
button. lights of each pad
Rhythm’s
drum
part is auf.
muted,
but the indication
der
Pads
blinken
Schlagen
Sie
die
deren
Lampen
start
You
can
also Rhythm’s
make
noflashing.
change
andisuse
aPads,
rhythm’s
default
kit. lights ofaufleuchten.
Press
[START]
button.
drum part
muted,
but the
indication
each pad
4.
Start
learning
4
start
flashing.
You
can
strikebut
thethe
pads
with indication
lights.
Rhythm’s
drum
part
is
muted,
indication
lights
of
each
pad
start
flashing.
Press
[START]
button.
You can strike the pads with indication lights.
start
flashing.
can but
strike
pads with
indication
Rhythm’s
drum
part is You
muted,
thethe
indication
lights
of eachlights.
pad
4. Start
learning
You
can
strike
the
pads
with
indication
lights.
start flashing.
5.
Stop
learning
Press
[START]
button.
Stop learning
5.5.Drücken
Sie STOP
um
die
Lektion
zu beenden
und LESSON um den
You can Rhythm’s
strike
the pads
with
indication
lights.
Press
[STOP]
button
stop learning.
part
is muted,
but thetoindication
lights of each pad
5.
Stop
learning
Press [STOP]
buttondrum
to stop
learning.
Lernmodus
verlassen.
Press [LESSON]
button
to learning.
exit LESSON mode.
5. Stop
learning
startzu
flashing.
button
to stop
Press [LESSON]
button Press
to exit [STOP]
LESSON
mode.
You can
strikePress
the pads
with learning.
indication
Press
[STOP]
button
to stop
[LESSON]
button tolights.
exit LESSON mode.
5. Stop learning
5
Press button
[LESSON]
button
to exit LESSON mode.
Press [STOP]
to stop
learning.
Press5.
[LESSON]
button to exit LESSON mode.
Stop learning
5
Press [STOP] button to stop learning.
5
Press [LESSON] button to exit LESSON mode.
Technische Spezifikationen
Pads
8 Drum Kits
8
Rhythmen
8
5
4 berührungssensitive Pads mit Kontrolllampen
8
8
26
49
Demo-Song
8
1
Bedienelemente
Power On/Off, Volume +/-, Kit +/-, +/-, 1-7, Demo,
Tempo +/-, Start, Stop, Lesson
Anschlussbuchsen
Kopfhörer, Netzteil
Stromquelle
6 Batterien, Größe C, SUM-2, R-14
Maße in mm (L x B x H)
398 x 278 x 95,6
Gewicht in g
1400
1
1
1
21
2
3
3
4
4
4
4
5
5
5
55
5
5
Percussion
Kit List
Liste der Percussion-Kits
No
01
02
03
04
05
06
07
08
09
10
11
12
13
14
15
16
17
18
19
20
21
22
23
24
25
26
10
Name
Acoustic Kit 1
Acoustic Kit 2
Standard Kit 1
Standard Kit 2
Room Kit 1
Room Kit 2
Rock Kit 1
Analog Kit 1
Electronic Kit 1
Jazz Kit
Latin Kit
SFX Kit 1
SFX Kit 2
SFX Kit 3
SFX Kit 4
Acoustic Kit 3
Bass Drum & Stick Kit
Bass Drum & Snare Kit 1
Analog Kit 2
Bass Drum & Snare Kit 2
Analog Kit 3
Rock Kit 2
Electronic Kit 2
Rock Kit 3
Electronic Kit 3
Analog Kit 4
Rhythm kit List
Rhythm kit List
Liste der Rhythmen
Song Name
Kits Num
8 Beat
4
Song Num
8 Beat Ballad
01 1
8 Beat Pop
02 1
8 Beat Rock
03 1
Rock 1
04 1
Rock 2
05 1
Hard Rock
06 7
Heavy Metal 1
07 7
Heavy Metal 2
08 7
16 Beat
09 1
16 Beat Ballad
10 1
16 Beat Pop
11 1
16 Beat Funk
12 1
Funk
13 1
Funk Pop
14 1
Blues Funk
15 1
Dance Pop
16 8
Disco
17 1
House
18 1
Hip Hop
19 1
Rap
20 9
Shuffle
21 1
Slow Rock
22 1
Soul
23 1
Cool Jazz
24 10
25
Song Num
26
Song Name
8 Beat 27
28
8 Beat Ballad
29
8 Beat Pop
30
8 Beat Rock
Rock 1 31
Rock 2 32
33
Hard Rock
34 1
Heavy Metal
35 2
Heavy Metal
16 Beat 36
37
16 Beat Ballad
38
16 Beat Pop
39
16 Beat Funk
40
Funk
41
Funk Pop
42
Blues Funk
43
Dance Pop
Disco 44
House 45
Hip Hop 46
47
Rap
Shuffle 48
49
Slow Rock
Soul
Cool Jazz
Kits Num
Song Name
10
Jazz
Swing
Kits Num
Song Num
Blues
4 1
26 1
Blues
1 2
27 1
Fusion
1
1
28 4
Fusion
1 2
29 1
Bounce
1
30 2
Reggae
1
1
31 1
Reggae
2
7
32 1
Bossa
Nova
7
33 5
Samba
7
34 1
Latin
1 Rock
35 1
Cha1 Cha
36 4
Mambo
1
37 11
Rhumba
1
38 4
Country
1
39 4
Country
Rock
1
40 2
March
1
41 6
Polka
8
42 1
Waltz
1
1
43 4
Waltz
1 2
44 4
SFX1 1
45 12
SFX9 2
46 12
SFX1 3
47 13
SFX1 4
48 14
1
49
10
Song Name
Jazz Swing
Blues 1
Blues 2
Fusion 1
Fusion 2
Bounce
Reggae 1
Reggae 2
Bossa Nova
Samba
Latin Rock
Cha Cha
Mambo
Rhumba
Country
Country Rock
March
Polka
Waltz 1
Waltz 2
SFX 1
SFX 2
SFX 3
SFX 4
Demo List
Demo List
Demo-Song
Song Num
01
Song Name
Funk Live
Song Num
01
Kits Num
10
1
1
4
1
2
1
1
5
1
1
4
11
4
4
2
6
1
4
4
12
12
13
14
Song Name
Funk Live
11
11
Herstellererklärung
Garantie und Gewährleistung
Neben der gesetzlichen 24 monatigen Gewährleistungsfrist übernehmen wir eine Garantie
von 6 Monaten. Die Garantiezeit beginnt ab dem Datum des Kaufs von fabrikneuen
ungebrauchten Produkten durch den erstmaligen Endkunden. Zum Nachweis heben Sie
bitte unbedingt den Kaufbeleg auf. Ohne diesen Nachweis, die der zuständige ServicePartner prüft, werden Reparaturen grundsätzlich kostenpflichtig durchgeführt. Auf dem
Kaufbeleg müssen das Kaufdatum und die Bezeichnung des Produkts angegeben sein.
Die Garantie-Leistungen bestehen nach unserer Wahl in der unentgeltlichen Beseitigung
von Material- oder Herstellungsfehlern durch Reparatur, Austausch von Teilen oder des
kompletten Geräts. Die im Rahmen eines Garantiefalls aus einem Produkt entfernten
defekten Teile gehen in das Eigentum des Herstellers oder dessen Service-Partner
zurück.
Ausgenommen von der Garantie sind:
• unwesentliche Fehler oder Abweichungen in der Beschaffenheit des Produkts, die
für Wert und bestimmungsmäßigen Gebrauch unerheblich sind,
• dem Produkt beigefügte Zubehörartikel, Akkus und Batterien (diese Produkte haben
wegen ihrer Beschaffenheit eine kürzere Lebensdauer, die zudem im Einzelfall
konkret von ihrer Nutzungsintensität abhängt),
• Mängel durch unsachgemäßen Gebrauch (z. B. Bedienungsfehler, mechanische
Beschädigungen, falsche Betriebsspannung), (Unter sachgemäßem Gebrauch ist
die Verwendung des Produkts unter den Bedingungen zu verstehen, die in der
Betriebsanleitung beschrieben sind.)
• Mängel durch Verschleiß, von Ihnen oder Dritten vorgenommene Modifikationen an
den Produkten, wenn über Art und Umfang der Modifizierung keine vorherige
schriftliche Zustimmung des Herstellers vorliegt,
• Mängel aufgrund höherer Gewalt,
• Mängel, die Ihnen beim Kauf bereits bekannt sind
• Der Garantieanspruch erlischt bei Eingriffen in das Produkt durch nicht autorisierte
Personen oder Werkstätten.
Im Garantiefall senden Sie das Gerät inklusive Zubehör und Kaufbeleg an den für Sie
zuständigen Service-Partner oder direkt an das Musikhaus Kirstein. Das Risiko der
erfolgreichen Zusendung liegt beim Kunden. Zur Vermeidung von Transportschäden sollte
möglichst die Original-Verpackung verwendet werden.
Konformitätserklärung
Dieses Produkt entspricht den grundlegenden Anforderungen und den
weiteren folgender Richtlinien:
• 2004/108/EU EMV-Richtlinie
• 2006/95EU Niederspannungsrichtlinie
Die vollständige Konformitätserklärung kann unter
http://www.kirstein.de/docs/konformitaetserklaerungen eingesehen werden
Akkus und Batterien
Die mitgelieferten Akkus oder Batterien sind recyclingfähig. Bitte entsorgen Sie die
Akkus über den Batteriecontainer oder den Fachhandel. Entsorgen Sie nur leere
Batterien oder Akkus, um den Umweltschutz zu gewährleisten.
WEEE-Erklärung
Ihr Produkt wurde mit hochwertigen Materialien und Komponenten entworfen
und hergestellt, die recycelbar sind und wieder verwendet werden können.
Dieses Symbol bedeutet, dass elektrische und elektronische Geräte am Ende
ihrer Nutzungsdauer vom Hausmüll getrennt entsorgt werden müssen. Bitte
entsorgen Sie dieses Gerät bei Ihrer örtlichen kommunalen Sammelstelle oder
im Recycling Center. Bitte helfen Sie mit, die Umwelt, in der wir leben, zu
erhalten.
Technische Aenderungen und Aenderungen im Erscheinungsbild vorbehalten. Alle Angaben entsprechen dem Stand bei Drucklegung. Für die Richtigkeit und Vollstaendigkeit der
enthaltenen Beschreibungen, Abbildungen und Angaben übernimmt Musikhaus Kirstein GmbH keinerlei Gewaehr. Abgebildete Farben und Spezifikationen koennen geringfuegig
vom Produkt abweichen. Musikhaus Kirstein GmbH - Produkte sind nur ueber autorisierte Haendler erhaeltlich. Distributoren und Haendler sind keine Handlungsbevollmaechtigten
von Musikhaus Kirstein GmbH und haben keinerlei Befugnis, die Musikhaus Kirstein GmbH in irgendeiner Weise, sei es ausdruecklich oder durch schluessiges Handeln, rechtlich
zu binden. Diese Bedienungsanleitung ist urheberrechtlich geschuetzt. Jede Vervielfaeltigung, bzw. jeder Nachdruck, auch auszugsweise, und jede Wiedergabe der Abbildungen,
auch in veraendertem Zustand, ist nur mit schriftlicher Zustimmung der Firma Musikhaus Kirstein GmbH gestattet.