1
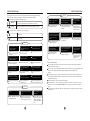
OPERATING THE UNIT
OPERATING THE UNIT
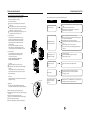
Removing the collected water
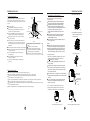
Positioning the unit
40cm or
more
A dehumidifier opera ting in a ba se ment will have little o r no
effect in drying a n a djacent enclose d s torage a rea , s uch a s a
closet, unles s t here is adequate circulation of ai r in an d out of
the a rea .
D o not use o utdoors.
T his dehumidifer is intended for indoor re sidential
ap plica tions only. T his dehumidifier sh ould not be u se d
for c ommercial or industrial a pplications.
Pl ac e the dehumidifier on a smooth, level floor s trong
en ough to su pport the u nit with a full bucket of water.
Allow at least 20cm of ai r s pace on al l s ides o f the u nit
for good a ir circulation.
Pl ac e the unit in a n a rea where the tempera ture will not
O
O
fa ll below 5 C( 41 F). T he co ils ca n become c overed with
frost at temperatures b elow 5 O C( 41 O F), which may re duce
performance.
Pl ac e the unit away from the c lothes d ryer, heater or ra diator.
U se the u nit to prevent moisture damage a nywhere books
or va luables a re stored.
U se the dehumidifier in a base ment to help prevent
m oisture damage.
T he dehumidifier must be o perated in an en close d
ar ea to be most effective.
C lose a ll doors, windows a nd other outside openings
to the r oom.
Air outlet grille
Air intake
grille
20cm or more
20cm or more
20cm or more
20cm or more
Fig.4
Casters(Install at four points on the bottom
of unit)
Casters can only move laterally.
Do not force casters to move over carpet,
nor move the unit with water in the bucket.
(The unit may tip over and spill water.)
NOTE:Casters is optional,some models without.
When using the unit
W hen first using the dehumidifier, o perate the unit continuously 24 hours.
This unit is d es igned to opera te with a working en vironment between 5 O C( 41 O F) and 35 O C( 95 O F).
If the unit has been sw itched off and ne eds t o be s witched on ag ain quickly, a llow approximately
three minutes for the c orrect operation to re sume.
Do not connect the dehumidifier to a multiple socket outlet, which is a lso being us ed for other e lectrical appliances.
Se lect a su itable loca tion, making s ure you have e as y a cces s t o a n e lectrical outlet.
Plu g the unit into a 115V~ 6 0Hz/220~240V 5 0Hz ( Re fer to the n ameplate located on the si de/rear of the unit ) e lectrical
socket-outlet with ea rth co nnection.
Make su re the W ater bucket is co rrectly fitted otherwise the u nit will not opera te properly.
1. Pull out the bucket a little.
There are two ways to remove collected water.
1. Use the bucket
When the bucket is full, the unit will automatically
stop running, and the Full indicator light will flash.
Slowly pull out the bucket. Grip the left and right
handles securely, and carefully pull out straight so
water does not spill. Do not put the bucket on the floor
because the bottom of the bucket is uneven.
Otherwise the bucket will fall and cause the water
to spill.
Throw away the water and replace the bucket. The
bucket must be in place and securely seated for
the dehumidifier to operate.
The machine will re-start when the bucket is restored
in its correct position.
2. Hold both sides of the bucket
with even strength, and pull it
out from the unit.
NOTES:
When you remove the bucket, do not touch any parts
inside of the unit. Doing so may damage the product.
Be sure to push the bucket gently all the way into the
unit. Banging the bucket against anything or failing to
push it in securely may cause the unit not to operate.
2. Continuous draining
Water can be automatically emptied into a floor
drain by attaching the unit with a water hose
(ID 13.5mm) (not included).
Re move the r ubber plug from the ba ck of the u nit an d s tore
it in a sa fe location.
Ins ert the water hose into the u nit from the drain outlet in the
back of the u nit as sh own in F ig.8. Make su re the co nnection
of the water hose a nd the drain hose o utlet of the unit is t ight
and do not let the water leak.
Then lead the water hose to the floor drain or a s uitable drainage
facility.Th e drainage fa cility should be lower than the drain outlet
of the unit.
Be su re to run the water hose s loping downward and let the
water to flow out s moothly.D o not install the water hose a s
shown F ig.9a an d F ig.9b.
Fig.6
3. Pour the water out.
Fig.7
Remove the
rubber plug
Insert the hose
from the drain
outlet
Fig.8
NOTE: When the continuous drain feature is not
being used,remove the drain hose from the outlet
and attach the rubber plug back to the drain outlet.
Fig.9b
Fig.9a
Do not block water flow by a rise.
6
Fig.5
Do not block water flow by a retortion.
7