1
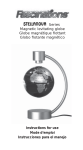
Specialty Plants
MAGLEV: Magnetic Levitation Plant
User Manual
MAGLEV User Manual
Table of Contents
1. MAGLEV Presentation........................................................................................................1
1.1. MAGLEV: System Description...................................................................................1
1.2. MAGLEV: Control Challenge.....................................................................................2
2. MAGLEV Component Description.....................................................................................2
2.1. Component Nomenclature...........................................................................................2
2.2. Component Description...............................................................................................4
2.2.1. Overall Enclosure (Component #1)......................................................................4
2.2.2. Electromagnet Coil (Component #2)...................................................................4
2.2.3. Pedestal Position Sensor (Component #4)...........................................................4
2.3. MAGLEV System Wiring Schematic..........................................................................5
3. MAGLEV Model Parameters..............................................................................................6
4. Wiring Procedure For The MAGLEV.................................................................................7
4.1. Cable Nomenclature.....................................................................................................7
4.2. Hardware Requirements...............................................................................................9
4.3. Typical Connections For The MAGLEV System......................................................10
4.3.1. Wiring Of The Electromagnet Power Line.........................................................10
4.3.2. Wiring Of The Electromagnet Feedback Sensors..............................................10
4.3.3. MAGLEV Wiring Summary..............................................................................12
5. Ball Position Sensor Calibration........................................................................................13
5.1. Calibration Model......................................................................................................13
5.2. Calibration Procedure................................................................................................14
5.2.1. WinCon Calibration Project...............................................................................14
5.2.2. Zero "Offset" Potentiometer Calibration: At Voltage Zero................................15
5.2.3. "Gain" Potentiometer Calibration: At The Maximum Voltage..........................16
6. Obtaining Support..............................................................................................................16
Document Number: 525 ! Revision: 03 ! Page: i
MAGLEV User Manual
1. MAGLEV Presentation
1.1. MAGLEV: System Description
The typical Magnetic Levitation plant, i.e.
MAGLEV, is depicted in Figure 1, below,
while levitating in air a steel ball within its
magnetic field. The MAGLEV can be
described by three distinct sections
encased in a rectangular enclosure. First,
the
upper
section
contains
an
electromagnet, made of a solenoid coil
with a steel core. Second, the middle
section consists of an inside chamber
where the magnetic ball suspension
actually takes place. One of the
electromagnet poles faces the top of a
black post upon which a one-inch steel
ball rests. The ball elevation from the post
top is measured using a photo-sensitive
sensor embedded in the post. The post is
designed in such a way that when the ball
rests on top of it, the air gap between the
ball's
top
hemisphere
and
the
electromagnet pole face is 14 mm. The
post also provides repeatable initial
conditions for control system performance
evaluation. Finally, the bottom section of
the MAGLEV apparatus houses the
system's conditioning circuitry needed, for
example, by the light intensity position
sensor. As detailed later in this manual,
both offset and gain potentiometers of the
ball position sensor are readily available
for proper calibration. A current sense
resistor is also included in the design in
order to provide for coil current
measurement if necessary.
Figure 1 MAGLEV Specialty Plant
Document Number: 525 ! Revision: 03 ! Page: 1
MAGLEV User Manual
1.2. MAGLEV: Control Challenge
As illustrated in Figure 1, above, the purpose of the magnetic levitation experiment is to
design a control system that levitates a one-inch solid steel ball in air from the post using an
electromagnet. The controller can then track the ball position to a desired trajectory.
The system is supplied with a feedback controller tuned through pole placement but, of
course, you may design any other controller you wish. The complete mathematical modelling and system parameters are provided to streamline the implementation of the control
theory of your choice.
2. MAGLEV Component Description
2.1. Component Nomenclature
As a quick nomenclature, Table 1, below, provides a list of all the principal elements
composing the MAGLEV Specialty system. Every element is located and identified,
through a unique identification (ID) number, on the MAGLEV plant represented in Figures
2 and 3, below.
ID #
Description
ID #
Description
1
MAGLEV Overall Enclosure
2
Solenoid Coil
3
Coil Steel Core
4
Pedestal and Position Sensor
5
Solid Stainless Steel Ball
6
Interior Lights
7
Position
Sensor
Potentiometer
9
Coil Leads 4-Pin DIN Connector
10
Position Sensor Cable 6-Pin-MiniDIN Connector
11
Current Sensor Cable 6-Pin-MiniDIN Connector
12
Inside Chamber
Offset
Position Sensor Gain Potentiometer
8
Table 1 MAGLEV Component Nomenclature
Document Number: 525 ! Revision: 03 ! Page: 2
MAGLEV User Manual
Figure 3 MAGLEV Plant: Back View
Figure 2 MAGLEV Plant: Front View
Document Number: 525 ! Revision: 03 ! Page: 3
MAGLEV User Manual
2.2. Component Description
2.2.1. Overall Enclosure (Component #1)
The MAGLEV overall enclosure is made of aluminum. Its external dimensions are shown
in Table 2, below.
Description
Value
Unit
Overall Enclosure Height
0.277
m
Overall Enclosure Width
0.153
m
Overall Enclosure Depth
0.153
m
Table 2 MAGLEV Overall Dimensions
2.2.2. Electromagnet Coil (Component #2)
The electromagnet consists of a tightly wound solenoid coil made of 2450 turns of 20 AWG
magnet wire. For safe operation, it results that the coil continuous current should never
exceed 3 A. The coil inductance, resistance, dimensions, and other specifications are shown
in Table 3, below. Moreover, the electromagnet wiring, together with the current sense resistor, can be seen in Figure 4, below.
2.2.3. Pedestal Position Sensor (Component #4)
The light-sensitive sensor measuring the steel ball vertical position consists of a NPN silicon photodarlington. The position sensor is embedded inside the ball pedestal and provides
linear position readings over the complete ball vertical travel. Its output measurement is
processed through a signal conditioning board and made available as 0 to 5V DC signal. Its
measurement sensitivity is given in Table 3, below.
Warning:
It is to be noted that the phototransistor measurement is sensitive to its environmental light
conditions. To that effect, two lights represented by components #6 in Figure 2 are present
in the chamber interior to provide repeatable and constant light conditions. However, as detailed in a following section, a calibration of the sensor offset and gain potentiometers
(components # 7 and 8, respectively) is required to keep consistent measurements in
changing light environments. As a consequence, the user should also avoid disturbing the
light conditions inside the MAGLEV chamber by, for example, grasping the ball with
his/her whole hand inside chamber.
Document Number: 525 ! Revision: 03 ! Page: 4
MAGLEV User Manual
2.3. MAGLEV System Wiring Schematic
The schematic depicted in Figure 4, below, presents a wiring diagram of the MAGLEV cable connectors in association with the system electrical components, namely, the electromagnet coil, current sense resistor, interior lights, and photodarlington.
Figure 4 MAGLEV System Wiring Schematic
Document Number: 525 ! Revision: 03 ! Page: 5
MAGLEV User Manual
3. MAGLEV Model Parameters
Table 3, below, lists and characterizes the main parameters (e.g. mechanical and electrical
specifications, convertion factors, constants) associated with the MAGLEV specialty plant.
Some of these parameters can be used for mathematical modelling of the MAGLEV system
as well as to obtain the steel ball's Equation Of Motion (EOM).
Symbol
Ic_max
Description
Maximum Continuous Coil Current
Value
Unit
3
A
Lc
Coil Inductance
412.5
mH
Rc
Coil Resistance
10
Ω
Nc
Number Of Turns in the Coil Wire
lc
Coil Length
0.0825
m
rc
Coil Steel Core Radius
0.008
m
Km
Electromagnet Force Constant
6.5308E-005
N.m2/A2
Rs
Current Sense Resistance
1
Ω
rb
Steel Ball Radius
1.27E-002
m
Mb
Steel Ball Mass
0.068
kg
Tb
Steel Ball Travel
0.014
m
g
Gravitational Constant on Earth
9.81
m/s2
µ0
Magnetic Permeability Constant
4π E-007
H/m
KB
Ball Position Sensor Sensitivity
(Assuming a User-Calibrated Sensor Measurement
Range from 0 to 4.95 V)
2.83E-003
m/V
2450
Table 3 MAGLEV System Model Paremeters
Document Number: 525 ! Revision: 03 ! Page: 6
MAGLEV User Manual
4. Wiring Procedure For The MAGLEV
This section describes the standard wiring procedure for the MAGLEV specialty plant.
The following hardware, accompanying the MAGLEV, is assumed:
Power Amplifier:
Quanser UPM 2405, or equivalent.
Data Acquisition Card:
Quanser Q8 / MultiQ-PCI / MultiQ-3, or one of the
National Instruments E-Series cards, or equivalent.
4.1. Cable Nomenclature
Table 4, below, provides a description of the standard cables used in the wiring of the
MAGLEV.
Cable
Designation
Description
5-pin-DIN
to
RCA
This cable connects an analog
output of the data acquisition terminal board to the power module
for proper power amplification.
4-pin-DIN
to
6-pin-DIN
This cable connects the output of
the power module, after amplification, to the desired actuator
(e.g. electromagnet). One end of
this cable contains a resistor that
sets the amplification gain.
When carrying a label showing "5", at both ends, the cable
has that particular amplification
gain.
Figure 5 "From Digital-To-Analog" Cable
Figure 6 "To Load" Cable Of Gain 5
Document Number: 525 ! Revision: 03 ! Page: 7
MAGLEV User Manual
Cable
Designation
Description
6-pin-miniDIN
to
6-pin-miniDIN
This cable carries analog signals
from one or two plant sensors to
the UPM, where the signals can
be either monitored and/or used
by an analog controller. The cable also carries a ±12VDC line
from the UPM in order to power
a sensor and/or signal conditioning circuitry.
5-pin-DIN
to
4xRCA
This cable carries the analog signals, previously taken from the
plant sensors, unchanged, from
the UPM to the Digital-To-Analog input channels on the data
acquisition terminal board.
Figure 7 "From Analog Sensors" Cable
Figure 8 "To Analog-To-Digital" Cable
Table 4 Cable Nomenclature
Document Number: 525 ! Revision: 03 ! Page: 8
MAGLEV User Manual
4.2. Hardware Requirements
Figures 9, 10, and 11, below, show, respectively, the MultiQ-PCI Terminal Board, the
MAGLEV plant back, and the Universal Power Module (UPM-2405), all connected with
the necessary cabling to interface to and use the MAGLEV plant.
Figure 9 MultiQ-PCI Terminal Board Connections
Figure 10 Back MAGLEV Connections
Figure 11 Universal Power Module: UPM2405
The Quanser UPM-2405 is capable of providing the required power to the MAGLEV coil.
Document Number: 525 ! Revision: 03 ! Page: 9
MAGLEV User Manual
However, it should be used in conjunction with a "To Load" cable of gain 5 (i.e. 4-pinDIN-to-6-pin-DIN cable), as described in Table 4, above.
Together with the power supply for the amplifier, all Quanser power modules are equipped
with a 1-ampere ±12-volt regulated DC power supply for signal conditioning of external
analog sensors. The connectors are also fully compatible with our quick-connect system
enabling you to switch from one experiment to another quickly and efficiently.
4.3. Typical Connections For The MAGLEV System
4.3.1. Wiring Of The Electromagnet Power Line
The "power" line wiring of the MAGLEV electromagnet consists of two connections, as
described below:
1. Connect the "From Digital-To-Analog" Cable – Cable #1:
The "From Digital-To-Analog" cable is the 5-pin-DIN-to-RCA cable described in Table
4 and shown in Figure 5. Connect the RCA end of this cable to the Analog Output 0
(i.e. DAC # 0) of your data acquisition card terminal board and its 5-pin-DIN connector
to the socket labelled "From D/A" on the UPM2405. These two connections are
illustrated by cable #1 in Figures 9 and 11, above.
2. Connect the "To Load" Cable Of Gain 5 – Cable #2:
The "To Load" cable of gain 5 is the 4-pin-DIN-to-6-pin-DIN cable described in Table 4
and shown in Figure 6. First, connect the cable 4-pin-DIN connector to the MAGLEV
Coil Connector, which is shown as component #9 in Figure 3. Then connect the cable 6pin-DIN connector to the UPM socket labelled "To Load". The connection to the UPM
is illustrated by cable # 2 in Figure 11, above.
4.3.2. Wiring Of The Electromagnet Feedback Sensors
The MAGLEV system contains two feedback sensors. One is a small current sense resistor
in series with the coil. The other is a photodarlington embedded in the chamber pedestal and
providing the ball position signal. Both current sensor and photodarlington are wired to one
6-pin-mini-DIN socket each, as seen in the wiring schematic in Figure 4. Pictures of the
same 6-pin-mini-DIN socket are available in Figure 3, where they are represented as
components #11 and #10, respectively.
To connect these two analog sensors, follow the steps described below:
Document Number: 525 ! Revision: 03 ! Page: 10
MAGLEV User Manual
1. Connect the "From Analog Sensors" Cable – Cable #4:
The "From Analog Sensors" cable is the 6-pin-mini-DIN-to-6-pin-mini-DIN cable
described in Table 4 and shown in Figure 7. First connect one end of the cable to the
Sensor Connector, located at the back of the MAGLEV and which is shown as
component #10 in Figure 3. Then connect the cable's other end to the UPM socket
labelled "S1 & S2", which is contained inside the UPM "From Analog Sensors" front
panel. These connections are illustrated by cable #4 in Figures 10, and 11, above.
2. Connect the "From Analog Sensors" Cable – Cable #5:
The "From Analog Sensors" cable is the 6-pin-mini-DIN-to-6-pin-mini-DIN cable
described in Table 4 and shown in Figure 7. First connect one end of the cable to the
Current Sense Connector, located at the back of the MAGLEV and which is shown as
component #11 in Figure 3. Then connect the cable's other end to the UPM socket
labelled "S3", which is contained inside the UPM "From Analog Sensors" front panel.
These connections are illustrated by cable #5 in Figures 10, and 11, above.
3. Connect the "To Analog-To-Digital" Cable – Cable #3:
The "To Analog-To-Digital" cable is the 5-pin-DIN-to-4xRCA cable described in Table
4 and shown in Figure 8. First, connect the cable 5-pin-DIN connector to the UPM socket
labelled "To A/D", as illustrated by cable #3 in Figure 11, above. The other end of the
cable is split into four RCA connectors, each one labelled with a single digit ranging
from one to four. This numbering corresponds to the four possible analog sensor signals
passing through the UPM, namely S1, S2, S3 and S4. In order for the analog signals to be
used in software, you should then connect all four RCA connectors to the first four
analog input channels of your data acquisition card terminal board. Specifically, connect
S1 to Analog Input 0, S2 to Analog Input 1, S3 to Analog Input 2, and S4 to Analog
Input 3, as illustrated by cable #3 in Figure 9, above.
In other words, the ball position is sensed using A/D #0 through the UPM analog channel
S1, and the coil current is sensed using A/D #2 through the UPM analog channel S3.
Document Number: 525 ! Revision: 03 ! Page: 11
MAGLEV User Manual
4.3.3. MAGLEV Wiring Summary
Table 5, below, sums up the connections detailed in the two previous subsections.
Cable #
From
To
1
DAC #0
UPM "From D/A"
Control signal to the UPM.
2
UPM "To Load"
MAGLEV "Coil"
Power leads to the coil.
3
UPM "To A/D"
Terminal Board:
S1 to ADC #0
S3 to ADC #2
Position and current feedback
signals to the data acquisition
terminal board, through the UPM.
MAGLEV "Sensor"
UPM "S1 & S2"
Position feedback signal to the
UPM.
MAGLEV "Current"
UPM "S3"
Current feedback signal to the
UPM.
4
5
Signal
Table 5 MAGLEV Wiring Summary
Document Number: 525 ! Revision: 03 ! Page: 12
MAGLEV User Manual
5. Ball Position Sensor Calibration
The photosensitive ball position sensor is calibrated at the factory but may need readjustment when you receive it, or under changing external light conditions.
The position voltage measured on the UPM channel S1 should be zero when the ball is
resting on the black post, while it should be between 4.75 Volts and 4.95 Volts when the
ball is held up by (or stuck to) the electromagnet. Such a procedure results in a precisely
known conversion factor relating ball displacement to sensor output voltage.
5.1. Calibration Model
The Simulink model used to control the electromagnet current, as required by the calibration procedure explained hereafter, is depicted in Figure 12, below.
Figure 12 Position Sensor Calibration Diagram
Such a controller diagram is used to generate the calibration real-time code and the associated WinCon project, as described in the following sections. The actual Simulink controller
diagram files are available in the "Calibration" directory under the name type q_cal_maglev_ZZ.mdl, where the extension 'ZZ' stands for the type of data acquisition board that the
diagram interfaces to. The name substitutions stood for by 'ZZ' are listed and described in
Table 6, below.
Document Number: 525 ! Revision: 03 ! Page: 13
MAGLEV User Manual
'ZZ' Substitution Name
Description
mq3
The corresponding controller file interfaces to the Quanser's
MultiQ-3 board.
mqp
The corresponding controller file interfaces to the Quanser's
MultiQ-PCI board.
q8
The corresponding controller file interfaces to the Quanser's Q8
board.
nie
The corresponding controller file interfaces to the National
Instruments' E-Series boards.
Table 6 'ZZ' Substitution Names
5.2. Calibration Procedure
The calibration procedure detailed in the following subsections is to calibrate the two
potentiometers, namely "Offset" and "Gain", shown in Figure 2, above, as components #7
and #8, respectively. The Offset and Gain potentiometers are part of the signal conditioning
circuitry of the photodarlington used as a position sensor for the steel ball.
In order to run the calibration procedure, first ensure that the MAGLEV system is wired as
previously described. Then power up the UPM2405. The two lights inside the chamber
should go on. The calibration should be carried out under normal external light conditions at
the location where you are planning to use the apparatus. You may also use a level to level
the MAGLEV rig, so that both electromagnet axis and gravity force acting on the steel ball
are aligned. You are now ready to proceed.
5.2.1. WinCon Calibration Project
To load the WinCon calibration project, run WinCon and open the project titled
q_cal_maglev_ZZ.wcp, where ZZ stands for either for 'mq3', 'mqp', 'q8', or 'nie', depending
on your system data acquisition board, as detailed in Table 6, above. This should download
the calibration code to the WinCon Client, open the calibration control panel, illustrated in
Figure 13, below, and two DigitalMeters displaying both the measured electromagnet
current, Ic, and the measured position sensor voltage, Vb.
Document Number: 525 ! Revision: 03 ! Page: 14
MAGLEV User Manual
Figure 13 WinCon Calibration Control Panel
5.2.2. Zero "Offset" Potentiometer Calibration: At Voltage Zero
If it is not yet present, place the steel ball on the post inside the MAGLEV chamber. The
control panel pushbutton should be OFF. You can now start WinCon by clicking on the
green START button on the WinCon Server Window. This should set the electromagnet
current to zero, as seen in Figure 14. You can now calibrate the offset potentiometer if
necessary.
Using a potentiometer adjustment tool (i.e. a small flat-end screwdriver), manually adjust
the offset potentiometer screw on the MAGLEV enclosure to obtain zero Volts on the Vb
DigitalMeter, as depicted in Figure 15. Turning the offset potentiometer screw clockwise
increases the voltage Vb, and vice-versa.
When this is achieved, you can stop WinCon by clicking on the red STOP button on the
WinCon Server Window.
Figure 14 Offset Calibration: Ic DigitalMeter
Figure 15 Offset Calibration: Vb DigitalMeter
Document Number: 525 ! Revision: 03 ! Page: 15
MAGLEV User Manual
5.2.3. "Gain" Potentiometer Calibration: At The Maximum Voltage
If it is not yet present, place the steel ball on the post inside the MAGLEV chamber. Click
on the control panel pushbutton to switch it to ON. You can now start WinCon by clicking
on the green START button on the WinCon Server Window. This should set the
electromagnet current to 2.0A, as seen in Figure 16. This should cause the steel ball to jump
up to the electromagnet core face and stay there, attaining the other limit of its displacement
range. If the ball does not jump up, you can give it a small lift. You can now calibrate the
gain potentiometer if necessary.
Using a potentiometer adjustment tool (i.e. a small flat-end screwdriver), manually adjust
the gain potentiometer screw on the MAGLEV enclosure to obtain anywhere between 4.75
and 4.95 Volts on the Vb DigitalMeter, as depicted in Figure 17. Turning the potentiometer
screw counter-clockwise increases the voltage Vb, and vice-versa.
When this is achieved, you can stop WinCon by clicking on the red STOP button on the
WinCon Server Window. Exit WinCon without saving the modified project.
Figure 16 Gain Calibration: Ic DigitalMeter
Figure 17 Gain Calibration: Vb DigitalMeter
6. Obtaining Support
Note that a support contract may be required to obtain technical support. To obtain
support from Quanser, go to http://www.quanser.com and click on the Tech Support link.
Fill in the form with all requested software version and hardware information and a description of the problem encountered. Submit the form. Be sure to include your email address
and a telephone number where you can be reached. A qualified technical support person
will contact you.
Document Number: 525 ! Revision: 03 ! Page: 16