1
User Guide
© Maplesoft, a division of Waterloo Maple Inc. 2009
No part of this book may be reproduced, stored in a retrieval system, or transcribed, in any
form or by any means — electronic, mechanical, photocopying, recording, or otherwise.
Information in this document is subject to change without notice and does not represent a
commitment on the part of the vendor. The software described in this document is
furnished under a license agreement and may be used or copied only in accordance with
the agreement. It is against the law to copy the software on any medium except as
specifically allowed in the agreement.
Copyrights
Copyright © Maplesoft, a division of Waterloo Maple Inc. 2009
Trademarks
Maple, Maple T.A., Maplesoft, and Waterloo Maple are all trademarks of Waterloo Maple
Inc.
Tomcat is a trademark of The Apache Software Foundation.
Firefox is a registered trademark of the Mozilla Foundation.
Red Hat is a registered trademark of Red Hat, Inc.
Ubuntu is a registered trademark of Canonical Ltd.
SUSE is a registered trademark of Novell, Inc.
Linux is a registered trademark of Linus Torvalds.
Microsoft, Internet Explorer, Windows, and Windows Vista are registered trademarks of
Microsoft Corporation.
Macintosh, Mac OS, and Safari are trademarks or registered trademarks of Apple
Computer Inc.
Java, all Java-based marks, Sun, and Solaris are trademarks or registered trademarks of
Sun Microsystems, Inc. in the United States and other countries. Waterloo Maple Inc. is
independent of Sun Microsystems, Inc.
All other brand names or product names are trademarks or registered trademarks of their
respective companies.
ISBN 978-1-897310-83-0
Contents
Getting Started .................................................................................... 1
System Overview ....................................................................................... 1
Assignments .......................................................................................... 2
Gradebook ............................................................................................. 2
Logging On ................................................................................................. 2
The Class Homepage ................................................................................. 3
Creating a Class ......................................................................................... 4
Adding Users to the System ...................................................................... 5
User Rosters .......................................................................................... 5
Adding Individual Users ...................................................................... 8
Registering Users in a Class ..................................................................... 8
The User Manager ................................................................................ 8
Student Self-Registration ..................................................................... 9
Class Rosters ......................................................................................... 9
Sharing Content ................................................................................ 11
Sharing Questions ................................................................................... 11
Course Modules ........................................................................................ 13
Child Classes ............................................................................................ 15
Featured Classes ...................................................................................... 16
Propagation of Material from Featured to Child Classes ................. 16
Question Repository......................................................................... 19
Overview ................................................................................................... 19
Question Editor ........................................................................................ 19
Example Questions .................................................................................. 21
The Question Designer ....................................................................... 22
Multiple-choice Question using the Question Designer ................... 23
Multiple-choice Question with Randomly Determined Parameters 25
Multiple Choice Question Incorporating 2-D Math .......................... 27
Maple-Graded Question ..................................................................... 29
Plotting the Student's Response ........................................................ 31
Inserting a Maple Plot in the Question Feedback ............................ 31
Apply Partial Grading to Maple-graded Questions .......................... 32
List Question using the Question Designer ...................................... 32
Numeric Question using the Question Designer .............................. 34
Equation Editor .................................................................................. 35
Downloading Questions ........................................................................... 35
Assignments ..................................................................................... 37
Overview ................................................................................................... 37
Assignment Editor Main Menu .......................................................... 37
Warnings and Locking Mechanism ................................................... 38
Creating Assignments ............................................................................. 39
Naming Assignments ............................................................................... 39
Selecting Questions ................................................................................. 39
Individual Versus Grouped Questions .............................................. 40
Setting Policies ......................................................................................... 40
Assignment Types ............................................................................... 42
Feedback ............................................................................................. 45
Assignment Properties ....................................................................... 46
Advanced Policies ............................................................................... 49
Reviewing and Saving Assignments ....................................................... 50
Special Cases ............................................................................................ 51
Deleting Assignments ......................................................................... 51
Shared Assignments: Saving Your Changes ..................................... 52
Gradebook ......................................................................................... 53
Overview ................................................................................................... 53
Gradebook Views ..................................................................................... 53
Generating Reports ............................................................................ 54
Student Statistics .................................................................................... 55
Assignment Weighting ....................................................................... 56
Assignment Statistics .............................................................................. 58
Item Statistics .......................................................................................... 59
Add External Assignment ....................................................................... 59
Content Creation in the Question Editor ........................................ 61
Question Types ......................................................................................... 61
Enhancing questions ............................................................................... 63
Feedback ............................................................................................. 63
Information Fields .............................................................................. 64
Hints .................................................................................................... 64
Solution ............................................................................................... 65
Including Formatted Math Expressions in Questions ........................... 65
Using the mathml Function ............................................................... 65
Using the Math Editor ....................................................................... 66
Using Maple's MathML[ExportPresentation] Function ................... 67
Including Images in Questions ............................................................... 67
Static Images ...................................................................................... 67
Maple Plots ......................................................................................... 68
Algorithmic Variables ....................................................................... 71
Creating Algorithmic Variables in Maple T.A. ...................................... 71
Algorithm Design Tool ........................................................................ 72
Maple T.A.’s Built-in Functions and Constants ..................................... 72
Examples of Randomization Functions in Maple T.A. .......................... 77
Basic Arithmetic ................................................................................. 78
Calculating Area ................................................................................. 79
Color Combinations ............................................................................ 80
Randomization Routines in Maple .......................................................... 81
Random Integers ................................................................................. 82
Random Polynomials .......................................................................... 82
LinearAlgebra Functions ................................................................... 83
RandomTools Functions ..................................................................... 83
Examples of Randomization Functions in Maple .................................. 85
Degree of polynomial .......................................................................... 85
Intersection of Sets ............................................................................. 85
Matrix Determinant ........................................................................... 86
Maple-graded Questions .................................................................. 89
A Basic Maple-graded Question .............................................................. 89
Testing Your Question ........................................................................ 92
A Randomized Question .......................................................................... 92
A Question with Infinitely Many Correct Answers ............................... 96
Testing your question ......................................................................... 98
Another Question with Infinitely Many Correct Answers .................... 99
Accepting Approximations of Exact Symbolic Answers ......................... 99
Questions with Vectors and Matrices ................................................... 100
Allowing for Partial Grading ................................................................. 101
Performing a String Match ................................................................... 102
Performing a Pattern Match ................................................................. 103
Troubleshooting Maple-graded questions ............................................ 104
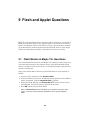
Flash and Applet Questions .......................................................... 105
Flash Movies in Maple T.A. Questions ................................................. 105
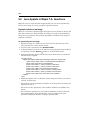
Java Applets in Maple T.A. Questions ................................................. 106
Dynamic Labels on an Image ........................................................... 106
Interactive Plots ................................................................................ 108
Flash Question Type .............................................................................. 110
Applet Question Type ............................................................................ 111
Step 1: Create and Deploy a Java Applet ........................................ 112
Step 2: Create and Deploy a Java Class for Grading ..................... 113
Step 3: Author the Maple T.A Question .......................................... 113
Question Authoring in LaTeX ........................................................ 115
Writing Questions in LaTeX ................................................................. 115
Requirements .................................................................................... 115
Authoring Process ............................................................................. 116
LaTeX Document Structure ............................................................. 116
Question Structure ........................................................................... 117
Sample Question File ....................................................................... 117
Converting into a Maple T.A. Script ................................................ 118
Sample .qu File ................................................................................. 119
Working with Algorithmic Variables .................................................... 120
Defining the Algorithm .................................................................... 120
Referencing Algorithmic Variables .................................................. 121
Placing Images in Questions ................................................................. 122
Setting the Image Base .................................................................... 122
Inserting an Image ........................................................................... 122
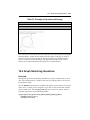
Graph Sketching Questions .................................................................. 123
Overview ........................................................................................... 123
Plain-text Question Files ................................................................ 127
Question Tags ........................................................................................ 128
Question Type Modes ............................................................................ 129
Question Fields ...................................................................................... 130
Notes: ................................................................................................. 132
Plain-text File Question Enhancements ............................................... 132
Response-specific Feedback ............................................................. 132
Key Word Questions ......................................................................... 133
Preface
Audience
The information in this guide is intended for instructors using the Maple T.A.
system for the first time.
Goals
This guide serves as an introduction to the Maple T.A. system and is grouped
into three parts. Chapters One through Five provide information related to
each component of the system. Chapters Six through Eight provide
instruction on basic question creation using the Question Editor. Chapters
Nine through Eleven provide instruction on advanced question creation,
including the use of Flash movies and Applets, LaTeX, and Plain-text
question creation.
Initially, the chapters should be read in sequence. This provides a linear
introduction to the process of using the components in the Maple T.A. system.
However, this guide can be used as a quick reference or as a launching point
for the Help system.
vii
viii •
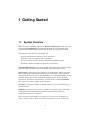
1 Getting Started
1.1 System Overview
Maple T.A. uses questions found in the Question Repository as the basis for
constructing assignments. The Question Repository is the location of all
questions for class homework, test items, or other class problem material.
Four types of users interact with Maple T.A.:
• System administrators manage classes and users.
• Instructors create questions and assignments.
• Proctors validate student identity and grant assignment access.
• Students complete assignments created by instructors.
System administrators can create, modify, and delete classes. They can also
create, modify, and delete users individually or by uploading a roster.
Instructors control the rules and policies for assignments, which can range
from self-study and homework sessions to proctored exams. Once satisfied
with the questions and rules in the assignment, it can be published for use by
students. Instructors control availability and due dates, and set grading
parameters. Grades are automatically recorded in the system Gradebook
and, if necessary, these grades can be changed.
Proctors can log in to validate a student's identity prior to administering a
proctored exam.
Students logged in to the system are allowed to register in your class, take
assignments as you make them available, and review the results of
assignments they have completed.
Once you log in to the Maple T.A. system, you can access your Maple T.A.
class or classes. This is where all system interactions occur for instructors,
1
2
•
proctors, and students. A class contains questions, assignments, resource
files, and the class gradebook.
Assignments
Maple T.A. has a variety of assignment types, including:
• Self-study practice
• Mastery
• Homework and quizzes
• Proctored exams requiring student validation
When an assignment is created, you specify the questions to be used, as well
as assignment access and feedback parameters. After determining the content
(questions), rules, and policies, you publish an assignment to the class web
site for use by students. Students can review the results of any previously
completed assignments.
Gradebook
After students complete an assignment, you can view the results in a
Gradebook or create downloadable performance reports.
With Maple T.A., you can generate comprehensive performance reports for
individual students and assignments, classes, or multiple assignments. You
can also perform statistical item analysis of questions.
1.2 Logging On
Log in to the system using the username and password your system
administrator has provided. The main system page is called the System
Homepage. The System Homepage provides access to the classes you are
teaching, and those in which you are a student or proctor.
If the system administrator has created a class for you, your class will be
listed under the Classes I Am Instructing section on your system homepage.
You can click on the class name to navigate to the Class Homepage.
If your system administrator has not created a class for you, you can create a
class.
1.3 The Class Homepage •
3
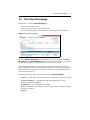
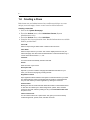
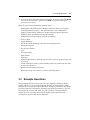
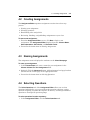
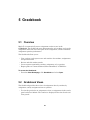
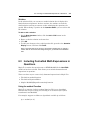
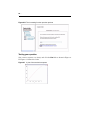
1.3 The Class Homepage
Instructors access the Class Homepage to:
• Create and edit questions
• Create, publish, and manage assignments
• Access a gradebook that records student work and assignment results
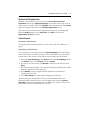
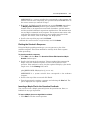
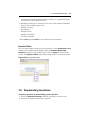
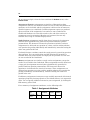
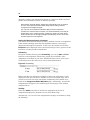
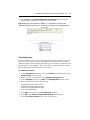
Figure 1-A Class Homepage
From the System Homepage, click the link to your class to open the Class
Homepage. The Class Homepage displays the class and instructor name, and
the list of assignments, quizzes, and tests that you have posted.
The assignment list displays the name and type of assignment, associated
points, availability (that is, scheduled dates and times), and specific policies in
the assignment (for example, time limit). Click the listed assignment name to
launch the assignment.
The following menu items are available from the Class Homepage.
• Actions -> Class Info, Add Child Class, User Manager, and Proctor Tools
• Content Manager -> Assignments, Question Repository, Course
Modules, and Web Site Editor
• Gradebook -> Open, Add External Assign.
• Help -> Instructor, Other Help -> Proctor, Other Help -> Student, Getting
Started, and About
• Logout
4
•
1.4 Creating a Class
Both instructors and administrators have sufficient privileges to create
unique (new and empty) classes or ones based on shared material.
Creating a new class
1. Start at the System Homepage.
2. From the Actions menu, select Administer Classes (System
Administrators only).
3. From the Actions menu, select Add Class.
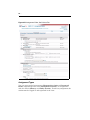
4. Complete the class registration form. Detailed information on available
fields is provided here:
Course ID
Select a unique string of letters and/or numbers as the Course ID.
Class Name
Select a unique name for your class. This name is displayed as the link to your
Class Homepage. The class name should be between 5 and 50 characters long. It
cannot contain the characters <, >, or &.
Instructor
Your name will be automatically entered in this field.
School
Enter the name of your school.
Description URL
Optional. If you have created a web page with additional information for your
class, you can link to the page by providing the URL.
Registration Locked
Open registration allows students in the system to enroll themselves in your class.
The default setting is locked, and students will not be able to enroll themselves
into your class unless you unlock registration by clearing the check box.
Featured Class
Marking the class as a Featured Class allows the creation of child classes based
on this class. This allows you to share assignments, quizzes, tests, and other
resources. with other classes by adding an entry to the Inherited Content From
drop down menu.
Inherit Content From
You can inherit content from a parent class. This gives you access to already
created assignments, quizzes, tests, and other resources.
1.5 Adding Users to the System •
5
5. Click Submit. A summary of the class details is displayed.
Creating a copy of a class
1. From the Class Homepage of the class you want to share, select the
Actions menu, and then select Add Child Class.
2. By default, you are listed as the instructor for the new class. Click the
Change Instructor link to select a different instructor.
3. Enter details of the instructor you are searching for and click Search.
Alternatively, you can search for the instructor in the list of registered
users.
4. Select the instructor and click Update. The name of the instructor should
be displayed.
5. Complete the Class Registration form and click Submit.
1.5 Adding Users to the System
System administrators and instructors that have create privileges can add
users to the system. Users can be created from a roster (to add a large number
of users at once) or individually. The system administrator can set up the
system to allow students to create user accounts for themselves, but you have
more control and the data will be more consistent if user accounts are created
by a few chosen individuals.
User Rosters
User rosters are a convenient method to add a large number of users at once.
Rosters are easily created and updated. Large numbers of users can also be
removed using batch removal.
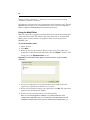
Creating a Roster
The user roster must be a comma-separated file (for example, *.csv) or tabseparated file (for example, *.tsv) that has one line for each user. The first line
must be a header row that specifies the data contained in each column. The
headers can be in any order, to make it easy to match your existing format.
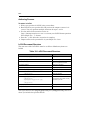
The acceptable fields in the roster are as follows:
Login, First Name, Middle Initial, Last Name, Email Address, Student ID,
Password, Role, Require User Validation
The corresponding header row values for these are as follows:
6
•
login, first, initial, last, email, student, password, role, validate
• The fields that are underlined are required.
• Login must be at least one alphanumeric character.
• First Name must be at least one alphabetical character.
• Middle Initial must be no more than one alphabetical character.
• Last Name must be at least one alphabetical character.
• Email addresses must be unique.
• Student IDs must be unique.
• Student ID must be at least five alphanumeric characters.
• Password must be at least five alphanumeric characters.
• If no password is provided, the system generates one which is displayed on
the next page. You can print or save this page. If it is not printed or saved,
the automatically generated login and passwords will be lost.
• Role can be Administrator, Instructor, Proctor, or Student. The role
specified cannot exceed the level of the user who is creating the roster. The
default is Student.
• Validate is a yes/no field and determines whether students have to review
their data on first login and validate it. The default setting is ‘yes’.
• If you have a null field (for example, a student did not provide a middle
initial), use two consecutive delimiters.
Note: If the header row includes Email and Student ID, you cannot have empty
values for those fields in the rows of student data. If there are some students who
do not have either an email or a student ID, you should use the value <Null>.
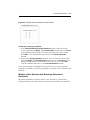
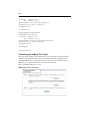
Uploading a Roster
You upload a user roster from the System Homepage. This will register users
in the system.
1. From the System Homepage, click Actions and select Administer Users.
2. From the Actions menu, select Roster, and then Import.
3. To locate your class roster, click Browse. Navigate to the file and click
Open.
4. From the drop-down menu, select the type of file being submitted as either
Comma-separated or Tab-separated.
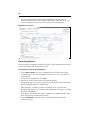
5. Click Submit. A table is displayed that includes all columns and
information in the file.
6. Click Enroll Roster. A roster upload summary is displayed.
1.5 Adding Users to the System •
7
Updating a Roster
User rosters can be updated by importing rows with Login values that are
already present in the Maple T.A. database. If an import row specifies a Login
that already exists and an LDAP system is being used to maintain the
database, then the user profile attributes are refreshed from the LDAP
system. In this case, the only column required in the import row is the Login
column. In other cases, the behavior is as follows:
• The imported attributes overwrite the corresponding attributes in the
Maple T.A. database.
• Empty attributes are ignored and do not overwrite existing information.
An attribute is empty if it is delimited by successive commas or tabs with
no intervening character.
• An attribute may be overwritten to null by providing the special Maple
T.A. string <Null> as its import value.
• An attribute that is specified as one or more spaces will be trimmed and
will overwrite the database attribute with an empty string (different from
a null value).
• Attribute values not included in the import (that is, with no column in the
import) are not modified in the database.
Batch Removal
Large groups of students can be removed from the system at once using a
special type of import. In this case, only the Login column of the import file is
used or required.
1. From the System Homepage, click Actions and select Administer Users.
2. From the Actions menu, select Roster, and then Delete.
3. Select the radio button to determine if the users will be “permanently
deleted (cannot be restored)”, or “marked as deleted (can be restored)”.
4. To locate the roster for batch removal, click Browse. Navigate to the file
and click Open.
5. From the drop-down menu, select the type of file being submitted as either
Comma-separated or Tab-separated.
6. Click Submit. A table is displayed that includes all information in the
database for the users selected.
7. Click Delete Roster. A roster validation summary is displayed.
Users that are “permanently deleted” are removed from the entire system,
along with any assignment answers or grades owned by those users. Users
that are “marked as deleted” are moved to a separate database within the
system and no longer have access to the system, but all of their information is
8
•
stored. They can be restored later by doing a search for deleted users in the
Administer Users page, selecting the check boxes beside their names and
clicking Restore. Permanently deleted users will not show up on a search for
deleted users.
Adding Individual Users
You can also add users to the system individually. This is useful for adding a
small number of users.
1. From the System Homepage, click Actions and select Administer Users.
2. From the Actions menu, select Add User.
3. Fill in the form.
4. Click Submit.
1.6 Registering Users in a Class
Before the Gradebook can begin tracking student performance, it must have
students registered in the course. You can register students in a class by:
• Using the User Manager
• Allowing students to register themselves for your course
• Creating and uploading a class roster
To register students in your course, they must have an account in the system.
Creating user accounts is usually done by the system administrator, although
the administrator can give instructors the ability to create user accounts. In
addition, the system administrator can set up the system to allow students to
create their own user accounts.
The User Manager
You can select students to register in your class from a list of system users. All
the students you want to register must already have an account in the system.
You can search the list for a user that satisfies particular criteria.
1. From the Class Homepage, click Actions and select User Manager. From
the Actions menu, select Register Users.
2. Enter search criteria to narrow the list of users down or to search for a
particular student.
3. Select the checkbox beside the students you want to register in your class.
4. Click Register.
1.6 Registering Users in a Class •
9
Student Self-Registration
Students can register for your class using the Find classes open for
registration link on the System Homepage. The student selects the class he
or she wants to enroll in, and clicks Register. The student then clicks Confirm
and must complete the form on the Student Registration screen.
You can lock access to this form of registration from your class homepage.
From the Actions menu, select Class Info, click Edit, and select the
Registration Locked check box.
Class Rosters
Creating a Class Roster
A class roster has the same format as a user roster. See “User Rosters” on
page 5.
Uploading a Class Roster
You can upload a class roster from your Class Homepage. This will register
users in the system as students in your course. If you have create privileges
and the user is not already in the system, a new account will be created.
1. From the Class Homepage, click Actions and select User Manager. From
the Actions menu, select Roster, and then Import.
2. To locate your class roster, click Browse. Navigate to the file and click
Open.
3. From the drop-down menu, select the type of file being submitted as either
Comma-separated or Tab-separated.
4. Click Submit. A table is displayed that includes all columns and
information in the file.
5. Click Enroll Roster. A roster upload summary is displayed.
As discussed in the User Rosters section, system administrators and
instructors with create privileges can also import users from the System
Homepage. This will add students into the Maple T.A. system, but you will
still need to register the students into a course.
10 •
2 Sharing Content
Sharing content is an important part of using a system like Maple T.A.
effectively. Sharing content makes a wider range of questions and
assignments available to all users. You can share questions, assignments, and
resources in a variety of ways, from choosing specific content to providing
access to all the content in a class.
2.1 Sharing Questions
Questions are owned by a class. The creator of a question becomes the default
owner of the question. Questions can only be modified by the owner.
Child classes automatically inherit questions from their ancestors.
Instructors can obtain question material for their groups in one of three ways:
1. Create a question. The instructor becomes the owner of this question.
2. Inherit a public question from an ancestor class. Instructors can use the
question in their assignments, but cannot modify the question. Only the
original owner (creator) of the question will be able to modify the question,
and those changes will be automatically propagated to all subscribers'
question groups. This is similar to the Question Bank inheritance rules in
Maple T.A. 4.0.
3. Shadow a public question from another class. Instructors can use the
question in their assignments, but cannot modify the question. Only the
original owner (creator) of the question will be able to modify the question,
and those changes will be automatically propagated to all subscribers'
question groups.
4. Clone a public question from repository. This operation creates a local
copy, or clone, of the public question and sets the owner to the instructor
11
12 •
who made the clone. Only this subsequent instructor will be able to modify
the cloned question. All changes made to the original public question will
not be visible in cloned questions.
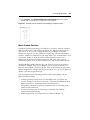
The Inherit, Shadow, and Clone methods have disadvantages:
• When instructors Inherit or Shadow a public question, they should expect
it to be modified by the question owner at any time without notice;
however, the question most probably will be a valid question with all
resources (images, etc.) in place.
• When instructors Clone a question, they can be sure that it will not be
touched by anybody, but there is a danger of losing resources (images, etc.)
because the cloning process does not copy the resources to the instructor's
web space; therefore, they can be deleted any time by the original author
of the question.
To create a question:
1. Click the Question Repository link from the menu bar.
2. Click Questions, then New Question.
3. Create the question and add it to one or more Groups.
To share a question:
1. Find the question that you wish to share.
2. Click the share button
or click the checkbox beside the questions you
wish to share and then click Make Public.
To shadow a question:
1. Click the Public Questions link.
2. Use the search methods available to find the public questions that you
wish to use.
3. Add the question to one or more of your question groups by clicking the
modify button
or by clicking the checkbox beside the questions you wish
to use and then clicking Add To Groups.
To clone a question:
1. Use the search methods to find the questions (Public or Private) that you
wish to clone.
2. Click the clone button or click the checkbox beside the questions you
wish to share and then click Clone.
Inherited questions automatically appear in a class’ repository as they are
created.
2.2 Course Modules • 13
2.2 Course Modules
If you want to share not just your questions, but also images and assignments
that you have created based on those questions, you should use course
modules. Once you create a course module, you can send it to other instructors
who can upload it into their classes and use it as is or alter it to better suit
their needs. Course modules can be uploaded to other installations of Maple
T.A., not just the one at your institution.
Note: Only local content can be included in a course module. If you are inheriting
content from another class, you will not be shown the inherited content in the
course module creation screen.
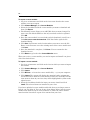
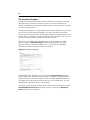
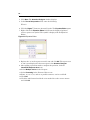
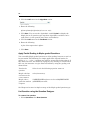
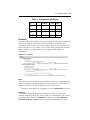
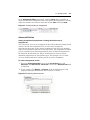
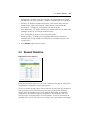
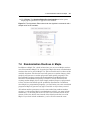
Figure 2-A The Course Module main menu screen enables you to create, import,
export, or delete course modules and their contents.
To share content using course modules, first create a course module by
choosing the items you want to include. Once you have created the course
module, you can save the course module file (.zip) to your computer and then
send that file to other instructors.
To create a course module:
1. Log in as an instructor and click on the class that contains the content you
want to share.
2. Click Content Manager, then Course Modules.
3. Click New.
4. Select the question banks, assignments, and web folders that you want
included in the course module. Click OK.
5. Enter a name for the module. Optionally, enter a description for any of the
items you have included in the module. Click OK. The course module now
appears in the list of course modules for your class.
14 •
To export a course module:
1. Log in as an instructor and click on the class name that has the course
module you want to export.
2. Click Content Manager, then Course Modules.
3. Select the checkbox beside the course module you want to download and
then click Export.
4. The following screen allows you to add URLs that you want changed. In
most cases, the default URLs are the only ones that need to be updated.
Click OK.
5. Once the course module is created and ready for download, you will see a
link click here to start the download. Click that link to open the file
download dialog.
6. Click Save, then browse to the location where you want to save the file.
Enter a new file name or use the existing name of the course module and
click Save.
7. Once the download is complete, click Close. You are returned to the
download screen.
8. Click Return to go back to the Course Modules menu.
When you receive a course module, you need to import and install it or pieces
of it to the desired class.
To import a course module:
1. Log in as an instructor and click on the class in which you want to import
the content.
2. Click Content Manager, then Course Modules.
3. Click Import.
4. Click Browse… to locate the course module file (.zip) on your computer.
5. Click Import. The system will display the question banks, assignments,
and web resources from the course module. If there are items that use the
same name as those in your class, they will be highlighted in yellow on the
upload screen.
6. Select the checkboxes beside the items you want to install and click
Install. The selected items are installed in your class.
If you have uploaded a course module and decide that you no longer want to
keep it, you can delete it. You can do one of two things: delete just the course
module name from the list of course modules; or, delete the course module
name from the list and all or part of its content from your class.
2.3 Child Classes • 15
To delete a course module:
1. Log in as an instructor and click on the class name that has the course
module.
2. Click Content Manager, then Course Modules.
3. Select the checkbox beside the course module you want to delete and then
click Delete. This will remove the course module name from the list of
course modules, but it will not delete the content of the course module
from your class.
4. You will receive a warning. Click OK to delete the course module name
from the list.
To delete course module content from a class:
1. Log in as an instructor and click on the class name that has the course
module.
2. Click Content Manager, then Course Modules.
3. Select the checkbox beside the course module you want to delete and then
click View Details.
4. Select the checkboxes beside the items that you want to remove from your
class and click Delete.
5. You will receive a warning. Click OK to delete the course module name
from the list and the selected content from your class.
2.3 Child Classes
If you have a class that contains content that you want to share with other
instructors at your institution, you have the ability to share the entire class.
The benefit of sharing the class rather than providing a course module is that
there is a link between a parent class and any child class. Child classes will
automatically get any changes that you make to the parent class content.
With a course module, there is no link between your class content and the
class in which the course module is uploaded.
Creating a child class can be done by an instructor or an administrator.
To create a Child Class:
1. Log in and click on the class you want to share.
2. Click Actions, and then Add Child Class.
16 •
3. Click Change Instructor and then browse the user list or use the search
panel to find the user who will be the instructor for the child class. Select
the radio button beside the user and click Update to change the instructor.
4. Enter the information in the registration form and click Submit. You will
get a notice that the class was created.
2.4 Featured Classes
If you have a class that will be used by many instructors or from year to year,
you may want to create a featured class. A featured class is similar to a shared
class as described in the previous section. The main difference is that a
featured class will appear in the drop-down list of classes from which you can
inherit content when a new class is created.
To create a Featured Class:
1. Log in as a system administrator.
2. Click Actions, and then Administer Classes.
3. If the tree view is showing, click Table View.
4. Click the Open link for the class that you want to make a featured class.
5. Click Edit.
6. On the Class Details page, select the checkbox beside Featured Class.
Click Submit.
Propagation of Material from Featured to Child Classes
The relationship between featured and child classes allows for quick and easy
propagation of material, while still allowing certain features within the child
classes to be customized. Details of this relationship are as follows:
• When an assignment is created in a featured class, all child classes will
receive only a copy of all assignment attributes (names, policies,
restrictions, etc.). The content of the assignment will not be copied to the
child classes; instead, inherited assignments will point to one copy of the
assignment content stored in the featured class.
• All changes made to the assignment content in the featured class will be
immediately visible in all child classes.
• All changes made to the assignment attributes (names, policies, etc.) in
the featured class will not be propagated to child classes, allowing them to
have their own customized set of attributes.
2.4 Featured Classes • 17
• Instructors of child classes will be allowed to modify all attributes of the
inherited assignments, but will not be able to modify assignment content.
• If instructors of child classes wish to customize the content of an inherited
assignment, they will have to make their own copy of the assignment.
18 •
3 Question Repository
3.1 Overview
The Question Repository is used to create, organize, and search for questions.
This replaces the use of Question Banks and Topics used in Maple T.A. prior
to version 5.0.
There are three methods for authoring question banks in the system:
1. Question Editor
2. Maple T.A. .qu plain-text script files
3. LaTeX files that can produce math-intensive questions formatted to
Maple T.A. specifications
This document discusses using the Question Editor. For information on
authoring questions banks using the other two methods, refer to the Maple
T.A. help system.
3.2 Question Editor
To create a question using the Question Editor:
1. Click the Question Repository link from the menu bar.
2. Click Questions, then New Question.
19
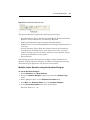
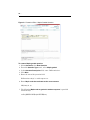
20 •
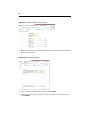
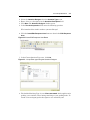
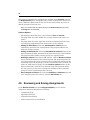
Figure 3-A Question Editor - New Question
3. Enter the content of your question. Examples are provided in the Example
Questions on page 21.
Figure 3-B Entering a Question
4. Once you have completed the question, click Finish.
5. Choose the groups (if any) that you wish the question to belong to and
click Submit.
3.3 Example Questions • 21
6. A preview of the question is displayed. Provide an answer and click Grade
to see how the question is graded. Click Edit to continue refining the
question as necessary.
Maple T.A. provides the following question types:
• Mathematical & Scientific Free Response Question Types (14 varieties
including formula, numeric, and questions that use the Maplesoft™
Maple™ mathematical software to grade and plot student responses)
• Multiple-choice (permuting and non-permuting)
• Multiple-selection (permuting and non-permuting)
• True-or-False
• Ungraded Essay
• Fill-in-the-blank including text region or drop down menu
• Question Designer
• Key Word or Phrase
• List
• Clickable Image
• Short Phrase
• Matching
• Multipart Questions (consisting of parts that are of any question type; can
be nested)
• Palette Questions (using a programmable palette of symbols for the entry
of student responses)
• Questions with applet interaction
• Questions using web references / objects (including plots)
3.3 Example Questions
This document discusses three question types: Question Designer, Maplegraded, and List. You are guided through the process of designing a simple
multiple-choice question using the Question Designer, followed by editing the
previous question to incorporate randomly determined parameters. You will
also learn how to insert 2-D math into your question. Creating a Maplegraded question, inserting plots into the Maple-graded question, and a
creating List question will also be discussed.
22 •
The Question Designer
The Question Designer provides a flexible format for creating free response
questions that can include multiple response cells. These questions are
similar to multipart questions in that they provide a shell structure in which
to embed other questions.
The Question Designer is an authoring environment as familiar as your word
processor. Using the Question Designer, you enter question text and the
correct answers wherever they should appear. Many formatting options such
as bold, italics, and fonts are available through the text editor icons. You can
also insert images, tables, or links to other file resources.
When you are satisfied with the appearance of the question, you define
answer regions, or Response Areas, and then apply grading and other
behaviors. Like all questions in Maple T.A., you can insert algorithmic
variables and inline math expressions as required.
Figure 3-C Question Designer
From the Question Designer, you can launch the Response Area window,
which allows you to define the question type, weighting, grading behaviors,
display behaviors, and correct answers. You can define additional behaviors
according to the individual question mode you select. Additionally, you can
add feedback, algorithms, hints, and solutions.
At the top of the Question Designer is the toolbar which includes the unique
Insert/Edit Response Area button that you use to activate the Response
Areas defined in your question.
3.3 Example Questions • 23
Figure 3-D Insert/Edit Response Area
The Question Designer supports the following question types:
• Formula Question Types: Formula, Formula Mod C, Restricted Formula,
Equation, Vector of Formulas, and Chemical Equation
• Maple-graded Question Types: Formula and Maple Syntax
• Multiple-choice, Non-permuting Multiple-choice (displayed horizontally or
vertically)
• Numeric Question Types: With and without required unit dimensions
• List Questions, including text or menu input styles, exact or relaxed
graders, multiple correct or incorrect responses can be specified, partial
credit can be defined for each response
• Essay Question
The following provides instruction for creating a simple multiple choice
question using the Question Designer. In addition, navigating, previewing,
and enhancing the appearance of a question are discussed.
Multiple-choice Question using the Question Designer
To use the Question Designer:
1. Select Questions, then New Question.
2. Select the Question Designer question type from the Question Type
menu.
3. Enter "Multiple-choice" in the Question Description field.
4. Click Next. The Question Editor opens the Question Designer.
5. In the Text of the question field, enter the following:
Question: What is 17 + 9?
24 •
6. Click the Insert/Edit Response Area button
Response Area window.
to launch the Edit
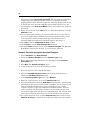
Figure 3-E Edit Response Area
7. Select Multiple-choice in the left pane.
8. Select Permuting in the Permute Choices row.
9. Highlight and delete choice 1 and enter 26.
10.Highlight and delete choice 2 and enter 27.
11.Press Enter to display a third multiple choice option.
12.Enter 23. Now that you are finished entering choices, click OK.
13.Click the radio button beside the correct answer to mark this answer as
correct and click OK.
14.Click Finish. The Question Editor>Preview Question window opens,
displaying the question as it appears to the student.
3.3 Example Questions • 25
Figure 3-F Multiple-choice Question Preview Window
To test and review your question:
1. In the Question Editor>Preview Question window, select the correct
answer (26) and click Grade. The Preview Grade window opens. A Correct
icon is displayed along with your answer matching the correct answer.
Click OK to close this window and return to the Preview Question
window.
2. Again in the Preview Question window, select an incorrect answer (23)
and click Grade. The Preview Grade window opens. An Incorrect icon is
displayed along with your answer and the correct answer. Click OK to
close this window and return to the Preview Question window.
In the next example, the Multiple-choice question created in the previous
example is extended by specifying algorithmic variables, hints, solutions, and
feedback.
Multiple-choice Question with Randomly Determined
Parameters
Specifying algorithmic variables allows you to generate a question that
changes each time you view it. Because values in the question are randomly
26 •
determined for each instantiation, students answer variations of the same
question.
Figure 3-G Question Editor with Algorithmic Example
To specify algorithmic variables:
1. In the Preview Question window, click Edit. The New Question window
opens.
Note: This procedure will overwrite the first question and not create a new one.
2. In the Question Description field, change the description to "Multiplechoice Enhanced".
3. Click Next. The Question Designer window displays.
4. Select the Algorithm tab and click Edit.
5. Enter the following code in the text box:
$a=range(10);
$b=range(10);
condition:ne($a, $b);
$sum = $a + $b;
$product = $a*$b;
• The range(n) function generates a random integer in the range 1,..., n
(inclusive). There are n numbers in that range. Hence, it is a selection of
one number from a choice of n.
• The condition:ne function ensures the two variables are not equal.
• $ is required to indicate a variable.
• The question variables are set to $a and $b. These will range from 1 to 10.
The answer is set to $sum, which is the integer value of $a+$b.
• As this question is multiple-choice, you must generate wrong answers to
be displayed alongside the correct answer. For variation, the wrong
answer variable $product is set to the randomly generated variable $a*$b.
3.3 Example Questions • 27
• All lines end with a semicolon.
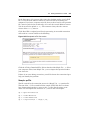
6. Click Save. The Question Designer window is displayed.
7. Select the Feedback tab and click Edit. The Edit Feedback window opens.
8. Enter the following text in the feedback text field:
The sum of $a and $b is $sum.
Note: As the instructor, you can choose to have this information shown to students
when they view their graded assignments.
9. Click Save. The Question Designer window is displayed.
10.You must now edit the text of the question and the answer choices to use
the variables. In the Text of the question field, replace:
What is 17+9?
with
What is $a + $b?
11.Double-click Edit below the multiple choice options and replace the
previous answers with the variables $sum and $product.
12.Delete the third option by clicking the Back Space key.
13.Click OK.
14.Ensure that the $sum variable is selected to be the correct answer.
15.Click OK to return to the Question Designer window.
16.Click Finish. The Preview Question window opens. Test the question by
selecting an answer and clicking Grade.
Note: Using the Question Designer, you can add feedback, algorithms, hints,
solutions, and information fields in the same interface as the question text as
illustrated in this example. You can also add these fields in the New Question
screen by selecting Edit beside each field. For all other question types, the New
Question window is the only place to add these fields.
The following example provides instruction for creating a multiple choice
question using the question designer to determine a square root.
Multiple Choice Question Incorporating 2-D Math
1. Select Questions, then New Question.
2. Select the Question Designer question type from the Question Type
menu.
3. Enter "Multiple-choice with 2-D Math" as a description in the Question
Description field.
28 •
4. Click Next. The Question Designer window displays.
5. In the Text of the question field, enter the following:
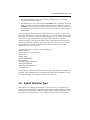
What is
6. Click the Sigma
Σ button to insert 2-D math. The Equation Editor opens.
7. Right-click in the Equation Editor field. From the displayed palettes,
select a square root symbol. The symbol is displayed in the Equation
Editor.
Figure 3-H Equation Editor
8. Replace the "a" in the square root with 144 and click OK. The square root
of 144 is now displayed in the text region in the Question Designer.
9. After adding a question mark to complete the question, click the
Insert/Edit Response Area icon.
10.Select Multiple-choice in the left pane.
11.Select Permuting in the Permute Choices row.
12.Enter 12, 14, 72, 13, and 15 as possible answers, one for each field.
13.Click OK.
14.Click the radio button beside the 12 to mark this as the correct answer
and click OK.
3.3 Example Questions • 29
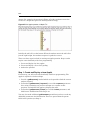
15.Click Finish. The Question Editor>Preview Question window opens,
displaying the question as it appears to the student.
Figure 3-I Multiple choice question incorporating 2-D math preview
Maple-Graded Question
The Maple-graded question type uses Maple to evaluate a student response
and to render a plot of the student's response. The Maple-graded question
type gives you access to the computational power of Maple. It includes
facilities for algebra, calculus, differential equations, discrete mathematics,
graphics, numerical computation, and many other areas of mathematics. You
can also use Maple to create questions whose responses require sets,
differential equations, unevaluated integrals, and many other types of
mathematical data. You can find common errors and reward partial marks.
With the Maple-graded question type, you also have access to the plotting
capabilities of Maple. You can use Maple to plot a student response (or a
function derived from a student response, such as the definite integral of the
student response) for a Maple-graded question type. You can also use Maple to
display a plot for any question type.
You must adhere to the following guidelines when using Maple code for
Maple-graded questions:
• A Maple-graded question must use valid Maple code to evaluate the
answer. Complete each line of code with a semicolon. For information on
Maple code, refer to your Maple system documentation.
• The grading code must evaluate to a Boolean value or a floating-point
number between 0 and 1.
• Use the long form name for all package commands, for example,
VectorCalculus[ArcLength].
• Maplet applications are not presently accessible in Maple T.A.
30 •
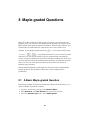
Figure 3-J Question Editor - Maple-Graded Question
To create a Maple-graded question:
1. Select Questions, then New Question.
2. From the Question Type menu, select Maple-graded.
3. In the Question Description field, enter "Differentiation".
4. Click Next.
5. Enter the text of the question field:
Differentiate sin(x) * x with respect to x.
6. Enter Maple code that evaluates to the correct answer:
diff(sin(x)*x, x);
7. The following Maple code to grade the student response is provided
automatically:
evalb(($RESPONSE)-($ANSWER)=0);
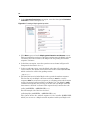
3.3 Example Questions • 31
$RESPONSE is a system variable that corresponds to the response the
student entered when completing the question and $ANSWER refers to
the correct answer you entered in step 6.
8. By default, the Maple-graded question type accepts Formula expressions.
In Maple-graded Formula question types, students can enter a math
formula, that is, an expression constructed of numbers, variable names,
and the standard arithmetic expressions and functions. The student must
not use Maple commands in the response. The instructor must write code
such that the student does not have to use a trailing semicolon in the
response. For details, refer to the Maple T.A. Help system.
9. Scroll to the top of the page and click Finish.
10.Enter the correct answer, cos(x)*x+sin(x), and click Grade.
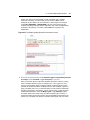
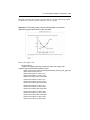
Plotting the Student's Response
Using the Maple-graded question type, you can generate a plot of the
student's response. This allows students to visually check their response
before proceeding.
To plot the student's response:
1. Click Edit, and then Next. The Question Editor>Edit Question>Maple
Graded window opens.
2. Scroll to the bottom of the question. Using a standard plot command in
Maple, enter the student's response as well as the derivative of the
question. If the student is correct, the plot region will display a plot with a
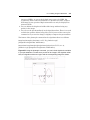
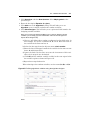
single curve. In the Plotting field, enter:
plot([$RESPONSE, diff(sin(x)*x, x)], x=-10..10);
$RESPONSE is a system variable that corresponds to the student's
response.
3. Scroll to the top of the screen and click Finish.
4. Test the question by entering a response and selecting the Plot link. The
plot is displayed in a separate window.
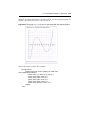
Inserting a Maple Plot in the Question Feedback
You can also insert a Maple generated plot in the question text, hints, or
feedback of any type of question.
To insert a Maple plot as an algorithmic variable:
1. Click Edit to edit the current question.
32 •
2. Click the Add button in the Algorithm section.
3. Enter the following:
$plot1=plotmaple("plot(sin(x)*x, x=-10..10)");
4. Click Save. You can use the algorithmic variable $plot1 to display the
Maple plot in all question types anywhere algorithmic variables can be
used (that is, in the question text, hints, and feedback).
5. Click the Add button in the Feedback section.
6. Enter the following:
A plot of the expression is $plot1.
7. Click Save.
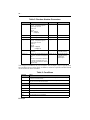
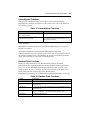
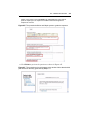
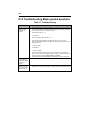
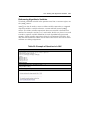
Apply Partial Grading to Maple-graded Questions
You can modify Maple-graded questions to allow grading between 0.0 and 1.0
for part marks. The following is a simple application of partial marks. In
solving 3x + 6 = 12 for x , students may add 6 to 12 instead of subtracting it. If
they made this error, but divided by 3 properly, they would get a result of 6. In
this case, the instructor can give them half marks by using the grading code
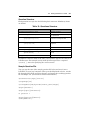
shown below:
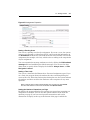
Text for the
question
Solve for x in the following equation: 3x+6=12
Maple code that
evaluates to the
correct answer
solve(3*x+6=12,x);
Maple code to
grade the student
response
if ($RESPONSE=6) then 0.5 else evalb($RESPONSE($ANSWER)=0 end if;
See Chapter 8 for more in-depth coverage of the Maple-graded question type.
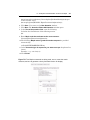
List Question using the Question Designer
To create a List question:
1. Select Questions, then New Question.
3.3 Example Questions • 33
2. Select the Question Designer from the Question Type menu.
3. Enter "List" as a description in the Question Description field.
4. Click Next. The Question Designer window opens.
5. In the Text in the question field, enter the following question:
Who introduced the Arabic number system to Europe?
6. Click the Insert/Edit Response Area button to launch the Edit Response
Area.
Figure 3-K Insert/Edit Response Area Button
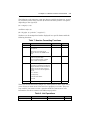
7. In the Choose Question Type area, click List.
Figure 3-L List question type using the Question Designer
8. The default Matching Type is set to Exact text match which applies strict
grading, case-sensitive, literal string-matching as your grading mode. To
invoke a less stringent grader that ignores case sensitivity and
34 •
punctuation, select Ignore case text match. The List mode also provides a
regular expression-matching grader, useful for customization of the
grading routine. These fields are applicable when the Display mode is set
to Text Field, which presents students with a blank response area. For
this example, select Drop-down Menu. Ensure the Permute list check box
is selected.
9. Enter answer choices in the Item fields. To add additional items, click the
Add Item button.
10.As you add possible answers, the system assigns them a credit value of
"0.0" in the right column. Additional answers are graded as fully correct
("1") or partially correct answers (with any value between 0 and 1
assigned). Edit the weight for Leonardo Fibonnaci and enter 1.0.
11.Click OK to exit the Edit Response Area window.
12.Click Finish to exit the Edit Response Area window.
13.Click the Finish button at the top of the Question Designer. The Question
Bank Editor displays the question as it is viewed by students.
Numeric Question using the Question Designer
1. Select Questions, then New Question.
2. Select the Question Designer from the Question Type menu.
3. Enter "Question Designer Numeric" as a description in the Question
Description field.
4. Click Next. The Question Designer opens.
5. In the blank text area, enter the following question:
Round 2.76789 m to three significant digits.
6. Click the Insert/Edit Response Area button (check mark symbol) to
launch the Edit Response Area window.
7. In the Choose Question Type area, select Numeric.
8. Enter the correct answer "2.77" in the Numeric Part field.
9. Click the blank field next to the Units Part field and enter a required unit
dimension for the correct answer (in this case, m for meters.) If you do not
enter a required unit dimension, the system displays only a single
response cell that accepts only numbers for student answers. If you do
enter a required unit dimension, students are presented with two cells:
one for the number part and one for the unit dimension. The student must
enter correct values in both cells to receive full marks for the question.
10.To set the margin of error, click the Required with menu, which is set to
Absolute Accuracy by default. You can specify absolute precision (student
3.4 Downloading Questions • 35
answers must match the defined answer exactly), or a significant figure
precision for an exact answer match.
11.Modify the tolerance by choosing one or more of the numeric formatting
options. The available options are:
• Absolute Accuracy
• Set # figures
• Margin of error
• Margin in n'th digit
• Percentage margin.
12.Click OK and then Finish to save and preview the question.
Equation Editor
You can enter symbolic math in any question type. In the Add Question Text
window, (this window usually displays after the Question Editor>New
Question window for each question type), click the Sigma Σ button in the
toolbar. The Equation Editor dialog opens. Right-click to access the palettes.
Figure 3-M Enter symbolic math
3.4 Downloading Questions
To back up questions by downloading to your hard drive:
1. From the Question Repository, find the questions you wish to save.
2. Select the checkboxes next to the questions.
36 •
3. Click Export. The files are saved as testbank.qu.
4. A message is displayed indicating the download is complete. Click Close.
You can import the saved question bank file (plain-text script file), and then
continue editing or install it in your class.
To open a question bank file that was downloaded to your hard drive:
1. From the Question Repository, click Questions, then Import Question
Bank
2. To locate your file, click Browse.
3. Navigate to the source file on your hard drive and click Open. The path
and filename are displayed in the Question Bank field.
4. Select how the questions will be organized when importing.
5. Click Import. The topics are displayed in the left panel of the Question
Bank Editor.
6. Save your imported question bank. From the Actions menu, select Save
Question Bank.
When you upload a question bank file into the system, it performs a set of
validation routines to ensure that the questions function. Occasionally, you
may encounter an error with a variable name or definition upon uploading.
The following is a summary of the system's analysis of variables upon initial
loading of a question bank file.
• For variables displayed within HTML text, for example, in a question
statement or feedback area, a problematic variable does not produce a
data value generated from its definition. Instead its variable name is
displayed, highlighted in red.
• For variables appearing in non-displayed field parameters, for example,
the answer to a question, the variables $ANSWER and $RESPONSE
default to 0. All others have the variable name passed.
4 Assignments
4.1 Overview
Assignments are created by selecting questions from the Question Repository.
The assignments you create can be organized such that Maple T.A. reorders
questions, generates questions, or displays a subset of questions. Each
student viewing your assignment can potentially complete a unique set of
questions.
The Assignment Editor allows you to create new assignments, edit the
content, properties, and appearance of existing assignments, delete
assignments, and change the order of existing assignments.
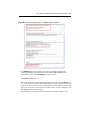
Assignment Editor Main Menu
From the Class Homepage, click Content Manager and select Assignments.
From the Assignment Editor main window, you can:
• Click New to create a new assignment.
• Reorganize the order of displayed assignments using the numbered list
beside each assignment.
• Open assignments for editing by clicking the assignment name link.
To activate other options, hover your mouse over the assignment name. Six
option buttons are displayed.
• Edit assignments by clicking edit.
• Copy assignments by clicking copy.
• Delete assignments by clicking delete.
• Hide/show assignments from student view in the Class Homepage by
clicking hide/show.
37
38 •
• Print assignments. Clicking the print link displays the print preview of
the assignment. You then have the option to print the assignment or click
Back to return to the Assignment Editor.
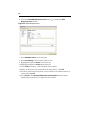
• View a summary of the assignment by clicking summary.
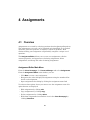
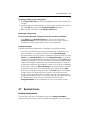
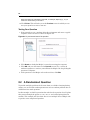
Figure 4-A Assignment Editor
The Assignment Editor main menu lists assignments created for your class.
These assignments may be populated with a series of assignments based on
testing materials or other shared questions. If not, you initially see a blank
list here. For more information on shared classes, see Chapter 2.
Warnings and Locking Mechanism
When an assignment is opened for edit, the system checks and warns the
instructor whether the assignment has associated student records in the
Gradebook or is currently in use by a student.
Note: The number of students currently using the assignment is displayed in the
Active field of the Assignment Editor main menu.
• If the assignment is currently in use, the questions in the assignment are
locked so that an instructor cannot edit them. You can edit some of the
policies of the assignment like the time limit for example.
• If the assignment is not currently active, the assignment is locked for
editing so that new active tests cannot be started during the editing
process. Students who try to start the assignment while it is locked are
notified with a warning message.
4.2 Creating Assignments • 39
4.2 Creating Assignments
The Assignment Editor organizes assignment creation into a four step
process.
1. Naming your assignment
2. Selecting questions
3. Establishing rules and policies
4. Reviewing, finishing, and publishing assignments to your class
To start a new assignment:
1. From the Assignment Editor screen, click New to begin a new
assignment. The Assignment Editor displays four tabs: Choose Name,
Select Questions, Set Policies, and Review & Finish.
2. Proceed to the instructions in Naming Assignments.
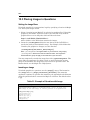
4.3 Naming Assignments
The assignment name is displayed to students on the Class Homepage.
To name your assignment:
1. In the Choose Name tab, enter a name for your assignment in the
Choose A Name For Your Assignment field.
2. Optional. Click the Advanced button. Add assignment-level page headers
and text for the results page in the appropriate fields.
3. Proceed to the instructions in Selecting Questions.
4.4 Selecting Questions
The Select Questions tab of the Assignment Editor allows you to select
questions (individually or as a group) from the question repository, assign
question weighting, scramble the sequence of delivery, and merge individual
questions to form specific question groups.
To select questions from the repository:
1. In the Assignment Editor, click the Select Questions tab.
40 •
2. From the Question Group list, select a source question bank.
3. If required, expand the topic lists and select the questions you want from
the list on the left using the check boxes. Click the Add button after
selecting a question or complete the selection process and click the Add As
Items button. In either case, individual questions are added to your
assignment.
4. Optional. To add a selection of items as a group, select questions using the
check boxes. Click Add As Group to include them as a pool of questions
within your assignment.
5. Optional.
• Change the default question weighting (one point per question) to match
your requirements.
• Select Scramble questions to randomly order the questions when
assignments are created.
• Reorder questions within your assignment by using the drop-down lists.
• Merge individual selected questions to form new question groups in your
assignment.
6. Proceed to the instructions in Setting Policies.
Individual Versus Grouped Questions
Individual Questions If you add selected questions to your assignment as
individual questions, each one is included in every version of the assignment
served to a student, and you control question weighting individually.
Question Groups Adding questions in question groups provides you with
the added option of selecting a group of questions and having the system
select from the questions at random, according to criteria you specify (for
example, choosing three of seven questions from the group each time a new
assignment is created for a student). You set a single point value that is
applied to every question in the group.
4.5 Setting Policies
In the Set Policies tab of the Assignment Editor window, you can:
• Select the type of assignment
• Set feedback options for the assignment
4.5 Setting Policies • 41
• Decide when to make it available to your class
• Establish other grading policies
You can configure the number of questions on a page, create test instruction
sheets and headers, and set policies for restricted access, repeated attempts,
and other options.
Students answer questions one page at a time, and the system records their
responses between pages. Jumping from question to question within an
assignment is allowed until students complete all questions (or choose to
ignore the warnings to do so) and submit their responses for automatic
grading.
42 •
Figure 4-B Assignment Editor, Set Policies Tab
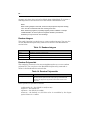
Assignment Types
You can create graded assessments (Homework or Quiz and Proctored
Exam), ungraded practice tests (Anonymous Practice), or assignments
with set criteria (Mastery and Study Session). To take any assignment, the
student must be logged in and registered in the class.
4.5 Setting Policies • 43
To set the assignment type:
1. Select one of the options in the Type of Assignment group box in the Set
Policies tab of the Assignment Editor. Homework or Quiz is the system
default assignment type.
2. For any assignment type, you can click the Advanced button to set
prerequisite conditions.
Homework or Quiz assignments have the following format.
• Students are presented with an assignment consisting of any number of
instructor-selected questions.
• Questions are delivered either in an instructor-specified or random
sequence.
• Student responses during sessions are recorded after every question, so
assignment sessions can be interrupted and continued upon next login.
• By default, Homework or Quiz assignments can be attempted multiple
times for credit. To limit the number of attempts a student can make on a
particular assignment, use Assignment Properties of the Set Policies tab
in the Assignment Editor.
• Results for every attempt at a Homework or Quiz assignment are recorded
in the Gradebook for the class.
Proctored Exams are similar to Homework or Quiz assignments, but with
an additional security measure to confirm the identity of the student taking
the test. All Proctored Exams require a proctor to authorize students
submitting their test for grading. You can require proctor authorization to
validate student identity and grant assignment access at the start of a
proctored exam. Students must be registered in your class. They are required
to provide their student login and password to access assignments in addition
to proctor authorization.
There are two types of proctors: Global and Local.
• Global proctors are defined by the System Administrator and can give
authorization for any class.
• Local proctors are defined by the Instructor and can only give
authorization for a particular class. To set up a local proctor, navigate to
the Class Homepage. From the Actions menu, select User Manager.
From Actions menu, select Register Users. In the User Role row, select
the Proctor radio button. Select, or search for, a user from the list of
registered users and click Register.
Proctors can give authorization directly, at the student's computer, or
remotely through the Proctor Tools menu. In both cases, the proctor must
sign in by giving a login name and password. To give authorization remotely,
44 •
the proctor must login, select the class and from the Actions menu, select
Proctor Tools.
Anonymous Practice assignments are similar to Homework or Quiz
assignments; however, the students results are not recorded. Any number of
questions can be included, and the assignment is delivered in an instructorspecified sequence (or scrambled). Graded assignment reports are produced
upon conclusion of the assignment, but results are not recorded in the
Gradebook. Students can view their results at the end of the session; no
permanent record is maintained. Results can be printed, but are only
available for as long as a student displays them.
Study Session assignments usually draw from a large pool of assignment
material (often algorithmically generated to produce limitless question
permutations). The instructor chooses the questions to include, but these
assignments are delivered one-question-at-a-time, and the student submits
each question for grading individually and immediately, instead of having the
entire test graded at the end.
For Study Sessions, students control the study process by practicing question
after question. You can provide hints and full solutions for questions to
students while they work. Results are displayed one question at a time and
are not recorded in the Gradebook.
Mastery assignments are similar to study session assignments, except the
results are recorded in the Gradebook. These assignments usually draw from
a large pool of assignment material (often algorithmically generated to
produce limitless question permutations). The instructor chooses the
questions to include and sets criteria for mastery. These assignments are
delivered one-question-at-a-time, and the student submits each question for
grading individually and immediately, instead of having the entire test
graded at the end.
For Mastery assignments, instructors create carefully structured collections of
questions grouped by learning objectives. The default delivery is in sequential
order. You can specify additional criteria for your assignment, by clicking the
Edit mastery policies link.
For a summary of assignment attributes, see the following table.
Table 1: Assignment Attributes
Assignment
Type
Anonymous
Practice
Graded
Recorded in
Gradebook
Hints
Available
Solutions
Available
yes
no
yes
no
4.5 Setting Policies • 45
Table 1: Assignment Attributes
Assignment
Type
Graded
Recorded in
Gradebook
Hints
Available
Solutions
Available
Homework/
Quiz
yes
yes
yes
no
Mastery
yes
yes
yes
no
Proctored
Exams
yes
yes
yes
no
no
yes
yes
Study Session yes
Feedback
You can specify which feedback elements are displayed to students when they
grade an assignment. The default system behavior is to show the final
assignment grade as well as question feedback, but you can switch either of
these elements on or off, control access to hints during assignment sessions
(before grading), or allow students to check grades while taking an
assignment.
Figure 4-C Feedback
Hints
You can allow access to question hints (if they exist) in any assignment type.
Hints will appear as hyperlinks below the question answer region and the
student can click on the link to display the hint, if they want.
• To display hints during an assignment, select the Show hints check box.
Feedback
You can show feedback during the assignment or after it is graded, for
example, displaying the grade, correct answer, or comment for each question.
In the drop-down lists of the Feedback group box, select from Always, If
correct, If incorrect, or Never condition options for displaying the correct
46 •
answer and question comment. You can also restrict feedback until a certain
date.
• To allow students to display a grade for each question while they are
taking the assignment, select the Allow students to check grades and
feedback check box.
• To display the final grade after the assignment is graded, select the Show
the final grade check box. You can customize the message students receive
by clicking the Edit grading message link and modifying the default
messages.
• To restrict the feedback to a certain date, select the Restrict feedback
until check box and enter in the date. This is very useful if you give
students a certain amount of time to do a homework assignment and you
don't want to the students who finish early from giving answers to other
students.
Hints and Question Feedback (contained in the Comment field of a question)
are not always present in the source question bank content. You can add hints
or comments by using the Question Editor and editing these fields for
individual questions. If you choose to display hints and comments and your
source questions lack them, the system simply ignores the display settings.
Sending Email
Maple T.A. can send you an email whenever a student completes an
assignment in Homework and Proctored mode. The email will contain the
name of the class, assignment, student and their grade. To receive email
notification, select the Send email reports to check box and enter your email
address.
Note: To use this feature, your system administrator must have an SMTP server
configured.
Assignment Properties
In the Assignment Properties section, you can set the following information.
• Passing score
• Time limit
• Number of questions on a page
• Maximum number of times an assignment may be taken
• Scheduling
• Visibility
4.5 Setting Policies • 47
Figure 4-D Assignment Properties
Setting a Passing Score
You can set a passing score for the assignment. If you set a score, the system
assesses each attempt as either Pass or Fail, and records this information in
the Gradebook automatically. The field shows the total available score for the
assignment (for example, out of 10), which varies according to the composition
of your assignment.
You can customize the message students receive by clicking the Edit feedback
messages link and modifying the default messages. You can use the dropdown menu to specify when to display the feedback: Always, Never, or If the
final grade is shown.
Setting a Time Limit
You can set a time limit for Homework or Proctored assignment types. If you
set a limit, the program shows the student the time remaining during the
course of the test. If the time limit expires during the test, the system informs
the student, and does not allow the student to enter responses to any more
questions.
Note: The timer does not stop until the student runs out of time or clicks Grade.
The timer will continue to run even if the student clicks Quit and Save.
Setting the Number of Questions per Page
By default, the program displays one question per page when presenting an
assignment to students. You can use this option to deliver more than one
question per page. If you have used question annotations and set the
annotations to display at the top or the bottom of the page in which the
48 •
question is loaded, your annotations appear as a page-level header or footer
(rather than immediately before or after the question).
Note: Mastery and Study Session assignments automatically serve one question
at a time. This is part of their instructional design and this setting cannot be
changed for these assignment types.
Tip: If you are concerned about a student's ability to assess complicated
questions over a slower online connection, it is recommended that you accept the
default setting of one question per page. Loading one question at a time usually
allows a student to move through the assignment effectively, but also saves each
question response as it is completed.
Setting the Maximum Number of Attempts
You can set the maximum number of times a student can take an assignment.
If the student attempts more than the maximum amount, a message is
displayed indicating the restriction. In this case, the student can click the
Exception button displayed in the restriction message screen. A proctor or the
instructor can then provide authorization.
Scheduling
Using the calendar function under Scheduling, you can set Start and End
times for each assignment. These times govern the availability of the
assignment to students in your class. Scheduled times refer to your server
clock and system's time zone set by your system administrator.
Figure 4-E Scheduling
Before and after the indicated availability window, the assignment is still
displayed in the list viewable by students on your Class Home Page, but it
cannot be selected. Note that unavailable assignments will continue to be
listed on the Assignment Editor Main Menu page. Additionally, unavailable
assignments will appear in the student's past results page, if the student
completed them.
Visibility
Check the Visible check box to include the assignment in the list of
assignments displayed to students on your Class Home Page.
Alternatively, you can select the assignments to display to students by doing
the following.
4.5 Setting Policies • 49
In the Assignment Editor main menu, click the show option available on
mouse rollover of the assignment name. Note that if the assignment is already
visible for students, the rollover menu will include hide instead of show.
Figure 4-F Setting Visibility of Assignments
Advanced Policies
Setting Assignment Requirements: Limiting Student Access to
Assignments
You can restrict access to an assignment so that only students meeting certain
criteria can take the assignment. You can also create assignment
requirements that refer to the current assignment, even if you are working
with a new assignment that has not yet been saved. The assignment on which
you are working is now listed along with all other available assignments in
the Criterion specification box. This is useful when you want to ensure
minimum competencies in prerequisite topics. For example, you can limit
access to students who have already passed an earlier assignment.
To restrict assignment access:
1. From the Assignment Editor screen in the Set Policies tab, click
Advanced. The Set Policies - Advanced screen with a Requirements field
is displayed.
2. To set criteria, click Design. A Criterion 1 rule based field opens. The
program adds input fields for the first criterion, as shown:
Figure 4-G Restricting Student Access
50 •
The program automatically propagates the settings in the Criterion panel to
the Requirements panel, and updates the criteria in this field as soon as you
select a different option from the list. You do not need to take any action to
add the criterion to the text area.
Note: You can also enter the criterion directly in the Requirements field, but using
the Designer is recommended.
Criterion Options
• The first drop-down list gives a choice between has and has not.
• The drop-down list in the middle lists a range of states and actions, as
shown.
• The drop-down list on the right lists all of the assignments for the class,
including the assignments whose restrictions you are defining.
• Adding an OR Criterion: Click the Add alternative criterion button
immediately below the list of assignments. The program adds the list
fields for another criterion.
• Adding an AND Criterion: Click the Add additional criterion button at the
bottom right of the form, below the frame that encloses the criterion fields.
The program adds another criterion group, in a separate frame.
• Deleting a Criterion: To delete an OR criterion, click the Remove criterion
button inside the frame for that criterion group. The program deletes the
last criterion from the group. You may have to change the settings for the
remaining criteria in the group to set the requirements that you want. To
delete an AND criterion group, click the Remove criterion button at the
bottom of the form, below the last criterion group. The program deletes
the last group. You may have to change the settings for the remaining
groups to set the requirements that you want.
• Save Changes to Criterion: To close the Set Polices - Advanced page and
save changes made to the criteria, click the Set Policies tab.
4.6 Reviewing and Saving Assignments
In the Review & Finish tab of the Assignment Editor, you can review
assignment summary information, including:
• "Assignment Type
• "Questions Selected
• "Scheduled Availability
• "Rules and policies you established
4.7 Special Cases • 51
To change settings in your assignment:
1. In the Review & Finish tab, click the highlighted link in the category to be
changed.
2. A prompt appears asking whether to return to the tab where the option is
set. Click OK. The appropriate Assignment Editor tab opens.
3. Make changes and return to the Review & Finish tab.
Finishing an Assignment
To accept and publish the assignment you have created or modified:
• Click Finish in the Review & Finish tab. You are returned to the
Assignment Editor list of assignments for your class, where your new
assignment is displayed in the list of all class assignments.
Assignment Status
Consider the following information regarding your assignment status.
• If you have scheduled the assignment for immediate availability, your
new assignment is available for students in the Class Homepage.
• The system does not save partially completed assignments until you click
Finish in the Review & Finish tab of the Assignment Editor. If you begin
to create an assignment and then abandon it without clicking Finish, your
additions and changes are lost. If you need to leave the Assignment Editor
without finishing the assignment, it is recommended that you mark the
assignment as hidden so that students cannot access it. Hide assignments
from student view in the Class Homepage by hovering the mouse over the
assignment name in the class assignment list, and then clicking hide.
• If the server shuts down before you click the Finish button, your editing
changes will be lost. When the server restarts, it uses the last saved
version of your assignment data. To reduce the risk of this during long
assignment editing sessions, it is recommended that you periodically click
the Finish button, then select your assignment from the main
Assignment Editor list of assignments to start a new editing session.
4.7 Special Cases
Deleting Assignments
You can select and delete assignments in the main Assignment Editor
window. If there are grades associated with an assignment, and you rename
52 •
or delete the assignment, a copy is made. Also, results continue to be available
through individual student records.
Shared Assignments: Saving Your Changes
Inheritance has changed slightly so that now you only inherit the content
(groupings of questions and their weightings). When you edit an inherited
assignment, only the options in the policy tab can be changed. Assignments
can still be copied to make a local assignment that can then be fully edited.
5 Gradebook
5.1 Overview
Maple T.A. automatically stores assignment session scores in the
Gradebook. The Gradebook stores information for each student, such as the
assignment start time, the time spent on the assignment, and the individual
assignment question performance.
The Gradebook allows you to:
• View, analyze, and report scores and statistics for students, assignments,
and question items
• Review and edit student results
• Create reports organized by student, assignment, or by question
• Export grades to comma-delimited, Microsoft® Excel, or XML files
To access the Gradebook:
• From the Class Homepage, click Gradebook and select Open.
5.2 Gradebook Views
The Gradebook provides three views of assignment data: by student, by
assignment, and by assignment item or question.
• To view the grades for an assignment, select an assignment in the search
panel and select Submit. The results are displayed below the Search and
View panels.
53
54 •
• To view summary statistics for each assignment, click the link to a
particular assignment in the student results table. From this view, you
can see summary statistics for each question on an assignment.
Figure 5-A Gradebook
Generating Reports
You can change assignment weighting, grades, or add comments from within
a generated report of an assignment or test.
To generate a report in the Gradebook:
1. In the Search Panel, select the assignment(s) to include in the report.
• To include more than one assignment, press the CTRL key and click the
assignments.
• To include all assignments, select All.
2. Specify the search criteria from the following options:
• Assignment Type - To specify a single type of assignment from Proctored,
Homework/Quiz, Mastery, and External.
• Show Results - To display results, for example, best or most recent.
• Completed/In Progress - To display only Completed, In Progress, or To Be
Reviewed assignments.
• Date Range - To specify date range. Assignments completed within that
date range will be included in the report.
3. In the View Panel, select the data to include in the report from the
following options:
5.3 Student Statistics • 55
• Assignment - To display the date and time the assignment was started
and finished, the time required to complete, and the number of attempts.
• Student - To display student information, such as first and last name,
middle initial, login and password, email address, and student ID.
• Grade Style - To indicate presentation style for the grade.
• View Results for - To display statistics for student, proctors, or instructors
(multiple items can be selected simultaneously).
• List - To display all users, or only users with grades.
• Summary Data - To display the weightings information, number of
attempts and average number of attempts, total number of points, and
average score.
4. Click Submit to generate the report.
5.3 Student Statistics
Figure 5-B Student Statistics
From the generated report, you can view a student record report, change the
weighting for assignments, and change grades.
To view a student record report, click on the first or last name of a student in
your generated report. The student record report contains the following
details about the student: login, email, student ID, number of completed
assignments, and number of active assignments. The student’s best and
average scores are displayed for each assignment, as well as the number of
attempts. The overall class best score, average score, and number of attempts
56 •
are displayed for comparison purposes, as well as the total points for the
assignment.
Additional information about each assignment session is displayed: start and
end time and date, and duration.
Assignment Weighting
To set weightings for each assignment, generate a report with the Weightings
option selected, and then click the Weighting link in the report. You can set
weighting for each assignment with respect to the cumulative grade for the
class. Enter the weighting for each assignment, with the total for all
assignments equal to 100%. You can Lock individual assignments to prevent
their weighting from being adjusted.
Additionally, you can change the total points of the assignment. If, for
example, one question was clearly too difficult in comparison to the rest of the
assignment, you can override the total points, making the assignment out of 9
instead of 10 points.
The Zero button sets all weightings to 0% and the Reset button resets the
weightings to the original settings.
Changing Grades
From a generated report, you can change a student’s grade. You may change a
student’s grade for several reasons:
• The system does not automatically grade essay questions, so you must
enter a grade for any essay questions included in your assignment.
• You might choose to raise a student’s grade based on effort, improvement,
or other subjective measures.
• You might choose to apply a curve, based on the performance of the entire
class.
5.3 Student Statistics • 57
Figure 5-C Student Record
To change a student grade:
1. In the resulting report, click the student name. The student record opens
as shown in Figure 5-C.
2. Beside each assignment is a link called Details. Click this link to display
the assignment results.
3. Edit the grade in the New Grade field.
4. Optional. Add comments in the Comment on Grade box. These comments
are strictly for your records; they are not visible to the student.
5. Optional. Add comments in the Instructors Comment box. Students see
these comments when they review their performance on the test. You can
add personalized comments to help individual students understand their
scores and master the material.
6. Click Update at the top of the page.
7. Click Submit to regenerate the statistical information.
58 •
5.4 Assignment Statistics
From the generated report, you can view details about the assignments.
To view assignment details, click on one of the assignment links at the top of
the student report table.
Figure 5-D Assignment Link
The following details are displayed: original and current total points, date last
modified, class average, number of attempts, average number of attempts,
and number of active assignments. Details about the assignment setup are
displayed as well. A histogram of the assignment statistics is provided.
The student report table now displays the students’ performance on each
question in the assignment. Click on a question
in the
table to display the details of the question.
Figure 5-E Assignment Statistics
5.5 Item Statistics • 59
5.5 Item Statistics
The system collects statistical data on the questions used in your
assignments. It can automatically produce various statistical analyses based
on item usage and student performance.
View item statistics by clicking on the Item Statistics link below the View
Panel. Statistical information for each question includes the success rate, pValue, d-Value, number of times the question was answered, the number of
times the question was answered correctly and incorrectly, and if any partial
marks were given.
Additionally, for non-permuting, non-algorithmic multiple choice questions a
chart is automatically displayed with the frequency each choice was selected.
Figure 5-F Item Statistics
5.6 Add External Assignment
The Gradebook gives you the ability to add the marks of an assignment that is
not in the system. To add the marks of an external assignment:
• From the Class Homepage, click Gradebook and select Add External
Assign.
• Enter the assignment name, total points, and a passing score in the
appropriate fields.
60 •
• Enter a score for each student and, optionally, a comment.
• Click Save to finish, or Save & Add Another, to add another external
assignment.
External assignments are displayed in the gradebook with other assignments.
6 Content Creation in the
Question Editor
6.1 Question Types
There are many different question types that you can choose. The following
table lists the most used question types and gives a brief description.
Blanks – Blank questions are a type of free-response question. They present
the student with a question and response object in which to enter their
response. The response object can either be a text region or a drop-down menu
of choices. The blank question does not provide as many features as the list
question.
Clickable imagemap - A clickable image question presents an image with a
number of hot spots. Students are required to identify the correct image
element by clicking the appropriate hot spot.
Essay – An essay question provides a text region for the student to enter their
response. It is not automatically graded by the system. Student responses are
sent to you, the instructor, who scores them traditionally, and assigns a grade
in the system Gradebook. No answer or feedback is available to the student.
Formula – The formula question allows instructors to compare student results
to a specified answer. It has several variants that can be accessed as a dropdown menu in the formula question creation screen.
Formula mod C – accept answers within an additive constant
Formula with physical units – requires units as well as a numeric value
List (ordered or unordered) – accept answers as lists of values
Restricted – the correct answer only uses basic operations
Equation – the correct answer contains an equal sign
Chemistry – the correct answer must match the given formula
61
62 •
Question Designer – The Question Designer is a powerful and flexible
question container that can hold multiple response areas, i.e., answer regions
supporting various question types including formula, Maple-graded, numeric,
multiple-choice, multiple-selection, essay, and list types – all in a single
question. Note: The Question Designer supersedes the Inline question type.
Key words – Key word or key phrase questions search the student's response
for specified key words or phrases but ignore other text. This question type is
not supported by the Question Editor.
List – List questions are a type of free-response question. They present the
student with a question and response object in which to enter their response.
The response object can either be a text region or a drop-down menu of
choices. With list questions, you have the ability to give partial credit to
certain answers.
Maple-graded – The Maple-graded question type uses the Maple™ computer
algebra system to generate algorithmic variables in questions, generate plots,
and evaluate student responses. The Maple-graded question type gives you
access to the computational power of Maple. You have access to many
different kinds of mathematical objects, not just simple expressions. The
Maple-graded question type allows for questions with complicated answers,
questions with different possible answers, and questions requiring a powerful
answer-equivalence checker. You can even find common errors and assign
partial grades.
Matching – Matching questions display two lists. A student must match each
element of the first list with an element in the second list. Matching question
types allow only 1 to 1 matches in the correct answer. Matches of 1 element to
many are not available in the system.
Multipart – A multipart question can contain a variety of related question
materials, data, even case scenarios for different types of assessment and
learning. Although the multipart mode is a question type, its component
question parts can be of any question type, including multipart. This allows
nested multipart questions. You must create the question parts in a separate
topic and then create the multipart question that combines all the parts.
Multiple-choice – Multiple-choice questions in the system can have any
number of choices, but there is only one correct answer. You can add incorrect
choices after questions are initially created. You can deliver the question with
the choices permuting or remaining static.
Multiple-selection – Multiple-selection questions are similar to multiplechoice questions. The key difference is that they can contain more than one
correct answer. You can deliver the question with the choices permuting or
6.2 Enhancing questions • 63
remaining static. The grading for a multiple-selection question is as follows,
with the exception that if the numerator is less than 0, it is set to 0.
# selected correct answers – # selected incorrect answers
Total # of correct answers
Numeric – The numeric question type compares a student’s response to a
given number, with or without units. You have the ability to set a tolerance in
the answer that you will accept, from a certain number of significant digits to
a percentage.
Palette – Palette questions enable you to use an Equation Editor to create
your own customized palette for student response entries.
True or false – True-or-false questions are treated as a class of multiple-choice
question featuring only two choices.
In Example Questions on page 21 we explored the Question Designer as a
container for authoring multiple-choice, Maple-graded, list, and numeric type
questions. Examples of formula questions, essay questions, and other question
types can be found in Maple T.A.’s built-in help system. In Chapter 8 we take
a closer look at the Maple-graded question type.
6.2 Enhancing questions
You can enhance your questions by including feedback (or comments that a
student will see when they finish their assignment), information fields, hints,
and even a fully-worked solution.
Feedback
To return custom feedback when a student enters an incorrect response, each
question type supports a feedback field. The comment in this field is displayed
after grading. In the comment field, you can include additional explanations
about solution method or final answer. When editing a question in the
Question Editor, you can add or edit the comment.
To add or edit a comment:
1. On the New Question window, click the Add or Edit button in the
Feedback area.
2. Enter or edit the comment in the text box. Comments can include HTMLformatted text, JavaScript™, and variables.
64 •
3. Click OK.
4. To add your changes to the cached question bank, proceed to the Question
Display screen, and then click Finish.
Information Fields
The info field allows you to add information subfields to a question to indicate
subtopic, learning objective, level of difficulty, authorship, ownership, or other
information. The information fields are defined as name/value pairs and can
be used for sorting and filtering during assignment creation. When editing a
question in the Question Editor, you can add or edit information fields.
To add or edit information fields:
1. On the New Question window, click the Add or Edit button in the
Information Fields area.
2. Enter or edit field names and corresponding values in the Field and Value
text boxes.
3. Each question can contain any number of information fields. To add rows,
click the More button.
4. Click OK.
5. To add your changes to the cached question bank, proceed to the Question
Display screen, and then click Finish.
Hints
You can enter hints that can be displayed when taking an assignment. To use
hints, you must enable them in the Set Policies tab of the Assignment Editor.
When editing a question in the Question Editor, you can add or edit hints.
To add or edit a hint:
1. On the New Question window, click the Add or Edit button in the Hints
area.
2. Enter or edit the hint in a text box. Hints can include text, HTMLformatted text, JavaScript™ code, and variables.
3. Each question can contain any number of hints. To add hint boxes, click
the More button.
4. Click OK.
5. To add your changes to the cached question bank, proceed to the Question
Display screen, and then click Finish.
6.3 Including Formatted Math Expressions in Questions • 65
Solution
In the solution field, you can enter a worked solution that is displayed in
Study Session assignments. In these sessions, the student can view the
solution before entering an answer or after submitting the question to be
graded. When editing a question in the Question Editor, you can add or edit
the solution.
To add or edit a solution:
1. On the New Question window, click the Add or Edit button in the
Solution area.
2. Enter or edit the solution in the text box.
3. Click OK.
4. To add your changes to the cached question file, proceed to the Question
Display screen, and then click Finish.
Note: The solution field is only shown in study session assignments. To include a
solution that can be used in other assignment types, you should use the feedback
field.
6.3 Including Formatted Math Expressions in
Questions
Maple T.A. renders the question text as HTML/MathML if the Use HTML:
check box has been selected. This allows you to include formatted math
expressions in questions.
There are three ways to create nicely formatted expressions in Maple T.A.:
1. The built-in mathml function
2. The built-in Equation Editor
3. Maple's MathML[ExportPresentation] function
Using the mathml Function
Maple T.A. contains a built-in mathml function. This is an algorithmic
function that accepts a string and, treating it as calculator-style syntax,
transforms it into MathML.
For example, suppose we define an algorithmic variable $y as follows:
$y = mathml(“x^n”)
66 •
n
Then $y will be rendered as x wherever it is referenced in the question
statement, comment, and hints.
This function is designed for small expressions and is limited in scope. For full
MathML functionality, it is recommended that you use either the Equation
Editor or Maple's MathML[ExportPresentation] function.
Using the Math Editor
Maple T.A. provides a graphical equation editor for use with all question types
except fill in the blank. This editor is the same editor that is included with
Maple and is used to translate the graphical form of your expression to
MathML code.
To use the equation editor:
1. Add a question.
2. Click Next.
3. Enter the text of your question. When you get to the place where you
would like to add a formatted expression, click the Sigma
brings you to the Equation Editor screen.
Σ button. This
Figure 6-A The Equation Editor applet is used to create a nicely formatted
expression.
4. Create your expression. Use keyboard shortcuts or right-click in the
region to get a palette from which you can choose.
5. When you are finished creating your expression, click OK. The expression
appears in the question text window.
6. Finish creating your question as you would normally.
Note: You can include algorithmic variables in your math expressions. If the
variable name is alphabetic only, you can enter $var in the Math Editor and it will
maintain the variable name as one unit. If the variable name is alphanumeric, you
6.4 Including Images in Questions • 67
will have to use an alphabetic name in the editor and then replace it with the
correct variable name in the question text area.
Using Maple's MathML[ExportPresentation] Function
Maple's MathML[ExportPresentation] function can take any expression in
Maple and convert it to presentation MathML for display purposes.
To use Maple’s MathML[ExportPresentation] command:
1. Create an algorithmic variable for the expression that you want to use.
2. Create a second algorithmic variable for the MathML version of that
expression using Maple's MathML[ExportPresentation]. This variable
will be used for presentation purposes only.
For example, suppose we define an algorithmic variable $z as follows:
$z = maple("MathML[ExportPresentation](x^2-3*x+2)")
2
Then $z will be rendered as x – 3x + 2 wherever it is referenced in the question
statement, comment, and hints.
6.4 Including Images in Questions
You can include a number of different types of images in your questions: static
images, Maple plots or animations, and images with algorithmic variables
overlaid.
Static Images
You can include static images in all question types. They can be included in
the question text itself, the comments, the hints, or the solution.
To include a static image in a Maple T.A. question, there are two steps.
Step 1: Upload the image to the class web site.
1. Log in as an instructor and click on the class in which you want to use the
image.
2. Click on Content Manager, then Web Site Editor.
3. Create a subfolder where you can place the image. It is possible to upload
your image at this point, but for maintainability, it is recommended that
you create a subfolder and place your images in it.
68 •
a) Click "new subfolder …".
b) Enter a name for your subfolder in the text region and click OK. You
are returned to the Web Site Editor page with your subfolder
expanded.
4. Click "upload file(s) to this point …".
5. Click Browse… to locate the file on your computer.
6. Select the radio button beside Single File – Save As: to use the same
name that the image has on your computer or enter a name for the file in
the text region. The name must be alphanumeric and can contain "_", "-",
or a single period. It cannot start or end with a period and it cannot
contain a space.
7. Click OK.
If you click on the image in the class Web Site Editor, you will be shown the
URL for that image. You can click on that link to see the image.
Step 2: Include an html reference to the image in your question or solution.
1. Create or edit a question in the Question Editor.
2. In the field where you want to include the image (question text, feedback,
hints, or solution), click the Insert/Edit Image
button.
3. Under the Image Info tab, click Browse Server and select the image you
uploaded in Step 1. You will be shown a preview of the image.
4. Click OK and the image will be added.
Note: The Browse Server screen (#3 above) also allows you to upload an image
to the server, in case you had not previously uploaded the image through the Web
Site Editor.
Maple Plots
There are two ways to include a Maple-generated plot in Maple T.A.: the
drawMaplePlot script and the plotmaple command. The plotmaple command
was added in Maple T.A. 2.5 and is now the recommended way to include
Maple plots in questions. The drawMaplePlot script is still available, but does
not provide the same functionality as the plotmaple command.
plotmaple command
The plotmaple command was introduced in Maple T.A. 2.5. With it, you create
algorithmic variables that contain your plots. You can then reference these
algorithmic variables in your questions, feedback, hints, or solutions.
Some of the benefits of using the plotmaple command are as follows:
1. You can specify in the command whether you want the image to be saved
as a GIF or JPEG. This is important if you want to display most of your
6.4 Including Images in Questions • 69
images as JPEGs, so you set the default image type to be JPEG, but
occasionally want to add an animation to a question and, thus, require a
GIF image for one question. Maple animations can only be displayed as
animated GIFs.
2. You can define the height and width of the image without losing any
quality in the image.
3. You can see the plot immediately in the algorithm editor. There is no need
to finish the question before being able to tell if you used the correct plot
command or if you need to change it slightly to improve the presentation.
The format of the plotmaple command in the algorithm editor is as follows:
$myplot=plotmaple("plot(sin(x), x=-Pi..Pi), plotdevice='gif',
plotoptions='height=250, width=250'");
$myanimation=plotmaple("plots[animate](sin(a*x),x=-Pi..Pi,a=1..4),
plotdevice='gif',plotoptions='height=200, width=200'");
Figure 6-B Using the plotmaple command, you can include algorithmic variables
in your plot statement. You will see a preview of the image in the algorithm editor.
Here, the algorithm editor text region and the corresponding image are shown.
70 •
7 Algorithmic Variables
You can use algorithmic variables to randomize your questions in Maple T.A.
These algorithmic variables can use the built-in algorithmic generator or can
use any of Maple’s randomization routines.
7.1 Creating Algorithmic Variables in Maple
T.A.
To create an algorithmic variable in Maple T.A., use the algorithm designer in
the Question Editor. Algorithmic variables can be used in any question type
and can be used in the question text, the answer region, as well as in the hints
and feedback sections. Algorithmic variables are denoted by a dollar sign, for
example, $var.
To create an algorithmic variable:
1. Upload an existing question or create a new one.
2. Click Questions, then New Question.
3. Choose the question type from the drop-down menu.
4. In the Algorithm field, click Add.
5. If you know the format of the command, you can type it in the text box and
proceed to Step 7. Otherwise, click Show Designer to load the algorithm
designer tool.
6. Type the required information in the algorithm designer template. Note
that you do not need to use the $ to denote variables in the template. Click
OK to add the command to the algorithm text box and display a possible
value for the variable.
71
72 •
7. Click Refresh to have Maple T.A. generate another possible value for the
variables.
8. Click Save to return to the main page for the question.
You can now continue creating your question and can use the variables that
you created.
Algorithm Design Tool
Figure 7-A You can use the algorithm designer to create simple random integers,
set conditions on the variables, or enter a Maple command that will generate a
random object.
7.2 Maple T.A.’s Built-in Functions and
Constants
Maple T.A. contains several functions for creating algorithmic variables. You
can create random integers or real numbers, perform operations on lists of
items, or set conditions on variables.
It is important to note that the algorithm generator in Maple T.A. works
linearly. This means you must be careful to define variables before referencing
them in other variable definitions.
Table 2: Numbers and Constants
e
2.71818...
7.2 Maple T.A.’s Built-in Functions and Constants • 73
Table 2: Numbers and Constants
pi ( π )
3.14159...
2.9E8
Scientific Notation:
290,000,000
Table 3: Arithmetic Operators
Operation
Description
+
Addition
–
Subtraction
*
Multiplication
/
Division
^
Exponential
Table 4: Assorted Math Functions
Function
Return Value
Example
Output
abs(x)
Absolute value of x
abs (-2)
2
sqrt(x)
Square root of x
sqrt(9)
3
ln(x)
Natural (base e) logarithm of x
ln(1)
0
log(x)
Common (base 10) logarithm of x
log(10)
1
exp(x)
Base e exponential function of x
exp(1)
2.71818...
fact(n)
Factorial n
fact(4)
24
gcd(a, b)
Greatest common divisor of a and b
gcd(4, 6)
2
frac(a, b)
A string that expresses the fraction a / b in its lowest terms.
This function can be combined with function mathml to
produce nicely typeset fractions.
frac(4, 6)
“2/3”
Random numbers can be generated with the following functions:
Table 5: Random Number Generators
Command
Output
Example
Output
rint(n)
A random integer among 0, 1, ..., n-1
rint(3)
0, 1, or 2
rint (m, n)
A random integer among
m, m+1, ..., n-1
rint(3, 6)
3, 4, or 5
74 •
Table 5: Random Number Generators
Command
Output
Example
Output
rint(m, n, k)
A random integer among
m, m+k, ..., m+q·k where q is the
largest integer such that
m+q·k £ n–k
rint(3, 12, 3)
3, 6, or 9
range(3)
1, 2, or 3
Note that
rint(n) = rint(0,n)
= rint(0,n,1)
range(n)
A random integer among 1, 2, ..., n
range(m, n)
A random integer among m, m+1, ..., n range(3, 6)
3, 4, 5, or 6
range(m, n, k)
A random integer among
m, m+k, ..., m+q·k where q is the
largest integer such that
m+q*k £ n
3, 6, 9, or 12
range(3, 12, 3)
Note that
range(n) = range(1,n)
= range(1,n,1)
rand(m, n)
A random real number between m and rand(0.5, 9.5)
n (inclusive)
A real number between
0.5 and 9.5 (inclusive)
rand(m, n, k)
A random real number between m and rand(0.5, 9.5, 3)
n (inclusive), expressed to k significant
digits.
A real number between
0.5 and 9.5 (inclusive),
expressed to 3
significant digits.
Note that in this definition, k represents
the number of significant figures, not
the step size (as it indicates in defining
range and rint).
You can place conditions on your variables. For example, you can specify that
two variables are not to be equal, or define a value for a specific variable based
on the values of other variables.
Table 6: Conditions
Command
Effect
condition:x
Imposes the condition defined by statement x, which is typically constructed using one
or more of the functions below.
if(a,b,c)
If statement a is nonzero, returns b. Otherwise, returns c. Typically, a is constructed
using one or more of the functions below.
Function
Return Value
eq(a,b)
1.0 if a is equal to b; 0.0 otherwise
ne(a,b)
1.0 if a is not equal to b; 0.0 otherwise
gt(a,b)
1.0 if a is greater than b; 0.0 otherwise
lt(a,b)
1.0 if a is less than b; 0.0 otherwise
not(a)
1.0 if a is equal to 0.0; 0.0 otherwise
Example
7.2 Maple T.A.’s Built-in Functions and Constants • 75
The following code generates a non-zero integer variable $a between -10 and
10 (inclusive), and a string variable $b that reads either positive or negative,
depending on the sign of $a.
$a = range(-10, 10);
condition: ne($a, 0);
$b = if( gt($a, 0), “positive”, “negative” );
Numbers can be manipulated and/or displayed in a specific format with the
following functions.
Table 7: Number Formatting Functions
Function
Return Value
Example
Output
int(x)
The integer part of x
int(20.8571)
20
decimal(n, x)
x as a floating-point number, rounded to n
decimal places.
decimal(3, 20.8571)
20.857
sig(3, 20.8571)
20.9
lsu(3, 20.8571)
0.1
numfmt("#.00", 20.9)
20.90
Trailing zeros are truncated and not
displayed. However, see numfmt function
below.
sig(n, x)
x expressed as a floating-point number
rounded to n significant digits.
In cases of possible ambiguity, scientific
notation is used to display the value.
lsu(n, x)
The unit in the nth significant place of x
This operation is designed to be used when
setting the tolerance for correct answers. For
example, to accept an answer to within a
tolerance of one unit in the third significant
digit, use:
$ans = <formula>;
$tol = lsu(3, $ans);
and set the answer field to:
$ans ? $tol
numfmt(fmt, x) x formatted according to the template fmt
There are several functions in Maple T.A. that operate on lists. These allow
you to choose an item out of a list based on a property or a value. They are
very useful if you want to create a question with the same stem or base
information, but have answers with different properties.
Table 8: List Operations
Function
Return Value
Example
Output
min(a, b, c, d,…)
the smallest element from a list
min(2, -1, 3, 5, 4)
-1
76 •
Table 8: List Operations
Function
Return Value
Example
Output
max(a, b, c, d,…)
the largest element from a list
max(2, -1, 3, 5, 4)
5
switch(n, a, b, …)
the nth item from a list (where
position numbering in the list
starts at 0)
switch(1,"red","green","yellow”)
green
switch(rint(n), a, b, …)
the nth item from a list (where n
is a random integer from the
given list)
switch(rint(5), 2, 3, 5, 7, 11)
either 2, 3, 5,
7, or 11
indexof(k, a, b, ..)
the index of item k within a list
(where position numbering starts
at 0)
indexof(3, 2, 3, 5, 7, 11)
1
If k is not present in the list, the
returned value is -1.
rank(n, a, b, c, …)
the nth smallest item from a list
rank(1, 9, 6, 11)
(where position numbering starts
at 1)
6
Table 9: Trigonometric and Hyperbolic Functions
sin(x), cos(x), tan(x), arcsin(x), arccos(x), arctan(x), sec(x), csc(x), cot(x)
sinh(x), cosh(x), tanh(x), sech(x), csch(x), coth(x), arcsinh(x), arccosh(x), arctanh(x),arcsech(x), arccsch(x),
arccoth(x)
Table 10: Statistical Functions
Function
Return Value
Example
Output
binomial(n, r)
the rth binomial coefficient of degree n, that is,
the number of ways of choosing r objects from
a set of n, ignoring order
binomial(6, 2)
15
erf(z)
the cumulative probability for a standard normal erf(0)
distribution (that is, with mean 0 and variance
1)
0.5
inverf(p)
the inverse function of erf(z)
0
studentst(k, x)
the cumulative probability distribution at x of the studentst(2, 1.55)
Students-t distribution with k degrees of
freedom
0.869362
invstudentst(k, x)
the inverse function of invstudentst(k, x)
1.55
inverf(0.5)
invstudentst(2, 1.55)
Table 11: More Functions
Function
Return Value
sum(var_name, start, stop, expr)
Sums the expression (expr) with respect to the dummy variable (var_name)
between the values start and stop.
7.3 Examples of Randomization Functions in Maple T.A. • 77
Table 11: More Functions
Function
Return Value
strcat(a, b, c, d, ...)
The concatenation of the strings in the list
mathml(f)
A string consisting of the formula f typeset in MathML
Note: The system renders MathML; the MathML tags do not appear on the
screen when the value of the string is displayed. See Section x.x[ca5] for more
information on this function.
java(cn, a, b, c, d, ...)
The arguments a, b, c, d, … are passed to a custom Java evaluation engine that
returns the result. The first argument (cn) must be a string giving the fullyqualified name of a Java class that implements the interface
gateway.question.random.AlgorithmicFunction.
This interface has a single public method.
public String eval(String[ ] args);
The arguments a, b, c, d,... are passed to eval() in a string array.
maple(text)
The text is passed to the Maple™ kernel, which returns the value of the last line
processed. See sections 7.4 and 7.5.
Table 12: Examples
Command
Output
sum(i, 1, 20, i^2)
Evaluates 1^2 + 2^2 + 3^2 + ... + 20^2 and returns 2,870
strcat("$a", " and ", "$b")
Returns “cats and dogs”
when $a=”cats” and $b=”dogs”
mathml(“x^n”)
x
n
mathml(frac(4, 6))
2
--3
java("com.mycompany.QuoteFunction",
"SUNW")
A real-time quote for Sun Microsystems, Inc. stock (assuming that
the class QuoteFunction had been suitably programmed)
maple(“diff(x^3,x)”);
3*x^2
7.3 Examples of Randomization Functions in
Maple T.A.
The following examples demonstrate some of the randomization routines that
are available in Maple T.A.
78 •
Basic Arithmetic
In this example we use a multiple choice question and ask the student to add
two numbers. In the algorithm designer, we define two integer variables, $a
and $b, and then define a third variable, $ans, which is the sum of $a and $b.
In the choices to be displayed, we create an inline algorithmic variable that is
the product of $a and $b by using the format ${expression}.
To create the question:
1. In the New Question window, select the Multiple Choice question type
from the Question Type drop-down list.
2. Enter “Addition” as a description in the Question Description field.
3. In the Algorithm section, click Add. The Edit Algorithm window opens.
4. Enter the following code in the text box:
$a=range(2,10);
$b=range(3,15);
condition:not(eq($a,$b));
$ans=$a+$b;
5. Click Save. You return to the New Question window.
6. Click Next. The Question Editor>Add Question window opens.
7. In the Text of the question field, enter the following:
What is $a + $b?
8. In the Choices for the answers section, enter $a, $b, $ans as possible
answers, one for each field.
9. We can also define an algorithmic variable on the question screen. To do
this, enter ${$a*$b} in the fourth choice box.
10.Select the radio button beside $ans to mark this as the correct answer.
11.Select Yes for Change the order of answers. Select No for Allow more
than one selection.
7.3 Examples of Randomization Functions in Maple T.A. • 79
12.Click Finish. The Question Editor>Preview Question window opens,
displaying the question as it appears to the student.
Figure 7-B One of the features of Maple T.A. is the ability to define inline
algorithmic expressions directly in questions by using the format ${expression}.
Calculating Area
In this example, we use a numeric question and ask the student to calculate
the area of a rectangle given two algorithmically-generated values for the
width and length. This example shows that you can combine commands, such
as decimal(x,n) and rand(m,n). We've also added a condition on the variables
$width and $length so that they will not be equal.
To create the question:
1. In the New Question window, select the Numeric question type from the
Question Type drop-down list.
2. Enter “Area” as a description in the Question Description field.
3. In the Algorithm section, click Add. The Edit Algorithm window opens.
4. Enter the following code in the text box:
$width=decimal(1,rand(2.5,6.5));
$length=decimal(1,rand(4.5,10.0));
condition:not(eq($width,$length));
$area=$width*$length;
5. Click Save. You return to the New Question window.
6. Click Next. The Question Editor>Add Question window opens.
7. In the Text of the question field, enter the following:
80 •
Given a rectangle with width of $width meters and length of $length
meters, calculate its area.
8. In the Number text box of The correct answer: area, enter $area.
9. In the Units text box of The correct answer: area, enter m^2.
10.In the Specify precision area, select the radio button beside Require
absolute accuracy.
11.Click Finish. The Question Editor>Preview Question window opens,
displaying the question as it appears to the student.
Color Combinations
This fill-in-the-blanks example illustrates the use of the switch command to
customize the question. Given two lists of information, one of three pairs of
colors and one of the colors when the pairs of colors are mixed, we can define a
random index value and then base the question on one of these three pieces of
matching information.
To create the question:
1. In the New Question window, select the Question Designer question type
from the Question Type drop-down list.
2. Enter “Color” as a description in the Question Description field.
3. In the Algorithm section, click Add. The Edit Algorithm window opens.
4. Enter the following code in the text box:
$index=rint(3);
$choice0="red and blue";
$choice1="red and yellow";
$choice2="blue and yellow";
$mix=switch($index,"$choice0","$choice1","$choice2");
$color=switch($index,"purple","orange","green");
5. Click Save. You return to the New Question window.
6. Click Next. The Question Editor>Add Question window opens.
7. In the Text of the question field, enter the following:
When you mix $mix, you get $color?
8. Position the cursor after the word “get” but before the period and click the
Insert/Edit Response Area button.
9. Choose List question for the question type.
10.Leave the radio button beside Text field selected. Add $color as the first
item and set the Weight to 1.0.
11.Click OK to return to the Question Editor>Add Question window.
7.4 Randomization Routines in Maple • 81
12.Click Finish. The Question Editor>Preview Question window opens,
displaying the question as it appears to the student.
Figure 7-C The Algorithmic Editor shows both the algorithmic commands and a
sample value for the variables.
7.4 Randomization Routines in Maple
In addition to Maple T.A.’s built-in functions, you can access Maple routines
as well from within Maple T.A. In particular, Maple has many randomization
routines that can be used in Maple T.A. This section discusses a subset of the
available functions. The function rand will generate a random integer, while
randpoly will generate a random polynomial with specific properties. The
LinearAlgebra package contains the RandomMatrix and RandomVector
functions. The RandomTools package contains a variety of functions for
creating random Maple objects, from simple random integers or polynomials
to lists of values that follow specific probability distributions. In addition,
since Maple is a programming language, you could write your own customized
program in Maple to generate any type of variable or object that you need.
All random number generators use the same underlying random number
sequence, so when using Maple’s randomization routines, you must include
randomize( ): as the first part of the call. This uses a number based on the
system clock as the initial state instead of the default seed that is used in
Maple. If you don’t include randomize( ), each call will return the same
82 •
sequence of values since each call to Maple from within Maple T.A. starts a
new Maple kernel and that will reset the default randomization seed.
Notes:
When entering multiple commands, ensure that all (except the last) have a trailing
colon. The last command should have a trailing semi-colon.
When referencing negative (or possibly negative) random variables in a maple
variable definition, be sure to place the negative variable in parentheses,
otherwise you may receive an error message.
Random Integers
The rand( ) function is a simple way to create random integers. You can also
use the RandomTools[Generate] command as shown in the RandomTools
section below.
Table 13: Random Integers
Function
Return Value
rand( )
Generates a 12-digit non-negative integer
rand(n)( )
Generates a random integer between 0 and n-1 (inclusive)
rand(a..b)( )
Generates a random integer between a and b (inclusive)
Random Polynomials
The randpoly( ) function is the most straightforward way to create random
polynomials. You can also use the RandomTools[Generate] command as
shown in the RandomTools section below.
Table 14: Random Polynomials
Function
Return Value
randpoly(variables, options)
Generates a random polynomial in terms of variables using the options specified.
The most common options are used to specify the type of coefficients and
exponents, the degree of the polynomial, and the number of terms in the
polynomial.
These options are specified as follows:
coeffs=rand(a..b) – the default is rand(-99..99)
degree=n – the default is 5
expons=n – the default is rand(6)
terms=m – the default is 6, but this value is overridden by the degree
option if there is a conflict
7.4 Randomization Routines in Maple • 83
LinearAlgebra Functions
The two most common random objects that can be created using the
LinearAlgebra package are Matrices and Vectors. You can create both row
and column vectors.
Table 15: LinearAlgebra Functions
Function
Return Value
LinearAlgebra[RandomMatrix]
(m, n, density, generator)
Generates a random m x n matrix using the options specified.
LinearAlgebra[RandomVector][o]
(dimension, density, generator)
Generates a random vector using the options specified. [o]
can be used to specify a row vector instead of a column
vector (which is the default).
Some examples:
$M=maple("randomize(): LinearAlgebra[RandomMatrix](3,3)"); returns a
random 3x3 matrix
$V=maple("randomize(): LinearAlgebra[RandomVector][row](6,
generator=rand(1..5)/10))"); returns a row vector of 6 elements whose entries
are rational numbers with a denominator of 10 and a numerator between 1
and 5. The elements are returned in simplified form.
RandomTools Functions
There are many functions in the RandomTools package, including
subpackages that implement different pseudo-random number generators.
There are several RandomTools[Generate] functions that can be used to
create random objects, a selection of which are included in the table below.
Each of the functions in the table below should follow
RandomTools[Generate], as in RandomTools[Generate](choose({a,b,c,d,e,f}));
Table 16: RandomTools Functions
Function
Return Value
choose(collection)
Select one of the entries in a non-empty collection with equal probability
complex(flav)
A random complex number with real and imaginary parts described by the given
random flavor flav
exprseq(flav,n)
An expression sequence with n entries where each entry is described by the given
random flavor flav
float(opts)
A random floating-point number in a particular range. The options can include a
range (e.g., range=2.532..7.723) and the number of digits (e.g., digits=4).
identical(expr)
Describes the object expr itself
84 •
Table 16: RandomTools Functions
Function
Return Value
integer(opts)
negint(opts)
nonnegint(opts)
nonposint(opts)
nonzeroint(opts)
posint(opts)
A random integer in a particular range. The options can include a range (e.g.,
range=0..10) and a statistical distribution from where the integer is chosen (e.g.,
distribution=poisson[5])
list(flav, n)
A list with n entries where each entry is described by the given random flavor flav
listlist(flav, m, n)
A list of m lists, each with n entries, where each entry is described by the given
random flavor flav. In the case where only m is given, n is assumed equal to m.
rational(opts)
negative(opts)
nonnegative(opts)
nonpositive(opts)
nonzero(opts)
positive(opts)
A random rational number in a particular range. The options can include a range, a
statistical distribution from where the rational number is chosen, or a denominator.
polynom(coeffs, x, opts)
A random polynomial in a given number of variables x with coefficients coeffs of a
given random flavor. The default degree of the polynomial is 5, but you can specify
the degree of the polynomial by using the degree option (e.g., degree=3).
set(flav,n)
A set containing n entries where the entries of the set are described by the given
random flavor flav. The final set can contain fewer than n entries if the same object is
generated more than once.
truefalse(opt)
Describes the values true or false. By default, the values true and false will be
chosen with equal probability, but you can modify this by using the probability option
(e.g., probability=p, where p is a numeric value between 0 and 1 that specifies the
probability that the object will be true).
Some examples:
$a=maple("randomize(): RandomTools[Generate](integer(range=2..9))");
returns a random integer between 2 and 9 (inclusive)
$b= maple("randomize():
RandomTools[Generate](list(rational(denominator=30), 10))"); returns a list of
10 rational numbers whose denominator is 30. They are returned in simplified
form.
$c=maple("randomize():
RandomTools[Generate]([integer(range=3..10),rational(range=3..10,
denominator=13)])"); returns a list of two elements where the first element is
an integer in the range 3 to 10 and the second element is a rational number
between 3 and 10 whose denominator is 13
You can also include other Maple commands in the algorithmic variable
definition. $d=maple("randomize():
seq(RandomTools[Generate](integer(distribution=normald[3.5, 1.5])),
i=1..10)"); creates a 10-item sequence of integers that follow a normal
distribution.
7.5 Examples of Randomization Functions in Maple • 85
7.5 Examples of Randomization Functions in
Maple
The following examples include the Maple T.A. source code required to
generate the question.
Degree of polynomial
This numeric question uses Maple to generate a random polynomial and
Maple's MathML[ExportPresentation] function to generate a nicely formatted
version of it. We then ask the student to determine the degree of the
polynomial.
To create the question:
1. Click Questions, then New Question to create a new question. The New
Question window opens.
2. From the Question Type drop-down menu, select Numeric.
3. In the Question Description field, enter “Degree of polynomial”.
4. In the Algorithm section, click Add. The Edit Algorithm window opens.
5. Enter the following code in the text box:
$a=range(0,2);
$b=range(2,5);
$poly=maple("randomize(): randpoly(x,degree=$b)");
$displaypoly=maple("printf(MathML[ExportPresentation]($poly))");
6. Click Save.You return to the New Question window.
7. Click Next. The Question Editor>Add Question window opens.
8. In the Text of the question field, enter the following:
What is the degree of $displaypoly?
9. In the Number text box of The correct answer: area, enter $b.
10.Leave the Units text box of The correct answer: area blank.
11.In the Specify precision area, select the radio button beside Require
absolute accuracy.
12.Click Finish.
Intersection of Sets
Here we use the RandomTools[Generate](set) function, to generate two
unique sets and ask the student to determine the intersection. This question
is written as a Maple-graded question because we want the student to enter a
set as the answer.
86 •
To create the question:
1. Click Questions, then New Question to create a new question. The New
Question window opens.
2. From the Question Type drop-down menu, select Maple-graded.
3. In the Question Description field, enter “Intersection of sets”.
4. In the Algorithm section, click Add. The Edit Algorithm window opens.
5. Enter the following code in the text box:
$set1=maple("randomize():RandomTools[Generate](set(posint(range=8),5))");
$set2=maple("randomize():RandomTools[Generate](set(posint(range=10),4))");
6. Click Save.You return to the New Question window.
7. Click Next. The Question Editor>Add Question window opens.
8. In the Text of the question field, enter the following:
What is the intersection of $set1 and $set2?
Enclose your answer in braces.
9. Enter Maple code that evaluates to the correct answer:
$set1 intersect $set2
10.Change the Maple code to grade the student response to:
is($RESPONSE=$ANSWER);
11.In the Select the type of expression you want to accept: drop-down list,
choose Maple syntax – e.g., diff(2*f(x),x)
12.Click Finish.
Matrix Determinant
In this example, we use Maple's LinearAlgebra[RandomMatrix] function to
create a square matrix with entries between -9 and 10. Again, we use
MathML[ExportPresentation] to generate a nicely formatted version for
display.
To create the question:
1. Click Questions, then New Question to create a new question. The New
Question window opens.
2. From the Question Type drop-down menu, select Maple-graded.
3. In the Question Description field, enter “Determinant”.
4. In the Algorithm section, click Add. The Edit Algorithm window opens.
5. Enter the following code in the text box:
$n= int(rand(2,4));
7.5 Examples of Randomization Functions in Maple • 87
$matrix=maple("randomize():LinearAlgebra[RandomMatrix]($n,$n,generator=rand(-9..10))");
$m=maple("printf(MathML:-ExportPresentation($matrix))");
6. Click Save. You return to the New Question window.
7. Click Next. The Question Editor>Add Question window opens.
8. In the Text of the question field, enter the following:
Calculate the determinant of the following matrix.
$m .
9. Enter Maple code that evaluates to the correct answer:
LinearAlgebra[Determinant]($matrix);
10.The following Maple code to grade the student response is provided
automatically:
evalb($ANSWER-$RESPONSE=0);
11.In the Select the type of expression you want to accept: drop-down list,
choose:
Formula – e.g., x^2 sin(x^2)
12.Click Finish.
Figure 7-D Two Maple commands are being used; one to create the matrix
construct, and one to generate a nicely formatted version for display.
88 •
8 Maple-graded Questions
Maple T.A. offers numerous question types to ensure you can present and
properly grade your question. The Maple-graded question type connects to the
Maple engine when grading students’ responses. This will give credit for any
response that is mathematically equivalent to the correct answer. For
d
dx
example, if your Maple-graded question is ------ sec ( x ) , the system would accept
tan ( x ) sin ( x )
sec ( x ) tan ( x ) , ---------------- , ------------------- , or anything equivalent as correct. If your question
cos ( x ) cos 2 ( x )
asked for a set, the system would accept any response that contained the
correct elements, regardless of the order in which the student gave them. You
can write questions that ask for differential equations, unevaluated integrals,
and so on. You can write questions that have more than one answer or
infinitely many answers.
This document will guide you through the creation of some example Maplegraded questions. The examples reflect only a small sampling of the
possibilities.
8.1 A Basic Maple-graded Question
In this first example, we build a question that asks for the derivative of sec ( x )
and uses Maple to grade the response.
1. Log in as an instructor and go to the Question Editor.
2. Click Questions, then New Question to start a new question.
3. From the Question Type menu, select Maple-graded.
89
90 •
4. In the Question Description text region, enter the description Derivative
of Secant as shown in Figure 8-A.
Figure 8-A Creating a Maple-graded question
5. Click Next to proceed to the Maple-graded Question and Answer screen.
This screen displays regions to enter the question text, the Maple code for
calculating the correct answer, the Maple code for grading the student
response, and more.
6. In the first text region, enter the question text as shown in Figure 8-B.
Compute the derivative of sec ( x ) .
7. In the second text region, enter the Maple code that will compute the
correct answer. The system stores this result in the variable $ANSWER,
which can then be used in the grading routine.
diff ( sec ( x ), x ) ;
8. The third text area includes Maple code to grade the student response.
The last line of your Maple code must evaluate to true for a correct
response, false for an incorrect response, or a floating-point value between
0 and 1 for partial credit (available as of Maple T.A. 2.5). Maple’s evalb
command is frequently the best way to do this, but any Maple command
that returns a boolean is allowed. This region already contains the code
evalb( ($ANSWER) – ($RESPONSE) = 0 );
For this example, alter the line of code to,
evalb(simplify( ($ANSWER) – ($RESPONSE) )= 0 );
The system stores the student response in the variable $RESPONSE,
which you can use as a Maple variable anywhere inside your Maple code.
8.1 A Basic Maple-graded Question • 91
Caution: We strongly recommend that you test your Maple code in a Maple
worksheet. Frequently, you will find that your first version of Maple code is
inadequate to give credit for all correct answers. In this example, if we had just
used evalb( ($ANSWER) – ($RESPONSE) = 0 ), the system would only give
credit for sec(x)tan(x) and reject all other responses, even if they are algebraically
equivalent to sec(x)tan(x). The reason is that evalb does not perform any
simplification.
Figure 8-B The Maple-grading Question and Answer screen
9. From the drop down menu titled Select the type of expression you want
to accept, ensure Formula - e.g. x^2 sin(x^2) is selected.
Note: The Formula option accepts basic algebraic expressions, either by entering
them in standard calculator syntax, for example, (2x/y + sin(x y))(4x^2-1), or by
using the symbol palette. When the student submits a response with this option
selected, the system translates it into Maple syntax so that the Maple engine can
apply your Maple code to it. If you want the student to enter equations, differential
operators, integral signs, summations, vectors, matrices, DEs, or other advanced
mathematical expressions, select the Maple syntax – e.g. diff(2*f(x),x) option.
This option allows a much wider range of student response types. However, it
requires the student to enter the response using proper Maple syntax because the
system runs your Maple code directly on what the student types. Also, this option
92 •
allows the student to enter Maple commands, for example, diff(sec(x),x);, so you
need to be careful when you choose it.
10.Click Finish. This will take you to the Preview screen in which you can
test your question or start a new one.
Testing Your Question
1. Now pretend you are a student doing the assignment and enter a typical
response in the text area as shown in Figure 8-C.
Figure 8-C A preview and test of the question
2. Click Grade to check that Maple is correctly assessing the response.
3. Click OK and you will return to the Preview screen. Try a variety of
student responses to convince yourself that the Maple code for grading the
question is adequate.
4. If the question or the Maple code needs revision, click Edit.
8.2 A Randomized Question
To provide multiple problems of the same form or to hinder cheating during
exams, you can include random parameters such as random problem data or
coefficients into math questions.
In this example, we build a question that asks for the equation of a 3-D plane
that passes through the points <1,0,0>, <0,1,0> and a third point picked at
random. This example will also show how to use multiple lines of Maple code
to grade a more complicated question.
8.2 A Randomized Question • 93
1. Click Questions and then New Question. Select Maple-graded as the
question type.
2. Enter the description Equation of a plane.
3. Click Add next to the Algorithm heading. This will take you to an
Algorithm screen in which you define the random variables.
4. Click Show Designer. This will take you to a point-and-click interface for
designing random variables.
Note: Once you become familiar with Maple T.A.’s syntax for designing random
variables, you can simply type the randomization code into the text region and
skip the Show Designer step.
a) Here we will define three random coordinates for the third point. In
this example, we call the coordinates a, b, and c. Enter the name of
the variable in the first text box, a.
b) Select the data type from the adjacent menu, whole number.
c) Enter the lower and upper bounds of the variable in the next two text
boxes, -2 and 5 respectively.
d) Ignore the final text box since we want the increments of this variable to be in steps of one, the default.
e) Click OK and the random variable is added to the text region below
the variable regions as shown in Figure 8-D.
f) Repeat these steps for b and c.
When referring to the random variables, use the names $a, $b, and $c.
Figure 8-D Defining algorithmic variables using the algorithm designer
Notes:
94 •
• You can also create random Maple variables. Enter these variables in the
third row of the Algorithm Designer or directly in the algorithm text
region as $<var name> = maple(“<maple command>”);
• We recommend wrapping random variables inside parentheses when
referring to them inside a Maple statement. Otherwise, if the random
variable turns out to be negative, Maple will generate a syntax error and
every response will be marked wrong. This is due to the fact that Maple is
unable to parse statements like 5+–2.
5. When you are finished, click Save to return to the New Question window.
6. Click Next to go to the Maple-graded Question and Answer screen.
7. Enter the question text.
Find the equation of the plane that passes through <1,0,0>, <0,1,0> and
<$a,$b,$c>. Write your answer in the form Ax+By+Cz+D=0 (using lower
case x, y and z).
8. Enter the Maple code for calculating the correct answer.
n := LinearAlgebra:-CrossProduct(<$a,$b,$c>-<1,0,0>, <0,1,0>-<1,0,0>);
n[1]*(x-1)+n[2]*y+n[3]*z=0;
9. Enter the Maple code for grading the student response.
evalb(lhs($RESPONSE)=lhs($ANSWER) or
lhs($RESPONSE)=-1*(lhs($ANSWER)) );
10.Set the expression type as Maple syntax – e.g. diff(2*f(x),x), because
students will be entering an equation.
8.2 A Randomized Question • 95
Caution: If this option is set to Formula (e.g., x^2*sin(x)), the system will not
parse the equal sign in the equation the student enters and will grade the
response as incorrect.
Figure 8-E The question definition and Maple syntax to grade the response
11.Click Finish to preview the question as shown in Figure 8-F.
Figure 8-F The question as it would appear to the student. Notice that the third
point has been randomly generated by Maple T.A.
96 •
8.3 A Question with Infinitely Many Correct
Answers
Part of the power of using Maple in Maple T.A. is that you can ask questions
that have an infinite number of correct answers, and let Maple do the work of
determining if the student's response is correct. You don't have to provide a
long list of possible answers to your markers.
In this example, we build a question that asks for a function that is increasing
on a given interval. We will use a different verification routine (verify), and we
also show the ability to plot the student's response.
1. In the New Question window, add a Maple-graded question and enter the
description, Increasing function.
2. Proceed to the Maple-graded Question and Answer screen.
3. Enter the question.
Give an example of a function f(x) that is increasing on the interval [0,1].
Enter only the expression for the function, omitting "f(x) =".
Click Plot to verify that your function increases.
In this question, simple HTML tags are used to format the question
nicely.
4. Since this problem has infinitely many correct answers, we won't enter
specific code in the Maple answer code text region.
5. Enter the Maple grading code.
assume(x >=0, x <= 1);
verify(diff($RESPONSE, x), 0, {'greater_equal'});
6. Ensure Formula - e.g. x^2 sin(x^2) is selected.
8.3 A Question with Infinitely Many Correct Answers • 97
Figure 8-G Including plotting code in a Maple-graded question
7. The Plotting text region allows you to plot a student’s response by
entering a Maple plot command and including $RESPONSE as the
expression to plot. In the Plotting text region, enter
plot($RESPONSE, x=0..1)
When the student is answering the question, they can click the Plot link to
see a plot of their response. For this example, if they understand the concept of an increasing function, seeing the plot allows them to verify that
they have entered a correct function. This feature is only available using
the Maple-graded question type.
8. Click Finish to see a preview of the question as shown in Figure 8-H.
98 •
Figure 8-H The increasing function question preview
Testing your question
Now, enter a response, say sin(x), and click the Plot link as shown in Figure 8H. Figure 8-I shows the result.
Figure 8-I A plot of the student's response
8.4 Another Question with Infinitely Many Correct Answers • 99
8.4 Another Question with Infinitely Many
Correct Answers
This example asks for an antiderivative of the function f(x) = x sin(x).
1. In the New Question window, add a new question and proceed to the
Maple-graded Question and Answer screen.
2. Enter the question:
Use integration by parts to give an antiderivative of the function f(x) = x
sin(x).
3. Since this problem has infinitely many correct answers, we won’t enter
specific code in the Maple answer code text region.
4. Enter the Maple grading code:
is(diff($RESPONSE, x) =x*sin(x));
5. Ensure Formula - e.g. x^2 sin(x^2) is selected.
The system will mark correct any response of the form sin ( x ) – x cos ( ( x ) + C ) ,
where C is a constant, because we are asking Maple to differentiate the
response. (The code evalb( simplify($RESPONSE – int(x*sin(x),x)) = 0) is not
appropriate here, as it would mark incorrect any response in which C ≠ 0 .)
We use Formula as the type of expression to accept in order to prevent Maplesavvy students from entering “int( x*sin(x), x)” as the response.
8.5 Accepting Approximations of Exact
Symbolic Answers
This example asks to find the perimeter of a circle where the radius is selected
at random. The student’s response is graded correct if it is within 5% of the
correct answer.
1. In the New Question window, add a new Maple-graded question.
2. Open the Algorithm screen and enter:
$r=range(2, 5);
100 •
This function generates a random integer in the range 2 to 5 inclusively.
3. Proceed to the Maple-graded Question and Answer screen and enter the
question:
Find the perimeter of the circle with radius $r correct to four significant
digits.
4. Enter the Maple answer code:
exact:= 2*Pi*($r):
evalf( exact, 4 );
5. Enter the Maple grading code:
evalb( abs( evalf( $RESPONSE - $ANSWER ) / $ANSWER ) < .05 );
6. Ensure Formula - e.g. x^2 sin(x^2) is selected.
This problem will mark correct either the exact symbolic expression 2 π r or
any numeric response that is within 5% of 2 π r evaluated to four significant
digits. Notice that the radius $r of the circle is randomly generated.
8.6 Questions with Vectors and Matrices
This example looks to determine the direction from a randomly generated
point that the function x2y2 is increasing fastest. This question uses the
VectorCalculus and LinearAlgebra packages to grade the response.
1. In the New Question window, add a new Maple-graded question.
2. Open the Algorithm screen and enter:
$p1=range(-3,3);
$p2=range(-4,4);
3. Proceed to the Maple-graded Question and Answer screen.
4. Enter the question:
In what direction from the point <$p1, $p2> is the function f(x,y) = x2y2
increasing the fastest?
Express your answer as a vector in the form < a, b >.
Note: Be sure to include a space between ‘<‘ and ‘a’. Otherwise, Maple T.A. treats
this as the beginning of an HTML tag and this will not be displayed correctly.
8.7 Allowing for Partial Grading • 101
5. Enter the Maple grading code:
gradientField := VectorCalculus:-VectorField(<2*x*y^2, 2*y*x^2>,
cartesian[x,y]):
gradientValue:=VectorCalculus:-evalVF( gradientField, <$p1, $p2>):
LinearAlgebra:-Equal( $RESPONSE);
6. Ensure Maple syntax – e.g. diff(2*f(x),x) is selected.
Notice that the last line of Maple code uses the LinearAlgebra:-Equal
command, which takes two vectors or matrices and returns true if and only if
they have the same entries. The command evalb($RESPONSE = gradValue)
would not work in this example because the “=” sign in Maple cannot be
applied to Matrices or Vectors.
We set the type of expression to accept expressions as Maple syntax instead of
Formulas because the Formulas option does not parse vector brackets < >.
8.7 Allowing for Partial Grading
This example asks for the zeros of an equation. Denoting by R the set of values
submitted by a student and S the actual solution set, we will have Maple
compute the grade as follows:
max ( S ∩ R – S\R , 0 )
Grade = --------------------------------------------------------R
This will produce a number between 0 and 1.
1. In the New Question window, add a new Maple-graded question.
2. Open the Algorithm screen and enter:
$plot=plotmaple("plot(x^3-x, x=-2..2, y=-2..2), plotoptions='width=200,
height=200' ");
3. Proceed to the Maple-graded Question and Answer screen.
4. Enter the question:
Solve the equation , omitting "x = " from your answer.
$plot
102 •
If there are multiple solutions, enter each separated by commas, e.g., 3,-2.
5. Enter the Maple answer code:
solve(x^3-x,x);
6. Enter the Maple grading code:
good := nops({$RESPONSE} intersect {$ANSWER});
bad := nops({$RESPONSE} minus {$ANSWER});
evalf(max(good-bad,0)/nops({$ANSWER}));
7. Ensure Maple syntax – e.g. diff(2*f(x),x) is selected.
Recall that in general the Maple grading code must always evaluate to either
a boolean (true or false) or a decimal number between 0 and 1.
We set the type of expression to accept expressions as Maple syntax instead of
Formulas because the Formulas option will not parse a sequence of values.
8.8 Performing a String Match
This example looks to find the set-theoretic difference between two sets. We
will need to set the type of expressions to accept as Maple syntax instead of
formulas because the Formulas option does not parse set notation { }.
However, we need to be careful not to accept a response that calls Maple’s
minus operator for sets. That we can achieve by searching the response string
for the word “minus”.
1. In the New Question window, add a new Maple-graded question.
2. Open the Algorithm screen and enter,
$plot=plotmaple("plot(x^3-x, x=-2..2, y=-2..2), plotoptions='width=200,
height=200' ");
3. Proceed to the Maple-graded Question and Answer screen.
4. Enter the question:
Find the set-theoretic difference {a,b,c,d,e} minus {c,a}.
Enclose your response in braces.
5. Enter the Maple answer code:
8.9 Performing a Pattern Match • 103
{a,b,c,d,e} minus {c,a};
6. Enter the Maple grading code:
evalb($RESPONSE=$ANSWER) and
evalb(StringTools[Search]("minus","$RESPONSE")=0);
7. Ensure Maple syntax – e.g. diff(2*f(x),x) is selected.
8.9 Performing a Pattern Match
This example tests students’ knowledge of the sum-product identities in
trigonometry. We want to check that a response is not only mathematically
equivalent to the correct answer, but also has the right form, and for that we
will use Maple’s patmatch function.
1. In the New Question window, add a new Maple-graded question.
2. Proceed to the Maple-graded Question and Answer screen and enter the
question:
Express sin ( x ) – sin ( y ) as a product of the form
c ⋅ sin ( f ) ⋅ cos ( g )
where f and g are expressions in x and y, and c is a constant.
3. Enter the Maple answer code:
2*sin((x-y)/2)*cos((x+y)/2);
4. Enter the Maple grading code:
if (is($RESPONSE=$ANSWER)) then
patmatch($RESPONSE,
a::realcons*sin('f'::anything)*cos('g'::anything));
else false; end if;
5. Ensure Formula - e.g. x^2 sin(x^2) is selected.
This problem will mark the expression 2*sin((x-y)/2)*cos((x+y)/2) correct and
the expression sin(x)-sin(y) incorrect.
104 •
8.10 Troubleshooting Maple-graded questions
Table 17: Troubleshooting
Problem
Maple T.A. keeps
grading correct
responses as
incorrect.
Solution
•
•
Test your Maple code in a Maple worksheet on several forms of the correct response.
If you used commands from a Maple package, make sure you included the package
name with the commands. For example, instead of
evalb( Norm(<$a,$b>, 2) = 1);
you should use
evalb( LinearAlgebra:-Norm(<$a,$b>, 2) = 1 );
•
•
Check that all random variables in the Maple code have a $ in front of them.
Check that all random variables in the Maple code have parentheses around them. For
example, instead of
p := factor(x+2*$b);
you should use
p := factor(x+2*($b));
•
•
Check the type of expression to accept. If the correct answer is (or contains) an
equation, vector, matrix, unevaluated derivative or integral, or a Maple command, the
type of expression must be set to Maple syntax, not Formula.
Check that all instances of $RESPONSE and $ANSWER are in upper-case letters.
I’m seeing variable
names instead of
instantiated variable
values in the
question.
•
Make sure that all references to random variables have a $ character in front of them.
My random Maple
variables have the
same values at each
question instance.
•
Make sure the Maple command that generates the random object has the prefix
randomize(): The syntax is $<var name> = maple(“randomize(): <maple command>”);
9 Flash and Applet Questions
Maple T.A. supports Flash movies and Java applets. In fact, you can include a
Flash movie or Java applet in any question type, as described in sections 9.1
and 9.2. In addition, you have the ability to create a question where students
are graded directly on their interaction with the Flash movie or Java applet.
This more advanced functionality is described in sections 9.3 and 9.4.
9.1 Flash Movies in Maple T.A. Questions
You can include Flash movies in your Maple T.A. questions, similar to the way
you would add an image to the question. First, you would upload the Flash
movie to a folder on your class web site; see Including Images in Questions in
section 6.4 for details.
Next, you would include a reference to the Flash movie in your question as
follows:
1. Create or edit a question in the Question Editor.
2. In the field where you want to include the image (question text, feedback,
hints, or solution), click the Insert/Edit Flash
button.
3. Under the Flash Info tab, click Browse Server and select the movie you
had uploaded. You will be shown a preview of the movie.
4. Click OK and the movie will be added.
Note: The Browse Server screen also allows you to upload a Flash movie to the
server, in case you had not previously uploaded the movie using the Web Site
Editor.
105
106 •
9.2 Java Applets in Maple T.A. Questions
Maple T.A. has a couple of built-in applets that you can use to dynamically
label a static image or create a graph of a specific function.
Dynamic Labels on an Image
Maple T.A. includes a labeling applet that allows you to include an image and
then place labels on it. This provides the ability to use the same underlying
image for your questions, but position algorithmic variables on the image to
generate variations.
To dynamically label an image:
1. Upload an image to a folder on your class web site and take note of its
exact location; see section 6.4 for details.
2. Create or edit a question in the Question Editor.
3. In the field where you want to include the image (question text, feedback,
button to view the html source.
or solution), click the Source
4. Paste the following applet code into the source html where you want the
labeled image to appear:
<div align=center>
<applet code="applets.labelImage.LabelImage" width="316" height="258">
<param name="image" value="../classes/classname/imagename">
<param name="size" value="numberoflabels">
<param name="label.1.x" value="x-position of first label">
<param name="label.1.y" value="y-position of first label">
<param name="label.1.text" value="text for first label">
<param name="label.2.x" value="x-position of second label">
<param name="label.2.y" value="y-position of second label">
<param name="label.2.text" value="text for second label">
</applet>
</div>
5. Modify the applet code to reflect the actual image and values you want to
include. In particular:
• The value of "image" parameter should be set to the path to the image you
uploaded in step 1.
• The value of "size" parameter is the number of labels to be added to the
image.
• For each label, specify the x- and y-pixel coordinates as well as the text
that should appear. Note that the text can be a variable from your
question's algorithm, thereby creating a dynamic label.
9.2 Java Applets in Maple T.A. Questions • 107
Example: Consider the following question which uses the label image applet
to add dynamic labels to points along the axes of a graph.
Figure 9-A The following image uses the labeling applet to incorporate
algorithmically generated values for the axis labels.
Here is the applet code:
<div align=center>
<applet code="applets.labelImage.LabelImage" width="316" height="258"
codebase="http://localhost:8080/mapleta/modules">
<param name="image" value="web/mapledemo/Public_Html/sup_dem_graph.gif">
<param name="size" value="5">
<param name="label.1.x" value="15">
<param name="label.1.y" value="107">
<param name="label.1.text" value="$B">
<param name="label.2.x" value="15">
<param name="label.2.y" value="159">
<param name="label.2.text" value="$A">
<param name="label.3.x" value="76">
<param name="label.3.y" value="250">
<param name="label.3.text" value="$a">
<param name="label.4.x" value="129">
<param name="label.4.y" value="250">
<param name="label.4.text" value="$b">
<param name="label.5.x" value="184">
<param name="label.5.y" value="250">
108 •
<param name="label.5.text" value="$c">
</applet>
</div>
In this example, an image file sup_dem_graph.gif from the class web site is
added to the question and dynamically labeled with values $a, $b, and $c
along the horizontal axis, and $A and $B along the vertical axis.
The variables themselves are defined in the question's algorithm:
$x=rand(100, 900, 2);
$y=sig(2, 5*(rint(19)+1));
$a=int($x);
$b=int(2*$x);
$c=int(3*$x);
$A=int(3*$y);
$B=int(5*$y);
Interactive Plots
The graph plotting applet is an interactive plot that is added to a question
type for dynamic plotting. The applet displays axes for the graph even when
the axes lie outside of the viewable area. You can shift-click and drag the
graph area to shift the viewable area or you can ctrl-click and drag to rescale
the image.
To add a graphing applet to your question:
1. Create or edit a question in the Question Editor.
2. In the field where you want to include the image (question text, feedback,
or solution), click the Source
button to view the html source.
3. Paste the following applet code into the source html where you want the
graph to appear:
<div align=center>
<applet code="applets.grapher.Graph" archive="graphing.jar" width="250"
height="250">
<param name="y1" value="an expression in x">
<param name="xMin" value="position of smallest x-coordinate">
<param name="xMax" value="position of largest x-coordiante">
<param name="yMin" value="position of smallest y-coordinate">
<param name="yMax" value="position of largest y-coordinate">
<param name="gridLines" value="number of gridlines">
</applet>
</div>
4. Modify the applet code to reflect the actual function, plot window, and
number of gridlines.
9.2 Java Applets in Maple T.A. Questions • 109
Example: Consider the following question which uses the graphing applet to
display a plot of the function y = (x-1)(x-3)(x-5).
Figure 9-B The graph of y = (x-1)(x-3)(x-5) generated with the graphing applet
Here is the applet code for this example:
<div align=center>
<applet height="400" archive="graphing.jar" width="400"
code="applets.grapher.Graph">
<param name="y1" value="(x-1)(x-3)(x-5)" />
<param name="xMin" value="0" />
<param name="xMax" value="6" />
<param name="yMin" value="-6" />
<param name="yMax" value="6" />
<param name="gridLines" value="12" />
</applet>
</div>
110 •
9.3 Flash Question Type
With Maple T.A.'s Flash question type, you can create a Flash movie and
integrate it into a Maple T.A. question which grades students directly on their
interaction with the movie. Students use the mouse and/or keyboard to alter
the movie or identify hot
spots in the movie in order to produce the correct answer. For example, the
question in Figure 9-C asks students to move the disk to a specific point in the
Cartesian plane.
Figure 9-C A Flash question in Maple T.A.
To create the Flash movie, you will need Flash development software (for
example, Adobe® Flash® CS3) and some familiarity with Flash programming.
Your Flash movie must implement the following features:
• A pair of variables called response and locked should be declared.
• Whenever a student interacts with the movie and brings it to a new state,
that state should be translated into a text string and assigned to the
variable response. You are free to decide for yourself how this translation
is done.
• When the Flash movie starts up, it reads the variable response and finds a
string that was returned by a previous call to GetVariable("response").
9.4 Applet Question Type • 111
You must program the movie to initialize its appearance to the state
consistent with that response.
• The Flash movie also reads the variable locked. This variable determines
when a student is allowed to modify his/her response. When the value of
locked is equal to true, this signals to the Flash movie that the question is
in 'feedback' mode; in this case the movie should present in a form suitable
for feedback
After creating the Flash movie you would upload it to a folder on your class
web site as described in section 6.4. Finally, you need to host the Flash movie
in a Maple T.A question, using our Flash question type. To do this, you need to
create a source question bank file. Note that Flash questions must be
authored outside of the question editor. Here is what the question source for
Cartesian coordinates question looks like. Note that the value of the "movie"
field should be set to the actual path to the Flash movie you would have
uploaded to your class web site:
question=Move the red disk to the point ($x, $y).@
answer=$x,$y@
movie=<path to your .swf file> @
width=400@
height=400@
bgcolor=#FFFFFF@
mode=Flash@
name=Graph Coordinates@
editing=useHTML@
algorithm=$x=range(1,8);
$y=range(1,8);@
For full details and to see the Flash source code for the Cartesian coordinates
example, please download the "Creating Flash Questions for Maple T.A." zip
file from the Maple T.A. Content Center on our web site.
9.4 Applet Question Type
With Maple T.A.'s Applet question type, you can create a Java applet and
integrate it into a Maple T.A. question which grades students directly on their
interaction with the applet. Students use the mouse and/or keyboard to alter
the applet or identify hot spots in the applet in order to produce the correct
112 •
answer. For example, the question in Figure 9-D asks students to move the
red ball to a height that gives the desired potential energy.
Figure 9-D An Applet question in Maple T.A.
Initially the red ball is at the bottom. When the student moves the red ball to
just the right height, the student's response is graded as correct.
There are three steps involved in creating an Applet question. Steps 1 and 2
require some familiarity with Java programming.
1. Create and deploy the Java applet.
2. Create and deploy a Java class grading.
3. Author the question.
Step 1: Create and Deploy a Java Applet
For this step, you will need some familiarity with Java programming. The
applet is required to do three things:
1. Provide a getResponse() method which can be queried to find the current
student response.
2. Call method getParameter("response") to read the response parameter
for a string containing any previous attempt at a response to this
question, and initialize the applet to display that state.
3. Call method getParameter("locked") to read the locked parameter, and
disable user modifications if the flag is set.
You may also make additional getParameter(paramName) values to read any
additional parameters for initialization. These are passed from the param
fields in the question (see Step 3).
9.4 Applet Question Type • 113
After creating the applet, place it in the "applets" folder (or an appropriate
subfolder if packages are used) on the Maple T.A. server.
Step 2: Create and Deploy a Java Class for Grading
This is a server-side grader module that accepts the student response as
prepared by the applet and compares it against the correct answer that you
will set in Step 3.
Your grader class should implement three methods:
1. An init(String paramName, String paramValue) method with void return
type. This method receives a set of name/value pairs which it can use for
initialization. These are passed from the grader.param fields in the
question (see Step 3).
2. A grade(String correctAnswerText, String studentResponseText) method
with a double return type value between 0.0 and 1.0, where 1.0 is full
credit. The method should compare the text of the student response with
text representing the correct answer.
Note: The student response text is delivered from the applet's getResponse()
method. In many cases, grading will be performed by judging whether the
response is "the same" as the correct answer text. However in some cases the
correct answer text may only provide general guidelines for grading. For example,
the correct answer might be "up and to the left" and the student response might be
a point "(76,145)" that the student clicked on.
3. A generateResponseMatchingAnswer(String correctAnswerText) method
with String return type. This method is called to get a sample correct
answer to display as student feedback. The method must use the answer
text provided to generate a string which the applet will display as the
correct answer when passed the string as a response parameter.
Note: In many cases, it will be enough to simply return the answer text in
unmodified form. However when the answer text only provides qualitative grading
criteria ("up and to the left") it's more difficult to generate a sample response. In
that case it may be a good strategy to provide an "example" answer as a grader
parameter in the testbank. E.g. set the answer text to be "up and to the left" and
set grader.param.example=(140,27).
After your grader class is created, create a JAR file and place it in the /WEBINF/lib folder so that it is accessible to the class loader. Then restart the
Maple T.A. server.
Step 3: Author the Maple T.A Question
The last step is to host your Java applet in a Maple T.A question, using our
Applet question type.
114 •
To do this, you need to create a source question file. Note that Applet
questions must be authored outside of the Question Editor. Open a text editor,
enter and fill in the following lines, and save the file with the name
filename.qu, where filename is the name you choose to assign to the source
question file.
qu.1.1.question=__@
qu.1.1.answer=__@
qu.1.1.applet=__@
qu.1.1.width=__@
qu.1.1.height=__@
qu.1.1.param.__=__@
qu.1.1.grader.class=__@
qu.1.1.grader.param.__=__@
qu.1.1.mode=Applet@
qu.1.1.name=__@
qu.1.1.editing=useHTML@
qu.1.1.algorithm=__@
For the example of the slider balls, a detailed explanation of these lines of code
is given below.
qu.1.1.question=The left-hand ball has mass of $m1 kg and the right-hand
ball has mass $m2 kg. The center of mass of the left ball is $h1 meters above
the ground. Move the right-hand ball to the height that gives it the same
potential energy as the ball on the left.@
qu.1.1.answer=$h2@
qu.1.1.applet=applets.sliderBall.SliderBall@
qu.1.1.width=100@
qu.1.1.height=200@
qu.1.1.param.right=2@
qu.1.1.param.left=$h1@
qu.1.1.grader.class=gateway.question.grader.StringMatch@
qu.1.1.grader.param.ignoreCase=true@
qu.1.1.mode=Applet@
qu.1.1.name=Physics Applet Question@
qu.1.1.editing=useHTML@
qu.1.1.algorithm=$h1=int(rint(35)+5);
$h2=int(rint(35)+5);
$m1=rand(10,70,3);
$m2=sig(3, $m1*$h1/$h2);@
10 Question Authoring in
LaTeX
There are some question types (for example, graph sketching questions and
matrix questions) which cannot currently be created within Maple T.A.'s
question editor. These questions would have to be authored either in LaTeX or
in plain-text script files. In fact, you can author and edit all question types
using LaTeX to generate plain-text script files that can be imported into
Maple T.A. Of course, it is recommended that you write and edit question
banks using LaTeX only if you are an experienced LaTeX user.
10.1 Writing Questions in LaTeX
Requirements
To use LaTeX to author Maple T.A. questions, you need:
• ed.sty—the LaTeX style file for Maple T.A. question authoring.
Download this file from
http://www.maplesoft.com/products/mapleta/latex2ta/index.aspx and
place it in the same location as your other LaTeX style files.
• A text editor
• LaTeX installed on your system
• Internet access
115
116 •
Authoring Process
To author in LaTeX:
1. Write your question in LaTeX using a text editor.
2. Run LaTeX on your question file and preview the output to ensure it is
correct. You may perform multiple iterations of steps 1 and 2.
3. Use the web-based conversion service at
http://latex2ta.mapleserver.com/ to convert your LaTeX-format question
file to Maple T.A. .qu format.
4. Save the .qu file when the conversion is complete.
5. Import and save the question file in your Maple T.A. class.
LaTeX Document Structure
The structure of the LaTeX file must be as follows. Mandatory items are
bolded.
Table 18: LaTeX Document Structure
Code
Description
\documentclass[12pt]{article}
Beginning of document
\usepackage{ed}
The ed package is required
\setImageBase{ }
Location of the folder in Maple T.A.
where your graphics will reside
\begin{document}
Beginning of document
\begin{topic}{topic name}
Beginning of topic
\begin{question}{question type}
Beginning of first question
...
\end{question}
End of first question
\begin{question}{question type}
...
\end{question}
\begin{question}{question type}
...
\end{question}
Your document may contain as many
questions as you like.
\end{topic}
End of topic
\end{document}
End of document
The region between the \begin{question} and \end{question} macros is
where you include the question details.
10.1 Writing Questions in LaTeX • 117
Question Structure
Each question in a topic has the following basic structure. Mandatory items
are bolded.
Table 19: Questions Structure
Code
Description
\begin{question}{question type}
Beginning of question
\name{question name}
A name given to the question in the Maple
T.A. question bank
\property{name1}{value1}
\property{name2}{value2}
...
Information fields, useful when sorting
questions in the assignment editor
\hint{first hint}
\hint{second hint}
...
Hints available to students when taking an
assignment
\comment{feedback text}
Feedback to students on the question
\qutext{question text}
Text of the question body
[additional, question-typespecific macros]
Each question type has its own required
macros
\end{question}
End of question
In addition to what is listed in the table, each question type has its own set of
LaTeX macros. For example, many math question types have a required
\answer{ } macro for specifying the correct answer.
Sample Question File
You can copy the text of the sample question file below and save it into a
LaTeX file on your local computer. Then go to the Maplesoft web site, run the
file through the LaTeX conversion feature, and import the resulting question
file into Maple T.A. (See below for detailed instructions.)
\documentclass[12pt]{article}
\usepackage{ed}
\setImageBase{web/myfolder/Public_Html/Images}
\begin{document}
\begin{topic}{Arithmetic}
%% Question 1
\begin{question}{Numeric}
\name{Addition}
118 •
\code{$a = range(1,10);
$b = range(1,10);}
\qutext{What is $\var{a}+\var{b}$?}
\answer{\var{\var{a}+\var{b}}}
\end{question}
%% Question 2
\begin{question}{Formula}
\name{Multiplication}
\code{$a = range(1,10);
$b = range(1,10);}
\qutext{What is $\var{a}\times\var{b}$?}
\answer{\var{\var{a}*\var{b}}}
\end{question}
\end{topic}
\end{document}
Converting into a Maple T.A. Script
Once you have written your question file, you can process it with LaTeX to
preview your questions. Once you are satisfied with the content, use the
LaTeX-to-Maple T.A. conversion service to convert your LaTeX file into a
Maple T.A. .qu question file. The converter is located at
http://latex2ta.mapleserver.com/.
Figure 10-A LaTeX Conversion
10.1 Writing Questions in LaTeX • 119
In the first entry cell, you may either enter the absolute path to your LaTeX
file, or click the first "Browse" button to choose the file by browsing your
computer. If you have a separate style file that you have used in your question
file, enter its path in the second entry cell or use the second "Browse" button.
You do not need to upload ed.sty. The converter always has the current
release of the ed.sty macros.
Click "Send File" to upload your files for processing. A successful conversion
will result in a screen similar to the following:
Figure 10-B Completed LaTeX Conversion
Click the "Click to Download File" link to download the Maple T.A. .qu file to
your computer. Then, from Maple T.A., you can import the question bank to
your class site.
If there is an error during conversion, you will be shown the conversion log to
help you identify the problem.
Sample .qu File
The file created by the conversion process is a Maple T.A. .qu question file.
The text of the .qu file created from the sample LaTeX file above is shown
here. Some authors prefer to create or edit .qu files directly using a text
editor. We will explore the structure of .qu files in the next chapter.
qu.1.topic=Arithmetic@
qu.1.1.mode=Numeric@
qu.1.1.name=Addition@
qu.1.1.algorithm=$a = range(1,10);
120 •
$b = range(1,10);@
qu.1.1.question=
<p class="noindent">What is <math
xmlns="http://www.w3.org/1998/Math/MathML" display="inline">
<mn>${a}</mn> <mo>+</mo> <mn>${b}</mn>
</math>?</p>@
qu.1.1.answer.num=${$a+$b}@
qu.1.1.answer.units=@
qu.1.1.showUnits=false@
qu.1.1.info=@
qu.1.1.grading=exact_value@
qu.1.2.mode=Formula@
qu.1.2.name=Multiplication@
qu.1.2.algorithm=$a = range(1,10);
$b = range(1,10);
@
qu.1.2.question=
<p class="noindent">What is <math
xmlns="http://www.w3.org/1998/Math/MathML" display="inline">
<mn>${a}</mn> <mo>×</mo>
<mn>${b}</mn>
</math>?</p>@
qu.1.2.answer=${$a*$b}@
qu.1.2.info=@
10.2 Working with Algorithmic Variables
One of Maple T.A.'s key features is its support for algorithmic question
generation. Authors can write questions that use randomly-generated values
in different assignment attempts.
Refer to the Maple T.A. Help System for detailed information about Maple
T.A.'s algorithmic capabilities. Below we describe the LaTeX macros for
algorithmic questions.
Defining the Algorithm
Use the \code{} macro to define the algorithmic variables used in the
question. Separate each variable with a semi-colon, exactly as if you were
defining the variables in the Question Editor.
10.2 Working with Algorithmic Variables • 121
Referencing Algorithmic Variables
To include a defined variable in the question text, hint, or answer region, use
the \var{} macro.
\var{} can also be used to create an inline variable expression: a computed
expression within a variable reference, constructed from nested \var{}
macros. Use inline variable expressions when one variable is derived from
another, for example a and 2a, or a, b and a2+b2. In this case, there is no need
to make a separate variable definition for each algorithmically-generated
quantity. Inline variable expressions allow for a minimum of variables. Not
only does this benefit the author, but it reduces the load on the servers when
students are taking assignments.
Table 20: Example of Question in LaTeX
Sample algorithmic question in LaTeX
\begin{question}{Formula}
\qutext{Find the solution of the linear equation
$\var{a}x+\var{b}=\var{c}$.}
\answer{(\var{c}-\var{b})/\var{a}}
\code{
$a=rint(12)+2;
$b=rint(12)+1;
$c=rint(12)+1;}
\end{question}
Additional notes
\code{variable1=code1; variable2=code2; ...}
\var{variable name}
Question displayed in Maple T.A.
122 •
10.3 Placing Images in Questions
Setting the Image Base
To include graphics in your questions, begin by specifying a location in Maple
T.A. where your images reside.
1. Select a location in your Maple T.A. web site for graphics files. Upload the
graphics to this folder. Now click on the icon to the left of any of these
graphics files to see its full path, which will have the form
http://.../web/Public_Html/<folder>/...
where <folder> is the folder that contains the images.
2. Insert the \setImageBase directive near the top of the LaTeX file to
specify the path you determined in step 1. For example, if the folder that
contains your graphics is "Images", use the directive:
\setImageBase{web/Public_Html/Images}
Note: \setImageBase has a global effect on your document, and grouping
\setImageBase within braces will not localize its effect. The image base
defined within the group will apply to the remainder of your document.
You may temporarily override the image base with \ignoreImageBase. This
macro takes no arguments. Its effect is local, so upon leaving the current
group or environment, the image base will revert to its previous value. For
further details, see the Maple T.A. Help System.
Inserting an Image
To include graphics in a question, use the \image{} macro. The format for
the \image macro is \image[extension]{filename}. The extension
argument is optional. It specifies the extension to be appended to the filename
when the question bank is converted to Maple T.A. format. The default value
is jpg.
Table 21: Example of Question with Image
Sample question with image in LaTeX
\begin{question}{Numeric}
\qutext{Quadrilateral $ABCD$ is circumscribed about a circle, as shown, with
$AB$=\var{a} cm, and $CD$=\var{b} cm. Find the perimeter of the quadrilateral.
\image{InsertImage.gif}}
\code{$a=range(5,25);
$b=range($a+1,$a+5);
$ans=2*(($a)+($b));}
\answer{$ans}[cm]
\end{question}
10.4 Graph Sketching Questions • 123
Table 21: Example of Question with Image
Additional notes
\image[extension]{filename}
Question displayed in Maple T.A.
You can also use the LaTeX macros for dynamically labeled images and graph
plotting applets, rather than working with the applet code that we used in
section 9.2. For complete details on images and plots in LaTeX questions,
please consult the "Creating Maple T.A. Questions Using LaTeX" article
which can be downloaded from the Maple T.A. Content Center.
10.4 Graph Sketching Questions
Overview
The Sketch question type displays introductory text accompanied by a set of
axes. The student draws a graph on the axes by clicking points to be used as
interpolation nodes.
Use the sketch environment to configure the applet, and to declare the ranges
of the axes, a sample correct response, and a list of criteria that the student
answer must meet. The \begin{sketch} macro takes one option and four
required arguments, in the following format.
\begin{sketch}[gridlines]{xMin}{xMax}{yMin}{yMax}
\example{point-list}
\check{criterion}
124 •
\check{criterion}
...
\check{criterion}
\end{sketch}
Table 22: Sketch Values
gridlines
Number of horizontal and vertical gridlines in addition to the axes (default is 10)
xMin
Minimum x-value displayed on the x-axis
xMax
Maximum x-value displayed on the x-axis
yMin
Minimum y-value displayed on the y-axis
yMax
Maximum y-value displayed on the y-axis
The \example{<point-list>} macro describes a sample correct answer
that is displayed if the student gives an incorrect response. The sketch is
given as <point-list>, a space-delimited set of coordinates of the form x, y. The
resulting sketch is a single curve interpolated from these points.
The \check{criterion} macro sets a criterion that the student's sketch
must satisfy. Available criteria include:
Table 23: Sketch Criteria
goes_through(xcoord, ycoord)
Sketched function must pass through the point (xcoord,
ycoord)
increasing
Sketched function must be increasing
decreasing
Sketched function must be decreasing
concave_up
Sketched function must be concave up
concave_down
Sketched function must be concave down
linear
Sketched function must be linear
In addition, you can perform many other checks (for example, evaluating the
slope of the student's response at a given x-value). For a complete list along
with detailed examples, visit the "Graph Sketching Question in LaTeX" page
in the Maple T.A. Help System.
10.4 Graph Sketching Questions • 125
Table 24: Example of Sketching Question in LaTeX
Sample graph sketching question in LaTeX
\begin{question}{sketch}
\qutext{Sketch the graph of the function $y=x+1$.}
\begin{sketch}[4]{-2}{2}{-2}{2}
\example{-2,-1 1,2}
\check{linear}
\check{goes_through(0,1)}
\end{sketch}
\end{question}
Additional notes
\begin{sketch}[gridlines]{xMin}{xMax}{yMin}{yMax}
\example{point-list}
\check{criterion}
\check{criterion}
...
\check{criterion}
\end{sketch}
Question displayed in Maple T.A.
This section described how to author a graph sketching question in LaTeX. To
see examples of other question types, please consult the "Creating Maple T.A.
Questions Using LaTeX" article which can be downloaded from the Maple T.A.
Content Center.
126 •
11 Plain-text Question Files
There are several ways to create questions for use in Maple T.A:
1. Use the Question Editor, as shown in the previous sections.
2. Create a plain-text file and upload it into the Question Repository.
3. Create a LaTeX file, convert it, and then upload it into the Question
Repository.
We explore the second option in this chapter. Consider, for example, the
following Formula type question in Maple T.A.:
Figure 11-A Formula Question
Here is what the underlying plain-text source for this question looks like:
mode=Formula@
name=Derivative@
comment=<p>The derivative of sin(x) is cos(x).</p>@
question=<p>Find the derivative of sin(x).</p>@
answer=cos(x)@
127
128 •
11.1 Question Tags
The following tables show the various tags that are used to create questions in
the different formats. The question elements in the first table are common
across all question types.
Table 25: Common Question Elements
Question Editor
Plain Text (.qu file)*
LaTeX
Question Type
mode
\begin{question}{type}
Question Description
name
\name{}
Feedback
comment
\comment{}
Algorithm
algorithm
\code{}
$a
$a
\var{}
Information Fields
info
\property{name}{value}
Hints
hint.i
\hint
Solution
solution
\solution
Use HTML
editing
* All lines in the .qu file must be prefaced by qu.x.y. where x is the topic
number and y is the question number.
The question elements in the following tables are specific to certain question
types.
Table 26: Specific Elements to Multiple-choice/Multipleselection Questions
Question Editor
Plain Text (.qu file)
LaTeX
Answer
answer
\choice*
Choices
choice.x
\choice
Table 27: Specific Elements to Formula Questions
Question Editor
Plain Text (.qu file)
LaTeX
Answer
answer
\answer
11.2 Question Type Modes • 129
Table 28: Specific Elements to Maple-graded Questions
Question Editor
Plain Text (.qu file)
LaTeX
Question Sub-type
type
\type
Answer Code
maple_answer
Not available
Grading Code
maple
\maple
Repository
libname
Not available in question, but 'lib' can
be used as an argument to an
algorithmic variable
Plot Code
plot
\plot
11.2 Question Type Modes
Every question has a mode element which identifies the question type.
Following are the values of the mode element for the various question types in
Maple T.A.
Table 29: Values of Mode Elements
Question Type
qu.x.y.mode=<question_type>@
Blanks [text] [menu] [formula] options
qu.x.y.mode=Blanks@
Clickable imagemap
qu.x.y.mode=Clickable Image@
Constant of integration/Formula mod C
qu.x.y.mode=Formula Mod C@
Customized symbolic palette
qu.x.y.mode=palette@
Equation
qu.x.y.mode=Equation@
Essay
qu.x.y.mode=Essay@
Formula
qu.x.y.mode=Formula@
Formula with physical units
qu.x.y.mode=Dimensioned formula@
Inline
qu.x.y.mode=Inline@
Key words
qu.x.y.mode=Key Words@
List
qu.x.y.mode=List@
Maple-graded
qu.x.y.mode=Maple@
Matching
qu.x.y.mode=Matching@
Matrices with numeric/formula entries
qu.x.y.mode=Matrix@
Multipart
qu.x.y.mode=Multipart@
Multipart formula
qu.x.y.mode=Multipart Formula@
130 •
Table 29: Values of Mode Elements
Question Type
qu.x.y.mode=<question_type>@
Multiple choice
qu.x.y.mode=Multiple Choice@
Multiple selection
qu.x.y.mode=Multiple selection@
Non-permuting multiple choice
qu.x.y.mode=Non Permuting Multiple Choice@
Non-permuting multiple selection
qu.x.y.mode=Non Permuting Multiple Selection@
Numeric (with or without units)
qu.x.y.mode=Numeric@
Ordered list of formulas
qu.x.y.mode=Formula List@
Restricted formula
qu.x.y.mode=Restricted Formula@
Short phrase
qu.x.y.mode=Short phrase@
True-or-false
qu.x.y.mode=True False@
Unordered list of formulas
qu.x.y.mode=Multi Formula@
Vector
qu.x.y.mode=Ntuple@
11.3 Question Fields
Following are descriptions Maple T.A. question fields.
Table 30: Maple T.A. Question Fields
qu.x.y.
<field
name>
Required or
optional
Can
include
HTML or
MathML?
mode
Required
type
Field Type
Description/ Function
No
Internal
directive
System command that identifies the question type
Required (in
Maple-graded
questions)
No
Internal
directive
Specifies subtype of Maple question. For Maple
Syntax questions, it is maple. For Maple Formula
questions, it is formula.
name
Optional
Yes
Display - no Displays text that identifies individual question.
variables
editing
Optional
No
Internal
directive
Indicates use of HTML editing in the question. Set
directly or automatically by Question Bank Editor.
question
Required
Yes
Display can contain
variables
The question statement. Can contain any
combination of text, MathML, HTML, tables, or
references to images or objects.
algorithm
Optional
No
Internal
directive
Contains variable definitions for use in the question.
Must conform to the system formula and variable
syntax.
11.3 Question Fields • 131
Table 30: Maple T.A. Question Fields
qu.x.y.
<field
name>
Required or
optional
Can
include
HTML or
MathML?
Field Type
Description/ Function
answer
Required
No
(except in
essay,
matching, and
Maple-graded
questions)
Internal
directive
Defines correct answer for use in grading. If
mathematical question, must conform to the system
math/formula syntax.
answer.number
or answer.unit
Optional
No
Internal
directive
Defines correct number and units of answers in
numeric questions. Required in numeric questions.
maple
Required (in
Maple-graded
questions)
No
Internal
directive
Maple code to grade student responses and prevent
cheating.
plot
Optional
No
Internal
directive
Maple plot command that plots a student response
or related function. Available in all Maple-graded
questions.
grading
Optional
No
Internal
directive
Defines grading mode in numeric questions.
Required in numeric questions.
units
Optional
No
Internal
directive
Reference to a customized table of units.
digit
Optional
No
Internal
directive
Number of significant digits. Required for exact_sigd
and toler_sigd grading modes in numeric questions.
perc
Optional
No
Internal
directive
Percentage error (or tolerance). Required for
toler_perc grading mode in numeric questions.
err
Optional
No
Internal
directive
Absolute error (or tolerance). Required for
toler_sigd and toler_abs grading modes in numeric
questions.
tolerance
Optional
No
Internal
directive
Absolute tolerance for formula questions (including
subtypes).
choice.i
Optional
Yes
Display can contain
variables
Contains the ith choice in a multiple choice or
multiple selection question. The values of i in a
question must start at 1 and be consecutive.
comment or
comment.i
Optional
Yes
Display can contain
variables
Contains feedback provided to students upon
grading. The comment.i field provides responsespecific in multiple choice questions. The values of i
in a question must start at 1 and be consecutive.
hint.i
Optional
Yes
Display can contain
variables
Contains a hint. The values of i in a question must
start at 1 and be consecutive.
solution
Optional
Yes
Display can contain
variables
Contains worked solution. Shown only in Study
Session assignments.
info
Optional user specified
No
Internal
directive
Contains descriptive information about the question.
Multiple user specified fields and corresponding
values can be contained in this statement.
132 •
Notes:
1. Internal Directive fields are commands that are evaluated and performed
by the system. They cannot contain HTML or MathML tags and must
conform to the system syntax for algorithms, formulas, math expressions,
or command switches.
2. Display fields hold question information that is used in displaying the
question or related feedback, hints, or solutions. The topic and name
fields cannot contain variable values because algorithmic variables are set
at the level of the question.
11.4 Plain-text File Question Enhancements
There are some question types in Maple T.A. that can be enhanced by editing
the .qu file. There are also some question types that can only be created or
edited by using plain-text files or LaTeX files.
Response-specific Feedback
You can add response-specific feedback to multiple-choice and list questions
by editing the .qu file.
Note: If you create your multiple choice questions in the Question Designer, then
you can add response-specific feedback without having to edit the .qu file. This
feature was added in Maple T.A. 3.0.
Multiple-choice Question The following example shows three possible
answers, each of which returns a different comment to the student if they
choose it.
Example Question Script
mode=Multiple Choice@
name=MC1@
editing=useHTML@
algorithm=$f=mathml("2*x^2+10*x+12=0");
$g=maple("printf(MathML[ExportPresentation](2*x^2+10*x+12=0))");@
question=What is a solution to $f in simplified form?@
answer=1@
choice.1=x=2@
choice.2=x=4/2@
choice.3=2(x+3)(x+2)@
comment.1= Well done@
comment.2= Your answer should be in simplified form@
11.4 Plain-text File Question Enhancements • 133
comment.3= Set one of the factors equal to 0 and solve for x@
List Question A basic List question can be created in the inline editor of the
Question Editor. You can add response-specific feedback by editing the .qu file
and uploading the altered question file. The following example shows four
answers that each have feedback geared toward that question.
Example Question Script
question=Who first developed the General Theory of Relativity?@
grader=relaxed@
display=text@
answer.1=Einstein@
credit.1=1.0@
comment.1=Yes, but you should use his full name@
answer.2=Albert Einstein@
credit.2=1.0@
comment.2=Completely correct@
answer.3=Stephen Hawking@
credit.3=0.25@
comment.3=Partially correct. Stephen Hawking helped extend Einstein's
Theory of Relativity@
answer.4=Hawking@
credit.4=0.25@
comment.4= Partially correct. Stephen Hawking helped extend Einstein's
Theory of Relativity, but you should use his full name.@
mode=List@
name=partial credit@
editing=useHTML@
Key Word Questions
A key word question looks in the student response for the specific words that
you have listed. If they appear anywhere in the response, the student will
receive credit. This question type can only be created in plain-text or LaTeX
files.
mode=key words@
question=<p class="noindent">Which two scientists independently discovered
inductance?</p>@
answer=Michael (Faraday) and Joseph (Henry)@
134 •
A
assignment editor
overview 37
assignment statistics
overview 58
assignment tab
choose name 39
select questions 39
set policies 40
assignments
create new 39
introduction 1
locked 38
mastery 44
naming 39
study session 44
types 42
C
changing grades 56
class
create new 4
registration form 4
Class Homepage 3
instructor use of 3
links 3
menu items 3
E
edit
student information 59
G
generating reports 54
gradebook
add comments 57
add external assignment 59
edit student information 59
generating reports 54
introduction 1
overview 53
grouped questions 40
H
headers
advanced button 39
I
individual questions 40
instructor
logging on 2
instructors
introduction 1
item statistics
overview 59
M
mastery assignment 44
merge questions 40
N
naming
assignments 39
new assignment 39
P
proctors
introduction 1
Q
question repository
introduction 1
questions
selecting 39
S
scramble questions 40
selecting
questions 39
setting policies 40
student statistics
add comments 57
assignment weighting 56
changing grades 56
overview 55
students
class homepage 1
study session 44
system administrators
introduction 1
system homepage 2
T
types of assignments 42