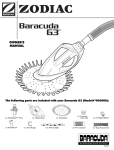
1
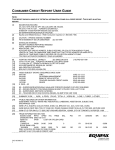
User Guide
NVAF, Volume and Decay Data Collection
and Edit System
Version 5.6
Ministry of Sustainable Resource Management,
Resource Information Branch
August 25, 2003
Contents
Introduction
1
Purpose of this Document ............................................................................................ 1
How this Document is Organized ................................................................................. 1
Document Conventions ................................................................................................ 1
User Commands and Data Entry Fields .......................................................... 2
Warning Notes................................................................................................. 2
Notes ............................................................................................................... 2
Screen Captures (Pictures) ............................................................................. 2
Data Entry Notes .......................................................................................................... 3
System Warnings ............................................................................................ 3
System Error Message .................................................................................... 3
Keyboard Commands ...................................................................................... 3
File Format and Utility................................................................................................... 4
New Version Developments ......................................................................................... 4
Getting Started
5
Installation of the Software ........................................................................................... 5
Installing DVHost and DVHand Software on PC ............................................. 5
Installing DVHand Software onto the Handheld .............................................. 6
Functional Overview
13
Using the Handheld
15
Starting the DVHand Program on the Handheld......................................................... 15
Standing Assessment.................................................................................... 15
Entering a Sample ......................................................................................... 16
Entering a Plot ............................................................................................... 19
Entering Trees ............................................................................................... 20
Felled Measures ......................................................................................................... 24
Felled Path.................................................................................................................. 26
Marking Phase Primary Leader .................................................................................. 28
Primary Leader Only...................................................................................... 28
Marking Phase Multiple Leaders ................................................................................ 30
Multiple Leaders ............................................................................................ 30
Bucking ....................................................................................................................... 34
Post Bucking - Entering Decay Section Measures ..................................................... 35
Transporting the Handheld ......................................................................................... 40
Managing Data - Overview
41
Managing Data
43
PC Handheld Data Transfer ....................................................................................... 43
Uploading Data from Handheld to the PC ..................................................... 43
User Guide Volume and Decay Data Collection and Edit System
08/08/2003
Contents • i
Downloading Data to the Handheld from the PC ...........................................49
Data Backing Up .........................................................................................................54
Transferring data to diskette ..........................................................................54
Transferring data to other PC subdirectories .................................................59
Reports...........................................................................................................62
Creating Reports ............................................................................................62
Maintaining Samples ...................................................................................................66
Troubleshooting ..........................................................................................................68
Purging All Data .............................................................................................68
Reindexing Data Files ....................................................................................69
Sample Tree Deletion ....................................................................................69
Bugs ...............................................................................................................70
Edits ............................................................................................................................70
Measurements to Edit ....................................................................................70
Appendices
73
Basic DOS Commands ..................................................................................73
DVHand Installation Files ...............................................................................73
SAMPLE DECAY REPORT ...........................................................................74
ii • Contents
08/08/2003
User Guide Volume and Decay Data Collection and Edit System
Introduction
Purpose of this Document
This document describes basic instructions on how to use the NVAF, Volume and
Decay Data Collection and Edit System. This document is designed for field
personnel who are already familiar with the NVAF or Decay data collection process.
The Volume data collection process involves the collection of taper data only
(diameters outside bark and double bark thickness); the process is not (yet) described
in this user guide.
How this Document is Organized
The User Guide is divided into the following sections:
1.
Introduction
Provides a brief overview of the entire document.
2.
Getting Started
Details how to load the software on your PC and the Handheld.
3.
Using the Handheld
Provides data entry instructions for the handheld.
4.
Managing your Data
5.
•
PC Handheld Data Transfer
•
Data Backup
•
Reports
•
Maintain Samples
Appendices
Document Conventions
All instructions contained in this document for the PC and Handheld are written as
DOS based commands. When using the PC, you may also use the equivalent
Windows commands.
User Guide Volume and Decay Data Collection and Edit System
08/08/2003
Introduction • 1
User Commands and Data Entry Fields
All commands that must be entered by the user are formatted in Courier 11
point bold and indented. These commands will look similar to the following
example.
cd dvhost
All fields that require data entry by the user will be Arial 10 pt. font bold and
underlined.
Warning Notes
WARNING!
Warning notes are used to
draw attention to critical
items or critical data entry
points in the program.
Warning Text
Warning notes are used in the document to draw attention to critical items or
indicate a point in the program where you MUST ensure that the information you
have entered is correct.
Warning notes at the end of the following three sections will indicate that the
information cannot be changed unless the tree is redone.
1.
Standing assessment
2.
Marking phase
3.
Post bucking phase
Notes
Any items that you should be aware of when following a procedure are described in a
note within a section similar to the following example.
NOTE: Items to note before proceeding.
Screen Captures (Pictures)
For each of the screen captures (pictures) an explanation of terminology (e.g., DIB-1)
and units is located at the bottom of the screen. This message will change depending
on the cursor location.
Header Data identifies
screen title, tree and
leader number as well as
utop and total height.
2 • Contents
08/08/2003
User Guide Volume and Decay Data Collection and Edit System
Footer information
contains screen # and a
brief explanation of the
active field.
Data Entry Notes
Use the <Esc> key to move
through the data entry screen
more quickly.
You can move through some screens quickly if the information is already in the
database by pressing <Enter> to accept the information, then <Esc> to move to
the "Screen OK?" prompt.
System Warnings
Press <Enter> to
acknowledge a system
warning.
System warnings are identified by a question mark and differ from error messages. If
a system warning occurs (i.e., a warning message at the bottom of the screen when
using this program), press <Enter> to acknowledge the warning. You have the
option of changing the information you entered or moving to the next screen.
System Error Message
System error messages are identified by an exclamation mark and are displayed at the
bottom of the screen when an error has been made in data entry. You cannot move
ahead in the program until the error is corrected.
Keyboard Commands
All frequently used PC and handheld keyboard keys that must be entered by the end
user will be denoted with < > brackets. The following example illustrates how
typical keys will be denoted in this document.
Key
<← Clr>
(Handheld only)
Text
Backspace/Clear
<Sp>
<Esc>
Space button
Escape
<F1>
Help
Pick lists
Go to Decay
Identification screen.
<F2> (Handheld)
<F3>
Description
• Validates information
• Moves ahead to next screen
User Guide Volume and Decay Data Collection and Edit System
(Handheld only)
Moves to previous screen. Does NOT
validate information.
Help for the current screen
Access pick lists
Only accessible from the Decay
Segment Measurement Screen.
08/08/2003
Introduction • 3
<F4>
Identify fork
<F5> (Husky: press
‘paw’ and 5)
<Bkspc>
<Ctrl>
<Alt>
<Enter>
Memo field
Up and down arrow
keys
Backspace
Control
Alt
Enter
Move between fields
Identify fork in the current volume or
decay section.
Memo field is accessible at anytime
(PC only)
(PC and Handheld)
File Format and Utility
.BAT – Batch file. These files are the software startup files that are used to initiate
the software. The DV.BAT file starts the handheld DVHAND software on the
handheld and DVHOST.BAT starts up the DVHOST software on the PC. In a DOS
screen, only the file name (ie DV) is needed to call up the file.
.DBF – Database files. These files contain the sample data and the lookup files used
by the software.
.EXE – Executable files. These files contain the operating instructions for the
software and are called up by the BAT files.
New Version Developments
Periodically the data collection software is enhanced and a new version is released.
Due to operational sampling concerns, the new version of the software may be
released in advance of a properly updated User Guide. Consequently, documentation
of the enhancements must initially be made in an ad hoc fashion and will be found in
the appendix. Note the present version, 5.6, appears to be stable and there are no
plans to update it.
4 • Contents
08/08/2003
User Guide Volume and Decay Data Collection and Edit System
Getting Started
Installation of the Software
The installation of the software has two steps:
1.
Installing DVHost and DVHand software on your personal computer
2.
Installing DVHand on your handheld computer.
Installing DVHost and DVHand Software on PC
Locate the zipped copy of the DVHost software currently found at the following site:
http://srmwww.gov.bc.ca/tib/vri/vri/software/nvafvoldecay.htm
NOTE: If using the Windows XP operating system, note that the PC / Husky
Handheld communication does not work. In order to work around this problem,
you can use “HCOM for Windows” available from the Itronix web site –
http://www.itronix-tac.co.uk/downloads/hcomw.zip . Unzip the program into a new
directory and run the setup.exe file.
Windows based instructions:
1.
Open Windows Explorer and access appropriate drive.
2.
Open File/New/Folder and create DVHOST subdirectory.
3.
Download the zipped software file from the web site.
4.
Extract contents into the DVHOST subdirectory.
5.
Create a shortcut for the desktop
DOS based instructions for use for most handhelds:
1.
Start DOS or open a DOS window. (You should be in the C directory as
shown below.)
C:\>
2.
Create directory called DVHost
C:\>md dvhost <Enter>
3.
Copy contents of floppy to directory DVHost
C:\>cd dvhost
C:\dvhost>copy a: *.* <Enter>
4.
Unzip the DVHost files
C:\dvhost>pkunzip dv56host <Enter>
NOTE: If you are installing a version of the software other than 5.6, please
substitute dv56host in Step 4 with the appropriate program name.
User Guide Volume and Decay Data Collection and Edit System
08/08/2003
Getting Started • 5
For DOS or Windows systems, follow step 5
5. Edit the Config.sys file, or its equivalent, to increase the buffer size and
the number to files that can be opened at any one time. Look for the
following lines of code and modify the number cited to match the ones
below:
Buffer = 30
Files = 99
Installing DVHand Software onto the Handheld
WARNING!
The following process is required for the initial setup ONLY. Do not
repeat this part of the setup. Repeat downloading of these data files to
the handheld will overwrite any sample DATA entered on the handheld.
The following installation instructions require using both your PC and handheld.
NOTE: Please consult your handheld user manual to determine which
connection ports are required.
1.
On the PC
On your PC, start the DVHost program from the DVHost directory
C:\dvhost>dvhost <Enter>
Windows: double click on DVHost icon
NOTE: Ensure that your handheld is connected to the PC before
proceeding.
On the Husky Handheld
2.
On the HANDHELD, at the C:\> prompt, create a directory called DV.
DOS commands are summarized in the appendix.
C:\>md dv <Enter>
3.
Type
HCOM <Enter>
you should see this screen.
Husky File Transfer Utility V0.06
Husky FS3 Portable Computer
© Copyright Husky Computers Ltd
Press ESC to exit.
On the PC
6 • Getting Started
08/08/2003
4.
Use the arrow keys and select:
PC Handheld-Communications Menu <Enter>
User Guide Volume and Decay Data Collection and Edit System
5.
Select:
Download Sample Data to Hand Held <Enter>
6.
Do not choose any samples and ensure that "N" is in each row.
7.
At the following prompt type <Y> <Enter> to continue
Ensure that "N" is at
the beginning of all
samples.
User Guide Volume and Decay Data Collection and Edit System
08/08/2003
Getting Started • 7
WARNING!
8 • Getting Started
If this is not a first time installation, ensure that no key data is stored in the
handheld or it will be overwritten.
08/08/2003
8.
At the following prompt type <Y> <Enter> to continue:
9.
Select from menu below:
•
If Husky Handheld and Windows other then XP: Ministry
Handheld <Enter>.
•
If Husky Handheld and Windows XP: Any Other <Enter>
•
If not a Husky Handheld: Any Other <Enter>
User Guide Volume and Decay Data Collection and Edit System
(A) Ministry Handheld Option (If Husky Handhelds and
Windows Operating System other than XP)
10. Once the ministry handheld is selected, this prompt will be displayed. Enter <Y>
for yes once the handheld is properly set up.
11. This screen will be displayed
NOTE: Baud setting can be as high as possible as long as transmission is
successful.
12. Press <Enter> to confirm Baud Rate (connects at 38400bps with the Husky).
To change any of the settings, press the <Tab> key, scroll to a different setting
and press <Enter>.
10. Press <Enter> to confirm the default COM1 port
11. If your COM port is not COM 1 a menu will appear after pressing
<Enter>. Select your COM port from the menu and press
<Enter>.
User Guide Volume and Decay Data Collection and Edit System
08/08/2003
Getting Started • 9
12. Press <Enter> at the <Y> prompt to continue.
13. The file transfer process will commence. The Husky screen will show
the status of the transfer of each file. The list of files that are
transferred are:
COLOURS.DBF
DV.BAT
DV_HAND.EXE
FLAG
HANDMESS.DBF
HELPTEXT.DBF
LOOKUP.DBF
MOFFILES.DBF
PCIKGRP.DBF
PICKLIST.DBF
PLOT.DBF
PUBLIC.DBF
RULES.DBF
SAMPLE.DBF
TL_DECAY.DBF
TREE.DBF
TRLEADER.DBF
TR_PATH.DBF
TR_SEG.DBF
TS_DECAY.DBF
VALID.DBF
VAL_FIELDS.DBF
WINDOW.DBF
WINDOW.DBT
NOTE: Note that all of the files to be downloaded are first sent to a PC
subdirectory named ‘handheld’, and then are sent off to the handheld. This
subdirectory is automatically emptied of its contents at each download.
14. Press <Esc> when the reception is complete to get back to the
DOS prompt on the handheld.
(B) Other Handheld (if non Husky Handhelds)
10. Once the Other Handheld option is selected, the cursor will appear
opposite a DOS prompt in the Handheld subdirectory
10 • Getting Started
08/08/2003
User Guide Volume and Decay Data Collection and Edit System
11. Follow the installation instructions provided with your handheld and
copy the files listed above to the handheld.
NOTE: Note that all of the files to be downloaded are first sent to a PC
subdirectory named ‘handheld’, then the files are sent off to the handheld. This
subdirectory is automatically emptied of its contents at each download.
12. Once the file copy is completed, enter ‘exit’ at the DOS prompt to
return to the DVHost software. The download process is complete.
(C) Other Handheld (Husky Handheld and Windows XP)
10. As in Section B above, select the Other Handheld option to get to
the DOS prompt in the Handheld subdirectory
11. Go to Windows and start the HCOM for Windows program by selecting
Start, All Programs, HCOM for Window.
12. Ensure the Com port is the correct one.
13. Click on the button with the white arrow to connect if not already
connected. The display will show all the files currently on the Husky.
14. Click on the button with the red arrow pointing down to start the
transfer of files to the Husky. Navigate to the Handheld subdirectory.
User Guide Volume and Decay Data Collection and Edit System
08/08/2003
Getting Started • 11
15. Select all the files and click on <Open>. If similar files already exist
on the handheld, you will see a prompt to overwrite existing files, click
yes to all.
NOTE: Note that all of the files to be downloaded are first sent to a PC
subdirectory named ‘handheld’, and then are sent off to the handheld. This
subdirectory is automatically emptied of its contents at each download.
16. After the file transfer is complete, return to the DOS window in
DVHost and type <Exit> and any other key to continue. At this stage
the file transfer process is complete.
12 • Getting Started
08/08/2003
User Guide Volume and Decay Data Collection and Edit System
Functional Overview
Using the Handheld
SAMPLE
Identify
Create
Sample entered in the system
PLOT
Identify
Create
Plot entered in the system
TREE
Identify
Enter Standing
Path
Base Segment
Measures
Yes
Another tree in plot?
No
Felled Measures
Felled Path
Yes
Multiple Leader
Primary Leader or
Multiple?
Primary Leader
Decay Section
Measures
Decay Section
Measures
Another Tree?
Yes
No
Managing Data
User Guide Volume and Decay Data Collection and Edit System
08/08/2003
Functional Overview • 13
Using the Handheld
Starting the DVHand Program on the Handheld
1.
Change to the DV directory
C:\>cd dv <Enter>
2.
At the c:\dv> prompt type:
C:\dv>dv <Enter>
3.
When the Hand-Held ID screen appears, enter your 3 digit
alphanumeric ID then press <Enter>
NOTE: If you do not already have an ID, enter a new ID by typing any
combination of three letters and/or numbers. The ID has no functional
purpose but serves as another way to identify the handheld.
4.
You will be in the Main Menu, which is the start of the Standing
Assessment
Standing Assessment
The Standing Assessment Phase involves:
1.
Entering a sample
2.
Entering a plot
3.
Entering trees
•
Standing Path
•
Base (Butt taper) Measures
User Guide Volume and Decay Data Collection and Edit System
08/08/2003
Using the Handheld •15
Entering a Sample
Entering a sample involves:
1.
Creating a sample
2.
Identifying a sample
3.
Describing a sample
Creating a Sample
Information is
entered in Reg,
Cmp, L, Ins, and
Samp to create a
sample.
1.
From the Main Menu select:
Identify Sample <Enter>
2.
Reg - Enter the Provincial Region Nmber or press <F2> to make a
selection from the pick list <Enter>
3.
Cmp - Enter the Provincial Compartment Number <Enter>
4.
L - Enter the compartment letter or leave blank <Enter>.
NOTE: The compartment letter field 'L' (Step 4) is usually left blank.
5.
Ins - Enter the Installation Code - 0-99 <Enter>
NOTE: The installation field 'L' (Step 5) is usually left blank.
6.
Samp - Enter the Sample Number <Enter>
NOTE: The sample number field 'Samp' (Step 6) is usually the VRI ground
sample number.
7.
Choose "Y" at the following prompt:
Create Y/N?
N - will close screen, return to Main Menu
Y - will create the new sample and proceed to sample memos fields and
sample type.
16 • Using the Handheld
08/08/2003
User Guide Volume and Decay Data Collection and Edit System
NOTE: If sample already exists press <Esc> to move ahead quickly
8.
Your cursor will be located in the memo field. Enter a memo comment or
simply press <Enter> to move to the Project # field. This memo field is
used for miscellaneous comments about the sample.
9. Project# - Enter the Project Number <Enter>
NOTE: The project # identifies the data collection project and is usually named
after the inventory unit being sampled, such as ‘Okanagan TSA NVAF’.
10. Sample Type (D/V/B) - Enter the Sample Type (‘D’ecay, ‘V’olume or
‘B’oth) <Enter>.
NOTE: NVAF samples are all Decay samples and require the code ‘D’.
11. Sample Date - Enter the Sample Date or press <Enter>
to accept the default
12. At the following prompt, press <Enter> to move to the next screen.
Screen OK (Y/N)? Y
N - returns to the comment field at the top of the screen.
Y - saves the entered fields and moves to the next screen.
Identifying an Existing Sample
Identifying a existing sample is done by either entering the sample region,
compartment and sample number or by selecting the sample from a pick list.
1.
Place the cursor at the Region field and press <F2> to access the pick list.
Scroll down the list and make selection by pressing <Enter>.
User Guide Volume and Decay Data Collection and Edit System
08/08/2003
Using the Handheld •17
2.
Once the sample selection is made, the cursor will drop down to the sample
memo field. Move the cursor through the remaining fields by using the
down arrow key.
3.
At the bottom of the screen will be the prompt
Screen OK(Y/N)? Y
N - returns to the comment field at the top of the screen.
Y - saves the entered fields and moves to the next screen.
NOTE: There is a shortcut that bypasses the fields inbetween the sample id
and the ‘screen OK prompt’. Press <Escape> after entering the sample id
and the cursor will move straight to the ‘screen OK prompt’.
Describing a Sample
ID is entered by
default using the
data from the
Identify Sample
screen.
1.
Composite Zone-SubZone-Var-Ph - Enter Biogeoclimatic
Zone or <F2> for pick list. Data will automatically be entered in
the next four fields by the program.
NOTE: If sample already exists press <Esc> to move ahead quickly.
2. (C)oast or (I)nterior
Enter C or I <Enter>
3.
Press <Enter> at the following prompt to save the data and move to
the DVHand main menu.
Screen OK(Y/N)? Y
N - returns to the comment field at the top of the screen.
Y - saves the entered fields and moves to the next screen.
18 • Using the Handheld
08/08/2003
User Guide Volume and Decay Data Collection and Edit System
Entering a Plot
In order to enter a plot into
the program, you are required
to identify the plot. If the plot
is new, it must be created.
Entering a plot involves:
1.
Creating/Identifying the plot
2.
Describing the plot (if the plot is new).
Creating/Identifying a Plot
1.
From the Main Menu select:
Identify Plot <Enter>
2.
ID - Default data will be inserted. An existing plot can be selected by
using pressing <F2> and selecting from the pick list.
3.
Plot# - Enter a Plot number.
Enter a number, then press <Enter>
A plot number is comprised of a number followed by a letter. Since VRI
ground sample plot are identified by their cardinal direction from the center
of the sample, convert the letter as follows:
4.
North plot
plot 1
East plot
plot 2
South plot
plot 3
West plot
plot 4
Enter F then press <Enter>
"F" refers to a full measured plot. "A" and "B" are count plots and are
no longer used
5. To accept the data, press <Enter> at the following prompt:
Create(Y/N)? : Y
Describing a Plot
User Guide Volume and Decay Data Collection and Edit System
08/08/2003
Using the Handheld •19
Press <F2> to
access the pick list,
which displays a
list of previously
created plots.
NOTES: If plot already exists press <Esc> to move ahead quickly. If the plot
has already been created and identified then press <F2> to access the
picklist, which displays a list of previously created plots.
1.
Aspect - Enter a value between 0-3600 <Enter>
2.
Elevation - Enter a value between 0-5000m <Enter>
3.
Slope% - Enter average slope percent as a value between 0-999
<Enter>
4.
Sl Pos – Slope position. Press <F2> to obtain a pick list <Enter>
5.
Site Unit - Enter a value between 0-99 <Enter>
(Refer to BEC book)
6.
Press <Enter> to move back to the Main Menu.
Screen OK (Y/N)?: Y
Entering Trees
Entering trees involves:
1.
Identifying the tree
2.
Entering the standing path
3.
Entering base segment measures
NOTE: You MUST enter the required data in the Standing Path Survey and
Base Segment Measures screens for ALL trees in the plot before
proceeding to Felled Measures.
Identify Tree
1.
20 • Using the Handheld
08/08/2003
From the Main Menu select:
Identify Tree <Enter>
User Guide Volume and Decay Data Collection and Edit System
Trees that are redone are
assigned the original tree
number plus 100.
Tree# - Enter a Tree number <Enter>
1.
NOTE: Use the arrow keys to check for trees already identified in the current
plot.
For example,
Initial tree = Tree#8
Must be redone = Now#108.
Tree#108 must be redone =
Now#208
2.
Species - Enter a Species Code or press <F2> to select a species from the
pick list <Enter>
3.
Date - Enter the date or press <Enter> to accept the default date
4.
D/V/B - Enter decay, volume or both <Enter>
5.
(A)ct/(E)st - Select (A)ctual or (E)stimate <Enter>
This field applies to actual or estimated DBH.
6.
Confirm the data by pressing <Enter> at the following prompt:
Screen OK (Y/N)?: Y
N - Moves cursor to the Tree number field
Y - Moves to the Standing Path Survey screen.
Standing Path Survey
S indicates
Standing Path.
NOTE: You must enter standing path for ALL trees in the plot before proceeding
to Felled Measures.
Measurement
units are shown
at the bottom of
the screen.
1.
Path -Enter the Pathological code or press <F2> to select from the
pick list, then press <Enter>
2.
StrHt -Enter the Start Height, then press <Enter>
Start height is the bottom height of indicators with a definite length and
the average height of indicators without a definite length.
3.
EndHt-Enter the End Height, then press <Enter>
End height is the top height for all indicators with a definite length:
Frost crack and Scar. Note this is different for Fell Path.
User Guide Volume and Decay Data Collection and Edit System
08/08/2003
Using the Handheld •21
4.
Width -Enter the average width of the SCAR path, then press
<Enter>
5.
For each additional Path, scroll down to the next blank row and repeat
steps 1 to 4.
6.
To continue press <← Clr> to validate data and move to the next
screen.
NOTE: Additional Standing Paths can be entered as long as you have not
completed Step 4 of Base Segment Measures and felled the tree.
NOTE: You can cycle between the path and butt taper screens by pressing
escape to go to the previous screen or by pressing backspace to go to
the next screen.
Base Segment Measures
1.
CumHt – Cumulative height from high side is fixed for the heights of
0.3 to 1.3 m, but there is an optional height between 0 and 0.3 m that
can be entered by overriding the 0.0 height. If the optional height is not
measured, then skip the 0.0 row and move the cursor to the DOB at 0.3
m height.
NOTE: The 0.0 height is an optional height that can be changed to any value
from 0.0 to 0.29 to allow for an additional bottom taper measures below
0.3 m.
22 • Using the Handheld
08/08/2003
User Guide Volume and Decay Data Collection and Edit System
Warning!
2.
DOB - Enter Diameter of outside bark <Enter>
3.
DBT - Enter Double Bark Thickness and press <Enter>
4.
When last field is entered <← Clr>
Ensure that your data is correct. If you select “Y” at the prompt in Step 5, the
data can no longer be changed and CANNOT be DELETED from the
database. Therefore, if you need to correct the tree data you MUST REDO
the tree. This is the LAST opportunity to change any of the data for the
standing tree.
4. Fell Tree (Y/N)?
Choose "N" if you have more trees to identify within the sample plot.
Choose "Y" if you have identified all the trees in the sample plot.
N - Saves the data and moves back to the Identify Tree screen (i.e.,
Standing Assessment is not complete.)
Y - Saves data (data cannot be changed) and moves to Felled Measures
for the current tree.
End of Standing Assessment
User Guide Volume and Decay Data Collection and Edit System
08/08/2003
Using the Handheld •23
Felled Measures
NOTE: Felled Measures are done after the sample tree has been felled. All
measurements are actual, except where a broken top is projected.
Missing wood radius
when applicable.
Sound wood radius
when applicable.
1.
Counted Stump Age - Enter a value between 10 – 150 yrs
<Enter>
2.
Stump Ht - Enter Stump Height where age is counted <Enter>.
Usually this height is 1.3m.
3.
Miss.Wood Rad - Enter missing wood radius in centimeters
<Enter>.
4.
SoundRad - Enter the Sound Wood Radius <Enter>. Sound
wood radius is only measured if there is a missing wood radius.
5.
AgeBfrCorr - Age Before Correction will be calculated by the system.
6.
Corr - Enter Age Correction then press <Enter>.
correction from site index tables.
7.
TotalAge - Total Age will be calculated by the system
8.
CrwnHT - Enter the Crown Height - 0.1 - 999.99m <Enter>. If
the tree is dead, then enter a height immediately below the break or
total height.
Obtain age
NOTE: Crown Height MUST be less than Total Height and must be entered
even if there is no crown.
24 • Using the Handheld
08/08/2003
User Guide Volume and Decay Data Collection and Edit System
9.
BrkHt – Enter Broken Height for the primary leader ONLY if broken
<Enter>. (Defaults to 0.0 if there is no break).
NOTE: If break is below the Utop, no Utop should be entered.
10. DIB@Br - Enter a Diameter Inside Bark at Break <Enter>
(ONLY if there is a broken top. Defaults to 0.0 if there is no break.)
11. Utop15 - Enter length to Utop <Enter> (If a broken top is below the
Utop enter at the default value of 0.0). Note that there is Utop 10 for
immature coastal trees > 120 years and all trees in the Interior.
NOTE: DO NOT enter a projected Utop length if the top is broken.
12. Tot Ht - enter the length measured or “projected” height in the case of
broken top Top Height - 3 - 100m. Round off to the nearest 0.5m.
13. To move to the next screen, press <Enter> to accept the "Y" default.
Screen OK(Y/N): Y?
N – Moves the cursor to Counted Stump Age for correction
Y - Moves the cursor to the Leaders and Utop screen (i.e., the
beginning of the Marking Phase on page 28.)
User Guide Volume and Decay Data Collection and Edit System
08/08/2003
Using the Handheld •25
Felled Path
Felled Path can be completed at any time after you have commenced the marking of
the sections of a leader. Any standing path that is confirmed as felled path must be
re-entered.
NOTES: F will now show in left column to indicate Fell Path.
Felled path can be added at any time after the tree is felled.
Felled path can be deleted by pressing the delete key.
Felled path in secondary leaders is entered when in the specific
secondary leader section screen. Leader number is displayed in the
screen header.
Use <F2> to access the Fell Path screen and <Esc> to exit
S in first column is for
Standing Path. The F
in the first column is
for Fell Path.
The units for each
column entry appear
next to the column
description.
Enter newly observed path on the felled tree and re-enter Standing Path
measurements that have been verified now that the tree is felled.
26 • Using the Handheld
08/08/2003
1.
Path - Press <F2> and select a pathological code from the list
<Enter>
2.
StrHt - Enter lower height of path in meters <Enter>
Start height is the bottom height of indicators with a definite length
(e.g., SCAR and frost crack) and the average height of indicators
without a definite length (e.g., conk, blind conk, rotten branch.)
3.
EndHt- Enter upper height <Enter>
End height is the top height for all indicators with a definite length:
Frost crack, scar, fork, crook, broken top, dead top. The start and end
heights of forks and crooks correspond to the heights sectioned on the
User Guide Volume and Decay Data Collection and Edit System
leader. The end height of broken tops is the projected height of the
tree.
4.
Wdth - Enter width of path (in cm) - only required for SCAR
5.
For each new entry scroll down.
6.
When you have finished entering data, press <Esc> to exit.
User Guide Volume and Decay Data Collection and Edit System
08/08/2003
Using the Handheld •27
Marking Phase Primary Leader
The Marking Phase for a Primary Leader involves:
1. Identifying secondary leaders (if any) and their heights and Utops
2. Entering segments
WARNING!
Identify whether you have a tree with a PRIMARY leader ONLY or a tree with
MULTIPLE leaders.
•
Primary Leader Only - Go to page 28.
•
Multiple Leaders - Go to page 30.
Primary Leader Only
For trees with a primary leader only
Identify Leader and Utop
Fields are filled by default (display screen only)
1.
Move to the next screen (DecaySec Screen) by pressing <← Clr>
You are now ready to enter the marking phase
28 • Using the Handheld
08/08/2003
User Guide Volume and Decay Data Collection and Edit System
Entering Cumulative Length Segments
At any time during this
process, press <F2> to
complete Felled Path . Refer
to page 26 for additional
information on Felled Path
1.
Use the down arrow key to scroll to segment #6.
2.
CumLen - Enter the Cumulative length of the next segment
<Enter>.
Top height and
Utop height are
cited in right hand
corner.
NOTE: If a segment entered is longer or shorter then 2m, or in segment #6,
1m, you will be asked to verify the segment length.
SegLn - the segment length will be calculated automatically by the system.
3. Press the down arrow and,
WARNING!
The Section # and CumLen of the Utop is automatically entered by the
system when you enter a CumLen greater than the Utop. If the Utop height
does not appear or is accidentally deleted, it must be manually entered or the
tree redone.
4. Repeat steps 2 and 3 until all the segments are entered.
5.
Enter the Top height or the “estimated” top height, then press the
<← Clr> button to validate the data.
NOTE: If the primary leader is broken, the second to last section will be the
section ending at the broken top. The final section is the projected height.
User Guide Volume and Decay Data Collection and Edit System
08/08/2003
Using the Handheld •29
WARNING!
Ensure that the cumulative length data is correct by scrolling through the
CumLen column. Once you select "Y" in the next step, the data CANNOT be
changed.
6. To move to the next screen, enter <Y> at the
prompt“Is Section #_, the top of the Leader
(Y/N)?”
N - Saves data and moves to the Identify Tree screen (i.e., Marking
Phase is not complete.)
Y – Saves Data and moves to the screen #211 in preparation for the
Bucking Phase.
End of Marking Phase for Primary Leader Only
Marking Phase Multiple Leaders
For trees with more then one leader
Multiple Leaders
The marking phase for Multiple Leaders includes:
30 • Using the Handheld
08/08/2003
1.
Identifying secondary leaders
2.
Entering primary leader segments
3.
Assigning secondary leader/s
User Guide Volume and Decay Data Collection and Edit System
Identifying Secondary Leaders
1.
Leader - The primary leader is listed by default.
2.
Scroll down to create a secondary leader/s and enter "1" for the first
secondary leader (limit of 9) <Enter>
3.
Height - Enter length measured <Enter>
NOTE: If a secondary leader top is broken, enter the actual broken top
height (and not the projected height)
4.
Utop10 - Utilization Height <Enter>
NOTE: If a secondary leader is broken below the utop height, enter 0.0 as the
utop height.
5.
Estimated Fork Ht - Fork Height is the height where the secondary
leader approximately joins the primary leader. This height is only used
to allow the sampler to keep track of the leaders and to aid in the
assignment of leaders to sections of the primary leader.
2.
Move to the next screen (DecaySec Screen) by pressing <← Clr>
User Guide Volume and Decay Data Collection and Edit System
08/08/2003
Using the Handheld •31
32 • Using the Handheld
08/08/2003
3.
Select the primary leader for section marking. The secondary leaders
are listed but are not available for section marking until the primary is
first marked.
4.
Follow the primary leader section marking procedures cited above.
5.
Once the primary sections have been marked, the secondary leaders can
be assigned to the forked sections on the primary leader. Select the
correct primary leader section by placing the cursor at the section that
bounds the fork.
6.
Press the <F4> key to start the leader assignment sequence. The <F4>
key will access the Decay Fork Identification screen for the selection of
the correct leader. Scroll down to the correct leader – it will be the one
with a similar estimated fork height.
7.
Press <← Clr> and then press ‘Y’ to assign the secondary leader.
User Guide Volume and Decay Data Collection and Edit System
8.
The assignment of leader can be confirmed by the presence of a tick
mark in the leader column at the forked section.
9.
Repeat the above steps for all remaining secondary leaders.
10. Once all the secondary leaders have been assigned, the first secondary
leader is ready for marking and must be selected in the leader and utops
screen. Note that the next leader to be marked is in bold. Place the
cursor on the leader and press <← Clr>.
11. Commence marking out the sections by scrolling down to the first blank
row below the first section.
NOTE: The height of the first section is equal to that of the height of the primary
leader forked section.
NOTE: The first segment number is the next consecutive number after the top
segment of the previous leader.
12. Section the secondary leader using the same process as the primary.
User Guide Volume and Decay Data Collection and Edit System
08/08/2003
Using the Handheld •33
NOTE: If a secondary leader is broken, the final section will be the one
ending at the broken top – the height is not projected.
13. Once the first secondary leader is marked and its top section is
identified, the cursor automatically returns to screen #211. Now the
next secondary leader is now ready for selection and marking.
14. Section the next secondary leader using the same process used to
section the primary and first secondary leaders.
15. After all sections on all secondary leaders are entered and the cursor has
returned to screen #211, scroll to “Ready to Buck” in preparation
for the Bucking phase.
End of Marking Phase for Multiple Leaders
Bucking
Bucking commences the final phase of the sample and allows for the entry of section
DIBs and decays.
1.
34 • Using the Handheld
08/08/2003
At Screen #211, Scroll to "Ready to Buck?" then press <Enter>
User Guide Volume and Decay Data Collection and Edit System
2.
To continue select the appropriate leader (Primary or Secondary) <Enter>
Post Bucking - Entering Decay Section Measures
Entering Gross Measures
NOTES: Enter a section DIBs first before entering the decay measures.
WARNING!
1.
Move the cursor to the segment #6 row by scrolling down with the
down arrow key.
2.
DIB-1 - Diameter Inside Bark <Enter>
Note that DIB1 is the long axis.
3.
DIB-2 - Diameter Inside Bark <Enter>
Note that DIB2 is the short axis.
DIB1 must be larger or equal to DIB2.
4.
DBT - Double Bark Thickness <Enter>. This is an optional
measurement and the cursor must be moved over to the DBT column in
order to input data.
5.
Repeat steps 2 to 4 for each segment.
User Guide Volume and Decay Data Collection and Edit System
08/08/2003
Using the Handheld •35
6.
AT UTOP:
⇒ Confirm the DIB-1 (15.0 cm) and the DIB-2 (15.0 cm) data by
pressing <Enter>.
NOTE: Do NOT change the DIB-1 and DIB-2 values at Utop.
7.
8.
AT THE TOP OF THE PRIMARY LEADER:
•
Do not press <Enter> at the DIBs of the top of the tree.
•
Press <← Clr>.
Enter "Y" or "N" at the following prompt:
If N - Press <F2> to complete Felled Path
If Y - Proceed to the Leader Selection screen.
For Multiple Leaders, select next leader and continue entering measurements as per
steps 1 through 8.
WARNING!
If a secondary leader is broken, the final section DIBs will be those of the
broken top, instead of 0.0 by 0.0. The validation routine will create an Error
message when <← Clr> is pressed. A workaround fix is to press
<Escape> to return to screen #211.
Entering Decay Measures
NOTE: Press <F3> to access the Decay Section Measures screen, <Esc>
to exit, <← Clr> to validate fields, and <F2> to access pick lists.
Note that the above image is a set of screens that you will see when completing this section.
36 • Using the Handheld
08/08/2003
User Guide Volume and Decay Data Collection and Edit System
WARNING!
The sampler should assess the decay through a number of sections before
deciding on a shape or a mixture. Once a shape or a mixture is selected, the
selections cannot be changed. Measurement difficulty arises when a solid
shape changes into a ring shape due to the large amount of coalescing that
is required.
Where there is more then one decay: (e.g., decay 2,3…..etc.) a Decay ID can be
created for each decay by scrolling down at D/S. When this field has been verified,
the next consecutive number will be entered in the DecID field by default.
NOTES: If there is another occurrence of the same decay in a tree, the new
occurrence is given a new decay ID and MUST be described as if it is a
new decay.
For Decay running through to Secondary Leaders, refer to Identifying Decay
Section Measures in Secondary Leaders.
Solid Decay
Inner Breadth
(InBrd)
1.
DecID- A numerical identification of decay will be entered by default.
2.
D/S/V – Select (D)ecay, (S)tain or (V)oid <Enter>
3.
Sh – Enter the Shape- (s)olid or (r)ing <Enter>
4.
InWth- Enter the longer diameter <Enter>. For solid or ring decay.
5.
InBrd- Enter the shorter diameter <Enter>. For solid or ring decay.
NOTE: If decay is solid, the program will move from the Inner Breadth field
to the T.Ht field by default.
6.
OutWth -Enter the Outer Width of the ring decay <Enter>
7.
OutBrd - Enter the Outer Breadth of the ring decay <Enter>
8.
T.Ht-Enter the top height of decay in the section <Enter>
9.
B.Ht-Enter the bottom height of decay in section <Enter>
User Guide Volume and Decay Data Collection and Edit System
08/08/2003
Using the Handheld •37
Ring Decay
NOTE: If decay runs through a section, B.Ht will enter by default. Top height
and bottom height are entered by default, except for the segments
where decay starts and stops.
Inner Breadth
(InBrd)
10. S/M - Single or mixed decay <Enter>.
Inner Width
(InWth)
11. %- If there is mixed decay, then indicate the % of one decay in the cross
sectional area. If there is no mixed decay press <Enter> to accept the
100% default and move to the next field.
Outer Breadth
(OutBrd)
NOTE: For single decay, accept the 100% default. Mixed decays MUST have
the decay measures duplicated for each decay in the mix.
NOTE: If one of the decays in a mix terminates while the other decay(s)
continue, continue the mix until the other decay(s) terminate and enter
a mix % of 1% for the terminated decay.
12. Ent - Describe the entrance of decay. Press <F2> and make a selection
from the pick list <Enter>
13. Comp - Compound decay description code. Press <F2> and make a
selection from the pick list <Enter>. This field will populate all of
the decay descriptor fields.
38 • Using the Handheld
08/08/2003
User Guide Volume and Decay Data Collection and Edit System
By default, the cursor will move to the Organ(ism) field.
14. The following decay descriptor fields will be automatically filled once
the compound description field code is selected. The individual codes
can be overridden if required by moving the cursor to the individual
item, pressing <Enter> . Press <F2> to call up the pick lists.
Strn – Decay organism strength.
Tex – Decay organism texture.
Shde – Decay organism shade.
Col –Decay organism colour.
Stg – Decay organism stage.
Frq - Pit, Flecks and Spots frequency.
Shp - Pit, Flecks and Spots shape.
Shd - Pit, Flecks and Spots shade.
Col - Pit, Flecks and Spots colour.
Typ - Pit, Flecks and Spots type
Shd – Mycelium shade.
Col – Mycelium colour.
Typ – Mycelium type.
15. Organ. - Enter the Decay stain Organism code or press <F2> to select
from the pick list <Enter>
16. When data entry is complete on this screen press <← Clr>
NOTE: The program ensures all required data are entered. If any required data item
has been skipped, the user will be advised, and the cursor will be positioned
at that field ready for data entry. If the validation is hung up, then press
<Esc> to return to the section screen.
Decay Measurements in Successive Sections
For a decay that continues into successive sections, enter only the diameter
measures and the T.Ht and B. Ht measures. If it is a mixed decay, also enter the
percentage mix. No other fields need to entered.
NOTE: The section screen will show a tick mark in the decay column opposite each
section if decay has been entered for the section.
User Guide Volume and Decay Data Collection and Edit System
08/08/2003
Using the Handheld •39
Identifying Decay Section Measures in Secondary Leaders
1.
Enter decay in primary leader first as described above.
2.
Select Secondary Leader #1 <Enter>
3.
The first segment in the secondary leader(the parent segment) will come
up
4.
Enter decay identification data as per the previous section, except in the
first shared fork segment the B.Ht must be entered as the length of the
parent segment.
5.
B.Ht will enter by default in the rest of the segments.
6.
Press <Esc> to exit.
NOTE: The program will treat this segment as containing a new decay and
assigned a new number.
End of Post Bucking Phase. Tree is complete.
Transporting the Handheld
WARNING!
It is essential to SHUTDOWN THE PROGRAM before transporting the handheld,
since data can be lost or changed if buttons are inadvertently pressed.
When you are ready to leave the site, shutdown the program and
turn off the handheld to make it safe for transport.
To shutdown down the program:
1. From the screen that you are in press <Esc> as many times as
necessary to get to the get to the main menu.
2.
Press <Esc> while in the DVHand Main Menu screen and you will see
the following prompt:
Exit (Y/N)?
40 • Using the Handheld
08/08/2003
3.
Press Y and you will be back at the C:\> prompt.
It is now safe to shutdown the handheld.
4.
To turn off the handheld: On the Ministry Handheld, press the red
button in top right hand corner.
User Guide Volume and Decay Data Collection and Edit System
Managing Data - Overview
Upload Data from the
Handheld to the PC
DVHost
PC/HANDHELD DATA
TRANSFER
Download Data from the
PC to the Handheld
Transferring Data to Other
PC Directories
BACKING UP DATA
Transferring Data to a
Disk
Sending a Report to a File
Creating a Report
Sending a Report to a
Printer
REPORTS
Copying a Report File
onto Disk
Sending a Report to the
Screen
MAINTAIN SAMPLE
TROUBLESHOOTING
User Guide Volume and Decay Data Collection and Edit System
08/08/2003 Managing Data - Overview •41
Managing Data
Data Management is an essential process for transferring data to and from the PC and
Handheld computers and in ensuring data is backed up, stored and reported properly.
It is important that the user understands that data can be overwritten on both the
handheld and the PC during uploading and downloading processes. Warnings are
indicated below.
Managing Data involves these steps:
1.
2.
PC/ Handheld data transfer
•
Uploading data from handheld to PC
•
Downloading data to the handheld from the PC
Data Backup
•
Transferring data to diskette and conversion to text file format.
•
Transferring data to other PC subdirectories.
3.
Reports
4.
Maintain Samples
It is mandatory to upload the data from the handheld and run the reports
at the end of the day since data can be lost.
PC Handheld Data Transfer
The PC handheld data transfer process is also a database management process since
the new data from the handheld is merged in with the existing sample data in the PC.
In order to prevent the overwriting or copying over of existing files, a two step
process occurs. The first step is the copying of selected handheld samples to a
subdirectory on the PC named handheld. The second step is the merging of the data
in the handheld subdirectory with the host data in the PC.
NOTE: This is the only place where individual trees can be brought over to the PC.
In all other file transfer phases, all trees within a selected sample are
transferred.
Uploading Data from Handheld to the PC
NOTE: Ensure that your handheld is connected to your PC before
proceeding.
On the Husky Handheld
1.
At the C:\> prompt change to the DV directory
C:\>cd dv <Enter>
User Guide Volume and Decay Data Collection and Edit System
08/08/2003
Managing Data •43
2.
Type
HCOM <Enter>
3.
On the PC
At the C:\> move to the dvhost directory
C:\>cd dvhost <Enter>
4.
Start the DVHost program by typing:
C:\dvhost>dvhost <Enter>
The Main Menu will appear
44 • Managing Data
5.
Select from the Main Menu
PC handheld communication menu <Enter>
6.
Select from menu below:
Upload Sample Data from Handheld <Enter>
•
7. Select from menu below:
If Husky Handheld and Windows other than XP: Ministry Handheld
<Enter>
•
If Husky Handheld and Windows XP: Any Other <Enter>
•
If not a Husky Handheld : Any Other <Enter>
08/08/2003
User Guide Volume and Decay Data Collection and Edit System
(A) Ministry Handheld Option
8.
Once the ministry handheld is selected, this prompt will be displayed.
9.
Press <Y> at the prompt when you have completed the instructions.
This screen will be displayed
NOTE: Baud setting can be as high as possible as long as transmission is
successful.
10. Press <Enter> to confirm Baud Rate
(connects at 38400 with the Husky)
User Guide Volume and Decay Data Collection and Edit System
08/08/2003
Managing Data •45
11. Press <Enter> to confirm the default Com1 port
12. If your COM port is not COM 1 a menu will appear after pressing
<Enter>
13. Select your COM port from the menu <Enter>
14. Press <Enter> at the "Y" prompt to continue.
NOTE: Once the transfer process is started, a list of the files received by the PC
will be displayed. There should be a total of 9 DBF files: TR_SEG,
SAMPLE, PLOT, TREE, TRLEADER, TS_DECAY, TL_DECAY,
TR_PATH and PUBLIC.
The handheld will indicate that it is transmitting files and when the
transmission is complete.
Skip past the “Other Handheld” sections to step 16 for the rest of the
upload process.
(B) For “Other Handheld” option.
8.
Once the “Other Handheld” option is pressed, you will be at a DOS
prompt as per the following screen:
At this stage activate the communications software for your specific
handheld and copy over the data files from the Husky to the HANDHELD
subdirectory.
NOTE: The 9 critical DBF files are: TR_SEG, SAMPLE, PLOT, TREE,
TRLEADER, TS_DECAY, TL_DECAY, TR_PATH and PUBLIC.
46 • Managing Data
08/08/2003
User Guide Volume and Decay Data Collection and Edit System
Skip to step 15 for the rest of the upload process.
(C) For Husky and Windows XP
9.
In Windows, start the HCOM for Windows program by selecting Start,
All Programs, HCOM for Window.
10. Ensure the Com port is the correct one.
11. Click on the button with the white arrow to connect if not already
connected. The display will show all the files currently on the Husky.
12. Select the 9 database files that are to be copied over to the PC. Click on
the green arrow pointing up to initiate the transfer.
NOTE: The 9 critical DBF files are: TR_SEG, SAMPLE, PLOT, TREE,
TRLEADER, TS_DECAY, TL_DECAY, TR_PATH and PUBLIC.
13. Once the green arrow is pressed, a popup window showing the PC file
structure. Select the HANDHELD subdirectory off of the directory
where the DVhost program resides (called VER56 in the example
above).
User Guide Volume and Decay Data Collection and Edit System
08/08/2003
Managing Data •47
NOTE: Note that all of the files to be uploaded are first sent to a DVHOST
subdirectory named ‘handheld’. From there, the uploaded data is merged with
the data in the DVHOST directory. The HANDHELD subdirectory is automatically
emptied of its contents at each download.
14. After the file transfer is complete, return to the DOS window in
DVHost and type Exit and any other key to continue.
15. On the PC - Press <Esc> after transmission is complete. You will see
the screen below.
16. Follow the instructions on the bottom of the screen.
Change ‘Y’ to ‘N’ for those Records NOT to UpLoad, then Press <Esc> when
Choices are complete
NOTE: Records are set to ‘N’ if there already exists an up-to-date occurrence of
the record in the PC.
WARNING!
48 • Managing Data
A tree cannot be uploaded without its sample and plot data unless this data
already exists in the PC.
08/08/2003
User Guide Volume and Decay Data Collection and Edit System
17. Press <Esc>
18. Type "Y" at the prompt above.
The main menu will appear and a screen will appear on the right of the PC
screen, this screen will show a series of files being opened, indexed and
packed.
Downloading Data to the Handheld from the PC
NOTES: If a sample is to be revisited and further data collected, it is imperative
that the original data collected from the sample, be downloaded from
the PC to the handheld before returning to the sample.
Ensure that your handheld is connected to your PC
before proceeding
WARNING!
If there is any data on the Handheld from the selected sample to be
downloaded it will be overwritten and lost. Ensure that all data is uploaded
from the handheld before proceeding.
User Guide Volume and Decay Data Collection and Edit System
08/08/2003
Managing Data •49
1. Follow steps 1 to 5 found in the Installing DVHand Software onto
the Handheld section at the beginning of this document.
6. Select Sample(s) to be downloaded by typing <Y> on the sample
line.
15. At the prompt Press <Esc>.
16. At the following prompt type <Y> to continue.
17. At the following prompt, OK to Copy New Version of Handheld Program. Press <N> to continue.
50 • Managing Data
08/08/2003
User Guide Volume and Decay Data Collection and Edit System
NOTE: Files being transferred are displayed at the bottom of the screen.
18. Select from menu below:
•
If Husky Handheld and Windows other then XP: Ministry
Handheld <Enter>.
•
If Husky Handheld and Windows XP: Any Other <Enter>
•
If not a Husky Handheld: Any Other <Enter>
(A) Ministry Handheld Option
19. Follow steps 8 to 14 from the “Uploading Data from Handheld to PC”
section to set up the communications link with the Husky.
20. The files that are automatically transferred to the Husky are
SAMPLE.DBF, PLOT.DBF, TREE.DBF, TRLEADER.DBF,
TR_SEG.DBF, TL_DECAY.DBF, TS_DECAY.DBF, TR_PATH.DBF
and FLAG. A status comment will appear on the handheld screen
showing the progress of each file transfer. Once the download is
complete, the following prompt will show on the PC: <Review
Communications and Continue (R)etry, or anything
else to exit communications>. If the communications is
successful, press any key other than R to return to the
Upload/Download screen. The download process is finished.
(B). Other Handheld Option (non Husky Handheld)
11. Once the Other Handheld option is selected, the cursor will
appear opposite a DOS prompt in the Handheld subdirectory. See
the section at the beginning of this user guide titled “Installation of
DVHand Software onto the Handheld”
12. Follow the communications protocols for your handheld and copy
all files in the Handheld subdirectory over to the handheld. These
files are: FLAG, SAMPLE.DBF, PLOT.DBF, TREE.DBF,
TRLEADER.DBF, TR_SEG.DBF, TR_PATH.DBF,
TL_DECAY.DBF, TS_DECAY.DBF.
13. Once the file copy is completed, enter <exit> at the DOS prompt
and return to the DVHost software. The download is now
complete.
User Guide Volume and Decay Data Collection and Edit System
08/08/2003
Managing Data •51
(C) the Handheld Option (Husky Handheld and Windows
XP)
14. Once the Other Handheld option is selected, go to Windows and
start the HCOM for Windows program by selecting Start, All Programs,
HCOM for Window.
15. Ensure the Com port is the correct one.
16. Click on the button with the white arrow to connect if not already
connected. The display will show all the files currently on the Husky.
14. Click on the button with the red arrow pointing down to start the
transfer of files to the Husky. Navigate to the Handheld subdirectory.
15. Select all files in the HANDHELD subdirectory. These files are:
FLAG, SAMPLE.DBF, PLOT.DBF, TREE.DBF, TRLEADER.DBF,
TR_SEG.DBF, TR_PATH.DBF, TL_DECAY.DBF and
TS_DECAY.DBF.
52 • Managing Data
08/08/2003
User Guide Volume and Decay Data Collection and Edit System
16. After the file selection, click <open>. You will then see a prompt to
overwrite existing files, click <yes to all>. At this stage the
data files from the PC will overwrite the data files in the handheld and
the download process is complete.
User Guide Volume and Decay Data Collection and Edit System
08/08/2003
Managing Data •53
Data Backing Up
Transferring data to diskette
This process reformats the 8 essential data base files produced by the handheld to a
text (ASCII) format. The 8 database file names remain the same but the file
extension is renamed from DBF to one of your choosing.
NOTE: Ensure that there is a diskette in drive A before proceeding.
On the PC
1.
At the C:\> move to the dvhost directory
C:\>cd dvhost <Enter>
2.
Start the DVHost program by typing:
C:\dvhost>dvhost <Enter>
The Main Menu will appear
54 • Managing Data
08/08/2003
3.
From the Main Menu select:
PC - Diskette "DataTran" Transfer Menu <Enter>
4.
From Data Transfer Menu select:
Export Samples from Hard Drive to Diskette
<Enter>
User Guide Volume and Decay Data Collection and Edit System
5.
Select source drive. i.e. Drive…D
6.
Press <Enter> to confirm the drive
7.
Select the source directory, i.e. \HANDHELD\VER56\
8.
Press <Enter> to confirm the directory
9.
Select the Samples you wish to transfer by pressing Y
<Enter>
10.
Follow instructions on the screen. Press any key to continue.
Press <Tab> pick
list will display a
list of created
samples
NOTE: Ensure that there is a disk in Drive A.
User Guide Volume and Decay Data Collection and Edit System
08/08/2003
Managing Data •55
56 • Managing Data
08/08/2003
11.
Press <Enter> to confirm drive A.
12.
Select a directory and press <Enter> to confirm.
13.
Press <Enter> on the Export Samples screen.
User Guide Volume and Decay Data Collection and Edit System
Files being transferred are displayed at the bottom of the screen.
WARNING!
14.
Reconfirm the drive, press <Enter>
15.
Reconfirm the directory <Enter>
If a sample with the same file extension name is already on the disk it will be
overwritten and lost. Ensure that the file extension name is not already being
used.
16.
Data set - Type in a three character file extension of your
choice, press <Enter>
User Guide Volume and Decay Data Collection and Edit System
08/08/2003
Managing Data •57
The file extension that you enter will be applied to all files in
the sample placed on the disk.
WARNING!
Do not overwrite the “.”, instead overwrite the question marks.
17.
On next the screen, note at the bottom,
Export Complete
18.
WARNING!
Press <Esc> to exit to the Main Menu.
Make more than one copy and store the copies in separate locations to
ensure data is not lost.
A list of files copied onto the A drive, will be as follows:
58 • Managing Data
08/08/2003
SAMPLE.QUA
PLOT.QUA
TREE.QUA
TRLEADER.QUA
TR_SEG.QUA
TR_PATH.QUA
TL_DECAY.QUA
TS_DECAY.QUA
User Guide Volume and Decay Data Collection and Edit System
Transferring data to other PC subdirectories
This process copies selected samples to other subdirectories. Copies of the 8 essential
data base files are moved over to the subdirectory. If samples already exist in the
subdirectory, the new sample data will merge with existing data.
On the PC
1.
At the C:\> move to the dvhost directory
C:\>cd dvhost <Enter>
2.
Start the DVHost program by typing:
C:\dvhost>dvhost <Enter>
The Main Menu will appear
3.
4.
From the Main Menu select:
PC - Diskette "DataTran" Transfer Menu <Enter>
From Data Transfer Menu select:
Transfer samples between hard Drive
directories <Enter>
5.
Confirm source drive <Enter>.
User Guide Volume and Decay Data Collection and Edit System
08/08/2003
Managing Data •59
60 • Managing Data
08/08/2003
6.
Confirm source directory <Enter>.
7.
Select destination drive <Enter>.
8.
Select destination directory <Enter>.
Press <Tab> for
a list of
directories that
are available
User Guide Volume and Decay Data Collection and Edit System
9.
User note - at the prompt, ensure that N is indicated at the
cursor press <Enter>.
10.
Select the samples you wish to transfer by pressing Y
<Enter>.
11.
Transfer progress report will be displayed at the bottom of the
screen, once transfer is complete it will be noted at the bottom
of the screen.
12.
Press <Esc> to exit to the Main Menu.
User Guide Volume and Decay Data Collection and Edit System
08/08/2003
Managing Data •61
Reports
Reports are sample specific and include all plots and trees in the specified sample.
You have the option of producing reports for one or all samples.
NOTE: Reports form the basis of the quality assurance process and also represent
another form of data backup. It is recommended to save the reports to a disk
and also the hard drive as a default.
Creating Reports involves these steps:
1.
Creating Reports
2.
Copying a Report File onto a disk
Creating Reports
To produce reports information can be sent:
1.
To a file
2.
To the printer, or
3.
To the screen
Sending a Report to a File
On the PC
1.
At the C:\> move to the dvhost directory
C:\>cd dvhost <Enter>
2.
Start the DVHost program by typing:
C:\dvhost>dvhost <Enter>
The Main Menu will appear
62 • Managing Data
08/08/2003
3.
Select Reports Menu from the Main Menu <Enter>.
4.
Enter "Y" for all samples or "N" for only selected samples
<Enter> .
User Guide Volume and Decay Data Collection and Edit System
5.
If you select N you must confirm each component number, by pressing
<Enter> at Region, Compartment, Letter, Installation, and Sample
Number or select a sample by pressing <F2> where a pick list will
display a list of created samples.
Press <Tab>
pick list will
display a list of
Confirm sample identification numbers <Enter>.
created
samples.
6.
Select F (for File) <Enter>
Do not select printer at this point.
7.
Enter a file name with up to 5 alphanumeric characters
<Enter>
(For example: the date or location of sample).
User Guide Volume and Decay Data Collection and Edit System
08/08/2003
Managing Data •63
The file name in the sample will be displayed as
QUALI00#.TMP where the number # corresponds to the type
of the report produced.
8.
Select a Report from the Report Selection Menu:
Comprehensive Decay Tree Report <Enter>
This Report is the most commonly used. See sample report in appendix.
Note file being transferred is displayed at the bottom of the screen.
9.
The file will be put in your DVHost directory where the file
name will be QUALI003.TMP.
10.
Press <Esc> to move back to the Main Menu
NOTE: It is recommended to open the report using WORD and select a Courier type
face as it will allow for the proper alignment of the columns of numbers. An
example of the report is located in the Appendices.
64 • Managing Data
08/08/2003
User Guide Volume and Decay Data Collection and Edit System
Sending a Report to the Printer
NOTE: DVHost software configures the report file for printing to a default printer,
the printer drives have not been maintained and will likely not be suitable for
your printer. It is recommended to send the report to the file and print it using
WORD.
Sending a Report to the Screen
1.
Complete Steps 1 to 3 of "Sending a Report to a File" on
page 62.
2.
Select "S" for screen <Enter>
3.
Select "Comprehensive Decay Tree Report" <Enter>
4.
Refer to the commands at the bottom of the screen to move through the
report.
5.
Press <Q> to quit.
User Guide Volume and Decay Data Collection and Edit System
08/08/2003
Managing Data •65
Maintaining Samples
This facility allows for the input (seldom used) of sample header information and
provides a quick review of plot and tree details for selected samples.
On the PC
1.
At the C:\> move to the dvhost directory
C:\>cd dvhost <Enter>
2.
Start the DVHost program by typing:
C:\dvhost>dvhost <Enter>
The Main Menu will appear
3.
At the Main Menu select
Maintain Samples <Enter>
Press <Tab>
pick list will
display a list of
created
samples.
66 • Managing Data
08/08/2003
4.
Confirm or change sample ID <Enter>.
5.
Select (E) for edit.
6.
Fill in the applicable fields.
User Guide Volume and Decay Data Collection and Edit System
7.
Press <Esc> to exit.
8.
Enter <P> to review plot and tree information.
9.
Press <Enter> to display tree information.
10.
Press <P> to review path data for a selected tree.
User Guide Volume and Decay Data Collection and Edit System
08/08/2003
Managing Data •67
11.
Press <Esc> to return to previous screen and press <D> to
review tree details. Press <Tab> to cycle through the various
tree detail components.
12.
Press <Esc> four times to return to the main menu.
Troubleshooting
There are several facilities that can be used to correct for common problems. These
include:
Purging the Handheld: Cleaning out the existing data from the handheld without
deleting files.
Reindexing Files: Reindexing amounts to a resort of all of the data files.
Deleting trees: Due to data input errors that cause a reentry of a sample tree with a
tree number 100 higher than the original number, the replaced
trees will require deleting.
Purging All Data
NOTES: Purging the handheld is required periodically to free up memory space.
How often you purge the handheld depends on the memory capacity of
your handheld. Most handhelds now have the space capacity to allow
68 • Managing Data
08/08/2003
User Guide Volume and Decay Data Collection and Edit System
for an entire project’s sample trees but the performance may be unduly
slow or create performance problems. Purging the handheld will
remove all data from the files while maintaining the directory structure.
WARNING!
Ensure that you have completed the Data Backup section before proceeding. Purging
the handheld will remove ALL sample data.
On the Handheld
1.
You must be in the C:\dv> directory
2.
Type:
C:\dv>dv purge <Enter>
3.
When purging is complete you will be returned to the Handheld ID
screen.
Reindexing Data Files
All of the data files are linked through indexing. Sometimes the links may be broken
and cause the program to crash.
On the Handheld
1.
2.
You must be in the C:\dv> directory
Type:
C:\dv>dv reindex <Enter>
3.
When reindexing is complete you will be returned to the Handheld ID
screen.
Sample Tree Deletion
NOTE: Sample trees can only be deleted using the sample handheld to PC upload
process. Follow that process and de-select the superseded trees.
NOTE: If the sample tree data is only available as text files on a diskette, the
Ministry Other Handheld option can be used to simulate the upload process.
Using the Ministry Other Handheld option:
1.
Convert the text files to DBF files using the “Reload Samples from
Diskette to HardDrive” facility found at the “PC – Diskette
“DataTran’ Transfer Menu’ selection at the Main Menu.
2.
Transfer the sample to a subdirectory using the “Transferring data
to other PC subdirectories” facility.
3.
Copy PUBLIC.DBF from the DVHOST directory to the subdirectory using
the regular PC file copy process.
User Guide Volume and Decay Data Collection and Edit System
08/08/2003
Managing Data •69
4.
Delete the sample from the DVHOST directory using the DVHOST sample
deletion facility found at the “PC – Diskette DataTran’ Transfer
Menu” selection at the Main Menu.
5.
Use the PC Upload process but select the Ministry Other Handheld
option.
6.
At the prompt, type in copy D:\TESTDELETE\*.dbf, where the
D:\TESTDELETE is the name of the subdirectory that has the sample with
the extra trees.
7.
You should see a notice of the files that have been copied to the DVHOST
directory. These files should be: SAMPLE.DBF, PLOT.DBF, TREE.DBF,
TRLEADER.DBF, TR_SEG.DBF, TR_PATH.DBF, TL_DECAY.DBF,
TS_DECAY.DBF and PUBLIC.DBF.
8.
Follow the instructions on the screen and de-select the trees should be
deleted.
Bugs
Primary Leader Duplicates: An unfixable bug has dogged this program since its
inception, where duplicate primary leaders are created. These leaders show up at the
“Leaders and Utop” screen and cannot be removed. The only recourse is to re-enter
the tree. This error appears to occur at the beginning of sampling projects when the
operator is still unfamiliar with the program and the handling of the handheld.
Utop Insertion Failure: On an occasional basis, the utop section will fail to be
inserted in the section screen. The operator must be vigilant and be prepared to
manually insert the utop height.
Edits
Some measurements can be readily edited in the DVHand program. Others can only
be altered while in certain phases of the process.
Measurements to Edit
Attribute
Edits
Comments
Sample Id
No
Must re-enter sample trees using new
id.
Sample BEC zone
Yes
Plot Id
No
Plot Descriptors
Yes
Tree ID
No
Must re-enter sample tree using new
id.
Standing Path
No
Must re-enter sample tree
Butt Taper Measures
No
Must re-enter sample tree using new
butt taper measures.
70 • Managing Data
08/08/2003
Must re-enter sample trees using new
id.
User Guide Volume and Decay Data Collection and Edit System
Felled Tree Measures
Yes
Note that section heights cannot be
altered.
Section Heights
No
Can only be changed when still in
marking phase.
Section DIBs
Yes
Decay
Yes
Section Decay shape
No
Decay diameters
Yes
Decay T.Ht and B.Ht
Yes
Decay Mix
Yes
Felled Path
Yes
Secondary Leader
No
User Guide Volume and Decay Data Collection and Edit System
Entire decay can be deleted
Note that decay in any section cannot
be deleted.
Path can also be deleted.
08/08/2003
Managing Data •71
Appendices
Basic DOS Commands
The following table outlines the basic DOS commands that are used throughout this
document.
Command
Description
cd
change directory
cd..
move up a directory level
copy
copy file or directory
md
make a directory
exit
exit from DOS
DVHand Installation Files
The following files will be installed on the handheld during the installation process:
1. COLORS.DBF
2. DV.BAT
3. DV_HAND.EXE
4. FLAG
5. HANDMESS.DBF
6. HELPTEXT.DBF
7. LOOKUP.DBF
8. MOFFILES.DBF
9. PICKGRP.DBF
10. PICKLIST.DBF
11. PLOT.DBF
12. PUBLIC.DBF
13. RULES.DBF
14. SAMPLE.DBF
15. TL_DECAY
16. TREE.DBF
17. TRLEADER.DBF
18. TR_PATH.DBF
19. TR_SEG.DBF
20. TS_DECAY.DBF
21. VALID.DBF
22. VAL_FIELDS.DBF
23. WINDOW.DBF
User Guide Volume and Decay Data Collection and Edit System
08/08/2003
Appendices •73
24. WINDOW.DBT
SAMPLE DECAY REPORT – Format report using word processing program.
REPORT No: 3
2003 Sep 3
14:11:29
Version 5.5
(2000.03.19)
Plot Number: 1-F
Ministry of Forests - Inventory Branch
Volume and Decay Section
Sample Collection and Edit System
Page:1
COMPREHENSIVE DECAY TREE DETAIL REPORT
---------- S A M P L E ----------Reg Comp Let Inst Sample Type
5
16
A
0
20
D
Tree Number: 1
Species..: CW
Date.....: 2003 Sep 2
DBH......:
55.1
Bucked?..: Yes
Nom. Decay Section Length:
Num. of Decay Sections...:
Counted Stump Age........:
Stump Height.............:
Missing Wood Radius......:
Sound Wood Radius........:
2.00
32
237
1.30
Age Before Corr'n.:
Age Correction....:
Total Age.........:
Total Tree Height.:
237
12
249
30.00
UTop Diameter.....:
Crown Height......:
Break Height......:
DIB at Break......:
15
12.54
26.89
7.8
Standing Pathological Occurrences:
(F)elled/(S)tanding PathID Type
S
1
SCAR
S
2
FK
S
3
FK
S
4
DT
StartHt
-0.20
7.20
13.70
23.50
EndHt.
2.57
Felled Pathological Occurrences:
(F)elled/(S)tanding PathID Type
F
5
FK
F
6
FK
F
7
BT
F
8
DT
F
9
SCAR
F
10
CK
F
11
BT
StartHt
7.17
13.79
26.89
23.17
-0.20
10.91
15.41
EndHt.
7.82
14.53
30.00
26.89
2.57
11.24
21.00
Width
25.0
27.00
Width
25.0
25.0
Primary Leader
Number of Sections...: 20
Leader Start Height..:
0.00
Leader UTop..........: 23.61
Leader Top Height....: 30.00
Decay Occurrences in Leader:
------ Decay Desc -----ID DSV S/M Shape Strn T S C Ds cCde
1 D
S
S
B F Z E E YL
2 V
S
S
Z Z Z Z Z VOD
3 D
S
S
D B B G C BP
---PFS--S N S C T
Z Z Z Z Z
Z Z Z Z Z
Z Z Z Z Z
-MYCS C T
Z Z Z
Z Z Z
Z Z Z
----Codes--Ent Organism
D 999999
D 999999
E 999999
Decay Section Details:
--------- Decay Instances in Section ---------- Sec Top --- Inner - - Outer Sec CumLn SecLn DIB#1 DIB#2 DBT Fk ID TopHt BotHt Lngth WdthBrdth WdthBrdth Mx%
1
0.00 0.00
0.0
0.0 0.0
2
0.30 0.30 54.8 54.8 3.6
1 0.00 0.30 0.30 15.6 14.7 0.0 0.0 100
2 0.00 0.30 0.30 16.3 4.9 0.0 0.0 100
3
0.60 0.30 52.7 52.7 3.5
1 0.00 0.30 0.30 14.5 14.2 0.0 0.0 100
2 0.00 0.30 0.30 12.3 4.1 0.0 0.0 100
4
0.90 0.30 52.5 52.5 3.2
1 0.00 0.30 0.30 13.9 13.7 0.0 0.0 100
2 0.00 0.30 0.30 11.8 3.7 0.0 0.0 100
5
1.30 0.40 51.9 51.9 3.2
1 0.00 0.40 0.40
9.8 8.4 0.0 0.0 100
2 0.00 0.40 0.40 10.7 3.8 0.0 0.0 100
6
2.30 1.00 50.8 50.7 0.0
1 0.00 1.00 1.00
7.6 5.9 0.0 0.0 100
2 0.01 1.00 0.99
0.0 0.0 0.0 0.0 100
7
4.30 2.00 49.5 49.3 0.0
1 0.00 2.00 2.00
4.2 4.1 0.0 0.0 100
8
7.17 2.87 47.2 46.8 0.0
1 0.52 2.87 2.35
0.0 0.0 0.0 0.0 100
74 • Appendices
08/08/2003
User Guide Volume and Decay Data Collection and Edit System
9
10
11
12
13
14
15
16
17
18
19
20
7.82
9.82
11.82
13.79
14.53
16.53
18.53
20.53
22.53
23.61
26.89
30.00
0.65
2.00
2.00
1.97
0.74
2.00
2.00
2.00
2.00
1.08
3.28
3.11
45.1
44.2
43.7
42.3
27.2
24.5
22.9
20.4
17.6
15.0
7.9
0.0
44.9
43.6
42.6
41.8
26.7
24.2
22.5
19.8
17.1
15.0
7.7
0.0
0.0
0.0
0.0
0.0
0.0
0.0
0.0
0.0
0.0
0.0
0.0
0.0
Secondary Leader No: 2
Number of Sections...:
Leader Start Height..:
Leader UTop..........:
Leader Top Height....:
Bottom Fork Height...:
Top Fork Height......:
3
3
0.00
0.00
0.12
3.28
0.12
3.28
3.1
4.5
2.9
4.1
0.0
0.0
0.0 100
0.0 100
5
13.79
21.14
26.50
13.79
14.53
No Decay Occurrences in this Leader
Decay Section Details:
--------- Decay Instances in Section ---------- Sec Top --- Inner - - Outer Sec CumLn SecLn DIB#1 DIB#2 DBT Fk ID TopHt BotHt Lngth WdthBrdth WdthBrdth Mx%
21 14.53 0.74 26.8 26.2 0.0
22 16.53 2.00 23.1 22.5 0.0
23 18.53 2.00 19.7 19.3 0.0
24 21.14 2.61 15.0 15.0 0.0
25 26.50 5.36
0.0
0.0 0.0
Secondary Leader No: 3
Number of Sections...:
Leader Start Height..:
Leader UTop..........:
Leader Top Height....:
Bottom Fork Height...:
Top Fork Height......:
7
7.17
14.82
15.41
7.17
7.82
Decay Occurrences in Leader:
------ Decay Desc -----ID DSV S/M Shape Strn T S C Ds cCde
4 D
S
S
B E B G E BS
---PFS--S N S C T
Z Z Z Z Z
-MYCS C T
Z Z Z
----Codes--Ent Organism
C 999999
Decay Section Details:
--------- Decay Instances in Section ---------- Sec Top --- Inner - - Outer Sec CumLn SecLn DIB#1 DIB#2 DBT Fk ID TopHt BotHt Lngth WdthBrdth WdthBrdth Mx%
26
7.82 0.65 26.3 25.9 0.0
27
9.82 2.00 24.6 24.1 0.0
28 10.91 1.09 22.8 22.7 0.0
4 0.00 0.41 0.41
8.2 4.1 0.0 0.0 100
29 11.24 0.33 19.6 18.7 0.0
4 0.00 0.33 0.33
6.2 6.1 0.0 0.0 100
30 13.24 2.00 17.1 16.8 0.0
4 1.12 2.00 0.88
0.0 0.0 0.0 0.0 100
31 14.82 1.58 15.0 15.0 0.0
32 15.41 0.59 12.3 12.1 0.0
Plot Number: 1-F
---------- S A M P L E ----------Reg Comp Let Inst Sample Type
5
16
A
0
20
D
Tree Number: 2
Species..: HW
Date.....: 2003 Aug 27
DBH......:
35.6
Bucked?..: Yes
Nom. Decay Section Length:
2.00
Num. of Decay Sections...:
13
Counted Stump Age........:
68
Stump Height.............:
1.30
Missing Wood Radius......:
3.6
Sound Wood Radius........:
13.1
Standing Pathological Occurrences:
(F)elled/(S)tanding PathID Type
Age Before Corr'n.:
Age Correction....:
Total Age.........:
Total Tree Height.:
UTop Diameter.....:
Crown Height......:
Break Height......:
DIB at Break......:
StartHt
EndHt.
User Guide Volume and Decay Data Collection and Edit System
87
9
96
25.00
10
14.72
14.73
21.8
Width
08/08/2003
Appendices •75
S
S
1
2
FC
BT
Felled Pathological Occurrences:
(F)elled/(S)tanding PathID Type
F
F
F
3
4
5
FC
BT
SCAR
0.34
14.80
4.67
25.00
StartHt
EndHt.
Width
0.34
14.73
14.27
4.52
25.00
14.73
4.0
Primary Leader
Number of Sections...: 13
Leader Start Height..:
0.00
Leader UTop..........:
0.00
Leader Top Height....: 25.00
Decay Occurrences in Leader:
------ Decay Desc -----ID DSV S/M Shape Strn T S C Ds cCde
1 D
M
S
B E B G E BS
2 D
M
S
B D B G D DBC
3 D
S
R
D B B G C BP
---PFS--S N S C T
Z Z Z Z Z
Z Z Z Z Z
Z Z Z Z Z
-MYCS C T
Z Z Z
Z Z Z
Z Z Z
----Codes--Ent Organism
F 999999
F 999999
E 999999
Decay Section Details:
--------- Decay Instances in Section ---------- Sec Top --- Inner - - Outer Sec CumLn SecLn DIB#1 DIB#2 DBT Fk ID TopHt BotHt Lngth WdthBrdth WdthBrdth Mx%
1
0.15 0.15 35.8 35.8 2.4
1 0.00 0.15 0.15
5.1 4.8 0.0 0.0 20
2 0.00 0.15 0.15
5.1 4.8 0.0 0.0 80
2
0.30 0.15 34.6 34.6 2.3
1 0.00 0.15 0.15
6.3 5.8 0.0 0.0 25
3
0.60
0.30
33.9
33.9 2.3
4
0.90
0.30
33.7
33.7 2.2
5
1.30
0.40
33.4
33.4 2.2
6
2.30
1.00
31.9
31.7 0.0
7
4.30
2.00
30.5
30.2 0.0
8
6.30
2.00
29.2
28.9 0.0
8.30 2.00
10.30 2.00
12.30 2.00
14.73 2.43
25.00 10.27
28.1
25.6
23.5
22.1
0.0
27.4
24.9
23.3
21.5
0.0
9
10
11
12
13
76 • Appendices
0.0
0.0
0.0
0.0
0.0
08/08/2003
2
1
2
1
2
1
2
1
2
1
2
1
2
0.00
0.00
0.00
0.00
0.00
0.00
0.00
0.00
0.00
0.00
0.00
1.87
1.87
0.15
0.30
0.30
0.30
0.30
0.40
0.40
1.00
1.00
2.00
2.00
2.00
2.00
0.15
0.30
0.30
0.30
0.30
0.40
0.40
1.00
1.00
2.00
2.00
0.13
0.13
6.3
8.7
8.7
2.3
2.3
5.2
5.2
3.5
3.5
1.6
1.6
0.0
0.0
5.8
8.4
8.4
2.1
2.1
5.1
5.1
3.4
3.4
1.1
1.1
0.0
0.0
0.0
0.0
0.0
0.0
0.0
0.0
0.0
0.0
0.0
0.0
0.0
0.0
0.0
0.0
0.0
0.0
0.0
0.0
0.0
0.0
0.0
0.0
0.0
0.0
0.0
0.0
75
25
75
50
50
90
10
99
1
99
1
99
1
3
3
0.00
0.00
0.87
2.43
0.87
2.43
3.4
4.2
3.2 23.5 23.3 100
3.9 22.1 21.5 100
User Guide Volume and Decay Data Collection and Edit System