1
Slide the GPS unit into the compartment and
move the GPS to the far left inside the
compartment. Place the Hydrolink Transceiver
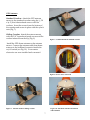
in the compartment on end (Fig. 4.)
Connect the Data jumper cable to transceiver
Port B. Connect the ADCP data cable to
transceiver Port A (center port.) Next connect
the stub antenna cable to the Hydrolink
transceiver. Position both the Hydrolink
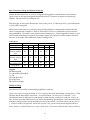
transceiver and GPS to the far right inside the
compartment (Fig. 5.) Finally, place the battery
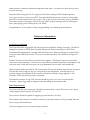
to the left of the GPS. Position the foam spacers
around the battery as shown (Fig. 6.) The fit is
intentionally snug. You’re ready for power
connection.
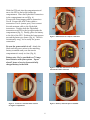
Figure 3. GPS transceiver ready for connection.
Be sure the power switch is off. Attach the
black and red power wires to the matching
battery terminals and your electronics
compartment is ready to close (Fig. 8.)
Battery note: We’ve provided two 7.2 amphour batteries with your system. Expect
about 5 hours of service from each fully
charged battery in the field.
Figure 4. GPS unit and transceiver with data
and antenna cables connected.
Figure 5. Transceiver and GPS units nested to
far right in compartment.
Figure 6. Battery and foam spacers installed.
6