1
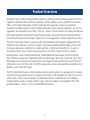
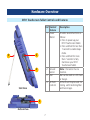
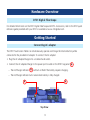
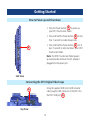
FOCIS
Fiber Optic Connector Inspection System
User’s Guide
www.AFLglobal.com or (800) 321-5298, (603) 528-7780
Table of Contents
Product Overview . . . . . . . . . . . . . . . . . . . . . . . . . . . . . . . . . . . . . . . . . . . . . . . . .
Hardware Overview . . . . . . . . . . . . . . . . . . . . . . . . . . . . . . . . . . . . . . . . . . . . . . .
DFD1 Touchscreen Tablet Controls and Features . . . . . . . . . . . . . . . . . . . . . . . .
DFD1 Accessories . . . . . . . . . . . . . . . . . . . . . . . . . . . . . . . . . . . . . . . . . . . . . . .
DFS1 Digital FiberScope . . . . . . . . . . . . . . . . . . . . . . . . . . . . . . . . . . . . . . . . . .
Getting Started . . . . . . . . . . . . . . . . . . . . . . . . . . . . . . . . . . . . . . . . . . . . . . . . . . .
Connecting AC adapter . . . . . . . . . . . . . . . . . . . . . . . . . . . . . . . . . . . . . . . . . .
How to Power up and Shut down . . . . . . . . . . . . . . . . . . . . . . . . . . . . . . . . . .
Connecting the DFS1 Digital FiberScope . . . . . . . . . . . . . . . . . . . . . . . . . . . . . .
DFS1 Digital FiberScope Basics . . . . . . . . . . . . . . . . . . . . . . . . . . . . . . . . . . . . .
Inspecting Fibers and Bulkhead Connectors with the DFS1 . . . . . . . . . . . . . .
Selecting and changing DFS1 adapter tips . . . . . . . . . . . . . . . . . . . . . . . . . .
Software Overview . . . . . . . . . . . . . . . . . . . . . . . . . . . . . . . . . . . . . . . . . . . . . . . .
AFL SimpleView Plus Inspection Software . . . . . . . . . . . . . . . . . . . . . . . . . . . . .
DFD1 Touchscreen Tablet Screen Structure . . . . . . . . . . . . . . . . . . . . . . . . . . . .
Operating Modes Summary . . . . . . . . . . . . . . . . . . . . . . . . . . . . . . . . . . . . .
Image Viewer Summary . . . . . . . . . . . . . . . . . . . . . . . . . . . . . . . . . . . . . . . .
Image Capture and Preview Utilities Field Summary . . . . . . . . . . . . . . . . . . .
Operating Instructions . . . . . . . . . . . . . . . . . . . . . . . . . . . . . . . . . . . . . . . . . . . . .
Live Image Inspection Mode . . . . . . . . . . . . . . . . . . . . . . . . . . . . . . . . . . . . . . .
Image Capture Mode . . . . . . . . . . . . . . . . . . . . . . . . . . . . . . . . . . . . . . . . . . . .
Image Manager . . . . . . . . . . . . . . . . . . . . . . . . . . . . . . . . . . . . . . . . . . . . . . . .
How to Open Images for Review . . . . . . . . . . . . . . . . . . . . . . . . . . . . . . . . . . . .
Image Review Mode Summary . . . . . . . . . . . . . . . . . . . . . . . . . . . . . . . . . . . . .
Settings Mode Summary . . . . . . . . . . . . . . . . . . . . . . . . . . . . . . . . . . . . . . . . . .
General Setup . . . . . . . . . . . . . . . . . . . . . . . . . . . . . . . . . . . . . . . . . . . . . . . . .
3
5
6
6
8
9
9
9
10
10
11
11
11
12
12
12
13
14
15
16
16
18
20
22
23
24
24
Table of Contents
Image Capture Setup . . . . . . . . . . . . . . . . . . . . . . . . . . . . . . . . . . . . . . . . . .
Text Editor . . . . . . . . . . . . . . . . . . . . . . . . . . . . . . . . . . . . . . . . . . . . . . . . . .
Power Setup . . . . . . . . . . . . . . . . . . . . . . . . . . . . . . . . . . . . . . . . . . . . . . . . .
About Screen . . . . . . . . . . . . . . . . . . . . . . . . . . . . . . . . . . . . . . . . . . . . . . . .
FAQs . . . . . . . . . . . . . . . . . . . . . . . . . . . . . . . . . . . . . . . . . . . . . . . . . . . . . . . . . .
Warranty Terms and Conditions . . . . . . . . . . . . . . . . . . . . . . . . . . . . . . . . . . . . . .
Product Registration . . . . . . . . . . . . . . . . . . . . . . . . . . . . . . . . . . . . . . . . . . . . . .
Contact Us: Returning Equipment . . . . . . . . . . . . . . . . . . . . . . . . . . . . . . . . . . . . .
Repair Services . . . . . . . . . . . . . . . . . . . . . . . . . . . . . . . . . . . . . . . . . . . . . . . . . . .
Standards Compliance Information . . . . . . . . . . . . . . . . . . . . . . . . . . . . . . . . . . . .
Safety Information . . . . . . . . . . . . . . . . . . . . . . . . . . . . . . . . . . . . . . . . . . . . . . . .
4
25
25
26
27
28
29
29
29
30
30
31
Product Overview
The NOYES family of FOCIS integrated fiber inspection solutions provides network personnel with the
capability to document fiber connector cleanliness. FOCIS combines a palm-sized DFD1 Touchscreen
Tablet, a DFS1 Digital FiberScope and AFL SimpleView Plus inspection software to provide the
inspection and analysis power of current laptop and probe solutions and the ergonomics, ease of use,
ruggedness and ownership costs of basic “live only” viewers. FOCIS solutions are future-proof because
their optical resolution and detection specifications exceed current international standards and their
software-based inspection and analysis applications can be upgraded as market requirements evolve.
The DFD1 Touchscreen Tablet is a purpose-built, hand-held Windows® computer equipped with AFL
SimpleView Plus inspection software. Its bright, crisp display provides detailed images and its Zoom/
Pan feature allow users to identify the smallest particles, scratches and imperfections. Its portrait
orientation makes it easy to hold and operate with just one hand. Unique to FOCIS is a patentpending feature, which simplifies before/after, jumper/bulkhead, input/output and other common
fiber cleanliness comparisons. Additional features include image capture and store/recall. Up to 1000
fiber images may be stored in on-board memory and images may be transferred via any off-the-shelf
USB memory stick or SD flash card. The DFD1 incorporates a proven shock-absorbing rubber boot that
doubles as a tilt stand and hanger.
The DFS1 Digital FiberScope is a high resolution video inspection probe. It is equipped with a focusing
knob and an image capture button. An extensive assortment of DFS1 adapter tips allow it to be used
with all types of fiber connector ferrules and bulkhead connectors. Bulkhead tips are available in
multiple lengths as well as straight and 60° angle. Connector adapters are available PC/UPC, APC
polished ferrule in 1.25 mm, 2.5 mm and MTP/MPO connectors.
5
Hardware Overview
DFD1 Touchscreen Tablet Controls and Features
5
3
2
Ref Control/
Feature
1 Power port
1
This is the interface for the AC
power adapter/charger.
Mini USB
• Allows connection to DFS1
function
Digital FiberScope for fiber
port
end-face inspection and image
capturing.
• Allows the user to transfer saved
images to a USB memory stick.
AC adapter/ When ON, indicates that an AC
charger
adapter is connected to DFD1.
indicator
• Red light ON indicates that
battery is charging.
• Green light ON indicates that
battery is fully charged.
Touchscreen Contains on-screen controls and
display
menus. Used to show live, captured
and saved fiber end-face images,
live image settings, image capture
modes, general settings and Image
Manager.
Boot
A proven shock-absorbing rubber
boot.
Loop
This loop can be used as a hanger.
2
Top View
6
3
5
4
Description
4
5
6
Front View
6
Hardware Overview
DFD1 Touchscreen Tablet Controls and Features
Ref Control/
Feature
1 Power
Button
2
3
2
2
3
4
Side View
4
Bottom View
7
Unused
button
Bail
SD flash
card slot
Description
Provides several functions as
follows:
• Press to power up your
DFD1 Touchscreen Tablet.
• Press and hold for less than
7 seconds to enable sleep
mode.
• Press and hold for more
than 7 seconds to fully
shut down your DFD1
Touchscreen Tablet.
Note: this button has no
function.
Bail can be used as a tilt stand
or hanger.
SD flash card may be used for
storing and transferring fiber
end-face images.
Hardware Overview
2
DFD1 Controls and Features
1 - Cable Retainer
1
A cable retainer is designed to provide strain relief
for the USB cable.
DFD1 Accessories
USB to mini USB converter cable
2 - USB to mini USB converter cable is provided
with your DFD1 Touchscreen Tablet. This cable
allows connection of the DFS1 Digital FiberScope
(USB plug) to the DFD1 Touchscreen Tablet (mini
USB port).
Back View
AC Adapter
An AC adapter supplied with your DFD1 features
four interchangeable AC adapter plugs for the
following regions: North America, Europe, United
Kingdom, and Asia.
AC Adapter with changeable plugs
• Choose the appropriate AC adapter plug for
your location and place it into the back of the
AC adapter/charger.
• To change the plug, remove it from the back of
the AC adapter/charger.
• Place another AC adapter plug into position.
8
Hardware Overview
DFS1 Digital FiberScope
For detailed information on the DFS1 Digital FiberScope and DFS1 Accessories, refer to the DFS1 quick
reference guide provided with your DFS1 or available at www. AFLglobal.com.
Getting Started
Connecting AC adapter
The DFD1 Touchscreen Tablet can simultaneously operate and charge the internal battery while
connected to the provided AC adapter. To connect the AC adapter:
• Plug the AC adapter/charger into a standard wall outlet.
• Connect the AC adapter/charger to the power port located on the DFD1 top panel A .
–– The AC/Charger indicator B will turn on Red if the battery requires charging.
–– The AC/Charger indicator turns Green when battery is fully charged.
A
B
Top View
9
Getting Started
How to Power up and Shut down
• Press the Power button A to power up
your DFD1 Touchscreen Tablet.
• Press and hold the Power button A for less
than 7 seconds to enable sleep mode.
• Press and hold the Power button A for at
least 7 seconds to fully shut down your DFD1
Touchscreen Tablet.
A
Note: The DFD1 Touchscreen Tablet powers
up automatically whenever the AC adapter is
plugged into the power port.
Side View
Connecting the DFS1 Digital FiberScope
Using the supplied USB to mini USB converter
cable, plug the USB connector of the DFS1 into
the DFD1 USB port A .
A
Top View
10
DFS1 Digital FiberScope Basics
Inspecting Fibers and Bulkhead Connectors with the DFS1
The following instructions assume the DFS1 Digital FiberScope is configured with the appropriate
adapter tip installed*, the DFD1 Touchscreen Tablet is powered up, the DFS1 is connected to the DFD1,
and real-time images from the DFS1 are currently being displayed on the DFD1.
1. If testing an optical fiber connector:
–– Slide the ferrule of the optical fiber into the installed adapter probe tip, using caution not to
contaminate the end-face of the fiber connector.
–– A dark circle will appear on the attached device display.
2. If testing an optical fiber connector mounted in a bulkhead adapter:
–– Slide the probe adapter tip into the bulkhead adapter.
–– Adjust the angle of the adapter tip until a dark circle appears on the attached device display.
3. Rotate the Focus Adjust Knob on the DFS1 clockwise or counter-clockwise until the displayed circle is
in sharp focus.
4. Once a good image has been obtained, it may be captured pressing the Display Capture button on
the DFS1, or by tapping the Capture icon on the DFD1 Touchscreen Tablet.
–– Either of these actions results in the DFD1 freezing the displayed live image and present it as a still
image in the Image Capture mode.
* Refer to the DFS1 Digital FiberScope Quick Reference Guide supplied with your DFS1 and available at
www.AFLglobal.com
Selecting and changing DFS1 adapter tips
Refer to the DFS1 Digital FiberScope Quick Reference Guide supplied with your DFS1 and available at
www.AFLglobal.com
11
Software Overview
AFL SimpleView Plus Inspection Software
The SimpleView Plus inspection software provides detailed fiber end-face images for live fiber
inspection, image capture, and image store/recall. Its Zoom and Pan features allow users to identify
the smallest particles, scratches, and imperfections. A unique patent-pending feature, the image pair
mode, simplifies before/after, input/output, cleaning, mating and other common fiber cleanliness
comparisons. Additional features include image capture and store/recall. Up to 1000 fiber images may
be stored in on-board memory and images may be transferred via any off-the-shelf USB memory stick
or SD flash card.
DFD1 Touchscreen Tablet Screen Structure
The DFD1 Touchscreen Tablet display is divided
into several sections and can be summarized as
follows:
A
B
C
A
Operating modes and Battery charge
state field.
See page 13 for details.
Image Viewer.
See page 14 for details.
Image Capture and Preview utilities field.
See page 15 for details.
B
C
12
Software Overview
A
Operating Modes Summary
Operating modes field contains various icons.
• Each icon represents a different operating mode
• Tap on a mode icon to select the desired operating mode
This bar/tab indicates
the currently active
mode
1
Ref
1
Icon
Feature/Mode
Live Image
Mode
2
Image Manager
3
Settings
4
Battery State
2
3
4
Description
This icon represents the Live Image mode. When in any
other mode or screen, tapping this icon will navigate to the
Live Image mode screen.
Tap on this icon to display the Image Manager mode.
Tapping this icon will select the Settings mode where users
perform General and Capture mode setup, change Power
settings and view the version information in the About
screen.
This field provides information about the battery charge
state or remaining capacity of the battery.
13
Software Overview
B
Image Viewer Summary
The Image Viewer occupies the middle
part of the DFD1 screen. It displays one of
the following:
• When DFD1 operates in the Live
Inspection mode, it displays a real-time
image of a fiber end-face that is being
inspected.
• When DFD1 operates in the Image
Capture and Preview mode, it displays a
captured image that is being previewed
before saving.
• When DFD1 operates in the Image
Review mode, it displays a previously
stored image or image pair.
14
Software Overview
C
Image Capture and Preview Utilities Field Summary
Image Capture and Preview Utilities field
provides several functions:
• In the Live Image mode, this field
provides access to the Live Image
Settings mode and provides image
capturing function.
• In the Captured Image Preview mode,
this field allows the user to review the
captured image and either delete or
save it in user-defined folders.
15
Operating Instructions
Live Image Inspection Mode
The Live Image mode displays real-time images of the fiber end-face that is being inspected with the
DFS1 Digital FiberScope.
A
1
This bar/tab
indicates that DFD1
operates in the Live
Image or Captured
mode.
This label is
displayed to
indicate that DFD1
operates in the
Live Image mode.
2
This field displays
the Image-pair
mode setup that
are user-defined
in the Settings
mode, which can be
accessed by tapping
the Settings
icon A .
5
3
4
16
Operating Instructions
Live Image Inspection Mode
Ref
1
2
3
Icon
Feature/Mode
Operating
modes
Image Viewer
Description
For details, see section titled “Operating Modes Summary”
on page 13.
This field displays a real-time image of a fiber end-face that
is being inspected.
Live Image
Settings
While in the Live Image mode, tapping on this icon will
display the Settings screen and allow the user to choose Live
Image Brightness, Contrast and Color settings.
Tap to exit
4
Image Capture
5
File Number
Tapping the Capture icon will freeze the displayed live image
and switch to the Capture mode, where the captured image
can be analyzed and saved or deleted.
This field displays the current file number, which may be
changed by tapping the Up or Down arrow. Note: Once the
image has been saved in the Capture mode screen, the file
number is automatically incremented.
17
Operating Instructions
Image Capture Mode
The Image Capture mode displays a still image of the fiber being inspected. This mode allows the user
to preview the captured images, change the currently displayed file number and either store or delete
the displayed image. The Capture mode is accessed from the Live Image mode when the Capture icon
is pressed.
For details, see
section titled
“Operating Modes
Summary” on
page 13.
A
1
This field displays
the Image-pair mode
setup that are userdefined in the Settings
mode, which can be
accessed by tapping
the Settings icon A .
7
2
3
6
5
18
Operating Instructions
Image Capture Mode
Ref Icon
1
Feature
Image Viewer
Description
This field displays a still image of the fiber being
inspected and provides zoom and pan functionality.
2
Zoom in
Tap to increase magnification, get more detailed
view of the displayed image.
Press and hold for continuous Zoom in.
3
Zoom out
Tap to decrease magnification, get less detailed
view of the displayed image.
Press and hold for continuous Zoom.
4
Pan
5
Save
6
Delete
Press and hold the fiber-end image displayed in
the Image Viewer to drag it to the desired location
within the Image Viewer window.
Tapping the Save icon will store the displayed
still image to internal non-volatile memory or an
external SD flash memory card. After saving, the
DFD1 will revert to the Live Image mode.
Tapping the Delete - Trash can icon will discard the
currently displayed still image. After deleting, the
DFD1 will revert to the Live Image mode.
7
File Number
This field displays the current file number, which
may be changed by tapping the Up or Down
arrow. Note: Once the image has been saved
in the Capture mode screen, the file number is
automatically incremented.
19
Operating Instructions
Image Manager
The Image Browser screen is displayed by tapping the Image Browser icon - A . This mode provides
file manager functions enabling users to browse and select stored results for review, create new
folders, and copy/transfer stored data.
This bar/tab indicates
that DFD1 operates in
the Image Manager
mode.
A
3
4
5
2
6
1
7
This field displays
thumbnails of saved
images and folders and
allows navigating and
selecting the desired
image file for review:
• Press Up/Down arrow
to scroll through saved
images.
• Tap on the desired
image thumbnail to
display it in the Image
Review mode.
8
9
20
Operating Instructions
Image Manager
Ref Icon
1
2
Feature
Description
Page Up/Down Tap to scroll through saved image files.
Select Drive
One Level Up
Directory
Tapping this icon (USB Flash Drive) launches the Drive selection
dialog and allows the user to select the desired drive for
images browsing (SD card when applicable or Internal drive).
Tapping this icon will go to the parent directory (one level up)
of the current directory.
4
Copy
Tapping this icon will copy the selected file or folder to media
of your choice.
5
Delete
Tap to delete the currently selected image. When prompted to
confirm, tap Yes or No.
6
Open
7
Filter
8
Image pair
9
Single image
• With an image or image pair selected, tap to open the
currently selected image or image pair.
• With a folder selected, tap to collapse the currently selected
folder.
This feature allows the user to sort and display images by a
user-defined filter: off, before/after, input/output, cleaning,
mating, documentation, and unpaired.
An image pair that was saved with one of Pair Mode option
enabled in the Capture Settings mode (see page 25 for
details).
A single image that was saved with Pair Mode off (see page
25 for details).
21
Operating Instructions
How to Open Images for Review
B
A
C
To review the previously saved image or image pair,
perform the following:
1. Open the Image Browser by tapping the Image
Browser icon - A .
2. Navigate to the desired image
–– Tap Up/Down arrows B to scroll through
saved images.
–– To collapse folders, select a folder and tap on
the Open icon C .
3. With the desired image selected, tap on the
Open icon C or tap on the selected image
thumbnail.
4. The selected image or image pair will be
displayed in the Image Review screen (as shown
on page 23).
22
Operating Instructions
Image Review Mode Summary
Ref Icon
Description
1 Image Displays the selected image for
Viewer review and provides zoom and
pan functionality.
2
Tap to increase magnification,
get more detailed view of the
displayed image. Press and hold
for continuous Zoom in.
3
Tap to decrease magnification,
get less detailed view of the
displayed image.
Press and hold for continuous
Zoom out.
4
Pan Press and hold the fiber-end
image displayed in the Image
Viewer to drag it to the desired
location within the Image
Viewer window.
5
Tap to unlock/ lock a paired
image. In the image pair preview,
the unlock feature allows the
user to individually zoom and pan
each image in the pair mode.
6
Tap to revert to the Image
Manager screen.
2
3
1
5
6
1
2
3
23
Operating Instructions
Settings Mode Summary
The Setting mode is accessed by tapping the
Settings icon - A .
This bar/tab indicates that DFD1
operates in the Settings mode.
This mode allows the user to perform various setup
functions as follows:
A
• General setup - B
• Image Capture mode setup • Power setup - D
2
• View version information - E
Tap on a function name to display the desired
function screen.
3
4
B
C
D
E
C
1
General Setup
Ref Setup
Description
Parameter
1 Calibration Tapping on this button allows
the user to perform screen
calibration.
Follow on-screen instructions.
2 Brightness Press and drag slider to the
left/right to decrease/increase
brightness.
3 Language Tap on
to display a list of
available languages.
4 Sounds
Enables/disables Sounds.
24
Operating Instructions
Image Capture Setup
1
A
2
3
Text Editor
• Tap to enter letters
• Press and hold to enter numbers (top row)
• Tap
to switch to capital letter
Ref Setup
Description
Parameter
1 Change
• Tap to display a list of
Storage
available drives and folders.
Path
• Navigate to the desired
folder and then tap OK to
make it current.
• To create a new folder, tap
on the New Folder icon.
Using the displayed Text
Editor enter new folder
name and then tap OK.
The newly created folder
automatically becomes the
current folder.
2 File Prefix Allows creation of a userfield
defined file prefix for images
identification.
• Tap anywhere on the prefix
field A to display the Text
Editor.
• Enter prefix, then tap Done.
3 Pair Mode • Tap on
to display a list of
available image pair modes.
• Tap on the desired mode to
select.
25
Operating Instructions
Power Setup
1
A
B
Ref Setup
Description
Parameter
1 Auto
Tap to check (enable) or
Shutdown uncheck (disable) the Auto
shutdown feature.
• When enabled, the user may
set up the Idle Timer A
2
3
C
2
Auto
Shutdown
Off
and Battery Level limits B
by tapping on
and
selecting the desired option
from a drop-down menu.
• DFD1 will automatically
shut down after reaching
the user-defined time of
inactivity and/or battery
charge level (whichever limit
is reached first).
Tap to check (enable) or
uncheck (disable) the Auto
shutdown feature when the
DFD1 unit is connected to an
AC adapter/charger.
Continued on next page —>
26
Operating Instructions
Power Setup
Ref Setup Parameter
3 Back Light Dimmer
Description
Tap to check (enable) or uncheck (disable) the Back Light Dimmer.
When enabled, the user may set up the Dimmer Timer C by tapping
on
and selecting the desired option from a drop-down menu.
About Screen
The About screen provides the user with the OS
version and FOCIS Software version information.
27
FAQs
Q: Is it be possible to load the FOCIS software onto another tablet or hand-held computer?
A: FOCIS application software has been designed to work in a Windows® CE environment to achieve
rapid start-up and low licensing costs. It may be possible to load it onto other CE devices as long as
the entire environment (memory, drivers, etc) is present. AFL does not guarantee that the software
bundled in FOCIS will operate elsewhere. Also, AFL does not provide this software in a form that
will facilitate such an installation.
Q: Can the DFS1 Digital FiberScope be used with other Windows CE devices?
A: The FOCIS DFD1 Touchscreen Tablet is custom engineered to have the capability to power the DFS1
Digital FiberScope from its mini USB port. It also includes the drivers and other software necessary
to support high-resolution streaming video, which enables the DFS1 probe video output to be
displayed. Most of the platforms we tested that had a mini USB ports did not provide a +5 volt
output for the probe and many did not support streaming video.
Q: Can I download other application software to the DFD1 Touchscreen Tablet?
A: We do not guarantee that the DFD1 Touchscreen Tablet will continue to function properly if users
download additional applications.
28
Warranty Terms and Conditions
All NOYES Test and Inspection products are warranted against defective material and workmanship for
a period of (1) one year from the date of delivery to the end user. Optional Extended Warranty starts
at the end of the standard (1) one year warranty period. Any product that is found defective within the
warranty period, will (at the discretion of NOYES) be repaired or replaced. Warranty will be voided if
the product has been repaired or altered by other than an authorized NOYES repair facility or when it
has been subjected to misuse, negligence, or accident.
In no case shall NOYES liabilities exceed the original purchase price.
Product Registration
Please take a few minutes to register NOYES products at
http://marketing.noyesfiber.com/acton/media/2238/reg
Registering your product will allow you to take advantage of the latest
updates and special offers from NOYES. Providing this information will
allow us to better serve you.
Contact Us: Returning Equipment
To return equipment, please contact NOYES to obtain additional information and a Service Request
(S.R.) number. To allow us to serve you more efficiently, please include a brief description specifying
the reasons for the return of the equipment.
AFL, NOYES Test and Inspection Division
16 Eastgate Park Road, Belmont, NH 03220
Phone 800-321-5298 • 603-528-7780
[email protected]
29
Repair Services
Please contact customer service for a return authorization number prior to sending your NOYES test
equipment in for repair or calibration.
USA Repair and Calibration services
AFL
NOYES Test and Inspection Division
16 Eastgate Park Road
Belmont, NH 03220
603-528-7780
800-321-5298
Europe Repair and Calibration services
Fujikura Europe Ltd.
C51 Barwell Business Park
Leatherhead Road
Chessington, Surrey, KT9 2NY
+44 (0) 208 240 2020
Standards Compliance Information
The DFD1 Touchscreen Tablet has been designed and tested to comply with the relevant sections of
any applicable specifications including full compliance with all essential requirements of the applicable
EU Directives.
30
Safety Information
CAUTION! Never view a live fiber. Never look directly into the optical outputs of fiber optic network
equipment, test equipment, patch cords and jumpers. Laser radiation is harmful to eyes.
NOTE! NOYES DFD1 Touchscreen Tablet contains no user serviceable parts.
• Do not remove the protective boot.
• This instrument must be returned to NOYES or authorized agents for repair.
NOTE! Refer to your company’s safety procedures when working with optical systems.
NOTE! Follow your company’s approved cleaning procedures.
31
Thank you for choosing NOYES Test and Inspection!
www.AFLglobal.com or (800) 321-5298, (603) 528-7780
© 2012 AFL , all rights reserved. DFD1-00-1ENG Revision PR_1, 2012-04-25