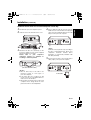
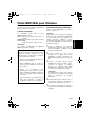
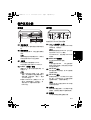
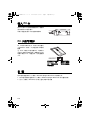
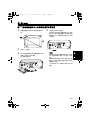
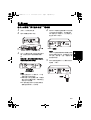
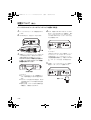
1
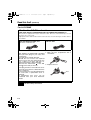
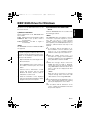
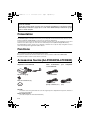
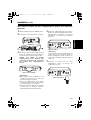
1 ページ 2006年6月28日 水曜日 午前9時49分 Operating Instructions/Mode d’emploi 操作手册 / Memory Card Drive/Lecteur de carte mémoire ENGLISH P_AJ-PCD20.book Model No. AJ- P E MC FRANÇAIS 驱动器 / 中 文 DEUTSCH Fur Erlauterungen in Deutsch, konsultieren Sie bitte die mitgelieferte CD-ROM. ITALIANO Per le istruzioni in italiano, vedere il CDROM in dotazione. ESPAÑOL Para la explicación en español, consulte el CD-ROM suministrado. Before operating this product, please read the instructions carefully and save this manual for future use. Avant d’utiliser l’appareil, lire attentivement ce mode d’emploi, et le conserver a des fins de reference ulterieure. 在操作本机之前,请仔细阅读本说明书,并将说明书妥善保管,以备将来使用。 F0606T0 -F @ Printed in Japan VQT0X89 P_AJ-PCD20.book 1 ページ 2006年6月28日 水曜日 午前9時49分 Read this first! For AJ-PCD20P and AJ-PCD20E WARNING: z TO REDUCE THE RISK OF FIRE OR SHOCK HAZARD, DO NOT EXPOSE THIS EQUIPMENT TO RAIN OR MOISTURE. z TO REDUCE THE RISK OF FIRE OR SHOCK HAZARD, KEEP THIS EQUIPMENT AWAY FROM ALL LIQUIDS. USE AND STORE ONLY IN LOCATIONS WHICH ARE NOT EXPOSED TO THE RISK OF DRIPPING OR SPLASHING LIQUIDS, AND DO NOT PLACE ANY LIQUID CONTAINERS ON TOP OF THE EQUIPMENT. CAUTION: TO REDUCE THE RISK OF FIRE OR SHOCK HAZARD AND ANNOYING INTERFERENCE, USE THE RECOMMENDED ACCESSORIES ONLY. CAUTION: THE AC RECEPTACLE (MAINS SOCKET OUTLET) SHALL BE INSTALLED NEAR THE EQUIPMENT AND SHALL BE EASILY ACCESSIBLE. TO COMPLETELY DISCONNECT THIS EQUIPMENT FROM THE AC MAINS, DISCONNECT THE POWER CORD PLUG FROM THE AC RECEPTACLE. AC Adapter Disconnect the AC mains plug from the AC mains socket when not in use. This apparatus must be earthed. To ensure safe operation the three-pin plug must be inserted only into a standard three-pin power point which is effectively earthed through the normal house-hold wiring. Extension cords used with the equipment must be three-core and be correctly wired to provide connection to earth. Wrongly wired extension cords are a major cause of fatalities. The fact that the equipment operates satisfactorily does not imply that the power point is earthed and that the installation is completely safe. For your safety, if in any doubt about the effective earthing of the power point, consult a qualified electrician. indicates safety information. E-1 P_AJ-PCD20.book 2 ページ 2006年6月28日 水曜日 午前9時49分 Read this first! (continue) FCC NOTICE Declaration of Conformity Model Number: AJ-PCD20P Trade Name: PANASONIC Responsible Party: Panasonic Corporation of North America One Panasonic Way, Secaucus, NJ 07094 Support contact: Panasonic Broadcast & Television Systems Company 1-800-524-1448 This device complies with Part 15 of FCC Rules. Operation is subject to the following two conditions: (1) This device may not cause harmful interference, and (2) this device must accept any interference received, including interference that may cause undesired operation. To assure continued compliance, follow the attached installation instructions and do not make any unauthorized modifications. CAUTION: This equipment has been tested and found to comply with the limits for a Class B digital device, pursuant to Part 15 of the FCC Rules. These limits are designed to provide reasonable protection against harmful interference in a residential installation. This equipment generates, uses and can radiate radio frequency energy, and if not installed and used in accordance with the instructions, may cause harmful interference to radio communications. However, there is no guarantee that interference will not occur in a particular installation. If this equipment does cause harmful interference to radio or television reception, which can be determined by turning the equipment off and on, the user is encouraged to try to correct the interference by one of the following measures: z Reorient or relocate the receiving antenna. z Increase the separation between the equipment and receiver. z Connect the equipment into an outlet on a circuit different from that to which the receiver is connected. z Consult the dealer or an experienced radio/TV technician for help. The user may find the booklet “Something About Interference” available from FCC local regional offices helpful. FCC Warning: To assure continued FCC emission limit compliance, the user must use only shielded interface cables when connecting to host computer or peripheral devices. Also, any unauthorized changes or modifications to this equipment could void the user’s authority to operate this device. indicates safety information. E-2 ENGLISH For AJ-PCD20P P_AJ-PCD20.book 3 ページ 2006年6月28日 水曜日 午前9時49分 Read this first! (continue) For AJ-PCD20E Caution for AC Mains Lead FOR YOUR SAFETY PLEASE READ THE FOLLOWING TEXT CAREFULLY. This product is equipped with 2 types of AC mains cable. One is for continental Europe, etc. and the other one is only for U.K. Appropriate mains cable must be used in each local area, since the other type of mains cable is not suitable. FOR CONTINENTAL EUROPE, ETC. FOR U.K. ONLY Not to be used in the U.K. FOR U.K. ONLY How to replace the fuse 1. Open the fuse compartment with a screwdriver. This appliance is supplied with a moulded three pin mains plug for your safety and convenience. A 13 amp fuse is fitted in this plug. Should the fuse need to be replaced please ensure that the replacement fuse has a rating of 13 amps and that it is approved by ASTA or BSI to BS1362. Check for the ASTA mark or the BSI 2. Replace the fuse. mark on the body of the fuse. If the plug contains a removable fuse cover you must ensure that it is refitted when the fuse is replaced. If you lose the fuse cover the plug must not be used until a replacement cover is obtained. A replacement fuse cover can be purchased from your local Panasonic Dealer. indicates safety information. E-3 Fuse P_AJ-PCD20.book 4 ページ 2006年6月28日 水曜日 午前9時49分 Table of Contents ENGLISH Read this first! . . . . . . . . . . . . . . . . . . . . . . . . . . . . . . . . . . . . . . . . . . . . . 1 Overview . . . . . . . . . . . . . . . . . . . . . . . . . . . . . . . . . . . . . . . . . . . . . . . . . 5 Features . . . . . . . . . . . . . . . . . . . . . . . . . . . . . . . . . . . . . . . . . . . . . . . . . . 5 Supplied Accessories (AJ-PCD20P/AJ-PCD20E) . . . . . . . . . . . . . . . . . . 5 Parts and their Functions . . . . . . . . . . . . . . . . . . . . . . . . . . . . . . . . . . . . . 6 Front Panel . . . . . . . . . . . . . . . . . . . . . . . . . . . . . . . . . . . . . . . . . . . . . . 6 Rear Panel . . . . . . . . . . . . . . . . . . . . . . . . . . . . . . . . . . . . . . . . . . . . . . 6 Inserting a P2 Card . . . . . . . . . . . . . . . . . . . . . . . . . . . . . . . . . . . . . . . . . 7 Write-protection of P2 Card . . . . . . . . . . . . . . . . . . . . . . . . . . . . . . . . . . . 7 Installation . . . . . . . . . . . . . . . . . . . . . . . . . . . . . . . . . . . . . . . . . . . . . . . . 7 To Connect the P2 drive to a Personal Computer for External Use . . . 8 To Mount the P2 drive in a Personal Computer 5-inch Bay . . . . . . . . 10 IEEE1394b Driver for Windows . . . . . . . . . . . . . . . . . . . . . . . . . . . . . . . 12 1) Before installation . . . . . . . . . . . . . . . . . . . . . . . . . . . . . . . . . . . . . . 12 2) Installation of the IEEE1394b driver . . . . . . . . . . . . . . . . . . . . . . . . 12 3) Confirmation of installation of the IEEE1394b driver . . . . . . . . . . . 13 IEEE1394b Driver for Macintosh . . . . . . . . . . . . . . . . . . . . . . . . . . . . . . 14 Installation of the IEEE1394b driver . . . . . . . . . . . . . . . . . . . . . . . . . . 14 Specifications . . . . . . . . . . . . . . . . . . . . . . . . . . . . . . . . . . . . . . . . . . . . . 15 Windows, Windows 2000 and Windows XP are trademarks of Microsoft Corporation of the United States. Macnintosh and Mac OS X are trademarks of Apple Computer, Inc. of the United States. Other names of companies and products are trademarks or registered trademarks of the respective companies. z In these instructions, Microsoft® Windows®, Windows® 2000 and Windows® XP Professional are given as “Windows,” “Windows 2000” and “Windows XP Professional,” respectively. z Similarly, in these instructions, Macintosh® and Mac OS® X are given as “Macintosh” and “Mac OS X” respectively. Software information for this product Customer advisory: This product includes software licensed under the GNU General Public License (GPL) and GNU Lesser General Public License (LGPL); customers have the right to download, modify, and redistribute source code for this software. Descriptions of the GPL and LGPL are stored on the installation CD included with this camerarecorder. See the folder named \LDOC. (The description is the original (written in English)). To download the relevant source code, visit http://panasonic.biz/sav/. Please note that we cannot answer any questions you may have about the content, etc. of any source code you may obtain from the above Web site. E-4 P_AJ-PCD20.book 5 ページ 2006年6月28日 水曜日 午前9時49分 While AJ-PCD20 is connected to the personal computer, install the required drivers from the CD-ROM. For details, refer to the install manual and “IEEE1394b Driver for Windows” (page 12) or “IEEE1394b Driver for Macintosh” (page 14) in this document. Overview The AJ-PCD20 (hereinafter referred to as “P2 drive”) is a data transfer device that uses a USB 2.0 or IEEE1394b interface and is designed only for P2 cards. The P2 drive is capable of making high-speed transfers of clip data shot with a memory card camera recorder for P2 cards to a personal computer (Windows/Apple Macintosh). This device supports not only the transferring and copying of clips recorded on P2 cards, but also direct editing. Features z The P2 drive features five card slots. z It enables high-speed data transfer using a USB 2.0 or IEEE1394b interface. z It can be used as either an external or an internal drive. Supplied Accessories (AJ-PCD20P/AJ-PCD20E) AC adapter Power cable for AC adapter For AJ-PCD20P Mounting screws (8) Rubber feet (4) For AJ-PCD20E (continental Europe,etc) For AJ-PCD20E (U.K.) CD-ROM (Driver for P2, P2 card manager, dedicated software for the respective P2 devices, install manual and operation manual) Operation Manual (2) (The Operating Instructions and the Installation Manual) E-5 P_AJ-PCD20.book 6 ページ 2006年6月28日 水曜日 午前9時49分 Parts and their Functions Rear Panel ENGLISH Front Panel USB 2.0 IEEE 1394b DC IN 16V (1) (1) (2) (3) (4) (1)Power Indicator This indicator lights up in green when the P2 drive is running. (2)Status Indicator This indicator lights up in green during access to a P2 card. <Note> Do not remove the P2 card during access of the card, otherwise files may be corrupted, or the P2 card may fail. (3)Card Slots The P2 drive’s card slots are designed for P2 cards. The P2 drive does not operate with cards other than P2 cards. (4)EJECT Button To remove a P2 card, press this button so that the button pops out, then press it in again. <Notes> z For Windows 2000 only : Open “My Computer” and use the right button of your mouse to select the drive from which you want to remove a card, then select “EJECT” before operating the EJECT button. z For Macintosh only: To remove a P2 card, drag the icon of the P2 card to “Trash,” and then press the EJECT button after confirming that the P2 card icon disappears. (2) (6) (5) (3) DC IN 12V (4) The picture shows the rear panel with its cover removed. (1)USB 2.0 connector (Type B) This connects a USB cable. Use a USB cable (shielded) compliant with USB 2.0. <Note> The P2 drive supports USB 2.0 only. It does not support personal computers compliant with USB 1.1. For Macintosh, USB 2.0 operations are not guaranteed. (2)IEEE1394b connector This connects an IEEE1394b cable. <Note> When cables are connected to both the USB 2.0 connector and IEEE1394b connector, only the interface that was connected first after turning on the power is available. (3)DC IN 16V Socket For external use of the P2 drive, connect an AC adapter to this socket. (4)DC IN 12V Socket To use the P2 drive mounted in a personal computer, connect one of the power supply connectors inside the personal computer to this socket. (See page 10) <Note> Do NOT supply power to both the DC IN 12V socket and DC IN 16V socket at the same time. (5)Cable Clamp Use this clamp to secure the AC adapter cable when connecting the P2 drive to a personal computer for external use of the Drive. (6)Antitheft Lock A commercially available antitheft cable can be connected to this lock. E-6 P_AJ-PCD20.book 7 ページ 2006年6月28日 水曜日 午前9時49分 Inserting a P2 Card When inserting a P2 card into the slot in the P2 drive, make sure you keep the card horizontal as you ease it in. Forcing the card in on an angle may cause a problem. Write-protection of P2 Card A P2 card has a write-protect switch. Setting this switch to “PROTECT” can prevent writing and deleting of data. Note: The write-protect switch is not effective when the P2 card is inserted in the P2 drive. Make sure you remove the P2 card from the P2 drive, set the switch, then re-insert the card, in order to effect the switch setting. PROTECT Setting the writeprotect switch to “PROTECT” can prevent writing and deleting of data. Setting the writeprotect switch to this side allows writing and deleting of data. Installation There are two ways to connect the P2 drive to a personal computer (Windows/Apple Macintosh) : 1. Using the P2 drive as an external drive connected to a personal computer (Windows/Apple Macintosh) 2. Mounting the P2 drive in a 5-inch bay of a desktop personal computer (Windows) E-7 P_AJ-PCD20.book 8 ページ 2006年6月28日 水曜日 午前9時49分 Installation (continue) 1 Attach the rubber feet to the dimples on the 4 (To be connected by USB 2.0) base of the P2 drive. Plug a USB 2.0 cable B connector into the USB connector on the P2 drive. then plug the other end (A connector) of the USB 2.0 cable into the USB 2.0 port on the personal computer. Dimples USB 2.0 IEEE 1394b DC IN 16V 2 Start the personal computer. 3 Plug the AC adapter supplied with the P2 drive into the DC IN 16V socket on the P2 drive. The P2 drive will start. USB 2.0 IEEE 1394b DC IN 16V DC IN 12V DC IN 12V USB 2.0 connector <Note> No USB 2.0 cable is supplied with the P2 drive in the package. Use a commercially available USB 2.0 cable (shielded). Take care to use a USB cable that is no longer than 3 metres. The P2 drive may not operate properly with a cable longer than 3 metres. For Macintosh, USB 2.0 operations are not guaranteed. E-8 ENGLISH To Connect the P2 drive to a Personal Computer for External Use P_AJ-PCD20.book 9 ページ 2006年6月28日 水曜日 午前9時49分 Installation (continue) 5 (To be connected by IEEE1394b) Connect the P2 drive to the personal computer with a IEEE1394b cable. USB 2.0 IEEE 1394b DC IN 16V DC IN 12V IEEE1394b connector <Notes> z No IEEE1394b cable is supplied with the P2 drive in the package. Use a commercially available IEEE1394b cable. z Before proceeding to connect the unit which uses a 6-pin type IEEE 1394 connector, carefully check the shape of the 6-pin type IEEE1394b cable and the connectors on IEEE1394b cable. Connecting a connector upside down may damage the parts inside the unit and cause malfunctioning. z Do not apply force when connecting IEEE1394b cable to IEEE1394b connector as this may damage the connector. E-9 6 Verify that the personal computer recognises the P2 drive. <Notes> z In Windows XP, some card slots of the P2 drive may be assigned drive names that have already been assigned to existing networks. Reassign network drive names if your personal computer does not display all five card slots. z In Windows, to remove a USB cable or an IEEE1394b cable, select “Safely Remove Hardware” in the “Task Tray” and stop the “Panasonic P2 Series USB/SBP2 Device” before removing the cable. z On an Apple Macintosh, to remove an IEEE1394b cable, drag the icon of the P2 card to “Trash” and then confirm that the P2 card icon disappears before removing the cable. P_AJ-PCD20.book 10 ページ 2006年6月28日 水曜日 午前9時49分 Installation (continue) 1 Turn OFF the personal computer’s power. 2 Undo the six screws and remove the cover. 4 Plug a USB 2.0 cable B connector into the USB connector on the P2 drive. then plug the other end of the USB 2.0 cable into the USB 2.0 port on the personal computer. USB 2.0 IEEE 1394b DC IN 16V DC IN 12V USB 2.0 IEEE 1394b DC IN 16V DC IN 12V USB 2.0 connector 3 Mount the P2 drive in a 5-inch bay on the personal computer. Use the screws supplied with the P2 drive for mounting. Please refer to your computer’s instruction manual for guidance in mounting to 5-inch bay drives. <Note> USB 2.0 connector pinouts vary according to the type of motherboard type. Check your computerís instruction manual before purchasing a commercially available USB 2.0 cable (shielded). 5 Connect the P2 drive to the internal power cable (4 pins) of the personal computer. USB 2.0 IEEE 1394b DC IN 16V Holes for securing the screws (the other side is the same.) <Notes> z The P2 drive may not be able to be fastened securely in some types of personal computers. z If all 5-inch bays are occupied, you will need to remove one of the built-in drives to make room for the P2 drive. z The P2 drive should be used in a personal computer whose design allows the front panel of the Drive to be manipulated. DC IN 12V Power cable E-10 ENGLISH To Mount the P2 drive in a Personal Computer 5-inch Bay P_AJ-PCD20.book 11 ページ 2006年6月28日 水曜日 午前9時49分 Installation (continue) 6 Start the personal computer and verify that it recognises the P2 drive. <Note> In Windows XP, some card slots of the P2 drive may be assigned drive names that have already been assigned to existing networks. Reassign network drive names if your personal computer does not display all five card slots. E-11 P_AJ-PCD20.book 12 ページ 2006年6月28日 水曜日 午前9時49分 This driver is for the IEEE1394b interface for the P2 card on this unit. 2) Installation of the IEEE1394b driver 1) Before installation Install the IEEE1394b driver in accordance with the following procedures. System requirements for the IEEE1394b driver are as follows. z OS: Windows XP Professional SP2 or higher z RAM: 512 MB or more (1 GB or more is recommended) 1.5 GHz or higher is z CPU: Pentium®4 recommended <Note> The IEEE1394b connection in Windows 2000 is not supported. Before installing the IEEE1394b driver, install the update program provided by Microsoft in accordance with the following procedures. If the updates are not installed, a sufficient transfer rate may not be obtained. 1 Open the Web browser and navigate to the Microsoft website. 2 Enter “KB885222” in the search column on the website, and then press the search button. 3 Click the link for “Performance of 1394 devices may decrease after you install Windows XP Service Pack 2,” which is indicated as a search result. 4 Read the information on the displayed page, then download and install the update program on the personal computer. <Note> The IEEE1394b driver is installed for each unit connected to a personal computer. If you use more than one unit on a single personal computer, install the drivers for the respective units separately. If the IEEE1394b driver are not installed, a sufficient transfer rate may not be obtained. 1 In accordance with the descriptions in “4. New Installation of the P2 Software” (from pages 4 to 6 of the installation manual), install the software up to Procedure No. 8. 2 When the window shown in Fig. 7 of Procedure No. 8 (page 6 in the installation manual) is displayed, select “AJ-PCD20 (P2 drive) 1394 driver” and then click OK. 3 When the message “Please connect AJPCD20 (P2 drive) by 1394” is displayed, connect this unit to the personal computer using IEEE1394b. Confirm that all five drive letters of this unit are displayed and then press Install. <Note> When the unit is connected to a personal computer through USB, remove the USB cable and then connect using IEEE1394b. 4 The warning box may be displayed; in such a case, click “Continue Anyway”. The warning box may be displayed two or more times. 5 In accordance with the instructions on the screen, complete the installation and restart the personal computer. E-12 ENGLISH IEEE1394b Driver for Windows P_AJ-PCD20.book 13 ページ 2006年6月28日 水曜日 午前9時49分 IEEE1394b Driver for Windows (continue) 3) Confirmation of installation of the IEEE1394b driver Confirm whether the IEEE1394b driver is installed properly in accordance with the following procedures. 1 Connected this unit to a personal computer using IEEE1394b. 2 Open Control Panel from the Start menu, and select properties. System to display system 3 Select the Hardware tab in the system properties and then press the Device Manager button. 4 Open the tree for “Disk drive” using Device Manager, and then press the right button for “MATSHITA AJ-PCD20# IEEEE 1394 SBP2 Device” to open properties. 5 Select the Driver tab in properties, and then press the Driver’s details button. 6 If the following files are included in the displayed driver file list, the IEEE1394 driver was installed properly. “p2sbp2.sys” “p2cmgr.dll” “p2csvc.exe” 7 For the following devices, confirm the installation using the same procedures as Nos. 4 to 6. “MATSUSHITA AJ-PCD20 #2 IEEE 1394 SBP2 Device” “MATSUSHITA AJ-PCD20 #3 IEEE 1394 SBP2 Device” “MATSUSHITA AJ-PCD20 #4 IEEE 1394 SBP2 Device” “MATSUSHITA AJ-PCD20 #5 IEEE 1394 SBP2 Device” E-13 <Note> When using IEEE1394b, only one AJ-PCD20 can be connected to the personal computer. If two or more AJ-PCD20 units are connected simultaneously, operations cannot be guaranteed. P_AJ-PCD20.book 14 ページ 2006年6月28日 水曜日 午前9時49分 IEEE1394b Driver for Macintosh This driver is for the P2 card on this unit. ENGLISH Installation of the IEEE1394b driver 1 Insert the installation CD. 2 Double-click the Macintosh folder on the CD. 3 Double-click the AJ-PCD20 folder. 4 Double-click “P2Drive Install.dmg” in the AJ-PCD20 folder. 5 Double-click “P2Drive Install.pkg”. 6 When driver installation starts, follow the instructions on the installation screen. <Notes> z By installing this driver, it is possible to connect to this unit to the Macintosh using IEEE1394b (Firewire 800) to transfer data at a higher rate. z The P2 card must be formatted using other P2 devices. z When the P2 card is removed or the IEEE1394b cable is disconnected, drag the icon for the P2 card to Trash and confirm that the P2 card icon disappears before executing removal or disconnection. z Reinsert the P2 card if the P2 card icon is not displayed. E-14 P_AJ-PCD20.book 15 ページ 2006年6月28日 水曜日 午前9時49分 Specifications AC 100 V - 240 V, 0.9 A - 0.5 A, 50 - 60 Hz (AC adapter input) DC 16 V, 0.6 A (when used with AC adapter) DC 12 V, 0.8 A (when mounted in a personal computer) indicates safety items. External dimensions (W a H a D) 148.4 mm a 42.5 mm a 199.5 mm (5-7/8 inches a 1-11/16 inches a 7-7/8 inches) (excluding protruding parts) Weight 1.2 kg (2.6 lb) [Environmental conditions] Operating temperature 0 °C to +40 °C (32 °F to +104 °F) Operating humidity 0% to 90% (w/o condensation) [ Personal Computer System Requirements] OS (proper operation guaranteed) Windows XP Professional (SP2 or later) Windows 2000 (SP4 or later) Mac OS X 10.3.9 Mac OS X 10.4.2 Mac OS X 10.4.6 Main Memory 512 MB or greater recommended Interface USB Ver. 2.0 compliant IEEE1394b compliant [Card slots] PC card Type II a 5 (CardBus compliant) Please note that specifications and appearance are subject to change, for improvement purpose, without notice. E-15 P_AJ-PCD20.book 16 ページ 2006年6月28日 水曜日 午前9時49分 This symbol on the products and/or accompanying documents means that used electrical and electronic products should not be mixed with general household waste. For proper treatment, recovery and recycling, please take these products to designated collection points,where they will be accepted on a free of charge basis. Alternatively, in some countries you may be able to return your products to your local retailer upon the purchase of an equivalent new product. Disposing of this product correctly will help to save valuable resources and prevent any potential negative effects on human health and the environment which could otherwise arise from inappropriate waste handling. Please contact your local authority for further details of your nearest designated collection point. Penalties may be applicable for incorrect disposal of this waste, in accordance with national legislation. For business users in the European Union If you wish to discard electrical and electronic equipment, please contact your dealer or supplier for further information. Information on Disposal in other Countries outside the European Union This symbol is only valid in the European Union. If you wish to discard this product, please contact your local authorities or dealer and ask for the correct method of disposal. E-16 ENGLISH Information on Disposal for Users of Waste Electrical & Electronic Equipment (private households) P_AJ-PCD20.book 1 ページ 2006年6月28日 水曜日 午前9時49分 Lire ces informations en premier ! AVERTISSEMENT: z POUR RÉDUIRE LES RISQUES D’INCENDIE OU DE CHOC ÉLECTRIQUE, ÉVITEZ D’EXPOSER CET APPAREIL À LA PLUIE OU À L’HUMIDITÉ. z POUR RÉDUIRE TOUT RISQUE DE FEU OU DE CHOC ÉLECTRIQUE, ÉLOIGNER L’APPAREIL DES LIQUIDES - UTILISER ET RANGER UNIQUEMENT DANS UN ENDROITNE RISQUANT PAS DE RECEVOIR DES GOUTTES OU D’ÊTRE ASPERGÉ DE LIQUIDES, ET NE PAS METTRE DE RÉCIPIENT RENFERMANT DES LIQUIDES SUR LE DESSUS DE L’APPAREIL. ATTENTION: POUR ÉVITER TOUT RISQUE D’INCENDIE, DE CHOCS ÉLECTRIQUES OU D’INTERFÉRENCES, N’UTILISER QUE LES ACCESSOIRES RECOMMANDÉS. PRECAUTION: LA PRISE DE COURANT (PRISE SECTEUR) DOIT ÊTRE INSTALLÉE À PROXIMITÉ DE L’APPAREIL ET FACILEMENT ACCESSIBLE. POUR DÉCONNECTER COMPLÈTEMENT CET APPAREIL DU SECTEUR, DÉBRANCHEZ LA FICHE DU CORDON D’ALIMENTATION DE LA PRISE DE COURANT. Adaptateur secteur Débrancher la fiche secteur de la prise lorsqu’on ne se sert pas de l’appareil. Cet appareil doit être mis à la terre. Pour que l’appareil fonctionne avec une entière sécurité, la fiche à trois broches fournie avec l’appareil doit être branchée dans une prise secteur standard à trois broches reliée à la terre par l’installation électrique de l’immeuble. Si l’on doit utiliser des rallonges, elles seront à 3 contacts avec conducteur de terre. Des rallonges ne respectant pas ces exigences peuvent entraîner des accidents mortels. Le fait que l’appareil fonctionne de façon satisfaisante ne veut pas dire que la mise à la terre a été effectuée et que l’installation est sûre. Pour plus de sécurité, si l’on a quelque doute que ce soit concernant la mise à la terre, consulter un électricien. Informations concernant la sécurité. F-1 P_AJ-PCD20.book 2 ページ 2006年6月28日 水曜日 午前9時49分 Table des matières FRANÇAIS Lire ces informations en premier ! . . . . . . . . . . . . . . . . . . . . . . . . . . . . . . . 1 Présentation . . . . . . . . . . . . . . . . . . . . . . . . . . . . . . . . . . . . . . . . . . . . . . . . 3 Fonctions . . . . . . . . . . . . . . . . . . . . . . . . . . . . . . . . . . . . . . . . . . . . . . . . . . 3 Accessoires fournis (AJ-PCD20P/AJ-PCD20E) . . . . . . . . . . . . . . . . . . . . . 3 Pièces et leurs fonctions . . . . . . . . . . . . . . . . . . . . . . . . . . . . . . . . . . . . . . 4 Panneau avant . . . . . . . . . . . . . . . . . . . . . . . . . . . . . . . . . . . . . . . . . . . 4 Panneau arrière . . . . . . . . . . . . . . . . . . . . . . . . . . . . . . . . . . . . . . . . . . 4 Insertion d’une carte P2 . . . . . . . . . . . . . . . . . . . . . . . . . . . . . . . . . . . . . . . 5 Protection de la carte P2 contre l’écriture . . . . . . . . . . . . . . . . . . . . . . . . . 5 Installation . . . . . . . . . . . . . . . . . . . . . . . . . . . . . . . . . . . . . . . . . . . . . . . . . 5 Pour connecter un lecteur P2 à un ordinateur personnel pour une utilisation externe . . . . . . . . . . . . . . . . . . . . . . . . . . . . . . . . . . 6 Pour monter le lecteur P2 dans l’emplacement 5 pouces d’un ordinateur personnel . . . . . . . . . . . . . . . . . . . . . . . . . . . . . . . . . . . 8 Pilote IEEE1394b pour Windows . . . . . . . . . . . . . . . . . . . . . . . . . . . . . . . 10 1) Avant l’installation . . . . . . . . . . . . . . . . . . . . . . . . . . . . . . . . . . . . . . 10 2) Installation du pilote IEEE1394b . . . . . . . . . . . . . . . . . . . . . . . . . . . 10 3) Confirmation d’installation du pilote IEEE1394b . . . . . . . . . . . . . . . 11 Pilote IEEE1394b pour Macintosh . . . . . . . . . . . . . . . . . . . . . . . . . . . . . . 12 Installation du pilote IEEE1394b . . . . . . . . . . . . . . . . . . . . . . . . . . . . . 12 Spécifications . . . . . . . . . . . . . . . . . . . . . . . . . . . . . . . . . . . . . . . . . . . . . . 13 Windows, Windows 2000 et Windows XP sont des marques commerciales de Microsoft Corporation aux États-Unis. Macintosh et Mac OS X sont des marques commerciales de Apple Computer, Inc. aux États-Unis. Les autres noms de sociétés et de produits sont des marques commerciales ou marques déposées des sociétés respectives. z Dans le cadre de ce manuel d’installation, Microsoft® Windows®, Windows® 2000 et Windows® XP Professional sont appelés “Windows,” “Windows 2000” et “Windows XP Professional,” respectivement. z De même, dans ce manuel d’installation, Macintosh® et Mac OS® X sont appelés “Macintosh” et “Mac OS X” respectivement. Informations logicielles pour ce produit Informations destinées au client : Ce produit contient un logiciel associé à la licence publique générale (GPL) et à la licence publique générale limitée (LGPL) GNU ; les clients ont donc le droit de télécharger, modifier et redistribuer le code source de ce logiciel. Les descriptions de licences GPL et LGPL sont disponibles dans le CD-ROM accompagnant ce caméscope. Ouvrez le dossier nommé \LDOC. (La description est l’originale de la licence (rédigée en anglais)). Pour télécharger le code source concerné, accédez aux sites Web http://panasonic.biz/sav/. À noter que nous ne pouvons pas répondre à toutes les questions que vous pouvez vous poser sur le contenu, etc. d’un code source quelconque que vous auriez obtenu sur le site Web mentionné ci-dessus. F-2 P_AJ-PCD20.book 3 ページ 2006年6月28日 水曜日 午前9時49分 Une fois que l’AJ-PCD20 est connecté à l’ordinateur personnel, installez les pilotes requis à partir du CD-ROM. Pour de plus amples détails, reportez-vous au manuel d’installation et à la rubrique “Pilote IEEE1394b pour Windows” (page 10) ou à celle “Pilote IEEE1394b pour Macintosh” (page 12) de ce mode d’emploi. Présentation L’AJ-PCD20 (appelé dorénavant “lecteur P2”) est un dispositif servant à transférer des données via une interface USB 2.0 ou IEEE1394b et conçu pour les cartes P2 uniquement. Le lecteur P2 est en mesure d’effectuer des transferts à haute vitesse de clip enregistrés sur la carte mémoire d’un caméscope pour cartes P2 à un ordinateur personnel (Windows/Apple Macintosh). Ce périphérique prend en charge non seulement le transfert et la copie de clips enregistrés sur des cartes P2, mais permet également l’édition directe. Fonctions z Le lecteur P2 est doté de cinq emplacements de carte. z Il permet le transfert de données à haute vitesse via une interface USB 2.0 ou IEEE1394b. z Il peut être utilisé comme lecteur externe ou interne. Accessoires fournis (AJ-PCD20P/AJ-PCD20E) Adaptateur courant alternatif Vis de montage (8) Câble d’alimentation courant alternatif pour l’adaptateur Pour l’AJ-PCD20P Pieds en caoutchouc (4) Pour l’AJ-PCD20E (Europe continentale, etc.) Pour l’AJ-PCD20E (R.U.) CD-ROM (Lecteur de carte P2, gestionnaire de carte P2, logiciel pour les dispositifs P2 respectifs, manuel et le manuel d’installation) Manuel d’utilisation (2) (le mode d’emploi et le manuel d’installation) F-3 P_AJ-PCD20.book 4 ページ 2006年6月28日 水曜日 午前9時49分 Pièces et leurs fonctions Panneau avant Panneau arrière USB 2.0 IEEE 1394b (1) (1) (2) (3) (4) (1) Voyant de mise sous tension Ce voyant s’allume (couleur verte) lorsque le lecteur P2 fonctionne. (2) Indicateur d’activité Ce voyant s’allume (couleur verte) lors de l’accès à la carte P2. <Remarque> Ne retirez pas la carte P2 pendant l’accès à la carte car cela peut endommager les fichiers ou provoquer une défaillance de la carte P2. (3) Emplacements de carte Les emplacements de carte du lecteur P2 sont conçus pour les cartes P2. Le lecteur P2 ne fonctionne pas avec des cartes différentes des cartes P2. (4) Bouton EJECT Pour retirer une carte P2, appuyez sur ce bouton jusqu’à ce qu’il sorte, puis appuyez dessus à nouveau. <Remarques> zSous Windows 2000 uniquement : Ouvrez le “Poste de travail” et utilisez le bouton droit de la souris pour sélectionner le lecteur duquel vous souhaitez retirer une carte, puis sélectionnez “EJECT” avant d’utiliser le bouton EJECT. zSous Macintosh uniquement : Pour retirer une carte P2, glissez l’icône de la carte P2 sur la “Corbeille”, appuyez ensuite sur le bouton EJECT après avoir confirmé que l’icône de la carte P2 a disparu. (2) (6) (5) (3) DC IN 12V (4) Cette image montre le panneau arrière sans son couvercle. (1) Connecteur USB 2.0 (type B) Il permet de connecter un câble USB. Utilisez un câble USB (blindé) conforme à l’interface USB 2.0. <Remarque> Le lecteur P2 ne prend en charge que l’interface USB 2.0. Il ne prend pas en charge les ordinateurs personnels conformes à USB 1.1. Sur Macintosh, il n’est pas toujours possible d’effectuer les opérations en port USB 2.0. (2) Connecteur IEEE1394b Il permet de connecter un câble IEEE1394b. <Remarque> Lorsque des câbles sont branchés au connecteur USB 2.0 et au connecteur IEEE1394b, seule la première interface qui a été branchée après la mise sous tension est disponible. (3) Prise Courant continu en entrée 16V Pour une utilisation externe du lecteur P2, branchez un adaptateur CC sur cette prise. (4) Prise Courant continu en entrée 12V Pour utiliser le lecteur P2 monté dans un ordinateur personnel, branchez l’un des connecteurs de mise sous tension de l’ordinateur personnel dans cette prise. (Voir page 8.) <Remarque> NE METTEZ PAS sous tension la prise d’entrée C.C. de 12V et la prise d’entrée CC de 16V en même temps. (5) Collier pour câble Utilisez ce collier pour fixer le câble adaptateur courant continu lors de la connexion du lecteur P2 à l’ordinateur personnel pour une utilisation externe du lecteur. (6) Verrou antivol Un câble disponible dans le commerce peut être branché sur ce verrou. F-4 FRANÇAIS DC IN 16V P_AJ-PCD20.book 5 ページ 2006年6月28日 水曜日 午前9時49分 Insertion d’une carte P2 Lors de l’insertion d’une carte P2 dans l’emplacement dans le lecteur P2, assurez-vous de maintenir la carte horizontale lorsque vous la glissez dans l’emplacement. Si vous forcez la carte sur un angle, vous risquez de rencontrer des problèmes. Protection de la carte P2 contre l’écriture Une carte P2 est équipée d’un commutateur de protection contre l’écriture. Si vous placez le commutateur sur “PROTECT”, vous évitez l’écriture et la suppression de données. Remarque : Le commutateur de protection contre l’écriture n'est pas activé lorsque la carte P2 est insérée dans le lecteur P2. Assurez-vous de retirer la carte P2 du lecteur P2, d’activer le commutateur, puis de réinsérer la carte pour que la configuration du commutateur soit effective. PROTECT Si vous placez le commutateur de protection contre l’écriture sur “PROTECT”, vous évitez l’écriture et la suppression de données. Si vous placez le commutateur de protection contre l’écriture de ce côté, vous autorisez l’écriture et la suppression de données. Installation Il existe deux manières de connecter un lecteur P2 à un ordinateur personnel (Windows/Apple Macintosh) : 1. Utilisation du lecteur P2 comme lecteur externe connecté à l’ordinateur personnel (Windows/Apple Macintosh) 2. Montage du lecteur P2 dans l’emplacement 5 pouces d’un ordinateur personnel (Windows) de bureau F-5 P_AJ-PCD20.book 6 ページ 2006年6月28日 水曜日 午前9時49分 Installation (suite) Pour connecter un lecteur P2 à un ordinateur personnel pour une utilisation externe les pieds en caoutchouc dans les rainures sur le socle du lecteur P2. Rainures 4 (Pour le branchement via USB 2.0) Branchez le câble USB 2.0 pour connecteur B dans le connecteur USB 2.0 du lecteur P2, puis branchez l’autre extrémité sur le port USB 2.0 de la carte-mère de l’ordinateur personnel. FRANÇAIS 1 Fixez USB 2.0 IEEE 1394b DC IN 16V 2 Démarrez l’ordinateur personnel. 3 Branchez le câble adaptateur CA fourni avec le lecteur P2 dans la prise d’entrée CC de 16V du lecteur P2. Le lecteur P2 va démarrer. USB 2.0 IEEE 1394b DC IN 16V DC IN 12V DC IN 12V Connecteur USB 2.0 <Remarque> Aucun USB 2.0 n’est fourni avec le lecteur P2 dans la boîte. Utilisez un câble USB 2.0 (blindé) disponible dans le commerce. Assurez-vous de ne pas utiliser un câble USB d'une longueur supérieure à 3 mètres. Sinon, le lecteur P2 risque de ne pas fonctionner correctement. Sur Macintosh, il n’est pas toujours possible d’effectuer les opérations en port USB 2.0. F-6 P_AJ-PCD20.book 7 ページ 2006年6月28日 水曜日 午前9時49分 Installation (suite) 5 (Pour le branchement via IEEE1394b) Brancher le lecteur P2 à l’ordinateur personnel avec un câble IEEE1394b. USB 2.0 IEEE 1394b DC IN 16V DC IN 12V Connecteur IEEE1394b <Remarques> zAucun IEEE1394b n’est fourni avec le lecteur P2 dans la boîte. Utilisez un câble IEEE1394b disponible dans le commerce. zAvant de procéder au raccordement de l’appareil utilisant une Connecteur IEEE1394 à 6 broches, vérifier soigneusement la Type à 6 forme du câble IEEE1394b broches et de ses connecteurs. Le raccordement d’un connecteur en sens inverse peut endommager des pièces internes du caméscope et provoquer un dysfonctionnement. zNe pas forcer lors du branchement du câble IEEE1394b dans la Connecteur IEEE1394b car cela pourrait endommager la prise. F-7 6 Vérifiez que l’ordinateur personnel reconnaît le lecteur P2. <Remarques> zSous Windows XP, il est possible que des noms de lecteurs déjà affectés à des réseaux existants soient affectés à certains emplacements de cartes du lecteur P2. Réaffectez les noms du lecteur réseau si votre ordinateur personnel n’affiche pas les cinq emplacements de cartes. zSous Windows, pour retirer un câble USB ou un câble IEEE1394b, sélectionnez “Retirer le matériel en toute sécurité” dans la barre des tâches et arrêter le “Dispositif USB/SBP2 Séries P2 Panasonic” avant de retirer le câble. zSous Apple Macintosh, pour retirer un câble IEEE1394b, glissez l’icône de la carte P2 sur la “Corbeille”, confirmez ensuite que l’icône de la carte P2 a disparu avant de retirer le câble. P_AJ-PCD20.book 8 ページ 2006年6月28日 水曜日 午前9時49分 Installation (suite) Pour monter le lecteur P2 dans l’emplacement 5 pouces d’un ordinateur personnel 1 Mettez l’ordinateur personnel HORS tension. 4 Branchez le câble USB 2.0 pour connecteur B dans le connecteur USB 2.0 du lecteur P2, puis branchez le connecteur A sur le port 2 Dévissez les six vis, puis retirez le couvercle. USB 2.0 de la carte-mère de l’ordinateur personnel. USB 2.0 IEEE 1394b DC IN 12V FRANÇAIS DC IN 16V USB 2.0 IEEE 1394b DC IN 16V DC IN 12V Connecteur USB 2.0 3 Montez le lecteur P2 dans l’emplacement 5 pouces de l’ordinateur personnel. Utilisez les vis fournies avec le lecteur P2 pour le fixer. Veuillez vous référer au manuel d’instructions de votre ordinateur pour obtenir des instructions sur le montage des lecteurs dans l’emplacement 5 pouces. <Remarque> Le brochage du connecteur USB 2.0 varie en fonction du type de carte-mère. Vérifiez le manuel d’instructions avant d’acheter un câble USB 2.0 (blindé) disponible dans le commerce. 5 Connectez le lecteur P2 au câble d’alimentation interne (4 broches) de l’ordinateur personnel. USB 2.0 IEEE 1394b DC IN 16V Trous des vis (l’autre côté est identique) <Remarques> zDans certains types d’ordinateurs, il est possible que le lecteur P2 ne puisse pas être fixé de manière sécurisée. zSi tous les emplacements sont occupés, vous devrez retirer l’un des lecteurs intégrés pour faire de la place au lecteur P2. zLe lecteur P2 doit être utilisé sur un ordinateur personnel dont la conception permet la manipulation du panneau avant du lecteur. DC IN 12V Câble d’alimentation F-8 P_AJ-PCD20.book 9 ページ 2006年6月28日 水曜日 午前9時49分 Installation (suite) 6 Démarrez l’ordinateur personnel et vérifiez qu’il reconnaît le lecteur P2. <Remarque> Sous Windows XP, il est possible que des noms de lecteurs déjà affectés à des réseaux existants soient affectés à certains emplacements de cartes du lecteur P2. Réaffectez les noms du lecteur réseau si votre ordinateur personnel n’affiche pas les cinq emplacements de cartes. F-9 P_AJ-PCD20.book 10 ページ 2006年6月28日 水曜日 午前9時49分 Pilote IEEE1394b pour Windows 1) Avant l’installation 2) Installation du pilote IEEE1394b Installez le pilote IEEE1394b en suivant la procédure ci-dessous. La configuration requise pour le pilote IEEE1394b est la suivante : z S.E: Windows XP Professionnel SP2 ou supérieur z RAM: 512 Mo ou plus (1 Go ou plus conseillé) z Processeur : Pentium®4 1.5 GHz ou plus conseillé <Remarque> Chaque appareil se connectant à un ordinateur personnel possède son propre pilote IEEE1394b. Si vous raccordez plus d’un appareil à un ordinateur personnel, installez les pilotes correspondants séparément. Si vous n’effectuez pas les pilote IEEE1394b, le débit de transfert pourrait être insuffisant. <Remarque> La connexion via IEEE1394b sous Windows 2000 n’est pas prise en charge. 1 Suivez Avant d’installer le pilote IEEE1394b, installez le programme actualisé fourni par Microsoft en suivant la procédure ci-dessous. Si vous n’effectuez pas les actualisations, le débit de transfert pourrait être insuffisant. 1 Ouvrez votre programme de navigation et allez sur le site de Microsoft. 2 Entrez “KB885222” dans la colonne de recherche du site et appuyez sur le bouton de recherche. 3 Entrez “Les performances des périphériques 1394 peuvent diminuer après l’installation de Windows XP Service Pack 2,” qui apparaît comme résultat de recherche. 4 Lisez les informations qui s’affichent sur la page, puis téléchargez et installez le programme actualisé sur votre ordinateur. les instructions de “4.Nouvelle Installation du logiciel P2” (pages 4 à 6 du manuel d’installation), installez le logiciel jusqu’à la Procédure No 8. 2 Lorsque la fenêtre de la Fig. 7 de la Procédure No 8 (page 6 du manuel d’installation) s’affiche, sélectionnez “AJPCD20 (P2 drive) 1394 driver” et cliquez sur OK. 3 Lorsque le message “Please connect AJPCD20 (P2 drive) by 1394” s’affiche, raccordez cet appareil à l’ordinateur personnel via l’interface EEE 1394b. Confirmez que les cinq lettres de cet appareil sont affichées et appuyez sur “Installer”. <Remarque> Si cet appareil est connecté à un ordinateur personnel via un port USB, retirez le câble USB et connectez-le via l’interface IEEE1394b. 4 L’avertissement pourrait s’afficher; dans ce cas, cliquez sur “Continuer”. L’avertissement pourrait s’afficher plusieurs fois de suite. 5 En suivant les instructions qui s’affichent à l’écran, terminez l’installation et redémarrez l’ordinateur. F-10 FRANÇAIS Ce pilote est destiné à l’interface IEEE1394b pour la carte P2 sur cet appareil. P_AJ-PCD20.book 11 ページ 2006年6月28日 水曜日 午前9時49分 Pilote IEEE1394b pour Windows (suite) 3) Confirmation d’installation pilote IEEE1394b du Confirmez que le pilote IEEE1394b est correctement installé conformément à la procédure suivante. 1 Appareil raccordé à l’ordinateur personnel via l’interface IEEE1394b. 2 Ouvrez le panneau de configuration du menu Démarrage et sélectionner Système pour afficher les propriétés de système. 3 Sélectionnez l’onglet Matériel sous Propriétés de système et appuyez sur le bouton Gestionnaire de périphérique. 4 Ouvrez l’arborescence de “Disk drive” avec le Gestionnaire de périphérique et appuyez sur le bouton droit “MATSHITA AJ-PCD20# IEEEE 1394 SBP2 Device” pour ouvrir les propriétés. 5 Sélectionnez l’onglet Pilote sous Propriétés et appuyez sur le bouton Informations détaillées de pilote. 6 Si les fichiers suivants sont inclus dans la liste des fichiers du pilote, le pilote IEEE1394 a été correctement installé. “p2sbp2.sys” “p2cmgr.dll” “p2csvc.exe” 7 Pour les périphériques suivants, confirmez l’installation en (voir No 4 à 6) “MATSUSHITA SBP2 Device” “MATSUSHITA SBP2 Device” “MATSUSHITA SBP2 Device” “MATSUSHITA SBP2 Device” F-11 procédant de la même façon AJ-PCD20 #2 IEEE 1394 AJ-PCD20 #3 IEEE 1394 AJ-PCD20 #4 IEEE 1394 AJ-PCD20 #5 IEEE 1394 <Remarque> Avec l’interface IEEE1394b, un seul AJ-PCD20 peut être raccordé à l’ordinateur personnel. Si plus d’un appareil AJ-PCD20 est raccordé, le fonctionnement ne peut pas être garanti. P_AJ-PCD20.book 12 ページ 2006年6月28日 水曜日 午前9時49分 Pilote IEEE1394b pour Macintosh Ce lecteur est destiné à la carte P2 sur cet appareil. Installation du pilote IEEE1394b 1 Introduisez le CD d’installation. 2 Double-cliquez sur le dossier Macintosh du CD. FRANÇAIS 3 Double-cliquez sur le dossier AJ-PCD20. 4 Double-cliquez sur “P2Drive Install.dmg” dans le dossier AJ-PCD20. 5 Double-cliquez sur “P2Drive Install.pkg”. 6 Lorsque l’installation du pilote démarre, procédez suivant les apparaissent à l’écran. instructions qui <Remarques> z Lorsque ce pilote est installé, il est possible de connecter cet appareil à un ordinateur Macintosh via l’interface IEEE1394b (Firewire 800) pour transférer les données à un débit plus élevé. z La carte P2 doit être formatée avec d’autres périphériques P2. z Lorsque vous voulez retirer la carte P2 ou débrancher le câble 1394b, glissez l’icône de la carte P2 sur la corbeille et confirmez que l’icône de la carte P2 a disparu avant de retirer la carte ou de débrancher le câble. z Réintroduire la carte P2 si l’icône de la carte P2 ne s’affiche pas. F-12 P_AJ-PCD20.book 13 ページ 2006年6月28日 水曜日 午前9時49分 Spécifications CA 100 V - 240 V, 0,9 A - 0,5 A, 50 - 60 Hz (entrée adaptateur CA ) CC 16 V, 0,6 A (si utilisé avec un adaptateur CA) CC 12 V, 0,8 A (si monté dans un ordinateur personnel) Informations concernant la sécurité. Dimensions externes (largeur a hauteura profondeur) 148,4 mm a 42,5 mm a 199,5 mm (5-7/8 pouces a 1-11/16 pouces a 7-7/8 pouces) (sans compter les pièces saillantes) Poids 1,2 kg (2,6 lb) [ Conditions d’environnement] Température de fonctionnement 0 °C à +40 °C Humidité de fonctionnement 0 % à 90 % (sans condensation) [ Caractéristiques système de l’ordinateur personnel] Système d’exploitation (fonctionnement correct garanti) Windows XP Professional (SP2 ou supérieur) Windows 2000 (SP4 ou supérieur) Mac OS X 10.3.9 Mac OS X 10.4.2 Mac OS X 10.4.6 Mémoire principale 512 MB ou supérieur recommandé Interface Compatible USB version 2,0 [Emplacements de cartes] Carte PC Type II a 5 (compatible CardBus) F-13 Veuillez noter que les spécifications et l’aspect du lecteur peuvent changer, pour améliorer l’appareil, sans préavis. P_AJ-PCD20.book 14 ページ 2006年6月28日 水曜日 午前9時49分 Lorsque ce symbole figure sur les produits et/ou les documents qui les accompagnent, cela signifie que les appareils électriques et électroniques ne doivent pas être jetés avec les ordures ménagères. Pour que ces produits subissent un traitement, une récupération et un recyclage appropriés, envoyez-les dans les points de pré-collecte désignés, où ils peuvent être déposés gratuitement. Dans certains pays, il est possible de renvoyer les produits au revendeur local en cas d’achat d’un produit équivalent. En éliminant correctement ce produit, vous contriburez à la conservation des ressources vitales et à la prévention des éventuels effets négatifs sur l’environnement et la santé humaine, pouvant être dus à la manipulation inappropriée des déchets. Veuillez contacter les autorités locales pour connaître le point de pré-collecte le plus proche. Des sanctions peuvent être appliquées en cas d’élimination incorrecte de ces déchets, conformément à la législation nationale. Utilisateurs professionnels de l’Union européenne Pour en savoir plus sur l’élimination des appareils électriques et électroniques, contactez votre revendeur ou fournisseur. Informations sur l’évacuation des déchets dans les pays ne faisant pas partie de l’Union européenne Ce symbole n’est reconnu que dans l’Union européenne. Pour supprimer ce produit, contactez les autorités locales ou votre revendeur afin de connaître la procédure d’élimination à suivre. F-14 FRANÇAIS Informations relatives à l’évacuation des déchets, destinées aux utilisateurs d’appareils électriques et électroniques (appareils ménagers domestiques) P_AJ-PCD20.book 1 ページ 2006年6月28日 水曜日 午前9時49分 请先阅读! 警告: z 为了减少火灾或触电的危险,不要让本机受到雨淋或放置在潮湿的地方。 z 为减少火患或电击的危险,本设备应避开一切使用液体的场合,并只能存 放在没有滴液或溅液危险的地方,也不要在本设备顶端放置任何液体容 器。 注意事项: 为了减少起火或电击的危险以及烦人的干扰,请只使用推荐的附件。 注意事项: 交流电源插座(主插座)必须安装在靠近设备的地方,以便于接近。请从 AC 插座拔下电源线插头,使设备与 AC 插座完全分离。 AC 适配器 未使用时,请从 AC 插座拔下 AC 电源插头。 本机必须接地。 为了保证本机操作安全,必须将三芯电源插头插入标准的三孔插座,而此插座是通过 一般的住宅地线妥善接地的。 本机使用的外接线必须是三芯的,正确布线与接地。外接线的错误连接是产生死亡事 故的主要原因。 本机工作正常并不意味电源已接地且安装得十分安全。为了您的安全,如果对电源的 有效接地有任何怀疑,请向合格的电工咨询。 表示安全信息。 C-1 P_AJ-PCD20.book 2 ページ 2006年6月28日 水曜日 午前9時49分 目 录 请先阅读! ...................................................... 1 概 览. . . . . . . . . . . . . . . . . . . . . . . . . . . . . . . . . . . . . . . . . . . . . . . . . . . . . . 3 特 点. . . . . . . . . . . . . . . . . . . . . . . . . . . . . . . . . . . . . . . . . . . . . . . . . . . . . . 3 随附的附件 (AJ-PCD20MC) . . . . . . . . . . . . . . . . . . . . . . . . . . . . . . . . . . . . 3 部件及其功能 . . . . . . . . . . . . . . . . . . . . . . . . . . . . . . . . . . . . . . . . . . . . . . . 4 前面板 . . . . . . . . . . . . . . . . . . . . . . . . . . . . . . . . . . . . . . . . . . . . . . . . . . 4 后面板 . . . . . . . . . . . . . . . . . . . . . . . . . . . . . . . . . . . . . . . . . . . . . . . . . . 4 插入 P2 卡 . . . . . . . . . . . . . . . . . . . . . . . . . . . . . . . . . . . . . . . . . . . . . . . . . 5 P2 卡的写保护 . . . . . . . . . . . . . . . . . . . . . . . . . . . . . . . . . . . . . . . . . . . . . . 5 安 装. . . . . . . . . . . . . . . . . . . . . . . . . . . . . . . . . . . . . . . . . . . . . . . . . . . . . . 5 将 P2 驱动器连接到个人计算机以用于外置使用 . . . . . . . . . . . . . . . . . . 6 在个人计算机 5 英寸盘中安装 P2 驱动器 . . . . . . . . . . . . . . . . . . . . . . . 8 用于 Windows 的 IEEE1394b 驱动程序 . . . . . . . . . . . . . . . . . . . . . . . . . . 10 1) 安装前 . . . . . . . . . . . . . . . . . . . . . . . . . . . . . . . . . . . . . . . . . . . . . . . 10 2) 安装 IEEE1394b 驱动程序 . . . . . . . . . . . . . . . . . . . . . . . . . . . . . . . 10 3) 确认安装 IEEE1394b 驱动程序 . . . . . . . . . . . . . . . . . . . . . . . . . . . . 11 用于 Macintosh 的 IEEE1394b 驱动程序 . . . . . . . . . . . . . . . . . . . . . . . . . 12 安装 IEEE1394b 驱动程序. . . . . . . . . . . . . . . . . . . . . . . . . . . . . . . . . . 12 规 格 . . . . . . . . . . . . . . . . . . . . . . . . . . . . . . . . . . . . . . . . . . . . . . . . . . . . . 13 中 文 Windows、Windows 2000 和 Windows XP 是 Microsoft Corporation 在美国的 商标。 Macintosh 和 Mac OS X 是 Apple Computer, Inc. 在美国的商标。 其它公司名称和产品是各自公司的商标或注册商标。 z本使用说明书中, Microsoft® Windows®、 Windows® 2000 和 Windows® XP Professional 相应以 “Windows”、“Windows 2000”和 “Windows XP Professional” 表示。 z同样,在本使用说明书中, Macintosh® 和 Mac OS® X 相应以 “Macintosh”和 “Mac OS X”表示。 本产品相关软件信息 本产品中包括基于 GNU General Public License(GPL) 和 GNU Lesser General Public License(LGPL) 授权的软件,顾客有权获得、变更和再次发布这些软件的源代码。 GPL/LGPL 的内容收藏在主机附带的安装 CD 中。请参看名为 LDOC 的目录。(又,其内容 以原文 (英文)记载。) 另外,请浏览下述网站以获得源代码。 http://panasonic.biz/sav/ 恕不答复有关顾客获得的源代码内容的咨询。 C-2 P_AJ-PCD20.book 3 ページ 2006年6月28日 水曜日 午前9時49分 在 AJ-PCD20 连接至个人计算机时,从 CD-ROM 安装所需的驱动程序。 有关详情,请参阅安装手册和本文档中的 “用于 Windows 的 IEEE1394b 驱动程 序”(第 10 页)或 “用于 Macintosh 的 IEEE1394b 驱动程序”(第 12 页)。 概 览 AJ-PCD20 (以下称为 “P2 驱动器”)是使用 USB 2.0或 IEEE1394b 接口的数据传输设备, 专用于 P2卡。 P2 驱动器可以将使用适用于 P2 卡的记忆卡摄像机拍摄的剪辑数据高速传输至个人计算机 (Windows/Apple Macintosh)。 本装置不仅能够传输和复制 P2 卡中录制的剪辑,而且还支持直接编辑。 特 点 z P2驱动器具有五个卡插槽。 z 使用 USB 2.0或IEEE1394b接口,可实现高速数据传输。 z 可用作内置或外置驱动器。 随附的附件 (AJ-PCD20MC) AC 适配器 安装螺丝(8) 橡胶脚垫(4) AC 适配器的电源电缆 CD-ROM (P2装置的驱动程序、 P2卡管理器、相关P2装置的专用软件、手册和安装手册) 操作手册 (2) (手册和安装手册) C-3 P_AJ-PCD20.book 4 ページ 2006年6月28日 水曜日 午前9時49分 部件及其功能 前面板 后面板 USB 2.0 IEEE 1394b DC IN 16V (1) (2) (6) (1) (2) (3) (4) (1) 电源指示灯 此指示灯在 P2 驱动器运行时呈绿色亮 起。 (2) 状态指示灯 此指示灯在存取 P2 卡的过程中呈绿色 亮起。 <注> 在卡存取过程中不要取出P2卡,否则文 件可能会损坏或 P2卡发生故障。 (3) 卡插槽 P2 驱动器的卡插槽专用于P2卡。 P2 驱动器无法用于除P2卡以外的卡。 (4) EJECT (弹出)按钮 要取出 P2卡,按下此按钮使其弹出,然 后再按一次。 <注> z 仅限于 Windows 2000:打开 “我的 电脑”并使用鼠标右键选择要取出卡 的驱动器,然后选择 “取出”,再按 下 EJECT 按钮。 z 仅限于 Macintosh :要取出 P2 卡,请 将 P2 卡的图标拖至 “回收站”,然 后在确认 P2 卡图标消失后按下 EJECT 键。 (5) (3) DC IN 12V (4) 本图片显示了取下外壳的后面板。 (1) USB 2.0连接器 (B 类) 它连接 USB电缆。使用符合USB 2.0的 USB 电缆 (带护套)。 <注> 本 P2驱动器仅支持USB 2.0。它不支持 符合 USB 1.1的个人计算机。 对于 Macintosh,无法保证 USB 2.0 可 以操作。 (2) IEEE1394b 连接器 用于连接 IEEE1394b电缆。 <注> 当 电缆 连接 至 USB 2.0 连 接器 和 IEEE1394b 连接器,仅可使用打开电源 后先连接的接口。 (3) DC IN 16V 插孔 要外置使用 P2 驱动器,将 AC 适配器 连接到此插孔。 (4) DC IN 12V 插孔 要使用安 装在个人计算机中 P2 驱动 器,将个人计算机内的一个电源连接器 连接到本插孔。 (请参阅第 8页 ) <注> 请勿向 DC IN 12V 插孔和DC IN 16V 插 孔同时提供电源。 (5) 电缆夹 将 P2 驱动器连接到个人计算机以外置 使用时,使用此夹紧固AC适配器电缆。 (6) 防盗锁 可以将商用防盗电缆连接至此锁。 C-4 中 文 P_AJ-PCD20.book 5 ページ 2006年6月28日 水曜日 午前9時49分 插入 P2 卡 将 P2 卡插入 P2 驱动器的插槽中时,请确保 使卡保持水平以轻松插入。 以某个角度强行插入卡可能会导致故障。 P2 卡的写保护 P2 卡 配有 写保 护开 关。将此 开关 设置 为 “PROTECT(保护)”可以避免写入和删除 数据。 注:当 P2 卡插在 P2 驱动器中时,写保护开 关无效。要使开关设置生效,请确保从 P2 驱 动器中取出 P2 卡,设置开关,然后重新插 入卡。 PROTECT 将写保护开关设置为 “PROTECT (保 护)”可以避免写入 和删除数据。 将写保护开关切 换至另一侧可以 写入和删除数据。 安 装 将 P2驱动器连接到个人计算机(Windows 或Apple Macintosh)有两种方式: 1. 将 P2驱动器用作连接到个人计算机(Windows 或 Apple Macintosh)的外置驱动器 2. 在个人计算机(Windows)的 5英寸盘中安装P2驱动器 C-5 P_AJ-PCD20.book 6 ページ 2006年6月28日 水曜日 午前9時49分 安 装 ( 继续 ) 将 P2 驱动器连接到个人计算机以用于外置使用 1 将橡胶脚垫安装至 P2驱动器底部的凹 洞。 凹洞 4 (要通过 USB 2.0连接) 将 USB 2.0 电缆 B 连接器插入 P2 驱动 器上的 USB 2.0 连接器中,然后将 A 连 接器插入个人计算机的主板上的 USB 2.0 端口。 USB 2.0 IEEE 1394b DC IN 16V 2 3 DC IN 12V USB 2.0 连接器 启动个人计算机。 将P2驱动器随附的AC适配器插入P2驱 动器上的 DC IN 16V插孔。 P2 驱动器将启动。 USB 2.0 IEEE 1394b DC IN 16V DC IN 12V <注> 中 包装中的 P2 驱动器不附带 USB 2.0 电 缆。请使用商用 USB 2.0 电缆 (带护 文 套)。 请务必使用不超过 3 米的 USB 电缆。使 用长于 3 米的电缆可能会导致 P2 驱动 器操作不正常。 对于 Macintosh,不保证 USB 2.0 可以 操作。 C-6 P_AJ-PCD20.book 7 ページ 2006年6月28日 水曜日 午前9時49分 安 装 ( 继续 ) 5 (要通过IEEE1394b 连接) 使用 IEEE1394b 电缆将 P2 驱动器连接 至个人计算机。 USB 2.0 IEEE 1394b DC IN 16V DC IN 12V IEEE1394b 连接器 <注> z 包装中的 P2 驱动器不附带 IEEE1394b 电缆。请使用商用 IEEE1394b 电缆。 z 连接使用 6 引脚类型 IEEE1394 连接器前, 检查 IEEE1394b 电缆 形状和 IEEE1394b 电 缆连接器。连接器颠倒 6 引脚类型 连接可能损坏装置内部 分,引起故障。 z 连接 IEEE1394b 电缆 到 IEEE1394b 连接器时,不要强行用力,因为这样 会损坏连接器。 C-7 6 验证个人计算机是否能够识别 P2驱动 器。 <注> z 在 Windows XP 中,系统已经为某 些 P2 驱动器的卡插槽指定了分配至 现有网络的驱动器名称。如果个人计 算机无法显示全部五个卡插槽,请重 新指定网络驱动器名称。 z 在 Windows 中,要移除 USB 电缆或 IEEE1394b 电缆,请在 “任务栏” 中选择 “安全移除硬件”,然后在移 除电缆之前停止 “Panasonic P2 Series USB/SBP2 Device” (Panasonic P2 系列 USB/1394b 设 备)。 z 在 Apple Macintosh 中,要移除 IEEE1394b 电缆,请将 P2 卡的图标 拖至 “回收站”,然后在移除电缆之 前确认 P2 卡图标已消失。 P_AJ-PCD20.book 8 ページ 2006年6月28日 水曜日 午前9時49分 安 装 ( 继续 ) 在个人计算机 5 英寸盘中安装 P2 驱动器 1 2 4 关闭个人计算机的电源。 旋下六颗螺丝并取下外壳。 将USB 2.0电缆B连接器插入P2驱动器 上的 USB 2.0连接器中,然后将 USB 2.0 电缆的另一端插入个人计算机的主 板上的 USB 2.0端口。 USB 2.0 IEEE 1394b DC IN 16V DC IN 12V USB 2.0 IEEE 1394b DC IN 16V DC IN 12V USB 2.0 连接器 3 在个人计算机的5英寸盘中安装P2驱动 器。安装时使用 P2驱动器随附的螺 丝。 有关安装 5 英寸盘驱动器的指导方法, 请参阅计算机的说明手册。 <注> USB 2.0 连接器的插脚引线根据主板类 型的不同而有所不同。购买商用 USB 2.0 电缆 (带护套)之前,请查看计算 机的说明手册。 5 将 P2驱动器连接到个人计算机的内部 电源线 (4 脚)。 USB 2.0 IEEE 1394b 固定螺丝的孔 (其它面相同。) <注> z 在某些类型的个人计算机中, P2 驱 动器可能无法牢固固定。 z 如果所有 5 英寸盘都被占用,则需要 取下其中的内置驱动器,以便腾出空 间安装 P2 驱动器。 z P2 驱动器应该用于允许在驱动器前 面板进行操作的个人计算机。 DC IN 16V DC IN 12V 电源线 C-8 中 文 P_AJ-PCD20.book 9 ページ 2006年6月28日 水曜日 午前9時49分 安 装 ( 继续 ) 6 启动个人计算机,验证它是否能够识别 P2 驱动器。 <注> 在 Windows XP中,系统已经为某些P2 驱动器的卡插槽指定了分配至现有网络 的驱动器名称。如果个人计算机无法显 示全部五个卡插槽,请重新指定网络驱 动器名称。 C-9 P_AJ-PCD20.book 10 ページ 2006年6月28日 水曜日 午前9時49分 用于 Windows 的 IEEE1394b 驱动程序 此驱动程序用于本设备上 P2 卡的 IEEE1394b 接口。 2) 安装 IEEE1394b 驱动程序 1) 安装前 <注> 连接到个人计算机的每台设备都要安装 IEEE1394b。如果一台个人计算机上使用多 个设备,请分别为每台设备安装驱动程序。 如果未安装 IEEE1394b 驱动程序,可能无法 获得足够的传输率。 IEEE1394b 驱动程序的系统要求如下所示。 z OS: Windows XP Professional SP2 或 更高版本 z RAM: 512 MB 或以上(建议使用 1 GB 或 以上) z CPU: 建议使用 Pentium®4 1.5 GHz 或以 上 <注> 不支持 Windows 2000 中的 IEEE1394b 连 接。 安装 IEEE1394b 驱动程序之前,按照以下 步骤安装由 Microsoft 提供的更新程序。如 果未安装更新程序,可能无法获得足够的 传输率。 1 2 3 4 按照以下步骤安装 IEEE1394b 驱动程序。 1 2 3 在网站的搜索栏中输入 “KB885222”,然后按下搜索按钮。 阅读显示页面上的信息,然后下载并 在个人计算机上安装更新程序。 当屏幕显示步骤 8 图 7(安装手册第 6 页)中显示的窗口时,选择 “AJ中 PCD20 (P2 驱动器) 1394 驱动程序”, 然后单击确定。 文 打开网页浏览器并浏览 Microsoft网 站。 单击搜索结果中显示为 “安装 Windows XP Service Pack 2后 1394 设备的性能可能会降低”的链接。 按照 “4. 新安装 P2软件”(安装手册 中的第 4 页至第 6 页)中的说明,安 装本软件,直至步骤 8。 当屏幕显示 “请使用 1394接口连接 AJ-PCD20 (P2驱动器)”消息时,使 用 IEEE1394b将本设备连接至个人计 算机。确认本设备的所有五个驱动器字 母都显示,然后按下安装。 <注> 通过 USB 将本设备连接至个人计算机 时,取 下 USB 电缆,然 后使 用 IEEE1394b 连接。 4 5 屏幕可能会显示警告框;在这种情况 下,单击 “仍然继续”。警告框可能会 显示两次或多次。 按照屏幕上的说明,完成安装并重新启 动个人计算机。 C-10 P_AJ-PCD20.book 11 ページ 2006年6月28日 水曜日 午前9時49分 用于 Windows 的 IEEE1394b 驱动程序 ( 继续 ) 3) 确认安装 IEEE1394b 驱动程序 按照以下步骤确认IEEE1394b驱动程序是否 已正确安装。 1 2 3 4 5 6 7 使用 IEEE1394b 将本设备连接至个人 计算机。 从 “开始”菜单中打开 “控制面板”, 然后选择 “系统”以显示系统属性。 在系统属性中选择 “硬件”标签,然后 按下 “设备管理器”按钮。 打开 “MATSHITA AJ-PCD20# IEEEE 1394 SBP2 Device”的树 状结 构以 开 启属性。 在属性中选择驱动程序标签,然后按下 驱动程序的详情按钮。 如果以下文件包含在显示的驱动程序文 件列表中,则 IEEE1394 驱动程序已正 确安装。 “p2sbp2.sys” “p2cmgr.dll” “p2csvc.exe” 对于以下设备,请使用与 4 到 6 相同的步 骤确认安装。 “MATSUSHITA AJ-PCD20 #2 IEEE 1394 SBP2 Device” “MATSUSHITA AJ-PCD20 #3 IEEE 1394 SBP2 Device” “MATSUSHITA AJ-PCD20 #4 IEEE 1394 SBP2 Device” “MATSUSHITA AJ-PCD20 #5 IEEE 1394 SBP2 Device” C-11 <注> 使用 IEEE1394b 时,仅一台 AJ-PCD20 可 连接至个人计算机。如果同时连接了两台或 以上 AJ-PCD20 设备,则无法保证操作。 P_AJ-PCD20.book 12 ページ 2006年6月28日 水曜日 午前9時49分 用于 Macintosh 的 IEEE1394b 驱动程序 本驱动程序适用于本设备的 P2 卡。 安装 IEEE1394b 驱动程序 1 2 3 4 5 6 插入安装 CD。 双击 CD 中的Macintosh文件夹。 双击 AJ-PCD20 文件夹。 双击 AJ-PCD20文件夹中的 “P2Drive Install.dmg”。 双击 “P2Drive Install.pkg”。 当驱动程序安装开始时,请遵循安装屏 幕中的指示。 中 <注> z 通 过 安 装 本 驱 动 程 序,可 以 使 用 IEEE1394b (Firewire 800) 将本设备连接 至 Macintosh 以便 以较 高的 速率 传输 数 据。 z P2 卡必须使用其它 P2 设备进行格式化。 z 要移除 P2 卡或断开 IEEE1394b 电缆,请 将 P2 卡的图标拖至 “回收站” ,并在执 行移 除或 断开 之前 确认 P2 卡图 标已 消 失。 z 如果P2卡图标不显示,请重新插入P2卡。 文 C-12 P_AJ-PCD20.book 13 ページ 2006年6月28日 水曜日 午前9時49分 规 格 AC 100 V - 240 V, 0.9 A - 0.5 A, 50 - 60 Hz (AC适配器输入) DC 16 V, 0.6 A (使用AC 适配器时) DC 12 V, 0.8 A (安装到个人计算机时) 表示安全项目。 外部尺寸 (宽 a 高 a 深) 148.4 mm a 42.5 mm a 199.5 mm (不包括突出部件) 重量 1.2 kg [ 环境条件 ] 操作温度 0 °C 至 +40 °C 操作湿度 0% 至 90% (无水汽凝结) [ 个人计算机系统要求 ] OS (保证正常操作) Windows XP Professional (SP2或更高版本) Windows 2000 (SP4或更高版本) Mac OS X 10.3.9 Mac OS X 10.4.2 Mac OS X 10.4.6 内存 建议使用 512 MB 或以上 接口 兼容 USB 2.0版 兼容 IEEE1394b版 [ 卡插槽 ] PC 卡 类型 II a 5 (兼容 CardBus) 请注意,出于改进之目的,规格和外观如有更 改,恕不另行通知。 C-13 P_AJ-PCD20.book 14 ページ 2006年6月28日 水曜日 午前9時49分 在欧盟以外其它国家的废物处置信息 此符号仅在欧盟有效。 如果要废弃此产品,请与当地机构或经销商联系,获取正确的废弃方法。 中 文 C-14 P_AJ-PCD20.book z z J-1 1 ページ 2006年6月28日 水曜日 午前9時49分 ® ® ® ® ® ® P_AJ-PCD20.book 2 ページ 2006年6月28日 水曜日 午前9時49分 J-2 P_AJ-PCD20.book 3 ページ 2006年6月28日 水曜日 午前9時49分 z z z z z z z z J-3 P_AJ-PCD20.book z 4 ページ 2006年6月28日 水曜日 午前9時49分 z z z z J-4 P_AJ-PCD20.book 5 ページ 2006年6月28日 水曜日 午前9時49分 z z http://panasonic.biz/sav/ J-5 P_AJ-PCD20.book 6 ページ 2006年6月28日 水曜日 午前9時49分 z z z J-6 P_AJ-PCD20.book 7 ページ 2006年6月28日 水曜日 午前9時49分 USB 2.0 IEEE 1394b DC IN 16V z z J-7 DC IN 12V P_AJ-PCD20.book 8 ページ 2006年6月28日 水曜日 午前9時49分 PROTECT J-8 P_AJ-PCD20.book 9 ページ 2006年6月28日 水曜日 午前9時49分 1 4 USB 2.0 IEEE 1394b DC IN 16V 2 3 USB 2.0 IEEE 1394b DC IN 16V J-9 DC IN 12V DC IN 12V P_AJ-PCD20.book 10 ページ 2006年6月28日 水曜日 午前9時49分 5 6 z USB 2.0 IEEE 1394b DC IN 16V z DC IN 12V z z z z J-10 P_AJ-PCD20.book 11 ページ 2006年6月28日 水曜日 午前9時49分 1 4 2 USB 2.0 IEEE 1394b DC IN 16V DC IN 12V USB 2.0 IEEE 1394b DC IN 16V DC IN 12V 3 5 USB 2.0 IEEE 1394b DC IN 16V z z z J-11 DC IN 12V P_AJ-PCD20.book 12 ページ 2006年6月28日 水曜日 午前9時49分 6 J-12 P_AJ-PCD20.book 13 ページ 2006年6月28日 水曜日 午前9時49分 z z z ® 1 2 1 3 2 3 4 4 5 J-13 P_AJ-PCD20.book 14 ページ 2006年6月28日 水曜日 午前9時49分 1 2 3 4 5 6 7 4 6 J-14 P_AJ-PCD20.book 1 2 3 4 5 6 z z z z J-15 15 ページ 2006年6月28日 水曜日 午前9時49分 P_AJ-PCD20.book z 16 ページ 2006年6月28日 水曜日 午前9時49分 z z J-16 P_AJ-PCD20.book J-17 17 ページ 2006年6月28日 水曜日 午前9時49分 P_AJ-PCD20.book 18 ページ 2006年6月28日 水曜日 午前9時49分 J-18 P_AJ-PCD20.book 19 ページ 2006年6月28日 水曜日 午前9時49分 PANASONIC BROADCAST & TELEVISION SYSTEMS COMPANY UNIT COMPANY OF PANASONIC CORPORATION OF NORTH AMERICA Executive Office: One Panasonic Way 4E-7, Secaucus, NJ 07094 (201) 348-7000 EASTERN ZONE: One Panasonic Way 4E-7, Secaucus, NJ 07094 (201) 348-7196 Southeast Region: (201) 348-7162 WESTERN ZONE: 3330 Cahuenga Blvd W., Los Angeles, CA 90068 (323) 436-3500 Government Marketing Department: One Panasonic Way 2E-10, Secaucus, NJ 07094 (201) 348-7587 Broadcast PARTS INFORMATION & ORDERING: 9:00 a.m. – 5:00 p.m. (EST) (800) 334-4881/24 Hr. Fax (800) 334-4880 Emergency after hour parts orders (800) 334-4881 TECHNICAL SUPPORT: Emergency 24 Hour Service (800) 222-0741 Panasonic Canada Inc. 5770 Ambler Drive, Mississauga, Ontario L4W 2T3 (905) 624-5010 Panasonic de Mexico S.A. de C.V. Av angel Urraza Num. 1209 Col. de Valle 03100 Mexico, D.F. (52) 1 951 2127 Panasonic Puerto Rico Inc. San Gabriel Industrial Park, 65th Infantry Ave., Km. 9.5, Carolina, Puerto Rico 00630 (787) 750-4300 Professional & Broadcast IT Systems Business Unit Europe Panasonic Marketing Europe GmbH Hagenauer Str. 43, 65203 Wiesbaden-Biebrich Deutschland Tel: 49-611-235-481 松下电器产业株式会社 Web Site: http://panasonic.net i C 2006 Matsushita Electric Industrial Co., Ltd All Rights Reserved T P E MC