1
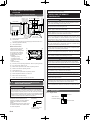
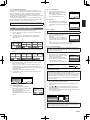
5.1.2. Group control
With a single remote controller, up to 16 units can be simultaneously
operated.
Indoor unit 0 Indoor unit 1 Indoor unit 2 Indoor unit 3
Y1 Y2 Y3
When there is a
functional earthing
Before using this product, always set DIP switch to “ON”. If not set, when
the main power is turned on again, the set data by menu operation will be
erased and cause erroneous operation.
[DIP Switch]
• Performs the enabling/disabling of the backup function by the internal
battery.
• It is disabled when shipped from the factory to prevent consumption of
the charge.
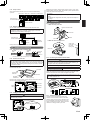
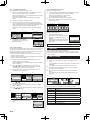
5. 3. Installation
Remote controller
5.3.1. Install the rear case
A. When mounting on the box:
5.1.3. Multiple remote control
Remote controller cable
Up to 4 remote controllers can be used to operate the indoor units.
Multiple installation method described above is prohibited to combine with
UTY-RNK* (3 Wired type) or UTY-RSK* (3 Wired type) or UTY-RHK*
(3 Wired type) and UTY-RNR* (2 Wired Type).
Connector
Indoor unit
Box
Screws
When there is a
functional earthing
Rear case
Remote
controller
Remote
controller
B. When the cable is along the wall:
Cut off
Cable cover
(more than 1
mm thick)
Epoxy putty
Group control and multiple remote control can be used together.
5. 2. Preparing for Installation
Rear case
5.2.1. Strip of the remote controller cable
Sheathed
cable
A
Shielded
cable
B
A
B
Functional
earthing
C
A: 7 mm (9/32 in.), B: 7 mm (9/32 in.), C: 25 mm (31/32 in)
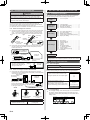
5.2.2. Remove the front case
When open the remote controller, remove the connector from the front
case. The cables may break if the connector is not removed and the front
case hangs down. When installing the front case, connect the connector to
the front case. When removing and connecting the connector, be careful
not to break the cables.
Release the claws (2 places) with a flat-blade screwdriver, and separate the
front case and rear case.
Front case
Lightly lift the
front case.
Rear case
Flat-blade
screwdriver
Claws (2 places)
Disconnect the connection cable connector from the connector of the front
case PC board (printed circuit board).
5.3.2. Connecting the remote controller cable
CAUTION
When connecting a remote controller cable to the remote controller
terminal block, please use the specified torque to tighten screws. If you
over-tighten screws, they will break the terminal unit.
Be careful to avoid breaking the cable by over-tightening the cable tie.
Tightening torque
0.8 to 1.2 N•m (8 to 12 kgf•cm)
Fasten the outside covering of the connection cable with the cable tie.
Tighten the cable tie firmly so that pulling force does not propagate to the
terminal connection even if force of 30 N is applied to the cable.
Select a flexible cable that can be bound using cable ties from over the
cable sheath inside this unit.
Cable tie
Front case
(back side)
Rear
case
Connector
Functional earthing (If necessary)
GOOD
PROHIBITED
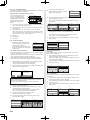
5.2.3. Setting the DIP switch
CAUTION
5.3.3. Attach the front case
Use an insulated screwdriver to set the DIP switches. Do not touch the
DIP switch with your hands.
Front case (back side)
Set the DIP switch to ON
Connect the connection cable connector to the
connector of the front case PC board. Insert after
adjusting upper part of front case. Otherwise, there
is a risk of damage to the internal parts of this unit.
When you attach the front case, make sure that the
cables are not being pinched by front case.
(1)
(2)
ON
OFF ON
En-3