1
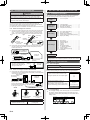
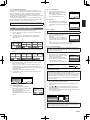
6.3.4. R.C. Group Name Setting
Touch the [R.C. Group Name Setting] on the “Initial Setting” screen. The “R.C.
Group Name Setting” screen is displayed.
4. Touch the [Change Setting] on the
• About the “R.C. Group Name Setting” screen
Touch the relevant key and enter
a name. Touch [OK] to return to
the (a) R.C. Group Name Setting
ABCDEFGHIJKL│ Over Cancel
OK “Initial Setting” screen after
displaying the “Confirmation
screen”.
(a)
Change Setting
(a)
Back
ABCDEFGHIJKLM│
(b)
Over
ABC
DE
FGH
IJ
KLM
NO
PQR
ST
UVW
XY
Z./
_–
0–9
Fixed
Phrase
(c)
Cancel
SP
(d)
(e)
(f)
BS
5. The “Change Setting” screen is 3 pages, it can be changed by the
[Previous Page] or [Next Page].
Items set to be [ON] require the administrator password to open the
setting screen.
OK
Fixed Phrase key: Floor, Corridor, Office, Conf Room, Recept
Room, Room, Room No., Front, Side, Entrance, Outlet, East, West,
South, North, Window are registered. Touch the [Fixed Phrase] key
until the sentence you wish to use is displayed.
Backspace key
Cursor keys
Change Setting
Page 2/ 3
[Off]
Weekly Timer
[On]
Anti Freeze
[On]
Off Timer
[Off]
Set Temp. Auto Return
[On]
Initial Setting / Maintenance
[On]
[Off]
Set Temp. Range Setting
Auto Off Timer
Next
Page
Cancel
OK
Cancel
Previous
Page
Change Setting
Page 3/ 3
[On]
Next
Page
OK
Cancel
Previous
Page
OK
6. Touch the relevant item to display the setting screen. Touch [OK] after
touching [ON] to return to the “Change Setting” screen.
Touch [OK] on the “Change Setting” screen after setting relevant
items to return to the password setting screen.
(d) Space key
(f)
Page 1/ 3
On Timer
Change Setting
Input area: If the number of input characters exceeds that permitted,
“Over” will be displayed on the right side.
(e)
Change Password
R.C.Group Name Setting
(b) Character keys: Touch the same key until the character you wish to
use is displayed.
(c)
Password Setting
“Password Setting” screen. The “Change
Setting” screen is displayed.
7. Touch the [Back] on the “Password Setting”. It returns to the “Initial
Setting” screen.
6.
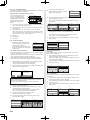
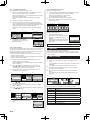
6.3.5. RC Sensor Setting
On Timer
1. Touch the [RC Sensor Setting] on the
R.C. Sensor Setting
“Initial Setting” screen. The “RC Sensor
Setting” screen is displayed.
If a remote-control sensor is used, touch
[Used]. Touch [OK] to return to the “Initial
Setting” screen.
Password Setting
On
Change Password
Used
Off
Change Setting
Not Used
Cancel
Cancel
OK
Back
OK
6.3.6. Master Indoor Unit Setting
• One of the multiple indoor units connected to the same refrigerant system
or RB unit can be set as the “master unit”.
• The indoor unit defined as the "master unit" determines the priority mode
(cool or heat) within the refrigerant system or RB group.
6.3.8. Display Item Setting
• Filter Sign
Set to “Visible” to display icons on the “Monitor mode screen” during the
indoor unit filter cleaning period.
1. Touch the [Display Item Setting] on the “Initial Setting” screen. The
“Display Item Setting” screen is displayed.
Then touch the [Filter Sign] on the “Display Item Setting” screen. The
“Filter Sign” screen is displayed.
• Switch setting on the outdoor unit or RB unit that is connected to the
indoor units. Refer to the installation manual of outdoor unit or RB unit.
1. Touch the [Master Indoor Unit Setting] on the “Initial Setting” screen.
The “Master Indoor Unit Setting” screen is displayed.
To set a unit as the Master Indoor Unit, touch [Set].
2. Touch [OK] after touching [Visible] or [Invisible] to return to the “Display
Item Setting” screen.
1.
2. Touch [Yes] when the confirmation screen is displayed to return to the
“Master Indoor Unit Setting” screen.
1.
7.
2.
Display Item Setting
Filter Sign
Filter Sign
Visible
[Visible]
2.
Room Temp.
Master Indoor Unit Setting
Cancel
Not Master Indoor Unit
Back
The connected indoor unit will be
set as the master indoor unit. OK?
Set
No
The “Room Temperature” screen is displayed.
4. Touch [OK] after touching [Visible] or [Invisible] to return to the “Display
Item Setting” screen.
5. Touch the [OK] on the “Display Item Setting”. It returns to the “Initial
Setting” screen.
3.
Filter Sign
Room Temp.
The default password is “0000” (4 digits).
Cancel
3. Enter the new password, then touch the [OK]. It returns to the
“Password Setting” screen.
2.
3.
Password Verification
Change Password
Enter Current Password
Enter New Password
Change Password
Back
En-6
0
1
2
3
4
5
6
7
8
9
Cancel
OK
4.
Display Item Setting
2. Enter the current password, then touch the [OK].
CL
OK
3. Touch the [Room Temperature] on the “Display Item Setting” screen.
Set or change the administrator password.
1. Touch the [Password Setting] on the “Initial Setting” screen. The
“Password Setting” screen is displayed.
Then touch the [Change Password] on the “Password Setting”
screen. The “Change Password” screen is displayed.
Change Setting
Cancel
Set to “Visible” to display the room temperature detected by this unit on the
monitor screen.
6.3.7. Password Setting (administrator password)
Password Setting
Invisible
OK
• Room Temperature
Yes
When changing the Master Indoor Unit, another indoor unit cannot be
made the master indoor unit unless the settings of the current master
indoor unit are cancelled beforehand.
(“Reset” cannot be performed while the indoor unit is operating.)
1.
[Invisible]
Master Indoor Unit Setting
Master Indoor Unit Setting
CL
0
1
2
3
4
5
6
7
8
9
Cancel
OK
5.
Display Item Setting
Room Temp.
[Visible]
Visible
Filter Sign
[Invisible]
Invisble
Room Temp.
OK
Cancel
OK
Cancel
[Visible]
[Visible]
OK