1
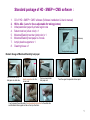
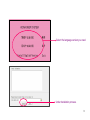
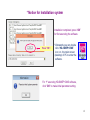
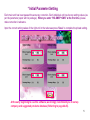
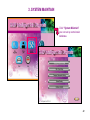
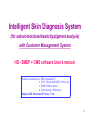
Intelligent Skin Diagnosis System
(for sebum/moisture/elasticity/pigment analysis)
with Customer Management System
HD - SMEP + CMS software User’s manual
•System requirement: a. IBM compatible PC
b. CPU: P4 with 40G HDD 1.5Hz or up
c. RAM: 512M or above
d. VGA memory: 32M above
Required OS: Windows XP, Vista, 7 & 8
0
Standard package of HD - SMEP + CMS software :
1.
2.
3.
4.
5.
6.
7.
8.
CD of “HD - SMEP + CMS” software (Software installation & User’s manual)
HD-1x ADJ. (Lens 1x focus adjustable for taking picture)
Initial parameter paper & private regist code
Moisture/Elasticity test paper
Sebum test bar (silver color) x 1
Moisture/Elasticity test bar (pink color) x 1
Moisture/Elasticity test paper x 2 boxes
Acrylic plastic supporter x 1
Cleaning tissue x 1
Moisture/Elasticity
test bar
Acrylic plastic supporter
Remark: Usage of Moisture/Elasticity test paper
Tear the sticker of the
test paper on white box.
Insert the white acrylic
plastic supporter into the
arrow area.
Pull one round white
test paper out.
Tear the upper transparent sticker apart.
Touch properly the white plate of moisture/elasticity test bar to the white side
and the black sticker paper will be on the top of test bar.
1
* HD-SMEP+CMS software installation
Insert the software CD-R into the CD-ROM drive,in the setup page please click “HD-SMEP+CMS
System install” to install the HD-SMEP+CMS software.
2
Select the language version you need.
Under installation process.
3
* Notice for Installation system
Installation completed, press “OK”
for first executing the software.
Press “OK”.
* Afterwards you can double
click “HD–SMEP+CMS”
icon on the main screen
(desktop) of PC to enter the
software.
For 1st executing HD-SMEP+CMS software,
click “OK” to make initial parameter setting.
4
* Initial Parameter Setting
Each main unit has been passed the accuracy correction. Each individual unit has its own setting values (as
per the parameter paper with its package). When you enter “HD-SMEP+CMS” at the first time, please
make correction in advance.
Input the correct setting values of the right unit in the red areas press “Save” to complete the private setting.
At the early beginning to use this software, we strongly recommend you to set up
company and suggested products database (Referring to page 44-45).
5
Please press with the right mouse on “HD-SMEP+CMS”
icon, then select the “Properties” item.
Kindly entry the “Compatibility” path and select “Privilege Level”
as “Run this program as an administrator” and then press
“Apply”, “OK”. This will keep the stability for software operation.
(2)
(1)
(3)
(4)
(5)
6
* First entry the software system
xxxxxxxxxxxxx
For entering the software at the first time, please make
sure the main unit connect to computer and powered on.
You should input the private password (regist code) for
your right unit.
(The regist code is in initial parameter paper with the
package.)
If the main unit and computer are not connected
& powered on, the error message will appear
while clicking “SMEP” icon from desktop.
There will be an error message for
wrong regist code. Please check
again and input the correct regist
code in order to enter the software.
7
* Home page of the HD-SMEP+CMS software
8
1. SKIN DIAGNOSIS
Click “Skin Diagnosis” to
start the SMEP auto analysis
process.
9
1-1 Sebum Analysis test procedures
(1) Firstly start from defaulted “sebum” test. After getting the sampled
image from sebum test bar, please click “Freeze” (or press
“Frame Freeze” button on probe) to capture the image.
Method to get a Sebum sample
a. Be sure to clean the Sebum test bar
(metal side) with cleaning tissue or
alcohol pad time before use.
b. Touch the sebum test bar (metal
side) to the skin part you want to
test. (Suggested test part: forehead)
c. Set IBS-50RN lens to the normal
(texture) inspection mode
Texture / normal inspection
(Surface inspection)
d. Contact the lens to the metal side &
freeze picture (press freeze button).
e. Be sure to clean the Sebum test bar
(metal side) with the cleaning tissue
and alcohol each time before use.
10
* If you want to get new sampled image, please click “Live” (or press “Frame Freeze”
button on probe).
(2) Click “Analysis” (or press “Frame Freeze” button on probe) to begin sebum analysis.
11
(3) Analyzing now.
12
(4) Sebum analysis is complete. You can see Sebum test result. Next click “Moisture”
to operate moisture test.
Click “Moisture” to let view image window live.
Or click “Live” to
let image window
live.
Sebum
test result
13
1-2 Moisture Analysis test procedures
(1) “Moisture” test, after getting the sampled image from moisture test bar,
please click “Freeze” (or press “Frame Freeze” button on probe) to
capture the image.
Method to get Moisture sample
a. Moisture/Elasticity test bar (pink
color) with a round sticker. (* change
the test paper each time you use it.
b. Touch the paper side to the skin part
you want to test.
(Suggested test part: lower cheek)
c. Set IBS-50RN lens to the normal
(texture) inspection mode
Texture / normal inspection
(Surface inspection)
d. Contact the lens to the paper side
& freeze picture (press freeze
button).
14
* If you want to get new sampled image, please click “Live” ” (or press “Frame Freeze”
button on probe).
(2) Click “Analysis” (or press “Frame Freeze” button on probe) and the system is
analyzing now.
15
(3) Moisture analysis is completed. You can see Moisture test result. Click “Elasticity”
to operate elasticity test.
Click “Elasticity” to let view image window live.
Or click “Live” to
let image window
live.
Moisture test result
16
1-3 Elasticity Analysis test procedures
(1) “Elasticity” test, after getting the sampled image from elasticity test
bar, please click “Freeze” (or press “Frame Freeze” button) to
capture the image.
Method to get Elasticity sample
a. Moisture/Elasticity test bar (pink
color), change the test paper each
time you use it.
b. Touch the paper side to the skin part
you want to test. (Suggested test part:
upper of the side neck, see picture
below)
c. Set IBS-50RN lens to the normal
(texture) inspection mode
c. Set IBS-50RN lens to the normal
(texture) inspection mode
Texture / normal inspection
(Surface inspection)
d. Contact the lens to the paper side &
freeze picture (press freeze
button).
17
* If you want to get new sampled image, please click “Live” ” (or press “Frame Freeze”
button on probe).
(2) Click “Analysis” (or press “Frame Freeze” button on probe) and the system is
analyzing now.
18
(3) Elasticity analysis is completed. You can see Elasticity test result. Click “Pigment”
to operate pigment test.
Click “Pigment” to let view image window live.
Or click “Live” to
let image window
live.
Elasticity test result
19
1-4 Pigment Analysis test procedures
(1) “Pigment” test, after getting the sampled image from polarized lens, please click
“Freeze” (or press “Frame Freeze” button on probe) to capture the image.
Method to get Pigment sample
a. Set lens to melanin (polarized)
inspection mode. Directly contact the
lens to the skin part
(Suggested test part: upper cheek)
Melanin / Polarized inspection
(deeper layer skin inspection)
b. Freeze picture (press “Frame Freeze”
button).
20
* If you want to get new sampled image, please click “Live” (or press “Frame Freeze”
button on probe).
(2) Click “Analysis” (or press “Frame Freeze” button) and the system is analyzing now.
21
(3) Pigment analysis is completed. You can see Pigment test result. Now click “Result”
to get the complete SMEP test result.
Pigment test result
22
1-5 Test results
Result are shown as the left side of the page.
In the blue mark areas, “Elasticity” and “Pigment” test results are appeared in bar charts;
“Sebum” and “Moisture” test results are appeared in a certain number in a quadrant area.
Click “Products” to set up suggested products.
23
1-6. Suggested Products
If you have already set up your suggested products database, the suggested products will be
shown in the marked area. You can add more comments in the marked area.
* If you want to change back to its original default, please click “Default”; if you only want to
print the test result & suggested products, click “Print” to print them out. If you want to save
this record, click “Save” icon. (Ref: Page 24-32)
24
(A) Print
If you only want to print the test result and suggested products (not save as return client),
then just click “Print” based on page 24, print out result report together with the suggested
products as shown below.
25
(B) Save
If you want to save this test data, click “Save” based on page 24, you can save as “New
Client” or as “Old Client”.
26
(B-1) Save as “New Client”
If you click “New Client” (based on the page 26)”, you can take a picture of the
client and key in personal data.
Use the HD-1x ADJ.
lens (with this software)
to take client picture.
27
Click “Save” icon, personal data saved. Now click “OK” and then click “Home” to the
home page.
2
1
3
28
(B-2) Save as “Old Client”
If you click “Old Client” (based on the page 26)”, please select the right client you
want to save the new test result in and then click “Save”.
29
If you are sure to save the test result for this client, please ckick “Yes”.
30
Data saved. Click “OK” then “Home” to the home page.
31
(C) Default
When you click “Default” based on page 24, you can return the comments in marked areas
to the original suggested products default. Click “Yes” to return the original database.
32
2. CLIENTS DATA
Click “Client Data” button, the system
will lead you to find the history data of
old client.
33
2-1 Search Clients
There are 3 methods to search clients:
(1) Directly click “Search” to find all clients.
(2) Select “Search Conditions” and then click “Search”.
(3) Key in “Key Word” and then click “Search”.
2
3
1
34
Search Conditions by “Client Name”, select client ex. Angelina Tung, “Search Result”
as targeted “Angelina Tung”. Click “Client Data” for the client’s history.
1
2
3
35
2-2 Clients Personal Data
(A) Personal Data Revise
Every client personal data can be revised as needed, remember to click “Save” icon
to storage it after revised.
36
(B) History Data Search
Select at first the exact date of history data which you want to study. After
selecting it, click “Search”, searching process starts.
37
(B-1) Printing out the analysis history result report
Click “Print” icon to entry the print form.
38
Print out analysis history result report form as shown below.
39
(B-2) Delete analysis history by date
History Data Search, select at first the exact date of history data which you want to
delete. After selecting it, click “Delete”, deleting process starts.
40
2-3 Delete Client
Delete the whole client analysis history. Select at first the exact client which
you want to delete. After selecting it, click “Delete”, deleting process starts.
41
3. SYSTEM MAINTAIN
Click “System Maintain”
you can set up some basic
database.
42
3-1 Standard Parameter Setting
As per we state in page 5, each main unit has
been setting its individual values. When you
enter “HD-SMEP+CMS” at the first time, please
make correction in advance.
Afterwards, if you think necessary, you can adjust
the setting or you can set the values to its default
data. Click “Standard Parameter Setting” to the
page, after the new setting or default setting,
please remember to click “Save”.
* The original values in this page
is our public default values.
You can recover them to the
default values or set the
proper values you need.
43
3-2 Skin Type Setting
If you click “Skin Type Setting”, you shall input
your own summary and suggested products for
each test result type. After the data input, click
“Save” to complete your own data setup.
• Sebum & Moisture test results
from Lo – Lo, Lo - M, Lo – Hi, M –
Lo, M – M, M – Hi, Hi – Lo, Hi – M,
Hi – Hi for setting; Elasticity
results from B(bad), M(medium),
G(good) for setting; Pigment
results from Lo(low), M(medium),
Hi(high) for setting.
44
3-3 Company Information Setting
If you click “Company Information Setting”,
you can input the software user’s data as below
and then click “Save”.
45
4. PRINT
* Click “Print” to get the client
data in label form or the client
data in an ordered / statistics
list form.
46
Printing Conditions Setting
You should select the following 3 conditions and then click “Search”.
(1)
(2)
(3)
47
(A) Label Print
After 3 conditions setting and click “Search”, click “Label Print” to get
the label print form.
48
This is “Label Print” paper. For example you can use the printed label for DM
mailing purpose.
49
(B) List Print
After 3 conditions setting and click “Search”, click “List Print” to get the list print form.
50
This is “List Print” paper, in which you can find the data listed by “Client Name” category.
51
After 3 conditions setting and click “Search”, click “List Print” to get the list print form.
52
This is “List Print” paper, in which you can find the data is listed by “Visiting times” category.
53
(C) Certain Area Print
If you only want to print client data in a certain area, you can mark the area in
advance and then click “Label Print” or “List Print” to get the print form.
Press “Ctrl” or “Shift” and
mouse at the same time
to get the selected area.
54
Label Print
List Print
55
5. Back Up
We strongly suggest you to back up your software data frequently! Please click
“System Backup” from “System Maintain” option in home page.
Here is reminding you the
last backup date.
56
Suggestion: You can back up the data in a certain file by adding the date.
57
6. Recovery
58
Suggestion: You can find the backed up data in your previously storage file /
date and recover the data to that certain date if needed.
59
7. Exit
To exit the software, click “Exit”.
If you are sure to exit the system, the system will
automatically remind you to back up current SMEP
system.
60