1
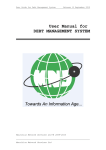
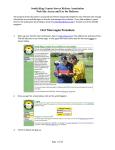
Assessment Processes (Research Community)
Research Grants Management System
User Guide – Assessment Processes
Target Audience – Research Community
Version: 1.3
11 September 2014
1
Assessment Processes (Research Community)
Version Control
Date
20/12/2013
Version #
0.1
Author
Benn Fleming
02/01/2014
0.2
Benn Fleming
03/01/2014
0.3
04/01/2014
02/04/2014
0.4
1.0
18/06/2014
1.1
Sally McEwan &
Lee Clayton
Benn Fleming
Lynne Sell, Tom
Flannery &
Lindsay Pennock
Lynne Sell
21/07/2014
1.2
Tom Flannery
11/9/2014
1.3
Lynne Sell
Details
Amalgamated the existing material into one
guide. Reviewed content and updated
screenshots.
Applied recommended changes from the first
pass review.
Provided review and feedback on the Assigners
Academy subjects.
Applied recommendations to new version.
Applied recommended changes and comparison
to other documentation.
Added chapter on accessing results (applicant
and RAO)
Transferred Accessing Assessment Results
chapter to ‘Awarding Grants’ user guide
Added section on Self-nomination for
Participation in a Peer Review Panel
Document Control
© Commonwealth of Australia 2014
This work is copyright. Apart from any use as permitted under the Copyright Act 1968, no part
may be reproduced by any process without prior written permission from the Australian
Government National Health and Medical Research Council (NHMRC). For any queries please
contact the RGMS training team at [email protected].
Continuous Improvement
NHMRC endeavours to provide the best training to the Australian medical and health research
community through a continuous improvement practice. Your feedback and recommendations will
be used to review and update the training materials in the future. Any feedback can be sent to the
RGMS training team at [email protected].
2
Assessment Processes (Research Community)
RGMS User Guide – Assessment Processes (Research Community)
Contents
1.
2.
Introduction ................................................................................................................................ 5
1.1.
Target Audience ................................................................................................................. 5
1.2.
RGMS Training Program ................................................................................................... 5
Assigning Applications (Assigners Academy) ........................................................................... 8
2.1.
Information for Assigners ................................................................................................... 8
2.2.
Responding to an Assigner Academy Invitation .............................................................. 10
2.3.
Setting an Assigners Custom Filter .................................................................................. 12
2.4.
Download Application Summary Documents ................................................................... 14
2.5.
Declaring Conflicts of Interest and Assigner Suitability ................................................... 17
2.6.
Formatting Assigner Email Stationery.............................................................................. 21
2.6.1.
2.7.
Identifying External Assessors ......................................................................................... 24
2.8.
Managing External Assessors Invitations ........................................................................ 28
2.8.1.
Identify Potential External Assessors ....................................................................... 28
2.8.2.
Invite External Assessors ......................................................................................... 29
2.8.3.
Cancel Invitations ..................................................................................................... 31
2.8.4.
Accept or Cancel an Invitation on an External Assessor’s Behalf ............................ 32
2.9.
3.
4.
Assigners’ Decisions on Conflicts of Interest (CoI) for External Assessors..................... 33
2.9.1.
Assigners Ruling on an External Assessor’s CoI ..................................................... 34
2.9.2.
Recording EA CoI Declared Outside of RGMS ........................................................ 34
2.10.
Coordinating Review by Overseas External Assessors ............................................... 36
2.11.
Monitor External Assessor (EA) Progress .................................................................... 36
2.11.1.
Monitoring Applications EA Overall Progress ....................................................... 36
2.11.2.
Monitoring external assessors’ progress on individual applications ..................... 38
2.12.
Extend the Due Date for External Assessment ............................................................ 40
2.13.
Copy External Assessors to Another Application ......................................................... 41
External Assessment (Project Grants and Program Grants only) .......................................... 43
3.1.
Accept an Invitation and declare any potential conflicts of interest ................................. 43
3.2.
Completing an Assessment ............................................................................................. 43
Panel Processes ..................................................................................................................... 46
4.1.
Self-nomination for Participation in a Peer Review Panel ............................................... 46
4.2.
Download Application Documents ................................................................................... 50
4.2.1.
Additional details for Mac users ................................................................................ 51
4.3.
Declaring Conflicts of Interest and Indicating Suitability as a Spokesperson. ................. 52
4.4.
Spokesperson Assessments (Selected Schemes Only).................................................. 54
4.4.1.
5.
Resetting the Assigner Email Text ........................................................................... 24
Rescoring an application (Project Grants Only) ....................................................... 56
Applicant Rebuttal ................................................................................................................... 57
5.1.
Viewing assessor comments ........................................................................................... 57
5.2.
Completing and submitting your response ...................................................................... 58
3
Assessment Processes (Research Community)
5.3.
Authorising an RAO to submit rebuttal comments on your behalf ................................... 59
5.4.
Submitting rebuttal comments on an applicant’s behalf (RAOs) ..................................... 61
4
Assessment Processes (Research Community)
1.
Introduction
This is the third in a series of RGMS user guides for members of the research community. This
document should be read in conjunction with the advice and instructions document, specific to the
scheme for which you are reviewing. The focus of this guide is the assessment phase of the
NHMRC grant lifecycle.
Topics covered in this guide include:
•
•
•
•
Assigning applications to external assessors
External assessment
Panel processes, including declaring conflicts of interest and spokesperson assessments
Applicant rebuttals
It is expected that anyone referring to this guide is familiar with the content in the RGMS User
Guide – Introduction to RGMS (Research Community).
1.1.
Target Audience
This guide is primarily targeted at assigners, external assessors and peer review panel members.
Section 5, addressing the rebuttal process, applies to applicants and RAOs only.
Where sections of this guide are only relevant to particular schemes, a note is appended at the
beginning of the section.
1.2.
RGMS Training Program
Training is structured around the four phases of the NHMRC grant lifecycle as illustrated in Figure
1 over the page. The training program aims to provide the skills and knowledge needed to perform
common tasks.
Target audiences for the program include:
•
•
•
•
•
•
Applicants
Assigners
Assessors
Grantees
Research Administration Officers
Finance Officers.
5
Assessment Processes (Research Community)
Figure 1 – NHMRC Grants Lifecycle
IMPORTANT NOTE
While this diagram summarises the typical steps in the process, the unique requirements of each NHMRC
funding scheme may introduce additional or fewer steps. Always refer to the scheme-specific funding
rules for further information and clarification.
6
Assessment Processes (Research Community)
Figure 2 – RGMS Training Program for the research community
7
RGMS User Guide – Assessment Processes (Research Community)
2. Assigning Applications (Assigners Academy)
IMPORTANT NOTE
This section applies to Project Grants only.
The first step in the peer review process is the assigning of applications to external
assessors. The assigning of applications is completed by members of the Assigners
Academy.
This section outlines how assigners use RGMS to manage external assessors and monitor
their assessment progress.
2.1.
Information for Assigners
General information, updates and publications relevant to assigners can be found on the
Assigners Academy page on the NHMRC website. The steps below outline how to access the
Assigners Academy page.
To access the Assigners Academy page use your internet browser to navigate to
http://www.nhmrc.gov.au/grants/peer-review/-nhmrc-academy.
Alternatively, you can access the Assigners Academy page via the NHMRC website:
1. Navigate to the NHMRC website at www.nhmrc.gov.au
2. Under the Grants drop down menu select Peer review.
Figure 3 - NHMRC Website Grants Drop Down Menu
8
RGMS User Guide – Assessment Processes (Research Community)
3. Scroll down to the Assigners Academy section and select the NHMRC Assigners
Academy hyperlink.
Figure 4 - Accessing the Assigners Academy
Figure 5 – The NHMRC Assigners Academy Page
9
RGMS User Guide – Assessment Processes (Research Community)
2.2.
Responding to an Assigner Academy Invitation
NHMRC identifies and invites potential Assigners Academy members through RGMS and the
steps below articulate how this process is initiated.
1. NHMRC will email potential Assigners Academy members an invitation to join the
Assigners Academy.
Below is an example of an email sent to a potential assigner.
Dear Professor Smith
Please see the attached letter seeking your willingness to participate as a
member of the 2014 Project Grant Assigners Academy.
If you experience any difficulties with this email or its attachment, please
contact the Research Help Centre on 1800 500 983 or via
[email protected]
Please lodge your response to this invitation in RGMS by clicking the
following link and selecting your decision for the Project initiative.
<Link to RGMS>
Some email clients split long URLs across lines. Please ensure that
the complete URL is displayed on a single line with no breaks before
clicking it.
Regards,
Dr Joe Bloggs, Director Project Grants
10
RGMS User Guide – Assessment Processes (Research Community)
2. Once you have selected the hyperlink, you will be directed to your Panel
Nominations and Invitations Properties page in RGMS.
Figure 6 – Profile and CV: Panel Nominations and Invitations Properties
3. From the Decision For This Invitation drop down menu select Accept or Decline.
Figure 7 - Panel Nominations and Invitations Properties Page
4. Select Save
to save your data and remain on the page. Alternatively select
Submit
to complete the process and you will navigate to the Profile and CV:
Panel Nominations and Invitations list.
For more information about the differences between save and submit refer to section
3.2.3 Save, Submit and Cancel in the RGMS User Guide – Introduction to RGMS
(Research Community).
You will be sent an email notifying you that your response has been submitted to NHMRC.
11
RGMS User Guide – Assessment Processes (Research Community)
2.3.
Setting an Assigners Custom Filter
Assigners Academy members will frequently use the ‘Assigner Application List’ page. Custom
filters can be prepared to remember your filter preferences to streamline navigating RGMS.
The filter settings below are appropriate for the majority of processes in RGMS and will be
referred to as the “standard filter preferences”. Where different filter preferences are required
(e.g. when declaring conflicts of interest) the necessary preferences are outlined.
1. From the RGMS Home page, select the Assigners tab.
Figure 8 – Accessing the Assigners Page
2. Select the Identify potential assessors quicklink.
Figure 9 – Identify Potential Assessors Quicklink
3. Use the Round lookup field by selecting the
binoculars icon. Enter the details of
the round and select Filter
. Choose the relevant round and select Add
.
Figure 10 – Identify Potential Assessors Quicklink
12
RGMS User Guide – Assessment Processes (Research Community)
For more information on lookup fields refer to section 3.2.2 Lookup in the RGMS
User Guide – Introduction to RGMS (Research Community).
4. Ensure the Assigned drop down menu is set to Yes.
Figure 11 – Assigned Drop Down Menu
IMPORTANT NOTE
To see applications already assigned to external assessors you will need to change the
Assigned drop down menu from No to Yes. This will assist you in monitoring the status of
external assessments. For further information on monitoring the status of external
assessment refer to section 2.11 Monitor External Assessor (EA) Progress.
5. Ensure the Active Applications drop down menu is set to Yes.
Figure 12 – Active Applications Drop Down Menu
6. Select Save Filter
.
7. Enter a name for this filter in the Filter Name field (e.g. Assigner Filter).
Figure 13 - Entering a Filter Name
8. Select the Default tick box.
9. Select Submit
to save the filter and return to the Assigner Application list.
The filter will now appear in the Filter drop down menu at the top left hand side of the page.
13
RGMS User Guide – Assessment Processes (Research Community)
Figure 14 - The Saved Filters Drop Down Menu
2.4.
Download Application Summary Documents
Assigners Academy members review application summaries to identify potential conflicts of
interest and suitability to be the assigner. The application summaries are provided in a
password protected zip file which is downloaded from RGMS.
You will require a zip file expander program, such as WinZip or Peazip (PC) or StuffIt
Expander (Mac), to extract the application documents from the file.
Instructions to download the summaries for all applications in your research area, to which
you have been allocated as an assigner, are outlined below.
1. From the RGMS Home page select the Assigners tab
Figure 15 – Accessing the Assigners Page
14
RGMS User Guide – Assessment Processes (Research Community)
2. Select the Review application documents quicklink.
Figure 16 – Review Application Documents Quicklink
3. Select New
to create a new download request.
4. Select the relevant round from the Round drop down menu.
Figure 17 - Create Download Documents Page
5. Select Application Summaries – Assigner from the Document Type drop down
menu.
6. Select Save
.
7. On the left hand menu select Summaries – Assigner.
8. In the Name field, use the lookup field by selecting the
binoculars icon. Enter your
details and select Filter
. Select your name and select Add
.
15
RGMS User Guide – Assessment Processes (Research Community)
Figure 18 – Summaries Assigner Page
9. Select the download purpose from the Download Purpose drop down menu.
Figure 19 – Download Purpose Drop Down Menu
The options available to you include:
•
•
Determine CoI – Select this option to extract the application summaries for
all applications listed within your research area and to assist you in declaring
your conflict of interest and suitability.
Allocate Assessors – Post CoI declaration documents can be generated
after the CoI declaration process has been completed. This selection will
produce a download which excludes documents associated with applications
on which you have declared a High CoI. The download will contain
documents for applications on which your declared CoI is either Low or None.
10. Enter a password in the Password field.
IMPORTANT NOTE
The password must be no more than 20 characters in length. It will be used to gain access to
the downloaded zip file and will be recorded on this page for future reference.
11. Select Yes from the Generate Zip File drop down menu.
Figure 20 – Generate Zip File Drop Down Menu
16
RGMS User Guide – Assessment Processes (Research Community)
12. Select Save
to save your data and generate the zip file.
The URL link should appear. If not, you may need to refresh the page for the URL to
appear.
13. When the URL is generated, select the hyperlink. You will have 48 hours to download
the zip file.
14. You may be prompted to save or open the zip file. Save the file to your computer;
If an error message appears (e.g. Status 404 Error) or nothing happens when you
select the URL, close the error message, wait five minutes, refresh the page and then
re-select the URL.
15. Open the zip file on your computer using a zip file expander program (such as WinZip
or Peazip [PC] or StuffIt Expander [Mac]). You will be required to enter the password
entered in Step 10 to open the files.
16. Extract the application documents to a folder on your computer. This will save having
to enter the password each time the documents are opened.
The extracted files will include a csv file entitled “AAA_<Assigner Name>” which lists the CIA
name and application ID of all the application summaries that have been downloaded.
Some Mac users have reported problems in opening the zip files. This occurs when Apple’s
default Archive Utility program is used to open the zip file. Use of an alternative zip expander
program is recommended.
2.5.
Declaring Conflicts of Interest and Assigner Suitability
Assigners declare their potential conflicts of interest against applications and indicate their
appropriateness to act as the assigner for the applications.
Assigners will need to complete their declarations in RGMS via the instructions below.
IMPORTANT NOTE
It is strongly advised that when using RGMS, you select Save
potential data loss.
frequently to avoid
1. From the RGMS Home page select the Assigners tab.
Figure 21– Accessing the Assigners Page
17
RGMS User Guide – Assessment Processes (Research Community)
2. Select the Declare conflicts of interest quicklink.
Figure 22 – Declare conflicts of interest quicklink
For information on how to create a default assigners filter refer to section 2.3 Setting
an Assigners Custom Filter.
Figure 23 –Setting an Assigners Custom Filter (see section 2.3)
3. At the top right of the page, select the Actions dropdown list and select Edit Mode.
Figure 24 – Actions Drop Down Menu
For further information on the Actions drop down menu refer to section 3.2.4 The
Actions Drop Down Menu in the RGMS User Guide – Introduction to RGMS
(Research Community).
18
RGMS User Guide – Assessment Processes (Research Community)
4. For each application listed, review the application title, team and institution to
determine if you have a potential conflict of interest.
Figure 25 –Determine Potential Conflict of Interest
You may also need to refer to the application summary previously downloaded. For
more information refer to section 2.4 Download Application Summary Documents.
5. To declare your conflict of interest level for an application, select the corresponding
CoI drop down menu.
Figure 26 - CoI Drop Down Menu
The options for the conflict of interest level are:
a. Ruling Required indicates you are unsure if you may have a conflict of
interest.
b. Yes indicates you have a conflict of interest.
c. Leaving the default [--Select--] indicates you have no conflict of interest
19
RGMS User Guide – Assessment Processes (Research Community)
For applications where you select Ruling Required or Yes as the level of conflict,
detail the nature of your conflict in the Note column free text field in the far right
column.
Figure 27 - Note Column - Free Text Field
NHMRC will review the information provided to determine an appropriate level of conflict with
the application. The guidelines for managing conflicts of interest are outlined in your scheme’s
peer review guidelines. For further information please refer to those guidelines.
6. For each application, indicate your appropriateness to act as the assigner in the
Assigner Suitability column.
Figure 28 - Assigner Suitability Drop Down Menu
You may need to refer to the application summary previously downloaded. Select
from the following options:
a. Yes – applications for which you are comfortable to be the Assigner,
b. No – applications completely out of your area of expertise, or
c. Limited – although not ideal, applications for which you could still be the
assigner.
7. Select Save
after declaring your conflict of interest and assigner suitability for
each application.
8. There may be multiple pages of applications to declare your conflicts of interest and
assigner suitability against. If numbers appear at the top or bottom of the page, be
sure to select each number and review the applications on the pages. Remember to
Save
before going to a new page.
Figure 29 - Multiple pages for Review
To revert back to a display mode select the Actions drop down menu at the top right of the
page and select Display Mode.
20
RGMS User Guide – Assessment Processes (Research Community)
Figure 30 - Actions Drop Down Menu
Figure 31 - Return to Display Mode
For further information refer to section 3.2.4. The Actions Drop Down Menu in the RGMS
User Guide – Introduction to RGMS (Research Community).
2.6.
Formatting Assigner Email Stationery
Assigners Academy members approach external assessors to review applications by sending
invitation emails from RGMS. Templates for invitation and cancellation email are generated in
RGMS and may be customised by Assigners Academy members. Instructions on preparing
the emails are outlined below.
1. From the RGMS Home page select the Assigners tab.
Figure 32 - Accessing the Assigners Page
2. Select the Configure assessor invitation emails quicklink.
Figure 33 – Configure Assessor Invitation Emails Quicklink
21
RGMS User Guide – Assessment Processes (Research Community)
3. Select one of the hyperlinks against your details or select the properties icon
.
4. Select the Assigner link from the menu on the left hand side.
Figure 34 – Accessing the Profile and CV: Properties Assigner Configure Assessor Page
Figure 35 – Profile and CV: Properties Assigner Page
22
RGMS User Guide – Assessment Processes (Research Community)
5. In the Email Address field, enter your preferred email address to be used for
assigner related correspondence.
Figure 36 – Email Address Field
6. Select the CC addressee on emails you generate? tick box if you want to be copied
into all email correspondence sent from RGMS.
Figure 37 – CC Addresses on Email You Generate? Field
7. Enter your preferred email sign off in the Sign off and signature block field.
Figure 38 – Sign Off and Signature Block Field
8. Select the Initialise email address and text tick box at the bottom of the page.
Figure 39 – Initialise Email Address and Text
9. Select the Initiative for sample email.
10. Select Save
.
11. Refresh your browser to update RGMS with the changes.
This will generate the default template text for your invitation and cancellation emails.
12. To preview an example of your emails, select the Generate sample invitation email
tick box or Generate sample cancellation email and select Save
.
The email address entered at the top of the page will shortly receive an example of
the email generated. If you would like to revise your email templates return to step 2.
23
RGMS User Guide – Assessment Processes (Research Community)
Figure 40 – Generate Sample Invitation Email and Generate Sample Cancellation Email Tick
Boxes
13. Once complete, select Submit
CV list.
2.6.1.
to save your work and return to the Profile and
Resetting the Assigner Email Text
You may wish to reset the text of your template emails. The instructions below continue from
the steps above.
1. To reset the text to the default templates select the Initialise email address and text
tick box so that it is not ticked and select Save
.
2. Select the Initialise email address and text tick box so that it is now ticked and
select Save
again. Refresh the page to display the default text.
Figure 41 – Initialise Email Address and Text
2.7.
Identifying External Assessors
RGMS provides application details, search functions and additional resources to assist
Assigners Academy members in identifying potential external assessors.
IMPORTANT NOTE
To assist you to identify external assessors you will need to download the application
documentation. For further information on how to download this information refer to 2.4
Download Application Summary Documents.
Instructions on identifying appropriate external assessors for applications are outlined below.
24
RGMS User Guide – Assessment Processes (Research Community)
1. From the RGMS Home page select the Assigners tab.
Figure 42 – Accessing the Assigners Page
2. Select the Identify potential assessors quicklink.
Figure 43 - Identify Potential Assessors Quicklink
For information on how to create a default assigners filter refer to section 2.3 Setting
an Assigners Custom Filter.
3. Select the relevant application by selecting the hyperlink Application ID column.
4. Select the Application tab.
Figure 44 – Assigner Application: Application Page
25
RGMS User Guide – Assessment Processes (Research Community)
Here you will be able to view application details including the:
•
•
•
•
Application summary document
Team members
Nominated possible assessors
Research keywords
5. Select the Ineligible Candidates tab. This displays a list of individuals who should
not be approached to review the application.
Figure 45 – Accessing the Ineligible Candidates Page
Figure 46 – Ineligible Candidates Page
6. Select the Candidates Based on Keyword Matches tab.
Figure 47 – Candidates Based on Keyword Matches
7. In the Minimum Matches With Application field enter a number (1-5) to display
RGMS account holders with at least the specified number of keywords in common
with this application.
IMPORTANT NOTE
In order to identify the best external assessor begin with a value of 5 in the Minimum
Matches With Application field. If no external assessor is found, reduce the value by one
and select Filter
, until an appropriate assessor is identified.
26
RGMS User Guide – Assessment Processes (Research Community)
Figure 48 – Candidates Matches With Application Page
8. Select Filter
.
9. Select the
plus icon to display additional information about the potential external
assessor’s recent research expertise.
Figure 49 – Candidates Based on Matching Keywords with Application
10. If you have not been able to select an appropriate external assessor you can select
the Keyword Search tab. This step is not required if you have found the required
external assessors.
Figure 50 – Accessing the Keyword Search Page
This page allows you to perform keyword searches to identify potential external
assessors. Detailed instructions on using this function are provided on the Assigner
Application: Keyword Search page.
11. Once you have identified a potential external assessor invite them to review the
application by selecting the Properties tab and following step 4 and onwards of
section 2.8.1 Invite External Assessors.
27
RGMS User Guide – Assessment Processes (Research Community)
2.8.
Managing External Assessors Invitations
When an appropriate external assessor has been identified they need to be invited to be an
external assessor. This section will outline how to:
•
•
•
Invite an external assessor
Cancel an invitation
Accept or cancel an invitation of behalf of an external assessor
2.8.1.
Identify Potential External Assessors
Assigners Academy members are responsible for obtaining two external assessments for
each application they are assigned. Instructions on identifying potential external assessors to
review an application are outlined below.
1. From the RGMS Home page select the Assigners tab.
Figure 51 – Accessing the Assigners Page
2. Select the Identify potential assessors quicklink.
Figure 52 -Identify Potential Assessors Quicklink
3. You can apply the filters to narrow the result and select Filter.
Applications that you are responsible for will be listed automatically.
4. Select an application by selecting the hyperlink in the Application ID column.
5. Select the Assignments link in the menu on the left.
6. Select the New button.
7. Search for your intended external assessor using the Candidate with RGMS Profile
option.
8. If they cannot be found, enter their details manually using the Candidate without
RGMS Profile option.
28
RGMS User Guide – Assessment Processes (Research Community)
IMPORTANT NOTE
Please use one option only, either the binocular lookup or entering the details manually.
Using the binocular lookup and also entering the assessor’s details manually will cause the
process to fail and the assessor will not be able to be invited.
9. Select Submit
.
The potential external assessor will now appear in the Assignments table. Repeat this
process to add more potential external assessors.
10. Click on the person
icon next to the potential external assessor. This will not be
available for external assessors without an RGMS account.
Use the relevant tabs to review the external assessor’s details such as research alignment,
commitment and publications to determine whether they are a suitable reviewer for the
application. Please pay particular attention to the Commitments and Unavailability – This
Year tab as this will indicate whether or not the potential assessor is available to participate in
peer review. Assessors who are listed as ‘unavailable’ should not be approached.
11. Close the Assignment Portlets: Personal Details page and return to the
Assignments table.
2.8.2.
Invite External Assessors
Assigners Academy members are responsible for obtaining two external assessments for
each application they are assigned. Instructions on inviting an external assessor to review an
application are outlined below.
1. From the RGMS Home page select the Assigners tab.
Figure 53 – Accessing the Assigners Page
2. Select the Assign applications to assessors quicklink.
Figure 54 – Accessing the Assigners Page
29
RGMS User Guide – Assessment Processes (Research Community)
3. You can apply the filters to narrow the result and select Filter.
Applications that you are responsible for will be automatically listed.
4. Select an application by selecting the hyperlink in the Application ID column.
5. Select the Assignments link in the menu on the left.
6. Select the hyperlink in the Last Name column of the relevant external assessor.
7. Select the Invitation link from the left hand menu.
8. The default invitation text will appear in the Invitation field. If you wish to customise
the invitation email text for this specific invitation make your amendments in the
relevant field. Any changes made will apply to this invitation only.
Figure 55 – Invitation page
9. By default, invitations address potential external assessors formally using their title
and last name entered in RGMS. To use an alternative name tick the Candidate is a
Friend? box and enter the alternative name in the Preferred Name field.
IMPORTANT NOTE
When submitting their application, applicants are asked whether or not they consent to their
application(s) being reviewed by an Overseas External Assessor. RGMS displays their
nomination in the ‘CIA Gave Consent For An Overseas Assessor?’ field with either a green
for ‘Yes’ or a red
for ‘No’. If consent has not been given, Assigners must not assign
the application to an Overseas External Assessor.
10. Select Yes from the Send Invitation Email drop down menu.
Depending on the individual’s involvement with the NHMRC assessment process for
the calendar year, one of four different options will appear:
1.
2.
3.
4.
Yes,
Yes (***GRP member***),
Yes (***>=6 assessments***),
Yes (***>=6 assessments and GRP member)
30
RGMS User Guide – Assessment Processes (Research Community)
With the exception of the first option, these selections indicate a potential assessor
with a recent, substantial commitment to NHMRC. Although RGMS will not prevent
you from sending an invitation displaying one oth the last three instances, you may
want to reconsider your choice if any but the first option appears.
11. Select Submit
to complete the process and send the invitation.
You will be navigated back to the Assigner Application: Properties page from where you
are able to invite additional external assessors for this application.
2.8.3.
Cancel Invitations
Assigners Academy members may cancel an invitation to an external assessor at any point in
time. The instructions below outline this process.
1. From the RGMS Home page select the Assigners tab.
Figure 56 – Accessing the Assigners Page
2. Select the Identify potential assessors quicklink.
Figure 57 - Identify Potential Assessors quicklink
3. Ensure the standard filter preferences are selected and select Filter
. For
more information refer to section 2.3 Setting an Assigners Custom Filter.
4. Select the hyperlink in the Application ID column for the application for which you
want to cancel the invitation.
5. Select the Assignments link from the menu on the left.
6. Select the external assessor’s last name.
7. Select the Invitation link from the left hand menu.
8. The default cancellation text will appear in the Cancellation field.
31
RGMS User Guide – Assessment Processes (Research Community)
9. If you wish to customise the default text for this specific cancellation, make your
amendments in the relevant field.
10. Select Yes from the Cancel Invitation drop down list.
11. Select Submit
Properties page.
to cancel the invitation and return to the Assigner Application:
12. To review cancelled invitations, ensure that ‘Inactive’ is selected from the Status Filter
and refresh the page.
Using this filter allows you to view cancellation dates and total cancellations for this
application as well as reducing the chance of sending an invitation to a potential External
Assessor who has already declined a previous invitation.
2.8.4.
Accept or Cancel an Invitation on an External
Assessor’s Behalf
On occasion, external assessors may contact an Assigners Academy member outside of
RGMS to indicate their willingness to review an application. It is important that external
assessors’ decisions are recorded in RGMS to either allow them access to provide
assessments, or to signal that an alternative assessor is required. Instructions on recording
external assessors’ decisions in RGMS are outlined below.
1. From the RGMS Home page select the Assigners tab.
Figure 58 – Accessing the Assigners Page
2. Select the Monitor and manage assigned applications quicklink.
Figure 59 – Monitor and Manage Assigned Applications quicklink
32
RGMS User Guide – Assessment Processes (Research Community)
3. Ensure the standard filter preferences are selected and select Filter
. For
more information refer to section 2.3 Setting an Assigners Custom Filter.
4. Select an application by selecting the hyperlink in the Application ID column - you
will be directed to the Assigner Application: Properties page.
5. Select the Assignments link from the menu on the left side.
6. Select the hyperlink in the Last Name column of the relevant external assessor.
7. Identify the corresponding response in the Candidate’s Decision drop down menu
as:
•
•
•
Accepted (Assigner) – External assessor has accepted the invitation.
Decline (Assigner) – External assessor has declined the invitation.
Decline (NHMRC – OS) – External assessor is an overseas assessor and
has declined the invitation.
If the Accepted option is selected the external assessor will receive an automatic
email from RGMS advising that they can now access the application in RGMS and
commence their assessment.
8. Select Submit
.
IMPORTANT NOTE
External assessors living in Australia will require a RGMS account to access the application in
RGMS and complete their assessment. The accepted (assigner) Candidate’s Decision
option will not be available if the assessor does not have an account. The invitation email
includes instructions on creating an account and accessing the application. Once the external
assessor follows the email instructions they will gain access to the application in RGMS. At
this stage RGMS will update the Candidate’s Decision drop down menu.
2.9. Assigners’ Decisions on Conflicts of Interest (CoI) for
External Assessors
External assessors approached by Assigners may indicate they have a potential conflict of
interest (CoI) with an application they have been invited to review. Managing CoI is essential
to maintaining a robust and equitable peer review process. For information on what
constitutes a conflict of interest, refer to the Guideline for Managing Conflicts of Interest in
NHMRC Peer Review outlined in your scheme’s peer review guidelines.
IMPORTANT NOTE
The members of Assigners Academy who are assigning for Project Grants are able to obtain
policy advice on COI rulings by contacting the Project Grants team at
[email protected].
33
RGMS User Guide – Assessment Processes (Research Community)
2.9.1.
Assigners Ruling on an External Assessor’s CoI
The invitation email sent to external assessors provides a hyperlink to an online form where
they indicate their willingness to review an application. External assessors may accept the
invitation but indicate that they have potential conflict of interest. Where this is the case, the
Assigners Academy member will receive an email from RGMS indicating that a ruling is
required.
The instructions below outline the process of ruling on a conflict of interest.
1. Select the link in the email.
2. Log into RGMS, you will be navigated to the Assignment Properties – Conflict of
Interest page.
3. Review the details of the potential conflict of interest as found in the CoI Comments
– Candidate field.
4. Enter any comments into the CoI Comments - Assigner/NHMRC field and select
Save
.
Figure 60 - Assignment Properties – Conflict of Interest page
5. Determine and select the level of conflict, using the CoI Ruling drop down menu:
•
•
•
None – There is no conflict of interest and the external assessor can review
the application.
Low – The conflict of interest is low and the external assessor can review the
application.
High – There is a conflict of interest and the external assessor will not be
able to review the application.
Select Save
.
If there are insufficient details to make a ruling, contact the external assessor.
If the CoI Ruling Requested? box is ticked, a ruling on the conflict must be made in RGMS
before the Candidate’s Decision drop down menu can be changed and the external
assessor given access to the application.
2.9.2.
Recording EA CoI Declared Outside of RGMS
When external assessors declare a conflict of interest outside RGMS (e.g. via email) it is
important that this conflict of interest information is documented in RGMS.
Instructions on recording a conflict of interest are outlined below.
34
RGMS User Guide – Assessment Processes (Research Community)
1. From the RGMS Home page select the Assigners tab.
Figure 61 - Accessing the Assigners Page
2. Select the Monitor and manage assigned applications quicklink.
Figure 62 – Monitor and Manage Assigned Applications Quicklink
3. Ensure the standard filter preferences are selected and select Filter
.
For more information refer to section 2.3 Setting an Assigners Custom Filter.
4. Select an application by selecting the hyperlink in the Application ID column, you will
be directed to the Assigner Application: Properties page.
5. Select the Assignments link from the menu on the left.
6. Select the hyperlink in the Last Name column of the relevant external assessor.
IMPORTANT NOTE
When the RGMS Profile tick box is ticked the external assessor has a RGMS account. If you
rule the conflict to be None or Low then the assessor will gain access to the application in
RGMS and receive a corresponding email.
If the tick box is not ticked then the assessor will need to create a RGMS account before they
can access the application in RGMS. If the conflict is ruled to be None or Low the assessor
will receive an email advising how to create an RGMS account and access the application.
The invitation email also includes instructions on creating an account and accessing the
application.
7. Select the Conflict of Interest link from the menu on the left.
8. Select the CoI Ruling Requested? tick box
35
RGMS User Guide – Assessment Processes (Research Community)
9. Enter the conflict details into the CoI Comments - Assigner/NHMRC field and select
Save
.
10. Determine and select the level of conflict using the CoI Ruling drop down list:
•
•
•
None – There is no conflict of interest and the external assessor can review
the application.
Low – The conflict of interest is low and the external assessor can review the
application.
High – There is a conflict of interest and the external assessor will not be
able to review the application.
11. Select Save
.
2.10. Coordinating Review by Overseas External Assessors
Assigners Academy members may contact overseas researchers to provide an external
assessment for an application they are assigned. Assessments by overseas external
assessors without an RGMS account will be managed differently, as outlined below.
1. Invite the overseas external assessor as outlined in section 2.8.1 Invite External
Assessors.
2. The invitation email requests that overseas external assessors contact NHMRC to
indicate their willingness to review the application.
IMPORTANT NOTE
Where assigners for Project Grants receive email from overseas external assessors indicating
their willingness, please forward this to the Project Grants team at
[email protected]
3. This will notify NHMRC to contact the assessor to coordinate review of the
application.
4. Once the assessment is complete and has been submitted in RGMS by NHMRC, the
Assignments table for that application will be updated to reflect a completed external
assessment. Refer to section 2.11 Monitor External Assessor (EA) Progress for
assistance with navigating to and interpreting the Assignments table.
2.11. Monitor External Assessor (EA) Progress
Assigners Academy members can track their progress in obtaining external assessments
using features provided in RGMS. Progress is presented at the overall applications level as
well as the specific external assessors for an application.
2.11.1. Monitoring Applications EA Overall Progress
Instructions on monitoring the progress of application external assessments are outlined
below.
36
RGMS User Guide – Assessment Processes (Research Community)
1. From the RGMS Home page select the Assigners tab.
Figure 63 – Accessing the Assigners Page
2. Select the Monitor and manage assigned applications quicklink.
Figure 64 – Monitor and Manage Assigned Applications Quicklink
3. Ensure the standard filter preferences are selected and select Filter
. For
more information refer to section 2.3 Setting an Assigners Custom Filter.
4. The filter options to the right of the page customise the applications displayed. Only
applications which meet specific criteria are displayed. This may assist you to identify
applications requiring attention.
Figure 65 – Assigner Filter Options
37
RGMS User Guide – Assessment Processes (Research Community)
The adjustable criteria are identified as:
•
•
•
•
•
•
•
Invitations – the number of external assessors invited to review an
application.
Resend – the number of invitations that have been resent due to no
response being received within the four day response period.
Accepted – the number of external assessors who have accepted to review
an application.
Completed – the number of completed assessments.
Declined – the number of external assessors who have declined to review an
application.
Overdue – the number of assessments which are past the due date.
Cancelled – the number of invitations cancelled for an application.
5. Enter the desired number range(s) in the available fields.
For example, you could filter for applications where there are:
•
•
•
Less than two accepted invitations,
Less than two completed assessments, or
One or more overdue assessments etc.
6. After defining the criteria, select Filter
.
7. The filters can be reset by clearing any values from the fields and selecting Filter
.
2.11.2. Monitoring external assessors’ progress on
individual applications
The specific external assessors for each application are detailed in and managed through the
Assignments table. The information provided in this table can be customised to aid
Assigners Academy members monitor the progress of invitations, responses and
assessments.
Instructions on customising the Assignments table are outlined below.
1. From the RGMS Home page select the Assigners tab.
Figure 66 – Accessing the Assigners Page
2. Select the Monitor and manage assigned applications quicklink.
38
RGMS User Guide – Assessment Processes (Research Community)
Figure 67 – Monitor and Manage Assigned Applications Quicklink
3. Ensure the standard filter preferences are selected and select Filter
. For
more information refer to section 2.3 Setting an Assigners Custom Filter.
Select an application by selecting the hyperlink in the Application ID column, you will
be directed to the Assigner Application: Properties page.
4. Select the Assignments link to the left side of the page.
5. The Assignments table for this application will be displayed.
Figure 68 – Assignments Table
Actions associated with potential external assessors for this application are recorded in this
table. The status of each potential external assessor is represented by a coloured arrow
defined below:
•
•
•
•
New – a potential external assessor who has not been invited. This will
include individuals who may have been considered as potential reviewers but
were not approached because of their unavailability.
Decision Pending
– an invitation has been sent, but a decision has not
been entered in RGMS.
Accepted – an invitation has been accepted.
Inactive
– an invitation to this external assessor has been either cancelled
or declined.
39
RGMS User Guide – Assessment Processes (Research Community)
Assigners Academy members can use the Status filter to customise the external assessors
displayed in the table based on their progress. For example, you may want to only see the
external assessors who are yet to respond to the invitation. How to customise the external
assessors listed is outlined in the instructions below.
1. Select the type of status from the Status field it will become highlighted in blue.
2. Select the Filter button
.
It is possible to filter for multiple status types concurrently. For example, you can choose to
display only those external assessors who are either New or Decision Pending. To view
multiple status types, hold the Shift or Ctrl key while clicking the required types, then select
Filter
. To display all the status types select Show All.
The status type(s) you choose to display in the table for one application will be the same for
all other applications.
2.12. Extend the Due Date for External Assessment
External assessors are initially requested to complete their assessments within 14 calendar
days of the date they accept the invitation. Once an external assessor accepts the invitation
to review an application the Assigners Academy member may change the due date if
required. The due date cannot be extended past the final completion date for that application
outlined in RGMS.
Instructions on changing the due date of an assessment are outlined below
1. From the RGMS Home page select the Assigners tab.
Figure 69 – Accessing the Assigners Page
2. Select the Monitor and manage assigned applications quicklink.
Figure 70 – Monitor and Manage Assigned Applications Quicklink
40
RGMS User Guide – Assessment Processes (Research Community)
3. Ensure the standard filter preferences are select and select Filter
information refer to section 2.3 Setting an Assigners Custom Filter.
. For more
4. Select an application by selecting the hyperlink in the Application ID column, you will
be directed to the Assigner Application: Properties page.
5. Select the Assignments link from the menu on the left.
6. Select the hyperlink in the Last Name column of the relevant external assessor.
7. Review the Assessment Must Be Completed By date for this assessment. Any
extension to the assessment due date cannot be past this date which has been predetermined by NHMRC.
8. Select the calendar icon
appear in a new window.
next to the Assessment Due Date field. A calendar will
9. Select the new date of the assessment.
10. Select Save
.
If you extend the due date of an assessment that was flagged as overdue, it will reset. The
external assessor will be notified that the due date has changed.
2.13. Copy External Assessors to Another Application
Assigners Academy members may wish to approach the same potential external assessors
for multiple applications. Once external assessors have been approached for one application
their information can be transferred to other applications. The instructions below outline this
process.
1. From the RGMS Home page select the Assigners tab.
Figure 71 – Accessing the Assigners Page
41
RGMS User Guide – Assessment Processes (Research Community)
2. Select the Monitor and manage assigned applications quicklink.
Figure 72 – Monitor and Manage Assigned Applications Quicklink
3. Ensure the standard filter preferences are selected and select Filter
. For
more information refer to section 2.3 Setting an Assigners Custom Filter.
4. Select an application by selecting the hyperlink in the Application ID column, you will
be directed to the Assigner Application: Properties page.
5. Select Copy Assignments link from the menu on the left.
6. Against the Assignees/Candidates field, select the external assessor(s) who have
been approached for that application whom you wish to also approach for other
application(s) by clicking the binoculars icon .
7. Against the Target Applications field, select the application(s) that you want the
external assessor(s) added to by clicking the binoculars icon .
8. Select Yes from the Create Assignments drop down menu.
9. Select Submit
.
10. Select the hyperlink in the Application ID column of the relevant application.
11. Select the Assignments link from the menu on the left.
The external assessor(s) will appear in the Assignments table of the target application(s).
They will not have been invited to review the target application(s). Refer to section 2.8.1
Invite External Assessors to add the external assessor to review the application(s).
42
RGMS User Guide – Assessment Processes (Research Community)
3. External Assessment (Project Grants and Program Grants
only)
IMPORTANT NOTE
This section only applies to external assessors for the following schemes:
• Project Grants
• Program Grants
You have been asked to provide an external assessment for one or more application(s). This
is in order to provide impartial advice regarding the application that is being considered for a
grant. In this section we will outline how to:
•
•
•
Accept an invitation and/or declare any conflicts of interest.
Complete your assessment (Project Grants).
Complete your assessment (Program Grants).
3.1. Accept an Invitation and declare any potential conflicts of
interest
The process for accepting an invitation and declaring potential conflicts of interest is outlined
within the invitation emails sent by members of NHMRC’s assigners academy. The emails
contain a link to an external website where you are able to perform the following;
•
•
•
Accept or decline the invitation.
Register any existing conflicts of interest
Request a ruling as to whether an existing conflict is of a high or low level
IMPORTANT NOTE
To assist assigners/NHMRC staff in making accurate rulings please provide as much detail
surrounding your conflict as possible.
Once these steps have been completed the details entered will be imported into RGMS and
depending on your response you will be granted access to the relevant application
documentation within RGMS.
3.2.
Completing an Assessment
You have been asked to assess a grant application in RGMS. You have declared any
Conflicts of Interest and are ready to review the application and complete your assessment.
As you complete the assessment, bear in mind the following:
•
•
Save your work often. RGMS will ‘time out’ after 30 minutes of inactivity and DOES
NOT recognise typing as an activity. A time out will cause you to lose any unsaved
data;
Avoid a time out by completing a draft of your work in an offline document such as
Word, from which you can copy and paste into the RGMS assessment fields.
43
RGMS User Guide – Assessment Processes (Research Community)
IMPORTANT NOTE
When copying and pasting from an offline document such as Word, please note that the
character count used within RGMS differs from that used by Word.
To check that your data fits within the RGMS character limit restrictions please use the
following resource;
http://www.webworldindex.com/countcharacters.htm
The following instructions outline the steps for locating the application documentation and
completing an assessment in RGMS.
1. From the RGMS Home page select the Assessors/Panel Members tab.
Figure 73 – Accessing the Assessors/Panel Members Page
2. Select the Complete my assessments quicklink.
Figure 74 – Complete My Assessments Quicklink
3. Use the lookup field by selecting the binoculars
Enter the round name and select the Filter
and select Add
.
icon to select the relevant round.
button. Select the relevant round
For more information on lookup fields refer to section 3.2.2 Lookup in the RGMS
User Guide – Introduction to RGMS (Research Community).
4. Select the folder
icon for the application you wish to review the documents and
enter an assessment.
44
RGMS User Guide – Assessment Processes (Research Community)
5. Click on the name of the file you require (assessor snapshot, grant proposal etc.) to
open/download the document.
6. Once you have reviewed the required documentation and you are ready to enter your
assessment select the Detail tab
Figure 75 – Accessing the detail tab
7. Select the External Assessment – Part 1 – Selection Criteria link from the menu
on the left.
8. Select Edit Mode from the Actions drop down menu in the upper-right of the screen.
Figure 76 – Edit Mode Option in the Actions Drop Down Menu
Once in Edit Mode, the page will display all selection criteria for this application.
There are editable fields under the Comments column.
9. Enter your comments for each criterion in the Comments fields. It is recommended
comments be copied from another source (i.e. Word document), and pasted into the
Comments fields.
Figure 77
10. Select Save
.
11. Select Display Mode from the Actions drop down menu in the upper-right of the
screen.
12. Select External Assessment – Part 2 – Comments and Verification from the menu
on the left.
13. In the fields provided, enter any additional comments you want to include with this
assessment.
14. From the Verify External Assessment drop down menu select Yes, Assessment is
complete (note: if you haven’t entered all necessary scores or comments, the drop
down list will instead inform you what is missing. You will need to complete the
missing information before returning to this step).
45
RGMS User Guide – Assessment Processes (Research Community)
15. To complete the submission of your assessment, select Submit
.
IMPORTANT NOTE
Once submitted and the verification process is complete, your assessment will be locked and
cannot be altered in any way.
4. Panel Processes
As a panel member you will be required to perform a portion of your duties within RGMS. This
section outlines how to:
•
•
•
•
•
Self-Nominate to Participate in a Peer Review Panel
Download application documents
Declare conflicts of interest and indicate suitability as a spokesperson
Record spokesperson assessments (selected schemes only)
Rescore an application (Project Grants only)
4.1.
Self-nomination for Participation in a Peer Review Panel
The following instructions outline the steps on how to nominate yourself to participate in a
peer review panel for an upcoming funding initiative. Self-nomination is not available at all
times for all schemes. Availability is advertised via Research Tracker when appropriate.
Before starting your self-nomination:
•
•
•
•
Log in to RGMS at https://www.rgms.nhmrc.gov.au
Ensure all keywords in your Profile are accurate.
Ensure NHMRC is aware of any future Peer Review Unavailability. If you need to
update this information:
o Follow steps 1 - 4 below.
o At step 5, select either the sub-menu ‘Pro-RE: Research Interests’ link or
‘Pro-PU: Peer Review Unavailability’ link, as appropriate.
If there is no need to update, follow Steps 1 - 14.
For indicative dates of when peer review panels are expected to meet, refer to the Funding
Scheme Activity Calendar on the NHMRC website at:
http://www.nhmrc.gov.au/grants/funding-calendar/3-month-funding-scheme-activity-calendar
1. Select the ‘My Profile & CV / Account’ tab.
2. From the ‘Quicklinks’ section, select ‘Panel Nomination and Response’.
46
RGMS User Guide – Assessment Processes (Research Community)
Figure 78 – Accessing Panel nomination and response
The ‘Profile and CV List’ page will open:
3. Select the ‘Properties Icon’ to open your profile.
Figure 79 – Accessing the ‘Profile and CV:Profile’ page
4. Select the ‘Profile Tab’ to open the ‘Profile and CV: Profile’ page.
5. Select the sub-menu ‘Pro-PN: Panel Nominations and Invitations’ link.
Figure 80 – Accessing the Panel Nominations and Invitations page
47
RGMS User Guide – Assessment Processes (Research Community)
6. Select ‘New’ to open the ‘Create Panel Nominations and Invitations’ page.
Figure 81 – Accessing the ‘Create Panel Nominations and Invitations’ page
7. From the ‘Initiative’ drop down menu, select the appropriate initiative. (e.g. for
Project Grants, select ‘(Research) Project’ from the list) [At certain times during
the NHMRC funding cycle, there may be no funding initiatives actively accepting
nominations. If that is the case, you will find no options available in the drop
down menu at Step 7.]
8. Select ‘Save’.
Figure 82 – Create Panel Nominations and Invitations
9. A new page - ‘Panel Nominations and Invitations Properties: General’ - will open.
From the ‘Response Type And Closing Date’ drop down menu select the
appropriate entry. [Depending on the initiative selected, either one or two options
may be available at Step 9. If no options are available, the selected initiative is
not currently accepting nominations.]
48
RGMS User Guide – Assessment Processes (Research Community)
Figure 83
10. On the same screen, select ‘Yes’ from the ‘Submit Nomination for GRP
Membership?’ drop down menu, or;
11. If rescinding a previous action, select ‘Yes’ in the ‘I Want to Cancel My
Response’ drop down menu.
12. Use this field if you wish to enter comments with regards to your expertise that
may assist NHMRC.
13. Select ‘Submit’ to send your nomination to NHMRC and return to the ‘Profile and
CV: Profile’ page. [Step 14]. Note - You will not be able to submit a nomination
if the closing date has passed. [Closing date is displayed in the drop down menu
at Step 9.]
Figure 84
14. Refresh your screen, (F5 on a PC – Command-R on a Mac) to display the date
as confirmation your nomination is lodged with NHMRC. Depending on system
activity, you may have to refresh more than once. Additionally, an email will be
sent to you confirming receipt of your nomination.
Figure 85
49
RGMS User Guide – Assessment Processes (Research Community)
4.2.
Download Application Documents
The following instructions outline the steps for utilising the Download All function.
After logging into RGMS follow the steps below to download the application documentation
relevant to your panel.
1. From the RGMS Home page select the Assessors/Panel Members tab.
Figure 86 – Accessing the Assessors/Panel Members Page
2. Select the Review application documents quicklink.
Figure 87 – Review Application Documents Quicklink
3. Select New to create a new download request.
4. Select the relevant Round from the Round drop down menu.
5. Select the appropriate Document Type from the drop down menu;
• Application Summaries – Assessor - download all of the application
summaries (used for declaring CoIs)
• Post COI Declaration Documents – download the full applications (used once
CoIs are complete)
• GRP Documentation - download the full applications with external assessments
and rebutals included (used for Project Grants once the Rebuttal process is
complete).
6. Select Save
.
7. On the left hand menu select the Document Type selected at Step 5.
8. In the Name field, use the lookup function by selecting the
your name and select Add
.
binoculars icon. Select
50
RGMS User Guide – Assessment Processes (Research Community)
For more information on lookup fields refer to section 3.2.2 Lookup in the RGMS User Guide
– Introduction to RGMS (Research Community).
9. Use the Applications For drop down to select the relevant panel.
10. Enter a password in the Password field.
IMPORTANT NOTE
The password must be no more than 20 characters in length. It will be used to gain access to
the downloaded zip file and will be recorded on this page for future reference.
11. Select Yes from the Generate Zip File drop down menu.
12. Select Save
to save your data and generate the zip file. This may take a few
minutes to generate.
The URL link should appear. If not, you may need to refresh the page for the URL to
appear.
13. When the URL is generated, select the hyperlink. You will have 48 hours to download
the zip file.
14. You may be prompted to save or open the zip file. Save the file to your computer.
If an error message appears (e.g. Status 404 Error) or nothing happens when you
select the URL, close the error message, wait five minutes, refresh the page and then
re-select the URL.
15. Open the zip file on your computer using a zip file expander program (such as WinZip
or Peazip [PC] or StuffIt Expander [Mac]). You will be required to enter the password
you entered to open the files. If you are a Mac user and experience difficulties with
this step please refer to section 4.1.1 below.
16. Extract the application documents to a folder on your computer. This will save having
to enter the password each time the documents are opened.
All application documentation will be extracted to the specified file destination. Within the
extracted files will be a document called AAA_(Assessor Name) this document itemises the
applications contained within the generated file, and indicates the currently assigned
assessment type for each one.
4.2.1.
Additional details for Mac users
Macintosh users may experience problems opening downloaded zip files from RGMS. The
problem occurs as the default utility selected by Macs is incompatible with the RGMS zip file.
Mac users need to use Stuffit Expander to read this file, but by default, attempts to use
Archive Utility.
The following steps will allow the zip file’s content to be successfully extracted on a Mac:
1. When the URL is generated, select the Hyperlink. This will download the file and the
Mac operating system will immediately try to decompress the file, and fail.
51
RGMS User Guide – Assessment Processes (Research Community)
2. Use the Finder utility to navigate to the directory where Safari stores downloaded files
(eg /Users/<user ID>/downloads).
3. Highlight the required file.
4. From the File menu in Finder, select Open With and choose StuffIt Expander from the
displayed options.
5. When requested, enter the password previously entered into RGMS when the file
was generated. This field is still visible in RGMS, if confirmation of the value is
required.
6. A subdirectory containing the relevant files will be created in the current directory.
4.3. Declaring Conflicts of Interest and Indicating Suitability as
a Spokesperson.
Before RGMS allows you access to the full set of relevant documentation associated with any
applications, you must first declare any conflicts of interest (CoI). Panel members will be given
access to the full application only if they have no or a low CoI. Where panel members have a high CoI
they will not be granted access to the full details of the application.
1. From the RGMS Home page, select the Assessors/Panel Members tab.
Figure 88 – Accessing the Assessors/Panel Members Page
2. Select the Declare conflicts of interest quicklink.
Figure 89 – Declare Conflicts of Interest Quicklink
52
RGMS User Guide – Assessment Processes (Research Community)
3. Use the lookup field by selecting the
binoculars icon to select the relevant
round. Enter the round name and select the Filter
button. Select the
relevant round and select Add
.
4. The selected funding round now populates the Round field. Select Filter
to update the listed results.The default display on the resulting page
is a list of applications for which you have not yet declared a CoI.
Take note of the All Active Conflicts List section at the bottom of the page.
Although not every possible conflict scenario is included here, many of the
more common High and Low conflicts are displayed to assist you with
determining your level of conflict.
5. In the top-right corner of the screen, click on the Actions drop down menu
and select Edit Mode.
Selecting Edit Mode opens four editable fields for each application. These
fields are:
•
•
•
•
Declaration Complete? – Use this drop down menu to change the
default setting of No to Yes after all other entries for this particular
application are complete.
Are you in Conflict? – The default is set to I have no conflicts. You
can change this by clicking on the
binoculars icon and filtering for an
appropriate selection. If you are uncertain, select I require a ruling.
Details of Conflict – Any CoI, other than I have no conflicts will be
reviewed by NHMRC. Use this field to provide staff with sufficient detail
to assess your level of conflict.
Suitable as SP – Use the drop down menu to best describe your
suitability to act as a Spokesperson on this application:
• Yes – This is within my area of expertise and I would feel
comfortable acting as a spokesperson on this application.
• No – This application falls outside my area of expertise.
• Limited – I have limited expertise in this area
6. Select Save
to save your declarations.
IMPORTANT NOTE
If the conflicts you are declaring occupy more than one page, you must save each page
before advancing to the next. RGMS will not save any data if you move to another page
without saving.
To verify that your declarations have been recorded in RGMS, return to the top of the page
and follow these steps:
7. From the Actions drop down menu, select Display Mode.
8. From the Declaration Complete? drop down menu, select No.
9. Select Filter
.
The text No items to display should appear in the filtered results section, indicating that
there are no further applications for which you need to declare conflicts. If applications
continue to appear in the filtered results you will need to repeat steps 5 and 6 in relation to
those applications until No items to display appears in the filtered results.
53
RGMS User Guide – Assessment Processes (Research Community)
4.4.
Spokesperson Assessments (Selected Schemes Only)
IMPORTANT NOTE
This section only applies to spokespersons participating in the following schemes:
• Project Grants
• Research Fellowships
• Practitioner Fellowships
• Translating Research Into Practice (TRIP) Fellowships
• Program Grants
• Partnership Projects
As a spokesperson for one of the above schemes, you will need to submit your rating and
comments in RGMS for all applications assigned to you.
As you complete the assessment, bear in mind the following:
•
•
Save your work often. RGMS will ‘time out’ after 30 minutes of inactivity and DOES
NOT recognise typing as an activity. A time out will cause you to lose any unsaved
data;
Avoid a time out by completing a draft of your work in an offline document such as
Word, from which you can copy and paste into the RGMS assessment fields.
The following instructions outline the steps for completing an assessment in RGMS.
1. From the RGMS Home page select the Assessors/Panel Members tab.
Figure 90 – Accessing the Assessors/Panel Members Page
2. Select the Complete my assessments quicklink.
Figure 91 – Complete My Assessments Quicklink
54
RGMS User Guide – Assessment Processes (Research Community)
3. Use the lookup field by selecting the binoculars icon to select the relevant round.
Enter the round name and select the Filter
button. Select the relevant round
and select Add
.
4. Select the properties icon
assessment.
of the application for which you want to enter an
5. Select the Panel/SP Assessment – Part 1 – Selection Criteria link from the menu
on the left.
6. Select Edit Mode from the Actions drop down menu in the upper-right of the screen.
Figure 92 – Edit Mode Option in the Actions Drop Down Menu
Once in Edit Mode, the page will display all selection criteria for this application.
There are editable fields under the Criteria Score and Comments columns.
7. Enter the application scores in the Criteria Score fields.
8. Enter the comments for the application in the Comments field. It is recommended
that comments be copied from another source (i.e. Word document), and pasted into
the Comments field.
9. Select Save
.
10. Select Display Mode from the Actions drop down menu in the upper-right of the
screen.
11. Select Panel/SP Assessment – Part 2 – Comments and Verification from the
menu on the left.
12. In the fields provided, enter any Budget Comments and/or Overall
Comments/Questions you want to include with this assessment.
13. From the Verify External Assessment drop down menu select Yes, Assessment is
complete.
14. To complete the submission of your assessment, select Submit
.
IMPORTANT NOTE
Once submitted and the verification process is complete, your assessment will be locked and
cannot be altered in any way.
55
RGMS User Guide – Assessment Processes (Research Community)
4.4.1.
Rescoring an application (Project Grants Only)
IMPORTANT NOTE
This section only applies to spokespersons participating in the following schemes:
• Project Grants
The following instructions outline the steps for completing rescoring of an application following
applicant responses.
After logging into RGMS follow the steps below to rescore applications following the applicant
response relevant to your panel and/or assessments:
1. From the RGMS Home page, select the Assessors/Panel Members tab.
Figure 93 – Accessing the Assessors/Panel Members Page
2. Select the Complete my assessment/s link from the menu on the left.
Figure 94 – Complete My Assessments Quicklink
3. Use the lookup field by selecting the binoculars icon to select the relevant round.
Enter the round name and select the Filter
button. Select the relevant round
and select Add
. Entering the Panel field at the bottom-right is optional.
4. Select the properties icon
to open the assessment.
5. Click the Detail tab.
6. Select Update Final Score from the menu on the left.
7. Select the New
button
56
RGMS User Guide – Assessment Processes (Research Community)
8. Select Selection Criteria Type from the drop down box.
9. Select the Selection Criteria to Update from the drop down box.
10. Select the New Final Score from the drop down box.
11. Select the Submit
button
The score will now be updated for this specific selection criterion. Repeat the process from
step 5 to alter any of the scores within the same application.
5. Applicant Rebuttal
IMPORTANT NOTE
This function is available to applicants and research administration officers (RAO) only.
When all assessments are in the system, you will receive an email advising that rebuttals are
due. That email will contain the assessors’ comments and questions, as well as instructions
on the format you are to follow in preparing a word document with your rebuttal comments.
That document will then be uploaded as a PDF into RGMS and submitted to NHMRC. This
section will outline the following:
•
•
•
•
Viewing assessor comments
Completing and submitting your response
Authorising an RAO to submit rebuttal comments on your behalf
Submitting rebuttal comments on an applicants behalf (RAO’s)
5.1.
Viewing assessor comments
In order to complete your rebuttal you will need to access the initial comments from the
spokesperson.
1. From the RGMS Home page, select the Applicants tab.
Figure 95 – Accessing the Applicants Page
57
RGMS User Guide – Assessment Processes (Research Community)
2. Select the Upload my rebuttal quicklink.
Figure 96 – Upload My Rebuttal Quicklink
3. Use the filters to select the relevant initiative in the Initiative drop down menu and
select the Filter
button.
For further information refer to the RGMS User Guide – Introduction to RGMS
(Research Community) section 3.2.1. Filtering.
4. Click on the properties icon
5. Select the folder icon
result.
5.2.
next to your application.
in the Letter of Results column to open your letter of
Completing and submitting your response
After viewing the assessor comments you are able to submit a response. This response
consists of a document that you attach to the application. When you have prepared the
written response follow the steps below to upload the document.
1. From the RGMS Home page, select the Applicants tab.
Figure 97 – Accessing the Applicants Page
58
RGMS User Guide – Assessment Processes (Research Community)
2. Select the Upload my rebuttal quicklink.
Figure 98 – Upload My Rebuttal Quicklink
3. Use the filters to select the relevant initiative, round and application ID and select the
Filter
button.
4. Select the properties icon
to access the relevant application. The new screen will
be opened up on the Results tab.
5. Select the Rebuttal tab.
6. Select the Rebuttal link from the menu on the left.
7. Select the Browse
uploaded.
button, navigate to and select the document to be
8. In the dropdown box next to the Completion of Rebuttal field select Yes, Submit
my response to NHMRC.
9. Select Submit
.
An automated email from RGMS will be generated notifying the CIA (and RAO if the RAO
submitted on behalf of the CIA) that the rebuttal has been successfully submitted.
5.3. Authorising an RAO to submit rebuttal comments on your
behalf
It may be necessary for the RAO to submit the rebuttal on your behalf. This topic outlines how
to enable the RAO to submit the rebuttal.
59
RGMS User Guide – Assessment Processes (Research Community)
1. From the RGMS Home page, select the Applicants tab.
Figure 99 – Accessing the Applicants Page
2. Select the Upload my rebuttal quicklink.
Figure 100 – Upload My Rebuttal Quicklink
3. Use the filters to select the relevant initiative, round and application ID and select the
Filter
button.
4. Select the properties icon
to access the relevant application. The new screen will
be opened up on the Results tab.
5. Select the Rebuttal tab.
6. Select the Allow RAO To Submit Response link from the menu on the left.
7. Select the relevant Administering Institution from the drop down menu.
8. Select Yes for the I Authorise The RAO(s) At This Institution To Attach And
Submit My Response drop down menu.
9. Select Submit
.
After the submit button is clicked, the RAO(s) will be able to upload and submit the rebuttal
response document on behalf of the CIA. The CIA and the RAO will receive an automated
notification of submission email once the document has been successfully submitted.
60
RGMS User Guide – Assessment Processes (Research Community)
5.4. Submitting rebuttal comments on an applicant’s behalf
(RAOs)
As an RAO it may be required that you submit a rebuttal on behalf of one of your applicants.
1. From the RGMS Home page, select the RAO/Finance Officers tab.
Figure 101 – Accessing the RAO/Finance Officers Page
2. Select the Submit Rebuttals on behalf of CIAs quicklink.
Figure 102 – Submit Rebuttals on behalf of CIAs Quicklink
3. Use the filters to select the relevant initiative, round and application ID and select the
Filter
button.
4. Select the properties icon
to access the relevant application. The new screen will
be opened up on the Results tab.
5. Select the Rebuttal tab.
6. Select the Rebuttal link from the menu on the left.
7. Select the Browse
uploaded.
button, navigate to and select the document to be
8. In the dropdown box next to the Completion of Rebuttal field select Yes, Submit my
response to NHMRC.
9. Select Submit
.
An automated email from RGMS will be generated notifying the CIA and RAO that the rebuttal
has been successfully submitted.
61
RGMS User Guide – Assessment Processes (Research Community)
62