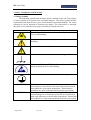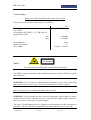
1
W5 User Guide
W5
WDM Laser Interrogator
User Guide and
SmartSoft Interface Instructions
SENSE THE FUTURE
abcdef
Document Ref:
7032-3000-A
Document Date:
03 April 2007
Prepared by:
K M Jones
Approved by:
C B Staveley
Smart Fibres Ltd · 12 The Courtyard · Eastern Road · Bracknell · RG12 2XB · United Kingdom
Email: [email protected] · Web: www.smartfibres.com
Tel: +44 1344 484111 · Fax: +44 1344 423241
Directors: C Staveley · A Melrose · Registered in England: 3563533 · VAT Registration No: GB723426060
Registered Office: 10 New Square · Lincoln's Inn · London · WC2A 3QG · United Kingdom
Certificate No: LRQ 4003532
Page 1 of 47
03 April 2007
7032-3000-A
W5 User Guide
Page
Features
5
1. Safety, Compliance, and Warranty
6
1.1 Safety Symbols
6
1.2 Line Power
7
1.3 Signal Outputs and Peripherals
7
1.4 Laser Safety
8
1.5 Compliance Information
10
1.6 Warranty and Calibration Information
11
1.7 Preventative Maintenance
11
2. Specifications
12
2.1. Optical Specifications
12
2.2. Mechanical, Environmental and Electrical Specifications
12
3. Front Panel Operation
13
3.1 Electrical Connections
13
3.2 Communication Ports
14
3.3 Optical Connections
14
3.4 LED Indicators
14
3.5 VGA Connection
14
4. Specifications Definitions and Test Methodology
15
4.1 Wavelength Accuracy
15
4.2 Repeatability
16
4.3 Stability
16
4.4 Resolution
16
4.5 Reproducibility
17
5. TCP-IP Control Interface
18
5.1 Configuration
18
5.2 Communication Protocol
18
6.0. Introduction to the SmartSoft Interface
19
6.1 Set Up
19
6.2 Installing the SmartSoft Interface
19
6.3 Prepare the W5 for use
19
6.4 Setting the IP Address of the host PC
20
6.5 Running the SmartSoft W5 Interface
21
6.6 Changing the IP settings of the W5
21
Page 2 of 47
03 April 2007
7032-3000-A
W5 User Guide
7.0 Using the SmartSoft Interface
22
7.1 Description
22
7.2 Data Retrieval
22
7.3 SmartSoft – the Remote Graphical User Interface
22
7.4 Starting the SmartSoft Interface
22
7.5 Selecting the IP Address
23
7.6 Retrieving a Reference set
24
7.7 General Parameters
25
7.8 Plot Table
26
7.9 Reference Slide Switch
27
7.10 Data Log Panel
28
7.11 Multi-Plot Graph View
29
7.12 Profile View
30
7.13 Table View
31
7.14 Temperature View
32
7.15 Conversions View
33
7.16 Graphic View
34
7.17 Channel Setting View
35
7.18 Closing the SmartSoft Interface
37
7.19 Changing the IP settings of the W5
38
7.20 Recovering lost IP settings of the W5
38
8.0 Mechanical Drawings and Rack Mounting Considerations
39
8.1 Mechanical Drawings
39
8.2 Mounting Options
41
Appendix A – Configuring TCP-IP Settings for W5 Communication
42
Appendix B – Troubleshooting
46
Document Revision History:
Issue
A
(this document)
Page 3 of 47
Issue Date
03 April 2007
03 April 2007
Change
New document
7032-3000-A
W5 User Guide
FIGURES
Page
2.1 Table of Optical Specifications
2.2 Table of Mech. Elec. & Environmental Specifications
3.1 W5 Front Panel
7.1 Selecting the IP address of the W5
7.2 Retrieving a Reference Set
7.3 General Parameters
7.4 Plot Table
7.5 Reference Set Slide Switch
7.6 Reference Set Slide Switch
7.7 Data Log Panel
7.8 Plot View
7.9 Profile View (FFT)
7.10 Table View
7.11 Temperature View
7.12 Conversions View
7.13 Graphic View
7.14 Channel Settings View
7.15 Saving a Reference Set
7.16 Changing IP settings
8.1 W5 Enclosure
8.2 Front Panel Diagram
8.3 Rear Panel Diagram
8.4 Side Panel Diagram
8.5 Flat Mounting Bracket
Page 4 of 47
03 April 2007
12
12
13
23
24
25
26
27
27
28
29
30
31
32
33
34
35
37
38
39
39
40
40
41
7032-3000-A
W5 User Guide
Features
●
●
●
●
●
●
●
●
High output power, swept laser source
Fast 1 kHz sweep rate
High Resolution and Repeatability
Excellent thermal and long-term stability
Compact, rugged and portable
Ethernet remote control and data transfer
Optional optical spectrum mode
Optional 16 channel expansion module
Applications
● Continuous monitoring of structural health of structures such as ship hulls,
and aircraft.
● Dynamic measurement of high speed events such as impacts or vibrations on
a variety of structures.
● Down-hole Oil well pressure and temperature sensing
● Deep-sea platform riser monitoring
Description
Smart Fibres’ W5 is a compact interrogator specifically designed for rapid,
accurate measurements of up to hundreds of optical sensors in real time. Using a
high power swept laser the W5 can interrogate up to 500 Fibre Bragg Grating
sensors simultaneously at scan rates of 100 Hz, 500 Hz or 1000 Hz with <0.2
pm (<0.25 µstrain) resolution and 5 pm (6 µstrain) repeatability over time and
its 0 to 50 °C temperature range.
The Ethernet based SmartSoft Interface can be used on a personal computer
making data collection and analysis fast and easy. The LabVIEWTM SmartSoft
Interface provides many display options for wavelength, temperature, pressure,
displacement, etc.
Rugged applications are also served well by the W5. It is designed and tested
for long-term operation in extreme temperatures like those found at many
measurement sites.
With a dynamic measuring range of 25 dB the W5 can be used with an optional
expansion module providing up to 16 channels and increasing the potential
sensor count to 2000. The W5 instrument is UTC licensed for use in sensing
applications with Fibre Bragg Gratings.
Page 5 of 47
03 April 2007
7032-3000-A
W5 User Guide
1. Safety, Compliance, and Warranty
1.1 Safety Symbols
The following symbols and messages may be marked on the unit. The purpose
of safety symbols is to alert the user to possible dangers. The safety symbols and the
explanations with them deserve your careful attention and understanding. The safety
warnings do not by themselves eliminate any danger. The instructions or warnings
they give are not substitutes for proper accident prevention measures.
Symbol
Description
Laser Safety. Refer to user’s manual for safety instructions
for use and handling.
Refer to user’s manual for safety instructions for use and
handling.
Caution. Risk of electric shock.
Frame or chassis terminal for electrical earth ground.
Electrostatic discharge (ESD). Refer to user’s manual for
safety instructions in use and handling.
Protective conductor terminal for electrical earth ground.
WARNING
CAUTION
Page 6 of 47
This sign indicates a procedure with the potential to cause
serious injury or loss of life to the user if not performed with
strict adherence to all safety instructions. Ensure that all
conditions are fully understood and met before proceeding.
This sign indicates a procedure with the potential to cause
serious damage to or destruction of the unit if not performed
with strict adherence to the all safety instructions. Ensure that
all conditions are fully understood and met before proceeding.
03 April 2007
7032-3000-A
W5 User Guide
1.2 Line Power
WARNING: If equipment is used in a manner not specified by the manufacturer, the
protection provided by the equipment may be impaired.
The W5 can operate from any DC power supply that supplies 7 to 36V with a power
rating of 50W or more.
WARNING: To avoid possibility of injury or death, do not operate any electrical
device with visible damage to power supply, line cord, or outer enclosure.
CAUTION: Do not expose the unit directly to rain or other excessive moisture.
IMPORTANT – CONNECTING POWER TO THE W5
The W5 is equipped with a 3 pin removable terminal block connector that is intended
for fixed wiring applications. It is therefore extremely important that the power is
applied in the correct sequence:
1. With the W5’s power switch in the OFF position…
2. Connect the power supply leads to the terminal block.
3. Plug the power connector block in to the front panel of the W5.
4. Secure the 2 retaining screws.
5. Switch on the power at the source.
6. Move the W5’s power switch to the on position.
If the front panel power connector needs to be removed the W5’s power switch must
be in the OFF position before disconnection or reconnection. The power connection
terminal is not designed to be used as a method of switching the W5 on or off.
It is recommended that the W5 is protected by a qualified transient protection device.
1.3 Signal Outputs and Peripherals
The only peripheral port required for normal operation is the RJ-45 Ethernet socket.
Additional Ports:
VGA:
Can provide limited diagnostic information to a VGA monitor,
including the IP parameters of the W5.
DIAG:
Factory use only
USB:
Factory use only, or future options.
8 pin DIN:
Used for W5 accessories such as the Channel Expansion Module.
Sync In:
SMA connector which can be used for synchronising trigger signals
among multiple W5s or triggering to an external sync signal.
Sync Out
SMA connector which can be used for synchronising trigger signals
among multiple W5s or triggering external acquisition equipment.
Page 7 of 47
03 April 2007
7032-3000-A
W5 User Guide
1.4 Laser Safety
Initial Laser Safety Information for Swept Laser Source
The specifications for these instruments are as follows:
W5
Fibre Laser
1
Laser Type
Laser Class
(According to IEC 60825-1, 21 CFR 1040.10)
Output Power (CW)
min
max
Beam Diameter
Numerical Aperture
Wavelength
>0.06mW
<0.25mW
9mm
0.1
1510nm – 1590nm
NOTE:
The laser safety warning labels are fixed on the instrument.
You MUST return instruments with malfunctioning lasers to Smart Fibres for repair
and calibration.
WARNING: Use of controls or adjustment of performance or procedures other than
those specified for the laser source may result in hazardous radiation exposure.
Refer servicing only to qualified and authorized personnel.
WARNING: Do not enable the laser (turn on instrument) when neither an optical
connector nor FC/APC connector cover is connected the optical output connector.
Refer to section 8 for location of optical outputs.
The laser is enabled when power is supplied to the instrument and the instrument is
initialised. The red LED on the instrument from panel indicates power is present.
Page 8 of 47
03 April 2007
7032-3000-A
W5 User Guide
WARNING: Under no circumstances look into the end of an optical cable attached
to the optical output when the device is operational.
WARNING: The laser radiation is not visible to the human eye, but it can seriously
damage your eyesight.
CAUTION: Connecting damaged or dirty fibres to the unit can damage the optical
connectors on the unit.
CAUTION: Never force-fit an optical connector.
damage the unit.
A ferrule may break off and
CAUTION: Do not attempt to connect an FC/PC or FC/UPC optical connector to the
front panel mount FC/APC connectors of the W5. Such mismatched connections can
lead to malfunction or even damage of the module.
Page 9 of 47
03 April 2007
7032-3000-A
W5 User Guide
Follow standard guidelines for cleaning optical fibres.
1. Fold a lint-free wipe into a compress.
2. Moisten the compress with isopropyl alcohol.
3. Remove the connectors protective cover.
4. Press the connector end face firmly to the moistened section of the
compress for a moment, then forcefully wipe the end with a twisting motion
towards the edge of the compress, finishing in a clean, dry section of the
compress. Repeat process, making sure to not reuse dirty sections of the
compress.
5. Discard the used compress.
NOTE: In order to maintain optimal measurement performance of the W5, the front
panel optical connectors must be kept clean. Use of an In-Adapter Ferrule Cleaner is
recommended periodically. Please contact Smart Fibres to purchase or receive a
recommendation for an appropriate ferrule cleaner.
1.5 Compliance Information
Compliance Testing on the W5 module is underway. Successful completion of the
scheduled tests allow for the following claims:
“This product complies with Part 15 of the FCC Rules. Operation is subject
to the following two considerations: (1) This device may not cause harmful
interference, and (2) this device must accept any interference received,
including interference that may cause undesired operation.
This product complies with Emissions Standard EN61326-1, Subpart B Rules
and Regulations Class A limits, EN61000-3-2 and EN61000-3-3.
This product complies with Immunity Standard EN61326-1 (2000).
This product complies with Safety Standard EN61010-1.
This product complies with 21 CFR Subchapter J.
This product complies will all applicable European Normatives and is CE
compliant.”
Page 10 of 47
03 April 2007
7032-3000-A
W5 User Guide
1.6 Warranty and Calibration Information
Smart Fibres offers excellent warranty protection for all components, modules
and instruments sold.
The Smart Fibres W5 Optical Sensing Interrogator is designed with long-term
field deployment in mind. Continual on-board calibration procedures using epoxyfree, Telcordia qualified optical referencing components and/or NIST Standard
Reference Materials ensure that sensor wavelength measurements remain within
specification over the life of the product.
1.7 Preventative Maintenance
The W5 is equipped with a system of redundant MTBF ball bearing cooling fans with
an externally mounted, user accessible particle filter. The user should periodically
monitor the degree of particulate accumulation and take steps to clean the filter when
appropriate.
As seen in figure 8.4, the externally mounted filter can be removed by first removing
the four screws of the filter surround. The filter should then be cleaned, away from
the W5, by using forced air in the opposite direction to the airflow when fitted to the
W5.
Page 11 of 47
03 April 2007
7032-3000-A
W5 User Guide
2. Specifications
2.1. Optical Specifications
Parameter\Model
Number of Optical
Channels
Wavelength Range
Scan Frequency
Wavelength
Repeatability1
Wavelength Stability2
Dynamic Range3
Max sensors / channel4
Optical Connectors
W5-7
4
W5-5
4
W5-2
1
(up to 16 with
expansion module)
(up to 16 with
expansion module)
(up to 16 with
expansion module)
1510-1590 nm
1510-1590 nm
1520-1570 nm
1000 Hz
500 Hz
100 Hz
1 pm at 1000Hz, 0.5 pm at 250Hz or
0.05 pm with 1000 avgs
2 pm typical, 5 pm max
25 dB (with per channel user-selectable gain)
125
FC/APC (others available)
Table 2.1: Optical Specifications
1
2
3
4
Defined as per NIST Technical Note 1297, 1994 Edition, Section D.1.1.2
Captures effects of long term use over full operating temperature range of the instrument
Defined as Laser launch power minus detection noise floor. Adjustable 15dB window within total range
Maximum of 50000 sensor readings per second.
2.2. Mechanical, Environmental and Electrical Specifications
Mechanical
Dimensions
Weight
Optical Connector Ports
267mm x 132mm x 135mm
~ 2.5 kg
FC/APC (others available)
Environmental
For Indoor Use, Altitude up to 2000 meters
0°C to 50°C
Maximum relative humidity 80% for temperatures up to
31°C decreasing linearly to 50% relative humidity at 40°C.
-20°C to +70°C
0 to 95% @40°C max, non-condensing
Operating Temperature
Operating Humidity
Storage Temperature
Storage Humidity
Electrical
Input Voltage
Power Consumption
Communication Protocol
7 to 36 Vdc (or 100 - 240Vac using supplied AC/DC PSU)
25W typical, 50W Max
Ethernet (TCP-IP) using custom Smart Fibres command set
Table 2.2: Mechanical, Environmental and Electrical Specifications
Page 12 of 47
03 April 2007
7032-3000-A
W5 User Guide
3. Front Panel Operation
Figure 3.1 A front panel view of the W5 Optical Sensing Interrogator
3.1 Electrical Connections
The W5 module is powered with 7 to 36Vdc. The unit can be run from any 7V to
36V DC power supply capable of providing 50 W of power. The W5 module is also
available with an external AC adapter which accepts an input voltage ranging from
100-240 Vac within a frequency range of 47 to 63Hz. The W5 is equipped with a
power switch and a 3 pin removable terminal block connector that is intended for
fixed wiring applications. It is therefore extremely important that the power is applied
in the correct sequence:
1. With the W5’s power switch in the OFF position…
2. Connect the power supply leads to the terminal block.
3. Plug the power connector block in to the front panel of the W5.
4. Secure the 2 retaining screws.
5. Switch on the power at the source.
6. Move the W5’s power switch to the on position.
If the front panel power connector needs to be removed the W5’s power switch must
be in the OFF position before disconnection or reconnection. The power connection
terminal is not designed to be used as a method of switching the W5 on or off.
It is recommended that the W5 is protected by a qualified transient protection device.
Page 13 of 47
03 April 2007
7032-3000-A
W5 User Guide
3.2 Communication Ports
A LAN connection on the front of the W5 facilitates an Ethernet TCPIP connection.
USB, RS-232, and RS-485 are available as options or for use in OEM configurations,
or for use by the W5 Processing Module, available from Smart Fibres Ltd.
3.3 Optical Connections
The W5 is available with any number of optical connections from 1 to 4. These
FC/APC connectors can be located on the right side of the module front panel. Care
should be taken to use only clean APC connectors. Dirty or mismatched connectors
will cause degradation in performance and may damage unit. Front panel-mounted
FC/APC connectors should be periodically cleaned to maintain optimal performance.
An additional channel expansion module can be purchased from Smart Fibres to
increase the number of channels to 8 or 16.
3.4 LED Indicators
Three LED indicators can be found on the upper left side of the W5 front panel.
These indicators communicate the current status of the module to the user. Located
on the far left, the red “Power” indicator will illuminate when electrical power is
supplied to the unit. The centre indicator in the cluster is and a green LED labelled
“Ready.” This LED will illuminate when the module has completed its boot up and
initialisation sequence. Illumination of this LED is a signal to the user that remote
communication can begin. When remote communication is active, the third and
rightmost indicator in the cluster will activate. The amber “Client” LED is an
indication that a client is actively connected to the module.
3.5 VGA Connection
The W5 front panel has a VGA connection. Plugging a VGA monitor into this
connection will permit viewing of limited diagnostic information during boot up, most
usefully the TCP-IP settings of the W5 are displayed at the end of the boot up
sequence.
Page 14 of 47
03 April 2007
7032-3000-A
W5 User Guide
4. Specifications Definitions and Test Methodology
4.1 Wavelength Accuracy
Defined as “accuracy of measurement”, per NIST Technical Note 1297, 1994 Edition,
Section D.1.1.1, the “closeness of the agreement between the result of a measurement
and the value of the measurand.”
Accuracy is here reported as the standard uncertainty of the distribution of
measurements made over the course several minutes, relative to the NIST Standard
Reference Material 2519, as described in NIST Special Publication 260-137. Of the
HCN lines characterized by NIST, those used in the qualification of our spectral
interrogators are the 21 lines certified by NIST (or a subset thereof) with an expanded
uncertainty (coverage factor k=2) of +/-0.0006nm.
To be consistent with the sensing and telecom industries’ expectation of low
distribution and low systematic error of wavelength measurements, we enhance its
definition of Wavelength Accuracy to a more stringent definition that includes a
component of “systematic error”, defined in NIST Technical Note 1297, Section
D.1.1.6. Here, “systematic error” is defined as the “mean that would result from an
infinite number of the same measurand carried out under repeatability conditions
minus the value of the measurand.” Here, again the measurand is NIST SRM 2519.
In total, the Wavelength Accuracy reported for our spectral interrogators is the
absolute value of the “systematic error” plus the standard uncertainty of the “accuracy
of measurement,” or |µ
µ| + σ of the series of wavelength measurements made on the
atomic absorption NIST Standard Reference Material 2517. In order to eliminate
stability effects of peak detection which might influence the accuracy measurement,
averaging of the spectrum prior to peak detection is performed.
In addition to the measurements made relative to the atomic absorption references,
measurements are made on Fabry-Perot artefacts which provide spectral features
across the full measurement wavelength range of the Equipment Under Test (EUT).
The Fabry-Perot artefacts are characterized using a method similar to that by which
NIST determines absolute wavelengths for the gas absorption SRMs (see NIST
Special Publication 260-137.) By the fundamentals of operation, the Fabry-Perot
elements exhibit a high degree of linearity in the frequency domain, limited to ~1pm
by chromatic dispersion. This behaviour is used to ensure frequency measurement
linearity, and thus relative wavelength accuracy, outside of the wavelength ranges
that can be measured using the NIST SRMs.
Note: For high speed interrogators employing analogue peak detection, such as the
W5, the exact reported wavelength can be a function of the spectral profile of the
sensor itself. For this reason, performance for the W5 is reported only in terms of
repeatability, stability and reproducibility.
Page 15 of 47
03 April 2007
7032-3000-A
W5 User Guide
4.2 Repeatability
Defined as “Repeatability (of results of measurements)”, per NIST Technical Note
1297, Section D.1.1.2, the “closeness of the agreement between the results of
successive measurements of the same measurand carried out under the same
conditions of measurement,” called “repeatability conditions.”
“Repeatability conditions” include using the same measurement procedure, the same
observer, the same measuring instrument used under the same conditions (constant
temperature), the same location, and repetition over a short period of time.
In the interest of making such measurements most applicable to the users of our
products, the test artefact selected for the Repeatability test is representative of a
typical sensor which might be used, of bandwidth ~0.1nm, high reflectivity. Repeated
measurements are made on the artefact by the EUT over the course of minutes, and
the standard uncertainty (1 σ distribution) of the resulting measurements is reported as
the Repeatability.
In order to address multiple likely applications, the Repeatability may be reported at
multiple data rates or averaging conditions (e.g. @ 250 Hz with no averaging, or at
10Hz with 25 averages per data point.)
4.3 Stability
In order to enhance the utility of the Accuracy and Repeatability specifications, a
specification called Stability has been added. The Stability specification captures
effects of operating temperature and longer term testing of the EUT, involving a
minimum of one thermal cycle over the operating temperature of the device.
The measurement for stability involves capturing data on an artefact of sufficient
stability with optical features that cover the full measurement wavelength range of the
EUT, such as a Fabry-Perot Etalon.
The agreement between successive
measurements is recorded over wavelength, time, and temperature. The resulting 1 σ
distribution is calculated and reported as the Stability of the EUT.
In the measurements and calculations used for computing the Stability parameter, no
data averaging is employed.
4.4 Resolution
To be derived by user for specific applications based upon stability and repeatability
specifications.
Page 16 of 47
03 April 2007
7032-3000-A
W5 User Guide
4.5 Reproducibility
Defined as “reproducibility (of measurement results)”, per NIST Technical Note
1297, Section D.1.1.3, the “closeness of agreement between the results of
measurements of the same measurand carried out under changed conditions of
measurement.”
Here, the “changed conditions” include a different observer, measurement instrument,
or time. In principle, this specification is intended to ensure that a given measurand
could be measured by multiple spectral interrogators using the same data analysis
tools at different times and by different users, and achieve measurement results that
are consistent within the Reproducibility specification.
In order to quantify the reproducibility of measurements from a particular class of
instruments, a complete Wavelength Accuracy analysis is made on each, and a mean
“error of measurement” is calculated. This “error of measurement” is defined by
NIST Technical Note 1297, Section D1.1.4, the error (of measurement)”, and is
measured relative to NIST SRM 2519. The reproducibility is then defined as the
standard deviation of the set of “error” measurements across a sample of measured
instruments.
Page 17 of 47
03 April 2007
7032-3000-A
W5 User Guide
5. TCP-IP Control Interface
This section contains brief information about how communications between the W5
and a host PC are achieved. In general communications are handled by the SmartSoft
interface suite. Users do not generally need to be concerned with the TCP-IP
command set unless they would like to write their own bespoke interface program. In
which case a Command Set Manual can be requested from Smart Fibres. Details for
the SmartSoft interface can be found in section 6.0
5.1 Configuration
Data transfer to and from the W5 is through a 100Mbit/S Ethernet port on the front of
the unit. The unit can be connected to an existing network through a hub or it can be
connected directly to a host PC using a crossover Ethernet cable. This latter
configuration maximizes data throughput. Either arrangement requires that the W5
and the host be on the same logical network. The network administrator can assure
this by providing an appropriate static IP address and Net mask for the W5. These
values can be configured using the SmartSoft interface, see Section 7.7 and Section
7.19 of this manual.
The W5 supports bi-directional communication through a data socket (port #1852).
NOTE: The default IP address and Net mask for the W5 are 10.0.0.126 and
255.255.255.0, respectively.
5.2 Communication Protocol
Commands and inquiries to the W5 are in the form of ASCII strings that begin with a
# character and end with a linefeed (ASCII char 10 [0x0a in hex, ‘\n’ in C, vbLf in
Visual Basic]). All characters sent to the W5 are internally buffered until a linefeed
character is detected. Once the W5 receives the linefeed, it then interprets all the
buffered data that preceded the linefeed. In response to the received data, the W5 will
first return a 10-byte ASCII string. This 10-byte string is not a response to the
submitted command or inquiry. Rather, the 10-byte string representing the number
bytes contained in the response to the command. This is the number of bytes that the
host is expected to read in addition to the first 10 bytes. The example below
illustrates the point:
host:
W5:
W5:
#GET_IP_ADDRESS<LF>
0000000010
10.0.0.126
In this example, the host has issued the #GET_IP_ADDRESS command to the W5.
This command is used to retrieve the IP address used by the W5. In response to this
command, the W5 first submits the 10-byte string “0000000010” indicating that the
response to the command is 10 bytes long. The W5 then submits the 10-byte string “
10.0.0.126” to the host. Thus, for every command written to the W5 by the host, the
host must make 2 reads. The first read is always 10 bytes long. The second read has
a variable length dictated by the first. Note that this protocol is followed whether or
not the data sent to the W5 is a valid command.
Page 18 of 47
03 April 2007
7032-3000-A
W5 User Guide
6.0. Introduction to the SmartSoft Interface
Features
Graphical Display of sensor peak readings
Real-time Data logging facility
Conversion to customer defined measurement units
Sensor Amplitude display
Setting Channel Gain and Averaging for the W5.
Graphic display of Customer Application
Applications
Present data collected from W5 interrogator
Configuration W5 interrogator
Description
The SmartSoft W5 Remote Interface allows the user to visualise the data collected
from the W5 interrogator. Sensor data can be displayed in table form, as a graph or as
a visual representation of the physical application.
Other features include the ability to log data and create files that are compatible with
common Microsoft OfficeTM programs.
Many other features can be added based on individual customer requirements. Please
contact Smart Fibres for further details.
6.1 Set Up
The SmartSoft Remote Interface requires a host PC running a Windows 2K or XP
operating system and fitted with an RJ45 Ethernet port. To guarantee maximum data
transfer, Smart Fibres recommends the PC should have a 2GHz processor and 1GByte
of RAM. The W5-2 can be used with a reduced spec. host PC, additionally the scan
rate of the W5-7 and W5-5 can be reduced in order to work with a reduced spec. PC.
6.2 Installing the SmartSoft Interface
From the CD find the Set Up program and double click it. Follow the on-screen
installation instructions.
6.3 Prepare the W5 for use
Power the W5 using the supplied AC to DC power pack or with a 50W, 7 to 36Vdc
supply. See section 3.1 for details.
Using the provided cross-over Ethernet cable, connect the W5’s Ethernet port to the
Ethernet port of the Host PC.
Page 19 of 47
03 April 2007
7032-3000-A
W5 User Guide
The W5 and the host PC must be on the same Ethernet subnet, usually this means that
the first 3 segments of the Internet Protocol (IP) address must be the same whilst the
last segment should be different. Consult your local Network Administrator for
further details.
If the host PC is connected to a Local Area Network (LAN) disconnect the Ethernet
cable to the LAN and plug in the cross-over Ethernet cable from the W5.
Later when the W5’s IP settings have been configured it can be connected to the LAN
using a straight-through Ethernet Cable but for initial configuration the crossover
cable must be used.
6.4 Setting the IP Address of the host PC
See also Appendix A - Configuring the IP settings of the PC.
Windows XP
•
•
•
•
•
•
•
•
•
•
•
•
•
•
•
•
Click Start > Connect To > Show All Connections
Select Local Area Connection
Right click on the connection and select Properties
In the Properties Window select Internet Protocol TCP/IP
If there is more than one TCP/IP connection ensure you select the Network
card that is to be used with the W5, ask your Local Network Administrator for
details.
For the TCP/IP connection press the properties button.
Select the Alternate configuration Tab.
Set the User Configuration check box.
Enter the IP address segments, usually the first 3 segments will be identical to
the W5’s IP address, the last segment should be different to that of the W5.
Enter the subnet mask, usually the first 3 segments will be 255 and the last
segment will be 000. You should check this with your Local Network
Administrator if you are unsure.
Leave all the other parameters blank and press the OK button.
Close the Local Area Connection Properties Window.
In the Network Connections Window right click on the Local Area
Connection.
Select Disable. Ensure that the PC is disconnected from the LAN and
connected to the W5.
When the Status changes to Disabled right click again on the Connection and
select Enable. After 60 seconds the PC should establish a connection with the
W5. This can be confirmed by right clicking the connection and selecting
Status and choosing the Support Tab. You should see the IP details that you
entered for the Alternate Configuration.
Close the Network Connections Window. You are now ready to start the
SmartSoft W5 Interface.
Page 20 of 47
03 April 2007
7032-3000-A
W5 User Guide
Windows 2000
•
•
•
•
•
•
•
•
•
•
•
•
•
Click Start > Settings > Control Panel > Network and Dial-up Connections
In the Network Window Select TCP/IP > Your Network Card.
If there is more than one TCP/IP connection ensure you select the Network
card that is to be used with the W5, ask your Local Network Administrator for
details.
For the TCP/IP connection press the properties button.
On the IP Address tab set the Specify an IP Address checkbox.
Enter the IP address segments, usually the first 3 segments will be identical to
the W5’s IP address, the last segment should be different to that of the W5.
Enter the subnet mask, usually the first 3 segments will be 255 and the last
segment will be 000. You should check this with your Local Network
Administrator if you are unsure.
Press the OK button of the Properties window.
Press the OK button of the Network window.
The PC may need to be restarted before the changes will take effect.
While the PC is rebooting Ensure that the PC is disconnected from the LAN
and connected to the W5.
Next time the PC is switched on it should establish a network connection with
the W5.
You will then be ready to start the SmartSoft W5 Interface.
6.5 Running the SmartSoft W5 Interface
Ensure that the Power Light and Ready Light of the W5 are illuminated. Select the
SmartSoft W5 program from the Start menu or navigate to the installed location and
double click the SmartSoft W5.exe file.
6.6 Changing the IP settings of the W5
In order for the W5 to operate on a LAN, the IP settings of the W5 must be changed
to those of the LAN.
When delivered from the factory the W5 will be configured with the default settings
of IP address = 10.0.0.126 and IP mask = 255.255.255.0 initially the Ethernet
crossover cable should be used and connected to a PC with compatible IP settings.
E.G. IP address = 10.0.0.101 and IP mask of 255.255.255.0, a label on the base of the
W5 displays the default Ethernet settings.
Follow the instructions in Section 7 for starting the SmartSoft W5 Interface. To
configure the preferred IP settings see section 7.19, the W5 can then be connected to a
LAN using a standard straight through Ethernet cable or can continue to be used with
a single PC via the Ethernet crossover cable.
Page 21 of 47
03 April 2007
7032-3000-A
W5 User Guide
7.0 Using the SmartSoft Interface
7.1 Description
Data transfer to and from the W5 is through a 100 Mbit/s Ethernet port on the front
panel of the unit. The W5 can be connected to an existing network through a hub or it
can be connected directly to a host PC using a cross-over Ethernet cable. This latter
configuration maximizes data throughput. Either arrangement requires that the W5
and the host be on the same logical network. The network administrator can assure
this by providing an appropriate static IP address and net mask for the W5.
The W5 supports bi-directional communication through a data socket (port #1852).
7.2 Data Retrieval
Peak wavelength data for connected Fibre Bragg Grating (FBG) sensors are retrieved
from the W5 in packaged with a Time Stamp. Co-efficients can then be applied to
convert the peak readings into the units required by the user. If a host PC of the
recommended specification is used (see section 6.1), sensor measurements can be
displayed and recorded to file at speeds of up to 1000Hz in real time.
7.3 SmartSoft – the Remote Graphical User Interface
Included with the W5 unit is the SmartSoft interface program, written in National
Instruments LabVIEWTM 8.0, that uses the TCP-IP communication protocol.
Pictures and descriptions follow...
7.4 Starting the SmartSoft Interface
The SmartSoft program is started by running SmartSoft W5 from the Windows Start
Menu or by double clicking ‘SmartSoft W5 .exe’ in its installed folder location. If the
program does not start automatically, hit the white RUN arrow on the left side of the
tool bar. The program will look for a configuration file called ‘Smart.ini’. If running
the program for the first time the file will not exist but will be created in due course.
The ‘ini’ file contains all the control panel variables saved from the last session.
Multiple .ini files may be created by appropriate renaming, however the .ini file in use
must always be named Smart.ini and be present in the original location.
Page 22 of 47
03 April 2007
7032-3000-A
W5 User Guide
7.5 Selecting the IP Address
First a dialogue box appears with the message “Enter IP Address of Interrogator”.
Figure 7.1
The IP address should match that of the W5 and comply with the net mask
restrictions. See Section 6.3 above. This box will not change the actual address of the
W5, see section 7.7 for details.
If the Ethernet connection is established the SmartSoft will start to run. The interface
program will try for 60 seconds to establish a connection. If the connection is not
made the program will halt with an error message. If this occurs check the cabling,
and check that the IP address matches that of the W5 and meets the restrictions of the
net mask (consult your local network administrator for more details). See also
Appendix B – Trouble shooting.
All being well, one of the following views will be displayed (see Figures 7.8 to 7.14).
The different views are selected by clicking on one of the tabs. Some of the control
panel objects are visible for all tabs whilst others that are specific to just one tab will
disappear when a different tab is selected.
Page 23 of 47
03 April 2007
7032-3000-A
W5 User Guide
7.6 Retrieving a Reference set
SmartSoft derives peak wavelength values for each Fibre Bragg Grating from the
spectral data provided by the W5. In order for the utility to convert to the customer
units, e.g. microstrain, it is necessary to compare the measured wavelengths to a
reference set.
As the program starts a dialogue box appears with the message “Retrieve Reference
Set from File ?” The user may select a Reference set that has been saved from a
previous session or select “Cancel” to create a file during this session.
Figure 7.2 Retrieving a Reference set
Page 24 of 47
03 April 2007
7032-3000-A
W5 User Guide
7.7 General Parameters
Figure 7.3a - General Parameters
Across the top of the screen are some objects that appear in all views.
Left / Right Axis Select the measurement units for the Left and Right Y axes,
these controls are not activated unless a set of reference wavelengths is being
used. See Section 7.6 and Section 7.9.
Data rate is the received acquisition rate as set by the W5 interrogator.
Buffer % displays how much buffer space is available in the W5’s internal
memory. Sensor readings are buffered in the W5 so that short term
interruptions or delays to the data transfer to the host PC do not cause loss of
data. However if the available buffer space falls to 0% data will be lost. If the
host PC is able to collect data as fast as the W5 can generate it then the
available buffer space should remain at 100 %. 60000 data sets can be
buffered, which represents a minute of sensor data at 1000 Hz, before the
oldest data sets start to be overwritten. This is important to note if it is
intended to use the W5 in a real time control system. The scan rate of the W5
can be slowed to suit a slower host PC. See page 35 of section 7.14
Interrogator IP Address is the IP address of the Interrogator unit with which
the program is communicating.
S/N is the serial number of the W5 with which the program is communicating.
Change will allow the internal IP settings of the W5 to be changed. Pressing
the change button will have no effect until the STOP button is pressed. See
section 7.19 for more details.
Figure 7.3b – Changing IP Settings
Page 25 of 47
03 April 2007
7032-3000-A
W5 User Guide
7.8 Plot Table
Down the right hand side of the screen are more objects that are present in all views.
Figure 7.4 - Plot Table
The Plot Table contains assignment parameters for up to eight plots on the
graph but also affects data logging as described below. The “Plot Name”
column allows the user to type a meaningful name to each plot on the graph.
The sensor that is assigned to each plot is selected by setting the channel
number and sensor number. The sensors that are available can be seen by
selecting the table view. The far right column contains push buttons that allow
some or all of the eight plots to be logged to a file. Note each sensor that is
logged will increase the amount of processing required by the PC.
When the Plot tab is selected a further column appears at the left side of the
table. The view column allows the user to select which of the eight available
plots to display on the graph. The Y column allows the user to assign the
sensor to the left or right axis of the graph. Thus data can be measured in two
different units simultaneously.
System Temperature Sensor One temperature sensor in the system can be
designated as the sensor which can be used to compensate any number of
sensors in the system against the effects of temperature. Additionally any
number of temperature sensors on each channel can be used to compensate all,
or a selection of, sensors on that particular channel. See section 7.14
“Temperature View”.
Page 26 of 47
03 April 2007
7032-3000-A
W5 User Guide
7.9 Reference Slide Switch
The Reference Set Slide Switch allows the user to compare the live data with
a previously recorded reference set. When the program is run for the first time
no reference set exists and the graph displays wavelength in nanometres over
time. A new reference set can be taken by setting the slide switch to “Take
New Reference Set”, where by the current wavelengths are stored and used as
a threshold to compare the live data. The data can now be expressed in other
units such as microstrain, and the y-axis of the graph changed accordingly.
Sliding the switch back will drop the current Reference Set and the graph will
revert to the wavelength scale. At the end of the monitoring session, when the
“STOP” button is pressed, the user has the option to save the Reference set to
a file for use on subsequent monitoring sessions, see Section 7.18 below.
Figures 7.5 and 7.6 - Reference Set Slide Switch
Page 27 of 47
03 April 2007
7032-3000-A
W5 User Guide
7.10 Data Log Panel
The Data Log Panel contains all the parameters required to create a log file.
Up to eight sensors can be selected for logging by setting the appropriate push
button in the Log column of the plot table (see section 7.8). Additionally all
sensors in the system can be logged by pressing the ‘Log All Sensors in the
Table button’. Note each sensor that is logged will increase the amount of
processing required by the PC.
Before logging can commence a number of other parameters need to be set up.
Figure 7.7 - Data Log Panel
Select Log file - enter a path and file name with an .xls extension or select a
file by clicking the file symbol.
Append to existing File – select whether new data should overwrite old data
or be appended to existing data in the same file.
Size of Log File - enter the time, in seconds, over which the data is to be
logged. Ensure that there is enough disk space on the selected drive of the PC.
Set Sample Rate - enter a sampling interval. The sampling frequency will
depend upon the acquisition rate of the W5. E.G. if the Data rate is 1000Hz a
sampling interval of 10 will result in an effective sampling frequency of
100Hz.
The Log Data Button - press this to start or stop logging. Note if no source
for the Data Logging has been selected the Log Button cannot be activated, if
this occurs, select at least one Sensor from the Plot table to log or press ‘Log
all Sensors in the table’.
The Log Time will start to increment after the Log Data button is activated.
When the “Log time” and “Size of Log File” are equal the log file is complete
and can be viewed using Microsoft Excel. The Log Data button can also be
pressed to stop logging before the log time is reached.
Page 28 of 47
03 April 2007
7032-3000-A
W5 User Guide
7.11 Multi-Plot Graph View
Figure 7.8 - Plot View
The main tab has a number of views, the first of which shows a graph. The x-axis
shows the time reference received from the W5. The left and right y axes have a
number of different modes to display different measuring units, among the units
available are wavelength in nanometres, µstrain, temperature in oC, pressure in bar,
force in Newtons and stress in N/m2, other units are available on request, contact
Smart Fibres for details. Setting the position of the Reference Set Slide Switch (see
Section 7.9) to the right, will activate the axis selection controls, see Section 7.7
above. Up to eight plots are visible at any one time and plots are selected for viewing
by clicking the button in the view column of the plot table. Each plot can be allocated
to any sensor on any of the four channels by setting the appropriate number in the
corresponding Channel and Sensor columns of the plot table.
The user may set the range of the y axes by entering values in the Max and Min boxes
of the y scales.
Graph Samples is the number of points plotted on the graph at any instant, as the
value is adjusted the time base on the x axis will be altered accordingly. With a high
number of samples a backlog of data may develop depending upon the processing
speed of the PC, other applications running concurrently and the level of network
traffic. The default value is 1000 samples.
Page 29 of 47
03 April 2007
7032-3000-A
W5 User Guide
7.12 Profile View
Figure 7.9 - Profile View
On the Profile tab a Power Spectrum for a selected sensor can show repeating periodic
features of collected data. SmartSoft’s peak detection algorithm shows the major
periodic features as vertical red lines on the graph. The desired sensor can be selected
using the Active Channel and Active Sensor controls. The amplitude on the Y-scale
can be set to Linear or Logarithmic. In Linear mode the amplitude of the signal is
normalised so that the maximum amplitude is always equal to 1.
Page 30 of 47
03 April 2007
7032-3000-A
W5 User Guide
7.13 Table View
Figure 7.10 - Table View
The first column of the table tab has only a single entry, that of a time stamp. The
time stamp is provided by the W5. It represents seconds of elapsed time since 00:00
on the 1st January 1970, known as UTC (Coordinated Universal Time).
The subsequent channels contain readings for all the sensors present in the system..
The quantity of sensors is shown in brackets next to the Channel headings at the top
of the table. The values in the table relate to the units selected in the Left and Right
Y-Axes above, the default is the Left Y-Axis units, but Right Y-Axis units can be
assigned by setting the ‘Y’ column in the Plot Table to ‘R’ for the selected Sensor.
See Section 7.8 for further details.
The Table view can be used in conjunction with the “Log All Sensors in the Table”
button. As an alternative to selecting individual plot traces to log (see Section 7.8), the
user can elect to log all the sensors present on all four channels (see Section 7.10).
Note each sensor that is logged will increase the amount of processing required by the
PC.
Page 31 of 47
03 April 2007
7032-3000-A
W5 User Guide
7.14 Temperature View
Figure 7.11 – Temperature View
On this tab all the controls for configuring temperature sensors can be set. Extra help
tips can be accessed by right clicking on the different control fields and selecting
“Description and Tip”. Only 3 rows of each section are visible, use the Scroll Down
controls to view settings for sensors further down the tables.
In the top section the user can allocate a temperature sensor from the same channel
that can be used to compensate for temperature effects. If the compensating sensor is
set to its own number then temperature compensation is not applied. Alternatively by
entering 199 the system temperature sensor is used for compensation.
In the second section a temperature offset can be added. If the units are set to
wavelength absolute values are displayed, but in all other cases the sensor readings
are compared to reference readings and the variation from the reference is displayed.
The reference would normally be taken in the zero condition, i.e. under conditions of
zero strain, atmospheric pressure etc. In the case of temperature the user may enter a
figure for the temperature at the time the reference set is taken rather than trying to
obtain an ambient temperature of 0 oC.
In the third section the user may adjust the wavelength to temperature scaling factor,
these values would normally be set by Smart Fibres or supplied with the Sensors.
The bottom section allows the user to adjust the thermal expansion coefficient of the
FBG sensor to take into account the material to which the FBG is bonded. In most
cases these values should be left at 1.00.
Page 32 of 47
03 April 2007
7032-3000-A
W5 User Guide
7.15 Conversions View
Figure 7.12 – Conversions View
The conversions view allows the user to scale various measurement units in order to
measure Pressure, Stress or Force.
Again extra help tips can be viewed by right clicking on the different control fields
and selecting “Description and Tip”. Only 5 rows of each section are visible, use the
Scroll down controls to view settings for sensors further down the tables.
Normally Smart Fibres would provide Pressure coefficients when supplying
SmartCell pressure sensors. For all other measurement units these co-efficients are not
used.
The user may enter a Young’s Modulus for the material in which the sensor is
embedded in order to obtain measurements of stress in Newtons /metre2. Individual
values can be entered for each sensor, or if all sensors are embedded in the same
material, the “Set all to:” button can be used.
If the area under stress is known, this value can be entered in the bottom section to
obtain measurements of Force in Newtons. Individual values can be entered for each
sensor, or if all sensors are embedded in the same size material, the “Set all to:”
button can be used.
Other custom conversions can be catered for, contact Smart Fibres for details.
Page 33 of 47
03 April 2007
7032-3000-A
W5 User Guide
7.16 Graphic View
Figure 7.13 - Graphic View
The Graphic View shows a diagram representing the application, in this case, an
offshore oil platform. The graphic can be changed to suit the application.
At the bottom of the tab the user may enter the folder location of a picture
representing the sensing application, the default is “\data\default.jpg”. The picture
must be in JPEG format with a .jpg file extension, and should be 600 pixels wide by
400 pixels high. By clicking on the file icon the user can also browse the file system
for a suitable picture. The picture could be created using a CAD type drawing
application or could simply be a digital photograph. Digital photographs should be
processed through proprietary graphics application to meet the size requirements of
600 x 400 pixels. Pressing the “Load JPG” button loads the file specified in the
adjacent File path box
Eight Indicator boxes are available to represent the FBG sensor positions as assigned
in the adjacent Plot Table (see section 7.8). The Indicator boxes can be moved around
the picture using the XY position controls at the side of the Graphic tab. The Position
controls are graduated in pixels. The range for X position is 0 to 570 and for Y
position 0 to 375. Location 0,0 is the bottom left hand corner of the picture.
At the bottom of the tab is a colour bar scaled from -100% to +100% this represents
the measurement range, with black representing zero. As sensor readings change in
different parts of the structure, the corresponding indicator box changes colour
accordingly. The scale of the colour bar can be set for the two sets of units that have
been selected as Left and Right axes. NOTE: The Indicator boxes are not active when
the W5 is displaying data in Wavelength. See Left / Right axis controls in section 7.7
Page 34 of 47
03 April 2007
7032-3000-A
W5 User Guide
7.17 Channel Setting View
Figure 7.14 – Channel Settings
On this tab the user can view the amplitude of light reflected from the sensors on the
selected channel. The channel is selected using the Active Channel control. Whilst a
particular channel is being viewed the user may adjust the gain of sensitivity and
noise threshold of that channel. These controls can be used to mask unwanted
reflections or boost signals to overcome optical losses in the system.
Whilst the sensor amplitudes are being displayed transfer of wavelength data is
suspended, therefore logging controls are disabled whilst this tab is being viewed.
Additionally if data logging is already in progress the Channel setting tab cannot be
displayed until logging period is completed.
The amplitude is displayed on the Y-axis in arbitrary units over the range 0 to 4096,
with each visible sensor represented by a vertical green line at its corresponding
centre wavelength with a point over the maximum value.
The noise threshold is represented as a blue horizontal line toward the bottom of the
graph which can be adjusted to ignore small signals which are not true sensors using
the Noise Threshold control. This control may also be used to ignore side lobe peaks
from sensors. In general the Noise threshold should be set as low as possible whilst
avoiding spurious reflections being recognised as valid sensors.
Another blue horizontal line at the top of the graph shows the maximum sensor
amplitude. The Gain (in dB) should be set so that all sensors on the channel are below
the maximum otherwise the accuracy of the sensor reading will be compromised.
Page 35 of 47
03 April 2007
7032-3000-A
W5 User Guide
Whilst a particular channel is being viewed the averaging applied to that channel can
also be set. The default value is 1, no averaging. Instructing the W5 to perform
internal averaging will yield an increase in measurement repeatability of the square
root of the number of averages. E.G. averaging over 25 readings would improve
repeatability five fold.
Also on this tab the user can set Oversampling, this effectively slows the rate of data
transfer by either transmitting sampled data, or when combined with Averaging
transmitting averaged data at the correspondingly slower rate.
For example:
Averaging = 1, Oversampling = 1. Un-averaged data is transmitted at full rate.
Averaging = 25, Oversampling = 1. Averaged data is transmitted at full rate.
Averaging = 1, Oversampling = 25. Un-averaged data is transmitted at 1/25th full rate.
Averaging = 25, Oversampling = 25. Averaged data is transmitted at 1/25th full rate.
Page 36 of 47
03 April 2007
7032-3000-A
W5 User Guide
7.18 Closing the SmartSoft Interface
When the user hits the STOP button in the bottom right corner of the screen the
program will shut down. All the control panel settings will be saved to the
configuration file.
Finally a dialog box appears with the message “Save Reference Set ?”. The reference
set last used by the program is available for saving by specifying a folder location and
file name. Any number of Reference Sets can be saved enabling the user to select the
most appropriate next time the Utility program is run. (See Section 7.6 above).
Figure 7.15
Page 37 of 47
03 April 2007
7032-3000-A
W5 User Guide
7.19 Changing the IP settings of the W5
If the Change button was pressed while SmartSoft is running (see section 7.7) then
when the STOP button is pressed to terminate the program the user will be given the
opportunity to change the internal IP settings of the W5.
Figure 7.16 Changing IP settings
The window shown in figure 7.16 will appear and a new IP address and/or IP mask
can be set. Care should be taken when using this feature as incorrect settings may
mean that Ethernet communication is lost.
The changes to the IP settings of the W5 will not take effect until the next time that
the W5 is switched on. The procedures in Section 6.4 and Section 7.5 will have to be
followed to ensure both host PC and W5 communicate using the new settings.
7.20 Recovering lost IP settings of the W5
Should you lose track of the IP settings of the W5 they can be recovered by plugging
a PC monitor in to the VGA socket on the Front Panel of the unit. When the W5 is
powered on, diagnostic information is written to the monitor. At the end of the boot
up sequence the current IP Address and Netmask are displayed.
Page 38 of 47
03 April 2007
7032-3000-A
W5 User Guide
8.0 Mechanical Drawings and Rack Mounting Considerations
8.1 Mechanical Drawings
W5 Front Iso View
W5 Rear Iso View
Figure 8.1 W5 Enclosure
W5 FBG Interrogator
Ready
7 - 36 Vdc
Sync In
Diag
Power
Laser Hazard
Ch1
Client
Power
Sync Out
0 - +
LAN
VGA
Ch2
Aux
Ch3
Reset
Ch4
SENSE THE FUTURE
Figure 8.2: Front Panel diagram of W5 unit.
Page 39 of 47
03 April 2007
7032-3000-A
W5 User Guide
Figure 8.3: W5 Rear View Diagram
Figure 8.4: W5 Side View Diagram
Page 40 of 47
03 April 2007
7032-3000-A
W5 User Guide
Figure 8.2 is a diagram of the front side of the W5 instrument. The red arrows and
numbers designate items of note. These items are as follows: 1) LED Indicator
Cluster, 2) VGA port, to be used for diagnostic purposes, 3) COM 1 Port: Rs-232
(Not active), 4) COM 2 Port: RS-485 (Not active), 5) LAN connection for TCPIP
communication, 6) USB connectors, 7) Power supply connector jack, and 8) Optical
connectors (from 1 to 4, depending on model).
8.2 Mounting Options
Figure 8.5 Mounting Option 1: Flat Mounting Bracket
Page 41 of 47
03 April 2007
7032-3000-A
W5 User Guide
Appendix A – Configuring TCP-IP Settings for W5 Communication
Section 1. Selecting settings to connect to the W5.
If you are not familiar with the various classes of IP addresses, seek help from
your network administrator. He or she will assist in choosing a compatible IP address
and Netmask for both W5 and host computer.
As was mentioned in Section 5.1 of this manual, data transfer to and from the
W5 is facilitated through the Ethernet port of the W5. The unit can be connected to
an existing network through a hub or it can be connected directly to a host PC using a
crossover Ethernet cable. Either arrangement requires that the W5 and the host be on
the same logical network. In other words, the host PC and the W5 must be set for the
same Netmask and different, but compatible IP addresses. Using the default IP
address and Netmask for the W5 of 10.0.0.126 and 255.255.255.0, respectively, the
following settings can be used to connect to the W5:
Case 1: Correct Settings
Netmask
IP Address
Host PC
255.255.255.0
10.0.0.121
W5
255.255.255.0
10.0.0.126
Reason they work: The W5 and host PC share the same Netmask. The W5
and host PC have different IP addresses of the same IP class.
Case 2: Incorrect Settings
Netmask
IP Address
Host PC
255.255.255.0
10.0.0.122
W5
255.255.255.0
10.0.0.126
Reason: The W5 and host PC have the same IP address. The W5 needs a
unique address on the network. If any other PC connected to the network is
assigned to the same IP address, communication will fail.
Case 3: Incorrect Settings
Netmask
IP Address
Host PC
255.255.255.0
192.168.1.1
W5
255.255.255.0
10.0.0.126
Reason: The W5 and host PC are not on the same subnet, as dictated by the
IP address. See your network administrator to select compatible values.
Case 4: Incorrect Settings
Page 42 of 47
03 April 2007
7032-3000-A
W5 User Guide
Netmask
IP Address
Host PC
255.255.0.0
10.0.0.121
W5
255.255.255.0
10.0.0.126
Reason: The W5 and host PC do not have identical Netmask settings.
Instructions for setting the Netmask and IP address for the host PC are captured in the
next section of this Appendix, Configuring TCP-IP Settings for W5 Communication.
The provided remote LabVIEWTM utility can be used to change the Netmask and IP
address settings of the W5, once connected. See details for changing network settings
with the SmartSoft Interface in Section 7.7 and Section 7.19 of this manual.
Page 43 of 47
03 April 2007
7032-3000-A
W5 User Guide
1. Windows 2000: On a Windows 2000 machine, click on the Start Bar and select
“Settings”, then “Control Panel”. Double-click on “Network and Dial-up
Connections” and the following window will open.
Right click on “Local Area Connection” and choose “Properties”. The following
window will then open.
Highlight “Internet Protocol(TCP/IP)” and click “Properties”. The following window
will then open.
Page 44 of 47
03 April 2007
7032-3000-A
W5 User Guide
Select “Use the following IP address” and you will have access to change the IP
address and subnet mask. Click “OK” to save the settings.
2. Windows XP: On a Windows XP machine, click and the Start Bar and select
“Control Panel.” Click on the icon entitled “Network Connections” to open. When
open, highlight the “Local Area Network” selection, right click, and choose
“Properties”. The following window will open.
Highlight the “TCP/IP” entry and click “Properties”. You will then have access to
change the IP address and subnet mask. Click “OK” to save settings.
You may also set up the Alternate Configuration Tab to suit the W5. This will allow
the host PC to normally be used on a LAN but also connect to a W5 without the need
for user interaction. If the PC does not establish communication with the LAN after 1
minute it will switch to the alternate configuration and hence establish communication
with the W5.
Page 45 of 47
03 April 2007
7032-3000-A
W5 User Guide
Appendix B – Troubleshooting
Problem
Unit will not power on.
Resolution
Make sure that power is supplied correctly to the
unit. The power cord attaches to the front of the
unit, in the connector labelled “Vdc”. When
power is supplied, the red “Power” LED indicator
on the lower left side of the front panel will
become lit.
The W5 will not respond to the “ping” command.
If the unit experiences a spike in supply voltage,
the power supply may need to cool down.
Remove the line cord, wait one minute, replace
the line cord, and try again to power on.
Is the subnet mask set the same as the host PC?
Are you pinging the correct IP address?
If connecting directly from a PC, are you using an
Ethernet crossover cable?
If connecting through an existing network, are you
using a standard Ethernet cable?
If you are not familiar with the various classes of
IP addresses, seek help from your network
administrator. He or she will assist in choosing a
compatible IP address for both W5 and host
computer.
How do I “ping” the unit?
How can I tell whether or not my Ethernet cable
is of the standard or crossover variety?
When I run the W5 executable, an error message
appears that says a dll is missing.
Page 46 of 47
03 April 2007
From the Windows Start bar, select “Run”. In the
window that opens, type “ping” then a space, and
then the IP address of the W5 that you wish to
communicate with. For example, if the IP address
of the W5 is 10.0.0.126, you would type
“ping 10.0.0.126”. A DOS window will launch.
The unit will reply if everything is correctly
connected and configured. If there is a connection
problem, the unit will time out or be deemed
otherwise inaccessible.
The a crossover cable should be labelled on its
packaging as such. If the original packaging is not
available, examine the wire colours at both RJ45
connectors. If the order of connector colours is
identical at both ends, the cable is not a crossover.
If two of the connector colours are opposite on
one end relative to the other, the cable is a
crossover cable.
Was the executable installed to the host PC using
the installation program, or was is just run from
the CD-ROM? Before the W5 executable can run
on a PC, the LabVIEW Runtime Engine must be
installed. Place the W5 installation disk in the
CD-ROM drive, locate the Installer folder and run
setup.exe. The installer will guide you through
the rest of the process.
7032-3000-A
W5 User Guide
LabVIEW example code communicates, but does
not transfer data at the full rate.
When I used the Channel Expansion Module, I
see unstable wavelength reading on some
channels.
The above suggestions have not solved the
problem.
Page 47 of 47
03 April 2007
Is the operating system of the host PC Windows
2000 or XP? Earlier versions of Windows are not
compatible with the installer used for the W5.
Please select a host PC with one of the above
operating systems.
How many clients do you have connected to the
W5? The W5 will support up to 5 clients, but is
optimised for maximum data transfer to a single
client. If high speed data transfer is desired,
restrict use to a single client and service additional
clients with another server.
Try to free as much of the host computer’s
resources as possible. Close other applications
that may be running.
Multiplexed Channel operation requires that each
of the two or four Multiplexed Channels be ported
to each of the original four Physical Channels.
This means that each Multiplexed Channel of the
four channel group must be set to the same gain.
Make sure that sensor arrays are grouped
according to reflectivity and insertion loss so that
none of the sensors are in detector saturation.
Please contact Smart Fibres for further assistance.
7032-3000-A