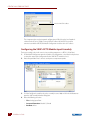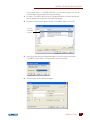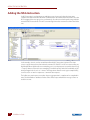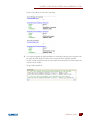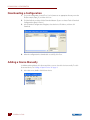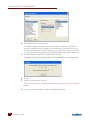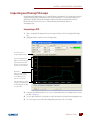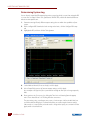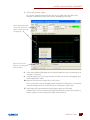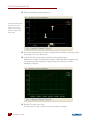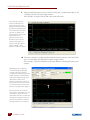
1
IO4AB USER’S GUIDE
SNAP-PAC-S1
SNAP-PAC-S2
SNAP-PAC-R1
SNAP-PAC-R2
SNAP-PAC-EB1
SNAP-PAC-EB2
SNAP-PAC-S1-W
SNAP-PAC-S2-W
SNAP-PAC-R1-W
SNAP-PAC-R2-W
SNAP-PAC-EB1-W
SNAP-PAC-EB2-W
SNAP-PAC-S1-FM
SNAP-PAC-R1-FM
SNAP-PAC-R2-FM
SNAP-PAC-EB1-FM
SNAP-PAC-EB2-FM
Form 1909-111010—October 2011
www.klinkmann.com
www
IO4AB User’s Guide
Form 1909-111010—October 2011
Copyright © 2011 Opto 22.
All rights reserved.
Printed in the United States of America.
The information in this manual has been checked carefully and is believed to be accurate; however, Opto 22 assumes no
responsibility for possible inaccuracies or omissions. Specifications are subject to change without notice.
Opto 22 warrants all of its products to be free from defects in material or workmanship for 30 months from the
manufacturing date code. This warranty is limited to the original cost of the unit only and does not cover installation, labor,
or any other contingent costs. Opto 22 I/O modules and solid-state relays with date codes of 1/96 or later are guaranteed
for life. This lifetime warranty excludes reed relay, SNAP serial communication modules, SNAP PID modules, and modules
that contain mechanical contacts or switches. Opto 22 does not warrant any product, components, or parts not
manufactured by Opto 22; for these items, the warranty from the original manufacturer applies. These products include,
but are not limited to, OptoTerminal-G70, OptoTerminal-G75, and Sony Ericsson GT-48; see the product data sheet for
specific warranty information. Refer to Opto 22 form number 1042 for complete warranty information.
Wired+Wireless controllers and brains and N-TRON wireless access points are licensed under one or more of the following
patents: U.S. Patent No(s). 5282222, RE37802, 6963617; Canadian Patent No. 2064975; European Patent No. 1142245;
French Patent No. 1142245; British Patent No. 1142245; Japanese Patent No. 2002535925A; German Patent No. 60011224.
Opto 22 FactoryFloor, Optomux, and Pamux are registered trademarks of Opto 22. Generation 4, ioControl, ioDisplay,
ioManager, ioProject, ioUtilities, mistic, Nvio, Nvio.net Web Portal, OptoConnect, OptoControl, OptoDataLink, OptoDisplay,
OptoEMU, OptoEMU Sensor, OptoEMU Server, OptoOPCServer, OptoScript, OptoServer, OptoTerminal, OptoUtilities, PAC
Control, PAC Display, PAC Manager, PAC Project, SNAP Ethernet I/O, SNAP I/O, SNAP OEM I/O, SNAP PAC System, SNAP
Simple I/O, SNAP Ultimate I/O, and Wired+Wireless are trademarks of Opto 22.
ActiveX, JScript, Microsoft, MS-DOS, VBScript, Visual Basic, Visual C++, Windows, and Windows Vista are either registered
trademarks or trademarks of Microsoft Corporation in the United States and other countries. Linux is a registered
trademark of Linus Torvalds. Unicenter is a registered trademark of Computer Associates International, Inc. ARCNET is a
registered trademark of Datapoint Corporation. Modbus is a registered trademark of Schneider Electric. Wiegand is a
registered trademark of Sensor Engineering Corporation. Nokia, Nokia M2M Platform, Nokia M2M Gateway Software, and
Nokia 31 GSM Connectivity Terminal are trademarks or registered trademarks of Nokia Corporation. Sony is a trademark of
Sony Corporation. Ericsson is a trademark of Telefonaktiebolaget LM Ericsson. CompactLogix, MicroLogix, SLC, and RSLogix
are trademarks of Rockwell Automation. Allen-Bradley and ControlLogix are a registered trademarks of Rockwell
Automation. CIP and EtherNet/IP are trademarks of ODVA.
All other brand or product names are trademarks or registered trademarks of their respective companies or organizations.
ii
IO4AB User’s Guide
www.klinkmann.com
www
Table of Contents
Chapter 1: Welcome . . . . . . . . . . . . . . . . . . . . . . . . . . . . . . . . . . . . . . . . . . . . . . . . . . . . . . . . . . . 1
Using this Guide . . . . . . . . . . . . . . . . . . . . . . . . . . . . . . . . . . . . . . . . . . . . . . . . . . . . . . . . . . . . . . . . . . . . . . . . . 2
Documents and Online Help . . . . . . . . . . . . . . . . . . . . . . . . . . . . . . . . . . . . . . . . . . . . . . . . . . . . . . . . . . . . . 2
Additional Resources for EtherNet/IP . . . . . . . . . . . . . . . . . . . . . . . . . . . . . . . . . . . . . . . . . . . . . . . . . . 3
Product Support . . . . . . . . . . . . . . . . . . . . . . . . . . . . . . . . . . . . . . . . . . . . . . . . . . . . . . . . . . . . . . . . . . . . . . . . . 4
Chapter 2: Introduction to IO4AB . . . . . . . . . . . . . . . . . . . . . . . . . . . . . . . . . . . . . . . . . . . . . . . 5
Opto 22 Advantage . . . . . . . . . . . . . . . . . . . . . . . . . . . . . . . . . . . . . . . . . . . . . . . . . . . . . . . . . . . . . . . . . . . . . . 5
Opto 22 Products . . . . . . . . . . . . . . . . . . . . . . . . . . . . . . . . . . . . . . . . . . . . . . . . . . . . . . . . . . . . . . . . . . . . . . . . 6
Architecture . . . . . . . . . . . . . . . . . . . . . . . . . . . . . . . . . . . . . . . . . . . . . . . . . . . . . . . . . . . . . . . . . . . . . . . . . . . . . 7
Implicit and Explicit Messaging . . . . . . . . . . . . . . . . . . . . . . . . . . . . . . . . . . . . . . . . . . . . . . . . . . . . . . . . . . . 7
Choosing the Messaging Type . . . . . . . . . . . . . . . . . . . . . . . . . . . . . . . . . . . . . . . . . . . . . . . . . . . . . . . . 8
Using CIP Objects . . . . . . . . . . . . . . . . . . . . . . . . . . . . . . . . . . . . . . . . . . . . . . . . . . . . . . . . . . . . . . . . . . . . . . . . 8
Specifications. . . . . . . . . . . . . . . . . . . . . . . . . . . . . . . . . . . . . . . . . . . . . . . . . . . . . . . . . . . . . . . . . . . . . . . . . . . . 9
Chapter 3: Getting Started . . . . . . . . . . . . . . . . . . . . . . . . . . . . . . . . . . . . . . . . . . . . . . . . . . . . 11
What You Will Need. . . . . . . . . . . . . . . . . . . . . . . . . . . . . . . . . . . . . . . . . . . . . . . . . . . . . . . . . . . . . . . . . . . . .
Installing EtherNet/IP Configurator. . . . . . . . . . . . . . . . . . . . . . . . . . . . . . . . . . . . . . . . . . . . . . . . . . . . . . .
Adding an Opto 22 Device . . . . . . . . . . . . . . . . . . . . . . . . . . . . . . . . . . . . . . . . . . . . . . . . . . . . . . . . . . . . . .
Configuring I/O Modules and Points . . . . . . . . . . . . . . . . . . . . . . . . . . . . . . . . . . . . . . . . . . . . . . . . . . . . .
11
12
12
16
Chapter 4: Setting Up Implicit Messaging . . . . . . . . . . . . . . . . . . . . . . . . . . . . . . . . . . . . . . 23
Creating an Input Assembly . . . . . . . . . . . . . . . . . . . . . . . . . . . . . . . . . . . . . . . . . . . . . . . . . . . . . . . . . . . . . 24
Creating an Output Assembly . . . . . . . . . . . . . . . . . . . . . . . . . . . . . . . . . . . . . . . . . . . . . . . . . . . . . . . . . . . 26
Configuring RSLogix for Implicit Messaging . . . . . . . . . . . . . . . . . . . . . . . . . . . . . . . . . . . . . . . . . . . . . . 28
Chapter 5: Setting Up Explicit Messaging . . . . . . . . . . . . . . . . . . . . . . . . . . . . . . . . . . . . . . 33
Creating an Assembly Instance . . . . . . . . . . . . . . . . . . . . . . . . . . . . . . . . . . . . . . . . . . . . . . . . . . . . . . . . . . 34
Using EtherNet/IP Configurator to Add and Configure a SNAP-AICTD Module . . . . . . . . . . 34
Configuring the SNAP-AICTD Module Input Assembly . . . . . . . . . . . . . . . . . . . . . . . . . . . . . . . . . 36
Configuring the SNAP-AOV27 Module Output Assembly . . . . . . . . . . . . . . . . . . . . . . . . . . . . . . 38
Downloading the Configuration to the SNAP PAC I/O Unit. . . . . . . . . . . . . . . . . . . . . . . . . . . . . 39
IO4AB User’s Guide
www.klinkmann.com
www
iiiiii
Configuring an EtherNet/IP Module . . . . . . . . . . . . . . . . . . . . . . . . . . . . . . . . . . . . . . . . . . . . . . . . . . . . . .
Creating a MESSAGE Object. . . . . . . . . . . . . . . . . . . . . . . . . . . . . . . . . . . . . . . . . . . . . . . . . . . . . . . . . . . . . .
Adding the MSG Instruction . . . . . . . . . . . . . . . . . . . . . . . . . . . . . . . . . . . . . . . . . . . . . . . . . . . . . . . . . . . . .
Configuring a MSG to Write an Assembly Instance . . . . . . . . . . . . . . . . . . . . . . . . . . . . . . . . . . . . . . . .
Using User Data Types (UDTs) . . . . . . . . . . . . . . . . . . . . . . . . . . . . . . . . . . . . . . . . . . . . . . . . . . . . . . . . . . . .
Summary . . . . . . . . . . . . . . . . . . . . . . . . . . . . . . . . . . . . . . . . . . . . . . . . . . . . . . . . . . . . . . . . . . . . . . . . . . . . . . .
40
43
50
52
54
55
Chapter 6: Connecting PAC Control and Allen-Bradley Systems . . . . . . . . . . . . . . . . . .57
Exchanging Values . . . . . . . . . . . . . . . . . . . . . . . . . . . . . . . . . . . . . . . . . . . . . . . . . . . . . . . . . . . . . . . . . . . . . .
Modifying PAC Control . . . . . . . . . . . . . . . . . . . . . . . . . . . . . . . . . . . . . . . . . . . . . . . . . . . . . . . . . . . . . . . . . .
Adding a Generic Opto MMP Device . . . . . . . . . . . . . . . . . . . . . . . . . . . . . . . . . . . . . . . . . . . . . . . . .
Modifying the Chart . . . . . . . . . . . . . . . . . . . . . . . . . . . . . . . . . . . . . . . . . . . . . . . . . . . . . . . . . . . . . . . . .
Creating Scratchpad Assemblies with EtherNet/IP Configurator. . . . . . . . . . . . . . . . . . . . . . . . . . . .
Creating an Assembly To Send Data to the PLC . . . . . . . . . . . . . . . . . . . . . . . . . . . . . . . . . . . . . . .
Creating an Assembly To Accept Data from the PLC . . . . . . . . . . . . . . . . . . . . . . . . . . . . . . . . . .
Modifying the RSLogix 5000 Ladder . . . . . . . . . . . . . . . . . . . . . . . . . . . . . . . . . . . . . . . . . . . . . . . . . . . . . .
Exchanging Data Online . . . . . . . . . . . . . . . . . . . . . . . . . . . . . . . . . . . . . . . . . . . . . . . . . . . . . . . . . . . . . . . . .
More Ideas for Accessing Data . . . . . . . . . . . . . . . . . . . . . . . . . . . . . . . . . . . . . . . . . . . . . . . . . . . . . . . . . . .
OptoOPCServer . . . . . . . . . . . . . . . . . . . . . . . . . . . . . . . . . . . . . . . . . . . . . . . . . . . . . . . . . . . . . . . . . . . . .
PAC Display . . . . . . . . . . . . . . . . . . . . . . . . . . . . . . . . . . . . . . . . . . . . . . . . . . . . . . . . . . . . . . . . . . . . . . . .
Using the Free Opto MMP Toolkit . . . . . . . . . . . . . . . . . . . . . . . . . . . . . . . . . . . . . . . . . . . . . . . . . . . .
58
58
58
60
63
63
66
68
71
72
72
72
73
Chapter 7: Using EtherNet/IP Configurator . . . . . . . . . . . . . . . . . . . . . . . . . . . . . . . . . . . . .75
Importing an Existing Configuration. . . . . . . . . . . . . . . . . . . . . . . . . . . . . . . . . . . . . . . . . . . . . . . . . . . . . . 76
Uploading a Configuration from an Opto 22 Device . . . . . . . . . . . . . . . . . . . . . . . . . . . . . . . . . . . . . . . 77
Downloading a Configuration. . . . . . . . . . . . . . . . . . . . . . . . . . . . . . . . . . . . . . . . . . . . . . . . . . . . . . . . . . . . 78
Adding a Device Manually . . . . . . . . . . . . . . . . . . . . . . . . . . . . . . . . . . . . . . . . . . . . . . . . . . . . . . . . . . . . . . . 78
Modifying a Device . . . . . . . . . . . . . . . . . . . . . . . . . . . . . . . . . . . . . . . . . . . . . . . . . . . . . . . . . . . . . . . . . . . . . . 80
Changing a Device’s IP Address . . . . . . . . . . . . . . . . . . . . . . . . . . . . . . . . . . . . . . . . . . . . . . . . . . . . . . . . . . 80
Adding and Deleting Assembly Elements. . . . . . . . . . . . . . . . . . . . . . . . . . . . . . . . . . . . . . . . . . . . . . . . . 81
Moving Assembly Members . . . . . . . . . . . . . . . . . . . . . . . . . . . . . . . . . . . . . . . . . . . . . . . . . . . . . . . . . . . . . 84
Viewing a Configuration Report . . . . . . . . . . . . . . . . . . . . . . . . . . . . . . . . . . . . . . . . . . . . . . . . . . . . . . . . . . 85
Configuring PID Loops. . . . . . . . . . . . . . . . . . . . . . . . . . . . . . . . . . . . . . . . . . . . . . . . . . . . . . . . . . . . . . . . . . . 86
Adding a PID Loop . . . . . . . . . . . . . . . . . . . . . . . . . . . . . . . . . . . . . . . . . . . . . . . . . . . . . . . . . . . . . . . . . . 87
Changing a PID Loop . . . . . . . . . . . . . . . . . . . . . . . . . . . . . . . . . . . . . . . . . . . . . . . . . . . . . . . . . . . . . . . 90
Deleting a PID Loop . . . . . . . . . . . . . . . . . . . . . . . . . . . . . . . . . . . . . . . . . . . . . . . . . . . . . . . . . . . . . . . . . 91
Algorithm Choices . . . . . . . . . . . . . . . . . . . . . . . . . . . . . . . . . . . . . . . . . . . . . . . . . . . . . . . . . . . . . . . . . . 91
Inspecting and Tuning PID Loops . . . . . . . . . . . . . . . . . . . . . . . . . . . . . . . . . . . . . . . . . . . . . . . . . . . . . . . . 93
Inspecting a PID . . . . . . . . . . . . . . . . . . . . . . . . . . . . . . . . . . . . . . . . . . . . . . . . . . . . . . . . . . . . . . . . . . . . 93
Determining System Lag . . . . . . . . . . . . . . . . . . . . . . . . . . . . . . . . . . . . . . . . . . . . . . . . . . . . . . . . . . . . 94
Tuning a PID Loop . . . . . . . . . . . . . . . . . . . . . . . . . . . . . . . . . . . . . . . . . . . . . . . . . . . . . . . . . . . . . . . . . . 98
Using I/O Point Features . . . . . . . . . . . . . . . . . . . . . . . . . . . . . . . . . . . . . . . . . . . . . . . . . . . . . . . . . . . . . . . . 104
Digital Features . . . . . . . . . . . . . . . . . . . . . . . . . . . . . . . . . . . . . . . . . . . . . . . . . . . . . . . . . . . . . . . . . . . . 104
Analog Features . . . . . . . . . . . . . . . . . . . . . . . . . . . . . . . . . . . . . . . . . . . . . . . . . . . . . . . . . . . . . . . . . . . 105
iv
IO4AB User’s Guide
www.klinkmann.com
www
Referencing I/O Points on SNAP PAC Racks . . . . . . . . . . . . . . . . . . . . . . . . . . . . . . . . . . . . . . . . . . . . . . 106
Appendix A: Supported Allen-Bradley Platforms . . . . . . . . . . . . . . . . . . . . . . 107
Appendix B: Using Counts . . . . . . . . . . . . . . . . . . . . . . . . . . . . . . . . . . . . . . . . . . . 109
Using Counts with EtherNet/IP . . . . . . . . . . . . . . . . . . . . . . . . . . . . . . . . . . . . . . . . . . . . . . . . . . . . . . . . . 109
How to Retrieve Counts . . . . . . . . . . . . . . . . . . . . . . . . . . . . . . . . . . . . . . . . . . . . . . . . . . . . . . . . . . . . .109
Most Analog Inputs . . . . . . . . . . . . . . . . . . . . . . . . . . . . . . . . . . . . . . . . . . . . . . . . . . . . . . . . . . . . . . . . .109
Load Cell Inputs . . . . . . . . . . . . . . . . . . . . . . . . . . . . . . . . . . . . . . . . . . . . . . . . . . . . . . . . . . . . . . . . . . . .110
Analog Outputs . . . . . . . . . . . . . . . . . . . . . . . . . . . . . . . . . . . . . . . . . . . . . . . . . . . . . . . . . . . . . . . . . . . .111
Linearizing the Pt100 and Pt1000 Probes from Resistance . . . . . . . . . . . . . . . . . . . . . . . . . . . . . . . . 111
Appendix C: Worksheets and Calculations . . . . . . . . . . . . . . . . . . . . . . . . . . . . 115
EtherNet/IP TCP/IP Requirements PLC Worksheet. . . . . . . . . . . . . . . . . . . . . . . . . . . . . . . . . . . . . . . . 116
EtherNet/IP Multicast Requirements PLC Worksheet . . . . . . . . . . . . . . . . . . . . . . . . . . . . . . . . . . . . . 117
SNAP PAC Connection Worksheets . . . . . . . . . . . . . . . . . . . . . . . . . . . . . . . . . . . . . . . . . . . . . . . . . . . . . 118
EtherNet/IP SNAP PAC Multicast Connection Worksheet . . . . . . . . . . . . . . . . . . . . . . . . . . . . . .118
EtherNet/IP SNAP PAC Encapsulation Connections . . . . . . . . . . . . . . . . . . . . . . . . . . . . . . . . . . .118
EtherNet/IP Module Packet Rate Limits. . . . . . . . . . . . . . . . . . . . . . . . . . . . . . . . . . . . . . . . . . . . . . . . . . 119
Implicit Messaging Volume . . . . . . . . . . . . . . . . . . . . . . . . . . . . . . . . . . . . . . . . . . . . . . . . . . . . . . . . .119
Explicit Messaging Volume . . . . . . . . . . . . . . . . . . . . . . . . . . . . . . . . . . . . . . . . . . . . . . . . . . . . . . . . . .119
Appendix D: Connecting with SLC5 or MicroLogix . . . . . . . . . . . . . . . . . . . . . 121
Connecting a PAC with a SLC5/05 PLC . . . . . . . . . . . . . . . . . . . . . . . . . . . . . . . . . . . . . . . . . . . . . . . . . . 121
General Tab . . . . . . . . . . . . . . . . . . . . . . . . . . . . . . . . . . . . . . . . . . . . . . . . . . . . . . . . . . . . . . . . . . . . . . . .122
Target Device Tab . . . . . . . . . . . . . . . . . . . . . . . . . . . . . . . . . . . . . . . . . . . . . . . . . . . . . . . . . . . . . . . . . .122
Connecting a PAC with a MicroLogix 1100 or 1400 PLC . . . . . . . . . . . . . . . . . . . . . . . . . . . . . . . . . . 123
General Tab . . . . . . . . . . . . . . . . . . . . . . . . . . . . . . . . . . . . . . . . . . . . . . . . . . . . . . . . . . . . . . . . . . . . . . . .124
MultiHop . . . . . . . . . . . . . . . . . . . . . . . . . . . . . . . . . . . . . . . . . . . . . . . . . . . . . . . . . . . . . . . . . . . . . . . . . .125
Appendix E: Detecting I/O Communication Failures . . . . . . . . . . . . . . . . . . . 127
Detecting the I/O Status Indicator State . . . . . . . . . . . . . . . . . . . . . . . . . . . . . . . . . . . . . . . . . . . . . .127
Detecting Each Generic Ethernet Module’s State . . . . . . . . . . . . . . . . . . . . . . . . . . . . . . . . . . . . .128
Appendix F: Generic Ethernet Module Options . . . . . . . . . . . . . . . . . . . . . . . . 129
Data Selection for the Communication Format . . . . . . . . . . . . . . . . . . . . . . . . . . . . . . . . . . . . . . . . . .
Determining the Number of Assembly Instances . . . . . . . . . . . . . . . . . . . . . . . . . . . . . . . . . . . . . . . .
Opto 22’s Mixed Architecture and the A-B Comm Format . . . . . . . . . . . . . . . . . . . . . . . . . . . . . . . .
Using CPS with Simple Data Types . . . . . . . . . . . . . . . . . . . . . . . . . . . . . . . . . . . . . . . . . . . . . . . . . . . . . .
Using CPS with a UDT . . . . . . . . . . . . . . . . . . . . . . . . . . . . . . . . . . . . . . . . . . . . . . . . . . . . . . . . . . . . . . . . . .
IO4AB User’s Guide
www.klinkmann.com
www
129
130
131
131
131
vv
vi
IO4AB User’s Guide
www.klinkmann.com
www
1909_Welcome.fm3: 1: WelcomeChapter 3
1: Welcome
Welcome to the IO4AB User’s Guide. Inside you’ll find instructions on how to set up EtherNet/IP
messaging between an Allen-Bradley® Logix™ controller and Opto 22’s SNAP PAC I/O using Opto 22’s
EtherNet/IP Configurator as well as Allen-Bradley’s RSLogix™ 5000 software. (For a list of supported
Allen-Bradley platforms, see page 107.)
This guide assumes that you are already familiar with how to use Allen-Bradley’s RSLogix 5000
software to configure Allen-Bradley devices.
SNAP PAC EB-series
SNAP PAC R-series
SNAP PAC S-series
PLCs
EtherNet/IP automation environment with PLCs and Opto 22
IO4AB User’s Guide
www.klinkmann.com
www
11
USING THIS GUIDE
Using this Guide
Chapter 1: Welcome—Provides information about this guide, where to find additional information,
and how to reach Opto 22 Product Support.
Chapter 2: Introduction to IO4AB—An overview of Opto 22’s implementation of EtherNet/IP, and
the things you will need to get started.
Chapter 3: Getting Started—How to install Ethernet/IP Configurator, add an Opto_22 device to the
network, and configure I/O modules and points.
Chapter 4: Setting Up Implicit Messaging—How to use EtherNet/IP Configurator and RSLogix 5000
software to set up implicit messaging between an Allen-Bradley controller and Opto 22 remote I/O.
Chapter 5: Setting Up Explicit Messaging—How to use the EtherNet/IP Configurator and RSLogix
5000 to implement explicit messaging.
Chapter 6: Connecting PAC Control and Allen-Bradley Systems—How to connect a SNAP-PAC-S
controller with an Allen-Bradley ControlLogix programmable logic controller (PLC) in order to
exchange data.
Chapter 7: Using EtherNet/IP Configurator—Additional information about EtherNet/IP Configurator
not included previous chapters.
Appendix A: Supported Allen-Bradley Platforms—Lists the Allen-Bradley controllers that support
EtherNet/IP.
Appendix B: Using Counts—Describes using counts with EtherNet/IP and linearizing the Pt100 and
Pt1000 probes from resistance.
Appendix C: Worksheets and Calculations—Provides a variety of worksheets to help you determine
your system’s requirements.
Appendix D: Connecting with SLC5 or MicroLogix—Provides information for connecting to an
SLC5/05 PLC, or to a MicroLogix 1100 or 1400 PLC.
Appendix E: Detecting I/O Communication Failures—Describes how ladder logic detects an I/O
communication failure.
Appendix F: Generic Ethernet Module Options—Provides information on selecting a
communications format.
Documents and Online Help
You may also need the following Opto 22 hardware documentation, depending on your application:
For this information
2
See this guide
Form
Installing and using SNAP PAC brains
SNAP PAC Brain User ’s Guide
1690
Installing and using SNAP PAC R-series controllers
SNAP PAC R-Series Controller User ’s Guide
1595
Installing and using SNAP PAC S-series controllers
SNAP PAC S-Series Controller User ’s Guide
1592
Using the OptoMMP Communication Toolkit or the
IEEE 1394-based OptoMMP memory-mapped
protocol for programming
OptoMMP Protocol Guide
1465
IO4AB User’s Guide
www.klinkmann.com
www
CHAPTER 1: WELCOME
For this information
See this guide
Form
Wiring, specifications, and installation information
for SNAP Analog Input Modules
SNAP Analog Input Modules Data Sheet
1065
Wiring, specifications, and installation information
for SNAP Analog Output Modules
SNAP Analog Output Modules Data Sheet
1066
Wiring, specifications, and installation information
for SNAP High-Density Digital Modules
SNAP High-Density Digital Modules Data Sheet
1556
Wiring, specifications, and installation information
for SNAP Digital Input Modules
SNAP Digital Input Modules Data Sheet
0773
Wiring, specifications, and installation information
for SNAP Digital Output Modules
SNAP Digital Output Modules Data Sheet
1144
Wiring, specifications, and installation information
for isolated analog input modules
SNAP Isolated Analog Input Modules Data Sheet
1182
Wiring, specifications, and installation information
for serial modules
SNAP Serial Communication Modules Data Sheet
1184
Using EtherNet/IP commands with remote
Opto 22 SNAP PAC I/O with an Allen-Bradley®
Logix™ controller
Ethernet/IP for SNAP PAC Protocol Guide
1770
Latest release, installation, and system requirements information for EtherNet/IP Configurator.
EtherNet/IP Configurator Release Notes. (See
www.opto22.com for the latest form number.)
All documents are available on our website, www.opto22.com. The easiest way to find a document
is to search on its form number.
Additional resources are also available on the Opto 22 Web site such as a demonstration video that
shows how easy it is to configure and program an Allen-Bradley controller to talk to SNAP PAC I/O. If
you are viewing this document online and have an internet connection, click the image. Otherwise,
go to the Learn tab on the Opto 22 website, www.opto22.com, and click SNAP I/O with
Allen-Bradley Systems.
Additional Resources for EtherNet/IP
For an overview of CIP and EtherNet/IP technology, see
http://www.odva.org/Portals/0/Library/Publications_Numbered/PUB00138R2_CIP_Adv_Tech_Series_EtherNetIP.pdf
For information on the network infrastructure for EtherNet/IP, see
http://www.odva.org/Portals/0/Library/Publications_Numbered/PUB00035R0_Infrastructure_Guide.pdf
For a good starting point for Ethernet/IP research on the ODVA web site, see
http://www.odva.org/default.aspx?tabid=67
IO4AB User’s Guide
www.klinkmann.com
www
33
PRODUCT SUPPORT
Product Support
If you have any questions about using EtherNet/IP to communicate with Opto 22 devices, you can
call, fax, or email Opto 22 Product Support.
Phone:
800-TEK-OPTO (835-6786)
951-695-3080
(Hours are Monday through Friday,
7 a.m. to 5 p.m. Pacific Time)
Fax:
951-695-3017
Email:
[email protected]
Opto 22 website:
www.opto22.com
NOTE: Email messages and
phone calls to Opto 22
Product Support are
grouped together and
answered in the order
received.
When calling for technical support, be prepared to provide the following information about your
system to the Product Support engineer:
•
Software and version being used
•
Firmware versions
•
PC configuration (type of processor, speed, memory, and operating system)
•
RSLogix 5000 version
•
PLC model
•
PLC firmware version
•
A complete description of your hardware and operating systems, including:
– type of power supply
– types of remote I/O installed
– third-party devices installed (for example, barcode readers)
4
•
Description and symptoms of the issue
•
Specific error messages seen.
IO4AB User’s Guide
www.klinkmann.com
www
4: 2: Introduction to IO4ABChapter 4
2: Introduction to IO4AB
This chapter includes a brief introduction to Ethernet/IP and how it is implemented in Opto 22
products. It also provides guidance in selecting a messaging type.
Built on the standard TCP/IP suite of protocols, EtherNet/IP gets the “IP” part of its name from CIP™,
the Common Industrial Protocol™. As the name implies, EtherNet/IP adapts CIP to standard Ethernet
technology, and thus provides tools to deploy manufacturing applications on an enterprise
network. Introduced in 2001, EtherNet/IP is now supported by hundreds of vendors around the
world and is a standard networking solution in industrial automation.
In this Chapter
Opto 22 Advantage ...................................................... 5
Opto 22 Products........................................................... 6
Architecture...................................................................... 7
Implicit and Explicit Messaging .............................. 7
Using CIP Objects .......................................................... 8
Specifications .................................................................. 9
Opto 22 Advantage
Using EtherNet/IP, Allen-Bradley Logix controllers can communicate with remote Opto 22 I/O and
take advantage of Opto 22’s distributed intelligence. With distributed intelligence, a controller (such
as an Allen-Bradley controller), handles overall control but does not have to attend to every detail of
every process. The I/O’s own onboard processor (also called a brain or device) has the intelligence to
handle not only on/off control but also functions such as latching, counting, thermocouple
linearization, even PID loops. With these functions running locally on the I/O unit, they still do their
job even if communication to the controller is lost, and the load on the controller is reduced.
IO4AB User’s Guide
www.klinkmann.com
www
55
OPTO 22 PRODUCTS
By connecting to Opto 22 devices as remote I/O, you can add the rich and sophisticated
functionality of Opto 22 equipment to your EtherNet/IP systems. While other manufacturer’s devices
may report only states and counts, our SNAP PAC System devices can provide access to the
following functions:
•
Power consumption
•
Thermocouple linearization
•
Power line monitoring
•
Temperature conversion
•
PID loop control (up to 96 loops)
•
Quadrature counting
•
Serial device control (RS-232/485)
•
Input latching
•
Analog scaling
•
Pulse generation and measurement
•
Offset and gain
•
High-speed counting (up to 20 kHz)
•
Analog ramping
•
Frequency and period measurement
•
Output clamping
•
Digital and analog totalizing
•
Filter weight
•
Watchdog timeout
•
Minimum and maximum values
•
Time-proportional output
•
Engineering unit conversion
•
Load cell
Opto 22 Products
You can use a variety of Ethernet-capable devices from the SNAP PAC family of products in an
EtherNet/IP environment, including the latest generation of SNAP PAC controllers and brains. There
are two basic approaches:
•
Use SNAP PAC I/O with a SNAP PAC EB-series brain or R-series controller as intelligent remote
I/O with an EtherNet/IP-enabled scanner such as an Allen-Bradley PLC. If you want a brain or
controller with Factory Mutual approval, choose the part number with FM at the end, such as
SNAP-PAC-EB1-FM.
NOTE: SNAP PAC EB-series brains are equipped with LEDs that report the EtherNet/IP module status
(MS) and network status (NS). For more information, see form 1690, the SNAP PAC Brains User’s Guide.
•
6
Use SNAP PAC S-series or R-series controllers to exchange scratch pad variable data with an
EtherNet/IP-enabled scanner such as an Allen-Bradley PLC.
IO4AB User’s Guide
www.klinkmann.com
www
CHAPTER 2: INTRODUCTION TO IO4AB
Architecture
In EtherNet/IP terminology, a device may function as either an adapter or a scanner. Our Opto 22
devices are implemented as adapters, and as such are able to send and receive data only when
requested to do so by a scanner. The Opto 22 device (or adapter) is therefore a target of instructions
and requests for information sent by a scanner, which is usually a PLC, but could be a PC running
control software.
An adapter class device receives message requests from all other classes of products, and it can
exchange peer data using messages with any class of device. However, an adapter cannot store or
originate the data communications parameters necessary to establish a connection. Therefore, it
cannot originate real-time I/O data connections, which is why it sends and receives I/O data only
when it is requested to do so by a scanner.
A scanner is capable of originating I/O data connection requests with adapter class products, as well
as with other scanner class products. Scanner class devices may also originate or be the targets of
explicit connection requests to and from other classes of products, and they can send or receive
messages to or from all other classes of products.
Implicit and Explicit Messaging
As adapters, SNAP-PAC-EB brains, and SNAP-PAC-R and SNAP-PAC-S controllers are able to exchange
messages with scanners using both explicit and implicit messaging.
Explicit messages are used for request/response transactions between two nodes. The scanner
sends a request and the adapter returns a response. Using TCP/IP, these messages can reach any
network-accessible object attributes and services within a device. Once the modules and points are
configured on an Opto 22 device, no additional configuration is required on an Opto 22 device. All
programming is done in RSLogix.
Implicit messages transfer data at regular intervals established by the scanner. No request is
required, the request is implied. Implicit messaging connections often are set up as one-to-many
relationships and use UDP/IP to multicast application-specific I/O data at regular intervals. When
properly configured, the data is always available to be scanned by the controller. In addition to
configuring the modules and points on an Opto 22 device, you must also create input and output
assemblies. An assembly provides the format for the implicit message packet that includes the
information for the point or points you are interested in.
For help with choosing a messaging type, see the next section “Choosing the Messaging Type.”
IO4AB User’s Guide
www.klinkmann.com
www
77
USING CIP OBJECTS
Choosing the Messaging Type
Implicit messaging is the normal way to communicate with I/O. However, there are times when
explicit messaging is more appropriate. See the reasons below for why you might use one
messaging type over the other. All of these apply for a properly configured Ethernet network (wired
or wireless).
Reasons for Using Implicit Messaging
•
For typical communications with I/O (also called I/O messaging) where an item is scanned or
repeated
•
For a simpler implementation and less programming in ladder logic. Programming in ladder
logic is required for explicit messaging.
•
If you want the SNAP I/O to send data at stated intervals to one or more PLCs without waiting
for a request (input instance), or if you want the PLC to do the same (output instance)
For instructions for using implicit messaging, see “4: Setting Up Implicit Messaging” on page 23.
Reasons for Using Explicit Messaging
•
If you want the PLC to initiate communication at specific points in your ladder logic
•
For communication among controllers (such as exception, handshaking, and access)
•
For more complex commands that are not suited to scanning. For example, Read and Clear
Counters.
•
To route messages over wide area connections. With explicit messaging, you can access a
remote Opto 22 device over the Internet.
•
For sending or receiving data on a serial communication module port using the Serial Port
object
•
If the quantity of data exchanged exceeds ~1000 bytes of input data or ~500 bytes of output
data, which are the limits in RSLogix 5000 software, the excess must be exchanged via explicit
messaging
•
For some OEM applications, properly configured explicit messaging can require less
programming and program management
For instructions for using explicit messaging, see “5: Setting Up Explicit Messaging” on page 33.
Using CIP Objects
EtherNet/IP accesses device data and functionality as a collection of object attributes and services.
As much as possible, Opto 22 device data and functionality is exposed through standard CIP objects,
extended for additional non-standard functions. In some cases vendor-specific objects are defined
for functionality that is not within the scope of the standard objects.
The classes available for implicit messaging in the EtherNet/IP Configurator are a subset of the CIP
classes, all of which are available through explicit messaging. For information on the CIP classes and
attributes, see form 1770, the Ethernet/IP for SNAP PAC Protocol Guide.
8
IO4AB User’s Guide
www.klinkmann.com
www
CHAPTER 2: INTRODUCTION TO IO4AB
Specifications
The following specifications apply to any SNAP PAC Ethernet-based brain or controller used as a
remote I/O unit for an Allen-Bradley PLC:
Description
Value
TCP/IP encapsulation connections
16
CIP Connections allowed per TCP/IP connection
2
Implicit Multicast Connections
16
Assembly instances supported
16
Assembly members in all assembly instances
4096
IO4AB User’s Guide
www.klinkmann.com
www
99
SPECIFICATIONS
10
IO4AB User’s Guide
www.klinkmann.com
www
5: 3: Getting StartedChapter 5
3: Getting Started
This chapter describes lists the things you will need in order to implement IO4AB. It also describes
how to install EtherNet/IP Configurator and two procedures which you must do for both implicit
and explicit messaging: adding an Opto_22 device to the network and configuring I/O modules and
points.
In this Chapter
What You Will Need....................................................11
Installing EtherNet/IP Configurator .....................12
Adding an Opto 22 Device......................................12
Configuring I/O Modules and Points ..................16
What You Will Need
•
A SNAP PAC EB-series or R-series device loaded with firmware R8.3a or newer, installed on a
mounting rack with I/O modules and connected to the network. See the documentation
included with the Opto 22 hardware.
NOTE: If you will be doing the exercises in “5: Setting Up Explicit Messaging” on page 33, and want to
run your example Logix project, you will need a SNAP PAC Learning Center from Opto 22, either part
number SNAP-IO4ABLC or SNAP-PACLC. However, if you do not plan to run your example project, you
do not need a Learning Center.
Make sure to assemble the Learning Center according to the instructions that are included. For more
information about obtaining a SNAP PAC Learning Center, go the Opto 22 website, www.Opto22.com
and search on the part number.
•
EtherNet/IP Configurator installed on your computer (see below). EtherNet/IP Configurator is
available as a free download from our website, www.opto22.com, and it is included with the
CD that came with the Opto 22 device.
•
RSLogix 5000, version V13 or newer installed on your computer
•
ControlLogix PLC 1756-L6x with a 1756-ENBT/A, 1756-EN2T, or 1756-EM2F EtherNet/IP
module. You can also use a CompactLogix 1769-L32E, a DriveLogix 700s Version 2, or a
SoftLogix.
IO4AB User’s Guide
www.klinkmann.com
www
11
11
INSTALLING ETHERNET/IP CONFIGURATOR
NOTE: If you have an SLC 5/05, MicroLogix 1100 (FRN4 or newer) or MicroLogix1400 (FRN4 or newer),
you can also connect the two systems and use Explicit Messaging to access data. For more
information, see “D: Connecting with SLC5 or MicroLogix” on page 121.
•
An industrial managed Ethernet switch
Installing EtherNet/IP Configurator
The easy-to-use EtherNet/IP Configurator provides the tools you need to configure modules and
points, create input and output assemblies, and download a configuration to an Opto 22 device.
EtherNet/IP Configurator is available as a free download from our website, www.opto22.com, and it
is included with the CD that came with your Opto 22 device.
If you are using the download, double-click the downloaded file. The installation wizard should
start automatically. Follow directions to install the software.
If you are using the CD, insert the CD in your CD-ROM drive. The installation wizard should start
automatically. If it doesn’t, use Windows Explorer to navigate to your CD-ROM drive and then
double-click setup.exe. Follow directions to install the software.
Adding an Opto 22 Device
The best way to add an Opto 22 device to the network (and also the configuration) is to allow
EtherNet/IP Configurator to discover the device. (To add a device manually, see “Adding a Device
Manually” on page 78.)
To open EtherNet/IP Configurator, select:
Start > All Programs > Opto 22 > EtherNet-IP > EtherNet-IP Configurator
12
IO4AB User’s Guide
www.klinkmann.com
www
CHAPTER 3: GETTING STARTED
Tabs for configuring
I/O modules and
assemblies
Toolbar
Configured
devices
Discovered
devices
Status
messages
When installed and first turned on, an Opto 22 device sends out a BootP broadcast requesting an IP
address. EtherNet/IP Configurator discovers each Opto 22 device on your network broadcasting a
BootP request and lists the devices in the device tree.
MAC addresses
Discovered Devices
Like all Opto 22 Ethernet-based controllers and brains, each of the discovered devices has a unique
hardware Media Access Control (MAC) address, which is displayed in the device list.
In order to add a discovered device to a configuration so that it can communicate on the network,
you must give the device a name, a valid IP address, and a subnet mask.
To add a discovered device:
1. Make sure the device is connected to the network and turned on.
The device now broadcasts a BootP request for its configuration.
Your SNAP-PAC-EB1 is identified by its MAC address, also written on a label attached to the side
of the controller’s housing. (The MAC addresses of Opto 22 devices begin with 00.a0.3d.) If no
devices are listed under Discovered Devices, turn your Opto 22 device off and then turn it on
again.
2. When the MAC address of the discovered device appears under Discovered Devices,
double-click the MAC address.
IO4AB User’s Guide
www.klinkmann.com
www
13
13
ADDING AN OPTO 22 DEVICE
CAUTION: EtherNet/IP Configurator lists ALL Opto 22 devices sending BootP or DHCP broadcasts.
Assign IP addresses only to the ones you know are yours!
The Assign IP Address dialog box appears.
3. Enter the IP Address and the Subnet Mask for the device. If it will be talking to a device on
another subnet, enter the Gateway (router) address. If it will talk only on the local subnet, leave
the gateway address all zeros (0.0.0.0). Leave the DNS address at 0.0.0.0 field blank.
WARNING! Each device on your network, including computers, routers, controllers, brains, and so on,
must have a unique IP address. Failure to assign unique IP addresses may cause catastrophic network
or hardware failures. If you don’t know which IP addresses are safe to use, check with your system
administrator.
4. When the IP address, subnet mask, and other fields are correct, click OK.
14
IO4AB User’s Guide
www.klinkmann.com
www
CHAPTER 3: GETTING STARTED
The Name This Device dialog box appears with the Device Type, IP Address and Port filled in
automatically.
5. At minimum, enter a Device Name.
You can also enter a description, select the temperature type, and whether you want to use a
watchdog.
Temperature. Choose whether temperatures will be handled in Fahrenheit or Celsius.
Watchdog. Select whether you want a Watchdog on the unit. The default is No (disabled). If
you select Yes, a new field appears; enter the Watchdog timeout value (in seconds). The default
timeout is 0.5 seconds.
NOTE: If you want to enable Watchdog on a point, make sure to enable it here at the point level as well.
6. Click OK to confirm the changes.
The new device appears in the device tree.
New device
IO4AB User’s Guide
www.klinkmann.com
www
15
15
CONFIGURING I/O MODULES AND POINTS
Configuring I/O Modules and Points
For both implicit and explicit messaging, once you have added a device, you need to configure its
modules and points as described in the following sections:
•
“Configuring Digital Points” (below)
•
“Configuring Analog Points” on page 19
Configuring Digital Points
Use the following steps to configure digital points on all 4-channel and high-density SNAP digital
modules.
1. In EtherNet/IP Configurator, click the Configure I/O Modules & Points tab.
2. Double-click the number that represents the digital module’s position on the rack. For help, see
“Referencing I/O Points on SNAP PAC Racks” on page 106.
16
IO4AB User’s Guide
www.klinkmann.com
www
CHAPTER 3: GETTING STARTED
3. In the Add Module dialog box, choose the module type and then the exact module part
number from the lists. Click OK.
4. Back in the Configure I/O Modules & Points tab, click the plus sign next to the new module to
expand it. Notice that the module icon is color-coded to reflect the type of module being
configured: white for digital DC input, red for digital DC output, yellow for digital AC input, and
black for digital AC output.
Module icon
Expand or collapse points
on the module by clicking
the + or - sign in the box.
Points
IO4AB User’s Guide
www.klinkmann.com
www
17
17
CONFIGURING I/O MODULES AND POINTS
5. Double-click the point you want to configure to open the Add Digital Point dialog box.
A
B
C
D
E
6. Complete the fields as follows:
A Name: Enter a name for the point. The name must start with a letter and may contain letters,
numbers, and underscores. Spaces are converted to underscores.
B Description: (Optional) Enter a description of the point.
C Type, Module: Type and module are already filled in for you.
D Features: To use a feature of the module, choose it from the drop-down list. For information
about the available features, see “Using I/O Point Features” on page 104.
E Watchdog: (Output modules only) To configure a status (On or Off ) the point should be set
to if the Watchdog timer on this device expires, click Yes and choose On or Off from the
drop-down list. In order for this to take effect, make sure Watchdog is enabled at the device
level. To do this, double-click the device in the device tree to open the Modify Device
Information dialog. Select Yes for Watchdog, choose a timeout, and then click OK.
7. When you have completed the fields, click OK.
The new point appears in the list.
8. To configure more digital points, repeat the steps. To configure analog points, see the next
section.
18
IO4AB User’s Guide
www.klinkmann.com
www
CHAPTER 3: GETTING STARTED
Configuring Analog Points
Use the following steps to configure analog points on all SNAP analog modules supported by the
device.
1. In the Configure I/O Points & Modules tab, double-click the number that represents the analog
module’s position on the rack. For help, see “Referencing I/O Points on SNAP PAC Racks” on
page 106.
2. In the Add Module dialog box, choose Analog Input or Analog Output, and then choose the
exact module part number from the list. Click OK.
3. In the Configure I/O Points & Modules tab, click the plus sign next to the new module to
expand it. Notice that the module icon is color-coded to reflect the type of module being
configured: blue for analog input, green for analog output.
Module icon
Expand or collapse points
on the module by clicking
the + or - sign in the box.
Points
4. Double-click the point you want to configure.
IO4AB User’s Guide
www.klinkmann.com
www
19
19
CONFIGURING I/O MODULES AND POINTS
A
B
C
E
F
D
G
5. Complete the fields as follows:
A Name: Enter a name for the point. The name must start with a letter and may contain letters,
numbers, and underscores. (Spaces are converted to underscores.)
B Description: (Optional) Enter a description of the point.
C Type, Module: Type and module are inserted for you. You may be able to choose a different
range or a scalable module from the drop-down list.
D Units, Scale: Units and scaling for this module. See “Using Custom Scaling” on page 21.
E Scaling Default: (Scalable modules only.) To return the units, zero-scale value, and
full-scale value to the defaults for the module, click Default.
F Scaling Custom: (Scalable modules only.) To assign custom units and values to the module,
click Custom. For example, you could scale the voltage range of a -10 to +10 VDC module
to be interpreted as engineering units of liters per second instead of volts. See “Using
Custom Scaling” on page 21.
G Watchdog: (Outputs only.) To configure a value this point should be set to if the Watchdog
timer on this device expires, click Yes and enter the value. In order for this to take effect,
make sure Watchdog is enabled at the device level. To do this, double-click the device in the
device tree to open the Modify Device Information dialog. Select Yes for Watchdog, choose
a timeout, and then click OK.
6. When you have completed the fields, click OK.
The new point is added.
20
IO4AB User’s Guide
www.klinkmann.com
www
CHAPTER 3: GETTING STARTED
Point types and features are shown in the Features/Subtype column.
7. To add more analog points, repeat the steps. To add digital points, see “Configuring Digital
Points” on page 16.
Using Custom Scaling
Scalable analog modules can be set to show something other than the actual inputs or outputs. For
example, you could scale the readings of a -10 to +10 VDC input point to measure its input as zero
liters per second when the real-world reading is zero VDC, and 1000 liters per second when the
real-world reading is five VDC.
NOTE: Custom scaling has no effect on the resolution or accuracy of the module.
1. In the Add Analog Point dialog box, click the Custom button in the Scaling area to open the
Scale Analog Readings dialog box.
A
B
C
This example shows units scaled to liters
per second. At an actual input of 0 VDC,
the point will show 0 liters per second.
At an actual input of 5 VDC, the point will
show 1000 liters per second.
D
E
2. Complete the fields as follows:
A Scaled Units: Enter new engineering units for the module. The example uses liters per
second.
B Actual Lower Value: Enter the actual real-world lower value that the scaled lower value
corresponds to. Note that inputs typically have under-range capability, which means you
IO4AB User’s Guide
www.klinkmann.com
www
21
21
CONFIGURING I/O MODULES AND POINTS
can specify a lower actual value that is less than the zero-scale value. Outputs do not have
under-range capability.
C Scaled Lower Value: Enter the new scaled lower value. This value can be any floating point
value.
D Actual Upper Value: Enter the actual real-world upper value that the scaled upper value
corresponds to. For inputs, you can specify an upper actual value greater than the full-scale
value.
E Scaled Upper Value: Enter the new scaled upper value. This value can be any floating point
value greater than the scaled lower value. This example uses 1000, which scales the output
to 1000 liters per second when its actual reading is 5 VDC.
3. Click OK.
The new custom-scaled units appear in the Add Analog Point dialog box.
Notice the new units of liters per second and the
new minimum-scale (“Zero Scale”) and
maximum-scale (“Full Scale”) values of -2000 and
+2000. The example connects a sensor with a
range of 0–1000 liters per second, but an output
of only 0–5 volts, to a SNAP-AIV module with an
output of -10 to +10 volts. The figures shown in
this dialog box reflect the total possible range of
the module, not the sensor.
Possible low
value for
module
Upper & lower
values entered
in dialog box
Possible high
value for
module
Custom scale
(Liters/sec)
Module’s
scale (VDC)
–2000
–10
–1000
–5
0
=
0
1000
=
5
2000
10
NOTE: On a bipolar module (for example, -10 VDC to +10 VDC), the minimum scale is always zero EU,
not a negative number.
22
IO4AB User’s Guide
www.klinkmann.com
www
6: 4: Setting Up Implicit MessagingChapter 6
4: Setting Up Implicit
Messaging
This chapter describes how to use EtherNet/IP Configurator and RSLogix 5000 software to set up
implicit messaging between an Allen-Bradley controller and Opto 22 remote I/O. If you want to set
up explicit messaging, see “5: Setting Up Explicit Messaging” on page 33. For help in choosing a
messaging type, see “Choosing the Messaging Type” on page 8.
Before you begin, make sure you have done the following things:
•
Installed your Opto 22 device and modules according to the instructions that came with the
device and modules
•
Added your Opto 22 device using EtherNet/IP Configurator (see “Adding an Opto 22 Device” on
page 12)
•
Configured the Opto 22 I/O module and points (see “Configuring I/O Modules and Points” on
page 16)
To set up implicit messaging you must use EtherNet/IP Configurator to create input and output
assemblies. An assembly provides the format for the implicit message packet that includes the
information for the point or points you are interested in. Once you have created the assemblies you
will use RSLogix 5000 to complete the setup.
For a list of the basic things you will need, see “What You Will Need” on page 11.
In this Chapter
Creating an Input Assembly ...................................24
Creating an Output Assembly ...............................26
Configuring RSLogix for Implicit Messaging ...28
IO4AB User’s Guide
www.klinkmann.com
www
23
23
CREATING AN INPUT ASSEMBLY
Creating an Input Assembly
1. In EtherNet/IP Configurator, click the Configure Assemblies tab, and then select an assembly
instance number, for example assembly instance 100. Each assembly instance created requires
a unique number. Unused assembly numbers have a white background.
2. Click Add to open the Add Assembly Member dialog box.
3. Select a class type such DiscreteInputPoint.
The classes available for implicit messaging in the EtherNet/IP Configurator are a subset of the
CIP classes, all of which are available through explicit messaging. For information on the CIP
classes and attributes, see form 1770, the Ethernet/IP for SNAP PAC Protocol Guide.
24
IO4AB User’s Guide
www.klinkmann.com
www
CHAPTER 4: SETTING UP IMPLICIT MESSAGING
4. Under Instance Information, select a point that you have configured. Otherwise, you can assign
an assembly member to a specific module and point.
5. Under Attribute, select an item in the list.
The attribute list allows you to define what information from each point you want to have
passed in the implicit message. In addition to value readings, you can get other data, such as
the minimum or maximum value for an analog input/output.
6. Click OK and follow any directions that appear for the class type.
For example, the Fill Module dialog box appears for DiscreteInputPoint and AnalogInputPoint.
7. Click OK.
8. Continue to add elements as necessary.
NOTE: If an assembly member or group of members adds up to less than 32-bits, you will need to add
padding.
9. To add a pad, click the Add button to open the Add/Modify dialog box.
IO4AB User’s Guide
www.klinkmann.com
www
25
25
CREATING AN OUTPUT ASSEMBLY
10. Under Class, select Pad, enter the size of the pad (for example, 28), and click OK.
The pad appears as the last member of element 0 to complete the 32-bit word, also called a
DINT. You can add up to 125 input DINTs.
When you have completed an input assembly for implicit messaging, go to the next section to
create an output assembly.
Creating an Output Assembly
Creating an output assembly is similar to creating an input assembly.
1. On the Configure Assemblies tab, click an assembly instance number other than the one used
for the input assembly, for example assembly instance 101.
Notice that the assembly numbers you’ve already used have a green background.
2. Select a class type such DiscreteOutputPoint.
The classes available for implicit messaging in the EtherNet/IP Configurator are a subset of the
CIP classes, all of which are available through explicit messaging. For information on the CIP
classes and attributes, see form 1770, the Ethernet/IP for SNAP PAC Protocol Guide.
26
IO4AB User’s Guide
www.klinkmann.com
www
CHAPTER 4: SETTING UP IMPLICIT MESSAGING
3. Under Instance Information, select a point that you have configured. Otherwise, you can assign
an assembly member to a specific module and point.
4. Under Attribute, select an item in the list.
The attribute list allows you to define what information from each point you want to have
passed in the implicit message. For example, in addition to writing a value to a point, you might
want to change the watchdog value or set high or low clamps on an analog point.
NOTE: If an assembly member or group of members adds up to less than 32-bits, you will need to add
padding.
5. To add a pad, click the Add button to open the Add/Modify dialog box.
6. Under Class, select Pad, enter the size of the pad (for example, 28), and click OK.
The pad appears as the last member of element 0 to complete the 32-bit word (or DINT). You
can add up to 124 output DINTs.
IO4AB User’s Guide
www.klinkmann.com
www
27
27
CONFIGURING RSLOGIX FOR IMPLICIT MESSAGING
When you've completed the output assembly instance, you are ready to download the
configuration to the Opto 22 device. This is also a good time to save the configuration.
7. To save the configuration, choose File > Save As. Then browse to an appropriate directory,
name the file (for example, Opto_IO), and then click Save.
8. Before you download the configuration, it is helpful to check for errors on an assembly
configuration report:
a. In the device tree, select an Opto 22 device.
Select an
Opto 22 device
b. From the Tools menu, choose Assembly Configuration Report. A text file opens showing
the configuration report.
9. To send the configuration to the device, choose Tools > Download Configuration to Opto 22
Device.
10. In the Download Configuration dialog box, select the device’s IP address, and then click
Download.
This completes the setup of the Opto 22 remote I/O for implicit messaging. In the next section, you
will configure communications with the Allen-Bradley controller.
Configuring RSLogix for Implicit Messaging
In this section you will use RSLogix 5000 to configure an Ethernet-enabled Allen-Bradley controller
to communicate with the remote Opto 22 I/O you configured in the previous sections. The
following instructions show screens from version 17 of RSLogix 5000 software using a
CompactLogix 1769-L32E PLC.
1. Open RSLogix 5000.
28
IO4AB User’s Guide
www.klinkmann.com
www
CHAPTER 4: SETTING UP IMPLICIT MESSAGING
2. Select File > New.
3. On the New Controller dialog box, fill in the appropriate information for the Type, Revision, and
Name fields.
Type
Revision
Name
4. Browse to the folder you want to use, and then click OK.
5. In the controller organizer, expand I/O Configuration, Backplane, and 1769-L32E Ethernet Port
LocalENB.
Expand
6. Right-click Ethernet and select New Module.
This module will be used to add the Opto 22 device.
7. Expand Communications in the controller organizer to open the Select Module dialog box.
IO4AB User’s Guide
www.klinkmann.com
www
29
29
CONFIGURING RSLOGIX FOR IMPLICIT MESSAGING
8. Scroll down to Generic Ethernet Module and then double-click it to open the New Module
dialog box.
9. Enter or select the following information:
– Name: An appropriate name such Opto_IO
– Comm Format: Choose the format most appropriate for the implicit message data, usually
Data - DINT or Data - REAL.
NOTE: Once you select the Comm Format and then click OK, it cannot be changed.
– IP Address: IP address of the Opto 22 device
10. For the Input Assembly Instance and the Output Assembly Instance, enter the assembly
instance numbers you configured for the input and output assemblies in EtherNet/IP
30
IO4AB User’s Guide
www.klinkmann.com
www
CHAPTER 4: SETTING UP IMPLICIT MESSAGING
Configurator. For example, you might have used 100 for the input assembly and 101 for the
output assembly.
For the size of the input and output assemblies, enter the number of 32-bit words defined for
each. For example, if you entered one 32-bit word for the input assembly in EtherNet/IP
Configurator as shown here, you would enter 1 as the size of the input assembly on the New
Module dialog box in RSLogix 5000.
The following example assembly from EtherNet/IP Configurator has three 32-bit words, so you
would enter a size of 3 in RSLogix 5000.
EtherNet/IP Configurator indicates the size of the assembly instance at the bottom of the
screen as shown here.
IO4AB User’s Guide
www.klinkmann.com
www
31
31
CONFIGURING RSLOGIX FOR IMPLICIT MESSAGING
Size of assembly
instance
11. For the Configuration fields, enter 254 for the Assembly Instance and 0 for the size.These
Configuration values are not used, but they must be entered.
NOTE: The Input Instance is an RSLogix READ assembly, and the Output Instance is an RSLogix WRITE
assembly. The Configuration values are not used, but they must be entered.
12. Click OK.
The Module Properties dialog box opens showing the Connection tab for you to enter the
Requested Packet Interval (RPI). The RPI is basically the scan time of the Opto 22 device.
13. Set the RPI to a reasonable value (range is 10-3200 ms), then click OK.
The Opto 22 remote I/O has now been configured and added to the RSLogix 5000 software as a
generic Ethernet module.
14. Select Communications > Download to download the RSLogix program to the controller, and
then click Download in the next two dialog boxes that appear.
Once the download is complete, the program will run automatically on the controller.
32
IO4AB User’s Guide
www.klinkmann.com
www
7: 5: Setting Up Explicit MessagingChapter 7
5: Setting Up Explicit
Messaging
This chapter describes how to use the EtherNet/IP Configurator and RSLogix 5000 to implement
explicit messaging over EtherNet/IP in order to access data from SNAP PAC I/O and SNAP PAC
controllers. If you want to set up implicit messaging, see “4: Setting Up Implicit Messaging” on
page 23. For help choosing a messaging type, see “Choosing the Messaging Type” on page 8.
Opto 22’s implementation of Allen-Bradley’s explicit messaging is an EtherNet/IP version of an
earlier messaging protocol, CIP Messaging over ControlNet. Similar in some ways to explicit
messaging, CIP messaging also used the MSG instruction. Along with implicit messaging, explicit
messaging is supported on controller platforms such the ControlLogix® and CompactLogix™. It is
also supported on other Allen-Bradley platforms that do not support implicit messaging.
For information on the objects available using explicit messaging in an IO4AB system, see form
1770, the Ethernet/IP for SNAP PAC Protocol Guide.
For a list of the basic things you will need, see “What You Will Need” on page 11. Note that the
examples in this chapter are based on the I/O contained in a SNAP PAC Learning Center. It is not
required that you have a Learning Center to do the majority of the steps. However, if you want to
obtain a SNAP PAC Learning Center in order to run your Logix project and exchange data with
Opto 22 I/O, go the Opto 22 website, www.Opto22.com and search on the part number, either
SNAP-IO4ABLC or SNAP-PACLC.
In this Chapter
Creating an Assembly Instance....................................................... 34
Configuring an EtherNet/IP Module ............................................. 40
Creating a MESSAGE Object ............................................................. 43
Adding the MSG Instruction............................................................. 50
Configuring a MSG to Write an Assembly Instance ............... 52
Using User Data Types (UDTs).......................................................... 54
Summary................................................................................................... 55
IO4AB User’s Guide
www.klinkmann.com
www
33
33
CREATING AN ASSEMBLY INSTANCE
Creating an Assembly Instance
This section provides an example of how to use EtherNet/IP Configurator to configure modules and
points on an Opto 22 device such that the data can be accessed by the Allen-Bradley Logix
architecture.
This section includes the following topics:
•
“Using EtherNet/IP Configurator to Add and Configure a SNAP-AICTD Module” on page 34
•
“Configuring the SNAP-AICTD Module Input Assembly” on page 36
•
“Configuring the SNAP-AOV27 Module Output Assembly” on page 38
•
“Downloading the Configuration to the SNAP PAC I/O Unit.” on page 39
Using EtherNet/IP Configurator to Add and Configure a
SNAP-AICTD Module
In this section you will use EtherNet/IP Configurator to import the Opto 22 SNAP PAC Learning
Center’s ioCookies I/O configuration and then configure the SNAP-AICTD module in slot 3 of the
module configuration.
In order to configure the ioCookies I/O module configuration in EtherNet/IP Configurator, you must
first use PAC Control to export the I/O configuration as an Opto Tag Database (.otg) file.
Creating an I/O Configuration Export File
1. In PAC Control, open the PAC Control version of the ioCookies strategy.
The ioCookies strategy is usually located on your local hard drive at Program Files > Opto22 >
PAC Project > Control Basic Examples > ioCookies.
2. Create a new I/O unit for your SNAP PAC R-series controller and move all of the I/O points from
the existing I/O unit (Mixed_IO_Unit) to the new I/O unit, as follows:
a. Choose Configure > I/O to open the Configure I/O Units dialog box.
b. Select Mixed_IO_Unit, and then click the I/O Points button to open the Configure I/O
Points dialog box.
c. Expand Module 00, highlight the point in slot 0, and then click the Move To button to open
the Move Point dialog box.
d. Select the new I/O unit, select the first available target channel, and then click OK.
e. Repeat this process for each point (highlighting the point and moving it to the new I/O
unit) until you have moved all of the I/O points to the new I/O unit.
f. Close all of the open dialog boxes in PAC Control.
3. In the strategy tree, right-click the old I/O unit and choose Delete to remove it.
4. In the strategy tree, right-click the I/O Units folder and choose Export from the pop-up menu.
The Export I/O Units to an Opto Tag Database dialog box appears.
5. Navigate to the location where you want to place the export file. Type the file name, and click
Save to create the export file.
34
IO4AB User’s Guide
www.klinkmann.com
www
CHAPTER 5: SETTING UP EXPLICIT MESSAGING
Importing the Configuration File into EtherNet/IP
1. In the EtherNet/IP Configurator main window, click the Open button
Open to open the Open Tag Database dialog box.
or choose File >
2. Locate the I/O configuration (otg) file and click Open to import the file.
3. Double-click on the device name to open the Modify Device Definition dialog box.
Double-click
device name
4. Enter the correct IP address for the PAC R controller.
IO4AB User’s Guide
www.klinkmann.com
www
35
35
CREATING AN ASSEMBLY INSTANCE
Enter the PAC R’s IP address
This is important because the imported configuration will likely have the local loopback
address for the I/O unit (127.0.0.1) instead of the IP address for the PAC R. In order to
communicate with the PAC R, EtherNet/IP Configurator needs the device’s IP address.
Configuring the SNAP-AICTD Module Input Assembly
The input assembly’s role in this exercise is to read the temperature as a REAL (a 32-bit float).
1. In EtherNet/IP Configurator, open the ioCookies I/O configuration as described in the previous
section, then expand the configuration for the SNAP-AICTD module in slot 3.
2. Notice that point 0 of slot 3 connects to the process temperature probe.
3. Click the Configure Assemblies tab, select assembly instance 100, and click the Add button to
open the Add Assembly Member dialog box.
4. Make the following selections:
– Class: Analog Input Point
– Instance Information: Module 3, Point 0
– Attribute: rValue
36
IO4AB User’s Guide
www.klinkmann.com
www
CHAPTER 5: SETTING UP EXPLICIT MESSAGING
5. Click OK.
As shown below, the assembly instance 100 has a single value, the rValue of module 3, point 0.
This corresponds to the Process Temperature input, which is the first of two channels on the
SNAP-AICTD module.
IO4AB User’s Guide
www.klinkmann.com
www
37
37
CREATING AN ASSEMBLY INSTANCE
Configuring the SNAP-AOV27 Module Output Assembly
1. Click the Configure I/O Modules & Points tab and expand the configuration for the
SNAP-AOV-27 module in slot 2.
2. Click the Configure Assemblies tab, select assembly instance 101, then click the Add button.
3. On the Add Assembly Member dialog box, make the following selections:
– Class: Analog Output Point
– Instance Information: Module 2, Point 0
– Attribute: rValue
4. Click OK.
5. On the Fill Module dialog box, select No, and then click OK.
This rValue will be a type REAL, just like the analog input.
38
IO4AB User’s Guide
www.klinkmann.com
www
CHAPTER 5: SETTING UP EXPLICIT MESSAGING
Downloading the Configuration to the SNAP PAC I/O Unit.
1. Choose Tools > Download Configuration to Opto 22 Device to open the Download
Configuration dialog box.
2. If this is the first time you are downloading an EtherNet/IP configuration, click the Clear
Settings button to erase all prior configurations, reset the PAC R to its factory default settings,
and restart the I/O unit.
3. Click the Download button to download the new configuration.
When the configuration has downloaded successfully to the device, you are ready to configure an
EtherNet/IP module using RSLogix.
IO4AB User’s Guide
www.klinkmann.com
www
39
39
CONFIGURING AN ETHERNET/IP MODULE
Configuring an EtherNet/IP Module
The instructions in this example exercise are primarily for a ControlLogix 1756-L61. However, you
can also use a CompactLogix 1769-L32E. Any differences for the 1769-L32E are included.
1. Create a new RSLogix project named “Explicit_Messaging.”
2. For ControlLogix, select the I/O Configuration folder in the controller organizer, and manually
add an EtherNet/IP interface.
The interface is added to the I/O configuration folder.
For a CompactLogix 1769-L32E PLC, when you create a new project in RSLogix, an Ethernet
interface named “LocalENB” is automatically created at slot 1.
40
IO4AB User’s Guide
www.klinkmann.com
www
CHAPTER 5: SETTING UP EXPLICIT MESSAGING
In this example, there is a 1756-ENBT/A (Revision 3.9) in Slot 1 of the Logix chassis. You will
need this information to complete the next set of dialogs.
3. To add the 1756-ENBT/A, right-click the I/O Configuration folder and choose New Module…
from the popup menu to open the Select Module dialog box.
4. Expand the Communications group, select the 1756-ENBT/A adapter, and click OK.
Select the
1756-ENBT/
A adapter
5. In the Select Major Revision dialog box that appears, select the major revision of the
1756-ENBT/A module, which is 3 for the module used in this example.
6. Click OK to open the New Module dialog box.
IO4AB User’s Guide
www.klinkmann.com
www
41
41
CONFIGURING AN ETHERNET/IP MODULE
7. Enter or select the following:
– Name: ENBTA
– Description: The 1756 ENBT/A in slot 1
– Slot: 1
– Revision (minor): 9.
Recall that our EtherNet/IP module has a revision of 3.9. The 9 is the minor revision number.
The other parameters are not necessary, so leave the other fields blank. The completed dialog
box should look like this:
8. Click OK.
42
IO4AB User’s Guide
www.klinkmann.com
www
CHAPTER 5: SETTING UP EXPLICIT MESSAGING
The RSLogix window should now look like this:
9. Click OK again to close the Module Properties dialog box.
Creating a MESSAGE Object
In RSLogix, an explicit message is created using a MESSAGE tag.
1. In RSLogix 5000, open the controller organizer, right-click Controller Tags, and then choose
New Tag.
2. In the New Tag dialog box, enter or select the following:
– Name: Read Message
– Description: My read message for an MSG instruction
– Tag Type: Base
– Data Type: MESSAGE
IO4AB User’s Guide
www.klinkmann.com
www
43
43
CREATING A MESSAGE OBJECT
To select MESSAGE, click the Data Type button,
box.
to open the Select Data Type dialog
The completed dialog box should look like this:
3. At the bottom of the dialog box, select Open MESSAGE Configuration.
4. Click OK to close the New Tag dialog box and open the Message Configuration dialog box.
44
IO4AB User’s Guide
www.klinkmann.com
www
CHAPTER 5: SETTING UP EXPLICIT MESSAGING
5. Select Get Attribute Single for the Service Type.
IO4AB User’s Guide
www.klinkmann.com
www
45
45
CREATING A MESSAGE OBJECT
Notice that the Source Element and Source Length fields are now inactive.
6. Populate the Class, Attribute, and Instance fields as follows:
– Class: 4 (Hex)
To Read an assembly instance is a Class 4 (Hexadecimal) Assembly operation.
– Attribute: 3 (Hex)
This is a set Attribute option.
– Instance: 100
This is assembly instance 100 that you configured within the EtherNet/IP Configurator.
For more information on the Class and Attributes, see form 1770, the EtherNet/IP for SNAP
PAC Protocol Guide.
So far, the Message Configuration dialog box should look like this:
46
IO4AB User’s Guide
www.klinkmann.com
www
CHAPTER 5: SETTING UP EXPLICIT MESSAGING
7. For the Destination, click the New Tag button to open the New Tag dialog box.
8. Create a variable with the following attributes:
– Name: ICTD_Temperature
– Data Type: REAL
– Scope: Explicit_Messaging
9. Click OK to close the New Tag dialog box.
10. In the Destination field, select the new controller-scoped tag. In a MESSAGE object, the Source
Element and Destination must be controller-scoped tags.
The completed Configuration tab should like this:
IO4AB User’s Guide
www.klinkmann.com
www
47
47
CREATING A MESSAGE OBJECT
11. Click the Communication tab.
12. For a ControlLogix controller (1756-L61 with a 1756-ENBT/A) implementation, enter the
communication path, ENBTA, 2, 000.000.000.000, where:
– ENBTA is the name of the EtherNet/IP communication module in slot 1 of our chassis.
– 2 indicates this is an external message.
– 000.000.000.000 is the IP address of your PAC remote I/O unit.
Leave the Connected checkbox unchecked.
48
IO4AB User’s Guide
www.klinkmann.com
www
CHAPTER 5: SETTING UP EXPLICIT MESSAGING
For a CompactLogix controller (1769-32E) with an embedded EtherNet/IP Communication
module, the path changes slightly. RSLogix automatically names the embedded EtherNet/IP
module “LocalENB.” All other values of the path are the same.
13. Click OK to close the dialog box and save the module configuration.
IO4AB User’s Guide
www.klinkmann.com
www
49
49
ADDING THE MSG INSTRUCTION
Adding the MSG Instruction
An MSG instruction is used to trigger an explicit message. It starts only when the input rung
condition transitions from off to on, which is different than most other ladder instructions. Once the
MSG is triggered, the message occurs asynchronously. You do not need to keep the rung condition
true to the MSG instruction on. This will cause more logic time to be consumed each time the ladder
runs.
In the example, a timer is used to control how often the MSG instruction is initiated. The timer
creates a regular interval to read or write to the remote I/O. If the PLC and I/O are connected by very
high bandwidth or reliable wide area networking, you can set the timer to a reasonable interval (e.g.
1 second). However, if the wide area networking is unreliable or fairly limited in bandwidth, set the
timer for longer intervals such as 1 minute. The longer timer allows the message to complete fully,
even if it ends in an error in response to a communication request.
The ladder must now inspect to see when the message operation is complete or has completed in
error. Check the Boolean attributes of either .DN or .ER to inspect whether the message is done or
ended in an error.
50
IO4AB User’s Guide
www.klinkmann.com
www
CHAPTER 5: SETTING UP EXPLICIT MESSAGING
Rung 1 in this example is incomplete. When the XIC for Read_Message.DN closes, the explicit data
read is available. Should the Explicit Message fail, the XIC for Read_Message.ER will close. In either
case, the typical ladder implementation will add additional logic to handle both successful and
unsuccessful communications.
The EtherNet/IP port is responsible for managing the TCP/IP communications of the explicit
messaging. According to Rockwell documentation the default unconnected timeout for an explicit
message is 30 seconds. This value may be changed by modifying the “UnconnectedTimeout”
member of the MESSAGE object. This timeout should not be lower than five seconds on an
optimally functioning network. Once an explicit message is initiated, it cannot be stopped.
Here are both rungs of the ladder in a single screen view.
IO4AB User’s Guide
www.klinkmann.com
www
51
51
CONFIGURING A MSG TO WRITE AN ASSEMBLY INSTANCE
Configuring a MSG to Write an Assembly Instance
A write assembly instance is also triggered by a timer, the same as a read assembly instance. You
should not use the message’s .ER and .DN attributes to trigger the next message operation because
that can cause erratic operation.
For more detailed information on creating a MESSSAGE object, see “Creating a MESSAGE Object” on
page 43.
1. In the controller organizer, right-click Controller Tags, and choose New Tag.
2. In the New Tag dialog box, enter or select the following:
– Name: Write Message
– Description: My read message for an MSG instruction
– Tag Type: Base
– Data Type: MESSAGE
3. At the bottom of the dialog box, select Open MESSAGE Configuration.
4. Click OK to close the New Tag dialog box and open the Message Configuration dialog box.
52
IO4AB User’s Guide
www.klinkmann.com
www
CHAPTER 5: SETTING UP EXPLICIT MESSAGING
Note that this message is an Opto 22 Object Model Class 0x04, attribute 0xe, and references the
assembly instance 101, where the output is configured.
5. Populate the fields as follows:
– Service Type: Set Attribute Single
– Class: 4 (Hex).
To Read an assembly instance is a Class 4 (Hexadecimal) Assembly operation.
– Attribute: 3 (Hex)
This is a set Attribute option.
– Instance: 101
For more information on the Class and Attributes, see form 1770, the EtherNet/IP for SNAP
PAC Protocol Guide.
6. Click on the Communication tab, and enter the same connection path as you did for the read
message.
IO4AB User’s Guide
www.klinkmann.com
www
53
53
USING USER DATA TYPES (UDTS)
In order to make this an unconnected message, do not check the Connected box. Unconnected
messaging is the most efficient usage of TCP/IP encapsulation sessions in the Logix
architecture.
7. Click OK to close the dialog box and save the module configuration.
Using User Data Types (UDTs)
If you are using version 16 or newer of RSLogix 5000, UDTs offer Explicit Messaging the ability to
access assembly instance data with system meaningful attributes. By giving an attribute to each
object within the UDT, it is much easier understand what an assembly instance is.
For example, compare these two data statements:“PAC:O.Data[2].3” and “PAC.Turn_Conveyor_Off.”
The second statement is easier to understand than the first one. UDTs also permit mixed data types
within a single object; you can place REALs, DINTs, INTs, and BOOLs throughout the UDT. These
values may be read or written at will, as a single block of data.
When implementing digital I/O states to map to the EtherNet/IP Configurator’s assembly instances,
use the BOOL data type in the UDT definition.
Remember that RSLogix 5000 will collect continuous BOOL definitions in the UDT into rounded
32-bit data sizes. We recommend that you create a BOOL padding in the UDT, or else create a BOOL
array of 32 values to clearly indicate the extension of the BOOL data. This will avoid confusion to data
mismatches between the assembly instance and the MSG operation. To match this padding, the
assembly instance configuration must also have an appropriate pad to fill out a block of 32-bits.
54
IO4AB User’s Guide
www.klinkmann.com
www
CHAPTER 5: SETTING UP EXPLICIT MESSAGING
Summary
Explicit messaging is simply a manual method of acquiring I/O data. In combination with the
EtherNet/IP configurator, you are still able to read and write I/O values to configure or manipulate
I/O states.
Explicit messaging provides a way of accessing data upon demand, and it isn’t necessarily difficult. It
requires a couple rungs of ladder to implement, a bit more effort than with implicit messaging.
The ladder controls when incoming and outgoing messaging occurs and the messaging occurs over
TCP/IP. This is very useful for implementing very remote or expansive network monitoring and
control systems.
Explicit messaging is the only method for accessing SNAP PAC I/O in Allen-Bradley PLC lines outside
of the Logix 5000 family such as the SLC5/05 and MicroLogix 1100 and 1400 families, which do not
support implicit (I/O) messaging.
IO4AB User’s Guide
www.klinkmann.com
www
55
55
SUMMARY
56
IO4AB User’s Guide
www.klinkmann.com
www
1: 6: Connecting PAC Control and Allen-Bradley SystemsChapter 1
6: Connecting PAC Control and
Allen-Bradley Systems
In this chapter you’ll learn how to connect a SNAP-PAC-S controller with an Allen-Bradley
ControlLogix programmable logic controller (PLC) so that you can use either implicit or explicit
messaging to exchange data between these two automation systems.
Connecting the two systems includes the following activities:
•
Modifying the PAC Control strategy
•
Creating and Downloading EtherNet/IP assembly instances
•
Modifying the RSLogix ladder
Each of these activities is demonstrated using a simple example.
In addition to the things listed on page 11 you will need the following things:
•
PAC Project Basic or PAC Project Professional. PAC Project Basic is free. Both versions are
available on the Opto 22 website, Opto 22 website, www.Opto22.com.
•
SNAP-PAC-R or SNAP-PAC-S controller
In this Chapter
Exchanging Values ........................................................................................................ 58
Modifying PAC Control................................................................................................ 58
Creating Scratchpad Assemblies with EtherNet/IP Configurator............. 63
Modifying the RSLogix 5000 Ladder..................................................................... 68
Exchanging Data Online............................................................................................. 71
More Ideas for Accessing Data................................................................................. 71
IO4AB User’s Guide
www.klinkmann.com
www
57
57
EXCHANGING VALUES
Exchanging Values
By doing the example exercises in this chapter, you will learn how to exchange several values
between an Opto 22 automation system and an Allen-Bradley PLC. Each system has a few variables
that need to be exchanged between each other. It is assumed that the control systems already exist
and the parameter sharing simply “marries” the two systems together.
The PAC System has the following values that the Allen-Bradley PLC needs:
32-bit integer
i32PACBuffer_Tank_Ready
32-bit integer
i32PACTank_Contents
32-bit float
f32PACGallons_In_Tank
The A-B PLC has several values that the Opto 22 PAC System needs, they are:
DINT
dABFill_Tank
DINT
dABBottles_Filled
REAL
rABGallons_Requested
Modifying PAC Control
Your PAC Control strategy needs to modified slightly to allow data to be read, and written to and
from the Allen-Bradley PLC. For small data sharing applications, the modifications will take only a
few minutes to do.
Adding a Generic Opto MMP Device
The first thing to do is add an I/O unit to your PAC Control strategy.
1. Open your strategy in PAC Control.
58
IO4AB User’s Guide
www.klinkmann.com
www
CHAPTER 6: CONNECTING PAC CONTROL AND ALLEN-BRADLEY SYSTEMS
2. Double-click the I/O Units folder to open the Configure I/O Units dialog box.
3. Click the Add button to open the Add I/O Unit dialog box.
4. Add or select the following information:
– Name: ioLocal
– Type: Generic OptoMMP Device
– IP Address: Select Local (Loopback)
If you are using PAC Control Basic, the completed dialog box should look like this:
If you are using PAC Control Professional, leave the Secondary Address blank.
Once you have completed configuring a local I/O unit for this SNAP PAC controller, you are ready to
modify the chart as described in the next section.
IO4AB User’s Guide
www.klinkmann.com
www
59
59
MODIFYING PAC CONTROL
Modifying the Chart
In this section you will learn how to modify a strategy to exchange data. In the example, you will
create a new chart, but you can modify an existing chart the same way. The new chart will read and
write shared values to and from the scratchpad registers in the local I/O unit.
The PAC Controller has 32-bit integer, 32-bit float, and string registers. 32-bit integers are
synonymous to the DINT data type. Opto 22 32-bit float data type is the same as the Logix REAL.
1. Before adding some code to the PAC Control strategy, create a couple of tables similar to the
ones below to show which scratchpad registers will hold what particular values.
32-bit Integer Scratchpads
Index
Variable
0
i32PACBuffer_Tank_Ready
1
i32PACTank_Contents
2
dABFill_Tank
3
dABBottles_Filled
32-bit Float Scratchpads
Index
Variable
0
f32PACGallons_In_Tank
1
rABGallons_Requested
2. Using either an OptoScript block or an action block, create code to write PAC Control values to
the scratchpad. When the data is present on the scratchpad, it is available to be read by other
applications such as the Logix PLC.
Using an OptoScript block:
60
IO4AB User’s Guide
www.klinkmann.com
www
CHAPTER 6: CONNECTING PAC CONTROL AND ALLEN-BRADLEY SYSTEMS
Using an action block to achieve the same thing:
3. Once again using either an OptoScript block or an action block, this time create code that reads
the values the Allen-Bradley PLC writes to the scratchpads of the SNAP PAC controller.
The PAC Control environment reads the values emplaced by the A-B PLC and moves them into
similarly named variables.
Using an OptoScript block:
IO4AB User’s Guide
www.klinkmann.com
www
61
61
MODIFYING PAC CONTROL
Using an action block sequence of commands to retrieve the A-B PLC scratchpad values:
See the next section for more scratchpad read and right commands.
Scratchpad Read and Write Commands
Here is a complete list of the PAC Control scratchpad read and write commands.
Scratchpad Read Commands:
•
Get I/O Unit Scratch Pad Float Element
•
Get I/O Unit Scratch Pad Float Table
•
Get I/O Unit Scratch Pad Integer 32 Element
•
Get I/O Unit Scratch Pad Integer 32 Table
•
Get I/O Unit Scratch Pad String Element
•
Get I/O Unit Scratch Pad String Table
Scratchpad Write Commands:
62
•
Set I/O Unit Scratch Pad Float Element
•
Set I/O Unit Scratch Pad Float Table
•
Set I/O Unit Scratch Pad Integer 32 Element
•
Set I/O Unit Scratch Pad Integer 32 Table
•
Set I/O Unit Scratch Pad String Element
•
Set I/O Unit Scratch Pad String Table
IO4AB User’s Guide
www.klinkmann.com
www
CHAPTER 6: CONNECTING PAC CONTROL AND ALLEN-BRADLEY SYSTEMS
Creating Scratchpad Assemblies with EtherNet/IP Configurator
For this section you will need to use EtherNet/IP Configurator to create assemblies to exchange
between the PAC controller and the Allen-Bradley PLC.
Creating an Assembly To Send Data to the PLC
1. Open EtherNet/IP Configurator.
This immediately creates a new configuration.
2. Double click on the Unnamed_Device in the device tree to open the Modify Device Definition
dialog box.
3. Select the Device Type that matches your controller.
The example uses a SNAP-PAC-S2, but it could be any SNAP-PAC-R/S controller.
4. Enter the IP address of the SNAP PAC controller in the IP Address field.
In our example, the IP address of the controller is 10.154.92.57.
IO4AB User’s Guide
www.klinkmann.com
www
63
63
CREATING SCRATCHPAD ASSEMBLIES WITH ETHERNET/IP CONFIGURATOR
5. Click OK to close the dialog box, then click the Configure Assemblies tab.
The tab opens assembly instance 100, which you will use to send the appropriate scratchpad
data to the Allen-Bradley PLC.
6. Begin populating assembly instance 100 by clicking the Add button to open the Add Assembly
Member dialog box.
64
IO4AB User’s Guide
www.klinkmann.com
www
CHAPTER 6: CONNECTING PAC CONTROL AND ALLEN-BRADLEY SYSTEMS
7. Select the following items:
– Class: ScratchpadDINT (Notice that the available fields change.)
– Instance Information
Start Element: 0
# of Elements: 1
– Attribute: Value
– Description: Add a comment such as “Location for i32PACBuffer_Tank Ready” to indicate
which value this scratchpad location will transfer. The example is the scratchpad element
for the PAC Control variable i32PACBuffer_Tank Ready.
8. In the same manner, add ScratchpadDINT element #2 for “i32PACGallons_In_Tank.“
9. To add the float variable, click again and select the following items in the Add Assembly
Member dialog box:
– Class: ScratchpadREAL
IO4AB User’s Guide
www.klinkmann.com
www
65
65
CREATING SCRATCHPAD ASSEMBLIES WITH ETHERNET/IP CONFIGURATOR
– Start Element: 0
– Description: Location for f32PACGallons_In_Tank
10. Click OK.
Your completed assembly instance 100 should look similar to this:
Creating an Assembly To Accept Data from the PLC
This section describes how to create assembly instance 101, which will be used to accept data from
the Allen-Bradley PLC. This is similar to creating assembly instance 100.
1. Follow the directions in the previous section for creating assembly instance 100, except note
the minor differences for the Element values.
66
IO4AB User’s Guide
www.klinkmann.com
www
CHAPTER 6: CONNECTING PAC CONTROL AND ALLEN-BRADLEY SYSTEMS
When completed, assembly 101 should look similar to this:
2. To download the configuration to the PAC controller, choose Tools > Download Configuration
to Opto 22 Device.
The following dialog box appears.
3. Click the Download button.
The following status information should appear showing that the configuration has been
successfully saved to flash.
IO4AB User’s Guide
www.klinkmann.com
www
67
67
MODIFYING THE RSLOGIX 5000 LADDER
4. If you haven’t already done so, choose File > Save As to give your configuration project a name
and to save it for later use.
Once you have created assemblies 100 and 101 using EtherNet/IP Configurator, the next step is to
use RSLogix 5000 to add some code to exchange data with the Assembly Instances you just created.
Modifying the RSLogix 5000 Ladder
In this section you will do the final step of integrating the two systems together by adding
functionality to the PLC's ladder. The instructions are for a ControlLogix PLC (1756-L61).
In previous sections you modified the scratchpad read and write values in the PAC Control strategy,
and you used EtherNet/IP Configurator to configure the PAC Controller to expose the scratchpads
with Assembly Instances 100 and 101.
In the following exercise you will add the interface to RSLogix 5000.
1. Add a Generic Ethernet Module to the Logix PLC's EtherNet/IP module using the following
settings.
– Name: PAC
– Comm Format: Data - DINT
– IP Address: Use the address of your PAC Controller
– Connection Parameters
Assembly
Instance
Size
Input
100
3
Output
101
3
Configuration
254
0
The Input and Output Assembly Instance information is based on the Assembly Instances
created in the EtherNet/IP Configurator software.
68
IO4AB User’s Guide
www.klinkmann.com
www
CHAPTER 6: CONNECTING PAC CONTROL AND ALLEN-BRADLEY SYSTEMS
Leave the Configuration Assembly Instance to 254 and the size to 0 because the
configuration assembly is not used. These settings tell RSLogix 5000 to ignore it.
2. Click OK to open the Module Properties dialog box.
3. Click on the Connection tab and set the RPI to 500 milliseconds for demonstrating the data
exchange.
4. You’re almost done. Now you just need to add a few CPS commands to copy the Generic
Ethernet Module's data to and from local variables of the ladder.
IO4AB User’s Guide
www.klinkmann.com
www
69
69
MODIFYING THE RSLOGIX 5000 LADDER
Here's a screen shot of the complete CPS instructions in the ladder.
Now the ladder is ready to be downloaded.
70
IO4AB User’s Guide
www.klinkmann.com
www
CHAPTER 6: CONNECTING PAC CONTROL AND ALLEN-BRADLEY SYSTEMS
Exchanging Data Online
When online, RSLogix will populate value fields something like this:
As shown here, you can create a watch window in PAC Control to see the exchanged values.
IO4AB User’s Guide
www.klinkmann.com
www
71
71
MORE IDEAS FOR ACCESSING DATA
More Ideas for Accessing Data
Once the data is exposed into the PAC Controller's scratchpads, the following methods are available
to access it.
OptoOPCServer
The Opto 22 OptoOPCServer is a high-performance, multithreaded OPC DA 2.0 complaint data
server. Using SCADAs and OPC Clients to access data, the scratchpad registers created in the
example exercise are accessible using the OptoOPCServer. The following table translates which
variables belong to the appropriate tags:
Shared Variable
OPC Item ID
i32PACBuffer_Tank_Ready
[mmio|ip|tcp:10.192.54.75:2001]sp_integer[0]
i32PACTank_Contents
[mmio|ip|tcp:10.192.54.75:2001]sp_integer[1]
dABFill_Tank
[mmio|ip|tcp:10.192.54.75:2001]sp_integer[2]
dABBottles_Filled
[mmio|ip|tcp:10.192.54.75:2001]sp_integer[3]
f32PACGallons_In_Tank
[mmio|ip|tcp:10.192.54.75:2001]sp_float[0]
rABGallons_Requested
[mmio|ip|tcp:10.192.54.75:2001]sp_float[1]
PAC Display
Once the data is available in the scratchpads, they may also be displayed in PAC Display, Opto 22's
HMI package. To access the scratchpads of the PAC controller, download and install both PAC Display
Basic and PAC Control Basic, both free software packages available on the Opto 22 website,
www.Opto22.com.
Using PAC Control Basic, doing the following:
1. Create a new strategy by choosing File > New.
2. Right-click the I/O units folder and choose Add to open the Add I/O Unit dialog box.
3. Provide a name, and select the Type as follows:
– For a SNAP-PAC-S series controller, select the Generic OptoMMP Device.
– For a SNAP-PAC-R1 or SNAP-PAC-EB1, select SNAP-PAC-R1.
– For a SNAP-PAC-R2 or SNAP-PAC-EB2, select SNAP-PAC-R2.
72
IO4AB User’s Guide
www.klinkmann.com
www
CHAPTER 6: CONNECTING PAC CONTROL AND ALLEN-BRADLEY SYSTEMS
4. Save and close your strategy.
Use your new strategy as the tag database into PAC Display.
Using the Free Opto MMP Toolkit
If you wish to use a custom PC application to access the data, use the OptoMMP Communication
Toolkit to access the scratchpad registers. The free kit is available on the Opto 22 website,
www.Opto22.com. Search for part number IOP-DEV-OPTOMMP.
IO4AB User’s Guide
www.klinkmann.com
www
73
73
MORE IDEAS FOR ACCESSING DATA
74
IO4AB User’s Guide
www.klinkmann.com
www
2: 7: Using EtherNet/IP ConfiguratorChapter 2
7: Using EtherNet/IP
Configurator
This chapter expands on the information in the previous chapters about EtherNet/IP Configurator
and includes additional topics not covered there.
In this Chapter
Importing an Existing Configuration ........................................76
Uploading a Configuration from an Opto 22 Device.........77
Adding a Device Manually ............................................................78
Modifying a Device...........................................................................80
Changing a Device’s IP Address...................................................80
Adding and Deleting Assembly Elements..............................81
Moving Assembly Members.........................................................84
Viewing a Configuration Report .................................................85
Configuring PID Loops ....................................................................86
Inspecting and Tuning PID Loops ..............................................93
Using I/O Point Features.............................................................. 104
Referencing I/O Points on SNAP PAC Racks ........................ 106
IO4AB User’s Guide
www.klinkmann.com
www
75
75
IMPORTING AN EXISTING CONFIGURATION
Importing an Existing Configuration
If you have an I/O configuration created in EtherNet/IP Configurator, you can import its otg (Opto
Tag Database) file and from it create a new configuration.
NOTE: You can also use an otg file created in Opto 22’s PAC Control or PAC Manager. For more information,
see the user’s guides for those products, form 1700 (for PAC Control) and form 1704 (for PAC Manager).
1. In the EtherNet/IP Configurator main window, click the Open button
Open to open the Tag Database dialog box.
or choose File >
2. Locate the configuration (otg) file and click Open.
76
IO4AB User’s Guide
www.klinkmann.com
www
CHAPTER 7: USING ETHERNET/IP CONFIGURATOR
Uploading a Configuration from an Opto 22 Device
If there is an existing configuration that you want to use loaded on an Opto 22 device, you can
upload it to EtherNet/IP Configurator, and then modify it (if necessary) and reuse it on another
device.
NOTE: When uploading EtherNet/IP configurations from PAC devices, the following information is not
stored on the I/O unit and thus is lost during the upload.
•
•
•
•
•
PID names
PID descriptions
Point descriptions
4-channel digital module types
Assembly Instance descriptions
To upload a configuration:
1. In the device tree, select the Opto 22 device with the configuration you want to load.
Select an
Opto 22 device
2. Choose Tools > Upload Configuration from Opto 22 Device.
The following dialog box appears.
3. Click Yes to upload the configuration data. This action overwrites the device’s existing
configuration data for any module position that is the same as the new configuration data.
IO4AB User’s Guide
www.klinkmann.com
www
77
77
DOWNLOADING A CONFIGURATION
Downloading a Configuration
1. To save the configuration, choose File > Save As, browse to an appropriate directory, name the
file (for example, Opto_IO), and then click Save.
2. Click the Verify tab and then click the Download button. (Or you can choose Tools > Download
Configuration to Opto 22 Device.)
3. In the Download Configuration dialog box, select the device’s IP address, and then click
Download.
4. When the configuration has downloaded successfully, click Close.
Adding a Device Manually
In addition to being able to add a discovered device, you can also add a device manually. To add a
discovered device, see “Adding an Opto 22 Device” on page 12.
1. In the device tree, double-click Add new device.
78
IO4AB User’s Guide
www.klinkmann.com
www
CHAPTER 7: USING ETHERNET/IP CONFIGURATOR
2. In the New Device Definition dialog box, at minimum enter the Device Name, select the Device
Type, and enter the IP address for the device.
Device Name. Enter a name for the remote I/O. The name must start with a letter and may
contain letters, numbers, and underscores. (Spaces are converted to underscores.)
Device Type. Choose the part number of the Opto 22 device from the drop-down list.
IP Address. Enter the IP address of the device.
NOTE: Changing the IP address in this dialog box does not change the IP address on the device. If you
want to change the IP address on the device, see “Changing a Device’s IP Address” on page 80.
Port. The default Ethernet port number is 2001 for communication with the Opto 22 device. If
you have changed this port for security purposes, also change it here. (See the device’s user
guide for details.)
Temperature. Choose whether temperatures will be handled in Fahrenheit or Celsius.
Watchdog. Select whether you want a Watchdog on the unit. The default is No (disabled). If
you select Yes, a new field appears; enter the Watchdog timeout value (in seconds). The default
timeout is 0.5 seconds.
NOTE: If you want to enable Watchdog on a point, make sure to enable it here at the device level as
well.
3. Click OK.
The new device appears in the device tree.
New device
IO4AB User’s Guide
www.klinkmann.com
www
79
79
MODIFYING A DEVICE
Modifying a Device
Do the following steps to change a device’s information.
1. In the device tree, double-click the device to open the Modify Device Information dialog box.
2. See “Adding an Opto 22 Device” on page 12 for tips on how to use this dialog box.
NOTE: Changing the IP address in this dialog box does not change the IP address on the device. If you
want to change the IP address on the device, see “Changing a Device’s IP Address” (below).
3. Click OK to confirm the changes.
Changing a Device’s IP Address
1. Right-click the device in the device tree and choose Change IP Settings to open the Change IP
Settings dialog box.
2. Enter the IP Address and the Subnet Mask for the device. If it will be talking to a device on
another subnet, enter the Gateway (router) address. If it will talk only on the local subnet, leave
the gateway address all zeros (0.0.0.0). Leave the DNS address at 0.0.0.0 and the Host Name
field blank.
NOTE: Make sure the EB1 is on the same subnet as the computer and the PLC.
80
IO4AB User’s Guide
www.klinkmann.com
www
CHAPTER 7: USING ETHERNET/IP CONFIGURATOR
WARNING! Each device on your network, including computers, routers, controllers, brains, and so on,
must have a unique IP address. Failure to assign unique IP addresses may cause catastrophic network
or hardware failures. If you don’t know which IP addresses are safe to use, check with your system
administrator.
3. When the IP address, subnet mask, and other fields are correct, click OK.
Adding and Deleting Assembly Elements
1. Click the Configure Assemblies tab, and then click the Add button to open the Add/Modify
dialog box.
2. Select a class type from the list on the left.
The classes available for implicit messaging in the EtherNet/IP Configurator are a subset of the
CIP classes, all of which are available through explicit messaging. For information on the CIP
classes and attributes, see form 1770, the Ethernet/IP for SNAP PAC Protocol Guide.
3. Under Instance Information, select a point that you have configured. Otherwise, you can assign
an assembly member to a specific module and point based on their position on the rack. (See
page 106 for module and point addressing.)
IO4AB User’s Guide
www.klinkmann.com
www
81
81
ADDING AND DELETING ASSEMBLY ELEMENTS
4. Under Attribute, select an item in the list.
The attribute list allows you to define what information from each point you want to have
passed in the implicit message. In addition to value readings, you can get other data, such as
the minimum or maximum value that the point has ever reached. This is a great way to attain
an alarm level without having to write logic in your RSLogix program that stores the high value.
5. Click OK and follow any directions that appear for the class type.
For example, the Fill Module dialog box appears for DiscreteInputPoint and AnalogInputPoint.
6. Click OK.
7. Continue to add elements as necessary.
NOTE: If an assembly member or group of members adds up to less than 32-bits, you will need to add
padding.
8. To add a pad, click the Add button to open the Add/Modify dialog box.
82
IO4AB User’s Guide
www.klinkmann.com
www
CHAPTER 7: USING ETHERNET/IP CONFIGURATOR
9. Under Class, select Pad, enter size of the pad (for example, 28), and click OK.
The pad appears as the last member of element 0 to complete the 32-bit word.
10. To save the configuration, choose File > Save As, browse to an appropriate directory, name the
file (for example, Opto_IO), and then click Save.
11. Click the Verify tab and then click the Download button. (Or you can choose Tools > Download
Configuration to Opto 22 Device.)
12. In the Download Configuration dialog box, select the device’s IP address, and then click
Download.
NOTE: Make sure that the SNAP I/O is properly configured with a SNAP PAC EB-series or R-series brain
loaded with firmware R8.3a or newer, and that the proper I/O modules are installed. Otherwise, errors
will occur.
The configuration is permanently stored in the device.
IO4AB User’s Guide
www.klinkmann.com
www
83
83
MOVING ASSEMBLY MEMBERS
13. When the configuration has downloaded successfully, click Close.
Moving Assembly Members
The Up and Down arrows allow you to move assembly members up and down in the assembly. For
example, if a pad is in the wrong place, some of the assembly members will be highlighted in yellow
as shown here:
Up and Down
arrows
84
IO4AB User’s Guide
www.klinkmann.com
www
CHAPTER 7: USING ETHERNET/IP CONFIGURATOR
To move the pad, select it and click the appropriate arrow to move the pad into its proper place.
The input assembly instance is now once again formatted properly with 32-bit words.
Viewing a Configuration Report
Available in the Tools menu are reports that provide a snapshot view of the configured assemblies
and I/O.
An Assembly Configuration Report shows all of the entries contained in the current assembly
instance, including the element number, bit size, and description. It also indicates any errors and
whether or not the assembly is configured properly for download. It is helpful to check for errors in
this report before you download the configuration to the device.
IO4AB User’s Guide
www.klinkmann.com
www
85
85
CONFIGURING PID LOOPS
The I/O Modules and Points Configuration Report lists the modules and points configured for the
selected device.
To view a configuration report:
1. In the device tree, select an Opto 22 device.
Select an
Opto 22 device
2. From the Tools menu, choose either Assembly Configuration Report or I/O Modules and Points
Configuration Report.
A text file opens showing the configuration report.
Configuring PID Loops
PID loops (or simply PIDs) are used to drive an input (a process variable) toward a particular value
(the setpoint) and keep the input very close to that value by controlling an output. For example,
consider temperature control, where the input is a measurement of ambient temperature, the
setpoint is the desired temperature, and the output is a heater. The PID for this system will use a
mathematical formula that controls the output to maintain a desired temperature, efficiently adjust
to changes in setpoint, and compensate for changes in load, such as the influx of cold air. In this
example, a temperature sensor (analog input), a thermostat (analog input), and a heater control
(analog output) are components of one system, controlled by a PID loop.
This guide assumes that you are already familiar with using PIDs. PID calculations are complex and
the physical qualities of systems suitable for PID control differ greatly. This guide includes only basic
information for configuring PIDs.
SNAP PAC I/O units support 96 PID loops. PIDs can control isolated systems or be part of cascaded
systems where one loop controls the setpoints or input variables of others.
86
IO4AB User’s Guide
www.klinkmann.com
www
CHAPTER 7: USING ETHERNET/IP CONFIGURATOR
Adding a PID Loop
The PID operates at the I/O unit, independently of the controller. Once configured and downloaded
to the brain, a PID operates until the I/O unit loses power. Remember that changes are not written to
the I/O unit until the configuration is downloaded to the Opto 22 device. Each PID loop must be
individually configured and tuned.
Tuning steps are described in “Inspecting and Tuning PID Loops” on page 93. For additional
information, see form 1641, OptoTutorial: SNAP PAC PID.
1. In EtherNet/IP Configurator, select the Opto 22 device, and then click the Configure PID Loops
tab.
Configure PID Loops tab
Opto 22
device
Lowest
unused
number
2. Double-click the lowest unused number to open the Add PID Loop dialog box.
3. Complete the Add PID Loop dialog box as detailed below, and then click OK.
IO4AB User’s Guide
www.klinkmann.com
www
87
87
CONFIGURING PID LOOPS
A
B
C
D
E
F
G
H
I
J
N
K
L
M
O
P
A Name: Type a unique, descriptive name for the PID. The name must start with a letter and
may contain letters, numbers, and underscores (spaces are converted to underscores).
B Description: (Optional) Enter a description of the PID.
C Input: Select the type of input: I/O Point, PLC, or PID Output.
– If the PID’s process variable comes from an I/O point on the same unit, select I/O Point.
Choose the point from the drop-down list or type a point name to configure a new
point.
– If the PID’s process variable comes from the Allen-Bradley controller, select PLC. Enter
an initial value for the input.
– If the PID’s process variable is the output of another PID on this brain (a cascading
control loop), select PID Output. Choose the PID from the drop-down list.
D Square Root: (Optional) If you chose I/O Point or PID for step C, check this box if the error
should be calculated based on the square root of the process variable (applies to flow
control systems where volumetric flow is proportional to the square root of a signal from a
flow transducer).
E Low/High Range: Set the valid range of the process variable by entering the low range and
the high range. (See Output Options for optional responses to out-of-range input.)
F Setpoint: Choose the source for the setpoint: I/O Point, PLC, or PID Output.
– To control the setpoint using a device (on the same brain) such as a potentiometer,
select I/O Point; choose an I/O point from the drop-down list or type a new point
name.
– To control setpoint using the Allen-Bradley controller, select PLC. For Initial Value, enter
the most common operating value.
88
IO4AB User’s Guide
www.klinkmann.com
www
CHAPTER 7: USING ETHERNET/IP CONFIGURATOR
–
If another PID loop will control the setpoint, select PID Output and choose the PID
from the drop-down list.
G Output: Choose the destination for the PID output: I/O Point or PLC. (To use the output for
controlling the setpoint or input of another PID, choose PLC.)
H Lower Clamp/Upper Clamp: Enter upper and lower clamp values to prevent the output
from exceeding a desirable range. These values should equal the range of the output point,
if used. Or choose values to make sure that the output device doesn’t shut off (for example,
keeping a circulation pump running regardless of the PID output) or that the output never
reaches a destructively high setting (for example, keeping a motor below maximum).
I Min Change/Max Change: (Optional) Enter minimum and maximum change values. The
output won’t respond until the minimum change is reached (for example, you may not
want a heater to turn on to correct a 1 degree error). Maximum change prevents too drastic
a change in output (for example, you could limit the increase in a pump’s output to prevent
pipe breakage). The default for both minimum and maximum is zero, which disables the
feature.
J Output Options: Choose how the PID should respond if the input goes out of range. To
have RSLogix logic or an operator respond, check Switch to manual mode. To force the
output to a specific value, check that option and type the output values.
NOTE: If both boxes are checked (forced output and manual mode), the output will be forced and the
PID put into manual mode; but if the PID is already in manual mode, the output will not be forced.
If neither box is checked and the PID input goes out of range (as defined by E– High/Low Range) then
the output will freeze, but only while the input is out of range.
K Algorithm: Choose algorithm: Velocity, ISA, Parallel, Interacting. For details on algorithms,
see “Algorithm Choices” on page 91.
L Mode: Choose the Mode you want the PID to be initialized to. The main difference between
Automatic and Manual mode is that in Manual mode the PID loop stops its mathematical
calculation. In both modes the PID's output value is still copied to the analog output.
– Auto mode: The PID makes calculations based on the difference between the input
and the setpoint resulting in changes to the output, which causes the input to move
toward the setpoint.
– Manual mode: The PID stops making changes to the output, but continues to write
the PID output to the analog point (or configured destination for the PID output).
Manual mode allows RSLogix logic or an operator to control the PID output, which in
turn is written by the PID loop to the analog point (or configured destination of the
PID output).
IO4AB User’s Guide
www.klinkmann.com
www
89
89
CONFIGURING PID LOOPS
NOTE: If the value of the analog point or configured destination is changed, it will be
overwritten by the PID output.
PID
Setpoint
Input
Output
Analog
Output
M Scan Rate: Enter a scan rate to determine how often the input is scanned and the controller
output is calculated. Minimum value is 0.001 (1 ms). Scan time should be greater than
system lag (the time it takes for the controller output to have a measurable effect on the
system). Also consider other PIDs and tasks on the brain competing for processing power.
N Gain: Type a positive or negative value for Gain. Heating systems usually require a negative
value and cooling systems a positive value.
NOTE: Gain is usually refined during the tuning process.
O Fd Fwd Initial/Fd Fwd Gain: (Optional) Enter Feed forward Initial and Feed forward gain
values if you need to offset the controller output in your application. These values are
constants that are multiplied and added to the controller output; often they are not used in
PIDs.
P Tune I/Tune D: (Optional) Type Integral and Derivative settings if you know the desirable
settings. However, Integral and Derivative are not essential to basic configuration and are
better determined in the tuning process.
Changing a PID Loop
You can change the PID loop’s configuration and its position in the I/O unit.
1. In EtherNet/IP Configurator, select the Opto 22 device, and then click the Configure PID Loops
tab.
The Configure PID Loops tab lists all configured PID loops. Remember that the number of PID
loops available depends on the Opto 22 device.
Selected
device
Up- and downarrows
90
IO4AB User’s Guide
www.klinkmann.com
www
CHAPTER 7: USING ETHERNET/IP CONFIGURATOR
PID loops are scanned by the I/O unit in the order that they appear in this list.
2. To move the PID loop to a different position on the I/O unit, use the up- and down-arrows in
the dialog box.
3. To change the PID loop’s configuration, double-click its name to open the Edit PID Loop dialog
box. Change the fields as necessary.
For help in completing the fields, see “Adding a PID Loop” on page 87.
Deleting a PID Loop
Only PID loops that have a reference count of zero can be deleted. Be careful when deleting PID
loops; you cannot undo a deletion.
1. In EtherNet/IP Configurator, select the Opto 22 device, and then click the Configure PID Loops
tab.
2. Right-click the name of the PID loop and choose Delete from the pop-up menu.
The PID loop is deleted.
You can also delete a PID loop in the Configure PID Loops dialog box by highlighting it and
clicking Delete.
Algorithm Choices
When you configure a PID loop in EtherNet/IP Configurator, choose one of the following algorithms:
•
Velocity - Type C
•
Velocity - Type B
•
ISA
•
Parallel
•
Interacting
The only difference between Velocity - Type C and Velocity - Type B is the Term P equation (see
equations below). The ISA, Parallel and Interacting algorithms are functionally equivalent; the only
difference is the way the tuning constants are factored. The identical and differing equations for all
algorithms are shown in the following sections.
IO4AB User’s Guide
www.klinkmann.com
www
91
91
CONFIGURING PID LOOPS
Key to Terms Used in Equations
PV
Process variable; the input to the
PID
TuneD
Derivative tuning parameter. In units
of seconds. Increasing magnitude
increases influence on output.
SP
Setpoint
Output
Output from the PID
InLo,
InHi
Range of the input
Err_1
The Error (PV – SP) from the previous scan
OutLo,
OutHi
Range of the output
Integral
Integrator. Anti-windup is applied
after the output is determined to be
within bounds.
Gain
Proportional tuning parameter.
Unitless. May be negative.
PV1, PV2
PV from the previous scan and the
scan before that.
TuneI
Integral tuning parameter. In units
of seconds. Increasing magnitude
increases influence on output.
ScanTime
Actual scan time (time since previous scan)
Equations Common to All Algorithms
Err = PV - SP
Span = (OutHi - OutLo) / (InHi - InLo)
Output = Output + FeedForward * TuneFF
Velocity - Type C Algorithm
TermP =
TermI =
TermD =
ΔOutput
( PV - PV1 )
TuneI * ScanTime * Err
TuneD / ScanTime * ( PV - 2 * PV1 + PV2 )
= Span * Gain * ( ΔTermP + ΔTermI + ΔTermD )
Velocity - Type B Algorithm
TermP =
TermI =
TermD =
ΔOutput
( Err - Err_1 )
TuneI * ScanTime * Err
TuneD / ScanTime * ( PV - 2 * PV1 + PV2 )
= Span * Gain * ( ΔTermP + ΔTermI + ΔTermD )
Non-velocity Algorithms
These equations were derived from the article “A Comparison of PID Control Algorithms” by John P.
Gerry in Control Engineering (March 1987). These three equations are the same except for the tuning
coefficients; converting from one equation to another is merely a matter of converting the tuning
coefficients.
Equations common to all but the velocity algorithm:
Integral = Integral + Err
TermP = Err
TermI = TuneI * ScanTime * Integral
TermD = (TuneD / ScanTime) * ( PV - PV1 )
“Ideal” or ISA Algorithm
Output = Span * Gain * ( TermP + TermI + TermD )
“Parallel” Algorithm:
Output = Span * ( Gain * TermP + TermI + TermD )
“Interacting” Algorithm:
Output = Span * Gain * ( TermP + TermI ) * ( 1 + TermD )
92
IO4AB User’s Guide
www.klinkmann.com
www
CHAPTER 7: USING ETHERNET/IP CONFIGURATOR
Inspecting and Tuning PID Loops
Using EtherNet/IP Configurator, you can view PID loops and tune them. This section gives you basic
steps for inspecting PIDs, determining system lag, and tuning PIDs. See also, Opto 22 form 1641,
OptoTutorial: SNAP PAC PID, which we highly recommend for detailed information on PIDs on
Ethernet-based I/O units. Form 1641 is available for download from our website at
www.opto22.com.
Inspecting a PID
1. With a configured PID downloaded and running on the brain, click the Configure PID Loops
tab.
2. Highlight the PID, and then click the Tuning button.
Click a tab to see or
change additional data.
Setpoint and Input plot.
Adjust resolution using the
Input Axis button below
the plot. Click and drag on
the scale to move the line.
Output plot.
Adjust resolution using
the Output Axis button.
Click and drag on the
scale to move the line.
Time axis. Adjust resolution
using the Time Axis button.
Click and drag left or right to
see other times.
3. View or change PID parameters as necessary. Click the other tabs to see additional data. To tune
the PID, see page 98.
4. To save, copy, or print the current plot, click the Data button and choose from the popup menu.
5. To save changes to any of the PID configuration parameters, click Save Tuning.
IO4AB User’s Guide
www.klinkmann.com
www
93
93
INSPECTING AND TUNING PID LOOPS
Determining System Lag
You can directly control the PID output to determine system lag, which is essential to setting the PID
scan rate. Also see Opto 22 form 1641, OptoTutorial: SNAP PAC PID, available for download from our
website at www.opto22.com.
1. Determine two significantly different output settings that are within the capabilities of your
system.
2. With a configured PID downloaded and running on the brain, click the Configure PID Loops
tab.
3. Highlight the PID, and then click the Tuning button.
4. Set the Mode to Manual (if not set already) and click Apply.
5. In the Output field, type one of your two output settings and click Apply.
Use an output value typical of your system but low enough to allow you to change output by
20%.
6. Reset your time axis, if necessary, by clicking the Time Axis and choosing from the popup
menu. Then choose Reset Scale Tracking from the same menu.
The span setting varies according to your system; a 3-minute span is often suitable. Until you
are familiar with the PID plot, it is recommended that you avoid using the shortest settings
(10-seconds or 1-second). After you’ve observed a change in the input, you can zoom in on the
graph, which is described later.
94
IO4AB User’s Guide
www.klinkmann.com
www
CHAPTER 7: USING ETHERNET/IP CONFIGURATOR
7. Wait for your system to stabilize.
The system is stable when the Input value does not vary significantly (some drift can be
expected). Stabilization may take several minutes, depending on the system.
A stable system exhibits little
change in the Input value,
which is shown numerically
and graphically.
Adjust resolution of the
Input Axis by clicking the
Input Axis button.
8. Increase the resolution of the Input Axis by clicking the Input Axis menu and choosing a span
setting of 1 or 5 percent.
9. Center the Input Axis, if necessary, by clicking the red line at its left end and dragging it up or
down until the plot is visible.
10. Under the Time Axis menu, choose Reset Scale Tracking.
This is a precautionary step, as changing settings on the plot can fix the plot at a certain point
in time. Resetting the time axis ensures that you are viewing the real-time values.
11. In the Output field, type the other of your two output settings and click Apply.
A 20% percent increase is a moderate, detectable change for most systems. Your system may
require a larger or a smaller change to stay within safety constraints.
IO4AB User’s Guide
www.klinkmann.com
www
95
95
INSPECTING AND TUNING PID LOOPS
12. Wait for a discernible change in the Input axis.
The Input axis (indicated by
the upper white arrow
added to this picture)
begins to respond to the
change in output (lower
white arrow).
13. Increase the resolution of the Time Axis by clicking the Time Axis button and choosing a lower
percentage, such as View 1 Minute Span.
14. Scroll the Time Axis to locate the point at which you changed the Output.
Both the time and input axes should display the point at which the Output changed, the lag,
and the point the input changed. If not, adjust the Input axis and Time axis, until this
information is displayed.
15. From the Data menu, select Cursor.
The data cursor, a line with a value bar attached to it, appears on the plot.
96
IO4AB User’s Guide
www.klinkmann.com
www
CHAPTER 7: USING ETHERNET/IP CONFIGURATOR
16. Right-click the data cursor and choose Delta X from the Style submenu, as shown below.
17. To measure the system lag (the time between the change in output and the change in input),
click and drag the first vertical red bar to just after the output change. Drag the second bar to
just before the change in input.
The Delta X cursor displays
the time difference between
the two vertical bars.
Drag the first bar into position
after the Output change.
Drag the second bar to a
position just before the
change in Input.
If you are unable to get the precision you want, you can view the plot at a lower time span,
such as 10 seconds. You will need to reposition your plot and the measurement bars of the
Delta X cursor.
The example above shows a system lag of 1.88 seconds. Generally, a suitable scan rate can be
anywhere from one-third the system lag to two times the system lag. Considerations in setting scan
rate are:
IO4AB User’s Guide
www.klinkmann.com
www
97
97
INSPECTING AND TUNING PID LOOPS
•
Slower scan intervals may be easier to tune. The PID controller has time to see the effect of the
previous output before calculating a new output.
•
Faster scan rates may be necessary to achieve the desired response. When scan intervals are
shorter than the system lag, tuning must compensate for any over-correction from the
controller output.
Tuning a PID Loop
Tuning a PID involves manipulating the P, I, and D constants in real time. The following steps should
be viewed as general suggestions to show you features that are available for tuning. We highly
recommend Opto 22 form 1641, OptoTutorial: SNAP PAC PID, for more detailed information.
Form 1641 is available for download from our website at www.opto22.com.
CAUTION: Before following these procedures, make sure you know the limits of the equipment being
controlled and monitored by your PID loop. Also, make sure that these points are configured properly. Any
values suggested in these steps are for example only and must be modified according to the capabilities
and constraints of your system.
1. Make sure the following PID features have already been configured:
– Scan Rate
– Input
– Input low range and high range
– Output
– Output lower and upper clamp
– Algorithm
– Setpoint. If your setpoint changes during normal operation, tune your PID with the
setpoint configured to host, so you can simulate setpoints from an input point or from
another PID.
– Gain. A final gain constant will be determined by tuning, but before you can tune your PID,
your gain constant must be either a positive or negative number according to the type of
system you have. For example, a heating system reports a negative error when heat needs
to be applied; a negative gain constant turns this error into a positive output for the heater.
Alternatively, a cooling system reports a positive error when the input exceeds the
setpoint; a positive gain constant maintains the positive output to the chiller.
– Optional, depending on your system: Minimum and maximum changes to Output and
Output forcing when the Input is out of range.
2. With a configured PID downloaded and running on the brain, click the Configure PID Loops
tab.
98
IO4AB User’s Guide
www.klinkmann.com
www
CHAPTER 7: USING ETHERNET/IP CONFIGURATOR
3. Highlight the PID, and then click the Tuning button.
4. Set the PID Mode to Auto (if not set already) and click Apply.
5. Change the Setpoint, if desired, by typing a new setpoint and clicking Apply. (Setpoint must be
configured as Host.)
Depending on the type of system, your PID may maintain a setpoint or respond to changes in
setpoint. Experiment with setpoint changes again after tuning the P, I, and D constants.
6. Adjust the span of the input, output, and time axes according to how much change you expect
from your system. To set a span, click the axis button and choose from the popup menu.
7. If desired, type a new Scan Rate and click Apply.
For most systems, you should use an appropriate scan rate based on the system lag (see
“Determining System Lag” on page 94). However, you can experiment with Scan Rates before
tuning the P, I, and D constants or adjust scan rate after tuning.
IO4AB User’s Guide
www.klinkmann.com
www
99
99
INSPECTING AND TUNING PID LOOPS
Here is an example for Scan Rate:
The lag for this system was
determined to be about 2
seconds. The left half of the
plot reflects a 0.5-second
scan rate, while the right half
shows a 3-second scan rate.
Notice both scan rates have
the same effect on the input;
however, the 3-second scan
rate is using less of the
processor ’s resources.
8. Experiment with gain settings by typing a new value in the Gain field and clicking Apply.
The easiest way to tune most PIDs is to experiment with the gain constant first. Try various
gains to see how well the system stays at setpoint and responds to setpoint changes.
100
IO4AB User’s Guide
www.klinkmann.com
www
CHAPTER 7: USING ETHERNET/IP CONFIGURATOR
In the example below, the white arrows (added for the example), show where gain constants of
-2, -5, -10, and -20 were applied:
In this example, a gain setting of -30 revealed an offset error:
With only a gain constant
applied, the input often
stabilizes at an incorrect
value. In this heating
example, a gain setting of
-30 drove the input close
to the setpoint, but
subsequent increases
failed to eliminate the
offset. It is time to try
integral constants to
eliminate the offset error.
IO4AB User’s Guide
www.klinkmann.com
www
101
101
INSPECTING AND TUNING PID LOOPS
9. Experiment with the integral constant: in the Tune I field, type a number between 0 and 1 and
click Apply. (Your PID may require larger numbers.)
In this example, an integral constant of 0.1 corrected the offset error.
The far left side of the plot
shows the offset before an
integral constant of 0.1 was
applied. This setting eliminated
the offset. In many applications,
a minor fluctuation around the
setpoint is acceptable, and
these applications use gain and
integral only. In some
applications, however, the
fluctuations at the setpoint
indicate that the gain is too
high (too much gain makes a
system unstable) or that a
derivative constant is required.
10. If derivative correction is needed, experiment with the derivative constant: in the Tune D field,
type 1 and click Apply. (Your PID loop may require a larger number.)
In this example, a derivative of 10 makes a noticeable difference in keeping the input near the
setpoint.
Many PID systems are effectively
controlled with gain and integral
constants only and no derivative
constant. In this example, the gain and
integral settings are maintaining the
temperature at 0.06 from setpoint. To
demonstrate the effect of the
derivative constant, the resolution of
the input axis was increased to show a
1 percent span. At this resolution, the
plot reveals changes of 0.01 degrees F.
The left side of the plot shows the
effect of gain at -30, integral at 0.1, and
no derivative constant. The arrow
shows when a derivative constant of 10
was applied. The right side of the plot
shows how the derivative constant is
keeping the input closer to setpoint.
102
IO4AB User’s Guide
www.klinkmann.com
www
CHAPTER 7: USING ETHERNET/IP CONFIGURATOR
11. Click Save to save your tuning parameters to the configuration.
Changes are lost unless you save them. You may wish to save your tuning parameters when
you see any improvement in performance, even if they are not final.
12. Click Yes.
Values are saved to the EtherNet/IP configuration file. Remember to download the
configuration to the Opto 22 device. (see “Downloading a Configuration” on page 78).
IO4AB User’s Guide
www.klinkmann.com
www
103
103
USING I/O POINT FEATURES
Using I/O Point Features
The I/O point features available on remote I/O depends on the combined capabilities of the device
(brain or on-the-rack controller). See the device's data sheet for supported features.
The following tables define the digital and analog features that are supported. For more information,
see form 1704, the PAC Manager User’s Guide. See also form 1798, the SNAP IO4AB Learning Center
User’s Guide.
To see a video demonstration of using I/O point features, click here, or go to the Learn tab on the
Opto 22 website, www.opto22.com, and click SNAP I/O with Allen-Bradley Systems.
Digital Features
Feature
Counters
Description
(input)—A counter keeps track of the number of times a digital input changes from off to on.
The count accumulates until it reaches the maximum count available in the remote I/O or until
you reset the counter to zero. For example, to count the number of widgets produced per shift,
you would clear the counter at the start of each shift and read it at the end of each shift.
For points on a 4-channel module, the speed of the counter depends upon the brain or controller ’s capabilities and the speed of the module used. For points on a high-density module,
counting is done in the module.
Frequency
measurement
(input)—Frequency is the speed with which a digital point changes state and is usually measured in counts per second. For example, reading the frequency can help you determine the
speed of rotating machinery.
Latches
(input)—When the value of a digital input point changes from off to on, an on-latch is automatically set. While the value of the point may return to off, the on-latch remains set, as a record
of the change, until you clear it. Similarly, an off-latch is set when the value of a digital point
changes from on to off, and it remains set until cleared.
Period
measurement
(input)—Period refers to the elapsed time for a complete on-off-on transition on a digital point.
Measurement starts on the first transition (either off-to-on or on-to-off) and stops on the next
transition of the same type. one-time or continuous or both?
Pulse duration
measurement
(input)—A pulse is a brief on (or off) state, usually repeated at a specific interval. The brain
can measure the first pulse, that is, the amount of time the input stays on (or stays off).
Quadrature
counters
(input)—A quadrature counter requires a SNAP quadrature input module, which is attached to
the encoder device. The module sends a pulse to the remote I/O upon each change in
quadrature state, and the remote I/O counts the pulses and keeps track of the direction and
rotation.
States
(input and output)—Automatic, not configurable. A digital point is either on or off. You can read
the current state of a digital input or write an on/off state to a digital output.
Time-proportional output
(TPO)
(output)—Time-proportional output varies the duty cycle and the percentage of on time within
that cycle. TPO is often combined with a PID loop and used to control the output, for example
in a heater or oven.
(digital and analog points)—A watchdog monitors communication to the device. If nothing
accesses the port for the length of time set in the watchdog, the remote I/O automatically sets
designated digital and analog I/O points to the values you have determined.
Watchdog
104
A watchdog helps make sure that a communication failure doesn’t result in disaster. If no
communication is received for the length of time set in the watchdog, the watchdog makes
sure the process is automatically brought to a safe state. For example, a valve could automatically close to avoid completely emptying a tank.
IO4AB User’s Guide
www.klinkmann.com
www
CHAPTER 7: USING ETHERNET/IP CONFIGURATOR
Feature
Description
Totalizers
Digital totalizers track the total time a specific input point has been on or off. For example, you
could track how long a pump, fan, or motor has been on. Digital totalizers are useful for periodic maintenance. Before using a totalizer, you must configure the point with this feature. The
availability of totalizers depends on the brain; see the brain’s data sheet for more information.
Analog Features
Feature
Description
Average filter
weight
(analog inputs)—A filter weight smooths analog input signals that are erratic or change suddenly.
Clamping
(analog output)—Clamping limits values that can be sent to analog output points so they do
not go above or below a specific value. For example, if you are using a 0–10 VDC output
module, but the device attached to one of its points can only handle a maximum of 5 VDC,
you can set an upper clamp of 5 VDC for that point. The values for upper and lower clamp
are set in engineering units.
Minimum and
maximum
values
(analog input)—Minimum and maximum values are sometimes called peaks and valleys.
You can read these values at any time, for example, to record minimum and maximum temperatures. You can also reset min/max values. For example, if you want to record the maximum temperature at point 2 in each 24-hour period, you must reset the values after they are
read each day.
Offset and gain
(analog input)—Offset and gain calculations are used to calibrate analog points. If a -50 mV
to +50 mV input receives signals that are slightly off (not exactly -50 mV at the lowest point,
for example), the offset and gain can be calculated so that values will appear accurately
when read.
PID loop
control
(analog points)—Proportional integral derivative (PID) loops are used to drive an input
toward a particular value (the setpoint) and keep the input very close to that value by controlling an output. PID loops are often used in temperature control.
Ramping
(analog output)—Some devices attached to analog outputs should not be abruptly stepped
up or down, because a sudden change might damage the equipment or cause other problems. Instead, you can gradually ramp the device up or down to the desired value.
Scaling
(analog input and output)—Analog input and output points can be scaled as needed. For
example, you can scale a -5 V to +5 V input point to reflect 0% to 100%
(analog input)—Automatic, not configurable. The remote I/O automatically converts the ther-
Thermocouple
linearization
mocouple junction's millivolt values into temperature values, so you don’t have to. Choose
the appropriate module and make sure you configure the point as the correct thermocouple
type (E, K, etc.) for your purpose.
(digital and analog points)—A watchdog monitors communication to the device. If nothing
accesses the port for the length of time set in the watchdog, the remote I/O automatically
sets designated digital and analog I/O points to the values you have determined.
Watchdog
A watchdog helps make sure that a communication failure doesn’t result in disaster. If no
communication is received for the length of time set in the watchdog, the watchdog makes
sure the process is automatically brought to a safe state. For example, a valve could automatically close to avoid completely emptying a tank.
IO4AB User’s Guide
www.klinkmann.com
www
105
105
REFERENCING I/O POINTS ON SNAP PAC RACKS
Referencing I/O Points on SNAP PAC Racks
This section shows input and output point numbers for SNAP PAC mounting racks, which can hold
up to 4, 8, 12, or 16 Opto 22 SNAP I/O modules.
Each module contains 1 to 32 points (channels), depending on the module. Examples of modules
are shown in the following diagram.
NOTE: Each channel of a SNAP PAC I/O module provides connectivity to one point of I/O. Each channel of
a SNAP PAC communication module provides connectivity to one communication port.
Module positions
Module position 0, 4-ch digital:
Points: 3
2
1
0
Module position 6, high-density digital:
Points: 31
0
Module position 14, serial:
Ports:
106
1
0
0
1
2
3
4
5
6
7
8
9
10
11
12
13
14
15
Module position 8, analog:
Points: 7 6 5 4 3 2 1 0
Module position 12, analog:
Points:
1
0
IO4AB User’s Guide
www.klinkmann.com
www
3: A: Supported Allen-Bradley PlatformsAppendix A
A: Supported Allen-Bradley
Platforms
Opto 22 supports using the ControlLogix® and CompactLogix™ controller platforms, V13-17, with
Opto 22 SNAP I/O. Both of these platforms support Implicit Messaging (also known as I/O
messaging) and Explicit Messaging.
The following Allen-Bradley platforms also support EtherNet/IP. While some controllers in these
platforms only support explicit messaging, Opto 22 may be able to assist you in using them.
•
MicroLogix™ 1100 and 1400 (FRN4 or newer)
•
DriveLogix 700s Version 2
•
SLC™5/05
•
SoftLogix5800
NOTE: Some Allen-Bradley controller platforms have only specific models that support EtherNet/IP or
require an adapter module or card.
For a complete and up-to-date list of Allen-Bradley platforms that support EtherNet/IP, and more
information on which platforms support Implicit Messaging or Explicit Messaging only, contact
Rockwell Automation.
IO4AB User’s Guide
www.klinkmann.com
www
107
107
108
IO4AB User’s Guide
www.klinkmann.com
www
B: B: Using CountsAppendix B
B: Using Counts
This appendix describes using counts with EtherNet/IP and linearizing the Pt100 and Pt1000 probes
from resistance.
In this Appendix
Using Counts with EtherNet/IP ...............................................................109
Linearizing the Pt100 and Pt1000 Probes from Resistance ........111
Using Counts with EtherNet/IP
While Opto 22’s SNAP PAC IO4AB implementation provides many configurable options for reading
and writing I/O (including robust scaled units) as an Allen-Bradley user you can still use counts if you
want to. However, using counts has various limitations due to the brain’s capability to linearize the
counts provided by the modules.
How to Retrieve Counts
When creating assembly instances in the EtherNet/IP Configurator, there are two types of values for
analog inputs and outputs, rValue and Value. Selecting rValue will report the value as a 32-bit float or
a Logix REAL data type. Value is the 16-bit integer value of counts as an input.
In the SNAP PAC architecture, the notion of counts varies with the particular module being used.
Most Analog Inputs
Most SNAP analog input modules provide a counts range of 0 to 24,999 counts for unipolar modules
(which read zero to a positive valued input) and –24,999 to 24,999 counts for bipolar modules
(which read a negative to positive input range).
The analog input range determines the limits of the counts. For example, a SNAP-AIV has either a
±10 VDC or a ±5 VDC input range. This range is selectable in the EtherNet/IP configuration. When
set to the ±10 VDC input range, 24,999 counts is 10 VDC and –24,999 counts is –10 VDC. If the
module is set to the ±5 VDC, 5 VDC is 24,999 counts and –5 VDC is –24,999 counts.
IO4AB User’s Guide
www.klinkmann.com
www
109
109
USING COUNTS WITH ETHERNET/IP
Opto 22’s SNAP analog inputs also allow 10% over range. This means that for the SNAP-AIV module,
the actual maximum range is ±11 VDC or ±5.5 VDC. This absolute range is 10% beyond the
advertised module limit, which means the counts may have a maximum magnitude of 27,499
counts.
NOTE: Any range outside of 27,499 counts magnitude is considered an invalid and out-of-bounds
condition.
Analog Input Exceptions
This section applies to the following modules and associated modes (including any –FM designated
parts):
SNAP-AICTD
SNAP-AICTD-8
SNAP-AITM (in thermocouple mode)
SNAP-AITM2 (in thermocouple mode)
SNAP-AITM-i (in thermocouple mode)
SNAP-AITM2-i (in thermocouple mode)
SNAP-AITM-8 (in thermocouple mode)
When these modules are configured in their temperature mode, they will output counts that are 10
times the linearized temperature value.
For example, if a SNAP-AITM has a “J” thermocouple input and it is reading 123.4F, the counts
reported with 1234 (as a 16-bit signed integer).
Resistance Temperature Inputs
The SNAP-AIRTD and SNAP-AIR40K are resistance modules. Linearized temperature for the
SNAP-AIRTD is available for Pt100 and specific nickel based probes. The SNAP-AIR40K is strictly a
resistance module but may be used for higher impedance probes, such as a Pt1000.
To read the temperature linearized SNAP-AIRTD, read the scaled engineering units. If counts are
used, they will represent the input value as wire compensated ohms. Wire compensation means
that the module provides instrumentation wire resistance compensation internally. For the
SNAP-AIRTD, 0 counts means 0 ohms. 24,999 counts indicate 400 ohms. A 10% over range is
provided so 27,499 will be reported for 440 ohms of input resistance.
If you are using counts for the SNAP-AIRTD and SNAP-AIR40K, you must must provide your own
linearization. In this case, using scaled engineering is recommended.
For additional information on determining the temperature from the probe resistance, see
“Linearizing the Pt100 and Pt1000 Probes from Resistance” on page 111.
Load Cell Inputs
When using the SNAP-AILC and SNAP-AILC2 load cell modules, only use the scaled engineering
units. These modules output a higher resolution as counts, which is too large of a number for a
16-bit signed integer (a type INT) too handle.
NOTE: Firmware versions R8.5 and newer support the load cell module. Use the Load Cell assembly class
(not the Analog Input class) for load cell values.
110
IO4AB User’s Guide
www.klinkmann.com
www
APPENDIX B: USING COUNTS
Analog Outputs
SNAP analog output modules are based on 12-bits. Unipolar output modules have a range of 0
counts to 4095 counts. Bipolar have a counts range of –4096 to 4095. Analog outputs do not have
the 10% over range that analog inputs have.
Linearizing the Pt100 and Pt1000 Probes from Resistance
If you would like to use counts strictly for the SNAP-AIRTD and thermistors for the SNAP-AIR40K
modules, tables in slope-intercept format are provided below. The Pt100 probe table may also be
used for Pt1000 applications. For Pt1000 applications, divide the resistance by 10. The SNAP-AIRTD
should be used for the Pt100 and the SNAP-AIR40K should be used for the Pt1000. When using the
Pt1000, use the 0-5000 Ohm input range with the SNAP-AIR40K.
To use these tables, start by searching from the lowest resistance value of the table. Compare the
resistance value until you reach the last value before the table’s resistance exceeds your measured
value.
Take the slope and intercept and compute this equation using floating-point variables.
temperature = (slope from table) × (measured resistance) + (intercept from table)
To convert from Celsius to Fahrenheit, use this equation:
Temperature(F) = Temperature(C) × (1.8) + 32
For better accuracy using probes with the SNAP-AIR40K module, short the leads at the probe’s
terminal blocks and record the resistance measurement. This is the resistance offset due to the
instrumentation wiring. Subtract this value from the resistance measurement before using the
linearization table.
IO4AB User’s Guide
www.klinkmann.com
www
111
111
LINEARIZING THE PT100 AND PT1000 PROBES FROM RESISTANCE
Table 1: 100 Ohm Nickel RTD -60 to 250 °C
Table Range 68.0 to 291.0 Ohms
112
Resistance
Slope
Intercept
68.0
-208.2
2.13121
73.0
-203.397
2.065415
78.0
-198.394
2.001275
84.0
-193.147
1.938809
90.0
-188.091
1.882628
96.0
-182.791
1.82742
103.0
-177.189
1.77304
110.0
-171.674
1.722901
117.0
-166.205
1.676152
124.0
-160.374
1.629129
132.0
-154.119
1.581747
140.0
-147.819
1.536746
148.0
-141.452
1.493727
156.0
-135.005
1.452396
164.0
-128.069
1.410108
173.0
-120.599
1.366925
182.0
-113.014
1.325248
191.0
-105.321
1.284971
200.0
-97.5315
1.246025
209.0
-89.6599
1.208362
218.0
-81.2915
1.169975
228.0
-72.4124
1.131032
238.0
-63.4985
1.093578
248.0
-54.5737
1.057591
258.0
-45.6613
1.023047
268.0
-36.3519
0.98831
279.0
-26.2247
0.952012
IO4AB User’s Guide
www.klinkmann.com
www
APPENDIX B: USING COUNTS
Table 2: 120 Ohm Nickel RTD -80 TO 260 °C
Table Range 65.0 to 381.0 Ohms
Resistance
Slope
Intercept
65.0
-182.127
1.533316
87.0
-179.959
1.508399
100.0
-176.723
1.476043
110.0
-172.557
1.438171
119.0
-167.486
1.395552
128.0
-162
1.352695
137.0
-156.357
1.311506
146.0
-150.64
1.272347
155.0
-144.621
1.233515
165.0
-138.325
1.195359
175.0
-131.967
1.159026
186.0
-125.596
1.124774
197.0
-119.322
1.092927
208.0
-112.759
1.061371
220.0
-105.979
1.030556
232.0
-99.093
1.000874
245.0
-92.0848
0.972269
258.0
-84.7268
0.943749
271.0
-76.8096
0.914535
284.0
-68.4858
0.885226
297.0
-59.9087
0.856347
310.0
-51.1933
0.828232
323.0
-42.291
0.800671
337.0
-33.3737
0.77421
351.0
-24.5218
0.748991
366.0
-15.9767
0.725644
IO4AB User’s Guide
www.klinkmann.com
www
113
113
LINEARIZING THE PT100 AND PT1000 PROBES FROM RESISTANCE
Table 3: Pt100 Platinum RTD -200 TO 850 °C, Alpha = 0.00385
Table Range from 17.0 to 391.0 Ohms
114
Resistance
Slope
Intercept
17.0
-242.952
2.323969
26.0
-243.957
2.362626
35.0
-245.257
2.399766
45.0
-246.907
2.436427
56.0
-248.793
2.47011
67.0
-250.836
2.500594
79.0
-253.104
2.529302
92.0
-255.638
2.556855
106.0
-258.572
2.584534
120.0
-261.869
2.612006
133.0
-265.501
2.639312
146.0
-269.615
2.667492
159.0
-274.242
2.696595
172.0
-279.416
2.726672
185.0
-284.944
2.756555
197.0
-290.783
2.786194
209.0
-297.182
2.81681
221.0
-304.176
2.848458
233.0
-311.804
2.881198
245.0
-319.755
2.913648
256.0
-327.971
2.945745
267.0
-336.831
2.978926
278.0
-346.374
3.013254
289.0
-356.646
3.048797
300.0
-367.181
3.083915
310.0
-377.91
3.118524
320.0
-389.366
3.154325
330.0
-401.597
3.191389
340.0
-414.654
3.22979
350.0
-427.878
3.267574
359.0
-441.182
3.304632
368.0
-455.294
3.34298
377.0
-470.266
3.382694
386.0
-482.558
3.414538
IO4AB User’s Guide
www.klinkmann.com
www
B: C: Worksheets and CalculationsAppendix C
C: Worksheets and
Calculations
This appendix provides a variety of worksheets to help you determine your system’s requirements.
In this Appendix
EtherNet/IP TCP/IP Requirements PLC Worksheet................ 116
EtherNet/IP Multicast Requirements PLC Worksheet.......... 117
SNAP PAC Connection Worksheets ............................................. 118
EtherNet/IP Module Packet Rate Limits..................................... 119
IO4AB User’s Guide
www.klinkmann.com
www
115
115
ETHERNET/IP TCP/IP REQUIREMENTS PLC WORKSHEET
EtherNet/IP TCP/IP Requirements PLC Worksheet
Each EtherNet/IP application should be reviewed for its TCP/IP connection requirements. The
following worksheet will assist in determining the number of connections required for each
Allen-Bradley PLC within the system.
TCP/IP Connections (for each PLC in the system)
Question
Quantity
RSLogix connection to the PLC using EtherNet/IP (enter 1 here)
How many RSLinx or 3rd Party OPC/DDE Servers?
How many PAC devices will be accessed via an unconnected MSG instruction?
How many other (non Opto 22) EtherNet/IP devices?
How many Logix to other EtherNet/IP PLC TCP/IP connections?
How many remote PLCs will connect to this PLC using a TCP/IP connection?
How many Generic Ethernet Modules are defined?
Total number of TCP/IP connections (sum the “Quantity” column together)
Depending on the specific PLC or EtherNet/IP module, your application could exceed the TCP/IP
connection resources. If you are using ControlLogix, you can use additional EtherNet/IP modules.
Typically, ControlLogix modules may support 64 (1756-ENBT) or 128 (1756-EN2T or 1756-EN2F)
TCP/IP connections. CompactLogix typically supports 32 connections.
For the specific TCP/IP limitations of your PLC, see Allen-Bradley form enet-um001_-en-p.pdf.
MicroLogix PLCs such as the 1100 and 1400 support 8 TCP/IP connections. A SLC-5/05 supports 64
TCP/IP connections. These limits are described in each product’s published specifications.
116
IO4AB User’s Guide
www.klinkmann.com
www
APPENDIX C: WORKSHEETS AND CALCULATIONS
EtherNet/IP Multicast Requirements PLC Worksheet
Each EtherNet/IP application should be reviewed for its multicast requirements. The following
worksheet will assist in determining the number of connections required for each Allen-Bradley PLC
within the system.
Multicast Connections (for each PLC in the system):
Quantity
Total
How many “Generic Ethernet Modules,” with status?
How many remaining “Generic Ethernet Modules?”
×2
How many consumed tags to other EtherNet/IP PLCs?
How many produced tags to other EtherNet/IP PLCs?
Total Number of Multicast Connections (add “Total” column together)
This total reflects the total number of CIP connections required for the application. Use the latest
version of the EtherNet/IP Capacity Tool to accurately determine limits of your application. This is
only necessary in applications that have large numbers of I/O especially when PLCs themselves are
producing and consuming tags.
NOTE: Only some of the ControlLogix EtherNet/IP modules support implicit messaging. The modules that
support implicit messaging are the 1756-ENBT, 1756-EN2T and the 1756-EN2F EtherNet/IP modules.
IO4AB User’s Guide
www.klinkmann.com
www
117
117
SNAP PAC CONNECTION WORKSHEETS
SNAP PAC Connection Worksheets
Complete the following worksheet for each SNAP PAC brain or controller used within an EtherNet/IP
system.
EtherNet/IP SNAP PAC Multicast Connection Worksheet
The SNAP PAC brain or controller supports 16 multicast connections. If this limit is exceeded,
EtherNet/IP modules will have difficulties connecting to the SNAP PAC brain or controller.
Quantity
Total
How many “Generic Ethernet Modules,” with status?
×2
How many remaining “Generic Ethernet Modules?”
Total number of Multicast Connections (add “Total” column together)
EtherNet/IP SNAP PAC Encapsulation Connections
The SNAP PAC brain or controller supports 16 CIP encapsulation connections (for EtherNet/IP). The
following worksheet will assist to determine the application requirements for each SNAP PAC device
within the Allen-Bradley system.
Typically for explicit messaging, a PLC will create one encapsulation using TCP/IP connection to the
PAC. Use only unconnected messaging (configured in the MSG instruction). This will ensure that the
PLC will not quickly exceed the encapsulation connection limit of the PAC.
The PLC will also create a UDP encapsulation connection for each implicit messaging multicast
session.
Quantity
Total
Number of PLCs with Explicit Messaging access
Total Generic Ethernet Modules w/Status accessing this device
×2
Total Generic Ethernet Modules accessing this device
Total Number of Encapsulation Connections Consume
118
IO4AB User’s Guide
www.klinkmann.com
www
APPENDIX C: WORKSHEETS AND CALCULATIONS
EtherNet/IP Module Packet Rate Limits
Implicit Messaging Volume
To determine the total volume of packets generated by the implicit messaging, use one of the
following equations. You will need to know the requested packet interval (RPI, in milliseconds) of
each Generic Ethernet Module.
When using a Generic Ethernet Module with Status:
Packet Rate per Second (for each Generic Ethernet Module) = 4000 / RPI
When using all other Generic Ethernet Modules:
Packet Rate per Second = 2000 / RPI
The total implicit messaging packet rate is the sum of all of the packet rates of all the configured
modules on the PLC.
Explicit Messaging Volume
Explicit messaging is determined by the rate the PLC logic decides when to initiate a message
sequence. By determining the maximum number of MSG commands per second, you can use this
number to estimate the maximum packet rate as follows:
Packet Rate per Second = 2 × maximum MSG commands per second
The total packet rate generated by implicit and explicit messaging is the sum of the implicit
message packet rate and the explicit message packet rate.
IO Packet Rate = Implicit Packet Rate + Explicit Packet Rate
Typically a ControlLogix 1756-ENBT module has a maximum packet rate of 5,000 packets per
second. A CompactLogix PLC has a throughput of 4,000 packets per second. Allen-Bradley form
ENET-AP001D-EN-P specifies the entire calculated rate should not exceed 90% of the maximum
packet rate of the EtherNet/IP module.
The calculations described above only accumulate a portion of the EtherNet/IP messaging rate. We
strongly recommend reviewing Allen-Bradley forms ENET-AP001 and 1756-RM094 to ensure that all
other sources of EtherNet/IP traffic are considered when validating your system design.
The Ethernet topology and switches are also responsible for the response rate and maximum
throughput of an EtherNet/IP implementation. We encourage you to evaluate the performance of
your Ethernet network topology.
IO4AB User’s Guide
www.klinkmann.com
www
119
119
ETHERNET/IP MODULE PACKET RATE LIMITS
120
IO4AB User’s Guide
www.klinkmann.com
www
B: D: Connecting with SLC5 or MicroLogixAppendix D
D: Connecting with SLC5 or
MicroLogix
This appendix provides information for connecting to an SLC5/05 PLC, or to a MicroLogix 1100 or
1400 PLC.
In this Appendix
Connecting a PAC with a SLC5/05 PLC................................................ 121
Connecting a PAC with a MicroLogix 1100 or 1400 PLC............. 123
Connecting a PAC with a SLC5/05 PLC
You can use SLC5/05 processors to read and write I/O data from a SNAP PAC IO4AB implementation
using the EEM (EtherNet/IP Explicit Message) command, which is the equivalent for the Logix family
MSG instruction (implementing explicit messaging over EtherNet/IP). For more information, see the
Allen-Bradley document, 1747-rm001_-en-p.pdf.
Assembly instances may be accessed using the Read Assembly and Write Assembly options. Other
values with the EtherNet/IP classes may be accessed using the Get Attribute Single and the Set
Attribute Single options.
The SLC5/05’s EEM message configuration is based around 16-bit words, however the EtherNet/IP
Configurator is based around 32-bit DINTs, and it requires that each assembly instance is filled up to
the nearest complete 32-bit boundary. When configuring the EEM message size, double the
message length to accommodate the transition between DINT sizes and word sizes.
For the Service field, select either Read Assembly or Write Assembly. When populating the fields of
the EEM message, use form 1770, the EtherNet/IP for SNAP PAC Protocol Guide to identify the
attributes for Service/Service Code, Class, Instance, and Attribute.
IO4AB User’s Guide
www.klinkmann.com
www
121
121
CONNECTING A PAC WITH A SLC5/05 PLC
General Tab
Field
Description
Message Timeout
Use default
Channel
1
Size in Words (Receive)
The size must be at least 2 times the DINTs in the assembly
instance. Will be grayed out on a write.
Size in Words (Transmit)
The size must be exactly 2 times the DINT size of the assembly
instance used to be written. Will be grayed out on a read.
Data Table Address (Send)
Select the source file address.
Data Table Address (Recv)
Select the destination file address.
Target Device Tab
Field
Description
Message Timeout
Use the default (internally calculated).
Multihop
Yes
Service
Use Read Assembly or Write Assembly.
Service Code
Selected by the service selection above.
Class
4
Instance
E/IP Configurator Assembly Instance Number
Attribute
3
Allen-Bradley publishes the following explicit messaging limits for the SLC5/05 family of PLCS. These
are TCP connection limits.
Model
Connections
1747-L551
32 connections
1747-L552
48 connections
1747-L553
64 connections
A connection is defined as each EEM instruction in the RSLogix 500 ladder. In most cases this will be
reading or writing an Assembly Instance configured in the EtherNet/IP Configurator. Typically each
I/O unit will have at least two connections. Most applications have an input and an output Assembly
Instance for each SNAP PAC I/O unit. This means that two connections are used for each SNAP PAC
I/O unit.
The EEM instruction by default is a triggered instruction. This means the EEM instruction starts when
the input rung condition toggles from off to on. If the rung condition remains on, it will not
re-trigger the EEM message. The continuous run bit should not be set in this instruction. This will
cause excessive amounts of needless I/O communication. Rather, a timer should be used to regulate
the rate of reads and writes to the I/O.
122
IO4AB User’s Guide
www.klinkmann.com
www
APPENDIX D: CONNECTING WITH SLC5 OR MICROLOGIX
The EEM has a limit of 124 16-bit words. When working with the EtherNet/IP Configurator, the limit
of each assembly instance decreases. For the SLC-5/05, an assembly instance may not exceed 62
DINTs (32-bit integers).
The COP instruction may be used to copy bitwise REAL (32-bit floating point values) that are within
the EtherNet/IP Configurator’s assembly instance. The copies should be implemented after the
completion of each successful EEM read operation. The COP should precede the initiation of an EEM
write operation to ensure the write has the very latest data state.
Connecting a PAC with a MicroLogix 1100 or 1400 PLC
You can use a MicroLogix 1100 (Series-B) or 1400 to read and write I/O data using IO4AB. Assembly
Instances configured in the EtherNet/IP Configurator may be read and written using the MSG
instruction.
Each MSG instruction must have it's own RIX (Extended Routing Information file) and MSG files. Add
these files before configuring the MSG instruction in the ladder.
To add more Message files follow these instructions:
1. While offline, select the data files folder in the RSLogix Micro project pane followed by a right
mouse click.
2. Select New...
3. Add a new file of the type Message.
4. Give the file a name such as “Message1.”
5. If desired, enter a description.
6. Elements should be set to 1, the default.
7. Select Global, the default.
8. Press OK.
To add additional Extended Routing Information files follow these instructions:
1. While offline, select the data files folder in the RSLogix Micro project pane followed by a right
mouse click.
2. Select New...
3. Add a new file of the type Extended Routing Information.
4. Give the file a name such as “RIX1.”
5. If desired, enter a description.
6. Elements should be set to 1, the default.
7. Select Global, the default.
8. Press OK.
Now you can add the MSG instruction to the ladder. See below for descriptions of the values when
configuring the MSG instruction.
IO4AB User’s Guide
www.klinkmann.com
www
123
123
CONNECTING A PAC WITH A MICROLOGIX 1100 OR 1400 PLC
General Tab
This Controller
Field
Description
Channel:
1 (Integral)
Communication Command:
CIP Generic
Data Table Address:
Insert the address to read or write data
Number of Elements
Target Device
124
Field
Description
Message Timeout:
This is automatically set.
Extended Routing Info File:
Routing Register File (create a unique file for each MSG)
Service:
Either “Read Assembly” or “Write Assembly”
Class:
4 (hex)
Instance:
Use the E/IP Configurator ’s Assembly Instance number (from 100 to 115)
Attribute:
3 (hex)
IO4AB User’s Guide
www.klinkmann.com
www
APPENDIX D: CONNECTING WITH SLC5 OR MICROLOGIX
MultiHop
Add Hop
Field
Description
From Device:
This MicroLogix
From Port:
Channel 1
To Address Device:
EtherNet/IP Device (str:)
To Address:
(insert IP address of PAC device)
The MSG has a limit of 124 16-bit words. However, when working with the EtherNet/IP Configurator,
there is a lower limit for each assembly. For the MicroLogix family, an assembly instance may not
exceed 62 DINTs (32-bit integers).
For additional information, see “Using Counts with EtherNet/IP” on page 109.
NOTE. MicroLogix 1100 must use firmware FRN 4 (OS Series B) or newer to enable CIP Generic messaging
through the Ethernet port. MicroLogix 1400 already has CIP Generic Messaging support.
IO4AB User’s Guide
www.klinkmann.com
www
125
125
CONNECTING A PAC WITH A MICROLOGIX 1100 OR 1400 PLC
126
IO4AB User’s Guide
www.klinkmann.com
www
B: E: Detecting I/O Communication FailuresAppendix E
E: Detecting I/O
Communication Failures
One important function ladder logic should perform is to detect when an I/O communication failure
occurs. This function is crucial so the control system may properly react and notify when such a
failure occurs.
When using implicit messaging, the PLC automatically restores the communications with the I/O
units. This automatic nature allows the ladder to function on stale values even when the
communication fails.
The only physical indicator of this failure on the PLC is the blinking I/O Status indicator on the front
panel. If the panel is out of reach or is not convenient to be inspected, a failure will go unnoticed.
Detecting the I/O Status Indicator State
ControlLogix and CompactLogix provide a way to gain access to the value that controls the I/O
Status indicator on the front panel of the Logix controller. The command is the GSV or Get System
Value instruction.
The following GSV instruction options allow the retrieval of the I/O Status indicator. This front panel
PLC indicator offers a global status of all module connections.
When implementing the GSV instruction, use these attributes:
Attribute
Description
Class Name:
“Module”
Instance Name:
leave blank
Attribute Name:
“LedStatus”
Destination:
An INT variable to receive the status
Here is an RSLogix screen capture of a configured GSV instruction to read the module’s LedStatus.
IO4AB User’s Guide
www.klinkmann.com
www
127
127
The return values are (excerpted from Allen-Bradley document 1756-RM003):
Value
Description
0
LED Off: No MODULE objects are configured for the controller (there are
no modules in the I/O Configuration section of the controller organizer).
1
Flashing red: None of the MODULE objects are Running.
2
Flashing green: At least one MODULE object is not Running.
3
Solid green: All the Module objects are Running.
Detecting Each Generic Ethernet Module’s State
Many system integrators will want to know precisely which I/O module failed. RSLogix provides the
ability to check on the status of each Generic Ethernet Module. This is another extension of the GSV
command.
To inspect the current status of the Generic Ethernet Module, additional ladder instructions need to
be added for each module in the PLC configuration.
These are the arguments for the GSV module:
Argument
Description
Class Name:
“Module”
Instance Name:
The Generic Ethernet Module you want to test.
Attribute Name:
EntryStatus
Destination:
An INT variable to receive the bitmask.
Here is a screenshot of the GSV instruction configured within the Ladder. The Instance Name
“PACLC” is a Generic Ethernet Module already defined within the ladder.
The GSV instruction may add a burden to the ladder’s scan time. As a result, the detection of I/O
failures should be implemented efficiently. Consider using a timer as a time period check to evaluate
the status of the PLC's I/O indicator. If this indicator should indicate a failure, then a routine should
be called to test the status of the I/O units. Calling a routine after knowing there is a failure will
reduce the number of GSV and conditional tests the ladder will have to perform.
For more information on the expected values reported by this instruction, see Allen-Bradley form
1756-rm003.
128
IO4AB User’s Guide
www.klinkmann.com
www
B: F: Generic Ethernet Module OptionsAppendix F
F: Generic Ethernet Module
Options
When creating a GENERIC-ETHERNET module, you may select the Comm Format. This field controls
the assumed type and the amount of data that may be transacted on this module. The
communications format selection is dependent on the data type and the amount of data that your
E/IP configuration will read or write.
Once this dialog is completed, the Comm Format cannot be changed, so make this data selection
decision carefully.
Data Selection for the Communication Format
For IO4AB, the communication format data type will usually be REAL (4-Bytes), DINT (32-bit
integers), or INT (16-bit integers). The selected data type always applies to both the input and
output assembly. Should a communication format be chosen with the status input assembly, this
data is always considered a DINT format.
The four primary communication format types are as follows:
Input Data. A single assembly instance of inputs from the SNAP PAC I/O.
IO4AB User’s Guide
www.klinkmann.com
www
129
129
DETERMINING THE NUMBER OF ASSEMBLY INSTANCES
Input Data with Status. Two assembly instances. The primary Input instance’s data may be
selected. The status assembly instance is assumed to be DINT.
Data. This is the most typical selection. There is an input assembly and an output assembly. The
user may select the data type for the input and output assembly.
Data with Status. Maximum data transfer possible. There is an input, output, and a status
assembly. The user may select the native data type for the input and output assemblies. The status
assembly is assumed to be a DINT.
The following table describes the communication format data types available for the Opto 22 I/O for
A-B implementation.
Comm Format
Typical Use
REAL
The assembly instances are only comprised of REAL values or
scaled engineering units of analog inputs or outputs.
DINT
The assembly instances contain any BOOL type data (for digital
inputs or outputs).
INT
The assembly instances are filled with analog inputs as type
“value” (32-bit integer in the E/IP configurator) and Boolean values.
Use the data type in the communication format that is closest to the data contained in your
assembly instances.
Determining the Number of Assembly Instances
An RSLogix ETHERNET-MODULE, Generic Ethernet Module may have at least one and up to three
assemblies of data. The three assembly types are Input, Output, and Status Input. An Input assembly
is required for all configurations. Most Module configurations will have two assemblies, Input and
Output. If additional Input data is required than Input assembly’s 125 32-bit DINT limit, you may use
the Status Input for additional data. The status input will permit up to 124 32-bit words in DINT
format only.
130
Assembly
Max (Quantity of DINTs)
Description
Input
125
Input data from the remote I/O unit.
Output
124
Output data to the remote I/O unit.
Status
Typically two less than the size
of the Output Assembly Size.
Status input data from the remote I/O
unit. Data is always in DINT format.
IO4AB User’s Guide
www.klinkmann.com
www
APPENDIX F: GENERIC ETHERNET MODULE OPTIONS
Opto 22’s Mixed Architecture and the A-B Comm Format
Opto 22’s architecture is based around a mixed analog and digital architecture so that assembly
instances usually have a combination of digital and analog data.
Since the Comm format will force the entire assembly to be represented as a single data type, this
means that some of the values are not adequately represented. For example, a REAL will be
contained in a DINT (bitwise) and vice versa.
RSLogix contains some methods to convert the data types.
Using CPS with Simple Data Types
For cases where the there is a minority data type in an assembly the ladder command, the CPS
command may be used to translate a REAL contained in a DINT to a REAL. The same applies if a DINT
was contained in a REAL. It may be converted to a DINT by using the CPS command.
In this case, the CPS command is a 4-byte transfer. The instruction does not convert the data, rather
it moves the binary value of the variable to the destination.
Using CPS with a UDT
If there are many mixed data types in the assembly instance, CPS may be used to copy the entire
module data array to (or from) a user-defined data type (UDT). The UDT’s definition must perfectly
align to the assembly’s data types.
IO4AB User’s Guide
www.klinkmann.com
www
131
131
USING CPS WITH A UDT
132
IO4AB User’s Guide
www.klinkmann.com
www
Index
A
C
adapter class device 7
adding
a device manually 78
PID loop 87
algorithms for PID loops 91
Allen-Bradley
how to configure (video) 3
platforms 107
analog
inputs 109
outputs 111
analog point
average filter weight 105
clamping 105
configuring 19
gain 105
maximum value 105
minimum value 105
offset 105
scaling 21, 105
watchdog 104, 105
assembly
adding & deleting 81
attribute list 82
input 24
moving 84
number of 130
output 26
average filter weight 105
calibrating analog point 105
changing
IP address 80
PID loop 90
CIP 3, 5, 33
objects 8
clamping analog output point 105
communication format 129
configuration file
adding analog point 19
custom scaling 21
configuration report 85
configuring
A-B controller (video) 3
PID loop 86
controller-scoped tags 47
copying I/O configuration 76
counter, description 104
counts 109
creating PID loop 86
B
BOOL data type 54
Boolean attributes 50
BootP request 13
D
deleting PID loop 91
device, adding 12
digital point
configure 16
counter 104
features 104
latching 104
quadrature counter 104
state 104
watchdog 104, 105
DINT
input, maximum 26
output, maximum 27
discover device 12
IO4AB User’s Guide
www.klinkmann.com
www
133
133
distributed intelligence 5
DNS address 80
download configuration 39, 78
E
EtherNet/IP Configurator, installing 12
EtherNet/IP module 40
revision number 42
explicit messaging, reasons to use 8
N
network infrastructure 3
O
ODVA 3
off-latch 104
offset, definition 105
on-latch 104
Opto Tag Database (.otg) file 34
output assembly 26
G
gain
definition 105
in PID loops 98
gateway address 14
generic Ethernet module 119, 129
Get Attribute Single 45
I
I/O point
features 104
referencing 106
I/O unit, import configuration 35
implicit messaging, reasons to use 8
import I/O configuration 35
input assembly 24
inspect PID loop 93
interacting algorithm for PID 91
IP address, change 80
ISA algorithm for PID 91
L
ladder logic 8
lag time, for PID 94
latch, definition 104
load cell inputs 110
M
MAC address 13
maximum value 105
MESSAGE object 43, 51
MicroLogix PLC 121
minimum value 105
modify device 80
MSG instruction 50
multicasting 7
134
P
parallel algorithm for PID 91
PID loop
algorithms 91
changing 90
configuring 86
deleting 91
determining system lag 94
inspect 93
tuning 98
Product Support 4
Pt1000 111
Q
quadrature counter 104
R
Requested Packet Interval (RPI) 32
resistance temperature inputs 110
retrieve counts 109
S
scaled units 21
scaling
analog point 21
description 105
scanner class device 7
setpoint for PID 86
SLC5/05 PLC 121
slope-intercept format 111
SNAP-AIR40K 111
SNAP-AIRTD 111
state of digital point 104
IO4AB User’s Guide
www.klinkmann.com
www
T
V
TCP/IP 51, 116
thermistors 111
troubleshooting 4
tuning PID loop 98
value readings 82
velocity algorithm for PID 91
view PID loop 93
W
U
UDP/IP 7
unconnected message 54
upload configuration 77
User Data Types (UDTs) 54
watchdog 15, 18
definition 104, 105
Opto22_IO4AB_User_Guide_en_0112.pdf
www.klinkmann.com
Riga
tel. +371 6738 1617
[email protected]
Helsinki
tel. +358 9 540 4940
automation@klinkmann.fi
St. Petersburg
tel. +7 812 327 3752
[email protected]
Moscow
tel. +7 495 641 1616
[email protected]
Yekaterinburg
tel. +7 343 376 5393
[email protected]
Samara
tel. +7 846 273 95 85
[email protected]
Кiev
tel. +38 044 495 33 40
[email protected]
Vilnius
tel. +370 5 215 1646
[email protected]
Tallinn
tel. +372 668 4500
[email protected]
Мinsk
tel. +375 17 200 0876
[email protected]