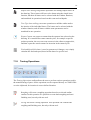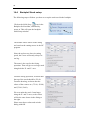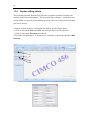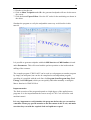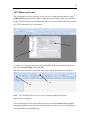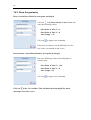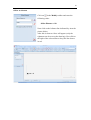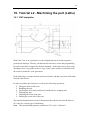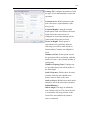
1
CIMCO CNC- Calc v6 User Guide
© 1991 - 2011 CIMCO Integration - March 22, 2011
2
1.
License information
Information in this document is subject to change without notice and does not
represent a commitment on the part of CIMCO Integration. The software described in
this document may be used or copied only in accordance with the terms of the license.
The purchaser may make one copy of the software for a backup, but no part of this
user manual may be reproduced, stored in a retrieval system, or transmitted in any
form or by any means electronically or mechanically, including photocopying and
recording for any purpose other than the purchaser's personal use, without prior
written permission from CIMCO Integration.
TERMS OF USE FOR:
Software: CNC-Calc v6
Version: 6.x.x
Date: March 2011
Copyright © 2011 by CIMCO Integration
Notice:
CIMCO Integration reserves the right to make changes to the CNC-Calc v6 Software
at any time and without notice.
Software License
You have the right to use the number of licenses of the enclosed program, which you
have bought from CIMCO Integration. You may not distribute copies of the program
or related documentation to any persons or companies. You may not modify the
program or related documentation without the prior written consent of CIMCO
Integration.
Disclaimer of all Warranties and Liability
CIMCO Integration makes no warranties, either express or implied, with respect to
the software, its quality, performance, merchantability, or fitness for any particular
purpose. The entire risk as to its quality and performance is with the buyer. Should the
CNC-Calc v6 software prove defective following its purchase, the buyer (and not
CIMCO Integration, its distributor, or its retailer) assumes the entire cost of all
necessary servicing, repair, of correction and any incidental or consequential
damages. In no event will CIMCO Integration be liable for direct, indirect, or
3
consequential damages resulting from any defect in the software, even if CIMCO
Integration has been advised of the possibility of such damages. Some jurisdictions do
not allow the exclusion or limitation of implied warranties or liability for incidental or
consequential damages, so the above limitation or exclusion may not apply to you.
Notice:
The accompanying software is confidential and proprietary to CIMCO Integration. No
use or disclosure is permitted other than as expressly set forth by written license with
CIMCO Integration.
Copyright © 2011 CIMCO Integration. All rights reserved.
THIS SOFTWARE CONTAINS CONFIDENTIAL INFORMATION AND TRADE
SECRETS OF CIMCO INTEGRATION. USE, DISCLOSURE, OR
REPRODUCTION IS PROHIBITED WITHOUT THE PRIOR EXPRESS
WRITTEN PERMISSION OF CIMCO INTEGRATION.
The CIMCO Logo is a trademark of CIMCO Integration. Microsoft, Windows, and
Windows NT are registered trademarks of Microsoft Corporation. Other brand and
product names are trademarks or registered trademarks of their respective holders.
Contacting CIMCO Integration
Phone: +45 4585 6050
Fax: +45 4585 6053
E-mail: [email protected]
Web: http://www.cimco.com
4
2.
1.
2.
3.
4.
5.
6.
7.
Table of Contents
License information .............................................................................................. 2
Table of Contents ................................................................................................. 4
Important Notice ................................................................................................... 6
Installation ............................................................................................................ 7
Overview .............................................................................................................. 8
Mouse functions ................................................................................................... 9
Toolbars .............................................................................................................. 10
7.1.
File ............................................................................................................ 10
7.2.
View .......................................................................................................... 10
7.3.
Snap ........................................................................................................... 11
7.4.
Points and Lines ........................................................................................ 12
7.5.
Arcs and Circles ........................................................................................ 13
7.6.
Pattern ....................................................................................................... 15
7.7.
Letters........................................................................................................ 15
7.8.
Modify ....................................................................................................... 16
7.9.
Milling Operations .................................................................................... 18
7.10.
Turning Operations ................................................................................... 19
8.
Menus ................................................................................................................. 21
8.1.
File menu................................................................................................... 21
9.
Configuring CNC-Calc ....................................................................................... 22
9.1.
Main configuration .................................................................................... 22
9.2.
Color configuration ................................................................................... 25
9.3.
Other configurations that affect CNC-Calc............................................... 26
10. Tutorial 1 2D Construction (Mill) ...................................................................... 27
10.1.
Before you start ......................................................................................... 28
10.2.
Draw the geometry .................................................................................... 30
11. Tutorial 2 CNC toolpaths and Face milling (Mill) ............................................. 35
11.1.
Before you start ......................................................................................... 36
11.2.
Creation of Facing toolpaths ..................................................................... 38
11.3.
Inserting a Tool with Feed and Speed Calculator ..................................... 41
12. Tutorial 3 Contour milling (Mill) ....................................................................... 43
12.1.
Before you start ......................................................................................... 44
12.2.
Creation of Contour toolpaths ................................................................... 45
12.3.
Inserting a Tool with Feed and Speed Calculator ..................................... 50
5
13. Tutorial 4 Pocket milling (Mill) ......................................................................... 52
13.1.
Before you start ......................................................................................... 53
13.2.
Creation of Pocket toolpaths ..................................................................... 54
14. Tutorial 5 Backplot in the Editor (Mill) ............................................................. 59
14.1.
Before you start ......................................................................................... 59
14.2.
The first backplot ...................................................................................... 61
14.3.
Backplot tool setup.................................................................................... 62
14.4.
Backplot Stock setup. ................................................................................ 64
15. Tutorial 6 Drilling (Mill) ................................................................................... 66
15.1.
Before you start ......................................................................................... 66
15.2.
Generate a drill cycle ................................................................................ 67
16. Tutorial 7 Milling of Letters (Mill) .................................................................... 70
16.1.
Before you start ......................................................................................... 70
17. Tutorial 8 Milling of TrueType Letters (Mill) ................................................... 76
17.1.
Before you start ......................................................................................... 76
17.2.
Pocket milling letters ................................................................................ 82
18. Tutorial L1 - Drawing the part (Lathe)............................................................... 84
18.1.
2D construction of a part for turning......................................................... 84
18.2.
Before you start ......................................................................................... 85
18.3.
Draw the geometry .................................................................................... 86
19. Tutorial L2 - Machining the part (Lathe) ........................................................... 95
19.1.
CNC toolpaths ........................................................................................... 95
19.2.
Before you start ......................................................................................... 96
19.3.
Facing the front of the stock ..................................................................... 98
19.4.
Roughing the part .................................................................................... 102
19.5.
Grooving the part .................................................................................... 108
19.6.
Finishing the part .................................................................................... 113
19.7.
Threading the part ................................................................................... 117
19.8.
Drilling the part ....................................................................................... 124
19.9.
Tapping the part ...................................................................................... 128
6
3.
Important Notice
Do not run the generated NC programs as is!
This is due to the fact that no tool changes or other codes for spindle speed etc. are
generated.
The same is the case in terms of program start and program finish codes. These codes
could for instance be inserted with the macro functionality provided in the Cimco Edit
editor.
7
4.
Installation
CNC-Calc v6 is installed as part of CIMCO Edit v6. Please see the CIMCO Edit v6
documentation for installation instructions.
If you are upgrading from an existing installation without CNC-Calc v6, reinstallation
of CIMCO Edit v6 is not necessary. Just copy the new keyfile (named "license.key")
to the appropriate directory.
8
5.
Overview
CNC-Calc v6 can draw 2D geometry and generate NC code in ISO and Heidenhain
conversational format for contours and drilling cycles. The main program window
(with an empty drawing pane) looks like this:
To the left of the drawing pane, you see
the CNC-Calc and Element Info panes.
The CNC-Calc pane shows coordinate
entry fields and other information about
the activity you are performing at any
given time, while the Element Info pane
shows the statistics of any element
hovered over by the mouse. To the right
an example of the Element Info pane
display is shown.
The following sections will describe first the mouse functions, then the toolbars and
menus.
9
6.
Mouse functions
The mouse buttons are used to perform the following functions:
Left button
Selects whatever is described in the lower left corner of the
program window.
Middle button (on most mice, pressing the scroll wheel)
Fits/zooms the geometry drawing to the entire graphics area. This
can also be achieved by clicking the
icon.
Right button
Drag the geometry drawing across the graphics area by holding
down the right mouse button as you drag the mouse.
Scroll wheel
Zoom in and out, centered on the cursor position.
10
7.
Toolbars
7.1.
File
The File toolbar handles file operations like loading and saving of files.
New Drawing clears the graphics area and opens a new document. This
can also be accessed with Ctrl-N.
Open Drawing opens existing CNC-Calc v6 or DXF files. This can also
be accessed with Ctrl-O. The downwards arrow next to the Open icon
gives access to a recent files list, making it easy to reopen a file that you
have been editing recently.
Save saves the drawing to your hard disk. If it is the first time you save
the drawing, you will be prompted for a file location and name. Save can
also be accessed with Ctrl-S.
Setup CNC-Calc lets you access the configuration for CNC-Calc.
7.2.
View
The View toolbar controls the way we look at the drawing. Here it is possible to
perform all the various zoom functions.
Zoom in centered on the middle of the graphics area. Zoom in can also be
accessed with Page Down.
11
Zoom out centered on the middle of the graphics area. Zoom out can also
be accessed with Page Up.
Zoom All fits the drawing to the graphics area. This can also be done by
clicking the middle button on the mouse (on most mice, pressing the
scroll wheel), or with Ctrl-End.
Zoom Window lets you zoom in on an area, which you select by first
clicking at one corner, then dragging the rectangle and clicking at the
opposite corner.
7.3.
Snap
The Snap toolbar handles the different kinds of snap options that are available. The
snap option is only available when some point position has to be selected or indicated.
Snap to Grid snaps to the grid points.
Snap to Points snaps to points drawn by the user.
Snap to Center Points snaps to the centers of circles and arcs.
Snap to Mid points snaps to the midpoints of elements
Snap to End points snaps to the endpoints of elements.
Snap to Intersections snaps to the intersections between elements.
Enable All Snap Types activates all snap types.
Disable All Snap Types deactivates all snap types.
12
7.4.
Points and Lines
The Draw Points/Lines toolbar contains functions for drawing lines and points
defined in different ways.
Point will draw a point at the selected position.
Between 2 Points will draw a line between two selected points.
Vertical will draw a vertical line. The first point selected defines the
starting point (and the X coordinate), the second point selected defines the
length (and need not be directly above or below the first point).
Horizontal will draw a horizontal line. The first point selected defines the
starting point (and the Y coordinate), the second point selected defines the
length (and need not be directly to the left or right of the first point).
Polar lets you select the starting point of a line, and you then select (or
write) the angle and length of the line.
Perpendicular draws a line perpendicular to another line. You first select
the line your new line is to be perpendicular to, then the starting point of
your new line. You then select the length of your new line, and last you
select in which direction from the starting point your new line is to go.
Parallel draws a line parallel to another line. You first select the line your
new line is to be parallel to, then the starting point of your new line. You
then select the length of your new line, and last you select in which
direction from the starting point your new line is to go.
13
Bisector draws a line bisecting two other lines, i.e. a line that halves the
angle between two lines. You first select the two lines you want to bisect,
then you select the length of your new line (from the intersection of the
two lines you are bisecting), and last you select which of the four possible
solutions you want to keep.
Tangent Two Elements lets you draw a line tangent to two circles or arcs.
You select the two circles or arcs your new line is to be tangent to, and
then you select which of the solutions you want to keep.
Tangent Angle draws a line tangent to an arc or circle, at a selected angle.
You first select the arc or circle your new line is to be tangent to, then the
angle and length, and last you select which of the two solutions you want
to keep.
Tangent Through Point draws a line tangent to an arc or circle, to a
selected point. You first select the arc or circle your new line is to be
tangent to, then the point it is to go though, and last you select which of
the two solutions you want to keep.
Rectangle draws a rectangle where you select the two opposite corners. It
is possible to define a corner radius for the rectangle (the corner radius is
ignored if there is not room for it).
7.5.
Arcs and Circles
The Draw Arcs/Circles toolbar lets you draw full circles (360 degree arcs) and arcs.
Center Radius lets you define the center of the circle, followed by the
radius.
14
Two Points lets you define the circle by selecting two (diametrically
opposite) points.
Three Points lets you define the circle by selecting three points on the
periphery of the circle.
Tangent Two Elements lets you define a circle tangent to two elements, of
a defined radius. You first write the radius, then you select the two
elements the circle is to be tangent to. Last you select which of the
solutions you want to keep.
Tangent Center on Line lets you define a circle tangent to one element,
with its center on a line, of a defined radius. You first write the radius,
then you select the line the center is to be on, and the element the circle is
to be tangent to. Last you select which of the solutions you want to keep.
Tangent through Point lets you define a circle tangent to one element,
through a point, of a defined radius. You first select the point the circle is
to go through then write the radius, and select the element the circle is to
be tangent to. Last you select which of the solutions you want to keep.
Tangent Three Elements defines a circle tangent to three elements. You
select the three elements the circle is to be tangent to, and then you select
which of the solutions you want to keep.
Two Points lets you draw an arc by selecting the endpoints of the arc,
entering the radius, and selecting which solution you want to keep.
Three Points lets you draw an arc by selecting three points. Note that the
arc created will not cross the zero degree point (3 o'clock). The selection
order of the three points is unimportant.
Start and End Angles lets you define an arc by its center point, radius,
starting angle, and end angle.
15
7.6.
Pattern
Rectangular Bolt Hole Pattern defines a rectangular bolt pattern. You
select the start point (one of the corners), and then enter the step in X, step
in Y, number of holes in X, number of holes in Y, and the hole diameter.
Circular Bolt Hole Pattern defines a circular bolt pattern. You select the
center of the bolt pattern, select the radius of the bolt pattern, and then
enter the start angle, step angle, number of holes, and the hole diameter.
7.7.
Letters
The Letters toolbar lets you draw two kinds of letters: simple letters and TrueType
letters. The simple letters are like the letters used on drawings. These letters can be
used to mill, for instance, a part number on a part. The TrueType letter is more
artistic, and any TrueType font installed in the Windows operating system can be
used.
Simple Text Linear Alignment defines simple text written on a line. You
enter the starting point, angle of the line, then the distance between and
height of the letters. It is also possible to select the horizontal and vertical
alignment of the text.
Simple Text Circular Alignment defines simple text that is written on a
circle. You select or enter the center and radius of the alignment circle,
then the start angle, space between and height of the letters. It is also
possible to select the horizontal and vertical alignment of the text on the
circle.
16
True Type Text Linear Alignment defines True Type text written on a line.
You enter the starting point and angle of the line, and then the height of
the letters. It is also possible to select the horizontal and vertical
alignment of the text.
True Type Text Circular Alignment defines True Type text written on a
circle. You select or enter the center and radius of the alignment circle,
then the start angle and height of the letters. It is also possible to select the
horizontal and vertical alignment of the text, on the circle.
7.8.
Modify
The Modify toolbar modifies the geometry in different ways.
Trim To Intersection will trim the selected element to the nearest
intersection(s). Select the element to be trimmed on that part to be
removed. It is then trimmed to the intersection(s) nearest the point where
it was selected. The trimmed element is also broken in two if there are
intersections on both sides of the selected point.
Trim One Element will trim one element to another. Select the element to
be trimmed first, on the section to be kept, and then select the element to
trim to. This kind of trimming may extend the trimmed element to the
intersection with the element it is trimmed to.
Trim Two Elements will trim two elements to each other. Select the two
elements to be trimmed, on the sections to be kept. This kind of trimming
may extend the trimmed elements to their intersection.
Fillet Elements creates a fillet between two elements, with a fillet radius
you select. It is optional whether the two elements should also be trimmed
to the fillet.
17
Chamfer Elements creates a chamfer between two elements, with a define
angle and/or distance. It is optional whether the two elements should also
be trimmed to the chamfer.
Break Elements will divide an element into two pieces. First select the
element to be broken into two, and then select the point at which it should
be divided.
Join Elements will join two selected elements into one.
Delete will delete the elements you select. They can be restored with the
Undo function (the
icon in the Modify toolbar).
Delete Duplicates will delete elements that are duplicated in the drawing.
Offset Elements will offset the elements you select by a specified distance.
It is optional whether the original element should be kept.
Mirror Elements will mirror the elements you select along a line selected
as the mirror axis.
Translate Elements will translate the elements you select along a vector
defined by selecting two points. It is optional, whether the original should
be kept, and it is possible to create multiple copies, where each copy is
translated one step further along the selected vector.
Rotate Elements will create one or more copies of the selected elements,
rotated around a selected point, at a specified angle per copy. It is optional
whether the original should be kept.
Scale Elements will create one or more copies of the selected elements,
scaled about a selected point by a specified scale factor. It is optional
whether the original should be kept.
Undo will undo one or more operations. This can mean deleting elements
created, restoring deleted elements, and/or undoing modifications to
elements. Undo can also be accessed with Ctrl-Backspace.
18
7.9.
Milling Operations
The Milling Operations toolbar allows the user to perform various operations used in
the manufacturing of parts. All the operations can be exported directly to CIMCO Edit
or to the clipboard, for insertion in a user-defined location.
Face Milling creates a facing operation based on a selected outline
contour.
Pocket Milling creates pocket operations for one or multiple pockets.
These pockets can contain multiple islands, or none. In a single operation,
it is possible to make both roughing and finishing cuts, but only with one
tool.
Contour Milling creates operations for contour milling. A contour
operation can machine multiple contours with roughing and finishing cuts,
but only with one tool.
Drilling creates drilling operations for hole drilling. From a drawing, the
hole positions can be selected with the use of a filter, or by simply
indicating the hole position. If multiple holes are drilled, they can be
arranged in both rectangular and circular patterns.
Helix Milling can generate operations for helix drilling. Like normal
drilling, multiple holes can be selected with the use of filters, or by
selecting the individual circles from the drawing.
Thread Milling can create threading milling operations. The threads can
be inside or outside, and can be created for tools with one or multiple
teeth. Again, multiple threads can easily be selected with the use of the
filter function.
19
Simple letter milling can generate operations for milling simple letters on
the drawing. These letters will have to be drawn using the simple letter
function, but then all letters can be selected with the window functions,
and machined in operations based on their start and end depths.
True Type letter milling can create operations to mill the outline and/or
the interior of the individual letters. The letters can be selected with the
window function, and all letters with the same parameters can be
machined in one operation.
Export Contour can export a contour that the operator has selected on the
drawing. If a controller has smart canned cycles, for example a specific
pocket operation, the user can create a macro in the editor to support this,
and then export the actual contour for insertion in the canned cycle.
Feed and Speed Calculator is used to generate tool changes, or to simply
calculate the feed and speed, based on the data of a specific tool.
7.10. Turning Operations
The Turning Operations toolbar allows the user to perform various operations used in
the manufacturing of parts. All the operations can be exported directly to CIMCO Edit
or to the clipboard, for insertion in a user-defined location.
Roughing will create a roughing operation based on a selected outline
contour. In this operation it is possible to create both roughing and semifinishing cuts, but only with one tool.
Facing will create a facing operation. This operation can contain both
roughing and finishing cuts, but only with one tool.
20
Finishing will create a finish operation based on a selected contour. This
operation will make only one toolpath that fits the selected contour.
Grooving creates a grooving operation, based on a selected contour. This
will enable machining of the areas that could not be machine with either
the Roughing or Finishing operation.
Drilling generates operations for drilling a center hole in the part. The
drilling operation will be performed as one continuous motion or as
pecking with or without dwelling at the end of each plunge.
Threading creates threading operations for inside and outside threads. The
geometry of the thread can be entered by hand or selected from tables.
The thread geometry can be normal or conical.
Cutoff generates an operation for cutting off the part from the stock. In the
operation it is possible to define the corner geometry as sharp, round or
chamfered.
Export Contour can export a contour that the operator has selected on the
drawing. If a controller has smart canned cycles for example a specific
roughing operation, the user can create a macro in the editor to support
this, and then export the actual contour for insertion in the canned cycle.
Calculator The feed and speed calculator is used to generate tool changes,
or to simply calculate the feed and speed, based on the data for a specific
tool.
21
8.
Menus
Most of the CNC-Calc v6 functions are accessed through the CNC-Calc menu,
however, a few are logically located under the File menu.
8.1.
File menu
Close
Closes the active file. If the active file has been modified, you
will be prompted to save it. Close can also be accessed with CtrlF4.
Close All
Closes all open files. If any files have been modified, you will be
prompted to save them.
Save
Saves the drawing to your hard disk. If it is the first time you
save the drawing, you will be prompted for file location and
name. Save can also be accessed with Ctrl-S.
Save As
Saves the drawing under a different name.
Exit
Closes CIMCO Edit v6, and thus also CNC-Calc v6. If any files
have been modified, you will be prompted to save them. Exit can
also be accessed with Alt-F4 (Alt-F4 is a Windows standard).
22
9.
Configuring CNC-Calc
Perhaps the most important thing to remember when configuring CNC-Calc is that the
configuration is specific to each machine type.
9.1.
Main configuration
The main configuration is entered most easily by selecting the icon Setup CNC-Calc
from the CNC-Calc File toolbar.
It is important to select the correct machine type, and it should be noted that the
selection between ISO and Heidenhain conversational NC code output is made by the
template used when creating the machine type. The window below shows the main
configuration dialog.
The top part of the CNC-Calc configuration dialog contains the settings for toolpath
output, with the settings for the drawing grid at the bottom section. The correct
settings for toolpath output depend on the machine and the control that is to run the
23
NC code. If in doubt, you should consult the programming manual for your specific
machine.
The settings for toolpath output are:
Turning
Select this for turning (lathe) output. This option is unavailable
for Heidenhain conversational NC code output.
Diameter programming (lathe)
Selects whether X axis output is in diameter measurement or in
radius measurement. This option is only available if turning
(lathe) output is selected.
Arc center is specified as diameter (lathe)
Selects whether the I value for arcs is specified in diameter
measurement or in radius measurement. This option is only
available if turning (lathe) output is selected.
Always add sign
Selects whether to always output the sign of the coordinate
(giving a + sign on positive and zero coordinates), or whether the
sign is only output on negative coordinates.
Modal X/Y values Selects whether the coordinates are modal or not. Modal
coordinates means the coordinates are only output when changed,
while non-modal coordinates means both X and Y are output on
every line, regardless of whether they are changed or not.
Show grid
Select this to make the grid visible.
Output G0X
Is used to format the ISO G-Code output format. With Output
G0X disabled G01 will be formatted as G1.
Output FMAX as F9999
This only affects Heidenhain machines. Here the Rapid moves
are normally formatted as FMAX but with the field enabled the
format will be F9999 that the older Heidenhain controllers use.
Machine Type
Select the machine that the output should be formatted for. For
milling this could be Heidenhain or ISO milling.
24
Arc Type
Absolute arc center
The arc center is given in absolute I and J coordinates.
Relative to start
The arc center is given in I and J coordinates, relative to
the start point of the arc.
Radius (R) values
The arc radius is given (with the address R), rather than
the arc center.
Number of decimals All coordinates are rounded to this number of decimals,
and if padding with trailing zeroes is selected below,
coordinates are padded with trailing zeroes to this number
of decimals.
Trailing 0's
X123.000
Coordinates are padded with trailing zeroes to the number of
decimals selected above, if rounding results in fewer non-zero
decimals.
X123.0
Whole numbers are output with one trailing zero. Other
coordinates are output rounded to the number of decimals
selected above, without trailing zeroes.
X123.
Whole numbers are output with a decimal point, with no trailing
zeroes. Other coordinates are output rounded to the number of
decimals selected above, without trailing zeroes.
Maximum arc output angle
This is primarily used in milling, and it allows the operator to
control the maximum sweep of the arcs. Some controllers can not
handle arcs with a sweep larger than 180 degrees, and here it is
possible to ensure that these arcs will not be generated.
Rotary axis
If Y-axis substitution is used, this field contains the address letter
of the axis used in this substitution.
Rotary axis linearization tolerance
When axis substitution is used, all Y-axis movements are
transformed to an axis rotation. To control the precision of this
transformation, the entered linearization tolerance is used.
25
The grid settings are:
Grid size
This sets the spacing between main grid points.
Show sub-grid
Select this to have a sub-grid visible when zoomed in to a degree
that shows few main grid points.
Show origin
Select this to have lines along X and Y zero visible.
9.2.
Color configuration
The Color configuration is entered by selecting Global Colors in the configuration
tree (after entering the configuration and selecting the correct machine type), and
scrolling down to the CNC-Calc colors in the list.
To change the color of a CNC-Calc element, either left click the element in the list to
select it and click the select color button
, or you can double-click the element in
the list. The color can then be picked from a standard palette, or a custom color can be
defined.
26
9.3.
Other configurations that affect CNC-Calc
There are a few other configurations in CIMCO Edit v6 that affect CNC-Calc.
Machine type template
As has already been mentioned, the template used when creating
a machine type determines whether the NC code output from
CNC-Calc is in ISO or Heidenhain conversational NC code.
Machine under file types
In the Machine dialog under File types in the configuration, the
Comment start, Comment end and Decimal point settings are
used by CNC-Calc, when creating NC code.
27
10. Tutorial 1
2D Construction (Mill)
This tutorial demonstrates one of many ways in which the 2-dimensional part above
can be drawn in CNC-Calc v6. Since the part consists of a number of similar elements
and since its part-elements are symmetrical, only a subsection of the part needs to be
drawn. The rest emerges from mirroring. Finally joining the mirrored elements with
straight lines completes the part.
This tutorial demonstrates the use of the following functions:
•
Draw a rectangle with a corner radius
•
Draw a circle with known center and radius
•
Draw vertical and horizontal lines from known points
•
Offset a circle
•
Make curves between elements
•
Delete elements
•
Mirror elements about lines
•
Join end points with straight lines
•
Save file with a given name
28
10.1. Before you start
The first thing to do before drawing a new part is to set the toolbar parameters. Start
CIMCO Edit v6 and open the editor configuration by clicking on the icon indicated
by A. Go to the Plugins section indicated by B. Now ensure that the checkbox Disable
CNC-Calc indicated by C is unchecked.
A
C
B
To make a new drawing you must click on CNC-Calc menu indicated by A and then
select New Drawing indicated by B.
When the new drawing is opened the following window should now be displayed:
29
A
B
Note If you hold the cursor over an icon a short description of the icon’s
functionality will appear.
30
10.2. Draw the geometry
Draw a rectangle with sides = 150, height = 100 and corner radius = 12.5
Click on
values:
in the toolbar and enter the following
First Corner X = 75
First Corner Y = 50
Second Corner X = -75
Second Corner Y = -50
Corner Radius = 12.5
Click on
to approve the command.
Draw a circle with radius = 5 defined by its center
Click on
in the toolbar.
Enter Circle Radius = 5
Activate the snap function
points).
(circles center
Snap to the center of the left topmost corner arc.
Left-click to add the circle.
31
Draw a vertical and horizontal line defined by its end point and length
Activate the snap function
points) and
Click on
(circles center
(midpoint of lines).
and enter the following into the dialog
Line Length = -20.0
Snap to the center of the left topmost corner arc.
Click to add the vertical line.
Snap to the midpoint of the topmost horizontal line.
Click to add a vertical line. This will serve as a
mirror line for the mirroring of our part about the Yaxis.
Similar to the above draw a horizontal line with length = 20 from the same center.
This time Line Length is set to 20 and next the mirror line is added from the center of
the left horizontal line (the X-axis, see picture below).
Offset a circle
Click on
in the toolbar and enter:
Offset Distance = 7.5 (12.5 - 5 = 7.5).
Click on the circle and select the outermost of the appearing circles.
32
Your drawing should now look like the one below.
Create a fillet between elements
Click on
in the toolbar.
Enter Fillet Radius = 5.
B
A
Click on the circle by A and on the line by B.
B
A
33
From the possible solutions select the part of the circle, which makes the right fillet.
In the picture below you can see how it should look.
Do the same by the vertical line.
The topmost left part of your drawing should
now look similar to the picture on the right.
Click on
and delete the two lines by C
(the ones pointing away from the center of the
circle).
C
C
Mirror elements about mirror lines
Click on
in the toolbar.
First, click on the vertical mirror line.
Click on all the elements, which should be mirrored (the circle and the inner corner).
You can hold down the left mouse button while dragging out a window around the
elements.
Now do the same and mirror along the horizontal mirror line. Continue mirroring until
your drawing looks similar to the one below.
Click on
and delete the mirror lines.
34
Connect the inner elements
Activate this snap function
Click on
(snap to end points).
in the Draw Points/Lines toolbar.
Snap to the two arcs’ end points and add the remaining horizontal and vertical lines to
finish the part.
Your part should now look as the one below.
Name the file and save it
A
B
Click on Main Menu indicated by A and then select Save as indicated by B from the
dropdown menu. Give the file the name CNC-Calc Milling Tutorial 1 and save it
(the file name extension is added automatically).
35
11. Tutorial 2
CNC toolpaths and Face milling (Mill)
With CNC-Calc v6 it is possible to create toolpaths directly from the program's
geometrical drawings. Thereby, calculations become more secure and programming
becomes much faster compared to doing it manually. At the same time you get a big
advantage, since it is possible to move, copy, rotate, scale, and mirror elements with
the result of instant NC-code generation.
This tutorial demonstrates how the 2-dimensional part above can form the basis for
NC-codes for various types of machining.
Note
This tutorial builds upon the result from CNC-Calc v6 Tutorial 1.
36
11.1. Before you start
The first thing to do before drawing a new part is to set the menu parameters. Start
CIMCO Edit v6 and open the editor configuration by clicking on the icon indicated
by A. Go to the Plugins section indicated by B. Now ensure that the checkbox Disable
CNC-Calc indicated by C is unchecked.
A
C
B
To open a drawing, click on CNC-Calc indicated by A and then on Open Drawing
indicated by B.
A
B
37
Select the file CNC-Calc Milling Tutorial 1
and click Open.
You should now see the part from CNC-Calc v6 Tutorial 1 displayed.
Note
If you hold the cursor over an icon for a moment, a short description of the
icon’s functionality will appear.
38
11.2. Creation of Facing toolpaths
First, in the drop down menu indicated by
arrow A, select the programming format
of the NC-program.
Select: ISO Milling.
Then select Generate a CNC-Toolpath
for Face Milling by clicking on the icon
by arrow B.
B
A
Write the text FACING in the Comment
field. This text will be included at the
start of the final NC code for this
operation. When multiple operations exist
in the same NC program, the comments
will help to locate and identify the start of
each operation.
Click on the outlining contour at the
place indicated by arrow C.
This will select the bounding contour that
the facing operation will operate on.
Click on Parameters by arrow D.
D
C
39
Enter the values into the dialog as shown in the table below.
Depths Tab:
Cutter Diameter:
This is the diameter of the cutter. Here it is a 30
mm Face Mill.
Start Depth: This is the top of the part.
End Depth: The final depth (will be corrected
by Stock to Leave).
Retract Height: When the operation is finished,
this is the height that the tool will retract to.
Roughing Stepdown: The maximum roughing cuts that the operation will take.
Finish Stepdown: If Finish Cuts is larger than zero, this is the cut that will be taken
in each finishing cut.
Finish Cuts: The number of finishing cuts that the operation will perform. If the
value is left at zero, only roughing cuts will be made.
Strategy Tab:
Cutting Method: The method used to perform
the face operation. It is possible to select Zigzag,
Climb, or Conventional.
Move Between Cuts: Is only used for the
Zigzag Cutting Method, since the other methods
will move free between cuts.
Overlap Across: The amount that the mill will
hang out over the side diagonal to the cutting
direction.
Overlap Along: The distance that the tool will move out over the end before the high
speed loops are taken.
40
Entry Distance: The distance that the tool will start out at before the actual cut is
taken.
Exit Distance: The distance the tool moves out after the final cut is taken.
Facing Angle: The angle at which the operation is performed. An angle of zero is
along the X-axis, and an angle of 90 is along the Y-axis.
Now close the parameters dialog with OK and click on Export Editor. The following
screen should now be displayed.
41
11.3. Inserting a Tool with Feed and Speed Calculator
The Feed and Speed calculator built into CNC-Calc is used to insert feed and speed
data into the NC program. All the data used in the calculations can normally be found
in the reference material supplied by the manufacturer.
In the facing example, we use a face mill that we give the following characteristics:
diameter is 30 mm; it has 5 flutes, a cutting feed of 0.08 mm per tooth, and a cutting
speed of 190 mm/min.
To use the feed and speed calculator, select
Feed and Speed Calculator for Milling
Operations by clicking on the icon indicated
by arrow A.
A
Fill in the following values:
Tool #: Lets say that the face mill have a tool
number of 1.
Diameter is 30 mm.
# Flutes: The number of flutes is 5.
Feed per tooth: In this example it is set to
0.08 mm.
Cutting Speed: Is set to 190.
The fields are linked together, so as entries
are made in the cutting speed field, the other
fields will be automatically updated.
If we then want to have RPM 2000 and a
feedrate of 800 instead of the calculated 2015
and 836.385, the value for the cutting speed
will be updated to 188.5.
Change the RPM to 2000 and the feedrate to 800.
Click on Export Clipboard indicated by arrow B.
B
42
The line for the NC program is now in the clipboard, and it is ready for insertion.
Change the window to that of the NC program, and press Ctrl-Home to move to the
very start.
Insert the text from the clipboard, either by pressing Ctrl-v, or selecting
Editor in the menu and the
Paste icon from the toolbar.
The NC program should now look similar to the one below.
Now save the NC program as CNC-Calc v6 Tutorial 2.NC
43
12. Tutorial 3
Contour milling (Mill)
CNC-Calc v6 can generate contour milling - with and without radius compensation.
There are several machine types in CNC-Calc, but the most commonly used are ISO
G-code programming and Heidenhain plain text.
This tutorial demonstrates how the above 2-dimensional part can form the basis of
NC-codes for various types of machining.
Note
This tutorial builds upon the result from CNC-Calc v6 Tutorial 1.
44
12.1. Before you start
The first thing to do before drawing a new part is to set the menu parameters. Start
CIMCO Edit v6 and open the editor configuration by clicking on the icon indicated
by A. Go to the Plugins section indicated by B. Now ensure that the checkbox Disable
CNC-Calc indicated by C is unchecked.
A
C
B
To open a drawing, click on CNC-Calc indicated by A and then on Open Drawing
indicated by B.
A
B
Select the file CNC-Calc Tutorial 1 and
click Open.
Note
If you hold the cursor over an icon for a moment, a short description of the
icon’s functionality will appear.
45
12.2. Creation of Contour toolpaths
To begin the creation of an NC program
for the contour operation, select the
Generate CNC-Toolpath for Contour
Milling by clicking on the icon
indicated by arrow A.
A
Write CONTOUR in the Comment
field.
This text will be included at the start of
the final NC code for this operation.
When multiple operations exist in the
same NC program, the comments will
help to locate and identify the start of
each operation.
B
Click on the outlining contour at the
place indicated by arrow B.
This highlights the outline contour; the
contour arrows indicate the direction the
tool will travel.
What side the tool will machine is
controlled by the Work Side drop down
box on the General tab in the parameters
dialog.
Click on Parameters by arrow C.
Enter the values in the Parameter dialog as shown below.
C
46
General Tab contains all the general parameters
that are used for roughing and finishing in both
depth and side cuts.
Cutter Diameter: The diameter of the tool in
use.
Retract Height: The height to which the tool
will move between contours, and where it will
stop at the end of the operation.
Safe Distance: The distance above the part, where the feedrate will change from rapid
to cutting speed.
Start Depth: This is the top of the stock.
End Depth The depth at which the last cut will be taken. This value is corrected by
the Stock to leave Z value.
Stock to Leave XY: The amount of stock that is left in the XY/side direction at the
end of the operation (after both Roughing and Finishing).
Stock to leave Z: The amount of stock that is left in the Z/depth direction at the end of
the operation (after both Roughing and Finishing).
Apply on Roughing Sidecuts: If this check box is checked, the compensation type
will be applied to both roughing and finishing side cuts. Otherwise computer
compensation is used for roughing cuts, and the selected compensation type for
finishing cuts.
Compensation Type: This is the compensation type used for the operation.
Work Side: This field determines on which side of the contour the tool will pass.
Together with the selected direction of the contour it determines if the milling type
will be climb or conventional.
47
Side cuts Tab Configures the cuts taken in
the XY direction.
Use Side Cuts: If this check box is
checked the operation will perform the
cuts defined by the parameters. Otherwise,
only one cut at the final contour will be
performed.
Number of Passes (Roughing): The
number of roughing side cuts in the
operation.
Spacing (Roughing): If more than one
roughing pass is taken, this is the distance between them.
Number of Passes (Finish): The number of finishing side cuts in the operation.
Spacing (Finish): The distance of each finishing pass.
Final Depth: If this check box is checked, the finishing passes will only be taken at
the final depth.
All Depths: If this check box is checked, the finishing passes will be taken at every
depth.
Overlap Distance: The distance that all the finishing laps will overlap, in order to
smooth the surface.
48
Depth cuts Tabs Configures the cuts taken in the
Z direction.
Use Depth Cuts: If this check box is checked,
the operation will perform the cuts defined by
the parameters. Otherwise, only one cut at the
final depth will be performed.
Max Roughing Steps: The maximum cut that
will be taken in a roughing cut.
Use Even Depth Cuts: If this check box is
checked, all the roughing passes will have the same distance. If it is left unchecked,
cuts will be taken at the Max Roughing Steps distance, and any rest material will be
taken with the last cut.
Number of Cuts (Finish): The number of finishing depth cuts in the operation.
Steps (Finish): The distance of each finishing pass.
Linearize Helix Movements: Some machines cannot make helix movements, and if
this check box is checked, all helix movements will be converted to lines in the NC
operation.
Linearization Tolerance: When the helix is converted to lines, this will be the
maximum error for the final lines.
By Depth: This is only used if multiple contours are milled in the same operation. If
selected, the cut on each depth will be performed on all contours, before any cuts are
made at a new depth.
By Contour: If selected, one contour will be milled from start to finish, before the
next contour is worked upon.
49
Lead in/out tab Configures the way the tool will
approach the contour at the start/end of the
roughing, and for each finishing pass.
The use of lead in/out is optional, when the
compensation is set to computer or none. It is
however mandatory, when any compensation is
performed by the controller.
Use Lead In/Out Parameters: Enables or
disables the lead in and out.
Use Line: Enables or disables the lead in/out lines.
Line Length: The length of the lead in/out line.
Perpendicular: If this is selected, the line will be perpendicular to the following
element for lead in, and the previous element for lead out.
Tangent: If this is selected, the line will be tangent to the following element for lead
in, and the previous element for lead out.
Use Arc: Enables or disables the lead in/out arcs.
Radius: The radius of the lead in/out arc.
Sweep: The sweep angle of the lead in/out arc.
The two arrows in the middle of the dialog are used to copy all values from lead in to
lead out, and vice versa.
Now, close the parameters dialog with OK and click on Export Clipboard. The NC
operation is now in the clipboard, and it is ready for insertion.
Change the window to that of the NC program and press Ctrl-End to move to the very
end. Insert the text from the clipboard, either by pressing Ctrl-v, or selecting Editor in
the menu and then selecting the
Paste icon in the toolbar.
50
The NC program in the Editor now consists of two operations, and currently they are
both made with the same tool. Now we need to insert a new tool for the contour
operation.
12.3. Inserting a Tool with Feed and Speed Calculator
Follow the steps from the previous tutorial for the Feed and Speed on page 41.
Instead of the values used there, use the following values:
Tool #: 2
Diameter (D) in mm: 10
# Flutes (Z): 4
Feed per tooth (Sz) in mm: 0.06
Cutting Speed (V) in mm/min: 175
Now, the last two values have been calculated and inserted in the dialog.
They should be:
RPM: 5570
Feedrate (F) in mm/min: 1336.9015
Correct the RPM to 5500 and then Feedrate (F) in
mm/min: to 1320.
Now the Feed and Speed dialog should look like the one to
the right:
Click on Export Clipboard to copy the generated line to
the clipboard.
Change to the NC program in the editor. After the contour
operation was copied to the editor, the cursor is at the very end of the program. In
order to insert the tool line from the clipboard, we must locate the start of the contour
operation. Since the comment CONTOUR was inserted, it is easy to locate the start of
the operation.
Find the text CONTOUR, either by pressing Ctrl-f, or selecting Editor in the menu
and then the
Find icon in the Find toolbar.
51
Go to the start of the comment line and insert the text from the clipboard.
The NC program should now look like the following.
Save the NC program as CNC-Calc v6 Tutorial 3.NC
52
13. Tutorial 4
Pocket milling (Mill)
CNC-Calc v6 can generate pocket milling. There are several machine types in CNCCalc, but the most commonly used are ISO G-code programming and Heidenhain
plain text.
This tutorial demonstrates how the above 2-dimensional part can form the basis of
NC-codes for various types of machining.
Note
This tutorial builds upon the result from CNC-Calc v6 Tutorial 1.
53
13.1. Before you start
The first thing to do before drawing a new part is to set the menu parameters. Start
CIMCO Edit v6 and open the editor configuration by clicking on the icon indicated
by A. Go to the Plugins section indicated by B. Now ensure that the checkbox Disable
CNC-Calc indicated by C is unchecked.
A
C
B
To open a drawing, click on CNC-Calc indicated by A and then on Open Drawing
indicated by B.
A
B
Select the file CNC-Calc Tutorial 1 and click
Open.
Note
If you hold the cursor over an icon for a moment, a short description of the
icon’s functionality will appear.
54
13.2. Creation of Pocket toolpaths
To start creating an NC program for the
pocket operation, select the function
Generate a CNC-Toolpath for Pocket
Milling by clicking on the icon
indicated by arrow A.
A
Write the text POCKET in the
Comment field.
This text will be included at the start of
the final NC code for this operation.
When multiple operations exist in the
same NC program, the comments will
help to locate and identify the start of
each operation.
Click on the inner contour where
indicated by arrow B. This will highlight
the inner contour.
Click on Parameters by arrow C.
Enter the values in the Parameter dialog as shown.
General Tab Configures the parameters used
for roughing and finishing in both depth and
side cuts.
Cutting Diameter: The diameter of the used
tool.
Retract Height: The height to which the tool
will move between contours, and where it will
stop at the end of the operation.
Safe Distance: The distance above the part
where the feedrate will change from rapid to cutting speed.
C
B
55
Start Depth: This is the top of the stock.
End Depth The depth at which the last cut will be taken. This value is corrected by
the Stock to leave Z value.
Stock to Leave XY: The amount of stock that is left in the XY/side direction at the
end of the operation (after both Roughing and Finishing).
Stock to leave Z: The amount of stock that is left in the Z/depth direction at the end
of the operation (after both Roughing and Finishing).
Compensation Type: This is the compensation type used for the operation.
Conventional: When checked, the operation will be generated using conventional
milling.
Climb: When checked, the operation will be generated using climb milling.
Side Cuts Tab Configures the cuts taken in the
XY direction.
Max Roughing Spacing: The maximum side
stepover used in the roughing of the part.
Number of Passes (Finish): The number of
finishing side cuts in the operation.
Spacing (Finish): The distance of each finishing
pass.
At Final Depth: If this check box is checked, the finishing passes will only be taken
at the final depth.
At All Depths: If this check box is checked, the finishing passes will be taken at
every depth.
56
Overlap Distance: The distance that all the finishing laps will overlap in order to
smooth the surface.
Roughing Smoothing: This slider controls the amount of smoothing used. The higher
the value (rightmost), the smoother the resulting toolpath will be.
Depth Cuts Tab Configures the cuts taken in the Z direction.
Use Depth Cuts: If this check box is checked, the
operation will perform the cuts defined by the
parameters. Otherwise, only one cut at the final
depth will be performed.
Max Roughing Steps: The maximum cut that will
be taken in a roughing cut.
Use Even Depth Cuts: If this check box is
checked, all the roughing passes will have the
same distance. If it is left unchecked, cuts will be
taken at the Max Roughing Steps distance, and any rest material will be taken with the
last cut.
Number of Cuts (Finish): The number of finishing depth cuts in the operation.
Steps (Finish): The distance of each finishing pass.
Linearize Helix Movements: Some machines cannot make helix movements, and if
this check box is checked, all helix movements will be converted to lines in the NC
operation.
Linearization Tolerance: When the helix is converted to lines, this will be the
maximum error for the final lines.
By Depth: This is only used if multiple pockets are milled in the same operation. If
selected, the cut at each depth will be performed on all pockets before any cuts are
made at a new depth.
By Pocket: If selected, one pocket will be milled from start to finish before the next
pocket is worked upon.
57
Entry strategies Tab Configures how
the tool cuts from one Z level to the
next.
Plunge: When this is selected, the tool
will move straight down.
Ramp: With the ramp entry, the tool
moves down to the Ramp Clearance
above the part. Then it makes a ramp
movement with the length Ramp
Length and the angle Ramp Angle.
Helix Entry: Moves down to Helix
Clearance above the part. Then it will
spiral down with the angle Helix Angle
in a circular movement with a diameter
between Helix Diameter and Minimum
Helix Diameter. How big the actual
diameter will be depends on the
geometry.
Lead in/out Tab Configures the way
that the tool will approach the contour at
the start/end of the roughing, and for
each finishing pass.
The use of lead in/out is optional when
the compensation is set to computer or
none. It is however mandatory when any
compensation is performed by the
controller.
Use Lead In/Out Parameters: Enables
or disables the lead in and lead out.
Use Line: Enables or disables the lead
in/out lines.
Line Length: The length of the lead
in/out line.
58
Perpendicular: If this is selected, the line will be perpendicular to the following
element for lead in, and the previous element for lead out.
Tangent: If this is selected, the line will be tangent to the following element for lead
in, and the previous element for lead out.
Use Arc: Enables or disables the lead in/out arcs.
Radius: The radius of the lead in/out arc.
Sweep: The sweep angle of the lead in/out arc.
The two arrows in the middle of the dialog are used to copy all values from lead in to
out, and vice versa.
Now close the parameters dialog with OK and click on Export Clipboard. The NC
operation is now in the clipboard, and is ready for insertion.
Change the window to that of the NC program and press Ctrl-End to move to the very
end. Insert the text from the clipboard, either by pressing Ctrl-v, or selecting Editor in
the menu and then selecting the
Paste icon in the toolbar.
The NC program in the Editor now consists of three operations, and since we use the
same tool for the contour and pocket operations we will not insert a tool before the
pocket operation.
Now save the NC program as CNC-Calc v6 Tutorial 4.NC
59
14. Tutorial 5
Backplot in the Editor (Mill)
One of the advantages of running CNC-Calc inside CIMCO Edit v6 is that the editor
can be used to manipulate and backplot the NC programs generated in CNC-Calc.
In the following, we will setup the backplot and verify the program.
14.1. Before you start
The first thing to do before drawing a new part is to set the menu parameters. Start
CIMCO Edit v6 and open the editor configuration by clicking on the icon indicated
by A. Go to the Plugins section indicated by B. Now ensure that the checkbox Disable
Backplot indicated by C is unchecked.
A
B
C
60
To open an NC Program, click the
open program icon indicated by
arrow A.
This will open the Open File dialog,
where the file you want to open can
be selected.
Please select the file from the last
tutorial and click Open.
You should now see the NC program from the last tutorial.
A
61
14.2. The first backplot
When the NC program has been loaded into the editor, it is possible to backplot it.
Click on the Backplot tab indicated by
arrow A. Then click on the
icon
indicated by B to backplot the NC
program.
B
A
Now the screen should look like the one below.
Here, the toolpath is shown. It looks OK, but it can be configured to look a lot more
like the final part. To do this, we need to define the individual tools and the stock.
62
14.3. Backplot tool setup.
The following steps will show you how to set up the tools used in the backplot.
Click on the Tool Setup
icon in the
Backplot Tool toolbar indicated by arrow
A. This will open the window Tool
Setup.
When backplot parsed the NC program, it
detected that two tools were being used.
Since these tools have not been defined,
the screen will look like the one to the
right.
In order to backplot the program
correctly, we need to define these two
tools.
By changing the type and the diameter of
the tools, we can create the correct setup.
Please select and enter the values for both
tools shown on the picture to the right.
These are the same tool values that were
used when the NC programs was
generated in CNC-Calc.
Now exit the configuration dialog with
OK.
A
63
After the tools have been configured, the screen should look like the one below. Try
to find the tool changes and verify that the tool does indeed change when a tool
change is encountered in the NC program.
64
14.4. Backplot Stock setup.
The following steps will show you how to set up the stock used in the backplot.
Click on the Solid Setup
icon in the
Backplot Solid toolbar, indicated by
arrow A. This will open the backplot
Solid Setup window.
The default values shown in the dialog
are based on the cutting moves in the NC
program.
Since the tool moves down in cutting
speed, the Z-max will nearly always be
too big.
The same is the case for the facing
operation. That will give a too large stock
along both the X- and Y- axes.
From the facing operation, we know that
the top of the stock should be Z:2.00.
From the drawing, we know that the
values of the corners are (-75.00, -50.00)
and (75.00, 50.00).
We now make the stock 2 mm larger
along the X- and Y-axes, so the values
will be the ones shown in the dialog to
the right.
Please enter these values and exit the
dialog with OK.
A
65
Now, everything has been configured and the backplot can be used to verify the
operations. The screen should now look like the one shown below.
66
15. Tutorial 6
Drilling (Mill)
CNC-Calc v6 can generate codes for drilling in either canned cycles or as longhand.
There are several machine types in CNC-Calc, but the most commonly used are ISO
G-code programming and Heidenhain plain text.
15.1. Before you start
The first thing to do before drawing a new part is to set the menu parameters. Start
CIMCO Edit v6 and open the editor configuration by clicking on the icon indicated
by A. Go to the Plugins section indicated by B. Now ensure that the checkbox Disable
CNC-Calc indicated by C is unchecked.
A
C
B
To open a drawing, click on CNC-Calc indicated by A and then on Open Drawing
indicated by B.
A
B
67
Select the file CNC-Calc Tutorial 1
and click Open.
Note
If you hold the cursor over an icon for a moment, a short description of the
icon’s functionality will appear.
15.2. Generate a drill cycle
Start with selecting the programming
format of the NC-program, the field
indicated by arrow A.
A
Select: ISO - Milling.
Then select Generate a drill Cycle by
clicking on the icon indicated by arrow
B.
Write the comment DRILLING in the
Comment field.
This text will be included at the start of
the final NC code for this operation.
When multiple operations exist in the
same NC program, the comments will
help to locate and identify the start of
each operation.
Click on Drill Parameters, to open the
parameter dialog. window shown
below.
B
68
For this drilling operation, please enter the parameters shown. Notice that in this
example it makes no difference if Incremental or Absolute are selected as Safe
Distance and Depth, since these incremental values refer to the Reference Plane,
which is 0.
For the selection of the location of the holes several options are available:
1. Select each hole location with the cursor. In order to get the correct hole center
for circles and arcs, the Snap to Center
function should be used
2. Select the actual circle or arc. This will create a new hole location, at the
centre of the circle/arc.
3. Use window selection with or without filter. If the filter is used, it is possible
to limit the selection to circles or arcs in different ranges.
In the following we will use the filter to select the corner holes, but not any of the
arcs.
69
By setting up the filter as shown, we will
limit the window selection to include
only circles in the range from 0 to 10 in
diameter.
Now enable the Use Selection Filter in the left hand pane, and then make a window
selection that includes the entire drawing.
When this selection is made, only the four corner holes should be selected.
Click on Export Editor. The following program is displayed in the editor.
(DRILL)
G00 X12.5 Y87.5
G00 Z10.0
G83 X12.5 Y87.5 Z-7.0 R2.0 Q1.0 F200.0
X137.5
Y12.5
X12.5
G80
The order of operation can then be changed by clicking on Reorder Circ and
Reorder Rect in the dialog.
70
16. Tutorial 7
Milling of Letters (Mill)
This tutorial demonstrates how a 2-dimensional text can be used as the basis for an
NC program milling letters and numbers.
16.1. Before you start
The first thing to do before drawing a new part is to set the menu parameters. Start
CIMCO Edit v6 and open the editor configuration by clicking on the icon indicated
by A. Go to the Plugins section indicated by B. Now ensure that the checkbox Disable
CNC-Calc indicated by C is unchecked.
A
C
B
To make a new drawing you must click on CNC-Calc menu indicated by A and then
select New Drawing indicated by B.
A
B
Note If you hold the cursor over an icon a short description of the icon’s
functionality will appear.
71
In this tutorial we will try to machine a single line of text composed of letters and
numbers. For this example we have chosen the text “CIMCO 123”.
Normal upper and lower case letters,
numbers, and characters can be entered
when the icon
is clicked in the CNCCalc Text toolbar indicated with A.
A
The dialog Text Entry appears to the
left. In the input field at the bottom
named text, enter the text that will be
machined. In this example “CIMCO
123”.
In addition to the text, five additional
parameters are needed to specify start
point, baseline angle, letter distance, and
letter height. Fill in the fields with the
values shown to the right.
When you are done entering text and values click the blue check mark button
the bottom right of the dialog to accept.
at
72
Your screen should now look like the following.
The drawing now shows the text, and its geometry can now be used for generating the
toolpaths.
Select the file type (NC Format) for
our example letter milling program
(e.g. ISO Milling) as indicated with
the letter A.
Then Select the feature Letter Milling
by clicking on the Mill Letters icon
indicated by the letter B in the Milling
Operations toolbar.
A
B
73
The dialog Letter Milling will appear
on the left side of the screen as shown.
Write the comment LETTER
MILLING in the Comment field.
Now click on the Parameter button
and enter the values shown below.
Now, use window selection to select the text you want
to mill. On the drawing, left-click one corner, hold down
the mouse button, and drag diagonally. When the
desired text is framed, release the button. The frame
disappears and the text will have turned yellow to
indicate that it has been selected.
74
Next click on the Export Editor button, and the NC codes for machining the text will
be shown in the Editor.
To verify the generated toolpath we must simulate it using the integrated Graphical
Backplot. To open the backplot window, click on the Backplot tab (indicated with
letter A) and then on the Backplot Window icon (indicated with letter B) as shown
below.
A
B
At the bottom right of the backplot window, start the simulation by clicking
Start/Stop Simulation, indicated by the icon
.
Simulation speed and direction is infinitely variable both forwards and backwards.
This is controlled by dragging the slider either to the left or to the right, where right is
forward.
If you want to verify a certain operation in the NC program, simply click on a line of
the NC code to the left. The simulation tool will immediately position itself on the
corresponding place in the simulation. You can move the tool one line at a time using
the up and down arrow keys on your keyboard, or skip through the code a page at a
time using PageUp and PageDown.
75
Your screen should now present “CIMCO 123” in the following way.
Notice the rapid moves, indicated by the yellow lines, retracting to the level we
defined using the Parameters dialog.
The example text milling program “CIMCO 123” can be used as a subprogram to
another program by simply cut-and-paste, but can also be completed as an
independent program, providing it is supplied with the code lines for Program
Start/Program Stop, Tool Change, and Feed/Speed, which you can quickly add
either manually or using the Macro function in CIMCO Edit 6.
Important notice
The final execution of the program depends to a high degree on the applied macro
programs. It is also important that the correct set-up of CNC-Calc is used for each
machine/control.
It is very important to verify/simulate the programs before they are executed on
a machine. Please pay special attention to the movements in the Z axis, and make
sure that they run with the required feed and rapid move speed.
76
17. Tutorial 8
Milling of TrueType Letters (Mill)
This tutorial demonstrates how a 2-dimensional TrueType text can provide the basis
for an NC program milling letters and numbers.
17.1. Before you start
The first thing to do before drawing a new part is to set the menu parameters. Start
CIMCO Edit v6 and open the editor configuration by clicking on the icon indicated
by A. Go to the Plugins section indicated by B. Now ensure that the checkbox Disable
CNC-Calc indicated by C is unchecked.
A
B
C
77
To make a new drawing you must click on the CNC-Calc menu indicated by A and
then select New Drawing indicated by B.
When the new drawing is opened the following window should now be displayed:
A
B
Note If you hold the cursor over an icon a short description of the icon’s
functionality will appear.
In this tutorial we will machine a single line of TrueType text composed of letters and
numbers. For this example we have chosen the text “CIMCO 456”.
Normal upper and lower case letters,
numbers, and characters can be entered
when the icon
is clicked in the CNCCalc Text toolbar indicated with A.
A
78
The dialog Text Entry appears to the
left. Enter the coordinates for the starting
point of the text, the angle (relative to the
horizontal axis) of the text baseline, and
the height of the letters.
In the bottom field text you write the text
(here: “CIMCO 456”) to be milled with
TrueType letters.
Next, by clicking on the button Select Font and opening the font dialog, select the
font type and font size. End this dialog by clicking 'OK'. As a result of the changes
you make in the font dialog the look of the text changes. You can enter the font dialog
again until you are satisfied with the layout.
When done, click on the blue check mark button
to insert the text. This is
important, since otherwise the text will disappear once you start doing other things.
With parameters, text, and font defined your screen should look like the following.
Depending on your choice of font this might vary.
79
The geometry is now finished and can be used for the generation of toolpaths.
Select the file type (NC Format) for our
example letter milling program (e.g. ISO
Milling) as indicated with the letter A.
Then Select the feature True Type Milling by
clicking on the Mill True Type Letters icon
indicated by the letter B in the Milling
Operations toolbar.
Now the dialog Letter Milling dialog is opened
to the left of the drawing area. Write “LETTER
MILLING” in the Comment field.
Click on the Parameter button.
A
B
80
The TrueType Text Milling Parameters dialog appears. Check the Mill Outline
checkbox at the top and fill in the rest of the fields as shown below. Click 'OK' when
done.
Use window selection to select the letters to mill. This is done by left-clicking in the
upper-left corner of the drawing. Now hold the mouse button down and drag the
cursor to the lower right corner and release the mouse button.
Click on the Show Toolpath button. Now the generated toolpath will be shown on the
drawing. Since the toolpath coincides with the contour of the letters it can be difficult
to see.
Now click on the Export Editor button in order to transfer the generated program to
the editor.
With the generated program in the editor it is now possible to backplot it. This is done
by first selecting the Backplot Menu indicated by A below and then clicking on the
81
Backplot Window
icon indicated by the letter B.
A
B
Use the buttons in the lower right corner of the window to control the simulation
speed and direction. By clicking on a line in the NC code to the left, the tool will jump
to that position in the simulation. The up and down keys move the line selection to the
previous or next line, and the tool will be moved accordingly.
82
17.2. Pocket milling letters
The toolpath generated from the text looks like a contour operation formed by the
outlines of the letters and numbers. The area inside these contours - inside the letters can be milled as a special pocket milling operation. The rest of this tutorial will show
you how to do this.
1. Return to the drawing by clicking the tab marked A in the Figure below.
2. Click on the button New marked B, and select the letters for the operation.
3. Click on the button Parameters marked C.
4. Insert the new parameters as shown below (remember to check the checkbox Mill
Interior).
A
C
B
D
83
5. Window-select the text.
6. Click on Show Toolpath marked D - the generated toolpaths will now be shown on
the screen.
7. Click the button Export Editor. Now the NC codes for the machining are shown in
the editor.
Simulate the program to verify the toolpath the same way we did earlier in this
tutorial.
It is possible to generate toolpaths with both Mill Interior and Mill Outline selected
under Parameters. This will create both the pocket operation on the inside and the
milling of the contours.
The example program “CIMCO 456” can be used as a subprogram to another program
by simply cut-and-paste, but can also be completed as an independent program,
providing it is supplied with the code lines for Program Start/Program Stop, Tool
Change, and Feed/Speed, which you can quickly add either manually or using the
Macro function in CIMCO Edit 6.
Important notice
The final execution of the program depends to a high degree of the applied macro
programs. It is also important that the correct set-up of CNC-Calc is used for each
machine/control.
It is very important to verify/simulate the programs before they are executed on
a machine. Please pay special attention to the movements in the Z axis, and make
sure that they run with the required feed and rapid move speed.
84
18. Tutorial L1 - Drawing the part (Lathe)
18.1. 2D construction of a part for turning.
This example demonstrates one of many ways in which the 2-dimensional part above
can be drawn in CNC-Calc v6. Since the part consists of a number of similar elements
and since its part-elements are symmetrical only a subsection of the part needs to be
drawn. The rest emerges from mirroring. Finally joining the mirrored elements with
straight lines completes the part.
This tutorial demonstrates the use of the following functions
•
•
•
•
•
•
•
•
•
Draw a vertical line defined by its starting point and length.
Offset a geometric element.
Draw a circle with a given radius defined by its centre.
Draw a line defined by its end points.
Draw a horizontal line defined by its start point and length.
Draw a line defined by its start point, angle, and length.
Trim element between points of intersection with other elements.
Connect and round with a given radius between two elements.
Connect and bevel two elements by a given angle and distance.
85
18.2. Before you start
The first thing to do before drawing a new part is to set the menu parameters. Start
CIMCO Edit v6 and open the editor configuration by clicking on the icon indicated
by A. Go to the Plugins section indicated by B. Now ensure that the checkbox Disable
CNC-Calc indicated by C is unchecked.
A
C
B
To make a new drawing you must click on the CNC-Calc menu indicated by A and
then select New Drawing indicated by B.
When the new drawing is opened the following window should now be displayed:
A
B
Note If you hold the cursor over an icon a short description of the icon’s
functionality will appear.
You can change the colors of the drawing area by selecting Setup and then Colors
from the dropdown menu. For this tutorial we have chosen to use red as our drawing
color and white for the background.
86
18.3. Draw the geometry
Draw vertical lines defined by start point and length
Click on
in the Draw Points / Lines toolbar and
enter the following values:
Start Point of Line Z = 0
Start Point of Line X = 0
Line Length = 12
Click on
to approve the command.
If the axes are shown it can be difficult to see the
line, since it is situated on the X-axis
Draw another vertical line defined by start point and length
Enter the following values in the dialog that is
already open:
Start Point of Line Z = -110
Start Point of Line X = 0
Line Length = 25
Click on
to approve the command.
Click on
in the View toolbar. This will make the drawing fill the whole
drawing area on the screen.
87
Offset an element
Click on
in the Modify toolbar and enter the
following value:
Offset Distance = 80
Now click on the leftmost line indicated by A on the
picture below.
After this is done two lines will appear (only the
rightmost can be seen on the drawing). Now click to
the right of the selected line to keep the line shown
in red.
A
88
Draw a circle with radius = 25 defined by its center
Click on
in the toolbar.
Center Point Z = -110+50 (-60)
Center Point X = 70
Circle Radius = 25
Click on
to approve the command.
Draw a line defined by its endpoints.
First click on
to activate the snap function 'Snap to Endpoints' labeled A on the
drawing below.
Now click on
to enter 'Draw line Between 2 Points' labeled B on the drawing
below.
Select the top point of the two long lines indicated by C and D. Please notice that the
cursor changes when it snaps to the endpoint of the lines. After the line is drawn the
drawing should look like the one below.
A B
C
D
89
Draw horizontal line defined by length and using snap
Click on
values:
in the toolbar and enter the following
Line Length = -20
with the end point snap enabled. Select the end of
the short vertical line furthest to the right. This is
indicated on the picture below.
Draw Polar line defined by angle, length, and using snap
Click on
values:
in the toolbar and enter the following
Line Angle = 180+45
Line Length = 5
With the end point snap enabled. Select the end of
the short horizontal line. This is indicated on the
picture below.
90
Chamfer the foremost corner
Click on
values:
in the toolbar and enter the following
First Length = 2
Chamfer Angle = 30
Since the chamfer angle is different from 45 degrees
it is important to select the lines in the right order.
The angle will always be measured from the first
element selected.
So first select the vertical line marked A and then the
horizontal line marked B on the drawing below.
A
B
91
Draw a line defined by its endpoints
Click on Line through 2 points
enter the following values:
in the toolbar and
First Point On Line Z = -20
First Point On Line X = 20
Second Point On Line Z = -40
Second Point On Line X = 20
Click on
to approve the command.
Now the drawing should look like the picture below.
Trim Between Points of intersection
•
•
•
Click on
to select Trim To Intersection.
Now trim the long horizontal line. To do this, select it as indicated by A on the
picture below.
Now trim the large circle. To do this, select it as indicated by B on the drawing
below.
92
B
A
Fillet intersections with radius 2.0
Click on
values:
in the toolbar and enter the following
Fillet Radius = 2
Select the elements on which the fillet operation
should be performed. This is done by left-clicking on
the part of the elements that you want to keep.
Select the elements as indicated on the picture below
by A and B.
Now you must select and left-click precisely on the
arc element you want to keep. This is the yellow arc
on the picture below.
93
A
B
Now repeat the operation to fillet the additional radius 2 corners
Select the other two corners A+B and A+C as shown at the picture below. Then select
the correct arcs to keep. At the end of the operation the drawing should look
something like the drawing below.
C
B
A
Now repeat the operation for the fillet operations with radius 1.00 corners
First change the Fillet Radius in the dialog from 2.00 to 1.00.
You might want to zoom in on the area we will be working on, as on the following
picture.
94
Then select the 3 corners A+B, B+C and C+D as shown on the picture below. Then
select the correct arcs to keep. At the end of the operation the drawing should look
something like the drawing below.
A
B
C
D
Now the drawing is finished, and it should look like the one below
Name the file and save it
Click on Files and then select ‘Save as’ from the dropdown menu. Save the file with
the name CNC-Calc V6 Lathe Tutorial 1 (the file extension is added automatically).
95
19. Tutorial L2 - Machining the part (Lathe)
19.1. CNC toolpaths
With CNC-Calc v6 it is possible to create toolpaths directly from the program’s
geometrical drawings. Thereby, calculations become more secure and programming
becomes much faster compared to doing it manually. At the same time you get a big
advantage since it is possible to move, copy, rotate, scale, and mirror elements with
the result of instant NC-code generation.
In the following we assume that the stock used is Ø60, and that it projects sufficiently
from the Chuck Jaws.
In order to produce the final part we will use the following operations:
4. Facing the front of the stock.
5. Roughing the part.
6. Grooving the areas that could not be handled by the roughing tool.
7. Finishing the part.
8. Threading the front of the part.
9. Drilling the center hole in the part.
This tutorial demonstrates how the 2-dimensional part shown can form the basis of
NC-codes for various types of machining.
Note This tutorial builds upon the result from CNC-Calc v6 Tutorial 1.
96
19.2. Before you start
The first thing to do before drawing a new part is to set the menu parameters. Start
CIMCO Edit v6 and open the editor configuration by clicking on the icon indicated
by A. Go to the Plugins section indicated by B. Now ensure that the checkbox Disable
CNC-Calc indicated by C is unchecked.
A
C
B
To open a drawing, click on CNC-Calc indicated by A and then on Open Drawing
indicated by B.
A
B
Select the file CNC-Calc V6 Lathe
Tutorial 1.cdd and click Open.
97
You should now see the part from CNC-Calc v6 Tutorial 1 displayed.
Note If you hold the cursor over an icon a short description of the icon’s
functionality will appear.
98
19.3. Facing the front of the stock
In the following tutorial we will generate an NC program to face the front of the part.
In order to select the facing operation the below described steps must be performed.
Select the file type (NC Format) for
our facing example program (e.g. ISO
Turning) as indicated with the letter
A.
Then Select the feature Face Turning
by clicking on the Face Turning icon
indicated by the letter B in the
Turning Operations toolbar.
A
B
This will open the Face Turning dialog to the left of the drawing area. Now insert the
values shown in the dialog below.
Comment:
This comment will be shown in the final NCProgram. It is always good to include a comment, in
order to distinguish the various operations in the
final program.
Start Point Z:
This is where the facing operation will start along
the Z-axis.
Start Point X:
This is the start diameter of the facing operation.
End Point Z:
This is where the facing operation will end along
the Z-Axis.
End Point X:
This is the end diameter of the facing operation.
Now we have defined where the facing operation will work on the stock. This will be
shown on the drawing as a rectangle with arrows that indicate the direction of the
operation.
99
Click the parameters button in the dialog to define how the operation will be
performed. Enter the following values shown below into the parameter dialogs.
Cuts Tab Configures the tool setup and
other parameters for the operation
Tool Orientation: The 9 icons represent
the possible 9 orientations of the tool.
Tool Radius: This is the nose radius of the
tool.
Overcut Amount: The distance the tool
will cut longer than the Endpoint X value.
Roughing: Here, the check-box can be
used to enable or disable the use of
roughing passes. If roughing is used, each
cut will be the size of the Roughing
Stepover.
Finish: The check box can be used to
enable or disable the use of finish passes.
If finish passes are used, Finish Cuts
passes will be made with a depth of the
Finish Stepover.
Stock To Leave: The stock to leave is the
amount of material that will be left after
the whole operation is performed.
Compensation Type: The compensation
type that is used for the operation. The two
most commonly used are Controller or
Computer.
100
Entry/Exit Tab Configure how the tool
approaches and leave the part.
Entry Amount: The length that the tool
will start each cut above Start Point X.
Retract Amount: The length that the tool
will pull free along the Z-Axis before it
makes moves for the next cut.
Use Entry Vector: Enable/Disable the use
of entry vector.
Entry Angle: The angle of the entry
vector.
Entry Length: The length of the entry
vector.
Use Exit Vector: Enable/Disable the use
of exit vector.
Exit Angle: The angle of the exit vector.
Exit Length: The length of the exit vector.
Click on OK to use the values,
Click on Show Toolpath, and the toolpath will be shown on the drawing.
Try experimenting with the various parameters and see how they change the
generated toolpath.
Click on Export Editor in order to generate the actual program. Now, a window like
the one shown below will appear. Notice that the comment from the dialog is inserted
at the top of the program as a comment.
101
A
B
To verify the generated toolpath, we must simulate it using the integrated Graphical
Backplot.
To open the backplot window, click on the Backplot menu (indicated with letter A
above) and then on the Backplot Window
icon (indicated with letter B) as
shown above.
Now a window like the one below will appear.
•
The Backplot animation is controlled using the slider and command buttons
bottom right.
102
19.4. Roughing the part
In the following tutorial we will generate a Roughing NC program. In order to select
the roughing operation the below described steps must be performed.
Select the file type (NC Format) for
our facing example program (e.g. ISO
Turning) as indicated with the letter
A.
Then Select the feature Roughing
Turning by clicking on the Roughing
Turning icon indicated by the letter B
in the Turning Operations toolbar.
A
B
This will open the Roughing Turning dialog to the left of the drawing area. Now
insert the values shown in the dialog below.
Comment:
This comment will be shown in the final NCProgram. It is always good to include a comment in
order to distinguish the various operations in the
final program.
Retract Point Z:
This is the Z value to where the operation will
retract the tool after completion.
Retract Point X:
This is the X value to where the operation will
retract the tool after completion.
Start Diameter:
This is the start diameter of the used stock.
103
The roughing operation works on a contour, and in order to generate a toolpath we
must select that contour. This is done by clicking on the contour as indicated by A in
the picture below.
A
When the selection is made the contour is selected until the end. This is OK for this
operation but we really do not want any work done on the leftmost face, so in order to
exclude this click the Back button once. This will deselect the leftmost face.
Now your drawing should look something like the one above.
Click on the Parameters Button to open the parameters dialog.
Enter the following values shown below into the parameter dialogs.
104
Tool Tab Configures settings for tool,
work orientation and compensation type
used for the operation
Tool Orientation: The 9 icons represent
the possible 9 orientations of the tool.
Tool Radius: The nose radius of the tool.
Work Orientation: The four icons
control the way we machine the part. In
the following we are machining outside
from right to left.
Horizontal Plunge: If the tool permits it
we could allow horizontal plunge.
Plunge Angle: Is the maximum angle we
will allow the tool plunge.
Compensation Type: This is the
compensation type that is used for the
operation. The two most commonly used
are Controller or Computer.
Cuts Tab Configures cutting parameters
for the operation.
Overlap: The distance that a cut will
overlap the previous cut.
Depth of Cut: The amount of material
that is taken in each cut.
Use Even Steps: Indicate what should
happen if the total depth is not dividable
by the cut depth. You can select whether
even steps or the entered amount should
be used.
Retract Distance: The distance that the
tool retracts from the stock before a
return move is made.
Use Finish Passes: Should any finish
passes be taken.
Passes: The number of passes to take in
the operation.
Spacing: The depth of each of the finish
105
passes.
Stock to Leave X: Is the amount of
material that will be left in the Xdirection after the whole operation is
performed.
Stock to Leave Z: Is the amount of
material that will be left in the Z-direction
after the whole operation is performed.
Entry/Exit Tab Configure how the tool
approaches and leaves the part.
Entry Amount: Is used to extend the
toolpath before it starts the actual cut.
Extension: Is used to extend the toolpath
at the end of the cut.
Use Entry Vector: Enable/Disable the
use of entry vector.
Entry Angle: The angle of the entry
vector.
Entry Length: The length of the entry
vector.
Use Exit Vector: Enable/Disable the use
of exit vector.
Exit Angle: The angle of the exit vector.
Exit Length: The length of the exit
vector.
Click on OK to use the values,
Click on Show Toolpath, and the toolpath will be shown on the drawing.
Try experimenting with the various parameters and see how they change the
generated toolpath.
Click on Export Clipboard in order to generate the actual program.
The program is now in the computer’s clipboard and is ready to be inserted into the
CNC program.
106
Change the window to the NC
program and move to the very end, by
pressing Ctrl-End.
Insert the text from the clipboard,
either by pressing Ctrl-v, or selecting
A
the Paste
icon from the Edit
Toolbar in the Editor Menu (indicated
by A in the picture).
Now the NC program should look like the following screen.
To verify the generated toolpath, we must simulate it using the integrated Graphical
Backplot.
To open the backplot window, click on the Backplot menu (indicated with letter A
below) and then on the Backplot Window
icon (indicated with letter B) as
shown above.
Now a window like the one below will appear.
107
A
B
108
19.5. Grooving the part
In the following tutorial we will generate a Grooving NC program. In order to select
the Grooving operation the below described steps must be performed.
Select the file type (NC Format) for
our facing example program (e.g. ISO
Turning) as indicated with e letter A.
Then Select the feature Grooving
Turning by clicking on the Grooving
Turning icon indicated by letter B in
the Turning Operations toolbar.
A
B
This will open the Grooving Turning dialog to the left of the drawing area. Now insert
the values shown in the dialog below.
Comment:
This comment will be shown in the final NC
program. It is always good to include a comment in
order to distinguish the various operations in the
final program.
Retract Point Z:
This is the Z value, to where the operation will
retract the tool after completion.
Retract Point X:
This is the Z value, to where the operation will
retract the tool after completion.
The Grooving operation works on a contour, and in order to generate a toolpath we
must select that contour. To select the contour for the operation perform the following
steps:
•
•
Ensure that single step is checked in the Grooving dialog.
Select the contour shown on the picture below. To do this, start at the far right
by selecting the R2 rounded corner with the indication arrow pointing to the
left. Now select the next 2 elements, so the selection looks like the one on the
picture below.
109
Now your drawing should look something like the one below.
Click on the Parameters Button to open the parameters dialog.
Enter the following values shown below into the parameter dialogs.
Cuts Tab Configures cutting parameters
for the operation.
Tool Width: The Width of the tool.
Corner Radius: The corner radius of the
tool.
Tool Orientation: The two icons indicate
how the tool is zeroed.
Stock Clearance: Indicates how far off
the part the tool should move before
making sideways moves.
Stock Amount: Indicates how much
stock there is above the actual groove.
Wall Backoff: If possible, the tool will
move this far away from the wall before it
retracts.
Angle: This is the angle of the groove’s
center line. An angle of 90 degrees is a
vertical angle on the outside, while an
110
angle of 0 is a horizontal groove from the
right.
Direction: This is the direction in which
the groove is machined. It can be
Positive, Negative, or Bi-Directional.
Stepover: This is the amount of material
removed in each cut.
Use Pecking: Indicates weather pecking
is used or not.
Pecking Depth: Defines how deep each
peck should be.
Pecking Retract: Determines how far the
tool should retract between pecks.
Stock to Leave: Indicates how much
stock should be left after the whole
operation is performed.
Finish Tab Configures how the finish
passé for the operation should be
performed.
Use Finish: Indicates whether or not
finish cuts should be performed.
Number of Finish Cuts: Describes how
many finish cuts should be taken.
Cut Depth: This is the amount of
material that will be removed with each
cut.
First Cut Direction: The finish cut is
made from both sides. The First Cut
Direction is the direction of the first of
the finish cuts.
First Distance: This is how far the first
cut will be taken along the contour.
Overlap: The second finish cut will
overlap the first finish cut by this
distance.
Compensation Type: This is the
compensation type that is used for the
111
operation. The two most commonly used are Controller or Computer.
Click on OK to use the values,
Click on Show Toolpath, and the toolpath will be shown on the drawing.
Try experimenting with the various parameters and see how they change the
generated toolpath.
Click on Export Clipboard in order to generate the actual program.
The program is now in the computer’s clipboard and is ready to be inserted into the
CNC program.
Change the window to the NC
program and move the cursor to the
very end by pressing Ctrl-End.
Insert the text from the clipboard,
either by pressing Ctrl-v, or selecting
A
Paste icon
in the Editor menu on
the Edit toolbar (indicated by A in the
picture).
Now the NC program should look like the following screen.
112
To verify the generated toolpath, we must simulate it using the integrated Graphical
Backplot. To open the backplot window, click on the Backplot tab (indicated with
letter A) and then on the Backplot Window
shown below.
Now a window like the one below will appear.
A
B
icon (indicated with letter B) as
113
19.6. Finishing the part
In the following tutorial we will generate a Finish NC program. In order to select the
Finish operation the below described steps must be performed.
Select the file type (NC Format) for
our facing example program (e.g. ISO
Turning) as indicated with letter A.
Then Select the feature Finish
Turning by clicking on the Grooving
Turning icon indicated by letter B in
the Turning Operations toolbar.
A
B
This will open the Finish Turning dialog to the left of the drawing area. Now insert
the values shown in the dialog below.
Comment:
This comment will be shown in the final NC
Program. It is always good to include a comment, in
order to distinguish the various operations in the
final program.
The Finish operation works on a contour, and in order to generate a toolpath we must
select that contour. To select the contour for the operation perform the following
steps:
•
•
Ensure that single step is unchecked in the Finish dialog
Select the contour shown on the picture below. To do this, start at the far right
by selecting the vertical line with the indication arrow pointing up. Now the
whole contour is selected, so unselect the last vertical line by clicking the
Back button.
114
Now your drawing should look something like the one below.
Click on the Parameters Button to open the parameters dialog.
Enter the following values shown below into the parameter dialogs.
Tool Orientation: The 9 icons represent
the possible 9 orientations of the tool.
Tool Radius: The nose radius of the tool.
Entry Angle: The angle at which the tool
will approach the part.
Entry Length: The length of the
approach.
Exit Angle: The angle at which the tool
will retract from the part.
Exit Length: The length of the retract.
Compensation Type: This is the
compensation type that is used for the
operation. The two most commonly used
are Controller or Computer.
Compensation Side: The side of the
contour that the tool will move on. This
determines if it is an inside or outside
toolpath, since the tool will always move
in the direction of the selection.
115
Click on OK to use the values.
Click on Show Toolpath, and the toolpath will be shown on the drawing.
Try experimenting with the various parameters and see how they change the
generated toolpath.
Click on Export Clipboard in order to generate the actual program.
The program is now in the computer’s clipboard and is ready to be inserted into the
CNC program.
Change the window to the NC
program and move to the very end, by
pressing Ctrl-End.
Insert the text from the clipboard,
either by pressing Ctrl-v, or selecting
A
Paste icon
in the Editor menu on
the Edit toolbar (indicated by A in the
picture).
Now the NC program should look like the following screen.
116
To verify the generated toolpath, we must simulate it using the integrated Graphical
Backplot. To open the backplot window, click on the Backplot tab (indicated with
letter A) and then on the Backplot Window
shown below.
Now a window like the one below will appear.
A
B
icon (indicated with letter B) as
117
19.7. Threading the part
In the following tutorial we will generate a Threading NC program. In order to select
the Threading Horizontal operation the below described steps must be performed.
Select the file type (NC Format) for
our facing example program (e.g. ISO
Turning) as indicated with letter A.
Then Select the feature Threading
Horizontal by clicking on the
Grooving Turning icon indicated by
letter B in the Turning Operations
toolbar.
A
B
This will open the Threading Z Turning dialog to the left of the drawing area. Now
insert the values shown in the dialog below.
Comment:
This comment will be shown in the final NCProgram. It is always good to include a comment in
order to distinguish the various operations in the
final program.
Start Z:
This is the Z value where the operation starts.
End X:
This is the Z value where the operation ends.
Click on the Parameters button to open the parameters dialog.
Enter the following values shown below into the parameter dialogs.
118
Thread Form Tab Configures the form of
the thread in the operation.
Threading Type: The 4 icons represent
threading outside or inside made from left
to right, or right to left.
Thread Lead: Defines the starting
position of the thread.
Number of Starts: This defines how
many starts the thread will have; the
normal number is one.
Select From Table: Instead of typing all
the various values for the thread, these
can be inserted from a table. This table
contains all of the most common threads
for both Imperial and Metric. Please see
the end of this section for further
explanations on the use of the table.
Included angle: The total angle of the
thread profile.
Thread Angle: The forward angle of the
thread profile measured from vertical.
Major Diameter: The largest measure of
the thread.
Minor Diameter: The smallest measure
of the thread diameter.
119
Cutting Tab Configure the number of and
the type of cuts that should be used in the
operation
Constant Area: With constant area the
tool will remove equal amounts of the
area per cut.
Constant Depth: Using the constant
depth option each cut will have the same
depth. Since the removed area is
triangular an increasing amount will be
removed the deeper the tool cuts.
First Cut Depth: If this option is
selected the first cut defines how the
following cuts will be made based on
what method (Constant Area/Depth) is
used.
Number of Cuts: If this option is used
the operation will be performed with this
number of cuts (+ the selected number of
spring cuts).
Number of Spring Cuts: If spring cuts
are used this many cuts will be made at
the final depth.
Stock Clearance: Defines how far away
from the stock the tool should move
before it moves back to the start.
Stock to Leave: Defines how much stock
should be left at the end of the operation.
Pulloff Distance:
Infeed Angle: The angle at which the
tool will move down. The reason for this
is to minimize the chip pressure at the
front of the tool and thereby obtain a
more even thread.
120
Taper Tab Configures extension of the
cuts and a possible taper for the
operation.
Taper Type: If the taper angle is not
zero, a conical thread will be produced.
The two icons represent the two ways the
cone can go.
Taper Angle: Is the angle of the conical
thread.
Absolute Overcut: With this option the
tool will continue the defined distance at
the end of the thread.
Revolutions Overcut: With this option
the thread will be extended by the number
of revolutions entered.
Acceleration Distance: The Distance
that the tool will start before reaching the
thread in order to accelerate to achieve a
more uniform thread.
Calculation Acceleration Distance:
With this option the acceleration distance
will be calculated by the operation.
Absolute Acceleration Distance: Here,
the operator can enter how far away the
tool should start before reaching the
thread.
Revolutions Acceleration Distance:
With this option the tool will use the
given number of revolutions to accelerate.
It will therefore start the number of
revolutions multiplied by the thread pitch
before reaching the thread.
Click on OK to use the values.
After the values have been entered in the dialog the screen will look something like
the picture below. Notice that the area of operation is shown with a blue rectangle.
121
Try experimenting with the various parameters and see how they change the
generated toolpath.
Click on Export Clipboard in order to generate the actual program.
The program is now in the computer’s clipboard and is ready to be inserted into the
CNC program.
Change the window to the NC
program and move to the very end by
pressing Ctrl-End.
Insert the text from the clipboard,
either by pressing Ctrl-v, or selecting
A
Paste icon
in the Editor menu on
the Edit toolbar (indicated by A in the
picture).
Now the NC program should look like the following screen.
122
To verify the generated toolpath, we must simulate it using the integrated Graphical
Backplot. To open the backplot window, click on the Backplot tab (indicated with
letter A) and then on the Backplot Window
shown below.
Now a window like the one below will appear.
A
B
icon (indicated with letter B) as
123
When entering the form parameters for the thread it is possible to use Select From
Table on the Thread Form tab.
When this button is clicked the dialog below is shown.
The selection is then performed in the following way:
•
•
•
First select if the thread is a metric or imperial thread.
Based on the above selection the different types of threads can be selected in
the drop down box.
It is now possible to select the specific thread in the list box, and when OK is
clicked the corresponding data will be copied to the form fields in the
parameter window.
124
19.8. Drilling the part
In the following tutorial we will generate a Drilling NC program. In order to select the
Drilling operation the below described steps must be performed.
Select the file type (NC Format) for
our facing example program (e.g. ISO
Turning) as indicated with letter A.
Then Select the feature Drilling by
clicking on the Drilling icon indicated
by letter B in the Turning Operations
toolbar.
A
B
This will open the Drilling dialog to the left of the drawing area. Now insert the
values shown in the dialog below.
Comment:
This comment will be shown in the final NC
Program. It is always good to include a comment in
order to distinguish the various operations in the
final program.
Clearance Height:
The position to where the tool is moved before the
actual operation, and where it will end after the
drilling is finished.
Retract Height: The distance from the start of the
operation where the feedrate will switch from rapid
to feed.
Start Depth: The depth at which the actual
operation is started.
End Depth: The final depth of the operation.
The Drilling operation is defined by the above parameters, after the entry of which the
screen will look something like the one shown below.
The four distances entered are shown as crosses on the drawing.
125
Click on the Parameters button to open the parameter dialog.
Enter the following values shown below into the parameter dialog.
Operation Type: The operation type can
be drilling or threading that is either
Clock or Counter Clock Wise.
Feedrate: The feedrate used for all feed
moves.
Dwell: The time that the drill will dwell
at the bottom of each cut in order to break
the chip.
Use Pecking: By selecting this option the
operation will be performed with pecking
movements.
Peck Clearance: The distance above the
previous cut to which the drill will move
in rapid after the retraction is performed.
Peck Retract: The distance the drill will
retract at each peck.
First Peck: The depth of the first peck.
Subsequent Pecks: After the first peck is
performed the entered distance will be
126
used for the remaining pecks.
Use Tip Compensation: Toggles the use
of tip compensation. This option is used
for drilling through a part. It will extend
the hole based on the geometry of the
drill.
Tip Angle: The angle of the drill.
Drill Diameter: The diameter of the drill.
Tip Compensation: The calculated
amount, by which the hole will be
extended.
Click on OK to use the values,
Try experimenting with the various parameters and see how they change the
generated toolpath.
Click on Export Clipboard in order to generate the actual program.
The program is now in the computer’s clipboard and is ready to be inserted into the
CNC program.
Change window to the NC program
and move the cursor to the very end
by pressing Ctrl-End.
Insert the text from the clipboard,
either by pressing Ctrl-v, or selecting
A
Paste
from the Edit menu on the
Editor Tab (indicated by A in the
picture).
Now the NC program should look like the following screen.
127
To verify the generated toolpath, we must simulate it using the integrated Graphical
Backplot. To open the backplot window, click on Backplot tab (indicated with letter
A) and then on Backplot Window
icon (indicated with letter B) as shown below.
Now a window like the one below will appear.
A
B
128
19.9. Tapping the part
In the following tutorial we will generate a Tapping NC program. In order to select
the Drilling operation the below described steps must be performed.
Select the file type (NC Format) for
our facing example program (e.g. ISO
Turning) as indicated with letter A.
Then Select the feature Drilling by
clicking on the Drilling icon indicated
by letter B in the Turning Operations
toolbar.
A
B
This will open the End Drilling dialog to the left of the drawing area. Now insert the
values shown in the dialog below.
Comment:
This comment will be shown in the final NC
Program. It is always good to include a comment, in
order to distinguish the various operations in the
final program.
Clearance Height:
The position, to where the tool is moved before the
actual operation, and where it will end after the
drilling finished.
Retract Height: The distance from the start of the
operation where the feedrate will switch from rapid
to feed.
Start Depth: The depth at which the actual
operation is started.
End Depth: The final depth of the operation.
The Tapping operation is defined by the above parameters, after the entry of which
the screen will look something like the one shown below.
The four entered distances are shown as crosses on the drawing.
129
Click on the Parameters button to open the parameter dialog.
Enter the following values shown below into the parameter dialog. Notice that the
dialog is different from the one in the previous drilling operation. It is no longer
possible to use pecking because the Operation Type is selected as CW Tapping.
Operation Type: The operation type can
be drilling or threading that is either
Clock or Counter Clock Wise.
Feedrate: The feedrate used for all feed
moves. Depending on the machine this
may be in a different format. For this
machine’s G32 code a feedrate of 125
will actually result in a pitch of 1.25.
Dwell: Is the time that the drill will dwell
at the bottom of each cut in order to break
the chip.
Use Tip Compensation: Toggles the use
of tip compensation. This option is used
for drilling through a part. It will extend
the hole based on the geometry of the
drill.
Tip Angle: The angle of the drill.
Drill Diameter: The diameter of the drill.
Tip Compensation: The calculated
amount by which the hole will be
extended.
130
Click on OK to use the values,
Try experimenting with the various parameters and see how they change the
generated toolpath.
Click on Export Clipboard in order to generate the actual program.
The program is now in the computer’s clipboard and is ready to be inserted into the
CNC program.
Change the window to the NC
program and move to the very end, by
pressing Ctrl-End.
Insert the text from the clipboard,
either by pressing Ctrl-v, or selecting
A
Paste
from the Edit menu on the
Editor Tab (indicated by A in the
picture).
Now the NC program should look like the following screen.
To verify the generated toolpath, we must simulate it using the integrated Graphical
Backplot. To open the backplot window, click on Backplot tab (indicated with letter
131
A) and then on Backplot Window icon
(indicated with letter B) as shown
below.
Now a window like the one below will appear.
A
B