1
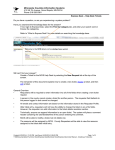
Project Deliverer User Guide: Volume 2
_______________
MCIS Project Deliverer
User Guide
_______________
Volume 2
Project Deliverer User Guide: Volume 2
Table of Contents
SET RISK RATING
SETTING PROJECT CATEGORISATION .......................................................................................... 5
LOCATIONS ........................................................................................................................................ 7
CLAIMS ............................................................................................................................................... 7
CLAIMS ............................................................................................................................................... 8
ISSUE A CONTRACT VARIATION ................................................................................................... 11
STEP 1: SEARCH FOR AND OPEN THE PROJECT ...................................................................................... 11
STEP 2: ASSIGN THE PROJECT .............................................................................................................. 11
STEP 3: SUSPEND THE PROJECT ........................................................................................................... 11
STEP 4: AMEND OFFER DETAILS ........................................................................................................... 14
STEP 5: ISSUE THE REVISED OFFER....................................................................................................... 15
STEP 6: MAKE THE REVISED PROJECT LIVE ............................................................................................ 17
VIEW FUNDING AGREEMENT ........................................................................................................ 17
VIEW PROJECT HISTORY............................................................................................................... 19
CLOSE A PROJECT ......................................................................................................................... 20
Project Deliverer User Guide: Volume 2
Set risk rating
Each live project should be assigned a risk rating on MCIS. New projects set up
on MCIS should be risk-rated prior to making them live.
The project should be risk assessed on an ongoing basis using the local
(Intermediate Body) risk assessment form, and the findings registered and
maintained on MCIS.
The risk rating for each project is displayed alongside the cost and output variance
ratings in the Search results ‘performance dashboard’.
To display this screen
Search for and open the project you wish to assign a risk-rating to. The Project
Profile Overview page will display. Click the Risk link displayed.
Add a meaningful
comment supporting
the risk rating.
About this screen
This screen records the risk rating for the project.
The current risk rating of the project is displayed at the top of the screen. If a risk
rating has not yet been assigned, the message ‘Not set’ will display.
Completing this screen
1. Select the level of the risk by clicking on the Low, Medium or High radio
button.
2. Add comments that give the reason for the level of risk chosen.
Project Deliverer User Guide: Volume 2
3. You must also attach a file (the completed local risk assessment form or
matrix) to support the selected risk rating. To upload the file:
a. Click the Add Attachment button
b. Click on the Browse button. A ‘Choose File’ pop-up window will display.
c. Navigate to where the attachment is stored.
d. Select the item to attach and click on the Open button.
e. Enter a title for the attachment in the Title field and add a description if
necessary.
f. Click on the Upload Attachment button.
g. Use the Abandon Upload button if you have chosen the wrong item to
attach. Select the correct item and then repeat the above steps.
4. Click on the Save button to save your data.
5. If you now search for the project you will see the assigned risk rating is
displayed in the search results.
Project Deliverer User Guide: Volume 2
Setting Project Categorisation
Project categorisations
To display this screen
About this screen
Project Categorisations are a
Project Deliverer User Guide: Volume 2
Completing this screen
Project Deliverer User Guide: Volume 2
Locations
Project Deliverer User Guide: Volume 2
Claims
To display this screen
If necessary search for and open the project. Click on the ‘Claims’ tab.
About this screen
The Claims screen displays project claims for each project Priority Axis. It lists:
•
•
•
The status of all claims; current, past and future.
Any ineligible expenditure identified on a paid claim
The details of any recovery of monies (clawbacks).
Click on any other of the links displayed to open the associated claim or clawback.
Project Deliverer User Guide: Volume 2
Column Heading
Description
Number
The claim number, arranged in chronological order.
Period
The claim frequency. Can be either Monthly or Quarterly, as
arranged with the applicant. Projects with greater
expenditure/grant are more likely to be organised on a
Monthly claim period.
Period End
The claim period end date.
Type
Interim: a scheduled, non-restricted claim made during a
project’s life.
Progress Only: A claim after the financial completion date,
the claim only measures and reports on targets/outputs.
Final: the scheduled final claim.
Restricted: a claim where the retention rate (usually 10%)
has been applied to the grant payable pending receipt of
the final audit.
Final restricted: a claim generated by MCIS to cater for the
situation where a final claim has been submitted on which
an amount must be retained pending receipt of the final
audit and an amount can be paid. The final restricted claim
enables the immediate payment of this second amount.
Status
Reflects the status of the transaction, e.g. draft, pending
approval, on hold, etc
Amount Paid
The grant paid to the Applicant on the claim.
Version
The claim version(s). Additional versions of a claim are
created when it is returned to an applicant for amendment
after it has been submitted to the Intermediate Body for
processing. Versions are not created if a claim is saved and
then re-opened.
Offset
This shows the amount of money, previously overpaid,
which has been ‘offset’ against a claim. Clicking on the
offset link displays the offset summary screen for this
particular claim.
Ineligible
Expenditure
The amount of ineligible expenditure declared on a claim.
Click on the link to view details of the overpayment.
Recovery
Mechanism
The recovery mechanism is the means by which the
Intermediate Body ‘claws back’ an overpayment made to an
Applicant. This will either be by demand note (i.e. an
invoice) or by offsetting the overpayment against a future
project claim, or claims. Clicking on the recovery
mechanism link displays the clawback details screen.
Project Deliverer User Guide: Volume 2
Column Heading
Description
Recovery Status
The recovery status column provides information on
progress towards recovery of the clawback, e.g.:
Recovered, Pending recovery, Non-recoverable. Clicking on
the recovery status link displays the clawback overview
screen which contains the history of the clawback.
Project Deliverer User Guide: Volume 2
Issue a contract variation
Follow the steps outlined below to issue a revised offer of grant.
Step 1: Search for and open the project
1. From your home page, click on the Projects tab.
2. Search for your project.
3. Click the link to open your project. The Project Profile Overview screen
displays.
Step 2: Assign the project
1. Scroll down the Overview screen until the Assign button displays.
2. Click on the drop-down field to display all Project Deliverer users within the
Intermediate Body. Select your name.
3. Click on the Assign button.
4. Click on the Home link to display your Task List. The assigned project
displays in the Task list, with a required action of Routed.
Open the project by
clicking on the link
Step 3: Suspend the project
Project Deliverer User Guide: Volume 2
1. Click on the Routed link to open the project.
2. Add a comment to indicate that the project is being suspended and click
Next Step.
3. Scroll down to view the Suspend button.
4. Click on the Suspend button.
5. You are prompted to confirm your action by MCIS. Click on OK.
Project Deliverer User Guide: Volume 2
6. A warning message displays at the top of the screen and the Comments
Step displays with an
.
Message indicates the project is
suspended.
Comments must be added before you
can amend the offer.
Comments page now
displays as blank page
icon, with a cross.
7. Add a comment to indicate you are going to amend the offer.
8. If required, you can also add an attachment. To add a file:
a. Click on the Add Attachment button
b. Click on the Browse button.
c. Navigate to where the file you wish to attach is stored.
d. Select the file and click ‘Open’. The file name will appear in the ‘Local
File (required):’ field.
e. Enter a title for the attachment in the Title field.
f. Click on the Upload Attachment button.
g. Click on the Abandon Upload button if you have chosen the wrong
item to attach. Select the correct item and then repeat steps.
h. If you wish to add more than one attachment, repeat the upload
process.
Project Deliverer User Guide: Volume 2
9. Scroll down and click on the
button to save the changes and
display the Amend Offer Details button.
Step 4: Amend Offer details
10. Click on the Amend Offer Details button.
11. You will be prompted to confirm this. Click OK.
12. All contractual fields will not be viewed in edit mode. Amend the details as
required.
Note: For more information on this process refer to the ‘Set up a New Project’
section.
13. Click on the Save, Next Step or Previous Step button to save changes
made.
14. Once you are happy all changes have been made, click on the Comments
Sheet link in the Steps navigation pane and add a comment.
Note: The comment entered in the Comment box should make clear to
subsequent users in the workflow what changes have been made, and where they
can be viewed.
15. Click on the Next Step button.
16. The following buttons display:
Project Deliverer User Guide: Volume 2
Button
Forward for
Approval
Description
Submits the revised offer to the Grant Approver.
Save and
Complete
If the project has had a non-contractual change made to it,
such as changing the quarterly funding profile, this button will
display. Click to save the changes and make the project live
again.
Rollback to
current offer
Removes the new project version which was created when
the project was put under amendment.
It returns the project to the current version and makes it live.
Send offer to
applicant under
amendment
Sends the offer to the applicant so that the applicant can
make amendments.
Save
Saves the changes made so far, and continues to display the
offer/project details on the screen.
17. Click on the Forward for Approval button to send the offer to the Grant
Approver.
18. You are prompted to confirm this action. Click on OK.
Step 5: Issue the revised offer
Once the Grant Approver has approved the offer a notification will display in your
Task list with a Required Action of: ‘Offer Approved – send letter to applicant’.
19. Click on the link. The offer History sheet displays.
20. Add your comment for the Grant Acceptor.
21. An attachment may also be added, if required.
Project Deliverer User Guide: Volume 2
Note: How to add an attachment is covered on page 4
22. Click on the
button.
button to save your comment and display the Issue
Issue button
23. Click on the Issue button.
Project Deliverer User Guide: Volume 2
24. The Status of the project is Offer Issued.
Note: Once the applicant has accepted the reissued offer, the offer will display in
the Task List, with a Status of Offer accepted – make offer live.
Step 6: Make the revised project live
Note: See the section on Make a Project Live, on page Error! Bookmark not
defined..
View Funding Agreement
The funding agreement can be viewed as a printable document through the
Cognos reporting tool. To access the Funding Agreement for your project click on
‘Funding Agreement’.
Project Deliverer User Guide: Volume 2
Project Deliverer User Guide: Volume 2
View Project History
Each time a significant change is made to a project which requires the re-issue of
the offer; MCIS creates a new version and retains previous iterations for audit
purposes. This Project History is visible to Intermediate Body and Applicant users.
To display this screen
With the project open, click on the Project History tab.
About this screen
This screen lists all previous versions of the project and offer. To view details
of a particular version click on the associated link. The screens will display in
read-only view.
Project Deliverer User Guide: Volume 2
Close a Project
It is only possible to close a project that is ‘Financially complete’. A project’s status
on MCIS changes from ‘Live’ to ‘Financially Complete’ when the final claim is paid.
1. If necessary, search for and open the project that you wish to close.
2. Click on the Claims tab and scroll down to display the Close button.
Click on the Close button. If you search for the project you will see the project
status has changed to Clos