1
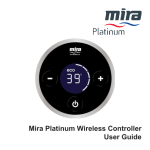
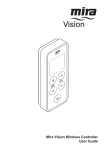
Mira Platinum Wireless Controller User Guide
1
CONTENTS
Introduction.............................................................................................. 3
General.................................................................................................. 3
Safety Information.................................................................................... 3
Control Layout.......................................................................................... 4
Display Symbols....................................................................................... 5
Using the Shower..................................................................................... 6
Switch On/Off........................................................................................ 6
Adjust Temperature............................................................................... 7
Adjust Flow............................................................................................ 7
Functions.................................................................................................. 8
Function Menu.......................................................................................... 9
Enter the Function Menu....................................................................... 9
Exit the Function Menu........................................................................ 10
Changing Functions/Settings............................................................... 11
Maximum Showering Water Temperature........................................... 11
Eco ................................................................................................. 12
Warm-Up............................................................................................. 13
Clock Display....................................................................................... 15
Flow Range......................................................................................... 16
Control Frequency............................................................................... 18
Replacing the Batteries......................................................................... 19
Fault Diagnosis....................................................................................... 20
Error Codes......................................................................................... 20
General Faults..................................................................................... 22
Cleaning.................................................................................................. 24
Disposal and Recycling......................................................................... 24
Notes....................................................................................................... 25
Customer Service................................................................................... 28
2
INTRODUCTION
General
Thank you for purchasing a quality Mira product. To enjoy the full potential of your
new product, please take the time to read this guide thoroughly and keep it handy
for future reference.
The Mira Platinum Wireless Controller is a remote user interface and controls the
following functions:
•
•
•
•
•
•
•
Showering Water Temperature
Showering Water Flow
Maximum Showering Water Temperature
Eco Mode
Warm-Up Mode
Clock
Flow Range
This guide covers the setting and use of these functions and includes a trouble
shooting guide should the appliance not function as expected. For issues relating
to the installation of the appliance or other associated products, please refer to the
relevant Installation Guide(s) or contact our Customer Services Team. (Details in
the back of this guide.)
NOTE! ALL FUNCTIONS ARE ONLY AVAILABLE AFTER THE CONTROLLER
HAS BEEN ASSIGNED TO A MIRA PLATINUM DIGITAL MIXER VALVE. (See
Mira Platinum Installation Guide.)
SAFETY INFORMATION
1. Make sure that you fully understand how to operate this shower and make sure
that it is properly maintained in accordance with the instructions given in this
manual.
2. Sunburn or skin conditions can increase your sensitivity to hot water. Make sure
that you set the shower to a cooler temperature.
3
CONTROL LAYOUT
Turn Outer Ring
Showering Water Flow Adjustment
Decrease
Flow
Increase
Flow
Decrease
Temperature
Increase
Temperature
Start/Stop
Display
4
DISPLAY SYMBOLS
Low Battery
Display
Economy Flow
Display
Temperature Display
Flow Display
Control Out Of
Range
Clock Display
5
USING THE SHOWER
Switch On/Off
Press “ ” to start or stop shower.
Temperature and flow settings will be same as when last used.
After a short period, display will dim to help extend battery life.
Approximately 10 minutes after shower has stopped, display will turn off
automatically.
Shower will not run continuously for more than 30 minutes before stopping
automatically (5 minutes when “ECO” function is set to “on”).
When “Warm-Up” function is “on”, there will be a short delay (5 seconds) before
water flows from shower.
6
Adjust Temperature
While shower is running, press “ + ” or “ - ” to adjust temperature. Showering
temperature appears on display in degrees Celsius (°C).
Adjust Flow
Turn outer ring clockwise or anticlockwise to adjust flow. Showering flow level
appears on display in white bars.
7
FUNCTIONS
The following functions can be altered individually to adjust how the shower operates:
F1 - Maximum Showering Water Temperature. This is the temperature the shower
cannot go beyond when in use.
F2 - Eco. The shower will stop automatically
after 5 minutes. When this setting is “on”,
maximum available showering flow is limited
to half the flow normally produced. “ECO”
symbol is displayed. When setting is “off”,
maximum showering flow will be at full flow.
“ECO” symbol goes out when more than half
flow is selected.
F3 - Warm-Up. When this setting is “on”
and the shower is started, there is a short
delay (5 seconds) before water flows and
temperature display will flash to indicate
shower is waiting for selected display
temperature to be achieved. When shower
stops, temperature has been reached and
shower is ready for use, press “ ” as normal.
If temperature cannot be found, shower will
stop automatically after 5 minutes.
When “Warm-Up” setting is “off”, temperature display will not flash and shower operates
as normal.
Note! When used with some combination boilers, the warm-up function may be impaired.
This is due to the functional nature of combination boilers.
F4 - Clock Setting. To set the time.
F5 - Clock Display. When Clock Display
is “on”, time is displayed when shower has
stopped, or after 10 seconds of inactivity
whilst the shower is running. When Clock
Display is “off”, the time is replaced by the
showering temperature.
on
off
F6 - Flow Range. For use with High
Pressure/Combi Valve version only. The water flow rate (showering force) can be adjusted
to within a desired range by setting a low point and a high point. During adjustment the
shower will need to be started.
F7 - Control Frequency. An unreliable functioning of the appliance (not always able to
change settings of shower) may indicate radio interference by another device transmitting
locally on same channel. Changing channel may resolve this problem.
8
FUNCTION MENU
Enter the Function Menu
Press “+” and “ ” buttons simultaneously
until “End” is displayed on the unit.
Use “+” or “-” buttons to cycle
through functions and press
“ ” to enter setting.
(See following sections in this guide
for details on each function and how to
alter their settings.) Note! If signal loss
occurs during a function change, “Err”
will appear on display.
Press “ ” to clear and retry function
change.
9
Exit the Function Menu
When finished, use “+” or “-” buttons to
cycle back through functions until “End”
appears. Press “ ” to exit.
Control is ready to use.
If necessary, test shower to see if
functions are working as expected.
10
CHANGING FUNCTIONS/SETTINGS
Maximum Showering Water Temperature
Factory default “45°C”.
Cycle menu to “F 1” and press
“ ”.
Press “+” or “-” to adjust temperature.
Maximum = 48°C
Minimum = 35°C
Press “ ” to set.
Press “ ” to exit back to Function
Menu. See section “Exit the Function
Menu”.
11
Eco
Factory default “off”.
Cycle menu to “F 2” and press
“ ”.
Press “+” or “-” to change setting
“on” or “off”.
Press “ ” to set.
Press “ ” to exit back to Function
Menu. See section “Exit the Function
Menu”.
12
Warm-Up
Factory default “off”.
Note! Function will not work with combination boilers.
Cycle menu to “F 3” and press
“ ”.
Press “+” or “-” to change setting “on”
or “off”.
Press “ ” to set.
Press “ ” to exit back to Function
Menu. See section “Exit the Function
Menu”.
13
Clock Setting
Factory default “4:00”.
Note! Can also be activated by disconnecting and reconnecting battery.
Cycle menu to “F 4” and press
“ ”.
Press “-” to change hour setting.
Press “+” to change minute setting.
Press “ ” to set time and exit back to
Function Menu. See section “Exit the
Function Menu”.
14
Clock Display
Factory default “on”.
Cycle menu to “F 5” and press
“ ”.
Press “+” or “-” to change setting “on”
or “off”.
Press “ ” to set.
Press “ ” to exit back to Function
Menu. See section “Exit the Function
Menu”.
15
Flow Range
For use with High Pressure/Combi Valve version only.
Factory default “1 - 99”
Cycle menu to “F 6” and press
“ ”.
“on” is displayed, press “ ” to start
shower.
Lower limit is displayed, e.g.
“L 1”. Adjust flow to desired lower limit
1-99.
Press “ ” to set lower limit.
16
Higher limit is displayed, e.g.
“H 23”. Adjust flow to desired higher
limit 1-99. (Most plumbing systems may
achieve maximum flow before 99.)
Press “ ” to set higher limit.
Press “ ” to set and exit back to
Function Menu. See section “Exit the
Function Menu”.
17
Control Frequency
Factory default “1”.
Cycle menu to “F 7” and press
“ ”.
Press “+” or “-” to change channel “1-7”.
Press “ ” to set.
Press “ ” to exit back to Function
Menu. See section “Exit the Function
Menu”.
18
REPLACING THE BATTERIES
To access the batteries, the control unit must be removed from the wall. Make sure
control unit is dry before removing.
Press button to release and remove
control from wall.
Turn unit over to access batteries.
Remove and replace all batteries.
Only use new batteries of same make
and type. Do not use rechargeable
batteries.
Hook control on top of bracket and
push firmly until control “clicks” back
into place.
If necessary, test shower to see if
functions are working as expected.
19
FAULT DIAGNOSIS
Error Codes
A specific problem relating to the electronic function of the shower will result in an
error code being displayed on the control.
Over Temperature at Control Sensor
1. Turn Digital Mixer off for 10 seconds. Turn back on and allow
15 seconds to reset.
2. If shower operation does not return to normal, make sure hot
and cold inlets are not reversed.
3. If shower operation does not return to normal, make sure inlet
filters and check valve cartridges are clean.
4. If shower operation does not return to normal, check the water
supplies to the valve are within the correct temperature and
pressure ranges. See “Mira Platinum Installation Guide Specifications”.
5. If problem still occurs, make a note of the error code and
contact our Customer Services Team.
Control Sensor
1. Turn Digital Mixer off for 15 seconds. Turn back on and allow
15 seconds to reset.
2. If shower operation does not return to normal, replace
Thermistor. (To be performed by competent tradesperson
only!)
3. If problem still occurs, make a note of the error code and
contact our Customer Services Team.
20
Control Sensor or PCB Relay
1. Turn Digital Mixer off for 15 seconds. Turn back on and allow
15 seconds to reset.
2. If shower operation does not return to normal, replace
Thermistor. (To be performed by competent tradesperson
only!)
3. If shower operation does not return to normal, replace PCB.
(To be performed by competent tradesperson only!)
4. If problem still occurs, make a note of the error code and
contact our Customer Services Team.
Digital Mixer Temperature Motor
1. Turn Digital Mixer off for 15 seconds. Turn back on and allow
15 seconds to reset.
2. If shower operation does not return to normal, check and,
if necessary, replace Mixer Valve. (To be performed by
competent tradesperson only!)
3. If problem still occurs, make a note of the error code and
contact our Customer Services Team.
Error Code Number Not Previously Described
Digital Mixer PCB Error.
1. Turn Digital Mixer off for 15 seconds. Turn back on and allow
15 seconds to reset.
2. If problem still occurs, make a note of the error code and
contact our Customer Services Team.
Replace batteries.
Control out of range.
Error During Function Change
Displayed if there is a signal loss between the Wireless Control
Unit and the Digital Mixer whilst a function setting is being
altered. Press “ ” to clear the display and retry the function
change.
21
General Faults
Malfunction
Cause
Remedy
No display.
The batteries are flat or
incorrectly fitted.
Check and rectify.
Shower will not operate.
Water supply isolated.
Check water supply.
Flat batteries.
Replace batteries.
+
Electrical supply isolated or fuse
blown.
Check electrical supply. If fuse
blown, replace Digital Mixer
Valve PCB.
+
No connection to Digital Mixer.
Control out of range.
Reset and recommission. Refer
to Installation Guide
Digital Mixer malfunction.
Isolate electrical supply and
reset after 30 seconds
If problem persists, contact our
Customer Services Team.
No flow or low flow from
Shower Fittings.
Showerhead blocked.
Check and clean.
Stuck Checkvalve in
Showerhead.
Check and clear or replace
Checkvalve.
Hose blocked or twisted.
Check and clean or release
twist.
Digital Mixer malfunction.
Contact our Customer Services
Team.
“L” and or “H” values set too
low in Flow Range (F6).
Change to higher setting.
Drip from showerhead.
A small amount of water may
be retained in showerhead after
showering. This may drain over
a few minutes.
This is normal. Changing
position of showerhead may
vary draining time.
Shower not hot enough.
Maximum showering
temperature set too low.
Increase maximum showering
temperature (Function F1).
Make sure hot and cold
water supplies are connected
correctly and delivering a
constant flow and temperature
within the required limits. See
“Specifications” in the “Mira
Platinum Installation Guide”.
Digital Mixer fitted incorrectly.
If problem persists, contact our
Customer Services Team.
Incorrect or fluctuating
temperature.
Controller out of range.
Radio interference.
Warm up feature is being used
with combi-boiler.
22
Refer to “Fault Diagnosis” in
the “Digital Mixer Installation
Guide”.
Fluctuating or reduced flow.
Filters blocked.
Water pressure too low.
Refer to “Fault Diagnosis” in
the “Digital Mixer Installation
Guide”.
Flow rate is too low.
Fluctuating water
temperature.
Maximum blend temperature
too hot or too cold.
Incorrect maximum
temperature setting.
Refer to “Maximum Shower
Water Temperature” in the
“Digital Mixer Installation
Guide”.
Continuous flow. Shower will
not shut off.
Wireless Controller or Digital
Mixer Valve failure.
Isolate power and water
supplies. Contact our
Customer Services Team.
Shower runs for a short time
(30 - 60 seconds) then flow
reduces, splutters or stops.
Worst when other hot taps
are in use. Less evident when
shower is on full cold.
Air is being sucked down
the vent pipe. (Gravity fed
system).
The hot draw off pipe is
positioned too high in relation
to the lowest water level of
the cold water cistern (100
mm min, refer to “Gravity
Fed Showers” diagram in the
“Digital Mixer Installation
Guide”. Consider increasing
size of cold feed pipe to
cylinder to 28 mm diameter.
Warm up setting inadvertantly
selected.
Disable Warm-Up feature.
Refer to ‘Function Menu’ “Warm-Up”.
Cistern capacity insufficient
(230 litres minimum required).
Increase cistern size.
Eco setting selected.
Disable Eco feature. Refer to
‘Function Menu’ - “Eco”.
Shower runs cool after
a short time (1 - 2 minutes)
then flow
splutters.
Air ingress into hot pipework.
Refer to plumbing
system diagrams under
“Installation” in the “Digital
Mixer Installation Guide”.for
correct connection.
Shower runs cold after
5 - 10 minutes.
Insufficient storage of
hot water in cylinder.
Increase storage of hot water.
Shower runs for a short time
(3 - 5 minutes)
23
CLEANING
Many household cleaners contain abrasives and chemical substances, and
should not be used for cleaning chrome plated or plastic fittings. These finishes
should be cleaned with a mild washing up detergent or soap solution, and then
wiped dry using a soft cloth.
DISPOSAL AND RECYCLING
End of Product Life
When the appliance has reached the end of its serviceable life, it should be disposed
of in a safe manner and in accordance with current local authority recycling or waste
disposal policy.
Batteries
Spent batteries should not be disposed of with your normal household waste. Contact
your local authority for information on waste disposal and recycling.
This symbol on the product or its packaging indicates that this product should not
be disposed of with your other household waste. Instead, it is your responsibility
to dispose of your waste equipment by handing it over to a designated collection
point for the recycling of waste electrical and electronic equipment. The separate
collection and recycling of your waste equipment at the time of disposal will help to
conserve natural resources and ensure that it is recycled in a manner that protects
human health and the environment. For more information about where you can drop
off your waste equipment for recycling, please contact your local council office, your
household waste disposal service or the shop where you purchased the product.
24
NOTES
25
NOTES
26
NOTES
27
CUSTOMER SERVICE
Guarantee
Your product has the benefit of our manufacturer’s
guarantee which starts from the date of purchase.
To activate this guarantee, please return your completed
registration card, visit our website or free phone 0800
0731248 within 30 days of purchase (UK only).
Within the guarantee period we will resolve defects in
materials or workmanship, free of charge, by repairing or
replacing parts or product as we may choose.
This guarantee is in addition to your statutory rights
and is subject to the following conditions:
● The guarantee applies solely to the original installation
under normal use and to the original purchaser only.
The product must be installed and maintained in
accordance with the instructions given in this user
guide.
● Servicing must only be undertaken by us or our
appointed representative. Note! if a service visit
is required the product must be fully installed and
connected to services.
● Repair under this guarantee does not extend the original
expiry date. The guarantee on any replacement parts
or product ends at the original expiry date.
● For shower fittings or consumable items we reserve
the right to supply replacement parts only.
The guarantee does not cover:
● Call out charges for non product faults (such as
damage or performance issues arising from incorrect
installation, improper use, lack of maintenance, build up
of limescale, frost damage, corrosion, system debris or
blocked filters) or where no fault has been found with
the product.
● Water or electrical supply, waste and isolation issues.
● Compensation for loss of use of the product or
consequential loss of any kind.
● Damage or defects caused if the product is repaired
or modified by persons not authorised by us or our
appointed representative.
● Routine maintenance or replacement parts to comply
with the requirements of the TMV 2 or TMV 3 healthcare
schemes.
● Products purchased ex-showroom display.
What to do if something goes wrong
If your product does not function correctly when you first
use it, contact your installer to check that it is installed
and commissioned in accordance with the instructions in
this guide. If this does not resolve the issue, contact our
Customer Services Team who will offer you or your installer
help and advice. If you experience problems, check in this
manual to see if simple home maintenance is required. If you
require further assistance call our Customer Services Team.
Helpdesk Service
Our Customer Services Team is comprehensively trained
and can offer help and advice, spare parts, accessories or a
service visit. We will need you to have your model name or
number, power rating (if applicable) and date of purchase.
As part of our quality and training programme calls may be
recorded or monitored.
Mira Showers Website (www.mirashowers.co.uk)
From our website you can register your guarantee,
download additional user guides, diagnose faults, purchase
our full range of accessories and popular spares, refer to
our FAQ’s and request a service visit.
Spares and Accessories
We maintain extensive stocks of genuine spares and
accessories and aim to provide support throughout the
product’s expected life. Payment can be made by phone
at time of order using most major Credit or Debit cards and
we aim to despatch orders within 2 working days. Items
purchased from us are guaranteed for 12 months from
date of purchase. For safety reasons spares exposed to
mains voltages should only be fitted by competent persons.
Returns – items can be returned within one month of date of
purchase, providing that they are in good condition and the
packaging is unopened. Please obtain authorisation from
our Customer Services Team before return. We reserve the
right to apply a 15% restocking charge.
Service / Repairs
We have a nationwide team of Service Technicians can
carry out service or repair work to your product within the
guarantee period and beyond. You have the assurance of a
fully trained Technician, genuine spare parts and a 12 month
guarantee on any chargeable work done.
Payment should be made directly to the Service Technician
who will accept most major Credit or Debit cards.
To Contact Us
UK
Telephone: 0844 571 5000
E-mail: [email protected]
Fax: 01242 282595
By Post: Mira Customer Services Dept, Cromwell Road,
Cheltenham, Gloucestershire, GL52 5EP
Eire
Telephone: 01 459 1344
E-mail: [email protected]
Fax: Dublin 01 459 2329
By Post: Modern Plant Ltd (Dublin),
Otter House, Naas Road, Clondalkin, Dublin 22
Extended Guarantees
A selection of protection plans are available that
enable you to cover repair bills for the life of your policy
(excludes Eire). Ring 01922 471763 for more details.
Mira is a registered trade mark of
Kohler Mira Limited.
The company reserves the right to alter
product specifications without notice.
1105041-W2-F (N86A) (1666)
FM 14648
28
Kohler Mira Ltd. February 2011