1
Incorrectly fitted
bulbs or the use
of high output
bulbs or HID kits
can cause
headlight lenses
to melt.
• Some headlights, particularly those for older models, are
not compatible with electric height adjustment, and the facility will no longer work once they are fitted - although the
headlights themselves will work fine. If electric adjustment is important to you, it’s best to check with the supplier of the headlights before purchasing.
• Electric headlight height adjustment is NOT an MOT requirement.
Transferring an electric headlight adjustment motor:
• Most headlights with electric height adjustment have a
small electric motor fitted onto the back of the headlight
unit (depending on the headlight design, the motor will
sometimes have a manual adjuster on it for inital setting
up of the headlights when they are first installed).
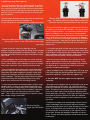
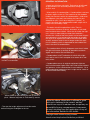
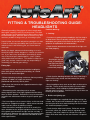
Correctly installed
headlight bulb (top);
incorrectly installed
bulb in bottom photo
will very soon cause the
headlight’s outer lens to
start melting.
8. A Note About Electric Height Adjustment:
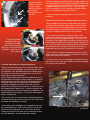
• The motor has a rod with a ball on the end, which
locates into a socket on the mounting frame of the headlight units inside the headlight housing. The motor is removed from the original light housing by turning it until the
locating lugs are loose (usually this is about a quarter of a
turn, it may be clockwise or anticlockwise but the direction
should be obvious), and then pulling it gently but firmly
backwards so that the ball releases from the socket.
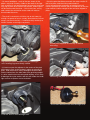
• There may be a locking tang holding the motor in place,
which must first be lifted up with a screwdriver to allow the
motor to be turned and removed.
• To fit the motor to the new headlights, the pivot that is fitted in place of the motor on the back of the new headlight
unit must first be removed.
• Many cars these days will have an electric height adjustment facility for the headlights, usually in the form of a
thumbwheel on the dashboard near the headlight switch.
This facility is commonly misunderstood, so let’s shed
some light on what it is and isn’t.
Electric height adjustment allows the headlight beam to
be adjusted over a narrow vertical range (i.e. up & down),
and it’s purpose is to allow the driver to compensate for
situations where the rear suspension is compressed,
causing the headlights to shine up into the air (for instance when towing a boat or caravan, or when the car is
fully loaded and the boot is full). It cannot substitute for
manual adjustment, nor can it adjust the headlights in the
horizontal plane (left to right). It is only for load compensation, nothing more.
• As a result, even if a car has electric height adjustment,
the beam adjustment still has to be set in the normal manner when new headlights are fitted.
• Some aftermarket headlights are compatible with electric height adjustment, either because they have an adjusting motor already built in, or (more commonly) by
making provision for the motor to be transferred across
from the old lights - see the guide which follows.
Adjustment motor showing locking tang
(arrowed).