1
• As a general rule, there will be four adjusters on each
side, two each for dipped & main beam units -although
some of the newer cars have only two adjusters each
side, so that once the dipped beam is set up, the main
beam is automatically at the correct setting.
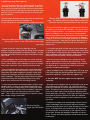
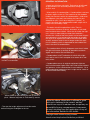
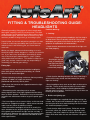
Adjusting lever
behind dipped
beam unit for setting lights for leftor right-hand drive
use.
• Some units will have three adjusters, but the one in the
middle will be the pivot point for the light unit, and should
under normal circumstances not be moved at all (if it has
been turned, it must be returned to the centre position before any further adjustment can be made).
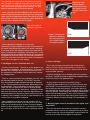
Typical location of
headlight adjusters
• When adjusting a headlight, it is very rarely
necessary to turn the adjusters very far, as even one turn
will make a big difference to where the beam is pointing.
If you have to turn the adjusters much more than two full
turns, it’s likely there’s a problem somewhere else. If the
adjusting screws are mashed and beaten up, the chances
are good that someone before you has had a twiddlefest
with them, and that’s most likely the cause of the problem.
Can’t blame the lights for that, though.
5. Headlights are for a left-hand drive car:
• Are they really though? Check first, as the problem can
be caused by twiddleitis, as detailed above. Of course it’s
possible for a headlight to be incorrectly labelled, but in
our experience most problems of this nature are caused
by maladjustment.
• There is a common belief that headlights in the UK must
be adjusted to point to the left. This is NOT the case –
they should point straight ahead at an angle of between
1.2 & 1.5 percent below the horizontal, depending on the
car concerned. The cut-off pattern to the left required
under UK law is a factor of the lens or reflector design,
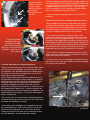
and nothing to do with the adjustment. Holding the headlight level and shining it onto a wall with dipped beam selected will produce a distinctive pattern that can be used
to identify if the headlight is for left- or right-hand drive, as
can be seen in the graphic alongside.
• Some headlights can be set for use on either left- or
right-hand drive cars, either by moving a lever (as in the
image) or by loosening three screws, turning the dipped
beam unit and retightening them. Instructions will usually
be on the lights in the form of a sticker explaining what to
do.
Graphic showing the
difference between
left- and right-hand
drive dipped beam
headlight patterns.
RHD
LHD
6. Lenses melting:
• This is almost always caused by one of two things –
either the fitment of high output bulbs or HID kits, or a
bulb having been fitted incorrectly. None of these will be
covered under warranty.
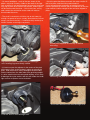
• Projector headlights use a shaped glass lens to project
the beam, instead of relying on patterned headlight lenses
as was the case in the good old days.
• Anyone who’s ever burned something using a
magnifying glass and the sun’s rays will be familiar with
the concept. Fit a bulb incorrectly, so that it’s sort-of-inthe-housing-but-not-really-secure, only held in place by
the retaining clip, and you’re likely to end up with a melted
lens very quickly. Even though the change in distance between the bulb and projector is only a few millimeters, it
will be enough to focus the light energy on the outer lens
instead of allowing it to pass through, with predictable results.
7. Warning lights show on dashboard after lights have
been fitted:
• This can sometimes be solved by having the vehicle’s
onboard electronic control unit reprogrammed by a dealer;
in other cases this may not be possible, and the lights will
have to be returned to the supplier for inspection.