1
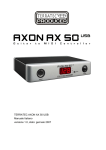
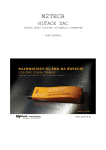
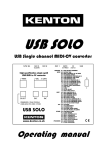
GUITARMASTER VERSION 2.1
(Guitarmaster)
by RoboSens Ltd
User's Manual
Copyright © RoboSens Ltd. 2002, 2012. All rights reserved.
Welcome!
Dear Customer
Thank you for purchasing GUITARMASTER© Version 2.1 by RoboSens Ltd. This
software is exciting in that it allows you, the guitarist, to create guitar tablature (tab)
in a standard text file and standard MIDI files for your chord sequences and singlenote runs with just your Windows PC and your guitar. No additional hardware is
required, apart from a simple connecting lead which can be easily constructed (see
Appendix I) or which we can supply.
The tablature produced by Guitarmaster is created in a standard text file and
viewed in the Windows Notepad application, so you do not need any additional
software to view the tablature. MIDI files produced by Guitarmaster can be
exported to a MIDI-compatible music notation package of your choice, to be played
back or to produce written musical scores in standard music notation. The MIDI file
can also be exported onto disk, and passed on to fellow musicians.
There is a wide range of standard music notation packages on the market which
can be used in conjunction with Guitarmaster to display your music in standard
notation. One example which works well is Noteworthy Composer (available from
www.noteworthysoftware.com).
If you have ordered a connecting lead this will have been shipped along with the
Guitarmaster CD-ROM. If you have elected to construct your own connecting lead,
full instructions on how to do so are included in the Appendix of this manual.
Please note that either way, you connect your guitar to your PC at your own
risk. RoboSens Ltd accepts no responsibility for consequential loss or
damage caused by plugging the output from your instrument into your PC's
sound card.
We at RoboSens have worked hard to create this product, which has been written
specifically with you, the guitarist, in mind. As keen guitarists ourselves we have
tried to produce a product with the musician, rather than the computer, at the
centre. We believe we have succeeded in this.
To let us know what you think, email us on
[email protected]
We look forward to hearing from you.
2
GUITARMASTER© V. 2.1 User’s Manual
Table of Contents
1. INTRODUCTION....................................................................................................................................................................... 4
1.1 SYSTEM REQUIREMENTS.......................................................................................................................................................... 4
1.2 GETTING STARTED .................................................................................................................................................................. 5
1.2.1. Installation ...................................................................................................................................................................... 5
1.2.2. Setting Volume Levels ..................................................................................................................................................... 5
For Windows 7: ........................................................................................................................................................................ 6
2.
USING GUITARMASTER.................................................................................................................................................... 9
2.1
INITIALISATION FUNCTIONS ............................................................................................................................................... 9
2.1.1
User ID...................................................................................................................................................................... 9
2.1.2
Check Level ............................................................................................................................................................... 9
2.1.3
Tuning Up ................................................................................................................................................................. 9
2.2
CONVERTING MUSIC TO TAB AND MIDI - A STEP-BY-STEP GUIDE .................................................................................. 10
2.2.1
Song Options........................................................................................................................................................... 10
2.2.2
Record and Playback .............................................................................................................................................. 11
2.2.3
Create MIDI............................................................................................................................................................ 11
2.2.4
Wav/MIDI Selector ................................................................................................................................................. 12
2.2.5
Notate...................................................................................................................................................................... 12
2.2.6
Export...................................................................................................................................................................... 12
3.
GUITARMASTER FUNCTIONS LIST ............................................................................................................................. 13
3.1
MAIN FUNCTIONS ............................................................................................................................................................ 13
3.1.1
Song Options........................................................................................................................................................... 13
3.1.2
Import Wav.............................................................................................................................................................. 13
3.1.3
Wav/MIDI toggle..................................................................................................................................................... 13
3.1.4
Create Midi ............................................................................................................................................................. 13
3.1.5
Export...................................................................................................................................................................... 14
3.1.6
Notate...................................................................................................................................................................... 14
3.1.7
Tuner ....................................................................................................................................................................... 14
3.1.9
Rewind..................................................................................................................................................................... 15
3.1.10 Play ......................................................................................................................................................................... 15
3.1.11 Stop ......................................................................................................................................................................... 15
3.1.12 Pause....................................................................................................................................................................... 15
3.1.13 Fast-Forward .......................................................................................................................................................... 15
3.2
MENU OPTIONS................................................................................................................................................................ 15
3.2.1
Fonts ....................................................................................................................................................................... 16
3.2.2
Midi Output............................................................................................................................................................. 16
3.2.3
Notation Options ..................................................................................................................................................... 16
3.2.4
Trigger Thresholds.................................................................................................................................................. 16
3.2.5
Notation Program ..................................................................................................................................................... 1
3.2.6
Skip Samples ........................................................................................................................................................... 17
3.2.7
About Guitarmaster................................................................................................................................................. 17
3.2.8
Soundcard Calibration............................................................................................................................................ 17
4.
TROUBLESHOOTING ................................................................................................................................................... 18
4.1
4.1
4.2
4.3
4.3
4.4
VOLUME SETTINGS .......................................................................................................................................................... 18
TRANSCRIPTION PARAMETERS......................................................................................................................................... 18
NOTATION OPTIONS ......................................................................................................................................................... 18
TRIGGER THRESHOLDS .................................................................................................................................................... 19
PLAYING STYLE ............................................................................................................................................................... 19
SOUNDCARD CALIBRATION ............................................................................................................................................. 19
APPENDIX I - CONNECTING LEAD SPECIFICATION ...................................................................................................... 21
APPENDIX II - KEYBOARD SHORTCUTS ............................................................................................................................ 22
GLOSSARY .................................................................................................................................................................................. 23
3
1. INTRODUCTION
GUITARMASTER V. 2.1 by RoboSens is an automatic MIDI transcription suite for Windows
operating systems. It allows you to plug the standard output signal from an electric guitar directly
into the soundcard of your PC and produce guitar tablature and standard MIDI files for your chord
sequences and single-note melodies with no need for additional hardware. The guitar tablature is
viewed directly in the Windows Notepad application, while the MIDI files can be exported or
output directly to a compatible music notation package (not supplied) to produce scores in
standard musical notation.
We recommend Noteworthy Composer (www.noteworthysoftware.com) as a suitable standard
notation package for use with Guitarmaster.
Put simply, Guitarmaster lets you write music in minutes and is up to 95% accurate depending on
playing style.
Guitarmaster's principal features are:
•
•
•
•
•
•
Attractive, intuitive graphic user interface
Digital guitar tuner tool
Record, Notate and MIDI Export functions, allowing you to record your music directly through
the sound card to produce standard MIDI files with no extra hardware
Output of guitar tablature and chord symbols in a standard text file, viewable on any PC
Output to a standard music notation package of your choice
Automatic key signature detection.
1.1 System Requirements
Guitarmaster requires a recommended absolute minimum of a 200 MHz Pentium (or Pentium
compatible) processor.
The PC must be running Windows 95 or later, have a minimum of 16 megabytes of RAM and an
installed soundcard (with a microphone socket or line-in socket) with 16 bit mono, 22050 Hz
sampling capability. We recommend that you have at least 100 MB free hard disk space when
running Guitarmaster.
Note: some newer Windows 7 laptops do not have a microphone ("mic") or line-in socket built in.
To use Guitarmaster with PCs of this type, you will need to additionally purchase a 3.5mm jackto-USB adaptor from a third-party supplier. We do not endorse any specific product, but one
example of a suitable USB adaptor is the Dynamode USB sound card, available from Amazon.
To use Guitarmaster's expert features you will also require an electric guitar(!). Some electroacoustic instruments also work well with Guitarmaster, depending on the output level from the
instrument.
4
1.2 Getting Started
In the Guitarmaster package you should find:
•
•
•
Installation CD
Guitar lead (if ordered with your software)
License Agreement
At the top of the license agreement you will find your unique user ID number. Do not lose this
number. You will need it each time you install Guitarmaster. Please read your license carefully,
as use of the Guitarmaster software implies acceptance of its terms.
To get Guitarmaster running carry out the following steps:
1.2.1. Installation
1. With Windows running, place the installation CD in your computer's CD ROM drive. If the
setup program does not launch automatically, locate the CD ROM through the "My Computer"
icon on the Windows desktop and double-click on the "Setup" icon.
2. The setup program will ask you onto which path on your hard drive you wish to install
Guitarmaster. The default directory is
C:\Guitarmaster.
3. Wait for the installation process to complete.
4. Uncoil the guitar lead supplied with the Guitarmaster software (or the lead which you have
constructed in accordance with the instructions in Appendix I of this manual) and plug the
small (3.5 mm) stereo jack into the microphone ("mic") socket or "line-in" socket on your PC's
sound card. Plug the large mono jack into your guitar's output socket.
Warning!
Do not plug the output from your guitar into any PC socket other than the microphone or "line
in" socket on the soundcard. Do not plug amplified guitar signals into the sound card's
microphone socket. Do not use effects units in conjunction with Guitarmaster. Some systems
will produce better results through the "line in" socket than through the "mic" socket. The lead
supplied by RoboSens Ltd has only one channel of the 3.5mm stereo jack connected.
1.2.2. Setting Volume Levels
Guitarmaster is now installed and ready to go, but before running the program, it is important to
verify the volume control settings on your Windows volume controller as follows:
5
For Windows 7:
1. Click the "Start" button on your Windows toolbar
2. Click on “Control Panel”, then choose “Sound”, then the “Recording” tab:
3. Double-click on the item corresponding to the input socket into which you will plug your
guitar (usually Line In)
4. Choose “Levels” and set the input level to around 60%.
5. Close the Sound windows.
For earlier versions of Windows:
1. Click the "Start" button on your Windows toolbar
2. Choose "Programs", followed by "Accessories", "Multimedia" and "Volume Control"
3. Set the MIDI playback level to near maximum, the Microphone and Wave settings to
around one quarter to one half of maximum as shown in the following diagram (N.B.: the
precise appearance of this screen will depend on the precise version of Windows which
you are using):
6
4. On the above Master Volume form click "Options" followed by "Properties". Then click the
"Recording" radio button. Ensure that the "Microphone" and "Line In" check box is selected
in the list box as shown in the following diagram. If there is a "Recording Level" check box
you should check that also.
5. Now click "OK". The Level Control screen will reappear, but this time the settings will be
for the recording volume as shown below:
Make sure the "Microphone" check box is checked, and set the microphone volume to between
two-thirds and three-quarters of maximum. Then close the Recording Control window by clicking
the "x" in the top right hand corner.
7
Note
The purpose of the above procedure is to ensure that the recording and playback volume settings
under Windows are set appropriately for Guitarmaster to run properly. Some system
configurations may differ in detail to those described above. If you do not obtain a satisfactory
recording level using the Microphone option, you may wish to try the "Line-in" channel instead.
6.
You're now ready to run Guitarmaster!
Click the "Start" button on the Windows toolbar, choose "Programs", then Guitarmaster to start
the application. After a short initialisation, the Guitarmaster main screen will appear.
8
2.
USING GUITARMASTER
The Guitarmaster main screen looks like this:
Show Help
Exit Guitarmaster
Minimise Window
"LCD" Display
Click and drag to
reposition the
interface
2.1
Initialisation Functions
2.1.1
User ID
When you run Guitarmaster for the first time you will be asked to enter your User ID number on
the login screen. You will find this number on the top of your license agreement which should be
retained for reference. If you have purchased the software via download then this number will
have been sent to you via email.
2.1.2
Check Level
Before using any of Guitarmaster's tuning and transcription features is it essential to check your
instrument's sound level registered by the application. To do this, observe the following steps:
1. Click the "Level" button on the Guitarmaster main screen. The Check Level tool will appear at
the bottom of the display portion of the Guitarmaster interface.
2. Set your instrument's volume control to maximum or near maximum. Strum the open strings
of your instrument at high volume. The level indicator on the Guitarmaster "LCD screen"
should reach a level of between 50 and 75% of maximum. If it does not, then follow steps 1,2,
4 and 5 in section above and increase the volume slider on the Windows Recording Control
form. Conversely, if the level indicator on the Guitarmaster Check Level form is continuously
in the red zone when playing, then the volume slider should be decreased accordingly.
Alternatively, try reducing the volume on your guitar.
3. When the sound level has been correctly set, click "Level" again to close the level indicator.
2.1.3
Tuning Up
You're just about ready to start accessing Guitarmaster's advanced note recognition and
transcription functions. But first, let's tune up! It's important to tune your instrument to your PC's
soundcard every time you use Guitarmaster, even if you have already tuned to an external
electronic tuner or a tuning fork, as the sampling rates of some soundcards may differ from their
factory specification.
9
To tune your guitar using Guitarmaster, observe the following steps:
1. Click the "Tuner" button on the Guitarmaster main screen. The guitar tuner screen will open:
2. Play the bottom "E" string on your instrument clearly. Preferably with a plectrum.
3. Guitarmaster will automatically detect the E string and indicate tuning status using the "lamps"
on the tuner screen. If the string is flat, the lamps to the left of the green central "bulb" will
indicate the degree of discrepancy. If the string is sharp, the lamps to the right will light. If the
string is in tune the green bulb will appear to light up.
4. Repeat step 4 for the remaining strings.
5. Click the
button to close the tuner and return to the Guitarmaster main screen.
2.2
Converting Music to tab and MIDI - a Step-by-Step Guide
The core functionality of Guitarmaster centres around its MIDI conversion abilities. In short, it
produces tablature and MIDI files from chord sequences and single-note runs played on your
instrument. The following sections describe the process from start to finish.
2.2.1
Song Options
Before recording your song Guitarmaster needs to know a few parameters such as time
signature, key etc which you select using the Song Options screen.
Activate the Song Options screen by clicking "Song Options" on the Guitarmaster main screen.
You must specify time signature, key signature, song title and tempo for the song you intend to
record. The default values are: 4/4 time, no sharps or flats, 120 beats per minute (2 beats per
second). The default song title is "Song1". You can alter these parameters as desired and
preview the tempo by clicking on the "Preview Tempo" button, which plays metronome beats at
the selected rate until you click "Preview Tempo" again. (Metronome sounds can be configured
under the "MIDI output" tab, found in the Menu).
Save your selected options by clicking "OK".
Note: All options may be altered after the song has been recorded and/or converted to MIDI.
However, changing time signature or tempo after recording but before conversion is not
recommended, as this will produce unpredictable results as Guitarmaster attempts to quantize
your music to an "alien" tempo.
Note: If you are unsure of the key signature of your piece, don't worry. When you convert your
music to a MIDI file, you can ask Guitarmaster to automatically suggest an appropriate key
signature for the piece!
10
2.2.2
Record and Playback
You're now ready to record your song. To begin, click the Record button:
The Record button will appear to depress and glow red. (Alternatively, pressing the spacebar
toggles recording on and off). You will be given two bars of metronome introduction before
Guitarmaster begins recording the soundcard input, and any music you play during this
metronome introduction will be ignored when the song is notated.
You should play your chord sequence and/or melody as cleanly as possible and keep to the
tempo indicated by the metronome. We strongly suggest using a plectrum if this is compatible
with your playing style.
Press the black "Stop" button or hit the spacebar to stop recording.
Please bear in mind that the more clearly you play, the better the end results will be.
Furthermore, the longer the duration of each chord or note the better the results produced by
Guitarmaster. You may obtain better results by recording your music at a slower tempo, then
increasing the tempo on the Song Options screen following the creation of the MIDI file.
Once you have recorded your chord sequence or melody (which can be up to five minutes in
length), you can play it back by clicking the Play button:
If you notice "clipping" (a "fuzzy" sound) when you play back the song, you should reduce the
input volume level using the Windows Volume Control application (see point 1.2.2. above).
Alternatively, you may have to reduce the input level into the soundcard itself by reducing the
volume control on your instrument.
2.2.3
Create MIDI
When you are happy with your recorded song, hit the "Create MIDI" button. You will then be
asked to select a number of parameters such as whether the music consists of single notes or
chords, the sensitivity of note detection, beat quantization etc. It is very important that you set
these parameters appropriately for your music or you will not obtain good results. If you do
not get good results the first time round, try adjusting parameters such as resolution and
note/strum detection sensitivity. You will soon find the settings which work best for you. In
addition, you may need to adjust the beat alignment calibration if your music consistently
falls ahead of or behind the beat when transcribed.
Clicking OK will convert the audio signals you have just recorded into a computerised MIDI file
which can be understood by other music packages, including virtually any music notation
package in the world! Please note that this process may take a few minutes depending on the
length of your "song" and the speed of your PC's processor.
Note: Interpreting direct analogue input from a conventional musical instrument is similar to
interpreting direct speech input, and is a complex task that is performed using a combination of
advanced digital signal processing and artificial intelligence techniques. The process involves
11
some inherent uncertainties; for example, Guitarmaster has no way of determining precisely how
you have voiced a chord (i.e. what fingering you have used), and cannot determine whether or
not octaves of low notes in the chord are present higher up in the chord voicing.
The precise manner in which Guitarmaster reproduces the chords you play in MIDI therefore
depends on the options selected under the "Notation Options" tab on the "Menu" screen.
You can instruct Guitarmaster to include octaves of lower notes in the chord where appropriate,
and to mirror notes played on the bottom E string on the top string. You can also instruct
Guitarmaster to refer to its own knowledge base of the more common chords (major, minor,
major 7th, 7th, minor 7th, augmented (+), diminished) and prefer standard fingering for all common
chords.
You should adjust the notation options to give the best results for your own style of playing. Some
experimentation may be required to determine the combination which works best for you.
To select the required notation options, click the Menu button in the top left corner of the
Guitarmaster main screen and select the Notation Options tab.
2.2.4
Wav/MIDI Selector
This button becomes available after you have converted your song into MIDI information using
the Create Midi function. It allows you to select whether you hear your original waveaudio (.wav)
file (i.e. the sound of you playing your song on your guitar) or the computer-generated MIDI (.mid)
file when you click the Play button.
Note
You can customise the playback sound by selecting the "MIDI Output" tab on
the Preferences screen under the Menu. You can alter the tempo of the
synthesised playback by adjusting the tempo specified on the Song Options
screen (Options menu). Note that this will not affect the speed of playback of the
waveaudio file.
2.2.5
Notate
When you click the Notate button, Guitarmaster will ask you whether you want to view your song
as guitar tablature in a standard text file, launch an external MIDI-compatible notation package of
your choice (with your song's MIDI file as a command line) so that the song you have just
recorded and converted into MIDI information appears on the screen, or whether you wish to
view your song in both of these formats. Note that you can select which application you wish you
use to notate your music by using the Notation Program tab under the Menu.
2.2.6
Export
Once you have produced a MIDI file with which you are happy, you can export that file to a
location of your choice, with a name of your choice. Just click the Export MIDI button. You can
also export the original waveaudio file along with song information and the guitar tab text file.
12
3.
GUITARMASTER FUNCTIONS LIST
3.1
Main Functions
3.1.1
Song Options
Clicking this button on the main screen opens the Song Options window for setting song title,
time signature, key signature, tempo etc. These parameters can be altered at any time. For
instance, once you have converted your music to MIDI, you can increase the tempo and the MIDI
file will play back at the new tempo. This is particularly useful if you are writing music at a fast
tempo, as better results will be obtained by playing it more slowly into Guitarmaster, and then
subsequently increasing the tempo under the Song Options screen. However, changing tempo
after recording but before conversion to MIDI is not recommended, as Guitarmaster will be
unable to make musical sense of what you have played in the context of the new tempo.
3.1.2
Import Wav
This option allows you to import a waveaudio file (a .wav file, i.e. the actual sound of you playing
your guitar) which you have previously recorded, converted to MIDI and exported using
Guitarmaster. When you export a waveaudio file using the Export function, Guitarmaster also
saves an information file (.gtf) containing necessary information about the song such as tempo,
time signature, note detection sensitivity etc. If you import a waveaudio file which has not been
correctly exported in this way, Guitarmaster has no means of knowing this information. You may
still import such files, but the results which you obtain after conversion to MIDI may be
unpredictable. Note also, that waveaudio files to be imported must be in the format: mono,
16 bit, 22050 Hz. If the file you wish to import is not in this format, then you can convert it using
the Windows Sound Recorder application or similar utility. When you import a “foreign”
waveaudio file, you will be asked to confirm the tempo of the waveaudio file, and to specify which
beat of the first bar your first chord or note falls on. This is achieved via a series of interactive
prompts.
Note: For an imported “foreign” wav file, if the notes in the song do not correctly align with the
beats in the bar after converting to MIDI, then you may have to adjust the Beat Alignment Offset
slider on the Transcription Parameters screen. If the notes are correctly aligned at the start of the
song, but then drift off, then you may need to re-import the wav file and select a slightly slower or
faster tempo from the Song Options screen when prompted to do so.
3.1.3
Wav/MIDI toggle
This button controls whether Guitarmaster plays the original waveaudio file (i.e. the sound of your
guitar) when you press the "Play" button, or the computer-generated MIDI file. The MIDI option is,
of course, only available after you have converted your music to MIDI information using the
Create MIDI function.
3.1.4
Create Midi
Converts the current waveaudio information into MIDI using the current Song Options, the
various options set under the Menu and the options selected in the Transcription Parameters
screen. The Transcription Parameters screen appears when you click the Create MIDI button and
allows you to select whether your music contains chords or single notes, whether to transcribe at
written or sounding pitch (guitar music is notated one octave above the pitch at which it sounds),
whether to suggest a key signature for the piece and whether to include any chord names as text
events in the MIDI file. Note: Many music notation packages will not reproduce these text events
when they convert your MIDI file to notation. Note also that if your piece contains chords, you will
13
be able to export a song sheet containing chord symbols for your song as a text file under the
Export MIDI option, whether or not you have elected to include chord names in the MIDI file.
NOTE: in previous versions of Guitarmaster, the option to transcribe music containing
chords and single notes was available on the Transcription Parameters screen. This
option must now be specifically enabled by the user, by accessing the Notation Options
screen under the Menu.
3.1.5
Export
Allows you to export the MIDI information created by Guitarmaster to a file location of your
choice. You can also export the waveaudio file (the sound of you playing the guitar, along with
song parameters so you can re-load it into Guitarmaster at a later date), and the tablature text
file.
3.1.6
Notate
When you click the Notate button, Guitarmaster offers the choice of whether you wish to view
your music as guitar tablature in a standard text file, or as standard musical notation. You can
also select 'both'. The guitar tablature is displayed as a standard text file, and you do not require
any special software to view it. To display the MIDI file as standard musical notation,
Guitarmaster launches a notation program to display the MIDI information for your piece of music
as music notation. Note that Guitarmaster does not itself produce standard notation. The
location of the executable (.exe) file which Guitarmaster will use to notate your music is defined
under the Notation Program tab on the Menu screen (click the Menu button to access this
screen). We have referred to a number of examples of suitable standard notation packages on
the Links page on our website (www.guitarmaster.co.uk). One such compatible package is
Noteworthy Composer (www.noteworthysoftware.com). RoboSens Ltd does not offer technical
support on any issues relating to third-party notation software.
3.1.7
Tuner
Clicking this button launches the Guitar Tuner tool. This is a computerised representation of an
electronic guitar tuner. When you play an open string, the tuner will identify the string played in
the box on the left of the tuner screen. The "lamps" on the tuner screen to the left of the large
green "lamp" in the centre will light if your string is flat, while the "lamps" on the right will light if
the given string is sharp. When the string is in tune the large green "lamp" in the centre will
appear to light up.
3.1.8 Level
Clicking this button launches the Check Level tool. A virtual level meter will appear in the lower
portion of the "LCD" display on the Guitarmaster main screen. When you play at the loudest
volume you intend to play at for the current piece of music, the indicator should remain just below
the red zone. If the indicator is permanently in the red zone, or if only a very few indicator bars
light when you play, then you should follow the steps laid out in the "Setting Volume Levels"
section of this manual. When you click the "Level" button, Guitarmaster will automatically try to
launch the Windows volume control tool. If it does not appear, you will need to launch it manually
to adjust input volume settings.
14
3.1.9
Rewind
Only available during playback mode. Clicking this button once moves to the start of the current
bar (indicated as numbers in the "LCD" display). Clicking and holding this button down will
reverse sequentially through the bars in your song.
3.1.10 Play
Only available after a song has been recorded. Plays your song either as the original waveaudio
(the sound of your guitar) or as the computer-generated midi file, depending on how you have set
the Wav/Midi toggle button. The current bar number appears in the "LCD" display.
3.1.11 Stop
Stops playing or recording. Pressing the spacebar achieves the same effect.
3.1.12 Pause
Pauses playback. Playback is resumed by clicking the Pause button again or by clicking the Play
button.
3.1.13 Fast-Forward
Only available during playback mode. Clicking this button once moves to the start of the next bar
(indicated as numbers in the "LCD" display). Clicking and holding this button down will advance
sequentially through the bars in your song.
3.2
Menu Options
To access the following menu options, click the Menu button in the top-left corner of the
Guitarmaster main window. To select an individual option, click on one of the "tabs" on the Menu
screen:
15
The menu options available are as follows:
3.2.1
Fonts
Allows you to customise the fonts used on the Guitarmaster main screen. You can alter size,
colour and appearance of the song title, tempo and other permanent on-screen information. Note
that because space is at a premium on the LCD display, not all font selections and sizes will
physically fit on the Guitarmaster screen. For this reason we do not advise selecting a font size
larger than 8.
3.2.2
Midi Output
Allows the user to configure the way songs sound when played back in MIDI form, and how the
metronome beats sound during the song recording process. Song melodies are played back on
midi channel 1, percussion on channel 10. The channel selection is not user-adjustable.
3.2.3
Notation Options
A very important feature. The options available on this preference tab determine how
Guitarmaster renders the results of its analysis of your song in MIDI form for chordal playing.
Because the signal processing employed by Guitarmaster has certain limitations (for example, it
cannot determine whether octaves of a given note are present in a chord), precisely how it
notates a given chord depends on the preference options selected on this menu tab. For
instance, if you select "Intelligent Add Octaves", the computer will use a knowledge base to
include octaves of lower notes in the chord voicing. This is of particular use if you tend to play
chords including the same note in more than one octave (for example the open voicing of a G
major chord.)
If you select the "Use standard fingering" check box, then Guitarmaster will consult its knowledge
base of common chords and use standard chord voicings for any chord which it recognises. You
can also instruct Guitarmaster to mirror notes on the bottom E string on the Top E string if this
seems appropriate.
You should experiment with different combinations of the notation options to find that which best
suits your style of playing.
Note: If you alter the Notation Options after you have converted your song to MIDI using the
Create MIDI function, you will have to click the Create MIDI button again for the new settings to
take effect in the current song.
Note: In older versions of Guitarmaster, the option was presented on the Transcription
Parameters screen to transcribe songs consisting of chords and single notes. As results using
this transcription method are not always predictable, this option must now be specifically enabled
by the user. This is done on the Notation Options tab under the Menu.
3.2.4
Trigger Thresholds
Configures the thresholds at which the computer begins sampling chords or notes. You should
adjust these settings as a last resort only. Generally speaking, if the input level on your
instrument and on the Windows volume settings have been set correctly, it will not be necessary
to alter these settings.
16
Note
The trigger thresholds are applied during the analysis of the waveaudio file
recorded using the "Record" function. If you change notation options after initial
notation Guitarmaster will have to re-notate from the given waveaudio file when
the "Create MIDI" option is next selected. This may take a few minutes.
3.2.5
Notation Program
Selects the notation program you wish Guitarmaster to launch when you click the "Notate" button
on the Guitarmaster main screen (for producing standard music notation). You must locate the
executable (.exe) file relating to your chosen notation package. This will normally be in the
relevant directory in your "Program Files" directory on your hard drive, though sometimes the
package will have its own directory in the root directory of your hard drive. When you install a
notation package, the installation program will ask into which directory you wish to install the
program. It is in this directory that you will find the relevant.exe file. If in doubt, consult the
supplier of your particular notation software.
3.2.6
Skip Samples
This feature was added to overcome a glitch with certain versions of Windows 98. Guitarmaster's
analysis routine discovered a "spike" at the start of each audio sample, which we required to
ignore. This menu options determines the number of samples to ignore to overcome this
problem. You should not normally require to adjust this setting and it is not recommended
that you do so unless instructed to do so by RoboSens support staff.
3.2.7
About Guitarmaster
Displays version information about the application.
3.2.8
Soundcard Calibration
Sometimes, the sample rate of a specific soundcard may vary slightly from the factory
specification. The practical result of this for Guitarmaster users is that, in longer pieces of music,
notated notes may appear to "drift" off the beat as the song progresses. For example, music
which is notated correctly in bar 5 may be notated "too late" in bar 50. If you experience this
problem, use the Soundcard Calibration feature under the menu to compensate for this drift.
Simply adjust the slider on the Soundcard Calibration tab such that the music aligns correctly with
the beat when notated.
17
4.
TROUBLESHOOTING
If you obtain unsatisfactory or unpredictable results with Guitarmaster, please read and act on the
suggestions contained in the following section in the first instance before approaching RoboSens
Ltd. for technical support.
4.1
Volume Settings
The most common cause of erroneous results when using Guitarmaster is unsuitable volume
settings, either under the Windows volume control panel or on the instrument itself.
You can access the Windows volume control settings in one of two ways:
1. By clicking the Windows "Start" button, then selecting "Programs", "Accessories",
"Multimedia", then "Volume Control". (In Windows 7, click on “Start”, “Control Panel” then
“Sounds”).
2. By double-clicking on the loudspeaker icon at the bottom right-hand corner of your Windows
main screen.
While the Windows volume control screen is loaded, select "Options", then "Properties" and click
the "Recording" radio button. Make sure you have checked all the relevant boxes on this options
screen, then check the Microphone or Line-in volume slider, depending on which input you are
using. (Note, the precise layout you will see will depend on the version of Windows you are
using).
Note that some computers produce better results through one or other of these inputs.
You can verify that the recording level has been set correctly by selecting the Windows Sound
Recorder application (Start, Programs, Accessories, [Multimedia]). Using this Windows
application, try recording a short chord sequence and playing it back. You should here the chord
sequence clearly, with no distortion ("fuzz"). If you hear distortion, you should reduce the
microphone or line in input volume setting accordingly. Alternatively, you may have to reduce the
instrument's volume control to achieve the same result.
With Guitarmaster running, running the "Check Level" tool (Level button) provides an indication of
the sound level as recorded by Guitarmaster. The sound level indicator should show al level
between 50 and 75% of maximum when you play at a moderate to high volume.
4.1
Transcription Parameters
When you click the Create MIDI button, you are asked to select parameters such as quantizing
level (the shortest duration of note that Guitarmaster can detect), detection sensitivity for notes
and strums, and whether the song consists of chords (or mainly chords) or single notes. You may
need to adjust these settings for different pieces of music until you achieve the result you require.
If your music consistently falls ahead of or behind the beat when transcribed, you may need to
adjust the beat alignment, also on the Transcription Parameters screen.
4.2
Notation Options
If Guitarmaster does not reproduce your music in the manner in which you expect, it may be that
the Notation Options you have selected under the Menu are not suited to your style of playing (for
18
example the system may be configured to add octaves in chordal playing which may not suit your
style of playing). Try adjusting these filters to suit your playing style.
4.3
Trigger Thresholds
If you have verified that the application input level is within the permitted range using the Check
Level tool, and that there is no distortion of the input signal on playback, poor results may still be
produced if the trigger thresholds are inappropriately low or high. For instance, if your system
appears over-sensitive when transcribing chords, you may have to alter the trigger thresholds
under the Preferences screen from the Tools menu (See 3.3.6.5 above). Note that this
parameter concerns the level above background noise at which Guitarmaster's detection
system is triggered. It is not the same as the note detection sensitivity on the Transcription
Parameters screen (see 4.1 above). In general the Trigger Thresholds variable should be
adjusted only as a last resort.
4.3
Playing Style
Guitarmaster is configured to work best with chords or single notes, strummed or plucked clearly.
To obtain the best results we recommend:
1. Always play clearly. Minims (half notes) and semibreves (whole notes) produce better results
for chords than quavers (eighth notes) and semiquavers (sixteenth notes).
2. For best results, try using a plectrum.
3. Fingerstyle playing is not likely to produce good results when your song is notated.
4. Reduce the tempo at which your song is recorded if you obtain poor results. You can then
increase the MIDI playback tempo after the song has been notated.
5. Always play back your song through the soundcard by clicking the blue Play button on the
Guitarmaster Record tool before notating the song. If you hear any distortion ("fuzz") during
playback, reduce the recording volume on the Windows volume control panel or on your
instrument, and re-record the song before notating.
4.4
Soundcard Calibration
Sometimes, the sample rate of a specific soundcard may vary slightly from the factory
specification. The practical result of this for Guitarmaster users is that, in longer pieces of music,
notated notes may appear to "drift" off the beat as the song progresses. For example, music
which is notated correctly in bar 5 may be notated "too late" in bar 50. If you experience this
problem, use the Soundcard Calibration feature under the menu to compensate for this drift.
Simply adjust the slider on the Soundcard Calibration tab such that the music aligns correctly with
the beat when notated.
19
5.
OBTAINING TECHNICAL SUPPORT
RoboSens Ltd is committed to providing the highest levels of customer care. We value your
custom and will do everything we can to help you get the best out of Guitarmaster.
However, before you approach us for technical support, please read this user’s manual carefully,
particularly the Troubleshooting section, or read the Troubleshooting section in the online Help.
You can also consult the Frequently Asked Questions page on our website at
www.guitarmaster.co.uk. If you do not find an answer to your particular problem you can contact
RoboSens Ltd for technical support in the following ways:
By Email...
Email us on:
[email protected]
We will endeavour to respond to your enquiry within one business day.
By Phone...
If you are in the UK, call us on:
0131 208 5373
If you are outside the UK, you should dial your country’s international dialling code followed by:
44 131 208 5373
If we cannot answer your call in person, we will endeavour to respond to your voicemail message
within one business day.
20
APPENDIX I - CONNECTING LEAD SPECIFICATION
2. CABLE SPECIFICATION
You can order a ready-made Guitarmaster connecting lead by visiting the Plugging In page at
www.guitarmaster.co.uk.
If you do not wish to purchase a connecting cable from us, construction is straightforward
according to the following specification:
Components:
1) 3.5 mm stereo jack plug.
2) 1/4 inch mono jack plug.
3) ca. 2m thin coaxial cable.
==Signal-- [not used]
3.5mm jack
==Signal--------------------------Signal= 1/4 in. jack
to sound card
<screened cable <to guitar
==Ground--------------------------Ground=
A standard large-to-small jack plug conversion cable may also work
satisfactorily, although it is preferable to use a stereo cable,
as most sound cards have a stereo input socket.
21
Appendix II - Keyboard Shortcuts
The following keyboard shortcuts apply to the Guitarmaster main screen:
<M>
<F1>
<S>
<I>
<W>
<D>
<T>
<C>
<E>
<N>
<L>
-
Menu
Help
Song Options
Import Wav
Toggle Wav
Toggle MIDI
Tuner
Create MIDI
Export
Notate
Level
<CTRL W>
Spacebar
<CTRL P>
<CTRL E>
<CTRL F>
<CTRL M>
<CTRL X>
-
Rewind
Start/Stop Recording; Stop Playback
Play
Pause
Fast Forward
Minimize
Close
The shortcuts for Help and Close also apply to the Tuner screen.
Hitting the carriage return key returns control to the main screen from the Tuner or Level mode.
22
GLOSSARY
MIDI (Musical Instrument Digital Interface)
The standard language of communication between electronic instruments (including sound cards)
and computers. MIDI files produced by Guitarmaster can be read by virtually any other PC in the
world.
Tablature ("Tab")
A 6-line graphical representation of guitar fingering. The top line represents the high "E" string,
while the bottom line represents low "E". Numbers placed on these lines indicate fret positions on
the respective string. Many music notation packages will also produce guitar tablature from the
MIDI files produced by Guitarmaster.
Waveaudio File (.WAV) File
A computer file containing recorded sound in digitised form. Guitarmaster stores the recorded
sound produced by your instrument in this form on your hard drive. Waveaudio files are typically
very large and require a large amount of hard disk space.
23