1
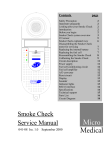
Contents
page
Introduction
3
Operation
3
Respiratory Pressure
Meter Layout
4
Cleaning and
Maintaining the
Respiratory Pressure
Meter
5
SNIP
MIP / MEP
OFF
Disassembling the
Respiratory Pressure
Meter
5
Reassembling the
Respiratory Pressure
Meter
5
Circuit Description
6
Parts List
8
Technical Support
10
Circuit Diagram
11
Respiratory Pressure
Meter
Service Manual
064-22 Iss. 1.0
October 2004
Respiratory Pressure
Meter
Service Manual
Information in this document is subject to change without notice and does not represent a
commitment on the part of Micro Medical Limited. Only the parts supplied by Micro Medical
Limited should be used to complete the service operation described in this manual. If in any
way you feel unsure about the successful completion of the service operation you should
contact Micro Medical Limited or its appointed agent in your country or region and arrange the
despatch of the product to a Micro Medical Limited Service Centre.
Copyright 2004 by Micro Medical Limited All rights reserved
Drawing no. 064-22
Version 1.0
October 2004
All other products are trademarks or registered trademarks of their respective owners.
2
Introduction
The Micro Medical respiratory pressure meter (RPM) is a hand held
instrument designed for rapid assessment of inspiratory and expiratory
muscle strength. The unit can measure the maximum inspiratory and
expiratory mouth pressures, MIP and MEP, and the Sniff Nasal Inspiratory
Pressure, SNIP. The result of each measurement is presented in units of
cmH2O gauge pressure on the liquid crystal display screen.
The MIP and MEP measurements represents the maximum pressure
sustained for 1 second. The SNIP measurement represents the peak
pressure detected in the manoeuvre.
3
Respiratory Pressure Meter Layout
1. Respiratory Pressure Meter PCB
2. Top Moulding
3. Bottom Moulding
4. Mouthpiece Holder
5. Retaining ring
6. 55mm of 1/16" I.D. 1/8" O.D. 'Tygon' tubing
7. Nylon barb connector
8. Countersunk screws
9. Plastic bolt M5 x 6mm
10. Cable tie
8
7
5
4
3
2
9
6
1
Fig.1
8
10
4
Cleaning and maintaining the Respiratory Pressure Meter
The Micro Medical Respiratory Pressure Meter requires no routine
maintenance or servicing.
Calibration is factory set and should remain constant throughout the
lifetime of the device. However the Respiratory Pressure Meter can be
calibrated, if in doubt by the Micro Medical Service Centre.
Disassembling the Respiratory Pressure Meter.
If the Respiratory Pressure Meter becomes faulty then the following procedure
is needed to investigate the fault.
1. Turn the unit face down and slide back the battery cover.
2. Remove the battery and place to one side.
3. Remove the 2 screws from the bottom moulding (Item 8) and put to one
side.
4. Turn the unit face up and ease the top moulding from the bottom
moulding and turn the top moulding to reveal the PCB as shown in
Fig.1 (page 4).
5. Remove the PCB from the bottom moulding and put the bottom
moulding to one side.
6. The Respiratory Pressure Meter is now ready for fault finding.
Reassembling the Respiratory Pressure Meter
1. Place the PCB into the bottom moulding and route the battery lead as
shown in Fig.1.
2. Position the top moulding on top of the bottom moulding and push
together (ensure that the battery leads are not trapped).
3. Turn the unit face down and secure the unit with the retained screws.
4. Refit the PP3 battery ensuring correct polarity.
5. Slide on the battery cover.
6. The Respiratory Pressure Meter is now ready for operation.
5
Circuit Description
Overview
A piezo resistive pressure transducer monitors pressure at the mouthpiece
holder. After conditioning, the signal from the pressure transducer is
applied to a 12 bit analogue to digital converter. A micro controller reads
the A/D converter and after applying a calibration factor displays the result
on an LCD, which is directly driven from the controller. The measurement
displayed is the maximum pressure recorded over a one second interval
when the unit is switched to the MIP/MEP position. When the unit is
switched to the SNIP position the peak pressure is displayed
Power Supply and battery monitoring
The Mouth pressure meter is powered by a PP3 9V Alkaline battery with
reverse polarity protection, D1, and is monitored by channel 2 of the A/D
converter through the resistive divider R13 and R14. Battery power is
supplied to the circuit via TR2. A bi-stable circuit consisting of U2, U9, R6,
R7, C5 and R17 controls TR2. The bi-stable circuit can be switched to the
off state (pin 4 of U2 high) by either the front panel switch, SW1A, or by
the micro controller via TR1 pulling pin 1 of U2 low. The unit is switched
on when SW1A is set to the middle position, pulling on side of R7 low and
applying a momentary pulse to pin 2 of U9 through the AC coupling action
of R6 and C15. The nominal 9 volt supply from the battery is applied to
the low drop-out 5 volt regulator, U4, which supplies the rest of the circuit.
Pressure Sensor Conditioning Circuit
The mouth pressure meter consists of an internally temperature
compensated solid-state pressure transducer (U5). The instrumentation
amplifier, U6, amplifies the differential signal from the pressure transducer.
The gain of U6 is adjusted by the calibration potentiometer VR1 that is
accessible externally. The reference pin of U6 and the A/D converter, U7,
are driven by the output of U3B at a voltage derived from the reference
output of the A/D converter. The signal from U6 is passed through a filter
consisting of U3A, R3, R4, C3 and C1. This is further filtered by R30 and
C30 before being applied to Channel 0 of the A/D converter.
Display
The display is a 3 1/2 digit custom LCD. A square wave of approximately
30 HZ is continuously applied to each segment and the back plane (BP).
To turn a segment off, the square wave applied to it is in phase with the
square wave applied to the back plane. To turn a segment on, the square
wave applied to it is in anti-phase with the back plane. 22 of the segments
and the back plane are driven directly from ports PA, PB and PC of the
micro controller, U1. The remaining 4 segments are connected to the
outputs of a serial to parallel converter, U11. The serial peripheral
interface of U1 is used to clock data into U11. The clock signal is inverted
6
by TR3 to obtain the correct polarity. The pull-up resistor for TR3 is
connected to the chip select line of the A/D converter, which is also on the
serial peripheral interface, disabling the clock signal when the A/D
converter is being accessed by the micro controller.
Analogue to Digital converter
The A/D converter, U7, is a 4 channel, 12-bit, serial device with internal
reference and communicates with the micro controller using the serial
peripheral interface. The A/D converter has an input range of COMVREF/2 to COM+VREF/2 where VREF is the internal reference voltage of
2.5 Volts. The voltage applied to COM, pin 6, is approximately 1.5 volts.
This is derived from VREF, pin 8, using a potential divider, R1 and R25,
and a buffer amplifier, U3B. The input range for the A/D converter is
therefore 0.25 to 2.75 volts. Channel 0, pin 2, is used to measure the
pressure signal. Channel 1, pin3, is connected to the common pin (6) and
to the reference pin of the instrumentation amplifier, U6, and is only read
during factory set-up. Channel 2, pin 4, is connected to the reference
output and is only read during factory set-up. Channel 3, pin 5, is used to
read the battery terminal voltage via the potential divider, R13 and R14.
Micro controller
The micro controller, U1, is an 8-bit device with integrated RAM, FLASH
program memory storage, and power on reset circuitry. The controller
communicates with the A/D converter to measure the pressure signal and
monitor the battery voltage using its serial peripheral interface bus. This
synchronous bus consists of a clock line, pin 15, a data transmit line,
pin14, and a data receive line, pin 13.
The controller directly controls 22 of the display segments and the back
plane from ports PA, PB and PC. The remaining 4 segments are
connected to the outputs of a serial to parallel converter, U11. The serial
peripheral interface is used to clock data into U11.
The buzzer is driven from port D, pin 19, with a square wave at
approximately 1 kHz. The buzzer is driven in a push-pull arrangement
using the inverter U8.
The controller is factory programmed using the on-board connector CON1.
The controller is set to program mode by activation of the reed switch,
SW2.
Communication with PC software is achieved through a RS232 interface.
The converter, U10, has on-board circuitry to generate the required +/- 10
Volts and is connected to the serial interface of the controller, pins 9 and
10.
7
Parts List
Designation
U1
U2
U3
U4
U5
U6
U7
U8
U9
U10
U11
TR1
TR2
TR3
D1
DISPLAY
R1
R2
R3
R4
R5
R6
R7
R8
R9
R10
R11
R12
R13
R14
R15
R16
R17
R18
R19
R20
R21
R22
R23
R24
R25
R26
R27
R28
R29
R30
VR1
C1
Description.
Motorola OPT Microcontroller
Single surface mount NAND gate
Texas Instruments dual low power OP-Amp
Low drop out surface mount 5 volt regulator
5 PSI pressure transducer
Analogue devices instrumentation amplifier,
Maxim 12 bit 4 channel surface mount serial D/A
Single surface mount NAND gate
Single surface mount NAND gate
Maxim RS232 transceiver
8-bit SIPO shift register
Rhom NPN surface mount transistor
Zetex PNP surface mount transistor
Rhom NPN surface mount transistor
Schottky diode.
3 1/2 digit custom display
22K Surface mount resistor 0.125 watt 1% size 0805
1.5K Surface mount resistor 0.125 watt 1% size 0805
5.6K Surface mount resistor 0.125 watt 1% size 0805
22K Surface mount resistor 0.125 watt 1% size 0805
10K Surface mount resistor 0.125 watt 1% size 0805
1M Surface mount resistor 0.125 watt 1% size 0805
1M Surface mount resistor 0.125 watt 1% size 0805
10K Surface mount resistor 0.125 watt 1% size 0805
10K Surface mount resistor 0.125 watt 1% size 0805
1K Surface mount resistor 0.125 watt 1% size 0805
10 ohm Surface mount resistor 0.125 watt 1% size 0805
10K Surface mount resistor 0.125 watt 1% size 0805
100K Surface mount resistor 0.125 watt 1% size 0805
39K Surface mount resistor 0.125 watt 1% size 0805
10M Surface mount resistor 0.125 watt 1% size 0805
10K Surface mount resistor 0.125 watt 1% size 0805
1M Surface mount resistor 0.125 watt 1% size 0805
10K Surface mount resistor 0.125 watt 1% size 0805
Not used
Not used
Not used
Not used
10K Surface mount resistor 0.125 watt 1% size 0805
10K Surface mount resistor 0.125 watt 1% size 0805
33K Surface mount resistor 0.125 watt 1% size 0805
Not used
100K Surface mount resistor 0.125 watt 1% size 0805
330K Surface mount resistor 0.125 watt 1% size 0805
1.2K Surface mount resistor 0.125 watt 1% size 0805
10K Surface mount resistor 0.125 watt 1% size 0805
Bourns 1k 25 turn potentiometer.
2.2nF ceramic surface mount capacitor, size 0805
8
C2
C3
C4
C5
C6
C7
C8
C9
C10
C11
C12
C13
C14
C15
C16
C17
C18
C19
C20
C21
C22
C23
C24
C25
C26
C27
C28
C29
C30
C31
SW1
SW2
J1
SPK1
X1
22pF ceramic surface mount capacitor, size 0805
6.8nF ceramic surface mount capacitor, size 0805
1uF ceramic surface mount capacitor, size 0805
22pF ceramic surface mount capacitor, size 0805
1uF ceramic surface mount capacitor, size 0805
1uF ceramic surface mount capacitor, size 0805
1uF ceramic surface mount capacitor, size 0805
1uF ceramic surface mount capacitor, size 0805
0.1uF ceramic surface mount capacitor, size 0805
10nF ceramic surface mount capacitor, size 0805
33nF ceramic surface mount capacitor, size 0805
0.1uF ceramic surface mount capacitor, size 0805
0.1uF ceramic surface mount capacitor, size 0805
0.1uF ceramic surface mount capacitor, size 0805
0.1uF ceramic surface mount capacitor, size 0805
0.1uF ceramic surface mount capacitor, size 0805
0.1uF ceramic surface mount capacitor, size 0805
0.1uF ceramic surface mount capacitor, size 0805
0.1uF ceramic surface mount capacitor, size 0805
0.1uF ceramic surface mount capacitor, size 0805
1uF ceramic surface mount capacitor, size 0805
0.1uF ceramic surface mount capacitor, size 0805
0.1uF ceramic surface mount capacitor, size 0805
33pF ceramic surface mount capacitor, size 0805
33pF ceramic surface mount capacitor, size 0805
33pF ceramic surface mount capacitor, size 0805
10uF Tantalum capacitor size A.
1uF ceramic surface mount capacitor, size 0805
1uF ceramic surface mount capacitor, size 0805
Not used
double pole 3 position slide switch
reed switch.
3.5mm Stereo jack socket
piezo ceramic sounder
32.768 KHz crystal, WATCH package.
9
Technical Support
Great Britain and World Headquarters
Micro Medical Ltd.
PO Box 6
Rochester
Kent ME1 2AZ
Telephone
Fax
Web Site
Email
+44 (0)1634 893500
+44 (0)1634 893600
http://www.micromedical.co.uk
[email protected]
[email protected]
Contact Micro Medical Ltd. for the local agent in your region or country for local service.
10
1
2
1uF
39K
R14
TR2
VIN VOUT
C9
1uF
C7
1
2
3
4
5
6
7
8
SW2
Reed Switch
C6
1uF
1
U4
LM2931M-5.0
0.1uF
C13
8
C8
1uF
100K
2
R13
2
3
3
FMMT591
2
3
3
1
2
5V
R11
10R
5V
J1
JACK
MAX3221CAE
EN FOFF
C1+ 5V
V+
C1 - TO
C2+ FON
C2 - TIN
V- INV
RIN RO
U10
R23
10K
1
4
C14
0.1uF
R16
10K
4
U2
16
15
14
13
12
11
10
9
5V
33nF
C12
R8
10K
+
2
1
2
1
C2
22pF
10nF
C11
C28
10uF
BU4S11
U9
BU4S11
5
3
5
3
R7
1M
42
1
11
44
43
10K
R9
SW1B
12
13
14
15
18
19
20
21
9
10
30
31
40
41
VDD 17
16
R15
10M
RESET
IRQ
C24
0.1uF
0.1uF
C10
5V
C5
22pF
R28
330K
X1
CRYSTAL_32
0.1uF
R6
1M
C15
R17
1M
2
1
SW1A
SLF2300
PC6
PC5
PC4
PC3
PC2
PC1
PC0
PA0/KBD0
PA1/KBD1
PA2/KBD2
PA3/KBD3
PA4/KBD4
PA5/KBD5
PA6/KBD6
PA7/KBD7
R27
100K
2
1
4
BU4S11
U8
32 PTA0
33
34
35
36
37
38
39
22
23
24
25
26
27
28
29
8
7
6
5
4
3
2
R19
10K
R18
10K
PTA7
U11
1
2
3
4
5
6
7
R22
10K
B1
C1
D1
E1
DP1
C2
D2
E2
DP2
C3
D3
E3
1
NC
NC
NC
NC
SNIP
NC
BP
R20
10K
C23
0.1uF
SIN VCC
SIN QH
QA QG
QB
QF
QC
QE
QD RES
GND CLK
14
13
12
11
10
9
8
DISPLAY_RPM
A1
F1
G1
B2
A2
F2
G2
NC
B3
A3
F3
G3
NC
NC
MIP
MEP
NC
BAT
NC
BP
DISPLAY
PTC1
PTC0
PTB0
PTC3
R26
10K
20
19
18
17
16
15
14
13
12
11
10
9
8
7
6
5
4
3
2
1
DTC114EKA
TR1
1
SPEAKER
SPK1
MC68HC908GP32CFB(44)
R10
1
5V
2
1K
PD0/SS
PD1/MIS0
PD2/MOS1
PD3/SPSCK
PD4/T1CH0
PD5/T1CH1
PD6/T2CH0
PD7/T2CH1
VDDa
VSSa
PB0/AD0
PB1/AD1
PB2/AD2
PB3/AD3
Vddad/Vrefh PB4/AD4
Vssad/Vrefl PB5/AD5
PB6/AD6
PE0/TxD
PB7/AD7
PE1/RxD
5V
GND
CGMXFC
RST
IRQ
OSC1
OSC2
U1
4
ZHCS750
BAT1
PP3
6
8
3
2
D1
7
3
5
5V
21
22
23
24
25
26
27
28
29
30
31
32
33
34
35
36
37
38
39
40
R21
10K
DTC114EK
TR3
1
PTB0
IRQ
PTC0
PTA0
PTC1
PTC3
RESET
PTA7
R29
1K2
VDD
CON10
1
2
3
4
5
6
7
8
9
10
CON1
U5
SDX05D4
5V
Date:
File:
A4
Size
Title
1uF
C4
10K
R12
OUT-
OUT+
5
2
1
3
-
+
6
5V
REFADJ
VREF
U7
9
6
2
3
4
5
1k
22k
R4
3
2
+
-
R24
10K
C31
1
U3A
1uF
33K
C29
R25
33pF
C27
10k
R30
C30
1uF
10K
R5
TLC27L2CP
TLC27L2CP U3B
5
+
7
6
-
C1
2n2
6n8
1uF
C22
20-Oct-2004
G:\Archive\064-01.SCH
064-01
Sheet 1of 1
Drawn By: A.F. Sadler
Revision
1.7
Respiratory Pressure Meter - Circuit diagram
1
C26
33pF
0.1uF
0.1uF
C3
C21
C20
MAX1246BCEE
COM
CH0
CH1
CH2
CH3
2
VR1
0.1uF
0.1uF
R3
5k6
C19
C18
R2 1k5 3
0.1uF
C17
DIN
DOUT
SCLK
CS
SSTRB
SHDN
Number
R1
22K
8
14
12
16
15
13
7
C25
33pF
2
U6
AD623
3
5V
0.1uF
C16
5V
Decoupling Capacitors
7
4
1
5
3
5
1
8
11
DGND
6
7
1
3
2
1
VDD
AGND
10
8
4
11


![[DRAFT] DEMO908JL16 User`s Manual](http://vs1.manualzilla.com/store/data/005639706_1-2a84cd2ce2f0b318fdb7aae7896f2a79-150x150.png)