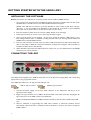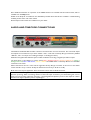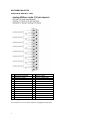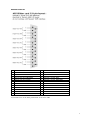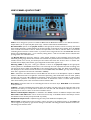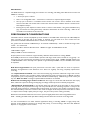
1
GETTING STARTED WITH THE SADIE LRX2 INSTALLING THE SOFTWARE BEFORE you connect your LRX2 to the computer you will need to install the SADiE software. 1. 2. 3. 4. 5. 6. You will have been provided with a CD-ROM containing the software installer. Place the disk in the CD-ROM drive. It should auto-run and a LRX Installation window will appear. (NOTE: If the CD does not auto-run, press the Windows™ "Start" button; select "Run" and type: "D:\setup" - if you are installing from CD-ROM. In this example D: is the letter of your CD-ROM drive. That may not be the case, so use the correct letter for your drive.) Press the "Software" button, then the “Version 5 PCM” button on the next page. Follow the instructions on screen as you run through the setup program. Three icons will appear on your desktop – for the three variants of software – BB2, which is a very basic editing interface, MTR - a simplified recording interface tailored to working with the LRX2, and SADiE5 which is the full SADiE software. Now you can proceed to connect power and then a USB lead between the PC and the LRX2 unit. After a short while, a Windows' "Found new hardware" message box will appear. Allow windows to install the hardware drivers automatically. When Windows reports that the LRX hardware is ready to use, you can double-click on the SADIE5 software icon to run the software. CONNECTING THE LRX2 Your LRX2 will be supplied with a USB2 (A to B) cable, and a 12V DC power supply (PSU), with a mains plug appropriate to your geographical location. Your USB2 cable will have an "A" type end and a "B" type end. USB "A" Type connector 1. 2. 3. 2 USB "B" Type connector Connect the Power Supply via the 4-pin XLR connector to the LRX2 unit, and plug in to an appropriate mains supply. Plug the "A" type connector in to a USB2 or Hi-Speed socket on the back of your PC, and plug the "B" type connector in to the USB2 socket on the LRX2 unit. NOTE: The LRX2 unit must use a USB2 connection and will not operate with a standard slow USB port. Wait for Windows to plug-and-play the LRX; allow windows to install the hardware drivers automatically. Wait until there is notification that the hardware is ready to use before running the SADiE software. More detailed instructions on operation of the SADiE software are included with the software itself, and are available from the Help menu. A PDF of the Help file is included on the CD-ROM provided. Note that this also includes a troubleshooting and FAQ section at the end of the manual. Printed copies of the manual are available from your dealer. AUDIO AND TIMECODE CONNECTIONS The LRX2 has dedicated AES and Video reference and Timecode in and out connectors. The main audio inputs and outputs are connected via up to three “Slither” cards – each with 2 x 25-way D Type connectors (labelled “AES I/O”, “Mic / line input” and “Analogue Output” in the diagram above). LRX2 can be supplied with different styles of audio I/O Slithers for analog or digital input and/or output. The back plates on the Slithers are colour coded: Red is Analogue Line In; Orange is Mic/Line In; Green is Analogue Line Out; Blue is AES In/Out; Yellow is MADI. The MADI slither is obviously different as it has BNC connectors on the back. When viewed from the rear of the unit the right-hand 25 way D-Type connector of the two on each slither carries channels 1-8 (or 17-24 or 33-40), the left hand carries 9-16 (or 25-32 or 41-48). Break out looms may be supplied to allow connection to these I/Os via XLR connectors. WARNING ! When using a Mic / Line Input slither, the inputs can be set in software to provide 48Volts D.C. phantom powering. When connecting devices to these Mic input connectors you should take great care to ensure the correct state of phantom powering – connecting 48 Volts phantom power to the output of a device that does not support phantom power, may damage it. 3 SLITHER PIN-OUTS ANALOGUE AND MIC / LINE 1 2 3 4 5 6 7 8 9 10 11 12 13 Channel 8 HOT Channel 8 GROUND Channel 7 COLD Channel 6 HOT Channel 6 GROUND Channel 5 COLD Channel 4 HOT Channel 4 GROUND Channel 3 COLD Channel 2 HOT Channel 2 GROUND Channel 1 COLD Not Connected 14 15 16 17 18 19 20 21 22 23 24 25 (9-16 and higher is the same order) Channel 8 COLD Channel 7 HOT Channel 7 GROUND Channel 6 COLD Channel 5 HOT Channel 5 GROUND Channel 4 COLD Channel 3 HOT Channel 3 GROUND Channel 2 COLD Channel 1 HOT Channel 1 GROUND To connect an "In" to an "Out" requires a straight pin-to-pin cable. 4 AES/EBU DIGITAL 1 2 3 4 5 6 7 8 9 10 11 12 13 Channel 7+8 OUT HOT Channel 7+8 OUT GROUND Channel 5+6 OUT COLD Channel 3+4 OUT HOT Channel 3+4 OUT GROUND Channel 1+2 OUT COLD Channel 7+8 IN HOT Channel 7+8 IN GROUND Channel 5+6 IN COLD Channel 3+4 IN HOT Channel 3+4 IN GROUND Channel 1+2 IN COLD Not Connected 14 15 16 17 18 19 20 21 22 23 24 25 Channel 7+8 OUT COLD Channel 5+6 OUT HOT Channel 5+6 OUT GROUND Channel 3+4 OUT COLD Channel 1+2 OUT HOT Channel 1+2 OUT GROUND Channel 7+8 IN COLD Channel 5+6 IN HOT Channel 5+6 IN GROUND Channel 3+4 IN COLD Channel 1+2 IN HOT Channel 1+2 IN GROUND To connect an "In" to an "Out" you’ll need a "cross-over" cable. 5 MADI ANALOGUE LEVEL JUMPERS On the Analogue Line Input and Output slithers, the operating level can be chosen, for each Input and Output individually if required, by changing the setting of some jumpers. With the card components-up, 2 x 25way connectors and face plate to the right, just to the left of the connectors, you will see a vertical line of sixteen three-way headers - one for each Input or Output. There are three possible ways of connecting these jumpers to change the operating level. This is noted in the legend on the slither card +24DBU No connection +21DBU Jumper to the left +18DBU Jumper to the right (FACTORY DEFAULT) Note that single-ended connection is not advisable for inputs or outputs that are set to +21dBu or +24dBu. Factory default is +18dBu. 6 LRX2 PANEL QUICK START Faders can be changed to operate on a different Bank with the Bank Select button, or for different functions Output faders, pan or Input level (Mic inputs only) - with the button below the Bank button. Record Enables operate on the playlist stream of the appropriate number, and not necessarily the stream that is feeding that fader. In MTR software the stream and fader are always the same number, but a full SADiE5 mixer could be customised so that for instance all output faders were stereo, and then faders 1-8 would be controlling level of streams 1-16. Be careful – if you have stereo merged streams in a full SADiE5 EDL then two buttons will enable/disable them – so for instance pressing button 1 will record enable streams 1&2, but then pressing button two will disable them. The Record All button above the wheel is a much quicker method of record enabling many streams than individually pecking single buttons. Record All record-enables only selected streams and therefore if you want to exclude streams from record, you should press the button that shows the stream’s name or number. Deselected streams display with a darker grey background and the button appears “up”. Metering LEDS on the panel - these give indication of level on the physical output of the appropriate number (and thus in full SADIE5 software this is not necessarily the same output that the fader is feeding). You can choose the level at which each LED lights in the software Setup page, under the “H64” topic. Meters are also displayed in the software beside the stream in both SADiE MTR, and SADiE5 (you may need to display these with a right-click in the left side of the EDL in SADiE5) PFL is automatic in the MTR software, and will PFL-solo that stream to the Headphone outputs. In SADIE5 software a PFL button has to be applied to each stream (ALT-Drag a Aux Send button from the mixer palette) and then you must route a Bus called PFL to whichever output you wish to listen to the PFL on. Thus pressing the PFL button (software or hardware) routes that fader to the PFL bus. There is a Mixer Setup switch to make these buttons perform the normal Solo function instead of PFL. Bank Select moves the faders on to controlling the next set of 8 mixer strips. Shift-Bank moves backwards to the previous 8. Talkback - pressing and holding this button opens the auxiliary mini-jack input on the right hand side of the LRX2 unit and this (as of v5.5.3) will be monitored on the Mon L/R and Headphone Outputs, and can be optionally set to record a “Slate” to the stereo mixdown stream. Monitor and Headphone Outputs are available in the SADIE5 software as additional output busses called Mon L&R and H/P L& R which can be routed in the normal way. In the MTR software these always monitor the Mixdown stereo stream (except when PFL is pressed) Headphone Output Level is adjusted using the rotary knob beside the headphone jack. Master Fader In MTR software this provides a master mix level to the mixdown stream. In full SADiE5 this can be assigned to any fader by right mouse clicking on that fader and ticking the Master Hardware Fader item. This setting saves with the mixer. 7 Phantom Power is enabled on Microphone inputs by pressing the small “lightning” icon in the left side of the EDL stream. Input Select Inputs are automatically configured based on the input slithers in the system, thus if you had for instance a Mic card in Slot 1 and an AES card in slot 2 then inputs 1-16 would be Mic/Line, and 17-32 would be AES. The Six Function keys (above the wheel) offer : Set sets a locator Record All Record Enables all Selected Streams Prev / Next Shift locates to the Previous or Next locator applies an alternative function when used in conjunction with other buttons. Mode switches the first four buttons so that they become programmable function keys. In the software these would be HWC F1 to HWC F4 respectively and are set in the usual Hotkey section of the Setup page. Thus when the LED on Mode is lit, the other keys are user keys. Timecode – set the LRX to be either timecode Master or Slave. Go to the Setup Window / Sync, choose Timecode type - LTC; Sync Mode – Master (to generate) or Slave. Then enable LTC generation or Slave by pressing the ONLINE button at the bottom of the screen (or SHIFT-SET on the panel). 8 MTR Software The MTR software is a simplified single pane interface for recording and editing. Main differences from the full SADiE are currently: 1 stream per input is created. The top pair of streams is a mixdown stream and this can record a stereo mixdown of the other streams in the EDL. The master fader is before this stream and the mixdown stream is monitored on the headphone output. There is no configurable mixer – each stream is routed to its respective physical output. Pressing the top-left “Clipstore” button reveals a “Source Tracks Folder”, along with a Metadata entry page, and sections for setting the Primary and Mirror destinations for audio recording – audio can be recorded to two locations at the same time. PERFORMANCE CONSIDERATIONS The LRX2 is able to record and playback up to 64 channels of 44.1/48K audio material (or 32 of 88.1/96K) but when recording at the high end of the number of channels, you will need to be more careful over the performance of the PC and hard disks that are used for the recordings. For greater than 24 channels of 48K/24 bit (or 12 channels of 96K/24 bit) – what we would call “larger track counts” - we recommend: Pentium Core Duo / Centrino Duo Processor 1.80GHz or higher. Or AMD Athlon 64 X2. 1GB of RAM or higher 7200rpm USB2 or Firewire hard drives. A Laptop with a screen resolution of approximately 1000 lines will be better for running SADiE5. Good USB2 performance is crucial to LRX2’s operation with larger track counts, and this can vary greatly – we have seen very poor performance, particularly on some cheaper plug-in cards. SADiE5 and MTR software has a “DSP Bandwidth” tool in the Help menu. Speeds of approximately 13.5MB/s read, and 15.5MB/s write should be expected. Disk Drive fragmentation will spoil performance and even make a quick disk too slow for operation. Windows de-fragmentation tools should be run if drives are regularly not being completely wiped before recording. The “Optimised Record Mode” item in the Record Setup page should be enabled for larger track counts. This disables “punch-in” type recording, which would otherwise assign processing power to BOTH recording and playback. If you’re not punching in, this mode should be enabled anyway. With the larger track counts you may see “Disk Too Slow” messages if Optimised Record Mode is not enabled. Disk Drives containing large numbers of files will take longer to refresh and read directories than empty disks, and thus the speed of starting and stopping recordings will be improved on relatively empty disks. “Optimised File Creation Mode” in the Record Setup page will speed up the time taken to start and stop recordings when the project becomes large. The stop record/ start new recording sequence is a busy for file opening & closing operations. “Optimised File Creation Mode” pre-creates a large number of temporary files in the record directory so that the creation of files need not happen at this busy moment. These files are called i.e. 123.pre and are usually 0 bytes (if they are larger, they are in the process of being renamed). Disk drives formatted to NTFS have been seen to perform slightly better than those using FAT32 format. iXML – including the iXML chunk (See Record Setup) will slow down the end of the recording a little. It is not recommended to run other software applications during a recording. SADiE is a high priority task, however certain Windows operations can change that priority, so even browsing a disk drive with Windows Explorer or copying files is to be avoided. 9 It is quite normal that a laptop that is reserved for exclusive SADiE use will perform better than the same spec PC that is running many other email, word processor, utilities, anti virus software and other audio software applications. Installing other applications (even if they are not running) may degrade the performance of a PC. MAXIMUM RECORD TIME To provide the best possible interchange with other software and hardware, SADiE MTR records in Broadcast WAV (BWF) format. BWF has a maximum file size limit of approximately 4GB. SADiE5 is able to choose other formats – WAVE64 and SADiE3 format do not have this limitation, but are less universally accepted. The stereo mixdown stream in SADiE MTR is recorded as a stereo interleaved file for convenience, whereas all other streams are mono. But this means that if you are recording with the stereo mixdown stream, you will reach the 4GB limit in half the time. Sample/ Bit Rate Stereo Mixdown included Maximum record time 96K / 24 bit yes 2 hours 4 mins 96K / 24 bit no 4 hours 8 mins 48K / 24 bit yes 4 hours 8 mins 48K / 24 bit no 8 hours 16 mins Errors and Omissions Excepted. 10 SADIE LRX2 REGISTRATION All fields with a star (*) are mandatory. *Name: Company: Address: *Country: Phone number: *Email address: *Serial number of product: *Make and model of computer to be installed on: *Basic computer description (processor speed, amount of ram, OS): Your main work area: Are you an existing SADiE user \ owner: *Where did you buy the product? *Date of purchase: Where did you hear about the product? What made SADiE LRX2? you choose Tick this box if you do not wish to receive offers and product information from SADiE Fax to SADiE UK +44 1353 648867 11