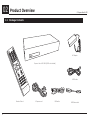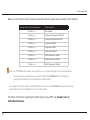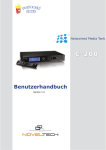
1
Networked Media Jukebox
User’s Guide
A-210
00
Table of Contents
1.0 Safety
1.1
For Your Safety
.................................................................................. 08
2.0 Product Overview
2.1
2.2
Introduction ....................................................................................... 10
2.3
Features
2.4
Minimum System Requirements
2.5
Hardware Overview
Package Contents
............................................................................... 09
............................................................................................. 11
.......................................................... 12
............................................................................ 13
2.5.1 Front Panel
............................................................................... 13
2.5.2 Back Panel
............................................................................... 14
2.6
Remote Control
.................................................................................. 16
2.6.1 Remote Control Overview
2.7
Installation
......................................................... 16
......................................................................................... 19
2.7.1 Video Connections
.................................................................... 19
2.7.2 Audio Connections
.................................................................... 21
2.7.3 Network Connections
2
// Popcorn Hour A-210
................................................................ 23
// Popcorn Hour A-210
3.0 Quick Start
3.1
Viewing a Video
3.2
Basic Remote Control Buttons
3.3
Basic Video Setup
3.4
Basic Audio Controls
4.0 Media Sharing
4.1
............................................................ 26
.............................................................................. 27
.......................................................................... 29
Installing Media Servers on your PC
.................................................... 30
4.1.1 myiHome
4.1.2 UPnP AV or DLNA Server
4.1.3 Windows Media Player Network Sharing Service (WMP-NSS)
4.1.4 Third-Party HTML-based Servers
............................................... 33
Setting up Network Shares on your NMT
............................................. 34
4.2
.................................................................................. 30
........................................................... 31
4.2.1 Samba Share Setup
4.2.2 NFS (Network File System) Shares Setup
3
................................................................................. 24
..... 32
.................................................................
.................................
34
35
// Popcorn Hour A-210
4.3
4.3.1 Browsing Network Shares
4.3.2 Permanent Network Shares
.......................................
36
........................................................
36
...................................................... 37
5.0 NMT Applications Installation
5.1
4
Accessing your Network Shares on the NMT
NMT Applications Installation ............................................................... 40
6.0 Using your Popcorn Hour A-210 NMT
6.1
Remote Control Functions
6.2
Media Source (Main Menu)
..................................................................
43
.................................................................. 50
6.2.1 Network
................................................................................... 50
6.2.2 Harddisk (Internal HDD)
6.2.3 USB
6.2.4 CD/DVD/BD
........................................................... 51
......................................................................................... 52
.............................................................................. 53
// Popcorn Hour A-210
6.3
................................................................................................. 54
6.3.1 Preferences
.............................................................................. 55
6.3.2 Audio/Video
............................................................................. 56
6.3.2.1 Video Mode Options
.........................................................
56
6.3.2.2 Audio Mode Options
.........................................................
60
6.3.3 Network
6.3.4 Network Share
6.3.5 NMT Applications
6.3.6 DVD/Audio CD
6.3.7 Maintenance
................................................................................... 61
......................................................................... 62
.....................................................................
63
.......................................................................... 65
............................................................................. 66
6.3.8 Firmware and NMT Applications Update
.................................... 67
6.3.9 USB Method (Offline) ................................................................ 69
5
Setup
6.3.10 NMT Applications Installation/Update
6.4
Web Services
......................................
71
....................................................................................
73
6.4.1 Internet Radio
6.4.2 MSP (Media Service Portal)
.........................................................................
6.4.3 MSP Community
74
......................................................
75
......................................................................
76
// Popcorn Hour A-210
6.4.4 Torrent
7.0 Configuring the NMT Applications
7.1
NAS (Network-Attached Storage) Functions
77
...................................
78
7.1.1 FTP Server
...........................................................................
78
7.1.2 SMB Server
...........................................................................
79
7.1.3 NFS Shares (Network File System)
7.1.3.2 Setting up NFS Shares on Linux OS
80
..................................
80
.........................................
81
...................................................................................
82
7.1.4 Syabas CE-HTML Server (myiHome)
7.2
...................................
7.1.3.1 hanaWIN NFS Server ......................................................... 80
Torrents Setup
7.2.1
Enable/Disable BitTorrent Downloading
...................................
84
7.3. Usenet Client Setup: NZBGet ..............................................................
85
7.3.1 Setting up the NZBGet on the NMT
7.3.2 Usenet: Working with NZBGet
6
............................................................................
...........................................
86
..................................................
88
7.3.3 Downloading .............................................................................
89
// Popcorn Hour A-210
8.0
8.1
Frequently Asked Questions (FAQs)
8.2
Technical Support Contact Information
8.3
Accessories Installation
Troubleshooting
....................................................
93
..............................................
99
.....................................................................
100
8.3.1 Chassis Fan Installation
...........................................................
100
9.0
A-210 Techical Specifications
9.1
User Interface
..................................................................................
101
9.2
Web Services
.....................................................................................
102
9.3
Supported Media File Formats
9.4
Hardware
............................................................
103
........................................................................................... 107
7
Appendix A
10.1 Apps Market - Internet Connection Required
10.2 NMJ - Required Internet Connection
....................................
110
.................................................. 113
01
1.1
Safety
// Popcorn Hour A-210
For Your Safety
Message
Description
This is a useful tip in using the product
Tip
This is a non-critical notice to the user
Note
Caution
Failure to take or avoid a specific action could result in damage
to the product or loss of data
Failure to take or avoid a specific action could result in injury
Warning
8
02
2.1
Product Overview
// Popcorn Hour A-210
Package Contents
AC Adaptor
Popcorn Hour A-210 NMJ (HDD not included)
TER
EN
HDMI cable
Remote Control
9
AC power cord
USB cable
USB Slave cable
// Popcorn Hour A-210
2.2
Introduction
Congratulations on your purchase of an award winning product that will enhance your home
multimedia experience.
The Popcorn Hour A-210 Networked Media Tank (NMT) allows you to stream digital video, audio
and photos from various sources for your enjoyment on your HDTV or Home Theater setup. You
can stream or playback your digital media content from a variety of sources, such as your PC,
Network Attached Storage (NAS), digital camera, USB mass storage devices (Flash drives, HDD,
external CD/DVD drives), internal SATA HDD, directly from the Internet via the Media Service
Portal and Apps Market.
Your NMT also serves as an NAS, supports Usenet downloading, and is also a BitTorrent peer-to
-peer downloader to eliminate the need to switch on a PC or other devices for this purpose.
Feel free to browse through this user guide to know your NMT better and we hope that you, your
family and friends have a great time with this amazing product.
10
// Popcorn Hour A-210
2.3
Features
The Popcorn Hour A-210 NMT is the ultimate solution for your networked home entertainment
environment. The A-210 allows you to configure your storage options, with the usage of the 2.5”,
3.5” SATA HDD and external CD/DVD drives. The HDMI 1.3a interface allows full support of videos
up to 1080p and HD Audio pass-through for DTS HD-HR, DTS HD-MA, Dolby Digital Plus and
Dolby TrueHD. The connectors and ports on the A-210 are laid out with your ease-of-use in mind,
especially the USB ports on the front and back.
The Popcorn Hour A-210 supports the latest high bitrate video formats (MPEG2 MP@HL,
H.264 [email protected], VC-1 AP@L3 in TS of at least 40Mbps) to give you up to 1080p high-definition videos.
In line with the advances in Internet TV, the A-210 supports peer-to-peer Internet TV streaming
technology from SayaTV, as well as popular unicast Internet TV such as YouTube, Revision 3 and
Vuze via the Media Service Portal. Also new with the A-210 is the internet-radio feature, which
allows you to listen to your favorite radio stations that are available online. In addition, with the
Apps Market, get more apps to power your experience.
The A-210 firmware is upgradeable to support future media containers, codecs and features.
For detailed specifications of your NMJ and supported audio/video formats, refer to Chapter 9: Product Specifications.
11
// Popcorn Hour A-210
2.4
Minimum System Requirements
•
High-Definition (HD) or standard television (TV) with HDMI, S-Video, Component Video, or
Composite Video input
•
TV, Stereo, or HD Audio receiver with Optical Digital, Coaxial Digital, or Composite Audio input
•
Wired or wireless network (wired 100Mbps or better network is recommended for networked
media streaming)
•
Connection to the Internet (for use with Web Services)
Listed below are the minimum requirements for installation of the myiHome Media Server
software application on your PC.
12
•
Pentium 233(MHz) or higher processor (Pentium III or higher recommended)
•
Microsoft Windows® 2000, XP, Vista (32 or 64-bit); Mac OS X or Linux operating systems
•
512MB of RAM
•
100MB of available hard disk drive (HDD) space
// Popcorn Hour A-210
2.5
Hardware Overview
2.5.1 Front Panel
1
3
2
1
13
2
POWER LED
Ring light color
Status
White
Active
Amber
Video OFF
Red
Standby
OFF (no light)
Power OFF
USB Ports
Connect a USB storage device to this
port to access its media content.
3
Reset Botton
Hardware reset, automatically set TV mode to
AUTO for video output detection.
// Popcorn Hour A-210
2.5.2 Back Panel
2
Y
1
Pb
R
Pr
L
COMPONENT VIDEO
CVBS
AUDIO OUT
8
6
7
3
COAX
OPTICAL
S/PDIF
HDMI (High-Definition Multimedia Interface) Connector
ACT
S-VIDEO
S/PDIF Coaxial Digital Audio Connector
Use this connector to connect your NMT to your home audio system
using the S/PDIF coaxial audio connector. (Audio only)
14
USB-PC
USB
HDMI
3
LNK
ETHERNET
5
Use this to connect your HD TV (High Definition TV). (Video and Audio)
2
4
1
POWER
12.0V
3.0A MAX
+
9
USB Port
Connect USB storage devices to this port to access its media
content.
4
Ethernet (RJ-45)Port
Connect an Ethernet cable (RJ-45) to the Ethernet port and
attach the other end to a router or hub on your LAN (Local
Area Network).
// Popcorn Hour A-210
5
S-Video Connector
6
Use this to connect your NMT to your TV using the S-Video connector.
(Video only)
7
Composite Audio Connectors
Use these connectors to connect your NMT to your TV using the red
and white Composite Audio connectors. These connectors usually
come attached with the Composite Video connector (yellow connector).
(Audio only)
9
Power Supply Port
Connect the supplied power cord here in order to power your NMT.
15
CVBS (Composite Video) Connector
Use this connector to connect your NMT to your TV using
the yellow Composite Video connector. The Composite Video
cable usually comes attached to Composite Audio connectors
(red and white connectors). (Video only)
8
Component Video Connectors
Use these connectors to connect your NMT to your TV set
using component video connectors. The connectors are
usually green, blue, and red in color. (Video only)
// Popcorn Hour A-210
2.6
Remote Control
2.6.1 Remote Control Overview
EJECT
TV MODE
SETUP
2 abc
3
4
5
jkl
6 mno
8
tuv
ghi
7 pqrs
DELETE
A-B
VIDEO
See Video Mode Options for more information.
def
9 wxyz
0
CAPS
NUM
FILE MODE
MUSIC
Quick-access button to select a TV output resolution.
Turns the NMT ON, OFF, or put on Standby mode.
BT
1 .:/@
TV MODE
Power
SUSPEND
FILE MODE
MUTE
Displays the File and Folder customization options.
Mutes the audio output.
SETUP
EJECT
Jumps to the Setup menu screen. During video
Ejects the disc of a CD/DVD/BD-ROM drive attached to
playback, this button allows customization of
the NMJ.
TIME SEEK
PHOTO
ALL
SOURCE
RETURN
the display output.
ENTER
BT
INFO
STOP
i
PAGE
UP
PLAY
PAGE
DOWN
PAUSE
MUTE
REV
FWD
MENU
PREV
NEXT
TITLE
REPEAT
SLOW
ANGLE
AUDIO
SUBTITLE
AA
ZOOM
SUSPEND
DELETE
This button is reserved for future use.
PAGE UP
Moves up a page when viewing a list of media files.
To erase alphanumeric values during input.
CAPS
NUM
Increases the volume during media playback.
PAGE DOWN
DELETE
CAPS/NUM
To switch between capitalized, numeric and noncapitalized letters during alphanumeric value input.
0-9
Alphanumeric Keypad
Moves down a page when viewing a list of media
Allows users to input alphanumeric characters. During
files. Decreases the volume during media playback.
video or audio playback, pressing a number will allow
the user to jump to a percentage of the media. See
6.1 Remote Control Functions for more information.
16
// Popcorn Hour A-210
RETURN
MENU
STOP
Returns to the previous menu screen.
Jumps to the DVD Menu screen during
Stops playback and returns to the menu
DVD Playback.
screen.
SOURCE
PREV
FWD
Returns to the Media Source screen.
Skips backward to the previous file/track.
Fast-forwards through the current media
playback. Press again to toggle 2x,
4x and 8x fast-forwarding.
i
INFO
PLAY
REPEAT
Displays the timeline bar during media
Plays the selected file/track.
Sets the playback mode to REPEAT.
ENTER
NEXT
ANGLE
Selects the currently highlighted selection
Skips forward to the next file/track.
Scroll through different camera or viewing
file playback. Press again to display the
media file information such as the title,
format, and so on.
ENTER
17
or plays the highlighted media file.
angles during playback. (only applicable for
(single file playback only)
supported multiangle playback formats)
Directional Keypad (D-Pad)
TITLE
PAUSE
Allows you to navigate and highlight
Opens the text input box for URL input
Pauses the current media playback.
options or media files.
while in a menu screen.
A-B
REV
SLOW
Allows users to repeat the playback of a
Rewinds the current media playback.
Slows down the playback of the current
self-defined portion or scene of your
Press again to toggle 2x, 4x and 8x
media playback.
media file.
rewinding.
// Popcorn Hour A-210
TIME SEEK
Allows you to time-seek the current
selected media for a jump to a particular
playback time; hour:minute:second = 00:00:00
AA
SUBTITLE
MEDIA FILTERS
Turns ON the subtitles and toggles
Video: Filters the content to display
through its options.
video files only.
(if available with your video playback).
(use numeric buttons to input the desired
Music: Filters the content to display
playback time).
music files only.
ZOOM
Toggles between available viewing options.
See Remote Control Functions for more
Photo: Filters the content to display
AUDIO
Toggles between the available audio
modes.
image files only.
ALL: Displays all file types.
information.
18
Tip: Remote control not functioning - Try replacing the batteries with new ones.
If problem persists, please refer to Chapter 8: Troubleshooting.
// Popcorn Hour A-210
2.7
Installation
2.7.1 Video Connections
To connect your NMT to your television (TV) for video output, use one of the following options
available on your NMT. All the video connectors are located at the rear panel of your NMT.
Component Video
Attach the COMPONENT video cable to the COMPONENT connectors of your NMT
by matching the color coded connectors and ensure that the same is done for
the opposite end into your TV input.
Note: This cable is not supplied with your NMT.
S-Video
Attach the S-VIDEO cable to the S-VIDEO connector of your NMT and ensure that
the same is done for the opposite end to your TV input.
19
Note: This cable is not supplied with your NMT.
// Popcorn Hour A-210
Composite Video
Attach the yellow COMPOSITE video cable to the COMPOSITE connector of your
NMT and ensure that the same is done for the opposite end to your TV input.
Note: This cable is not supplied with your NMT.
HDMI
Attach the supplied HDMI cable to the HDMI connector of your NMT and ensure
that the same is done for the opposite end to your TV input.
HDMI provides the best interface for your NMT and your High Definition TV as it
is able to support a video mode of up to 1080p, with audio output as well.
20
// Popcorn Hour A-210
2.7.2 Audio Connections
To connect your NMT to your TV or audio system for audio output, use one of the following options
available on your NMT.
Note: The HDMI cable also carries your audio output on the same cable, thus a
separate audio connection from your NMT to your TV is not required.
Composite Audio
Attach the COMPOSITE audio cable to the red and white COMPOSITE
connectors of your NMT and ensure that the same is done for the
opposite end to your TV input.
Note: This cable is not supplied with your NMT.
Optical Digital Audio
Attach the optical audio connector into the OPTICAL connector on your NMT
and ensure that the same is done for the opposite end to the audio input of
your audio system.
21
Note: This cable is not supplied with your NMT.
// Popcorn Hour A-210
Coaxial Digital Audio
Attach the coaxial digital audio connector to the COAXIAL on your NMT and
ensure that the same is done for the opposite end to the audio input of your
audio system.
22
Note: This cable is not supplied with your NMT.
// Popcorn Hour A-210
2.7.3 Network Connections
Your NMT allows you to connect the unit to your network to expand its functionality and enhance
your multimedia experience. Use one of the following connections to connect your NMT to your
network.
LAN (RJ-45 Ethernet)
Attach the LAN connector to the ETHERNET connector at the rear of your NMT
and connect the opposite end of the LAN cable to a router on your network.
The LAN (RJ-45 Ethernet) cable connection is the recommended connection
method as it allows faster access to and from your NMJ.
For more information about the Ethernet functions on your NMT, refer to
Chapter 7.1: Network.
W
N-1
50
Wireless USB Adapter
23
You may purchase a optional wireless USB adapter such as the WN-150 to extend
your NMT to wireless connection.
Note: The wireless USB adapter is not supplied with your NMT.
03
Quick Start
// Popcorn Hour A-210
This Quick Start chapter will guide you on how to set up your Popcorn Hour A-210 NMT to play
your first video on your TV.
Movies, videos, music, photos, and other media stored on external storage devices such as flash
memory drives or external hard disk drives (HDD) can be easily connected to your NMT via the
available USB interface and played back on your TV.
3.1
Viewing a Video
Once the power supply and the appropriate cables have been connected to your NMT and TV,
connect a USB external storage device (containing your desired video file) to your NMT using
the USB port (available on the front and rear of your NMT).
Follow the steps below to play a video:
1. Power ON your NMT and allow it to boot up. The loading screen may flicker as the unit configures
its video output to suit your TV.
24
// Popcorn Hour A-210
2. At the Media Source screen, use the D-Pad on the remote control or front panel to scroll to the
USB option, as shown below.
3. Press ENTER to select the USB option. Your USB external storage device is now activated for
use with your NMJ.
Note: If you have more than one USB storage device connected, you may
choose to activate one of the devices from the given list.
4. Using the D-Pad, browse to the location of your video file.
25
// Popcorn Hour A-210
5. Select the desired video file. Press PLAY or ENTER to start the playback of the chosen video file.
6. Press the STOP button to end the video playback. Repeat the steps above to play any other
compatible media file.
3.2
Basic Remote Control Buttons
Here are some basic remote control buttons and their functions.
Playback controls
26
PREV
PLAY
Plays the previous file in the media list
Plays the current selection and the other files in the media list
NEXT
REV
Plays the next file in the media list
Rewinds the current active playback file
STOP
FWD
Stops the current active playback file
Forwards the current active playback file
PAGE UP
PAUSE
Increases the output volume of the NMT
Pauses the current active playback file
PAGE DOWN
SOURCE
Decreases the output volume of the NMJ
Returns to the Media Source screen
// Popcorn Hour A-210
For a comprehensive list of remote control functions, refer to Chapter 6.1:
Remote Control Functions.
3.3
Basic Video Setup
The video output resolution can be customized to fit your TV properly. To identify the best viewing
resolution for your TV, refer to the user guide supplied with your TV.
To select the best video output resolution for your TV, follow the steps below.
1. At any menu screen, press Setup on your remote control.
2. At the Setup Screen, select the Audio/Video option to access the display options screen.
3. Select the Video Output option to choose a video output resolution for your TV.
4. Press ENTER to confirm your selection and save your selection by selecting SAVE
(the SAVE button is located at bottom-right side of the Audio/Video menu).
27
// Popcorn Hour A-210
Below is a list of some common output resolutions and their quick-access remote control buttons:
Remote Control quick-access button
Video resolution
TV Mode -> 0
Auto (default)
TV Mode -> 1
Component/Composite NTSC 480i
TV Mode -> 2
Component/Composite PAL 576i
TV Mode -> 4
Component 720p60
TV Mode -> 5
Component 1080i60
TV Mode -> 6
Component 1080p60
TV Mode -> 7
HDMI/Component 720p60
TV Mode -> 8
HDMI/Component 1080i60
TV Mode -> 9
HDMI/Component 1080p60
Note: The TV MODE button allows you to perform an on-screen selection of an output resolution.
To use the quick-access buttons, press and release the TV Mode button, followed by
pressing and releasing the corresponding numeric button.
For example, to get the output of HDMI 1080i60, press and release TV Mode, followed by pressing
and releasing the numeric 8 button on the remote control.
For further information regarding the Video Setup of your NMT, see Chapter 6.4.2.1:
Video Mode Options.
28
// Popcorn Hour A-210
3.4
Basic Audio Controls
The audio volume output of your NMT can be controlled using the Page Up
Page Down
and
buttons on the remote control during playback.
For the most natural sound output from your NMT, leave the volume at 0 (no signal boost).
For volume control, increase or decrease the volume of your audio system to obtain a
comfortable audio volume output.
29
Caution: Boosting the output volume of your NMT may cause audio distortion.
04
4.1
Media Sharing
// Popcorn Hour A-210
Installing Media Servers on your PC
4.1.1 myiHome
When it comes to digital content, there is always the hassle of organizing and presenting your
content for playback. Showcasing your digital content is made simpler by having an organized
media library.
The fundamental concept behind the myiHome Media Server has always been an easy to use,
simple to navigate and quick to access method to showcase your contents.
myiHome is updated automatically when it detects new content. It also allows transcoding, which
means that if the NMT does not support the reproduction of some form of native multimedia file
for lack of proper codec, myiHome transcodes it on the computer to reproduce such content via
network streaming. This way, you do not have to re-encode the file to another compatible format
for use on the NMT.
To set up myiHome on your PC, follow the steps below.
1. Download the latest version of myiHome from:
http://www.popcornhour.com/download/myihome/myihome.html
30
// Popcorn Hour A-210
2. Once the download is complete, launch the installation program.
3. Follow the onscreen instructions to install the myiHome program.
4. Once the installation is complete, launch the program and follow the onscreen instructions to
set up the myiHome program.
4.1.2 UPnP AV or DLNA Server
Your NMT will automatically detect all available UPnP AV compliant content servers on starting up
and will list them on the Media Source screen. No additional setup is required on the unit itself.
It is possible to access attached USB storage devices remotely using your NMT. Browse to
Setup>Network Share on your NMJ to see the USB storage devices attached to your PC.
The attached USB storage devices must be formatted with Ext2 / Ext3 or FAT16 / FAT32 in order
to be compatible with your NMT . This will enable you to upload, change or execute files
(NTFS and HFS formatted drives are read-only).
Note: FAT16 and FAT32 formats have a file size limitation at 4 GB, which may pose a
problem for large media files such as a DVD ISO with minimal compression.
31
// Popcorn Hour A-210
Some servers may require additional authorization configuration on the server-side, such as the
Windows Media Player Network Sharing Service (WMP-NSS) described below.
4.1.3 Windows Media Player Network Sharing Service (WMP-NSS)
WMP-NSS allows you to playback your PC’s media files using your NMT when both units are
connected to your home LAN network.
To enable WMP-NSS playback on your NMT, the NMT has to be authorized using the WMPNSS
application on your PC. Follow the steps below to set up the WMP-NSS.
1. Ensure that both your PC and NMT are connected to your LAN and switched on.
2. On your PC, launch the WMPNSS application, select the following menu options:
Options > Library > Configure Sharing
3. Select the checkbox next to the Share my media to menu item. You should now have a list
of detected devices to choose from on the menu (right-clicking a selected device listed on it
will show you a list of options).
32
// Popcorn Hour A-210
4. Select Properties to view details about each device. Find the device that matches the MAC
address of your NMT and select Allow in the menu item for that device.
Note: To identify the MAC address of your NMT on the network, refer to
Setup > Network on your NMT. The MAC address will be listed
under Ethernet Configuration.
4.1.4 Third-Party HTML-based Servers
Your NMT supports HTML-based media stream extensions. User-developed media streaming
servers are compatible with your NMT and you will be able to access media content from
these streaming servers over the internet.
These open-source third-party streaming servers are available at:
33
WiZD for NMT
http://jhue.users.sonic.net/
SwissCenter
http://swisscenter.co.uk
Llink
http://www.lundman.net/wiki/index.php/Llink
GB-PVR
http://jhue.users.sonic.net/
// Popcorn Hour A-210
4.2
Setting up Network Shares on your NMT
A network share allows the NMT to stream media stored on external devices that are connected
to the same network. Currently, the NMT supports network shares through Samba (SMB), File
Transfer Protocol (FTP), and Network File System (NFS).
Home
Preferences
Audio / Video
Network
Network Share
DVD / Audio CD
Maintenance
.
.
.
.
.
.
browse
add
.
// setup
4.2.1 Samba Share Setup
To set up your NMT for Samba Sharing, navigate to Setup > Network Share. You can browse
your SMB network and add the path to the list, or manually input the path to your SMB share by
selecting the add button:
34
// Popcorn Hour A-210
smb://<hostname or ipaddr>/foldername
4.2.2 NFS (Network File System) Shares Setup
To set up your NMT for NFS sharing, navigate to Setup > Network Share, and type in the full
path to your NFS share, as shown below.
smb://<hostname or ipaddr>/foldername (colon after hostname is required)
With firmware 01-15-080330-14-POP-402 or newer you can select the protocol (TCP or UDP)
used for the NFS connection:
nfs://
(UDP)
nfs-tcp://
(TCP)
Some firewalls, including the Microsoft® Windows XP firewall will block critical parts of UDP
NFS server connections, even if correctly configured. If you experience a No content found
error when using UDP, try switching to the TCP mode.
Some gigabit switches have problems with UDP, thus preventing data streaming (viewing files
may appear to be unaffected). If you encounter this problem, try switching to the TCP mode.
35
// Popcorn Hour A-210
4.3
Accessing your Network Shares on the NMT
4.3.1 Browsing Network Shares
//Network Browser
01
WORKGROUP
02
NFS Server
To browse your connected Network Shares, go to Media Source > Network Browser and select
WORKGROUP to see the available Network Shares on your network.
Various shared media servers on your network and Permanent Network Shares may also appear on
the Media Source screen for easy selection.
Note: Ensure that your NMT is connected to your network properly and the desired media
servers or folders have been configured to allow sharing before browsing for Network
Shares.
36
// Popcorn Hour A-210
4.3.2 Permanent Network Shares
Home
Preferences
Audio / Video
Network
Network Share
NMT Applications
DVD / Audio CD
Maintenance
.
.
.
.
.
.
.
.
Please leave user name and password entry blank if it is not
available.
Share Name
URL
User Name
Password
: Test
: smb://pcname/share
:
:
add
cancel
// setup
To ease the search of specific Network Shares on your network, you may bookmark them on your
NMJ. Follow the steps below to add Permanent Network Shares to your NMT.
1. Go to Setup > Network Share and select the add button.
2. Enter the information into each category according to the type of Network Share that you
want to add:
37
// Popcorn Hour A-210
38
•
Share Name - Enter a name for your Permanent Network Share. The name will be displayed
on the Media Source screen if the Permanent Network Share is active.
•
URL
•
User Name - Enter the login username of the Network Share that you want to access
(if required).
•
Password
- Enter the path of the Permanent Network Share. Refer to Section 4.2 to obtain
the correct paths according to the type of Network Share.
- Enter the login password of the Network Share that you want to access
(if required).
Note: Network Shares are mounted and active after it has been selected in the Media Source
or Network Browser screens. Only one Permanent Network Share can be active at a time.
// Popcorn Hour A-210
Your NMT allows you to install an internal hard disk drive (HDD) to expand its capabilities.
A HDD is required for installation of media applications on your NMT.
Note: If you do not wish to use the NMT Applications on your Popcorn Hour A-210 NMT,
you may skip this chapter.
Refer to the Hard Disk Drive (HDD) Installation to install a HDD.
39
05
NMT Applications Installation
// Popcorn Hour A-210
Caution: The Fresh Setup installation option will ERASE ALL DATA on your HDD. Ensure that
you backup important files on the HDD into separate storage media.
The Typical Setup will reinstall the NMT Application without erasing your HDD.
1. Switch ON your NMT and allow it to start up.
2. Ensure that the HDD is properly installed and recognized by your NMT.
3. Navigate to the Setup screen and select Maintenance.
4. At the Maintenance screen, select the NMT Setup Wizard and follow the onscreen instructions.
5. At the NMT Setup Wizard screen, choose a setup option (Typical Setup or Fresh Setup) and
select Next to confirm option.
6. In the next screen, select Next to confirm the HDD selection.
40
// Popcorn Hour A-210
7. Select Next to format your HDD using the ext3 format.
8. At the warning notice screen, read the message and ensure that the correct selections have
been made. Select Next to go the NMT Setup Source screen.
9. At the NMT Setup Source screen, select Online or USB according to the source of the update
NMT Applications file. To begin the NMT installation process, select Next. To perform a manual
NMT Applications installation, download the latest firmware package from the NMT website and
unzip the files into the root drive of a USB flash memory device.
For further information, see Chapter 6.4.8: Firmware and NMT Applications Update.
Note: For an automated installation procedure, select Online at the
NMT Setup Source screen (ensure that your NMT is connected to the internet).
10. Your NMT will restart when the installation is completed. Your NMT is now ready for use with
NMT Applications.
41
06
Using your Popcorn Hour A-210 NMT
Important:
Please ensure that your Popcorn Hour A-210 NMT has been updated
with the latest firmware. Firmware updates will ensure that your
Popcorn Hour is compatible with the latest hardware and software
available today.
This user guide is written for the Popcorn Hour A-210 NMT with
firmware version:
02-03-0100918-21-POP-411-000 or newer.
Refer to Chapter 6.3.7: Maintenance section below for a guide
on updating your firmware.
42
// Popcorn Hour A-210
// Popcorn Hour A-210
6.1
Remote Control Functions
Button
Functions
Press once to put the NMT into Standby mode or to awaken the NMT from the Standby mode
POWER
FILE MODE
Press Power > Eject to reboot the NMT
Press Power > Delete to turn off the NMT
Press once to display three options:
• Add file to list
• Create Folder
• Rename File
If you already have a file listed then you have further options:
• Add to list
• Remove from list
• Copy listed items here
• Move listed items here
• Create folder
• Clear list
• Delete listed items
• Rename file
Press Enter on the highlighted file to confirm the selection.
Press once to access the Setup menu screen
SETUP
43
During video playback, press this button once to see the video display options
Press Setup > Play to disable the Setup Page Lock option
// Popcorn Hour A-210
BT
SUSPEND
This button is reserved for future use
Moves up a page on a list of media files
PAGE UP
Increases the volume during media playback
Moves down a page on a list of media files
PAGE DOWN
Decreases the volume during media playback
Ejects an attached external CD/DVD-ROM drive
USB DVDROM/
EJECT
Ends a media playback
Quick-access button to select a TV output resolution. See Video Mode Options for more information
TV MODE
Mutes the audio output
MUTE
0-9
Alphanumeric
Keypad
44
Quick selection of media content according to their numbered listing on the menu screen
Allows users to input alphanumeric values
During media playback, pressing a number on the keypad will skip to a certain percentage of the total playback time
of the media file. For example, pressing 3 will skip to 30% of the media file and start the playback from there
// Popcorn Hour A-210
DELETE
DELETE
CAPS
NUM
To erase alphanumeric values during input
To switch between capitalized, numeric and non-capitalized letters during alphanumeric value input
CAPS/NUM
RETURN
Return to the previous menu screen
Returns to the Media Source screen
SOURCE
Allows you to navigate and highlight options or media files
Directional
Keypad (D-Pad)
ENTER
Partial time seek during movie playback (left and right directional keys only)
Selects the currently highlighted selection or plays the highlighted media file (single file playback only)
ENTER
i
INFO
Displays the timeline bar during media file playback.
Press again to display the media file information such as the title, format, and other details
Returns to the Media Filters menu screen of your currently selected Media Source
HOME
45
During a DVD playback, this button enables or disables Repeat A/B
// Popcorn Hour A-210
Jumps to the DVD Menu screen during DVD playback to allow playback customization
MENU
PREV
PLAY
NEXT
TITLE
REV
STOP
FWD
46
Skips backward to the previous file/track
Plays the selected file/track and continues to the next file/track on the list
Skips forward to the next file/track
Opens the text input box for URL input while in a menu screen
Rewinds the current media playback
Stops playback and returns to the menu screen
Fast-forwards through the current media playback, continue pressing to toggle 2x, 4x and 8x fast-forwarding
// Popcorn Hour A-210
Repeats the current selected media file.
REPEAT
During
•
•
•
music
Press
Press
Press
playback, this button offers three playback modes:
once: Chosen song is played repeatedly.
twice: Playback will restart at the top of the list once the final song on the list is done playing.
three times: Disables the Repeat modes.
Switches the camera or viewing angle during DVD playback (only applicable for supported multiangle DVD playback formats)
ANGLE
PAUSE
SLOW
TIME SEEK
(Switches the PMT for TS with multiple-PMT support)
Pauses the current media playback
Slows down the playback of the current media playback
Allows you to time-seek the current selected media for a jump to a particular playback time;
hour:minute:second = 00:00:00
(use numeric buttons to input the desired playback time)
Toggles between the available audio modes
AUDIO
Tip: Replace the batteries with two new AAA batteries if the
remote control is slow to respond or does not respond at all.
47
// Popcorn Hour A-210
AA
SUBTITLE
Turns ON the subtitles and toggles through its options (if available with your video playback)
More functions of the Subtitle button:
• Press once for timing offset. Use the Left/Right D-Pad buttons to set the timing offset
• Press twice to display the language used. Use the Left/Right D-Pad buttons to toggle between languages
or turn subtitles OFF
• Press three times to change the color of the subtitles. Use the Left/Right D-Pad buttons to change the colors
• Press four times to display the subtitle size. Use the Left/Right D-Pad buttons to change the size
• Press five times to change subtitle position. Use the Left/Right D-Pad buttons to lower/raise the subtitle position on the
screen
• Press the Subtitle button on the Media Source screen to display the time
Toggles between the available viewing options
During single file playback, the Zoom button functions:
ZOOM
•
•
•
Press once and use the Left/Right D-Pad button to toggle between Actual Size, Fit To Screen, Crop or Full Screen
Press twice to Magnify the screen size. Use the Left/Right D-Pad buttons to reduce or zoom by 1% increments
Press three times to Pan/Scan. Use the Left/Right and Up/Down D-Pad buttons to move the display screen on the
X-axis/Y-axis
During DVD Playback;
• During playback of a DVD/ISO file, press Zoom once, then use Left/Right D-Pad buttons to zoom in/out
RED button
GREEN button
YELLOW button
BLUE button
48
Displays only video files (press twice to initiate NMJ setup)
Displays only audio files
Displays only image files
Removes all Media Filters and displays all file formats
// Popcorn Hour A-210
49
Tip: The four media filter buttons may have extra functions depending on the
applications used, such as third-party HTML servers and when browsing
MSP portals. The extra functions will be displayed onscreen for easier
reference when available.
// Popcorn Hour A-210
6.2
Media Source (Main Menu)
This is the main selection menu where you may select the source of your media or access the
network and setup menu.
Navi: D-Pad to scroll through available options and ENTER to confirm selected option.
6.2.1 Network
This option allows you to browse and activate available file servers on your network such as
workgroup computers and network-attached storages (NAS).
50
// Popcorn Hour A-210
6.2.2 Harddisk (Internal HDD)
This selection allows you to browse and select the media in the internal hard disk drive. This
option will only accessible when one or more hard disk drives are installed and formatted in
the NMT.
51
// Popcorn Hour A-210
6.2.3 USB
This selection allows you to browse and select the media files in USB external storage devices
attached to your NMT. This option will only be accessible when one or more USB external storage
devices are connected to your NMT.
52
// Popcorn Hour A-210
6.2.4 CD/DVD/BD
This selection allows you to browse and select the media in the CD/DVD/BD that you have
inserted into the CD/DVD/BD-ROM drive. This option will only be accessible when a
CD/DVD/BD-ROM drive has been installed into or attached to your NMT.
53
// Popcorn Hour A-210
6.3
Setup
The Setup screen allows you to configure various options of your NMT.
A description of the available options on the Setup screen is listed below.
Home
Returns to the Media Source screen or the media list of the current media source.
Preferences
Allows you to configure general settings for your NMT.
Audio / Video
Displays settings for video output as well as video aspect ratio control.
Network
Displays current IP information and allows the configuration of network settings.
Network Share
Allows you to configure the media servers.
NMT Applications
Allows you to configure the settings for the BitTorrent client and other installed applications.
This screen will only be enabled when a HDD has been installed into your NMT and the NMT
Applications have been installed.
DVD / Audio CD
Allows you to configure the content parental control levels, the Autoplay function, the audio
output and subtitles used when a DVD or CD player is connected to your NMT.
Maintenance
Displays the current device firmware information and allows you to check for firmware updates.
The NMT Setup Wizard is also available on this screen.
54
Tip: Remember to select SAVE when your customization is complete to confirm your selections.
// Popcorn Hour A-210
6.3.1 Preferences
This setup screen allows you to set your preferences for some features of the NMT.
Options
Description
Language
Allows you to set the display language of your NMT.
Subtitle Language
Allows you to select the default subtitle language (if available) during video playback.
Play Mode
Allows you to set the repetition mode of your media during playback.
Photo Transition
Allows you to set the transition type when viewing photos in a folder.
Photo Interval
Allows you to set the time length that a photo will be displayed (up to 600 seconds).
Screen Saver
Allows you to set the idle time length before the screensaver displays.
Setup Page Lock
Allows you to lock the settings made on the Setup page to prevent accidental changes in
the settings.
Tip: To disable the Setup Page Lock, press Setup > Play
on your remote control. Remember to SAVE your settings
to confirm your selection
55
// Popcorn Hour A-210
6.3.2 Audio/Video
This option allows you to configure your NMJ to produce the best possible audio and visual
experience for your enjoyment.
6.3.2.1 Video Mode Options
This setup screen allows you to customize the video output modes of your NMT to suit your TV
or projector.
Note: To use the quick-access buttons, press and release the TV Mode button, followed by
pressing and releasing the corresponding numeric button.
For example, to get the output of HDMI 1080i60, press and release TV Mode, followed by
pressing and releasing the numeric 8 button on the remote control
56
// Popcorn Hour A-210
Options
Description
Video Output
Allows you to select the video output mode and resolution of your NMT. Kindly refer to your
TV or projector user manual to determine the best output resolution for the video display.
There are three video modes available:
• Composite Mode
• Component Mode
• HDMI Mode
For the Component and HDMI modes, you will be able to select the output resolution to
better suit your TV. Shown below is a comparison of the resolution sizes.
57
// Popcorn Hour A-210
Listed below are the remote control quick-access buttons for some of the common TV resolutions.
58
Quick-access button
Video resolution
TV Mode -> 0
Auto (default)
TV Mode -> 1
Component/Composite NTSC 480i
TV Mode -> 2
Component/Composite PAL 576i
TV Mode -> 4
Component 720p60
TV Mode -> 5
Component 1080i60
TV Mode -> 6
Component 1080p60
TV Mode -> 7
HDMI/Component 720p60
TV Mode -> 8
HDMI/Component 1080i60
TV Mode -> 9
HDMI/Component 1080p60
// Popcorn Hour A-210
Framerate Sync
Select a framerate sync for the video output if the playback shows an inconsistent or
poor sync rate.
Video Zoom
Allows you to select the default video zoom output of your NMT.
Zoom options: Actual Size, Fit to Screen, Crop View and Full Screen View.
TV Type
Allows you to set the viewing aspect ratio to suit your TV or projector. Please refer to
the user manual supplied with your TV to determine the best viewing aspect ratio.
Colorspace
59
Allows you to choose a suitable colorspace for the NMJ display output.
// Popcorn Hour A-210
6.3.2.2 Audio Mode Options
This setup screen allows you to customize the audio output modes to suit your TV or audio system.
Options
Description
HDMI Audio
Allows you to enable or disable the HDMI audio when using a HDMI cable to connect
your NMT and TV.
DTS
Allows you to configure your NMT DTS audio output as analog or digital.
AC3 (Dolby Digital)
Allows you to configure your NMT Dolby Digital audio output as analog or digital.
AAC
Allows you to configure your NMT AAC audio output as analog or digital.
WMA Pro
Allows you to configure your NMT WMA Pro audio output as analog or digital.
60
Note: Please ensure that your audio system is fully compatible with the selected
output options. If there is no audio output after an audio setting has been
changed, kindly reset the audio to the previous working option.
// Popcorn Hour A-210
6.3.3 Network
This setup screen allows you to customize your NMT to work with your network.
Options
Description
Mode
Allows you to select the wired or Wi-Fi IP address assignment mode (auto or manual).
Time Zone
Allows you to select the time zone in which your NMT is located.
Time Server
Allows you to input the URL of the server that your NMT retrieves the day and time information.
The default URL is set to pool.ntp.org.
Daylight Saving
Allows you to enable or disable Daylight Saving Time
(only applicable to countries that practice daylight saving time).
MAC Address
The MAC address of your NMT is displayed here.
IP Address
Displays IP address of your NMT on your network.
Select the Configure IP option to configure an IP address for your NMT on your network, or the
Configure Proxy option to configure the proxy settings of your NMT.
61
// Popcorn Hour A-210
6.3.4 Network Share
Network Shares allow the NMT to stream media content stored on external devices connected
together within the same local network. The NMT supports Samba (SMB), File Transfer Protocol
(FTP), and Network File System (NFS) shares.
This setup screen allows you to configure the various media servers available for use on your NMT.
For more information about the settings and options available, see Media Sharing.
62
// Popcorn Hour A-210
6.3.5 NMT Applications
This screen allows you to set your NMT device name and workgroup for use on a Samba Workgroup
as a Samba server. The Samba server allows your PC to access media or files stored on your NMT.
This screen also allows you to stop or start an application that has been installed and configured
on your NMT. Press ENTER on your remote control to stop a running application or start a stopped
application.
NMT Applications are network services that can be installed onto your NMT to further extend its
functionality. The added network services are such as:
63
UPnP AV Server
This functions as UPnP AV server to share your NMT media to other UPnP AV clients.
myiHome Server
Allows you to access media files on your NMT over HTTP with a HTML-based UI.
FTP Server
File Transfer server.
Samba Server
Samba remote filesharing server.
NFS Server
NFS remote filesharing server.
Torrent
Allows you to perform and maintain BitTorrent downloads.
Usenet Client
Allows you to use the Usenet downloading service.
// Popcorn Hour A-210
For NMT Applications installation, see NMT Applications Installation.
To set up the NMT Applications to function on your network, see Configuring the NMT
Applications.
64
// Popcorn Hour A-210
6.3.6 DVD/Audio CD
This setup screen allows you to configure the DVD and Audio CD settings of an attached
external USB CD/DVD-ROM drive.
Options
Description
Parental Control
Allows you to turn the parental control on or off.
Autoplay
Allows you to turn Autoplay on or off when a CD or DVD is inserted into the external USB
CD/DVD-ROM drive.
Audio
Allows you to select the default language for your audio output from a DVD or CD.
Subtitle Language
Allows you to select the default language for the subtitles to be displayed when playing a
DVD movie from the external DVD-ROM drive.
65
// Popcorn Hour A-210
6.3.7 Maintenance
This setup screen allows you to view and perform maintenance of your NMT.
Options
Description
Firmware Version
Displays your current NMT firmware version.
Kernel Version
Displays the current NMT kernel version.
NMT Version
Displays the current of your NMT Applications version.
Cardea License
Displays the Cardea license number (if available).
Check for firmware update
Select this option to allow your NMT to check for the latest firmware available.
Your NMT has to be connected to the internet to use this function.
NMT setup wizard
Select this option to setup your NMT when a new HDD is installed into your NMT. This option
will format your HDD to work with your NMT and install the required NMT Applications.
Note: This setup wizard will erase all data in your HDD
if a Fresh Setup is selected.
Reset to factory settings
66
Resets your NMT to its factory default settings.
// Popcorn Hour A-210
6.3.8 Firmware and NMT Applications Update
There are two methods to update the firmware of your NMT. Choose one of the procedures below.
Caution: Do NOT attempt to turn off or restart your NMT when the unit is
performing a firmware update, as doing so will damage your unit.
Online Method
Note: Both the firmware and NMT Applications updates are included in the firmware update file.
1. On your NMT, stop all torrents from uploading and downloading.
2. Stop all file copying/transferring and all network shares.
67
Note: Unplug all USB devices connected to your NMT.
// Popcorn Hour A-210
3. Restart the unit.
Note: To restart the unit, press the POWER button for 3 seconds to allow the internal HDD (if installed) to
turn off. Once the POWER button ring light turns red, switch the unit off using the Power ON/OFF switch
at the rear panel and unplugging the power cord. Wait for 60 seconds before reconnecting the power cord
and switching the unit on using the Power ON/OFF switch. Press the POWER button to start the NMT. Once
the Media Source screen appears on your TV, the restart is completed.
4. Ensure that your NMT is connected to the Internet.
5. Go to Setup > Maintenance > Update and select Check for Firmware Update.
6. Allow the unit to check for updates and perform them if there are updates available
(this may take up to a few hours depending on your Internet connection speed and bandwidth).
7. Your NMT will restart when the update is completed and the NMT Applications Setup will begin
if you have an internal HDD installed.
68
// Popcorn Hour A-210
6.3.9 USB Method (Offline)
To update your NMT without using the Check for Firmware Update function, follow the steps below.
Note: Both the firmware and NMT Applications updates are included in the firmware update file.
1. Using your PC and an Internet connection, download the latest firmware updates from the link below.
http://www.popcornhour.com/download/firmware_update.html
2. Once the download is complete, unzip the files into the root folder of a USB flash memory device.
Please ensure that the file usbupdate-firmware release date.html is present on the USB flash memory device.
3. On your NMT, stop all torrents from uploading and downloading.
4. Stop all file copying/transferring and all network shares.
69
Note: Unplug all USB devices connected to your NMT.
// Popcorn Hour A-210
5. Restart the unit.
Note: To restart the unit, press the POWER button for 3 seconds to allow the internal HDD (if installed) to
turn off. Once the POWER button ring light turns red, switch the unit off using the Power ON/OFF
switch at the rear panel and unplugging the power cord. Wait for 60 seconds before reconnecting
the power cord and switching the unit on using the Power ON/OFF switch. Press the POWER button
to start the NMT. Once the Media Source screen appears on your TV, the restart is completed.
6. Plug the USB flash memory device into a USB port on your NMT. Use the Media Source screen
to select the USB flash memory device.
7. Locate the file usbupdate-firmware release date.html and press ENTER on the remote
control to select it.
8. A screen with the firmware version will be displayed. Press ENTER again to start the firmware
update.
9. Do NOT turn off your NMT while the update is running, as it will cause your NMT to stop working.
10. Your NMT will restart when the update is completed.
70
// Popcorn Hour A-210
6.3.10 NMT Applications Installation/Update
To update or reinstall the NMT Applications on your NMT, follow the instructions below.
1. Using your PC and an Internet connection, download the latest update file from the
link below.
http://www.popcornhour.com/download/firmware_update.html
2. Once the download is complete, unzip the files into the root folder of a USB flash memory device.
Please ensure that the file apps.nmt is present on the USB flash memory device.
3. On your NMT, stop all torrents from uploading and downloading.
4. Stop all file copying/transferring and all network shares.
5. Restart the unit.
71
Note: Unplug all USB devices connected to your NMT.
// Popcorn Hour A-210
Note: To restart the unit, press the POWER button for 3 seconds to allow the internal HDD (if installed)
to turn off. Once the POWER button ring light turns red, switch the unit off using the Power
ON/OFF switch at the rear panel and unplugging the power cord. Wait for 60 seconds before
reconnecting the power cord and switching the unit on using the Power ON/OFF switch. Press
the POWER button to start the NMJ. Once the Media Source screen appears on your TV, the
restart is completed.
6. Plug the USB flash memory device into a USB port on your NMT.
7. On your NMT, browse to Setup > Maintenance > NMT Setup Wizard.
8. Select Typical Setup, press Next, then select USB as the setup source. Press Next to
reinstall or update the existing NMT Application on your NMT.
9. Do NOT turn off your NMT while the update is running, as it will cause your NMT to stop working.
10. Your NMT will restart when the update is completed.
72
// Popcorn Hour A-210
6.4
Web Services
This option allows you to connect to Internet-based services such as the Internet Radio, Media
Service Portal (MSP), view the BitTorrent status screen, and access URLs from your most
frequently visited web service sites.
Press the MENU button to add and/or edit web services on your NMT, as shown below.
//Web Services
// Internet Radio
73
.. .. Press Menu to add/edit
// Popcorn Hour A-210
6.4.1 Internet Radio
The Internet Radio screen allows you to tune into available internet radio stations.
//Internet Radio
Menu
Search
Log Out
74
01
My Favorites
02
Browse by Genre
03
Browse by Country
04
Browse by Language
// Popcorn Hour A-210
6.4.2 MSP (Media Service Portal)
The Media Service Portal allows you to access popular unicast web-based media content such
as YouTube, Picasaweb and Flickr using your NMT.
login
Vuze (video)
Get ALL your podcasts from ONE place delivered ANYWHERE
3 /40
press number key to switch channel mode
1 video
75
2 audio
3 photo
4 rss
5
what’s new
// Popcorn Hour A-210
6.4.3 MSP Community
The MSP Community is a web community containing user-developed plugins.
// 20 items
For more information about the MSP Community, kindly refer to:
http://www.networkedmediatank.com/wiki/index.php/Web_Services
76
// Popcorn Hour A-210
6.4.4 Torrent
The Torrent screen allows you to view and control the status of your BitTorrent downloads.
// Torrent
Free space: 726GB Used: 0%
Refresh Scheduler
delete
Video 1 (816.74M)
DL: 495.70M (60.8%)
Rx: 9.90kB/s
Peer(s) : 2
Tx: 10.00kB/s
Ratio
Rx: 0.00kB/s
Peer(s) : 0
stop
Tx: 0.00kB/s
Ratio
Rx: 1.43kB/s
Peer(s) : 3
Tx: 62.05kB/s
Ratio
Seeding
Video 3(233.8M)
DL: 99.93M (100.0%)
Setting
Downloading
Video 2 (513.2M)
DL: 0.00M (0.0%)
start
Downloading
1 - 3 / 5 items
77
Note: This option requires the installation of a HDD and the NMT Applications.
For more information about BitTorrent downloads, see Torrent Setup.
07
7.1
Configuring the NMT Applications
NAS (Network-Attached Storage) Functions
7.1.1 FTP Server
The FTP service allows for simple and convenient file transfer to and from your NMT.
1. Connect with an FTP client, such as FileZilla.
2. Use the following settings and credentials:
78
Host
Port
Username
Password
:
:
:
:
IP address of your NMT
21
ftpuser
1234
// Popcorn Hour A-210
// Popcorn Hour A-210
7.1.2 SMB Server
Samba Share (SMB) is one of the most common ways to share files over a network. SMB can
be used for streaming your media files as well.
1. Connect to the NMT with the unit’s IP address or browse to the SMB host name;
for example \\PCH-C200\.
2. Use the following credentials:
79
Username
Password
: nmt
: 1234
// Popcorn Hour A-210
7.1.3 NFS Shares (Network File System)
7.1.3.1 haneWIN NFS Server
For information on the haneWIN NFS Server, visit http://www.hanewin.net/
7.1.3.2 Setting up NFS Shares on Linux OS
Follow the steps below to set up a NFS share on Linux OS.
1. Configure the kernel to include the NFS file-system and server support.
2. Edit the /etc/exports file and add the following commands as a new line:
<access path> <allowed IP address range+permissions>
For example: /home/share 192.168.0.0/24(rw)
This will share the /home/share folder to everyone in the 192.168.0.x network with Read
and Write (rw) permissions.
3. Run /usr/sbin/exportfs -a to update the changes.
80
// Popcorn Hour A-210
7.1.4 Syabas CE-HTML Server (myiHome)
Showcasing your digital content is made simpler by having an organized media library.
The myiHome Media Server is a proprietary server software designed for your PC to ease
the sharing of your media with your NMT.
Popcorn Hour provides the myiHome software for use with your NMT, and it can be downloaded
from:
http://www.popcornhour.com/download/myihome/myihome.html
Once the myiHome software is installed on your PC, it should be automatically detected by your
NMT, and added to the list on your Media Source screen.
81
// Popcorn Hour A-210
7.2
Torrents Setup
Open Remove Pause Resume Pause All Resume All
1 Transfers
All
Filter Inspector
Downloading
Seeding
Total DL: 0 bytes/s
Paused
Total UL: 0 bytes/s
filter
Video 1_h264_850x362.mkv
0 bytes of 30.8 MB (0.00%)
Pause
Video 1_h264_850x362.mkv
30.8 MB
Torrent Information
Tracker:
undefined:undefinedhttp://abc.aaauiop
Hash:
ajjfjfhuv1182125gfgkfkj8455k455k5j
Secure:
Public Torrent
Comment:
Provided by abc
Created By
Creator:
BitComet/1.0
Date:
Wed, 30 April 200815:43:18 GMT
Free Space: 2.05 GB (90.9%)
To setup your NMT to perform BitTorrent downloads, you must first have the NMT Applications
installed on your NMT. The supplied BitTorrent client is accessible using your PC connected to
the NMT via network. Follow the steps below to access the BitTorrent client:
1. On your PC, use a web browser to access the BitTorrent client on the NMT. Type the following
address in the URL address bar of the web browser:
http://NMT-IP:8883/torrent/bt.cgi
(where NMT-IP is the IP address of your NMT on your network, for example 192.168.2.2.)
82
// Popcorn Hour A-210
2. At the BitTorrent client GUI, click on Browse and select the torrent file that you have downloaded
to your PC earlier.
3. Once the torrent file is selected, click on Upload to add the torrent file to the torrent list on your
NMT. The BitTorrent client will start the torrent download if the Torrent option on your NMT is
enabled.
4. Other functions available such as the Scheduler can be used to schedule torrent downloads and
set their upload/download limits, or the Setting screen to customize the BitTorrent client.
Note: The NMT has to be switched ON and properly connected to the Internet during the scheduled
download time in order for the BitTorrent client to download the required files.
83
// Popcorn Hour A-210
7.2.1 Enable/Disable BitTorrent Downloading
The BitTorrent client runs as a service on the NMT and installed together with the NMT Applications
package.
To enable or disable the BitTorrent service, follow the steps below:
1. Go to Setup > NMT Applications.
2. In the list of installed NMT Applications, locate the Torrent application and notice its status.
3. If the status is labeled Start, it means that the BitTorrent client is currently disabled.
Select Start to enable it or Stop to disable the BitTorrent client.
84
// Popcorn Hour A-210
7.3
Usenet Client Setup: NZBGet
NZBGet is a command-line based binary newsgrabber that downloads files from Usenet servers
based on information given in NZB files. NZBGet can be installed on the NMT and the files can
be downloaded straight into the NMT.
To run the NZBGet application you need access to a Usenet provider. Your ISP may have a news
server that you can access, or you can have a separate Usenet account on a pay-server. Usenet
accounts vary in prices from a few dollars up to $35 a month depending on your needs. There are
many Usenet servers to choose from, and here is a list provided by Google:
http://www.google.co.uk/search?q=usenet+provider+comparison
Once you have a Usenet account, you can configure NZBGet on your NMT to access the account.
Your Usenet provider will provide you with the information required, such as:
1. User ID and Password.
2. News-server name and port to connect (usually at port 119).
3. Number of concurrent connections allowed.
85
// Popcorn Hour A-210
7.3.1 Setting up the NZBGet on the NMT
In the root of your hard disk you will find a folder called .nzbget. Inside this folder you will
find two files: nzbget.conf and unpak.sh.
Note: Some FTP clients may hide this folder because it begins with a dot .. On UNIX
systems, files or folders that begin with a dot are hidden from normal directory
listings. If you cannot see the folder, find an option on your client that will show
hidden files or try to type in the folder name.
You can open and edit nzbget.conf with a text editor.
Note: To edit the nzbget.conf file, use a UNIX-format capable text editor.
In the text editor, fill in the information you got from your Usenet provider:
86
# Host-name of news server:
server1.host=news.yourserver.com
(Put the server name behind the = )
// Popcorn Hour A-210
# Port to connect to
(default should be set to 119 if not specified):
server1.port=119
# Username to use for authentication
(change USERNAME to the name supplied by your Usenet provider):
server1.username=USERNAME
# Password to use for authentication
(change PASSWORD to the password supplied by your Usenet provider):
server1.password=PASSWORD
# Maximum number of simultaneous connections to this server:
server1.connections=4
Once completed, save the file to the same place and restart the Usenet service in the NMT
Applications menu (Setup > NMT Applications).
87
// Popcorn Hour A-210
7.3.2 Usenet: Working with NZBGet
Working with NZBget is simple and quick. Connect to the NZBGet web GUI from a browser
via http://ip.of.your.nmt:8066.
Note: If the IP address of your NMT is 192.168.1.100, type
http://192.168.1.100:8066 in the address bar of your web browser.
To log in, use the following access username and password:
User ID
Password
: nmt
: 1234
NZBGet Web Interface
Please login
Username:
nmt
Password:
Login
88
// Popcorn Hour A-210
You will now see the NZBGet web GUI, as shown below:
NZBGet Web Interface v 1.0
Upload NZB file
Currently downloading
Choose a file to upload:
name
My Kids Performance Day
Browse...
download rate
Upload File
upload status
Messages
Max download rate
New rate:
0
Set
NZBGet version 0.4.1
uptime:
download time:
average download rate:
total downloaded:
free disk space:
0:36:21
0:36:21
0KB/s
0 MB
2.06 GB
pause resume refresh logout
view mode: groups
files
Next updates in 6 seconds
DETAIL
DETAIL
DETAIL
DETAIL
DETAIL
DETAIL
DETAIL
DETAIL
DETAIL
DETAIL
DETAIL
DETAIL
DETAIL
DETAIL
DETAIL
DETAIL
DETAIL
DETAIL
Waiting
Waiting
Waiting
Waiting
Waiting
Waiting
Waiting
Waiting
Waiting
Waiting
Waiting
Waiting
Waiting
Waiting
Waiting
Waiting
Waiting
Waiting
1 2 3 4 5
89
10
10
10
10
10
10
10
10
10
10
10
10
10
10
10
10
10
10
sec
sec
sec
sec
sec
sec
sec
sec
sec
sec
sec
sec
sec
sec
sec
sec
sec
sec
to
to
to
to
to
to
to
to
to
to
to
to
to
to
to
to
to
to
retry
retry
retry
retry
retry
retry
retry
retry
retry
retry
retry
retry
retry
retry
retry
retry
retry
retry
0KB/s
left remaining time
4.52 GB
0%
// Popcorn Hour A-210
7.3.3 Downloading
To perform a download, upload your NZB file by clicking on the Choose… button and browsing
to the NZB file, as shown below.
NZBGet Web Interface v 1.0
Upload NZB file
Currently downloading
Choose a file to upload:
name
My Kids Performance Day
Browse...
download rate
0KB/s
left remaining time
4.52 GB
Upload File
upload status
Max download rate
New rate:
0
Set
NZBGet version 0.4.1
uptime:
download time:
average download rate:
total downloaded:
free disk space:
0:36:21
0:36:21
0KB/s
0 MB
2.06 GB
pause resume refresh logout
view mode: groups
files
Next updates in 6 seconds
DETAIL
DETAIL
DETAIL
DETAIL
DETAIL
DETAIL
DETAIL
DETAIL
DETAIL
DETAIL
DETAIL
DETAIL
DETAIL
DETAIL
DETAIL
DETAIL
DETAIL
DETAIL
Waiting
Waiting
Waiting
Waiting
Waiting
Waiting
Waiting
Waiting
Waiting
Waiting
Waiting
Waiting
Waiting
Waiting
Waiting
Waiting
Waiting
Waiting
1 2 3 4 5
10
10
10
10
10
10
10
10
10
10
10
10
10
10
10
10
10
10
sec
sec
sec
sec
sec
sec
sec
sec
sec
sec
sec
sec
sec
sec
sec
sec
sec
sec
to retry
toFile
retry
Upload
to retry
to retry Look in:
to retry
to retry
My Recent
to retry
Documents
to retry
to retry
Desktop
to retry
to retry
to retry
to My
retry
Documents
to retry
to retry
to retry
My Computer
to retry
to retry
My Network
Places
Desktop
My Documents
My Computer
My Network Places
Open
File name:
Files of type:
All Files
Next, click the Upload File button and begin the download.
The file will be uploaded to your NMT and added to download queue.
(This process does not upload any files to the Internet).
90
0%
Messages
Cancel
// Popcorn Hour A-210
After uploading the NZB file, it will take a minute before the program commences the download.
There is a safety interval of 1 minute to allow NZBGet to ensure that the NZB file is completely
on the HDD before commencing the download. You may adjust the safety interval in nzbget.conf,
option NzbDirFileAge. The progress of the download is displayed on the web GUI for your
convenience.
After a download is finished and the NZB file set contains par2 files, your download will be checked
and repaired if necessary. The unpack script in .nzbget will be called and your download will be
unpacked. The unpack script of the NMT is able to unpack .RAR packed files and also unpack .RAR
files nested inside of .RAR packs.
With the GUI you will be able to pause, delete, and move your downloads. You may set the file
download priority of important file by moving them to the top of the queue with the buttons in
front of the file set.
If you want to pause all downloads, you can do that via the pause button on the bottom left of
the web GUI, and restart it again with the resume button.
All downloads will be downloaded and unpacked to the folder Download on your NMT’s HDD and
will be in a folder that has the same name as the NZB file you uploaded, so be sure to give your
NZB files descriptive names to ease identification.
91
// Popcorn Hour A-210
For more information and download optimization tips, kindly refer to:
http://www.networkedmediatank.com/wiki/index.php/Nzbget
92
08
8.1
Troubleshooting
// Popcorn Hour A-210
Frequently Asked Questions (FAQs)
This collection of frequently asked questions (FAQs) provides brief answers to many common
questions about the Popcorn Hour A-210 NMT.
Q1: Why can’t I play my DVD .iso file using myiHome?
myihome does not support DVD playback. Please use the SMB/NFS functions for DVD .iso playback.
Q2: My Popcorn Hour A-210 NMT will not start after resetting it using the factory default
settings function.
The factory default setting function will reset your video display to the Auto mode, which may not
be compatible with your TV or projector. Refer to Video Mode Options to change your display
mode to suit your TV or projector.
Q3: There is no display or video output after waking up the Popcorn Hour A-210 NMT
from Standby mode.
This is because the Video output mode has been changed using the TV MODE key and the settings
were not saved. Go to Setup > Audio/Video to configure the Video Output mode again and save
the settings using the SAVE button.
93
// Popcorn Hour A-210
Q4: (HDMI Mode) During initial setup, no display or video signal detected.
1. Disconnect the HDMI connection and connect your NMT to your TV using a Composite Video
connection
2. Restart the NMT and wait for the loading screen to appear
3. Wait until the screen goes blank
4. Press TV MODE -> 1 for NTSC or TV MODE -> 2 for PAL on your remote control to force a
video output mode.
5. Once the menu screen is visible, go to Setup > Audio/Video and set up the proper HDMI
output mode for your TV and then SAVE the selection.
6. Remove the Composite Video connections and reconnect the HDMI connectors to the NMT and
your TV.
7. Restart the NMT.
94
// Popcorn Hour A-210
Q5: Can I plug in an external CD/DVD-ROM drive?
Yes, the USB port can support an external CD/DVD-ROM drive. However, the NMT does not support
CSS encryption. Your DVD must region-free and encryption-free in order to use the CD/DVD-ROM
drive function.
Q6: Where can I download/update the firmware for my Popcorn Hour A-210 NMT?
See Firmware and NMT Applications Update for instructions and more information.
Q7: Help, my video files are not playing. Is this a bug or a faulty Popcorn Hour A-210 NMT?
Not all codec and encoding formats are compatible with your NMT. See Supported Audio/Video
Formats or go to MediaInfo (http://mediainfo.sourceforge.net/) for more information.
For further help and information regarding video playback, kindly refer to our forum at
http://www.networkedmediatank.com for advice.
95
// Popcorn Hour A-210
Q8: Why won’t the video subtitles appear?
• Ensure that the subtitles are in a supported format
• The subtitle file must be in the same folder as the video file
• The name of the subtitle file must be the same as the name of the movie
(except for the file format extension).
• The Subtitle Language (Setup > Preferences > Subtitle Language) must not be set to
None, as this will disable all subtitles. Remember to save the setting when done.
Q9: How do I back up my DVD so that it can be played back by the Popcorn Hour A-210 NMT ?
The DVD has to be saved into the .iso format. DVD .iso playback is only supported via NFS/SMB
network connection (it will not work with myiHome). In case of poor quality playback in SMB, use
NFS to share the file.
96
// Popcorn Hour A-210
Q10: How do I recover the Popcorn Hour A-210 NMT from a failed firmware update with
the fail-safe kernel?
To recover the NMT if the firmware update fails and the NMT is no longer responding, visit the
following link for the latest methods and required files. (PC with internet connection required)
http://support.popcornhour.com/article.aspx?id=1089
Note: This method is only applicable for the Popcorn Hour C-200 NMT.
Q11: What are the hard disk drives (HDDs) that are compatible with the Popcorn Hour
A-210 NMT?
For an updated list of compatible HDDs, please refer to:
http://www.networkedmediatank.com/wiki/index.php/HDD_Compatibility
Q12: How do I fix the EXT2/EXT3 filesystem in the Popcorn Hour A-210 NMT if it is corrupted?
1. Download the tools from http://files.syabas.com/networkedmediatank/scan_package.zip
and unzip them into the root folder of a USB flash storage device.
97
// Popcorn Hour A-210
2. Select the USB flash storage device as the Media Source and browse to the Others media filter.
Select the scandisk.html.
3. Select the Disable NMT option.
4. Then click on the Scan NMT Partition option to scan the HDD partition for damaged sectors.
Restart the NMT when the scanning has been completed.
5. Browse to the Others media filter again and select Enable NMT.
6. Restart the NMT and test the options or services that were affected.
7. If the problem persists, reinstall the NMT Applications or repeat steps 3 to 6 with the
Scan Content Partition option selected.
98
// Popcorn Hour A-210
8.2
Technical Support Contact Information
If you experience problems not listed in the Troubleshooting chapter and require help and support
for your NMT, kindly refer to our online Help and Support webpage at:
http://www.popcornhour.com
On the Popcorn Hour website, click on:
Support - For technical articles, downloads, documentation and other materials to help you get
the most from your Popcorn Hour NMT.
Community – To get connected to the online Popcorn Hour community, user forums, guides,
tutorials, and the ever-expanding NMT Wiki.
99
// Popcorn Hour A-210
8.3
Accessories Installation
8.3.1 Chassis Fan Installation
Your NMT allows the installation of an internal chassis fan to assist with lowering the operating
temperature of your unit. Follow the steps below to install a 60mm computer fan into the NMT.
1. Remove the top cover of your NMT and locate the chassis fan mount.
2. Align the fan to expel warm air from the inside of your NMT.
3. Secure the fan to the NMT using four screws and plug in the power supply of the chassis fan
to the Molex connector (labeled: BACK FAN) on the mainboard.
4. Select the appropriate jumper configuration to control the fan voltage settings.
100
Note: The chassis fan is not included with your NMT. Kindly contact your nearest
IT store to purchase a chassis fan.
09
9.1
A-210 Technical Specifications
User Interface
Types
Bonjour
UPnP SSDP
UPnP AV
Windows Media Connect
Windows Media Player NSS
Samba
NFS
BitTorrent P2P
Usenet downloader
Casgle iDVR RSS feed downloader
101
Media Servers
myiHome, myiHomeLite, myiHomeMS (UPnP), MSP Portal
Third-party media servers
WizD, SwissCenter, Llink, GB-PVR
Third-party Apps
NMT Community Software Installer
NAS Access
SMB, NFS, FTP
// Popcorn Hour A-210
// Popcorn Hour A-210
9.2
Web Services
Video
Revision 3, Videocast, CNET TV, Mediafly, Mevio, Bliptv, Break Podcast, CBS
Evening News, CNN Anderson Cooper 360 Daily, CNN The Larry King Podcast,
NBC Today Show, The CNN Daily, CNN In Case You Missed It, NBC Nightly News,
NBC Meet The Press, CBS Face the Nation, Podfinder UK, Motorz.
Audio
Jamendo, iPodcast, BBC Podcast, Indiefeed, CNN News, ABC News.
Photo
Flickr, Picasaweb, Pikeo, 23, Photobucket, SmugMug.
RSS feed
Yahoo! Weather, NMT Forum, Bloglines, Cinecast, MSNBC News, Traffic
Condition, Yahoo! Traffic Alerts, Yahoo! News, Weather Bug.
Peer-to-peer TV
102
SayaTV.
// Popcorn Hour A-210
9.3
Internet Radio
SHOUTCast™ Radio, Radiobox, Live365 Radio.
Apps Market
Apps Store for your Popcorn Hour
Supported Media File Formats
Video Containers
MPEG1/2/4 Elementary (M1V, M2V, M4V)
MPEG1/2 PS (M2P, MPG, DAT, VOB)
MPEG2 Transport Stream (TS, TP, TRP, M2T, M2TS, MTS)
AVI, ASF, WMV
Matroska (MKV)
MOV (H.264), MP4, RMP4
103
// Popcorn Hour A-210
Video Decoders
XVID SD/HD
MPEG-1
MPEG-2 MP@HL
MPEG-4.2 ASP@L5, 720p, 1-point GMC
MPEG-4.10 (H.264)
•
BP@L3
•
[email protected]
•
[email protected]
•
[email protected]
WMV9
•
MP@HL
SMPTE 421M (VC-1)
Audio Containers
•
MP@HL
•
AP@L3
AAC, M4A
MPEG audio (MP1, MP2, MP3, MPA)
WAV
WMA
FLAC
OGG
TTA
104
// Popcorn Hour A-210
Audio Decoders
Dolby Digital
DTS
WMA, WMA Pro
MPEG-1 Layer 1,2,3 MPEG-4 AAC-LC, MPEG-4 HE-AAC, MPEG-4 BSAC
LPCM
FLAC
Vorbis
DTS
Audio Pass-Through
DTS-HD MA
DTS-HD HR
Dolby Digital
Dolby Digital Plus
Dolby True HD
105
// Popcorn Hour A-210
Other Formats
ISO
IFO navigation
AVCHD navigation
Simple BD navigation
Photo Formats
JPEG
BMP
PNG
GIF
Subtitle Formats
SRT
MicroDVD SUB
SSA
SUB/IDX
106
// Popcorn Hour A-210
9.4
Hardware
Chipset
Sigma Designs SMP8643, 667 MHz CPU with floating point coprocessor
Memory
512MB DDR2 DRAM, 256MB NAND Flash
Audio/Video Outputs
HDMI v1.3a, 36bpp deep color
12-bit xvYCC processing
HDCP 1.2 content protection
Component Video
S-Video
Composite Video
Stereo Analog Audio
S/PDIF Optical
Coaxial Digital Audio
Ports/Connectors
Power LED and Attention LED
1x USB 2.0 host at the front
1x USB 2.0 host at the back
1x USB 2.0 slave at the back
107
// Popcorn Hour A-210
Internal mounting for 2.5” or 3.5” SATA HDD
Infra-Red Remote Control
Full power down, standby and power up by remote control
Service pin hole for TV Mode switching and shutting down without remote control
High Quality Aluminum Case
Fanless Operation
Dimension
Width 10.4” (265 mm)
Depth 5.31” (135 mm)
Height 1.77” (45 mm)
Weight
Network
2.2 lbs (1kg)
Ethernet 10/100/1000** Mbps
** Gigabit support depends on Switch/Router compatibility
108
// Popcorn Hour A-210
Power
AC-DC adaptor
Input 100~240V AC, 50~60 Hz
Output 12V DC, 3A max
typical : 8 W (no additional device installed/attached)
maximum : 36 W
109
A
10.1
Appendix A
// Popcorn Hour A-210
Apps Market - Internet Connection Required
1. Navigate to Web Services -> Apps Market.
Figure 1.0 : Apps screen
2. A list of apps market available for installation will be shown.
3. Navigate with your D-pad on your remote, and choose which apps market you like to install.
110
// Popcorn Hour A-210
4. Choose Install and hit enter on the remote. You will be prompted to start the application once
installation is successful.
Figure 2.0 : Apps Market installation successful prompt
5. Hit Left on the D-pad to bring up the apps menu, which will provide more viewing options.
Figure 3.0 : Apps Market menu screen
111
// Popcorn Hour A-210
6. Navigate to Exit, return to Apps Market.
7. On Apps, navigate left to access your Apps Market that you have already installed.
Figure 4.0 : My Apps screen
112
// Popcorn Hour A-210
10.2
NMJ - Required Internet Connection
Preparation for Jukebox Setup and Scanning
1. Movie - For more accurate Jukebox setup, we recommend you change the filename to
remove any extra tagging other than the movie name. For example:
movie_name HD1080p.mkv should be rename to:
movie_name.mkv
TV series - If the TV series has multiple seasons, the files must be named as follows:
tvseries S01E01.mkv
tvseries S01E02.mkv
...
tvseries S01E02.mkv
( S = Season and E = Episode within that series)
113
Note: If the cover art is incorrect for a movie of TV series after Jukebox setup,
you can manually edit the information page for the particular item to
correct the mistake.
// Popcorn Hour A-210
2. While browsing the content of any writable source such as HDD, Samba or NFS Share,
press corresponding colored button to enter Jukebox mode.
114
Video Wall
Music Wall
Photo Wall
Apps
// Popcorn Hour A-210
3. If this is your first time, it will prompt for scanning of media files on your storage device,
to build the user interface.
Figure 5.0 : Create database pop-up screen
4. Press enter on “OK” and it will start scanning through the storage for media files. After a
few minutes, a progress indicator will be displayed on center corner. This process may take
from a few minutes to hours, depending on the amount of content on your storage.
Figure 6.0 : Scanning progress indicator screen
115
// Popcorn Hour A-210
Note: If the cover art is incorrect for a movie of TV series after Jukebox setup,
you can manually edit the information page for the particular item to
correct the mistake.
5. Once the scanning is done, it will enter Jukebox user interface with video wall.
6. You may return to list view by using the corresponding colored key.
7. In Setup preference, NMJ database update must set to automatic, otherwise it will not
scan for new contents when entering Jukebox.
116
// Popcorn Hour A-210
Networked Media Jukebox Guide
1. In Jukebox mode, press the MENU
to access Jukebox option.
Figure 7.0 : NMJ movie screen
•
•
•
•
•
•
•
•
•
117
By Movie - Sort by Movies
By TV Series - Sort by TV Series
By Genre - Sort by movie genre, for example: Acion, Adventure or Cartoon
By Year - Sort by movie year of release
By User Rating - Sort by User Ratings of Movies
Search - Allow you to input movie title to quickly conduct a search
Parental Control - Enable or Disable Parental Control
View Mode - Wall or Category Mode
Help - An MNJ Overview
// Popcorn Hour A-210
2. In Jukebox mode, press the MENU to access Help.
Figure 8.0 : NMJ help screen
3. In Jukebox menu, press LEFT to access additional menu option.
Figure 9.0 : NMJ help guide screen
118
// Popcorn Hour A-210
•
•
•
•
•
Quick access to Movie Jukebox
Quick access to Music Jukebox
Quick access to Photo Jukebox
Quick access to Apps
User Preference
•
Security
- Enable/Disable the “DELETE” key function
•
Scan
Media Source - Manually start a scan for a new media
•
Autostart
Menu - Enable/Disable the Autostart menu
• Setup
Figure 11.0 : NMJ security screen
119
// Popcorn Hour A-210
Shortcut Keys
1. Press ANGLE button
to quickly switch view mode.
Figure 13.0 : Shortcut video view mode screen
2. Press TIME SEEK button
to quickly switch view mode.
Figure 14.0 : Switch view mode screen
120
// Popcorn Hour A-210
3. Press Alphanumeric keys to access quick search.
Figure 15.0 : Quick search screen
Options in Movie Sypnosis
1. Delete - Delete the current selected movie, can disable in Jukebox menu.
Figure 16.0 : Delete movie screen
121
// Popcorn Hour A-210
2. User Rating - You can rate your movies here, from 1 to 5 stars.
Figure 17.0 : User rating screen
3. Edit - Edit movie sypnosis data.
Figure 18.0 : Edit movie sypnosis screen
122
// Popcorn Hour A-210
4. Play - Play your Movie.
Figure 19.0 : Movie screen
You may scroll up or down in this page, by using the UP or DOWN button in remote to move
to next movie.
123