1
EZ Post Installation with Welded Base Plate
Start by ensuring that you have a solid and level mounting surface for your Post(s). Washers or
galvanized/stainless metal shims (not included) may be used to plum posts.
Installation into wood/composite decking/Non ACQ lumber:
STEP 1:
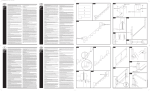
1. Determine the 3”x3” post location(s). Spacing between posts should be 6’
or less to meet IBC codes when installed 24” or higher above the ground.
2. We recommend the edge of the 5”x5” base plate is fastened at least 1 ¾” in
from the edge of the deck (do not lag screw into the rim joist unless
absolutely necessary).
3. Reinforce the decking with support lumber “backer board”. A piece of
2”x10” lumber cut to fit tightly between the joists and installed flat under
the decking works great.
4. Square up the post with the deck and mark all (4) holes with a pencil.
5. At your (4) pencil marks, drill a ¼” hole through the decking and backer
board.
6. Using a 7/16” socket bit in your drill, thread the ¼”x4” Thru Bolt into the
post plate, through the deck, and through the backer board. **
7. Thread the Tee Nut onto the 4” Thru Bolt underneath the decking and
support lumber.
8. Tighten post firmly to deck.
9. Slide on optional post base cover to hide fasteners.
10. Attach post cap after railing has been installed using 1” fasteners
provided.
** Note: The 4” Thru Bolt fits very tightly into the post base plate (especially
Textured Black Posts due to thicker powder coat finish) and in some cases must be
predrilled using a ¼” drill bit.
www.ezhandrail.com for videos
8