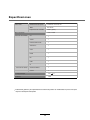
1
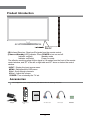
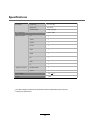
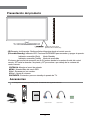
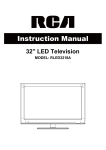
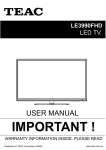
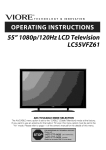
manual de instrucciones / instructions for use
Televisor Digital COLOR FULL HD LED 22"
Digital Full HD LED COLOR Television 22"
Precaución: lea y conserve estas importantes instrucciones
Caution: please read and preserve these important instructions
ref. SS-2237
Contents
Contents
Caution
Safety Information
1
2
Product Introduction
Accessories
3
3
Connections
4
Remote Control
5-6
Basic Operation
7
OSD Menu
1. Picture menu
2. Sound menu
3. Channel menu
4. Feature menu
5. Setup menu
8-14
8
9
10-11
12-13
14
Multimedia Operation
15-17
Recording Operation
18-20
Simple Troubleshooting
21
Specifications
22
Caution
Caution
The lightning flash with arrowhead symbol, within an equilateral triangle
is intended to alert the user to the presence of un-insulated “dangerous
voltage” within the products enclosure that may be of sufficient magnitude
to constitute a risk of electric shock to the persons.
The exclamation point within an equilateral triangle is intend to alert the
user to the presence of important operating and maintenance (servicing)
instructions in the literature accompanying the appliance.
Correct disposal of this Product
(Waste Electrical & Electronic Equipment (WEEE)
Your product is designed and manufactured with high quality materials and
components which can be recycled and reused.
This symbol means that electrical and electronic equipment, at their endof-life should be disposed of separately from your household waste.
Please dispose of this equipment at your local community waste collection/
recycling center.
In the USA there are separate collection systems for used electrical and
electronic products. Please help us to conserve the environment we live in!
directives.
1
Safety Information
Safety Information
To ensure reliable and safe operation of this equipment, please read carefully all the
instructions in this user guide, especially the safety information below.
1. Warnning: Only use attachments/accessories specified provided by the manufacturer, the
apparatus is supplied by AC adapter, the AC adapter is used as disconnect device, the
disconnect device shall remain readily operable.
2. Warnning: The battery (battery or batteries or battery pack) shall not be exposed to excessive
heat such as sunshine, fire or the like.
3. Warning: To prevent fire or electric shock hazard, do not expose the unit to rain or moisture.
Do not expose the Adaptor and LED TV to water (dripping or splashing) and no objects filled
with liquids, such as vases, should be placed on the unit.
4. Attention: Can only be used for 12V vehicle-mounted output, can't be used for
24V vehicle-mounted output !
5. No naked flame sources, such as lighted candles, should be placed on the apparatus.
6. The ventilation should not be impeded by covering the ventilation openings with items, such as
newspapers, table-cloths, curtains, etc.
7. Attention should be drawn to the environmental aspects of battery disposal.
Electrical safety
• To prevent overload, don't share the same mains supply socket with too many other
items of equipment.
- Do not place any connecting wires where they may be stepped on or tripped over.
- Do not place heavy items on the leads, which may damage them.
- Hold the Mains plug, not the wires, when removing from a socket.
- During a thunderstorm or while leaving the TV for long periods, disconnect the aerial
(if outdoor) and mains power from the supply.
- Do not allow water or moisture to enter the TV . Do NOT use in wet
or moist areas such as Bathrooms, steamy kitchens or near swimming pools.
• Pull the plug out immediately, and seek professional help if:
- the mains plug or cable is damaged.
- liquid is spilt onto the set, or if it is accidentally exposed to water or moisture.
- anything accidentally penetrates the ventilation slots.
- the set does not work normally.
- Do NOT remove the safety covers. There are no user serviceable parts inside.
You may invalidate the warranty. Qualified personnel only are permitted to service
this apparatus.
- To avoid battery leakage, remove exhausted batteries from the remote control
handset, or when not using for along period.
- Do NOT break open or throw exhausted batteries on a fire.
Physical safety
• Do NOT block ventilation slots in the back cover. You may place the TV in a cabinet,
but ensure at least 5cm (2") clearance all around the unit.
• Do NOT tap or shake the TV screen, you may damage the internal circuitry. Take good
care of the remote control, do not drop it or allow it to come into contact with liquids.
• To clean the TV use a soft dry cloth. Do NOT use solvents or petrol based fluids. For
stubborn stains, you may use a damp soft cloth with diluted detergent.
2
Product Introduction
Product Introduction
INPUT
MENU
CH+
CHVOL+
VOLPOWER
Remote Control window
(IR) Infrared Receiver: Receives IR signals from the remote control.
(Power on/Standby) LED indicator: Press POWER to turn on and off.
Indicator on(Red)
Standby mode
Indicator on(Green)
Power on mode
The effective receiving range for the signal is 5-8 metres from the front of the remote
control window, and 300 to the left or right side and 200 above or below the control
window.
INPUT: Display the input source menu.
MENU: Display/exit the OSD menu.
CH+/-: Scan through channels.
VOL+/-: Adjust the volume.
POWER: Turn on/standby the TV set.
Accessories
The configuration of the components may look different fron the following illustration.
Adapter
Remote Control
E-14
User’s Guide
Mini YPbPr cable
3
Mini AV cable
Batteries
Connections
HDMI
USB
RF
mini YPbPr mini AV
Connections
Headphone out
POWER
PC-IN
SCART
VGA
Coax
POWER: Connect to the mains adaptor.
Headphone: Connect it to your headphone or other audio equipment.
PC-IN: Connect it to the audio output terminal of PC.
VGA: For PC display.Connect it to the D-Sub 15 pins analog output connector of the PC.
SCART: Connect them to the SCART video output terminal of DVD.(used in component source)
Coax: Digital coaxial output.
HDMI: Connect it to the HDMI of DVD or other equipment.
USB: USB jack for update,media and PVR.
RF: Connect antenna or cable 75 Ohm coaxial to receive TV signal.
Common Interface: CI slot.
mini YPbPr: Connect them to the YPbPr video output terminal of DVD.(used in
component source)
mini AV: Connect it to the audio & video output terminals of DVD with the Converter cable.
(Audio terminals are shared with YPbPr)
4
Remote Control
Remote Control
The remote control is using Infra-Red(IR). Point it towards the front of the TV. The remote
control may not work correctly if it is operated out of range or out of angle.
POWER
PICTURE
MUTE
SOUND
ASPECT
SLEEP
EPG
FAV
SUBTITLE CH.LIST
TV/RADIO
INPUT
OK
MENU
EXIT
1
2
3
4
5
6
7
8
DISPLAY
9
0
REC
TV/TXT
INDEX
PICTURE: Select the picture mode.
SOUND: Select the sound mode.
ASPECT: Adjust picture size
SLEEP: StandbyTimer
SUBTITLE: Turn on/off the subtitle display in DTV mode
CH.LIST: Display the programs list.
EPG: To show the Electronic Program Guide during nomenu state only in DTV mode.
FAV: Display the favorite program list.
Buttons for Basic operating
TV/RADIO: Switch to TV/RADIO.
INPUT : Display the input source menu.
THUMBSTICK(
OK): Allows you to navigate
the on-screen menus and adjust the system settings to your
preference.
MENU: Press to display the OSD menu.
EXIT: Press to exit the OSD menu.
REC.LIST
VOL
POWER(red button): Turn the TV on/standby.
MUTE: Press to mute the sound, press again or press
VOL+ to unmute.
CH
CANCEL REVEAL
HOLD
SIZE
NICAM/A2
SUBPAGE
NUMBER BUTTONS: Choose channel directly. Press
number buttons and press OK button to play the channel.
: Return to the previous channel viewed.
DISPLAY: Press to display the current mode’s information.
5
Remote Control
Remote Control
POWER
PICTURE
MUTE
SOUND
ASPECT
SLEEP
EPG
FAV
SUBTITLE CH.LIST
TV/RADIO
INPUT
OK
MENU
EXIT
1
2
3
4
5
6
7
8
9
0
DISPLAY
REC
REC.LIST
VOL
TV/TXT
INDEX
CH
CANCEL REVEAL
HOLD
VOL +/- : Volume +/-.
CH / : Channel/Program +/-.
REC: Press to start recording the program in DTV mode.
REC.LIST: Record List.
: Play/pause program.
: Stop program.
: Fast reverse.
: Fast forward.
: Previous chapter.
: Next chapter.
SIZE
NICAM/A2
SUBPAGE
Colour buttons : Short cuts-follow the coloured links in the text.
Buttons for TELETEXT operating
You could use the buttons only in TELETEXT .
TV/TXT: Turn off/on the Teletext display.
CANCEL: Cancel the Teletext display.
REVEAL: Reveal any hidden text.
NICAM/A2: TV Nicam/A2 select.
INDEX: Go to index.
HOLD: Hold or carry on the current subpage.
SIZE: Press to see top half of page double size. Press again to
see the bottom half of page double size. Press again for
normal size.
SUBPAGE: Press to enter subpages, pressagain to cancel.
6
Basic Operation
Basic Operation
Power on/off
1. Connect to the power supply with the adaptor.
2. -To turn on the TV
Press POWER button on the TV or remote control.
-To turn off the TV
Press POWER button on the TV or remote control.
Input Source select
Press INPUT button on the TV set or remote control to display the
input source menu, and use CH+/- button on the TV set or Ĥ0ĥ!button
on remote control to select the input source, press OK button on the
remote control to enter.
Note: Before you select the input source, make sure the
connections are prepared.
Basic OSD Menu operation
Press MENU button to display the OSD menu as below:
Main menu: Picture Sound Channel Feature Setup
Submenu
(Picture menu
for example)
ĥ
Hint---you should operate
the OSD menu according
to the hint.
Use Ĥ / ĥ button to select the main menu, and press
/ OK button to enter the submenu.
In the submenu, use Ĥ / ĥ button to select the function item, press / OK button to enter
the setup menu, then press / button to adjust, or press Ĥ / ĥ to select and press OK /
/ button to confirm.
* (Press MENU / button to return to the upper menu.)
* (Press EXIT button to exit the menu display.)
Note1: Only when you input the suitable signal, the relevant items can be activated
Note2: Please operating the OSD menu according to hint on the bottom of the banner.
7
OSD Menu
OSD Menu
1. Picture menu
Description
Picture Mode: Select your desired picture mode from Dynamic, Standard, Mild and User.
Brightness: Adjust image black level.
Contrast: Adjust image contrast.
Sharpness: Adjust the sharpness(Gray and invalid in VGA/PC mode).
Colour: Adjust image colour from black and white.
Tint: Control the tint ( NTSC mode only).
Colour Temp.: Select an optimum color temperature mode to suit your eyes for viewing from
Warm, Cool, Standard.
Aspect Ratio: Change the aspect for the screen from 4:3,16:9,Zoom1,Zoom2 or Panorama etc....
Noise Reduction: If the broadcast signal received is weak, you can select the Noise Reduction
option to reduce the video noise level between Off, Low, Middle and High.
8
OSD Menu
OSD Menu
2. Sound menu
Description
Sound Mode: Select your desired sound mode from Standard, Movie, Music, Speech and User.
Bass: Adjust the level of the lower-pitched sounds.
Treble: Adjust the level of the higherpitched sounds.
Balance: Adjust the audio output between left and right speakers.
Surround: Turn on/off the surround sound function.
Auto Volume Level (AVL): The volumes of all sources will be maintained when the function’s on.
SPDIF: Select the spdif mode for the TV from off, PCM and Auto.
9
OSD Menu
OSD Menu
3. Channel menu(In ATV/DTV mode)
Description
Channel Management: Enter the Channel management menu to edit the channels.
Delete: Press RED button to sign the channels you want to delete, it will hint you when you exit.
Lock: User must set the “Lock enable”(Feature-Lock- Lock enable) at ON to active this function.
Press GREEN button to sign(lock) or cancel(unlock) the channel. And you have to enter the
password to view the program.
Skip: Press YELLOW button to skip the channel or cancel the setting, and the program will not be
programed by CH+/- button.
Swap: Press BLUE button to sign the channel, press /
button to move, and press OK button to
swap the position.
Favorite Management: Add or remove
favourite channels by the colour buttons.
Up to 4 favourite lists are available,
RED-Fav1, GREEN-Fav2, YELLOW-Fav3,
BLUE-Fav4.
10
OSD Menu
OSD Menu
Country: Select the country.
When the Child Lock is on, please enter the Password (Lock Password in Feature menu)
to start Auto and Manual Search.
Auto Search: Press OK button to enter the Auto Search menu, select search mode, and press
OK button to start auto search.
Note:
1. ALL: Auto search channels for DTV, ATV and
Radio.
DTV: Auto search channels for DTV and radio.
ATV: Auto search channels for ATV.
2. When the TV is auto tunning, you could
press MENU button to stop auto tunning and
return to preview menu.
DTV Manual Search : Enter the DTV Manual Search menu.
Press
button to select the “Channel” item, and press
then press
button to select the “Start” item, and press
button to select the channel,
button to manual search.
DVB-T
ATV Manual Search : Enter the ATV Manual Search menu.
Current Channel: Select the current channel for manual searching.
Search: Press OK button to enter the search menu, and manual search the frequency
by
button.
Fine Tune: Press OK button to enter the Fine tune menu, and fine tune the frequency
by
button.
Color/Sound System: Select the Color/Sound system for the program.
11
OSD Menu
OSD Menu
4. Feature menu
Description
Lock: This menu allows you to lock certain features of the television so that they can not be used
or viewed. For example if you don’t want certain channels viewed by children or if the television
is to be used in a hotel and you want certain channels be locked.
When you enter the system lock menu you will be asked for a password. As default it is 0000.
Lock Enable - Turn on/off the Lock functions.
Note: When it is be turned on, the functions of Parental Guidance and Change Pin code
below will be locked, and the functions Lock(in Channel Management), Auto Search, DTV
Manual Search, ATV manual Search in Channel menu will also be locked.
Parental Guidance - Select the Parental Guidance mode, or turn off the function.
Change Pin Code – Press OK button to enter , first enter the current code, then enter your
new code and confirm your new code.
12
OSD Menu
OSD Menu
Hotel Mode - Enter the Hotel Setting menu.
Hotel Lock: Turn on/off the Hotel Lock function.
Channel Lock: Disable the Channel menu in OSD.
Picture Lock: Disable the Picture menu in OSD.
Sound Lock: Disable the Sound menu in OSD.
Feature Lock: Disable the Feature menu in OSD.
Setup Lock: Disable the Setup menu in OSD.
Key Lock: Disable the buttons on the TV set.
Source Lock: Disable the input source you desired.
Set Source: Select the default source when you turn on the TV.
Channel Number: Select the default channel number when you
turn on the TV.
Max Volume: Set the Max volume for the TV.
Default Volume: Set the default volume when the program is on.
Clear Lock: Clear all the locks above, it means set all the locks to
OFF and max volume to 100.
Database Export: Export all Hotel Settings to the USB device.
Database Import: Import all Hotel Settings from the USB device.
Language: Lets you adjust the different language options available.
Clock: Allows you to set the clock (as default the information is taken automatically from the
digital signal).
Sleep Timer: Lets you set the sleep timer so the television automatically switches off after a
certain amount of time.
Auto Power Off: The TV will switch off itself automatically if no change in status within the
time you select. You can choose 1H, 2H, 4H or off.
Hearing Impaired: You can switch on the hearing impaired feature, this provides additional
information and subtitles
CI Info: Pay per view services require a “smartcard” to be inserted into the TV.
If you subscribe to a pay per view service the provider will issue you with a ‘CAM’ and a
“smartcard”. The CAM can then be inserted into the COMMON INTERFACE PORT
(CI Card In).
PVR/Timeshift: Setup menu for recording, please see the Recording Operation section.
13
OSD Menu
OSD Menu
5. SETUP menu
Home Mode
Home
Description
OSD Timer: Lets you adjust the amount of time the On Screen Menu stays on the screen
before disappearing.
Auto SCART: The TV will be changed to SCART source automatically when you connect the
TV to the SCART device.
PC Setup: Change the PC Settings in PC mode.
Auto Adjust: Setup the parameter of the screen automatically.
H/V-Position: Adjust the transverse/vertical position of the screen.
Phase: Adjust the phase of the ADC sampling clock relative to the sync signal, until a
stable image is obtained.
Clock: Adjust the pixel clock frequency, until the image size is maximized for the screen.
Blue Screen: Changes the background when there is no input between clear and a blue
background (Only available in some sources).
Home Mode: Press to select from the following home modes:Home,Dynamic.
Reset TV Setting - This clears all the TV settings for the television.
Software Upgrade: From time to time we may release new firmware to improve the running
of the television (available to download). This menu lets you upgrade that software onto the
television. Further details of how to do this will be issued with the firmware. Contact the
helpline or refer to the ‘product support’ section of the website.
14
Multimedia Operation
Multimedia Operation
Basic Operation
1). Press the INPUT button on the remote control to display the input source menu, select Media
source by the /
buttons, and press OK button to enter the Multimedia menu as shown below.
2). Insert USB device, and select the Media mode form Photo, Music, Movie and eBook, then you will
find the name of the device display on the screen as shown below.
Hints for operation
3). Press
/
button to select the USB device and press OK button to enter the file list as shown below.
Return to
device list
Preview
File list
Informations
Hints
Press
/
buttons to move (press OK button to select the file or unfold the folder);
Press RED button to delete the file; Press GREEN button to sign or cancel all the files to playlist;
Press OK button to sign or cancel the selected file to playlist.
Press
button to previous menu, Press EXIT button to select the file view type list( ) or thurnbnail(
Press Exit again to veturn to the root MENU.
Then press
button to program the files (be signed) you select or the files in the fold you select.
Press
button to stop and exit the full screen program, please notes the hints on the bottom.
15
).
Multimedia Operation
Multimedia Operation
1. Photo
Play the photo
Press / button to select the option on the table, and press OK button to change.
Note: You could press OK button to display the option table when it disappears.
Play/Pause the photo playing.
Stop and exit the full screen program.
Play the previous or next file directly.
Ratate the picture(0, 90, 180, 270).
Zoom in/out the picture, you could move the picture by Cursor left/right/up/down button in Zoom mode.
Display the information of the current file.
Display the photo setup menu, and select the Repeat mode, Background Music, Music Source,
Slide Time, Effect.
Display the playing list.
2. Music
Play the music
Press / button to select the option on the table, and press OK button to change.
Play/Pause the music playing.
Stop and exit the music playing.
Play fast backword or forword.
Play the previous or next file directly.
ALL Select the repeat mode for playing music.
Switch the window between “Information” and “Playlist”.
Switch off the screen displaying (BLUE button as quick button), and it will be turned on by
exepet power button)..
16
Multimedia Operation
Multimedia Operation
3. Movie
Play the movie
Press / button to select the option on the table, and press OK button to change.
Note: You could press OK button to display the option table when it disappears.
AB
Play/Pause the movie playing.
Stop and exit the full screen program.
Play fast backword or forword.
Play the movie in slow mode.
Play the movie in step mode.
Set the A-B repeat playing mode.
Play the previous or next file directly.
Display the playing list.
Display the information of the current file.
Display the movie setup menu, and setup the Program, Subtitle, Audio, Repeat mode.
Goto mode, Input the time and start playing directly.
4. eBook
Play the text
Turn to previous/next page of the text.
RED button: Add or delete the bookmark.
GREEN button: Goto the appoint page.
YELLOW button: Display the bookmark list.
BLUE button: Display the playlist.
17
Recording Operation
Recording Operation
PVR settings
Press the MENU button select Feature-PVR/Timeshift menu, press OK button to enter the menu as below.
1). Record File Format
Select Record File Format mode from TS and PS for storing in the USB device.
2). Partition Select
USB device informations
Format: Press RED button to format the selected USB device.
Set Default Partition: Press GREEN button to set the focus partition as the
default partition .The recorders are stored in the default partition. It need to
be reset if the default partition is full in recording progress.
3). Timeshift Buffer
Set Timeshift Buffer mode: auto, 30Mins, 1hr, 2hr.
4). Timer
Enter the Timer menu to setup the timer recording settings.
Press yellow button to add.
Recorder: Turn on/off the recorder function.
Type: Select the type of the program you want to recording.
Channel: Select the channel you want to recording.
Start Time: Setup the start time for recording the program.
Duration: Setup the duration time for recording.
Date: Select the date for recording.
Mode: Select the mode for recording.
18
Recording Operation
Recording Operation
5). Record List
Display the Record list menu.
Delete: Press RED button to delete the selected record plan.
6). Recorder Start
Press OK button to start recording, as the function of the REC button on the remote control.
EPG and Timer Record
Press EPG button on the remote control to display the EPG menu.
EPG mode: Press RED button to change the EPG display mode.
Daily mode: shows the information of the programs to be broadcasted in daily mode.
Weekly mode: shows the information of the programs to be broadcasted in weekly mode.
Reminder: Press GREEN button once to remind the program for watching, and press GREEN button again
to remind the program for recording. You could check it in Timer menu, and the TV will record the
program according to your settings automatically.
Previous/Next Day: Press YELLOW/BLUE button to display the programs on previous or next day.
19
Recording Operation
Recording Operation
Recording
Press REC button on the remote control to start recording in DTV mode, and the TV will give you a hint.
Select “OK” item, and press OK to start recording, there will be a sign on the screen.
Note:
a. Please make sure the USB device is on the TV.
b. Please mke sure the speed and free space of the USB is enough.
c. Press STOP button to exit the recording mode.
d. Press Recording list button to display the Recorder list, and you can play the program you selected.
e. You could also play the Recorded program in Multimedia mode.
Timeshift
Press PAUSE button on the remote control to start timeshift in DTV mode, and the TV will give you
a hint. Select “OK” item, and press OK to start timeshift, there will be a sign on the screen, and the
screen will be freezed.
Note:
a. Please make sure the USB device is on the TV.
b. Please make sure the speed and free space of the USB is enough.
c. Press STOP button to exit the timeshift mode.
d. Press PLAY button to play the program you are recording from the beginning, and the timeshift will be
going on.
e. Timeshift time menu on the right top corner shows the fallen time between the current picture and the
living broadcasting picture;
f. During the recoding progress, if the signal is missing, the recording process will take a pause until the
signal is stable again.
20
Simple Troubleshooting
Simple Troubleshooting
If the display fails or performance dramatically deteriorates check the Display in accordance
with the following instructions.Remember to check the peripherals topinpiont the source of the
failure.
If the display still fails to perform as expected,connect your helpline for assistance.
No power
- Check all connections to the TV.
- Press either the power button or the Standby button on the Remote control.
No picture or sound
- Ensure that the TV is plugged in and the power is on.
- Ensure that the aerial is connected.
- Try a different program.
Poor picture quality
- Check the aerial connections.
- Check that the channel is tuned in properly.
- Adjust the picture settings:brightness,color,sharpness,contrast,hue.
- Make sure that the TV is not located close to electrical appliances that may emit radio
frequency interference.
No colour
- Adjust the color setting.
- Check that the programme is broadcast in color.
- Check that the channel is tuned properly.
TV does not respond to remote control
- Check that there are no obstructions between the remote control and the unit.
- Check that the remote control is within range of the unit.
- Check that the batteries in the remote control and not weak or exhausted.
This TV is for household use and registered as harmless on electromagnetic waves.
Therefor,you can use it in every location as well as residential areas.
21
Specifications
LED Panel
Panel Size
22” TFT LED
Brightness
200 cd/m2
Contrast Ratio
1000:1 (typical)
Max. Resolution
Input Connector
Output Connector
1920 x 1080
AV
1
YPbPr
1
SCART
1
PC-IN
1
VGA
1
HDMI
1
RF
1
USB
1
CI
1
HEADPHONE
1
COAX
1
Main Voltage
12V
Power
36W
3A
The cabinet design and electronics specifications will be modified without prior notice for
improving the performance.
22
Contenido
Contenido
Precaución
Medidas de seguridad
1
2
Introducción al producto
Accesorios
3
3
Conexiones
4
Control remoto
5-6
Funcionamiento básico
7
Menú OSD (Idioma en pantalla)
1. Menú de imagen
2. Menú de sonido
3. Menú de canales
4. Menú de características
5. Menú de configuración
8-14
8
9
10-11
12-13
14
Funcionamiento multimedia
15-17
Grabación
18-20
Solución de problemas sencillos
21
Especificaciones
22
Precaución
Precaución
El rayo con punta de flecha dentro de un triángulo equilátero tiene por finalidad
alertar al usuario de la presencia de "voltaje peligroso" sin aislamiento dentro
de la carcasa del aparato que pueden ser de magnitud suficiente como para
constituir un riesgo de descarga eléctrica para las personas.
El signo de exclamación dentro del triángulo equilátero tiene por objeto llamar
su atención sobre instrucciones importantes acerca del uso y mantenimiento del
equipo que figuran en el manual de instrucciones que se incluye con dicho equipo.
Eliminación apropiada de este producto
Residuos de Aparatos Eléctricos y Electrónicos (RAEE)
Su producto está diseñado y fabricado con materiales y componentes de
alta calidad que se pueden reciclar y reutilizar.
Este símbolo indica que los equipos eléctricos y electrónicos, al final de su
vida útil, no deben desecharse junto con la basura doméstica.
Lleve este equipo a un centro municipal de recolección o reciclaje.
En EEUU, existen sistemas de recolección separados para productos eléctricos
o electrónicos usados. ¡Colabore con la preservación del medio ambiente!
Este aparato se encuentra conforme con las directivas europeas de
seguridad e interferencias eléctricas.
1
Medidas de seguridad
Medidas de seguridad
Para asegurarse un uso seguro y fiable de este equipo, lea con atención todas las instrucciones
de este manual, en particular, las medidas de seguridad siguientes.
1. Advertencia: Utilizar solo piezas/accesorios indicados y suministrados por el fabricante, el
aparato incluye un adaptador eléctrico AC, el adaptador eléctrico AC sirve de dispositivo de
desconexión, el dispositivo de desconexión debe estar operativo en todo momento.
2.Advertencia: La pilas (batería o pilas instaladas) no deben exponerse a una fuente de calor
excesivo como por ejemplo el sol, el fuego o similares.
3. Advertencia: Para evitar que se produzca un incendio o una descarga eléctrica, no exponga el
aparato a la lluvia ni la humedad. No exponga el Adaptador ni el televisor LED al agua (gotas o
salpicaduras) y no coloque sobre el aparato ningún recipiente lleno de líquido, por ejemplo una jarra.
4. Atención: ¡Solo puede ser utilizado en una toma de carga de 12V del vehículo, no puede ser
utilizado en una toma de carga de 24V del vehículo!
5.No colocar sobre el aparato ninguna llama desnuda, como por ejemplo velas.
6. No obstaculizar la ventilación del aparato tapando los orificios de ventilación con algún artículo,
por ejemplo un periódico, un mantel, una cortina, etc.
7. Preste atención a los aspectos medioambientales a la hora de desechar las pilas.
Seguridad eléctrica
• Para evitar sobrecargas, no enchufe demasiados aparatos a la misma toma de corriente.
- No coloque cables de conexión en lugares donde se puedan pisar o tropezar con ellos.
- No coloque objetos pesados sobre los cables porque se pueden dañar.
- Al desenchufar el aparato, agarre el enchufe, no lo haga tirando del cable.
- Durante tormentas eléctricas o si no va a usar el aparato de TV durante largos periodos de
tiempo, desconecte la antena (si se encuentra en el exterior) y el cable de la toma de corriente.
- No deje que entre agua o humedad al aparato de TV. NO lo use en lugares mojados
o húmedos, tales como, baños, cocinas con vapor o cerca de piscinas.
• Saque el enchufe de la toma de corriente inmediatamente y busque ayuda profesional si:
- el enchufe o el cable de alimentación están dañados.
- le ha caído líquido o ha sido expuesta por accidente al agua o a la humedad.
- si le cae algún objeto dentro de las ranuras de ventilación.
- si no funciona con normalidad.
- NO abra las tapas protectoras. No contiene piezas que puedan ser reparadas por el
usuario. Si lo hiciera, la garantía podría quedar anulada. Este aparato solo puede ser
reparado por personal cualificado.
- Para evitar fugas, saque las pilas gastadas de dentro del control remoto, o cuando no
vaya a utilizarlo por largos periodos de tiempo.
- NO abra o eche al fuego las pilas gastadas.
Seguridad física
• NO bloquee las ranuras de ventilación en la parte posterior. Puede colocar el aparato de
TV en un armario, pero deje al menos un distancia de 5cm (2") alrededor del aparato.
• NO golpee o sacuda el aparato de TV podría dañar sus circuitos internos. Cuide del control
remoto, no lo deje caer o permita que entre en contacto con líquidos.
• Para limpiar el aparato de TV, use un paño seco y suave. NO use líquidos que contengan
gasolina. Para eliminar las manchas más resistentes, use un paño suave humedecido con
detergente diluido.
2
Presentación del producto
Presentación del producto
INPUT
MENU
CH+
CHVOL+
VOLPOWER
Ventana de control remoto
(Mantener libre de obstáculos)
(IR) Receptor de infrarrojos: Recibe señales infrarrojas desde el control remoto.
(Encender/Standby) indicador LED: Presione ENCENDER para encender y apagar el aparato.
Indicador encendido (Rojo)
Modo Standby
Indicador encendido (Verde) Modo de encendido
El alcance de la señal de recepción es de 5-8 metros desde la la ventana frontal del control
0
0
remoto, 30 hacia la derecha o izquierda y 20 por encima o por debajo de la ventana del
control remoto.
ENTRADA: Muestra el menú de entrada.
MENU: Muestra/Sale del menú OSD.
CH+/-: Escanea por los canales.
VOL+/-: Ajusta el volumen.
ENCENDER: Enciende o pone en standby el aparato de TV.
Accessories
La configuración de los componentes puede ser diferente de la siguiente ilustración.
Adaptador
Adaptador
E-14
Guía del usuario
Cable mini YPbPr
3
Cable mini AV
Baterías
Conexiones
HDMI
USB
RF
mini YPbPr mini AV
Conexiones
Headphone out
POWER
PC-IN
SCART
VGA
Coax
POWER: Ligue para o adaptador de corrente.
Salida de auriculares: Conéctela a su equipo de audio o auriculares.
PC-IN : Conéctelo al terminal de salida de audio del PC.
VGA: Para visualizar el PC. Conéctelo al conector de salida analógico de 15
pines D-sub del PC.
EUROCONECTOR: Permite recibir y enviar señales de aparatos externos
Coax: Salida coaxial digital. Transmite la señal digital de audio de la fuente
actualmente seleccionada.
HDMI : Conéctelo a un aparato con toma HDMI como DVD.
USB: USB para actualizaciones, visualización de medios y PVR.
RF: Conecte la antena o el cable de 75 Ohm para recibir la señal de TV.
Interfaz común: Ranura CI, se utiliza para introducir una tarjeta de Interfaz
Común (CI). Esta tarjeta le permite ver los canales a los que esté abonado.
Lea Información CI para más información
mini YPbPr: Conexión al terminal de salida de vídeo YPbPr del DVD
(usado en fuente por componentes).
mini AV: conexión a los terminales de salida de audio y vídeo del DVD usando el
cable convertidor. (terminales de audio compartidos conYPbPr)
4
Control remoto
Control remoto
El control remoto funciona por medio de rayos infrarrojos (IR). Apúntelo hacia la parte frontal
de aparato de TV.
POWER
PICTURE
MUTE
SOUND
ASPECT
SLEEP
EPG
FAV
SUBTITLE CH.LIST
TV/RADIO
INPUT
OK
MENU
EXIT
1
2
3
4
5
6
7
8
DISPLAY
9
0
REC
REC.LIST
VOL
TV/TXT
INDEX
ENCENDER(Botón rojo): Enciende o pone en standby
el aparato de TV.
SILENCIO: Para silenciar el sonido, presione este botón.
Presiónelo de nuevo o pulse VOL+ para volver a obtener
sonido.
IMAGEN: Selecciona el modo de imagen.
SOUND: Selecciona el modo de sonido.
ASPECTO: Ajusta el tamaño de la imagen.
DORMIR: StandbyTemporizador.
SUBTÍTULOS: Activa/Desactiva los subtítulos en pantalla
en el modo DTV.
LISTA CANALES: Muestra la lista de programas.
EPG (guía electrónica de programas) Muestra la Guía
Electrónica de Programas durante el estado sin menú
solamente en el modo DTV.
FAV: Muestra la lista de programas favoritos.
Botones de operaciones básicas
TV/RADIO: Para seleccionar TV/RADIO.
ENTRADA: Muestra el menú de entrada.
BOTÓN(
OK): Permite navegar por los
menús en pantalla y ajustar el sistema de configuración
según su preferencias.
MENU :Pulse para acceder al menú OSD, idioma en
pantalla.
SALIR: Pulse para salir del menú OSD, idioma en pantalla.
CH
CANCEL REVEAL
HOLD
SIZE
NICAM/A2
SUBPAGE
BOTONES NUMÉRICOS: Seleccione el canal directamente.
Presione los botones numéricos y presione el botón OK
para ver dicho canal.
: : Vuelve al último canal que se estaba viendo.
PANTALLA: Presione para ver el modo de información
actual.
5
Control remoto
Control remoto
POWER
PICTURE
MUTE
SOUND
ASPECT
SLEEP
EPG
FAV
SUBTITLE CH.LIST
TV/RADIO
INPUT
OK
MENU
EXIT
1
2
3
4
5
6
7
8
9
0
DISPLAY
REC
REC.LIST
VOL
TV/TXT
INDEX
CH
CANCEL REVEAL
HOLD
SIZE
NICAM/A2
SUBPAGE
VOL +/- : Volume +/-.
CH / : Canal/Programa +/-.
REC: Presione para comenzar a grabar un programa en modo
DTV.
REC.LIST: Lista de grabación.
:Reproduce/Pausa el programa.
: Detiene el programa.
: Retroceso rápido.
: Avance rápido.
: Capítulo anterior.
: Capítulo siguiente.
Botones de colores : Atajos - siguen los enlaces de color que
aparecen en el texto.
Botones de TELETEXTO
Estos botones solo se pueden usar en TELETEXTO.
TV/TXT: Activa/Desactiva la pantalla de Teletexto.
CANCELAR: Cancela la pantalla de Teletexto.
DESVELAR : Desvela cualquier texto escondido.
NICAM/A2: Selecciona TV Nicam/A2.
ÍNDICE: Lleva al índice.
MANTENER: Mantiene o lleva a la subpágina actual.
TAMAÑO: Presione para ver la parte superior de la página en
tamaño doble. Presione de nuevo para ver la mitad inferior de la
página en tamaño doble. Presione otra vez para volver al tamaño
normal.
SUBPÁGINA: Presione para entrar a subpáginas, vuelva a
presionar para cancelar.
6
Operaciones básicas
Operaciones básicas
Encendido y apagado
1. Conecte el aparato a la fuente de alimentación con el adaptador.
2. –Para encender el televisor
Pulse el botón POWER del televisor o del mando a distancia.
- Para apagar el televisor
Pulse el botón POWER del televisor o del mando a distancia.
Selección de la fuente de entrada
Para mostrar el menú de la fuente de entrada, pulse el botón INPUT
del televisor o del mando a distancia y use el botón CH+/- del televisor o
el botón Ĥ0ĥ!
del mando a distancia para seleccionar la fuente de
entrada; pulse el botón OKdel mando a distancia para confirmar.
Nota: antes de seleccionar la fuente de entrada, asegúrese de
que las conexiones están listas.
Operaciones básicas del menú en pantalla
Pulse el botón MENU para mostrar el menú en pantalla que se indica a continuación:
Menú principal: Imagen Sonido Canales Características Con
Submenú
( Menú de
imagen, por
ejemplo)
ĥ
Consejo: maneje el menú
siguiendo las sugerencias.
ĥ
Ĥ
ĥ
Ĥ
ĥ
Utilice el botón Ĥ / ĥ!para seleccionar el menú principal, y presione el botón / OK para
entrar en el submenú.
En el submenú , use el botón Ĥ / ĥ para seleccionar la opción que desee y pulse
el botón
/ OK para entrar en el menú de configuración. A continuación, pulse el botón
/ para realizar el ajuste o el botón Ĥ / ĥ!para seleccionarlo y pulse OK / / para
confirmar .
* (Presione el botón MENÚ / para volver al menú superior.)
* (Presione el botón SALIR para salir de la pantalla del menú.)
Nota 1: los elementos relevantes sólo pueden activarse introduciendo la señal correcta.
Nota 2: maneje el menú en pantalla siguiendo las sugerencias de la parte inferior.
7
Menú en pantalla
Menú en pantalla
1. Menú Picture (imagen)
Descripción
Picture Mode (modo de imagen): seleccionar el modo de imagen (dinámico, estándar, suave
opersonalizado).
Brightness (brillo): ajustar el nivel de negro de la imagen.
Contrast (contraste): ajustar el contraste de la imagen.
Sharpness (nitidez): ajustar la nitidez (en gris y no seleccionableen modoVGA/PC).
Colour (color): ajustar el color (blanco y negro) de la imagen.
Tint (tonalidad): controlar la tonalidad(sólo en modoNTSC).
Colour Temp. (temperatura de color): seleccionar unmodo de temperatura de color óptimo
(cálido, fríooestándar).
Aspect Ratio:(formato): cambiar el formato de pantalla (4:3, 16:9, Zoom1, Zoom2, Panorámico, etc.).
Noise Reduction (reducción de ruido): cuando la señal recibida sea débil, seleccione esta opción
para reducir el nivel de ruido en la imagen (modos desactivado, bajo, medio o alto).
8
Menú en pantalla
Menú en pantalla
2. Menú Sound (sonido)
Descripción
Sound Mode(modo de sonido): Seleccionar el modo de sonido (estándar, película, música, voz
o personalizado).
Bass (graves): Ajustar el nivel de graves.
Treble (agudos): Ajustar el nivel de agudos.
Balance:Ajustar el balance de audio entre los altavoces izquierdo y derecho.
Surround: Activar/desactivar la función de sonido surround.
Auto Volume Level (AVL) (nivel de volumen automático): Activando esta función se mantendrá el
volumen de todas las fuentes.
SPDIF: Seleccionar el modo SPDIF del televisor (desactivado, PCM u automático).
9
Menú en pantalla
Menú en pantalla
3. Menú Channel (canales) (en modo ATV/DTV)
Descripción
Channel Management (administración de canales): Entre en el menú de administración de canales
para editar los canales.
Mover
Delete (borrar): pulse el botón ROJO para marcar los canales que desee borrar. Aparecerá un
mensaje cuando salga.
Lock (bloqueo): para activar esta función, deberá situar la opción “Lock enable” (habilitar bloqueo) en
Feature-Lock- Lock enable (características-Bloqueo-Habilitar bloqueo) en ON (activada). Pulse el
botón VERDE para marcar (bloquear) o cancelar (desbloquear) canales. Deberá introducir la
contraseña para ver el programa.
Skip (saltar): pulse el botón AMARILLO para saltar un canal o cancelar el ajuste. El canal no se
seleccionará con el botón CH+/-.
Move (Mover): pulse el botón AZUL para marcar un canal, pulse el botón /
para cambiar su
posición y pulse el botón OK para confirmar el cambio.
Favorite Management (administración de favoritos):
añadir o eliminar canales favoritos con los botones
de colores.
Hay hasta 4 listas de favoritos disponibles,
ROJO-Fav1, VERDE-Fav2, AMARILLO-Fav3,
AZUL-Fav4.
10
Menú en pantalla
Menú en pantalla
Country (país): seleccionar el país.
Cuando el bloqueo para niños esté activado, deberá introducir la contraseña en la opción
Lock Password (contraseña de bloqueo) del menú Feature (características) para iniciar una
búsqueda automática y manual.
Auto Search (búsqueda automática): Pulse el botón OK para entrar en el menú de la búsqueda
automática, seleccione el modo de búsqueda y pulse el botón OK para iniciarla.
Nota:
1. ALL (todos): búsqueda automática de canales de
DTV, ATV y radio.
DTV: búsqueda automática de canales de DTV y radio.
ATV: búsqueda automática de canales de ATV.
2. Cuando el televisor esté realizando una sintonización
automática, podrá pulsar el botón MENU para detenerla
y volver al menú de vista previa.
DTV Manual Search (búsqueda manual de DTV): Entrar en el menú de búsqueda manual de DTV
Pulse el botón /
para seleccionar la opción "Channel" (canales) y pulse el botón / para
seleccionar el canal. A continuación, pulse el botón / para seleccionar la opción “Start”
(iniciar) botón / para iniciar la búsqueda manual.
DVB-T
ATV Manual Search (búsqueda manual de ATV): Entre en el menú de búsqueda manual de ATV.
Current Channel (canal actual): Seleccionar el canal actual para la búsqueda manual.
Search (búsqueda): Pulse el botón OK para entrar en el menú de búsqueda y buscar
manualmente la frecuencia con el botón
.
Fine Tune (sintonización precisa): pulse el botón OK para entrar en el menú de sintonización
precisa y realizar una sintonización precisa de la frecuencia con el botón
.
Color/Sound System (color/sistema de sonido) seleccionar el color/sistema de sonido del
programa.
11
Menú en pantalla
Menú en pantalla
4. Menú Feature (características)
Descripción
Lock (bloqueo): Permite bloquear determinadas características del televisor para que no puedan
usarse o verse. Resulta útil, por ejemplo, si desea que los niños no puedan ver determinados
canales o si el televisor va a utilizarse en un hotel y desea bloquear determinados canales.
Cuando entre en el menú de bloqueo del sistema, deberá introducir una contraseña. La
contraseña predeterminada es 0000.
Lock Enable (habilitar bloqueo): activar/desactivar las funciones de bloqueo.
Nota: cuando esta opción está activada, las funciones Parental Guidance (orientación paterna)
y Change Pin Code (cambiar el código PIN) están bloqueadas y las funciones Lock (bloqueo)
de Channel Management (administración de canales), Auto Search (búsqueda automática),
DTV Manual Search (búsqueda manual de DTV) y ATV manual Search (búsqueda manual de
ATV) del menú Channel (canales) también están bloqueadas.
Parental Guidance(orientación paterna): seleccione este modo o desactive la función.
Change Pin Code (cambiar el código pin): pulse el botón OK para entrar. Introduzca primero
el código actual y luego el nuevo código y confírmelo.
12
Menú en pantalla
Menú en pantalla
Hotel Mode (modo hotel): Entrar en el menú de configuración para hotel.
Hotel Lock (bloqueo para hotel): Activar/desactivar la función.
Channel Lock (bloqueo de canales): Desactivar el menú de canales en
pantalla.
Picture Lock (bloqueo de imagen): Desactivar el menú de imagen en
pantalla.
Sound Lock (bloqueo de sonido): Desactivar el menú de sonido en pantalla.
Feature Lock (bloqueo de características): Desactivar el menú de
características en pantalla.
Setup Lock (bloqueo de configuración): Desactivar el menú de configuración
en pantalla.
Key Lock (bloqueo de botones): Desactivar los botones del televisor.
Source Lock (bloqueo de fuente): Desactivar una fuente de entrada.
Set Source (fijar fuente): Seleccionar la fuente predeterminada al encender
el televisor.
Channel Number (número de canal): Seleccionar el canal predeterminado
al encender el televisor.
Max Volume (volumen máximo): Fijar el volumen máximo del televisor.
Default Volume (volumen predeterminado): Fijar el volumen predeterminado
al sintonizar un programa.
Clear Lock (cancelar bloqueo): Cancela todos los bloqueos anteriormente
mencionados. Significa que todos los bloqueos se desactivan y el volumen
máximo se sitúa en 100.
Database Export (exportar base de datos): Exportar todos los ajustes del
modo Hotel al dispositivo USB.
Database Import (importar base de datos): Importar todos los ajustes del
modo Hotel del dispositivo USB.
Language (idioma): Permite ajustar las distintas opciones de idioma disponibles.
Clock (reloj): Permite ajustar el reloj (por defecto, la información se obtiene directamente de
la señal digital).
Sleep Timer (temporizador de desconexión): Permite programar el temporizador de desconexión
para que el televisor se apague automáticamente después de cierto tiempo.
Auto Power Off (apagado automático): El televisor se apagará automáticamente tras un periodo
de inactividad prefijado. Las opciones disponibles son 1H, 2H, 4H o desactivado.
Hearing Impaired (discapacidad auditiva): Activando esta función obtendrá información
adicional y subtítulos.
CI Info (información de CI): Los servicios de pago por visión requieren la inserción de una "tarjeta
inteligente" en el televisor.
Si suscribe un servicio de pago por visión, su proveedor le facilitará un módulo "CAM" y una tarjeta
inteligente. Podrá entonces insertar el módulo CAM en el puerto para CI (CI Card In).
PVR/Timeshift (grabadora/reproducción diferida): menú de configuración de grabaciones. Remítase
a la sección Operaciones de grabación.
13
Menú en pantalla
Menú en pantalla
5. Menú SETUP (configuración)
Descripción
OSD Timer (temporizador de menú en pantalla): Permite ajustar el tiempo que el menú
permanece en pantalla.
Auto SCART(EUROCONECTOR automático): El televisor cambia a la fuente EUROCONECTOR
de forma automática al conectar el televisor al dispositivo EUROCONECTOR.
PC Setup (Confígurar PC): cambiar los ajustes del PC en modo PC.
Auto Adjust (ajuste automático): Configurar automáticamente los parámetros de la pantalla.
H/V-Position (posición H/V): Ajustar la posición horizontal y vertical de la pantalla.
Phase (fase): Ajustar la fase del reloj de muestreo ADC conforme a la señal de sincronización
hasta obtener una imagen estable.
Clock (reloj): Ajustar la frecuencia del reloj de píxeles hasta maximizar el tamaño de la imagen
para la pantalla.
Blue Screen (pantalla azul): Activará un fondo azul si no se detecta ninguna señal de entrada
(sólo disponible en algunas fuentes).
Home Mode : Pulse para seleccionar uno de los siguientes modos de inicio: Home, Dynamic.
Reset TV Setting (restablecer la configuración del TV): Borra todos los ajustes del televisor.
Software Upgrade (actualización de software): de vez en cuando lanzamos un nuevo firmware
para mejorar el funcionamiento del televisor (este firmware puede descargarse).Desde este menú
podrá actualizar el televisor con dicho software. Encontrará más información sobre cómo hacerlo
con el firmware. Póngase en contacto con la línea de asistencia telefónica o remítase a la sección
"soporte del producto" de la web.
14
Funcionamiento multimedia
Funcionamiento multimedia
Operaciones básicas
1). Pulse el botón INPUT del mando a distancia para mostrar el menú de la fuente de entrada, seleccione
Media con / y pulse el botón OK para entrar en el menú multimedia que se indica a continuación.
2). Inserte el dispositivo USB y seleccione el modo multimedia que desee (fotos, música, películas o eBook).
Aparecerá el nombre del dispositivo en la pantalla.
Sugerencias de manejo
3). Pulse
/
para seleccionar el dispositivo USB y luego pulse el botón OK para mostrar la lista de archivos.
Volver a la lista
de dispositivos
Vista previa
Lista de archivos
Información
Sugerencias
Pulse
/ para desplazarse (pulse el botón OK para seleccionar el archivo o desplegar la carpeta);
Pulse el botón ROJO para borrar el archivo; pulse el botón VERDE para marcar o cancelar todos los
archivos de la lista de reproducción;
Pulse el botón OK para marcar o cancelar el archivo seleccionado de la lista de reproducción.
Pulse para ir al menú anterior, pulse EXIT para mostrar una lista de archivos ( ) o miniaturas ( ).
Vuelva a pulsar EXIT para volver al menú principal.
Luego pulse
para reproducir los archivos que ha marcado o los archivos de la carpeta que seleccione.
Pulse para parar la reproducción y salir de la pantalla completa. Fíjese en las sugerencias de la parte inferior
de la pantalla.
15
Funcionamiento multimedia
Funcionamiento multimedia
1. Fotos
Reproducción de fotos
Pulse / para seleccionar la opción en la tabla y pulse el botón OK para cambiar.
Nota: puede pulsar el botón OK para mostrar la tabla de opciones cuando desaparezca.
Iniciar/detener la reproducción.
Parar y salir de la pantalla completa.
Reproducir directamente el archivo anterior o siguiente.
Rotar la imagen (0, 90, 180, 270).
Ampliar/reducir la imagen. Use los botones de dirección para desplazarse por la imagen en el modo Zoom.
Mostrar la información del archivo actual.
Mostrar el menú de configuración y seleccionar el modo de repetición, la música de fondo, el tiempo y
los efectos.
Mostrar la lista de reproducción.
2. Música
Reproducción de música
Pulse / para seleccionar la opción en la tabla y pulse el botón OK para cambiar.
Iniciar/detener la reproducción.
Parar y salir de la reproducción.
Retroceso y avance rápido.
Reproducir directamente el archivo anterior o siguiente.
ALL Seleccionar el modo de repetición de la reproducción.
Conmutar entre la pantalla "Información" y "Lista de reproducción".
Apagar la pantalla (se puede apagar directamente con el botón AZUL). Para encenderla, pulse el
botón de encendido.
16
Funcionamiento multimedia
Funcionamiento multimedia
3. Películas
Reproducción de películas
Pulse / para seleccionar la opción en la tabla y pulse el botón OK para cambiar.
Nota: puede pulsar el botón OK para mostrar la tabla de opciones cuando desaparezca.
Iniciar/detener la reproducción.
Parar y salir de la pantalla completa.
Retroceso y avance rápido.
Reproducción a cámara lenta.
Reproducción paso a paso.
Seleccionar el modo de repetición A-B.
Reproducir directamente el archivo anterior o siguiente.
Mostrar la lista de reproducción.
Mostrar la información del archivo actual.
Mostrar el menú de configuración y ajustar el programa, los subtítulos, el audio y el modo de repetición.
Modo "Ir a": introducir un tiempo e iniciar la reproducción desde ese punto.
AB
4. eBook
Reproducción de texto
Ir a la página anterior/siguiente del texto.
RED button (Botón ROJO): añadir o borrar un marcador.
GREEN button (Botón VERDE):ir a una determinada página.
YELLOW button (Botón AMARILLO): mostrar la lista de marcadores.
BLUE button (Botón AZUL): mostrar la lista de reproducción.
17
Operaciones de grabación
Operaciones de grabación
Ajustes de la grabadora
Pulse el botón MENU, seleccione Feature-PVR/Timeshift (características-grabadora/reproducción diferida) y
pulse el botón OK para entrar.
1). Record File Format (formato de grabación)
Seleccione el formato en el que desee grabar los archivos en el dispositivo USB (TS o PS).
2). Partition Select (selección de partición)
Datos del dispositivo USB
Format (formato): pulse el botón ROJO para formatear el dispositivo USB
seleccionado.
Set Default Partition (seleccionar la partición predeterminada): pulse el botón
VERDE para que la partición resaltada sea la partición predeterminada. Las
grabaciones se almacenarán en dicha partición. Si la partición predeterminada
se queda sin espacio durante una grabación, deberá repetir el proceso.
3). Timeshift Buffer (buffer de reproducción diferida)
Seleccione el modo del buffer de reproducción diferida: automático, 30 minutos, 1 hora, 2 horas.
4). Timer (temporizador)
Entre en el menú del temporizador para programar una grabación temporizada.
Pulse el botón amarillo para añadirla.
Recorder (grabadora): activar/desactivar la función de grabadora.
Type (tipo): seleccionar el tipo de programa que desea grabar.
Channel (canal): seleccionar el canal que desea grabar.
Start Time (hora de inicio): ajustar la hora de inicio de la grabación.
Duration (duración): ajustar la duración de la grabación.
Date (fecha): seleccionar la fecha de la grabación.
Mode (modo): seleccionar el modo de grabación.
18
Operaciones de grabación
Operaciones de grabación
5). Record List (lista de grabaciones)
Muestra el menú de la lista de grabaciones.
Delete (borrar): seleccione una grabación y pulse el botón ROJO para borrarla.
6). Recorder Start (inicio de la grabación)
Pulse el botón OK para iniciar la grabación. También puede usar el botón REC del mando a distancia.
EPG y grabaciones con temporizador
Pulse el botón EPG del mando a distancia para mostrar el menú de la guía electrónica de programación.
EPG mode: Pulse el botón ROJO para cambiar el modo de visualización de la EPG.
Daily mode(modo diario): muestra información sobre los programas que se van a emitir a diario.
Weekly mode (modo semanal): muestra información sobre los programas que se van a emitir
semanalmente.
Reminder(Aviso): pulse el botón VERDE una vez para establecer un aviso para ver el programa y
vuelva a pulsarlo para establecer un aviso para grabarlo. Podrá comprobarlo en el menú del temporizador
y el televisor grabará el programa automáticamente de conformidad con los ajustes que usted ha realizado.
Previous/Next Day (día anterior/siguiente): pulse el botón AMARILLO/AZUL para mostrar los programas
del día anterior o siguiente.
19
Operaciones de grabación
Operaciones de grabación
Grabación
Pulse el botón REC del mando a distancia para iniciar una grabación en modo DTV. Aparecerá un mensaje
en la pantalla del televisor. Seleccione “OK” y pulse OK para iniciar la grabación. Aparecerá un símbolo en
la pantalla.
Nota:
a. Asegúrese de que el dispositivo USB está conectado al televisor.
b. Compruebe la velocidad y asegúrese de que hay suficiente espacio libre en el USB.
c. Pulse el botón de parada para salir del modo de grabación.
d. Pulse el botón REC LIST para mostrar la lista de grabaciones. Si lo desea, puede reproducir el
programa seleccionado.
e. También puede reproducir un programa grabado en modo Multimedia.
Reproducción diferida
Pulse el botón de pausa del mando a distancia para iniciar la reproducción diferida en modo DTV.
Aparecerá un mensaje en la pantalla del televisor. Seleccione “OK” y pulse OK para iniciar la reproducción
diferida. Aparecerá un símbolo en la pantalla y la imagen se congelará.
Nota:
a. Asegúrese de que el dispositivo USB está conectado al televisor.
b. Compruebe la velocidad y asegúrese de que hay suficiente espacio libre en el USB.
c. Pulse el botón de parada para salir del modo de reproducción diferida.
d. Pulse el botón de reproducción para reproducir desde el principio el programa que
está grabando.
e. El menú de reproducción diferida situado en el ángulo superior derecho muestra la
diferencia de tiempo entre la imagen actual y la emisión en directo;
f. Durante el proceso de grabación, en caso de ausencia de señal el proceso se detendrá hasta
que la señal vuelva a ser estable.
20
Solución de problemas sencillos
Solución de problemas sencillos
Si la pantalla se avería o no funciona bien, compruébela siguiendo estas instrucciones. Recuerde
que debe examinar los periféricos para descubrir la fuente del problema.
Si continúa sin funcionar como se espera, entre en contacto con la línea de ayuda al cliente para
que le presten asistencia.
No se enciende
- Compruebe todas las conexiones al aparato de TV.
- Presione el botón de encendido o el botón de standby en el control remoto.
No tiene imagen o sonido
- Verifique que el televisor está enchufado y encendido.
- Verifique que la antena está conectada.
- Pruebe con un programa diferente.
Imagen de mala calidad
- Compruebe las conexiones de la antena.
- Compruebe que el canal está bien sintonizado.
- Ajuste la configuración de la imagen: brillo, color, nitidez, contraste, tono.
- Asegúrese de que el televisor no está ubicado cerca de aparatos eléctricos
que podrían estar produciendo interferencias por frecuencia de radio.
No tiene color
- Ajuste la configuración del color.
- Compruebe que el programa que se emite es en color.
- Compruebe que el canal está bien sintonizado.
El aparato de TV no responde al control remoto
- Compruebe que no existen obstrucciones entre el aparato de TV y el control remoto.
- Compruebe que el control remoto se encuentra dentro del alcance del televisor.
- Compruebe que las pilas del control remoto no están faltas de energía o agotadas.
Este aparato de TV es para uso doméstico y está registrado como aparato que emite
ondas electromagnéticas no perjudiciales. Por lo tanto, se puede utilizar en cualquier
lugar dentro del ámbito residencial.
21
Especificaciones
Panel LED
Dimensiones del panel
Pantalla TFT LED de 22”
Brillo
200 cd/m2
Proporción de contraste
1000:1 (típico)
Máx. resolución
Conector de entrada
Conector de salida
1920 x 1080
AV
1
YPbPr
1
EUROCONECTOR
1
AUDIO PC
1
VGA
1
HDMI
1
RF
1
USB
1
CI
1
AURICULARES
1
COAX
1
Voltaje principal
12V
Potencia
36W
3A
El diseño del gabinete y las especificaciones electrónicas pueden ser modificadas sin previo aviso para
mejorar el desempeño del aparato.
22
“Eliminacion de Residuos de Equipos Eléctricos y
Electrónicos por Parte de Usuarios Particulares en
la Union Europea”
Este símbolo en el producto o en su envase indica que no debe eliminarse junto con los
desperdicios generales de la casa. Es responsabilidad del usuario eliminar los residuos
de este tipo depositándolos en un “punto limpio” para el reciclado de residuos eléctricos y
electrónicos. La recogida y el reciclado selectivos de los residuos de aparatos eléctricos en
el momento de su eliminación contribuirán a conservar los recursos naturales y a garantizar
el reciclado de estos residuos de forma que se proteja el medio ambiente y la salud. Para
obtener más información sobre los puntos de recogida de residuos eléctricos y electrónicos
para reciclado, póngase en contacto con su ayuntamiento, con el servicio de eliminación de
residuos domésticos o con el establecimiento en el que adquirió el producto.
“The Disposal of Electrical and Electronic Equipment Waste
Products on the part of Final users in The European Union”
This symbol on the product or on the container indicates that this product cannot be
eliminated with the general waste. The user is responsible for eliminating this kind of
waste. Selective collection and electrical equipment recycling contribute to preserve natural
resources and warrant waste recycling to protect environment and health. In order to receive
further information about electrical and electronic waste collecting and recycling, contact
your Local Council, the service of household waste or the establishment where the product
was acquired.”
español english français
portuguese
ref. SS-2237