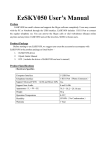
1
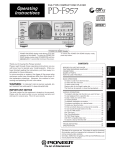
DVD PLAYER
DVD-V7200
NTSC
Operating Instructions
(Advanced Feature operations)
FUNCTION
CU-V155
DISP
REPEAT
A
8
B
D
8
E
AUDIO
ANGLE
G
DVD PLAYER DVD-V7200
GUI
KEY LOCK
H
MEMORY
RECALL
DOLBY
D I G I T A L
SCAN/SKIP
DISPLAY
1
4
STANDBY
ON
¡
¢
STILL/STEP
e
E
PLAY/PAUSE
^
§
CLEAR
¢
L
NEXT
MENU
RETURN
M
N
O
7
8
9
PQ
R
4
5
S
6
T
U
2
V
TITLE
LEVEL
MIN
MAX
MOUSE
/KEY BOARD
3
WX
0
PHONES
4
¡
> 10
1
EXT CONT
I
ENTER
DVD / CD
Î
1
K PREV
J
STOP
OPEN/CLOSE
6
F
SPACE
CHP/FRM
/TIME
BACK
YZ
FUNCTION
BARCODE/COMAND STACK
ANGLE
POWER
6
C
SUBTITLE
RPT A-B
DVD VIDEO BLACKBOARD
Thank you for buying this Pioneer product.
Please read through these operating instructions so you will
know how to operate your model properly. After you have
finished reading the instructions, put them away in a safe place
for future reference.
ADVANCED FEATURE MENU
'
INTRODUCTION
In the Basic Operation edition, basic handling of this unit is explained. In this Advanced Features edition,
however, original features of this unit are explained.
÷ Connection of mouse and keyboard
How to connect the mouse and keyboard to this unit is explained in this section.
÷ Player control using mouse
Control method using the mouse is explained in this section.
÷ Advanced Feature menu
Besides the player menu (explained in the Basic Operation edition) this unit also has an Advanced Feature menu. This section
explains details of weekly timer and power on start setup etc., using this menu.
÷ Video blackboard function
Using the mouse and keyboard, pictures, lines and characters (alphabet, numbers, symbols) can be drawn during video playback
or displayed alone.
Free lines can be drawn on the picture during playback, and pre-drawn drawings or characters can be superimposed on the
image and displayed at a specified position during playback.
Uses
÷
÷
÷
÷
1
4
¡
¢
e
E
^
§
Curved lines can be drawn with
the mouse
2
<VRB1208>
Introduction
1
4
¡
¢
e
E
^
§
1
4
¡
¢
e
E
^
§
Pre-drawn drawings or characters can be automatically
superimposed on the playback picture
A pointer
For picture subtitle
For picture explanation
For picture masking
Various barcodes or commands used to control the DVD-V7200 can be stored in this player’s memory in advance.
Memorized content can be recalled for successive or step by step execution.
With this function, program playback is possible using the player alone without the need for a computer, controller or advance
registration of barcodes.
Input
Playback
Uses
BC/COMMAND STACK GROUP 001: 001
001
002
003
004
005
÷ Sale promotion presentation
÷ Picture reference/Picture
exhibition
÷ Education/training
01:02-03
03:001234-002365
02:05-08
01:045867-123456
STEP FWD
1
4
¡
¢
e
E
^
§
1
4
¡
¢
e
E
^
ADVANCED FEATURE MENU
÷ Barcode/command stack function
§
Automatic playback
Input
Command input with
provided remote control unit
Input
Barcode input with barcode
reader
Successive playback/repeat with:
÷ Provided remote control unit
÷ External option switch
÷ Weekly timer/Power on start
Manual playback
Step by step playback with
provided remote control unit
÷ Others
External synchronizing function
Playback time/Power supply time display
Introduction
3
<VRB1208>
CONTENTS
Introduction ...................................................................... 2
Connection of mouse and keyboard ..................... 5
Player control using a mouse ......................................... 6
Player control icon ......................................................... 6
Advanced feature menu
Advanced feature menu setting ......................................... 8
Advanced feature menu setup ........................................... 9
Displaying the menu screen .......................................... 9
Clearing the menu screen ............................................. 9
Weekly Timer operation ............................................................. 10
Setting/correcting the current time. ............................ 10
Setting the weekly timer ............................................. 11
Clearing the set time ................................................... 12
Playing the specified title and chapter ......................... 12
Setup for recalling displaying the Barcode/command stack
groups from memory ................................................... 13
Setting the timer function to not operate with the weekly
timer setting left as is .................................................. 13
Power on start function .................................................... 14
Power on start function ............................................... 14
Tuning off the power on start function ........................ 15
Advanced feature menu detailed information
Title play mode setup ..................................................
Repeat mode setup .....................................................
Baud rate setup ...........................................................
Tray lock setup .............................................................
Black board lock setup .................................................
Still mode setup ...........................................................
D.R.COMP setup .........................................................
Mark frame squelch setup ...........................................
Squelch dur search setup ............................................
Sync out (during sq) setup ...........................................
Stack mode osd setup .................................................
16
16
16
16
16
16
16
17
17
17
17
DVD VIDEO BLACKBOARD
Character input/picture drawing .......................................
Operation using the mouse or keyboard .....................
Activating the blackboard function ..............................
Inputting characters .....................................................
Using the drawing tools ...............................................
Drawing a picture ........................................................
18
18
18
18
19
19
Grouping video blackboards
Grouping blackboards .................................................. 22
Executing an entire group to execute a group ............. 22
To execute steps in a group ........................................ 22
Recalling/executing previously input blackboards while
observing their list ....................................................... 23
BARCODE/COMMAND STACK FUNCTION
Introduction ............................................................. 24
Basic usage ................................................................. 24
Advanced usage .......................................................... 24
Barcode/Command Stack Setting
Displaying the Barcode/Command Stack screen .........
Direct setting using a barcode reader ..........................
Setting using the remote control unit ..........................
Setting the Subtitle, Audio and Angle ..........................
To use only the chapter search or frame search .........
To change a value during input ....................................
To cancel input in the middle .......................................
25
26
26
29
29
29
29
Setup of LASERBARCODE compatible discs
Video, audio setup ....................................................... 30
Saving a Barcode/Command Stack .................................. 31
To delete a previously input Barcode/Command Stack .... 32
Correcting a previously input Barcode/Command Stack .. 33
Adding a step in a previously input Barcode/Command Stack
..................................................................................... 34
Grouping some Barcode/Command Stacks ..................... 35
Switching the barcode command stack group ................. 36
Deleting a group ............................................................... 36
Dividing a previously input group ..................................... 38
Joining two Barcode/Command Stack groups ................. 40
Using a Barcode/Command Stack .................................... 42
Recalling/executing barcode commands in memory ... 42
To execute steps in a command group ....................... 42
Recalling/executing previously input barcode commands
from list view ............................................................... 43
How to display total hours played and total power on
time
How to display total hours played and total power on time
..................................................................................... 44
External synchronizing function ................................... 45
Saving
Saving characters or pictures ......................................
Details on the blackboard ............................................
To change the display mode ........................................
Pencil tool/Freehand drawing ......................................
4
<VRB1208>
contents
20
20
21
21
A commercially available PS/2 mouse or PS/2 keyboard can be connected to this unit’s mouse/keyboard connector as follows.
1. Turn this unit’s POWER off to set it to
the standby mode.
2. Connect the PS/2 *mouse or PS/2
*keyboard to this unit’s MOUSE/KEYBOARD connector.
3.Turn this unit’s POWER ON.
Connection is now complete.
ADVANCED FEATURE MENU
CONNECTION OF MOUSE AND KEYBOARD
If you want to use both the mouse and keyboard, connect them using a commercially available “Y” cable.
Note:
÷ The power rating of this MOUSE/KEYBOARD connector is no more than 100mA. Do not use a mouse or keyboard with a
current drain exceeding the rating of 100mA.
÷ Certain commercially available PS/2 mouse models, PS/2 keyboard models and “Y” cables may not be compatible with
this unit. For details, please consult PIONEER technical support.
* PS/2 is a registered trademark of IBM corporation.
Connection of mouse and keyboard
5
<VRB1208>
PLAYER CONTROL USING A MOUSE
Mouse operation is possible by connecting a PS/2* mouse and turning
power ON.
PLAYER CONTROL ICON
Pressing the mouse’s left and right button simultaneously or clicking
the right button while holding the left button displays the player control
icons on the bottom left of the screen. When the mouse pointer is
to
placed on a player control icon, the pointer changes from
While the pointer is in the form of
.
, clicking with the left mouse
button performs the same operation as the remote control unit button.
Discs
Function
¢
¡
E
3
e
1
4
DVD
VIDEO CD
CD
YES
YES
YES
When left is clicked
YES
YES
YES
YES
YES
NO
YES
YES
YES
Skip
Skip
Scan
YES
NO
NO
YES
YES
YES
YES
YES
YES
Clicking the mouse’s right button while
Scan
Still/Step
Still/Step
Play
When right is clicked
is placed on the right half
buttons of the player control icon performs the same operation
as that when the
button of the remote control unit is pressed.
In the same way, clicking the mouse’s right button while
on the left half
is placed
button of the player control icon performs the
same operation as that when the
and then
button of the
remote control unit is pressed.
To make the player control icons disappear, perform the same operation
as for displaying them, i.e. click the mouse’s right button while holding
the left button.
CAUTION
While player control icons are displayed, clicking the mouse’s right
button cannot activate the video blackboard function. To activate the
video blackboard function, make the player control icons disappear
before clicking the mouse’s right button. (Refer to page 18.)
6
<VRB1208>
Player control using mouse
TITLE MENIU
MENU
ADVANCED FEATURE MENU
<VRB1208>
7
ADVANCED FEATURE MENU SETTINGS
There are 13 items for setup of the DVD-V7200’s original functions. Menu operation is carried out with the remote control unit.
÷ WEEKLY TIMER: OFF/ON
This can set the time for turning power on/off for each day of
the week together with the title and chapter (or COMMAND
STACK) with which playback is to be started. With this
function, unattended operation is possible.
÷ POWER ON START: OFF/ON
This can set whether playback is to be started automatically
(ON) or not (OFF) when the power is turned on.
÷ TITLE PLAY MODE: SINGLE/ALL
When this is set to SINGLE, playback stops after having played
a title. When it is set to ALL, playback stops after having
played all titles* in a disc.
* Excluding some discs with menus.
÷ REPEAT MODE: OFF/CHAPTER/TITLE/DISC
This item sets what is played repeatedly.
When the TITLE DISPLAY MODE is set to ALL, the DISC
mode will be added.
OFF:
Repeat playback is deactivated.
CHAPTER: Only a chapter is played repeatedly.
TITLE:
Only a title is played repeatedly.
DISC:
The entire disc is played repeatedly.
÷ BAUD RATE: 4800 bps/9600 bps
This sets the baud rate of the RS-232C interface. The baud
rate can be selected between 4800 bps and 9600 bps.
÷ TRAY LOCK: OFF/ON
When this is set to ON, the disc tray is locked and cannot be
opened or closed. This item helps prevent disc theft.
÷ BLACKBOARD LOCK: OFF/ON
Normally, clicking the mouse’s right button will display the
video blackboard input screen but when this is set to ON, the
blackboard is locked and will not be activated when the
mouse’s right button is pressed.
÷ STILL MODE: FRAME/FIELD
Set this item to FIELD if the still image fluctuates.
÷ D.R.COMP.: 9 options including OFF/1 to 8 (MAX)
D.R.COMP. stands for Dynamic Range Compression. As the
DVD audio has a wide dynamic range, the words may be
hard to be understood through your stereo system or TV. In
this case, set this item as required.
CAUTION:
D.R.COMP. affects only discs recorded in Dolby Digital (AC3).
8
<VRB1208>
ADVANCED FEATURE MENU
SETTINGS
÷ MARK FRAME SQUELCH: OFF/ON
The picture will be paused at the set mark frame command
(end point).
ON: Frame search is used near the end point to confirm
the accuracy of the mark frame.
OFF: Although transition from playback to still picture is
smooth, there is error between mark frame set value
and actual still picture.
÷ SQUELCH DUR SEARCH: OFF/ON
To set whether a black screen is displayed or not each time
search is used. (excluding frame search)
÷ SYNC OUT (DURING SQ): OFF/ON
ON: The video output is stopped except during playback or a
menu screen.
OFF: Video is always output.
÷ STACK MODE OSD:ON/OFF
For ON/OFF control of OSD display during stack execute.
Advanced feature menu setting is done with the remote control unit. Setup can be done either when a disc is playing, or when the
player is stopped.
DISPLAYING THE MENU SCREEN
Move the ‰ (pointer) to the item you want to set with the
Press and hold the
button until the menu
screen appears (for about 1.5 sec.).
÷ The menu screen is displayed.
or
setting with the remote control unit’s
button and change the
or
button.
Menu setup is explained in detail from the next page.
Menu to the 1/2 screen
MENU
WEEKLY TIMER
POWER ON START
TITLE PLAY MODE
REPEAT MODE
BAUD RATE
TRAY LOCK
BLACKBOARD LOCK
STILL MODE
D.R.COMP
remote control unit’s
page 1/2
OFF
OFF
SINGLE
CHAPTER
4800bps
OFF
OFF
FRAME
OFF
ADVANCED FEATURE MENU
ADVANCED FEATURE MENU SETUP
CLEARING THE MENU SCREEN
Press the
button.
÷The menu screen disappears.
NOTE:
When the menu screen is closed the settings will be
stored in the internal memory.
If this unit’s power is turned OFF while the menu setup
screen is open, settings will be erased without being
stored.
« »
Menu to the 2/2 screen
MENU
MARK FRAME SQUELCH
SQUELCH DUR SEARCH
SYNC OUT (DURING SQ)
STACK MODE OSD
Pressing the remote control unit’s
page 2/2
OFF
OFF
OFF
ON
or
button
will move the ‰ (pointer) on the left side of the setting item
up or down. When the menu page 1/2 screen has a ‰ (pointer)
at the very bottom part of it, pressing the remote control’s
button again will change the menu to the page 2/2
screen. When the menu page 2/2 screen has a ‰ (pointer) at
the very top part of it, pressing the remote control’s
button again will change the menu to the 1/2 screen.
ADVANCED FEATURE menu setup
9
<VRB1208>
WEEKLY TIMER OPERATION
1
MENU
WEEKLY TIMER
POWER ON START
TITLE PLAY MODE
REPEAT MODE
BAUD RATE
TRAY LOCK
BLACKBOARD LOCK
STILL MODE
D.R.COMP
page 1/2
OFF
OFF
SINGLE
CHAPTER
4800bps
OFF
OFF
FRAME
OFF
ON
2
SETTING/CORRECTING THE CURRENT TIME
Set the current date and time.
1.
Move the ‰ (pointer) to “WEEKLY TIMER” by pressing
the
or
button.
2.
Press the
or
3.
Press the
button.
÷ The Weekly Timer setting screen is displayed.
4.
MENU
WEEKLY TIMER
POWER ON START
TITLE PLAY MODE
REPEAT MODE
BAUD RATE
TRAY LOCK
BLACKBOARD LOCK
STILL MODE
D.R.COMP
page 1/2
ON
OFF
SINGLE
CHAPTER
4800bps
OFF
OFF
FRAME
OFF
button and set to ON.
Press the
button.
÷ The date/time setting screen is displayed blinking.
5.
Set the time of the day.
÷ Set figures in order of year (2 digits), month, day, day of the week,
hour, minute and second.
These figures can be input in any of the following two
methods.
A. Input using the numeric buttons and the NEXT
3-4
00–00–00 –––. 00:00.00
(
) button
B. Input using the
TER (
or
button and the EN-
)button
÷ “A” and “B” in the following description refers respectively
to the two operation methods above.
Example) To set to 8:15:00, Wednesday April 29, 1998
=
A: Press
=
5
98–00–00
SUN.
00:00.00
=
=
=
=
=
=
=
=
=
=
=
=
=
=
*
=
=
=
=
.
* The days of the week can be set using the following numeric buttons.
MON.: 0, TUE.: 1, WED.: 2, THU.: 3, FRI.: 4, SAT.: 5, SUN.: 6.
B: Press the
the
or
button to select 98 and press
item to start the setting of the next set of fig-
ures (the month in this case).
Set the month, day, day of the week, hour, minute and
Tip
The built-in clock is powered by a capacitor. The clock of
this unit functions even when it is in the STANDBY mode,
provided that the AC cord is plugged into a power outlet.
If the AC cord is unplugged, the clock can continue
functioning for 3 or 4 days (when the capacitor is fully
charged and at 25 deg.C).
second, and press the
button to complete the set-
ting operation.
To correct the date or time
When the setting screen appears in step 3 above, press the
button so that the figures of the year start to blink. Then press the
button 4 times so that the figures of hour blink, and set them
with the same method as above.
10
<VRB1208>
Weekly Timer operation
1
SETTING THE WEEKLY TIMER
98–04–29 WED. 08:15.00
1.
\
When the setting screen appears in step 3 on the previous page, press the
or
button to move ‰
(pointer) to the day of the week and press the
button.
2.
«
TIMER ON/OFF
WED.
Set the power ON/OFF time.
Example 1) To turn power ON at 10:30 on Wednesday
÷ Move ‰ (pointer) to “WED” and press the ENTER button.
A: Press
=
=
=
1.TITLE
2.BARCODE/COMMAND STACK
B: Press the
=
=
=
.
or
press the
=
ADVANCED FEATURE MENU
WEEKLY TIMER OPERATION
button to select 10 and
item to start the setting of the next
set of figures. Now set it to 30 and press the
button twice.
÷ If the power OFF time is not set, the timer simply turns power ON.
2
TIMER ON/OFF
WED.
Example 2): To turn power ON at 10:30 on Wednesday and turn it
off at 17:45
A: Press
=
=
=
=
=
1.TITLE
=
=
=
=
=
=
2.BARCODE/COMMAND STACK
=
B: Press the
«
TIMER ON/OFF
WED.
.
or
button to select 10 and
press the
item to set the setting of the next set
of figures. Set the subsequent sets of figures to 30,
17 and 45 by repeating the above.
NOTE:
1.TITLE
2.BARCODE/COMMAND STACK
It is also possible to set only the power OFF time without setting the
power ON time. In this case, when power is turned ON manually, it
will be turned OFF at the set time.
Weekly Timer operation
11
<VRB1208>
WEEKLY TIMER OPERATION
1
3
TIMER ON/OFF
WED.
1.TITLE
2.BARCODE/COMMAND STACK
3.
Set the operation to be performed at the moment timer
playback starts.
1. TITLE: Setup for playing the specified title and chapter.
÷ Refer to ”Playing the specified title and chapter”.
2. BARCODE COMMAND STACK: Setup for recalling the display
of the barcode command stack groups from memory.
÷ Refer to ”Recalling the display of the barcode command stack
groups from memory” on next page.
÷ Select one of the above with the
2
the
TIMER ON/OFF
or
button, and press
button.
WED.
CAUTION
1.TITLE
2.BARCODE/COMMAND STACK
÷ This step cannot be performed if the power ON time has not been
set.
÷ The data is written in memory at the moment the timer setup screen
is exited. The timer setup will not be stored in memory if power is
turned off before or without exiting the screen.
÷ On a DVD disc that has been setup to start playback automatically,
the setup made above will not be applied to the disc.
CLEARING THE SET TIME
TIMER ON/OFF
WED.
With the TIMER ON/OFF time input screen (shown above) disbutton of the remote control unit.
played, press the
To clear the set time and return to the list display.
1.TITLE
2.BARCODE/COMMAND STACK
PLAYING THE SPECIFIED TITLE AND CHAPTER
Pointer
«
÷ Move ‰ (pointer) to “1 TITLE” and press the
button.
Example) To begin playback with Chapter 2 of Title 6
98–04–29
WED.
08:15.00
=
A: Press
=
=
=
=
=
.
B: Press the
or
button to select 06 and
press the
item to start the setting of the next
set of figures. Now press the
or
to select
02 and press the
button.
CAUTION
÷ When a title and chapter are selected, playback continues after the
selected chapter only when there is one or more chapter after it.
Playback completes at the end of the selected title.
÷ If repeat playback is set in the Advanced Feature menu, the selected
chapter is played first then the set repeat playback starts.
÷ When setting tracks on a CD or Video CD, please enter the track
number in the CHAPTER in the above setting. At this time TITLE
and BARCODE/COMMAND STACKs settings will not operate.
12
<VRB1208>
Weekly Timer operation
TIMER ON/OFF
SETUP FOR RECALLING THE DISPLAY OF BARCODE/
COMMAND STACK GROUPS FROM MEMORY
WED.
÷ Move the pointer to 2. BARCODE/COMMAND STACK and press
1.TITLE
.
2.BARCODE/COMMAND STACK
Example) To recall and display Barcode/Command stack group
“5”
A: Press
«
B: Press the
98–04–29
WED.
08:15.00
press the
=
=
or
.
ADVANCED FEATURE MENU
WEEKLY TIMER FUNCTION OPERATION/DISPLAY
WEEKLY TIMER
SPECIFICATIONS
OPERATION
button to select 005 and
button.
Now the timer setting is complete.
CAUTION
When a Barcode Command stack group is selected, the command
stack within the group will be executed repeatedly regardless of
whether the repeat mode in the Advanced Feature menu is set to ON
or OFF.
SETTING THE TIMER FUNCTION TO NOT OPERATE
WITH THE WEEKLY TIMER SETTING LEFT AS IS
MENU
WEEKLY TIMER
POWER ON START
TITLE PLAY MODE
REPEAT MODE
BAUD RATE
TRAY LOCK
BLACKBOARD LOCK
STILL MODE
D.R.COMP
page 1/2
OFF
OFF
SINGLE
CHAPTER
4800bps
OFF
OFF
FRAME
OFF
1. Move the ‰ (pointer) to WEEKLY TIMER on the Advanced Feature menu screen and set to OFF with the remote control unit’s
or
button.
Weekly Timer operation
13
<VRB1208>
POWER ON START FUNCTION
1-2
MENU
WEEKLY TIMER
POWER ON START
TITLE PLAY MODE
REPEAT MODE
BAUD RATE
TRAY LOCK
BLACKBOARD LOCK
STILL MODE
D.R.COMP
page 1/2
OFF
ON
SINGLE
CHAPTER
4800bps
OFF
OFF
FRAME
OFF
POWER ON START FUNCTION
1.
Move the ‰ (pointer) to “POWER ON START” by pressing the
or
button.
2.
Set it to ON by pressing the
3.
Press the
or
button.
button.
÷ The POWER ON START setting screen is displayed.
3
1. TITLE: Playing the specified title and chapter.
POWER ON START
1.TITLE
2. BARCODE/COMMAND STACK: Recalling and displaying
the Barcode/Command stack groups in memory.
2.BARCODE/COMMAND STACK
÷ Select one of the above with the
Select 1
or
button, and
press the
Select 2
1. Playing the specified title and chapter
÷ Move the ‰ (pointer) to 1. TITLE and press
Example) To begin playback with Chapter 2 of Title 6
POWER ON START
1.TITLE
TITLE 06
CHAPTER 02
2.BARCODE/COMMAND STACK
=
A: Press
=
press the
=
=
or
item to start the setting of the next
02 and press the
page 1/2
OFF
T06:C02
SINGLE
CHAPTER
4800bps
OFF
OFF
FRAME
OFF
Specify the title and chapter.
14
<VRB1208>
POWER ON START function
=
button to select 06 and
set of figures. Now press the
«
=
.
B: Press the
MENU
WEEKLY TIMER
POWER ON START
TITLE PLAY MODE
REPEAT MODE
BAUD RATE
TRAY LOCK
BLACKBOARD LOCK
STILL MODE
D.R.COMP
.
or
to select
button.
CAUTION
÷ When setting tracks on a CD or Video CD, please enter the track
number in the CHAPTER in the above setting. At this time TITLE
and BARCODE/COMMAND STACKs settings will not operate.
2.
POWER ON START
Recalling and displaying the Barcode/Command stack
groups in memory
÷ Move the ‰ (pointer) to 2. BARCODE/COMMAND STACK and
1.TITLE
press
2.BARCODE/COMMAND STACK
GROUP 005
.
Example) To execute Barcode/Command stack group 5
A: Press
B: Press the
«
MENU
WEEKLY TIMER
POWER ON START
TITLE PLAY MODE
REPEAT MODE
BAUD RATE
TRAY LOCK
BLACKBOARD LOCK
STILL MODE
D.R.COMP
press the
page 1/2
OFF
GROUP 005
SINGLE
CHAPTER
4800bps
OFF
OFF
FRAME
OFF
=
=
or
.
button to select 005 and
button.
ADVANCED FEATURE MENU
POWER ON START FUNCTION
÷ The Advanced Feature menu setup screen is displayed again, in
which the POWER ON START setting is shown.
Now the setting of the operation to be performed at power ON is
complete.
CAUTION
With a disc with which playback starts automatically, the operation
may differ from the setting.
Specify the Barcode/Command stack.
TURNING OFF THE POWER ON START
FUNCTION
1.
On the Advanced Feature menu screen, move the ‰
(pointer) to POWER ON START with the remote control unit’s
or
button and select OFF with
or
button.
the remote control unit’s
POWER ON START function
15
<VRB1208>
ADVANCED FEATURE MENU DETAILED INFORMATION
TITLE PLAY MODE SETUP
TRAY LOCK SETUP
On the Advanced Feature menu screen, move the ‰(pointer)
to TITLE PLAY MODE with the remote control unit’s
or
button and press the remote control unit’s
or
button to select SINGLE or ALL.
When this mode is set to ON, the tray is locked and can not
be opened or closed. When a disc is loaded and the TRAY
LOCK is set to ON, the disc can not be ejected until TRAY
LOCK is set to OFF with the remote control unit.
Use this function when you do not wish the tray to be
openable by others.
For setup, move the ‰ (pointer) to TRAY LOCK on the
TITLE PLAY MODE SINGLE
In the normal DVD player mode, playback will stop after
playback of 1 title on the DVD disc.
TITLE PLAY MODE ALL
Advanced Feature menu screen using the remote control
unit’s
or
button, and press the remote control
unit’s
or
button to select between OFF/ON.
After playback of 1 title on the DVD disc, playback will continue
to the next title and play all titles on the disc.
NOTE:
Some DVD discs include menus etc., and on these types of
discs playback will pause while the menu screen is displayed
and the above operations will not function.
REPEAT MODE SETUP
On the Advanced Feature menu screen, move the ‰ (pointer)
to REPEAT MODE with the remote control unit’s
or
button and press the remote control unit’s
or
BLACK BOARD LOCK SETUP
This function locks the black board input mode so that the
black board screen is not displayed. Input functions other than
player control functions operated with the mouse are
prohibited. Use this function when an undetermined number
of people are using the player and you do not want the video
back board input commands etc., to be changed.
For setup, move the ‰ (pointer) to BLACK BOARD on the
Advanced Feature menu screen using the remote control
unit’s
or
button and press the remote control
unit’s
or
button to select between OFF/ON.
button to select between OFF/CHAPTER/TITLE/
DISC.
When the TITLE DISPLAY MODE is set to ALL, the DISC
mode will be added.
OFF:
In the normal DVD player mode, repeat playback
is deactivated.
CHAPTER: Only one chapter is played repeatedly. (DVD disc)
On a CD or V-CD one track is played repeatedly.
TITLE:
Only one title is played repeatedly.
DISC:
The entire disc is played repeatedly.
STILL MODE SETUP
The paused picture of scenes with much movement may
fluctuate during STILL. In this case, changing the FRAME to
FIELD will stop the fluctuation, making the picture easier to
see.
For setup, move the ‰ (pointer) to BLACK BOARD on the
Advanced Feature menu screen using the remote control
unit’s
or
button and press the remote control
unit’s
FIELD.
or
button to select between FRAME/
On a CD or V-CD the whole disc is played repeatedly
when either TITLE or DISC is selected.
D.R.COMP SETUP
(DYNAMIC RANGE COMPRESSION)
BAUD RATE SETUP
This function sets the baud rate of the RS-232C interface.
The baud rate can be selected between 4800 bps and 9600
bps.
For setup, move the ‰ (pointer) to BAUDE RATE on the
Advanced Feature menu screen using the remote control
unit’s
or
button, and press the remote control
unit’s
or
button to select between 4800bps and
9600bps.
16
<VRB1208>
How to display the play time and power ON time
As the DVD audio has a wide dynamic range, words may be
hard to understand through your stereo system or TV. In this
case set this function as required.
There are 9 levels that can be selected: OFF/1 to 8 (MAX).
For setup, move the ‰ (pointer) to P.R.COMP on the Advanced
Feature menu screen using the remote control unit’s
or
button and press the remote control unit’s
or
button to select between OFF/1 to 8 (MAX).
MARK FRAME SQUELCH SETUP
STACK MODE OSD SETUP
Within mark frame input commands, the picture will be
paused at mark frame (playback stop point).
When set to ON, frame search is used near the end point to
confirm the accuracy of the mark frame.
When set to OFF, although the transition from playback picture
to still picture will be smooth, some amount of frame error
between the mark frame set value and the actual still picture
may occur.
This function controls ON/OFF of OSD displays during stack
playback.
ON: STACK OSD is displayed on the screen when search
is used during stack playback.
OFF: STACK OSD is not displayed.
For setup, move the ‰ (pointer) to MARK FRAME SQUELCH
unit’s
or
button and press the remote control
on the Advanced Feature menu screen using the remote
unit’s
or
button to select between ON/OFF.
control unit’s
control unit’s
or
or
For setup, move the ‰ (pointer) to STACK MODE OSD on
the Advanced feature menu screen using the remote control
ADVANCED FEATURE MENU
ADVANCED FEATURE MENU DETAILED INFORMATION
button and press the remote
button to select between OFF/
ON.
SQUELCH DUR SEARCH SETUP
ON: Screen momentarily turns black during search.
OFF: Screen does not momentarily turn black during search.
For setup, move the ‰ (pointer) to SQUELCH DUR SEARCH
setup on the Advanced Feature menu screen using the
remote control unit’s
remote control unit’s
or
button and press the
or
button to select
between ON/OFF.
SYNC OUT (DURING SQ) SETUP
This function sets whether a picture sync signal is output
with video output when the player is stopped.
OFF: Video is always output and there is no loss of sync
signal.
ON: There is loss of picture output at times other than
playback or when menu screens are displayed.
For setup, move the ‰ (pointer) to SYNC OUT (DURING SQ)
on the Advanced Feature menu screen using the remote
control unit’s
or
button and press the remote
control unit’s
or
button to select between ON/
OFF.
17
<VRB1208>
DVD VIDEO BLACKBOARD
CHARACTER INPUT/PICTURE DRAWING
The video blackboard function of this unit allows you to draw characters
and pictures just like on a blackboard. The drawn characters and
pictures can be displayed alone or superimposed on the disc video.
OPERATION USING THE MOUSE OR
KEYBOARD
”Y“ cable
Connect the PS/2 mouse or PS/2 keyboard to the mouse/keyboard
connector of this unit.
Be sure to put this unit to the standby mode or unplug the power cord
before connecting the mouse or keyboard to this unit.
If you want to use both the mouse and keyboard, connect them using
a commercially available ”Y“ cable.
* The power rating for the mouse/keyboard connector of this unit is
5 V and no more than 100 mA.
Do not use a mouse or keyboard with a current drain exceeding
the rating of 100 mA.
Certain PS/2 mouse models and PS/2 keyboard models may not
be usable with this unit. For details, please consult PIONEER
TECHNICAL SUPPORT.
ACTIVATING THE BLACKBOARD FUNCTION
1.
2.
Press the POWER button.
Click the right button anytime to display the Blackboard
screen.
÷ This causes forward play to stop automatically. Forward play
resumes when video blackboard mode is exited.
1-3
ABC
COLR SAVE UNDO EXIT
ABC
COLR SAVE UNDO EXIT
Blackboard screen
4
INPUTTING CHARACTERS
P IONEER_
1.
Move the cursor to ABC and press click the mouse’s
left button.
2.
Move the cursor to the position where you want to
input the first character.
÷ The cursor changes to the I cursor in the area where character
input is possible.
Input of PIONEER
5
3.
Click the mouse’s left button.
4.
Input a character.
5.
Click the mouse’s right button after completing the input.
÷ “_” is displayed overlapped with the I cursor.
÷ Characters can also be input from the PC keyboard provided that
this is connected.
The PC keyboard can input characters by distinguishing the
numerals, symbols and uppercase/lowercase alphabet as well as
carriage returns.
ABC
COLR SAVE UNDO EXIT
÷ The Blackboard screen is displayed again.
÷ To save the characters, use the procedure in “Saving characters or
pictures” on page 20.
18
<VRB1208>
Character input/picture drawing
CHARACTER INPUT/PICTURE DRAWING
USING THE DRAWING TOOLS
÷ Use the mouse’s left button to select icon below.
(LINE): Draws a straight line.
(BOX): This tool can be switched by clicking to a tool
ABC
for drawing a line-enclosed rectangle, solidpainted rectangle or a rectangle the outside
of which is painted.
COLR SAVE UNDO EXIT
Drawing tools
(ROUND): This tool can be switched by clicking to a
1
: This tool can be switched by clicking to a tool for
drawing a thin, medium or thick line.
ABC
COLR SAVE UNDO EXIT
COLR : Each click switches the color to Red, Blue, Green,
Yellow, White, Black, Gray or Purple.
SAVE : Saves the drawn picture.
(See page 20 for the saving method.)
2
UNDO : Cancels the drawn picture. Each click cancels the last
drawn picture.
Press with the mouse for more than 1 second to clear the
entire drawing in the screen.
ABC
COLR SAVE UNDO EXIT
DVD VIDEO BLACKBOARD
tool for drawing an ellipse, solid-painted
ellipse or an ellipse the outside of which is
painted.
EXIT : Click the mouse to exits the current screen .
NOTE
3
÷ The Direction buttons (
) and ENTER button on the remote control unit can
also be used for the above operation.
÷ The blackboard function will not function in a disc’s menu screen.
DRAWING A PICTURE
Press the mouse’s left button at the point you want to start drawing
and move the cursor (without releasing the mouse button). (This
operation is referred to as dragging.)
4
1.
Select a drawing tool.
2.
Move cursor to the drawing start position.
3.
Drag.
4.
Release finger from the mouse.
÷ A picture is drawn as you move the cursor.
ABC
COLR SAVE UNDO EXIT
÷ Draw other pictures by repeating the above.
Character input/picture drawing
19
<VRB1208>
CHARACTER INPUT/PICTURE DRAWING
SAVING CHARACTERS OR PICTURES
1
1.
Click the SAVE button on the screen.
2.
Display the video where you want to begin displaying
the object or text.
÷ The Save screen is displayed.
COLR SAVE UNDO EXIT
ABC
2-4
GROUP 001
DISPLAY AREA
NEXT
IN
OUT
÷ “IN” blinks.
÷ Display the video by controlling the player control icon at the bottom
left of the screen.
3.
Click the SAVE button on the screen.
4.
Display the video where you want to stop displaying
the object or text.
÷ “OUT” starts to blink.
÷ This sets the display start position.
÷ Display the video by controlling the player control icon at the bottom
left of the screen.
AUTO DISP SAVE DEL EXIT
5
GROUP 001
001 R–3, RED 02-015.29~015.36 A
5.
Click the AUTO DISP button on the screen.
6.
Click the EXIT button.
÷ This sets the display end position.
÷ The characters or pictures are saved in the player's memory.
÷ The group and step where they are saved are shown.
÷ The Blackboard screen is displayed again.
NOTE:
AUTO DISP SAVE DEL EXIT
By saving the characters and drawing without playing a disc, the
drawing can be displayed in a desired scene. (See page 23 for execting
method.
CAUTIONS:
6
GROUP 001
001 R–3, RED 02-015.29~015.36 A
÷ With a DVD, the start point (IN) and end point (OUT) can be set
only within the same title.
÷ Should mention that video blackboard will not function in a disc‘s
menu screen.
÷ The stored frame will have a ± 1 frame error.
÷ The Direction buttons (
) and ENTER button on the remote control unit can
also be used for the above operation.
AUTO DISP SAVE
DEL EXIT
DETAILS ON THE BLACKBOARD
GROUP 001
001 R–1, YLW 02-002.41~032.06
002 B–3, GRN 01-027.30~035.08
Display mode
Display end min./sec.
Display start min./sec.
Display title
20
<VRB1208>
Character input/picture drawing
RED: Red
BLU: Blue
GRN: Green
YLW: Yellow
WHT: White
BLK: Black
GRY: Gray
PUR: Purple
1: Line width fine
2: Line width medium
3: Line width thick
i: Solid painted
o: Outline only
L: Line
B: Box
R: Round
CHARACTER INPUT/PICTURE DRAWING
TO CHANGE THE DISPLAY MODE
Indicator on the top right
GROUP 001
001 R–3, RED 02-015.29~015.36 A
1. Move the cursor to the line you want to change and
click the left button of the mouse.
2. Move the cursor to AUTO DISP and click the left button of
the mouse.
Indicator display on the right edge of screen
A
AUTO DISP SAVE DEL EXIT
: Displayed at the same time as the disc playback, from the
set start point through the set end point.
A S : The video becomes a still image at the set start point.
–
No display: The set characters or pictures are not displayed.
button in this section starts drawing.
Pressing the
S : The video becomes the still image at the set start point but
objects are not displayed.
Press the
button on the remote control unit to start
picture drawing.
*
: The * mark is displayed on the top right of the screen during
playback.
Pressing the
button in this section starts drawing.
* S : The video becomes a still image, in which only the * mark
is displayed, at the set start point.
Press the
button on the remote control unit to start
picture drawing.
Meaning of displayed symbols
“S” stands for “Still image” and plays a still image at the IN point.
“A” stands for “Auto display”, which displays drawing in the screen
set with AUTO DISP.
“*” displays only the * marking.
“–” displays a still image immediately before the start of the IN
point.
DVD VIDEO BLACKBOARD
A S : The video becomes a still image immediately before the
set start point.
PENCIL TOOL/FREEHAND DRAWING
Click the right button of the mouse in the video blackboard input screen
to turn the pointer into the pencil tool. Freehand drawing is possible
by holding the mouse’s left button.
Clicking the right button again displays the Blackboard screen.
CAUTION:
÷ Pictures can be drawn using the pencil tool but they cannot be
saved later.
÷ To change the color or line width, select COLR or the
tool on
the Blackboard screen. (See “Drawing Tools” on page 19.)
Freehand drawing is possible by
holding the mouse’s left button.
Character input/picture drawing
21
<VRB1208>
GROUPING VIDEO BLACKBOARDS
Step section
Group section
GROUP 001
001 R–1, YLW 02-002.41~032.06
002 B–3, GRN 01-027.30~035.08
GROUPING BLACKBOARDS
Blackboards can be registered by dividing them into groups according
to the disc and title to enable selective use later.
This makes it possible to store drawn characters and pictures in
positions matching the played images.
Pictures and characters comprising groups are also stored as steps.
When executing the blackboards, arbitrary registered blackboard
groups can be selected and displayed.
It is also possible to delete blackboards on a per-group basis.
When ‰ (pointer) appears to the left of DISPLAY or GROUP on the
setup screen (refer to page 20), the group can be selected by pressing
NEXT, PREV. Pressing SAVE will then enter that group.
When ‰ (pointer) appears to the left of GROUP, pressing the DEL
button will cancel that groups content.
Select a group
EXECUTING AN ENTIRE GROUP TO EXECUTE
A GROUP
BLACKBOARD GROUP 001: 000
1.
2.
÷
÷
÷
÷
Select a step
Press the
button.
Press the
button twice.
The step section blinks.
The step section should continue displaying 000.
When the step is 000, the entire group will be executed.
When a step is selected, only the selected step in the group will
be executed.
3.
Press
4.
Input the number of the group to be recalled/executed
using the numeric buttons.
5.
Press the
.
button twice.
÷ This starts execution according to the selected blackboard.
BLACKBOARD GROUP 001: 000
TO EXECUTE STEPS IN A GROUP
1.
Press the
button.
2.
Press the
button twice.
3.
Press
if you want to switch the group.
÷ If you do not want to change the group, go to step 6 below.
4.
Input the number of the group to be recalled/executed
using the numeric buttons.
5.
Press the
6.
Input the number of the step to begin execution using
the numeric buttons.
7.
Press the
button.
button.
÷ This starts execution of the selected step in the selected group.
÷ The step setup is released after the step has been executed.
22
<VRB1208>
Grouping VIDEO blackboards
GROUPING VIDEO BLACKBOARDS
Select a step
RECALLING/EXECUTING PREVIOUSLY INPUT
BLACKBOARDS WHILE OBSERVING THEIR LIST
Select a group
GROUP 001
001 R–1, YLW 02-002.41~032.06
002 B–3, GRN 01-027.30~035.08
1.
Press the
button.
2.
Press the
button twice.
3.
Press the
button and press the
button.
÷This displays a list of commands.
Select a group by pressing the
5.
Select a step by pressing the
6.
Press the
or
button.
or
button.
button.
NOTE
Press the
button to clear the characters or pictures being
displayed. However, characters and pictures that have been set with
the AUTO DISP button cannot be cleared with the
Example
button.
Display of the recalled characters and pictures
Characters and pictures recalled by “Executing an entire group” are
not displayed in the order they were registered but in order of the
locations of the set display start points. When a characters or picture
is displayed while another character or picture is already displayed,
the newly displayed character/picture is superimposed above the
existing character/picture, and all characters/pictures are displayed until
the last display end point among the set display end points.
Time flow
(Start point)
(End point)
(Start point)
(Start point)
(Start point)
(End point)
(End point)
DVD VIDEO BLACKBOARD
4.
÷ When pictures A and B are displayed, picture B appears after the
display of picture A has ended.
÷ When pictures A and C are displayed, picture C appears above
picture A which is already displayed, and the display of pictures A
and C ends at the picture C end point.
÷ When pictures C and D are displayed, picture D appears above
picture C which is already displayed, and the display of pictures C
and D ends at the picture C end point.
(End point)
Grouping VIDEO blackboards
23
<VRB1208>
BARCODE STACK/COMMAND STACK FUNCTION
INTRODUCTION
This player can be used as follows using the Barcode stack/
Command stack function
÷ Commands in the barcode book included with the disc
can be memorized in the player in advance. (Barcode stack
function.)
÷ Barcodes can be set using the provided remote control
for discs that do not have barcodes, or for commands that
you want to use that are not provided with barcodes.
(Command stack function.)
÷ The remote control can be used for recall and successive
execution or step by step execution of memorized content.
In the case of laser barcode compatible discs, barcodes
for industrial LD use can be used as is (please check
mark). Use of the LB
barcode sheet for unmarked discs is not possible.
CAUTION:
The Barcode stack/Command stack function will not
operate with CDs.
NOTE:
The maximum number of steps that can be memorized in
the player is 300 steps including video blackboards.
BASIC USAGE
How to use the barcode stack/command stack function is
indicated as follows:
1) Display the barcode stack/command stack
setup screen with the remote control
\ Page 25
2) Input the barcode with the barcode reader and
transmit to player \ Page 26
÷ Input can also be done with the remote control unit.
In the case of LaserBarcode compatible discs \ page30
In the case of regular DVD discs \ Page26~29
3) Repeat step 2 in the desired playback order.
4) When input is finished, store in the player’s
memory \ Page 31
5) Execution \ Page42, 43
24
<VRB1208>
Introduction
With the barcode stack/command stack function of this unit,
groups can be divided and memorized without influencing
previously input commands.
This is convenient for separate memorization of contents of
more than one disc, or when one player is being jointly used
by many people.
To register a group separate to the already previously
memorized content
1) Register a new group \ Page 35
CAUTION:
that such discs include the
ADVANCED USAGE
“GROUP 002” on the top right of the barcode stack/
command stack input screen is the group number that
will be memorized.
As the group number will be important for execution,
please make a note of it so that you do not forget it.
2) Input the barcode with the barcode reader and
transmit to player \ Page 26
÷ Input can also be done with the remote control unit.
In the case of laser barcode compatible discs \ Page 30
In the case of regular DVD discs \ Page 26~29
3) Repeat step 2 in the desired playback order.
4) When input is finished, store in the player’s
memory \ Page 31
5) Execution \ Page 42, 43
At this time please select the group number that was
noted in step 1.
NOTE:
Commands stored in the player’s memory can be grouped
together or divided \ Page 38~41.
Please note, however, that the order of commands can not
BARCODE/COMMAND STACK SETTING
The player can store commands input using LASERBARCORD 2 and
DVD barcodes. The stored commands can be recalled for either
successive or step-by-step execution.
DISPLAYING THE BARCODE/COMMAND
STACK SCREEN
1
1.
Press the
button.
÷ “BARCODE/COMMAND” is displayed.
BARCODE/COMMAND
BARCODE/COMMAND STACK screen
2.
2
BC/COMMAND STACK GROUP 001/001
001 PLAY
002 03:123000–129000
003 05:03–07
03 2 1
004
005
006
007
008
ALL CLEAR? YES NO
Press the
÷ The Barcode/Command Stack screen is displayed.
÷ If barcodes have already been input, their data are shown in the
screen.
Select whether barcodes are to be input by erasing existing
barcodes or by adding them to the existing barcodes.
÷ To input new barcodes from the beginning, select “YES” with the
or
button and press the
button.
÷ To add new barcodes to existing barcodes, select “NO” with the
or
«
BC/COMMAND STACK GROUP 001: 001
SAVE DEL
INS
button and press the
button.
÷ Press the
button to display the Barcode/Command Stack
Input screen.
÷ When barcodes have not been input, the BARCODE/COMMAND
STACK input screen will be displayed.
The barcode/command stack input screen appears.
÷ The setting procedure of this screen will be described in the
subsequent pages.
÷ Barcode/Command Stacks can be set directly using a barcode
reader (optional) or set using the remote control unit.
EXIT
Barcode/Command Stack function
BARCODE/COMAND STACK
TITLE
00
SEARCH FRAME 000000
MARK FRAME - - - - - SUBTITLE
*
AUDIO
*
ANGLE
*
button.
25
<VRB1208>
BARCODE/COMMAND STACK SETTING
1
DIRECT SETTING USING A BARCODE READER
1. Read a barcode with a barcode reader.
2. Send it to the player.
Example 1) Read “PLAY” and send it.
Example 2) Read “Play Title 8 Chapters 5 to 12 with Subtitle 3, Audio
2 and Angle 1” and send it.
2
SETTING USING THE REMOTE CONTROL
UNIT
Five commands including Play 3, Pause 8, e Still/Step E and Stop
7 can be set using the remote control unit.
The chapter search, chapter play, frame search and frame segment
play commands can also be set using the remote control unit.
1. Press the
button.
÷ The TITLE number will blink and the input mode will be selected.
BC/COMMAND STACK GROUP 001: 001
PLAY
SAVE DEL
Press the
button.
÷ The Barcode/Command Stack Input screen shows “PLAY” and
increments to the next Input screen.
INS
EXIT
Display when the example on the right is input
26
<VRB1208>
Example 1) To set “Play”
Barcode/Command Stack Setting
BARCODE/COMMAND STACK SETTING
Example 2) To “Play Title 3 Frames 1230000 to 129000”
BC/COMMAND STACK GROUP 001: 001
TITLE
03
SEARCH FRAME 123000
MARK FRAME 129000
SAVE DEL
INS
EXIT
1. Press the
÷
button.
The TITLE number will blink.
2. Press the
mode.
3. Press
÷
÷
button to initiate the numeral input
to select SEARCH FRAME.
This item sets the frame number where playback should start.
Each press switches “CHAPTER” and “FRAME” alternately.
=
4. Press
Display when the example on the right
is input
÷
÷
=
=
=
=
=
.
This sets the start frame number.
If the operation up to the present has been performed during
playback, the input start frame is searched now.
=
5. Press
=
=
=
=
=
.
÷
This sets the end frame number. Now go to the next step.
6.
Press the
÷
button to return to the cursor mode.
If the operation in steps 4 and 5 is performed during playback,
you can press
in place of specifying the frame number
in steps 4 and 5 above. In this case, the frame number being
played is input automatically.
Example 3) To “Play Title 5 Chapters 3 to 7 with Subtitle 3, Audio
2 and Angle 1”
BC/COMMAND STACK GROUP 001: 001
TITLE
SEARCH CHAPTER
MARK CHAPTER
SUBTITLE
AUDIO
ANGLE
INS
EXIT
Display when the example on the right
is input
÷
The TITLE number will blink.
2. Press the
3. Press
÷
4. Press
÷
÷
÷
6.
÷
7.
÷
To play chapter 7 till the end as shown in Example 3),
enter “8”, obtained by adding 1 to 7, in MARK
CHAPTER.
.
to select SEARCH CHAPTER.
=
.
This sets the start chapter number.
Press
=
.
This sets the end chapter number.
Press
=
.
This sets Subtitle 3.
. (Do not press
.)
This sets Audio 2.
9. Press
÷
=
This item sets the chapter number where playback should start.
Each press switches “CHAPTER” and “FRAME” alternately.
8. Press
÷
to initiate the numeral input mode.
This sets title 5 and the frame input mode starts.
5. Press
CAUTION
button.
. (Do not press
.)
This sets Angle 1. Now go to the next step.
10. Press the
BARCODE/COMAND STACK
SAVE DEL
05
03
08
03
2
1
1. Press the
to return to the cursor mode.
Barcode/Command Stack Setting
27
<VRB1208>
BARCODE/COMMAND STACK SETTING
BC/COMMAND STACK GROUP 001: 001
TITLE
00
SEARCH FRAME 000000
MARK FRAME - - - - - SUBTITLE
01
AUDIO
2
ANGLE
3
SAVE DEL
INS
EXIT
Example 4) To input the command for setting Subtitle 1, Audio 2
and Angle 3
1. Press the
÷
2. Press the
BC/COMMAND STACK GROUP 001/ 001
001 SUBTITLE 01 AUDIO 2 ANGLE 3
002 03:10000–15000
003
004
005
006
007
008
SAVE DEL INS EXIT
BC/COMMAND STACK GROUP 001: 001
TITLE
03
SEARCH FRAME 123000
MARK FRAME 129000
SAVE DEL
INS
EXIT
TITLE
00
SEARCH FRAME 000000
MARK FRAME - - - - - SUBTITLE
*
AUDIO
*
ANGLE
*
SAVE DEL
INS
EXIT
BC/COMMAND STACK GROUP 001: 002
REPEAT
SAVE DEL
28
<VRB1208>
INS
EXIT
Barcode/Command Stack Setting
.
4. When the AUDIO digit starts to blink, press
.
5. When the ANGLE digital starts to blink, press
.
÷ With a play command that specifies the start and end frames, it is
not possible to set the subtitle, audio and angle simultaneously.
However, by placing the subtitle, audio and angle setting command
as described above before the frame section play command, the
section playback can be executed with the specified setting.
The input as shown above allows to play title 3 frames 10000 to 15000
by setting Subtitle 1, Audio 2 and Angle 3.
With commands other than the frame section play command, such
as the frame search, chapter search and chapter section play
commands, the specified setting is valid within each command.
Example 5) To repeat “Play Title 3 frames 123000 to 129000”
in Example 2
1. Perform steps 1 to 6 in Example 2.
÷ The BARCODE/COMMAND STACK input screen of the next
step appears.
2. Press the
blinking.
3. Press the
BC/COMMAND STACK GROUP 001: 002
while the TITLE digits are blinking.
3. When the SUBTITLE digits start to blink, press
then
Pressing the
button switches
over to the following display.
button.
The TITLE number will blink.
button while the title number is
button.
÷ The REPEAT indicator appears on the screen.
BARCODE/COMMAND STACK SETTING
SETTING THE SUBTITLE, AUDIO AND ANGLE
SUBTITLE
÷ “00” turns the screen color to the color specified in “Background
color” in the GUI menu and makes the played image invisible.
÷ “01” to “32” displays the corresponding subtitle.
÷ “33” plays with Subtitle OFF.
÷ “34” is used to make the played image made invisible with “00”
visible again.
÷ “99” retains the previous condition. This is used to change other
setting than SUBTITLE while maintaining the SUBTITLE setting
the same.
÷ “35” to “98” are invalid.
AUDIO
÷ “0” plays image with Audio OFF.
÷ “1” to “8” selects and plays the corresponding audio.
÷ “9” retains the previous condition.
ANGLE
÷ “1” to “8” selects and plays the corresponding angle.
÷ “9” retains the previous condition.
÷ “0” selects and plays Angle 9.
CAUTION
÷ When “retain the previous condition” is selected, “*” is displayed
in the input screen.
÷ The barcode/command stack cannot be executed if a value that
does not exist in the disc is input.
TO USE ONLY THE CHAPTER SEARCH OR
FRAME SEARCH
In item “MARK CHAPTER” or “MARK FRAME”, simply press the
button without setting anything.
A still image is displayed after search., still image is displayed after
search.
Press the numeric button of the correct number (including 0).
To return to a previous setting point, press the
button.
TO CANCEL INPUT IN THE MIDDLE
Press the
button to return to the cursor mode, move the ‰
(pointer) to “EXIT” by pressing the
button.
button and press the
Barcode/Command Stack Setting
BARCODE/COMAND STACK
TO CHANGE A VALUE DURING INPUT
29
<VRB1208>
BARCODE/COMMAND STACK SETTING
SETUP OF LASERBARCODE COMPATIBLE DISCS
Example) Playback of “analog stereo” audio channel from frame
1500 to 1800 without video.
BC/COMMAND STACK GROUP 001: 001
TITLE
SEARCH FRAME
MARK FRAME
VIDEO
AUDIO
LD
01500
01800
0
3
1. Press the
÷
The TITLE number will blink.
2. Press the
÷
÷
÷
=
=
=
=
=
=
=
=
.
The playback picture disappears.
6. As the AUDIO number will blink, press
÷
.
The stop frame number is entered.
5. As the VIDEO number will blink, press
÷
.
The start frame number is entered.
If the procedure up until this point has been done during
playback, the start frame that was input is searched for.
4. Press
÷
button to display LD.
Be sure to set the laser barcode compatible disc command
to the TITLE LD display.
3. Press
Display when the example on the right
is input
button.
.
Audio will be entered and the next step proceeded to.
7. Press the
button to return to the cursor mode.
NOTE:
Pressing the
button after step 2 will select the chapter input
mode. Refer to example 3 on page 27 for the input methods of
SEARCH CHAPTER and MARK CHAPTER.
VIDEO, AUDIO SETUP
VIDEO:
÷ Inputting 1 selects normal video output.
÷ Inputting 0 selects the background color set on the GUI menu
and cancels the playback picture.
÷ Inputting 9 maintains the previous mode. Input when you want
to leave the VIDEO setting as is and change other settings.
÷ 2 to 8 are invalid.
AUDIO:
On laser barcode compatible discs, laser disc digital audio and analog
audio are converted and recorded in the DVD format.
Audio can be selected as follows.
÷ Inputting 0 selects the Audio OFF playback mode.
÷ Inputting 1 selects the “Analog audio 1/L” playback mode.
÷ Inputting 2 selects the “Analog audio 2/R” playback mode.
÷ Inputting 3 selects the “Analog audio” stereo mode.
÷ Inputting 5 selects the “Digital audio 1/L” mode.
÷ Inputting 6 selects the “Digital audio 2/R” mode.
÷ Inputting 7 selects the “Digital audio” stereo mode.
÷ Inputting 9 maintains the previous mode.
÷ 4 and 8 are invalid.
CAUTION:
When “Maintaining previous mode” is selected “*” is displayed on
the input screen.
30
<VRB1208>
Barcode/Command Stack Setting
SAVING BARCODE/COMMAND STACK
BC/COMMAND STACK GROUP 001: 001
TITLE
SEARCH CHAPTER
MARK CHAPTER
SUBTITLE
AUDIO
ANGLE
SAVE DEL
INS
05
03
08
03
2
1
EXIT
When this screen appears, press the
or
button to
move ‰ (pointer) to SAVE and press the
button.
÷ The display disappears and the input information is saved.
÷ The input information is not saved if ‰ (pointer) is moved to SAVE
BC/COMMAND STACK GROUP 001: 002
TITLE
00
SEARCH FRAME 000000
MARK FRAME 000000
SUBTITLE
*
AUDIO
*
ANGLE
*
INS
When the input operations shown in the example have completed
till the end, the bar code stack/command stack input screen for
the next step appears in a few seconds.
NOTES:
«
SAVE DEL
SAVING A BARCODE/COMMAND STACK
button is pressed before the bar code stack/
and the
command stack input screen for the next step appears.
÷ The input information is not saved if ‰ (pointer) is moved to EXIT
and the
button is pressed.
EXIT
The display disappears.
BARCODE/COMAND STACK
Saving Barcode/Command Stack
31
<VRB1208>
TO DELETE A PREVIOUSLY INPUT BARCODE/COMMAND STACK
BC/COMMAND STACK GROUP 001/ 001
001 PLAY
002 03:123000–129000
003 05:03–07
03 2 1
004
005
006
007
008
SAVE DEL INS EXIT
TO DELETE A PREVIOUSLY INPUT BARCODE/
COMMAND STACK
1.
button.
÷ “BARCODE/COMMAND” is displayed.
2.
Press the
button.
÷ The Barcode/Command Stack screen is displayed.
3.
«
Press the
Select “NO” with the
the
button.
or
button and press
÷ The Barcode/Command Stack Input screen is displayed when the
button is pressed.
BC/COMMAND STACK GROUP 001/ 001
001 03:123000–129000
002 05:03–07
03 2 1
003
004
005
006
007
008
SAVE DEL INS EXIT
4.
Press the
button.
÷ The list display appears.
5.
Move the ‰ (pointer) to “DEL” by pressing the
button.
6.
Select the step to be deleted by pressing the
or
button.
7.
Press the
button.
÷ The selected step is deleted and the numbers of the subsequent
steps are decremented by 1.
8.
Move the ‰ (pointer) to “SAVE” by pressing the
button and press the
button.
IMPORTANT:
Even if you have come to step 7 in the above deletion procedure, you
can still abort deletion by moving the ‰ (pointer) to “EXIT” by pressing
the
button then pressing the
button. The deletion is
entered in memory when the SAVE” operation is performed in step
8.
32
<VRB1208>
To delete a previously input
Barcode/Command Stack
CORRECTING A PREVIOUSLY INPUT BARCODE/COMMAND STACK
CORRECTING A PREVIOUSLY
BARCODE/COMMAND STACK
BC/COMMAND STACK GROUP 001: 003
TITLE
SEARCH CHAPTER
MARK CHAPTER
SUBTITLE
AUDIO
ANGLE
SAVE DEL
INS
05
03
05
03
2
1
EXIT
INPUT
Example) To change the Audio setting of step 003 from 2 to 1
1.
Press the
button.
÷ “BARCODE/COMMAND” is displayed.
2.
Press the
button.
÷ The Barcode/Command Stack screen is displayed.
«
3.
Select “NO” with the
the
BC/COMMAND STACK GROUP 001: 003
or
button and press
button.
÷ The Barcode/Command Stack Input screen is displayed when the
button is pressed.
TITLE
SEARCH CHAPTER
MARK CHAPTER
SUBTITLE
AUDIO
ANGLE
SAVE DEL
INS
05
03
05
03
1
1
EXIT
4.
Press the
button.
÷ The list display appears.
5.
Select “003 ‰” by pressing the
6.
Press the
or
button.
button.
÷ This initiates the Barcode/Command Stack input mode.
7.
Press the
mode.
button to initiate the numeral input
8.
Press the
button 4 times to select item “AUDIO”.
9.
Press
button.
÷ The next step’s Barcode/Command Input screen is displayed.
11.Press the
CAUTION:
To save the corrected information, move ‰ (pointer) to
the last item (ANGLE in this example) by pressing the
button repeatedly.
button to return to the cursor mode.
12. Move the ‰ (pointer) to “SAVE” by pressing the
button and press the
button.
button one more time to move to the
Press the
page for the next step.
In this “next step”, move ‰ (pointer) to SAVE and press
the
button to save data.
The corrected information is not saved if ‰ (pointer) is
button is pressed before
moved to SAVE and the
the end of correction (in the middle of the step being
corrected).
Correcting a previously input
Barcode/Command Stack
BARCODE/COMAND STACK
10. Press
button.
33
<VRB1208>
ADDING A STEP IN A PREVIOUSLY INPUT BARCODE/COMMAND STACK
ADDING A STEP IN A PREVIOUSLY INPUT
BARCODE/COMMAND STACK
BC/COMMAND STACK GROUP 001/ 001
001 PLAY
002
003 03:123000–129000
004 05:03–07
03 2 1
005
006
007
008
SAVE DEL INS EXIT
1.
Perform steps 1 to 4 of “Correcting a previously input
Barcode/Command Stack”.
2.
Select the step where a new step is to be inserted by
pressing the
3.
or
button.
Move the > (pointer) to “INS” by pressing the
button and press the
or
button.
÷ This inserts a new step before the selected step and the numbers
of subsequent steps are incremented by 1.
4.
Press the
button.
÷ This initiates the Barcode/Command Stack input mode.
5.
Press the
mode.
6.
Set a step in the same way as “Setting a barcode command”.
7.
Move the ‰ (pointer) to “SAVE” by pressing the
button to initiate the numeral input
button and press the
34
<VRB1208>
Adding a step in a previously
input Barcode/Command Stack
button.
GROUPING SOME BARCODE/COMMAND STACKS
1
GROUPING SOME BARCODE/COMMAND
STACKS
BARCODE/COMMAND
Grouping of Barcode/Command Stacks
A group can be formed with several Barcode/Command Stacks, and
more than one group can be formed and stored. When executing a
group of commands, select a group from the stored groups and
execute them either consecutively or step by step. It is also possible
to divide or delete a group.
2
3
BC/COMMAND STACK GROUP 001/001
001 PLAY
002 03:123000–129000
003 05:03–07
03 2 1
004
005
006
007
008
ALL CLEAR? YES NO
BC/COMMAND STACK GROUP 001: 004
The following procedure consists of inserting a group delimiter after a
group of barcode commands.
1.
Press the
2.
Press the
SAVE DEL
INS
3.
Select “NO” with the
button and press
button.
÷ The Barcode/Command Stack Input screen is displayed when the
button is pressed.
5
BC/COMMAND STACK GROUP 002: 001
TITLE
00
SEARCH FRAME 000000
MARK FRAME - - - - - SUBTITLE
*
AUDIO
*
ANGLE
*
4. Press the
button.
÷ The list display appears.
÷ Make sure that the ‰ (pointer) is located at the step immediately
following the last entry.
5.
Press the
button.
÷ The input screen for the first step of the next Barcode/Command
Stack group appears.
÷ The Barcode/Command Stacks of the next group can be set from
here.
EXIT
Grouping some Barcode/Command Stacks
BARCODE/COMAND STACK
BC/COMMAND STACK GROUP 001/ 001
001 PLAY
002 03:123000–129000
003 05:03–07
03 2 1
004
005
006
007
008
SAVE DEL INS EXIT
INS
or
EXIT
4
SAVE DEL
button.
÷ The Barcode/Command Stack screen is displayed.
the
TITLE
00
SEARCH FRAME 000000
MARK FRAME - - - - - SUBTITLE
*
AUDIO
*
ANGLE
*
button.
÷ “BARCODE/COMMAND” is displayed.
35
<VRB1208>
GROUPING SOME BARCODE/COMMAND STACKS
BC/COMMAND STACK GROUP 001/ 003
001 PLAY
002 03:123000–129000
003 05:03–07
03 2 1
004
005
006
007
008
SAVE DEL INS EXIT
SWITCHING THE BARCODE/COMMAND
STACK GROUP
1.
Press the
button.
÷ “BARCODE/COMMAND” is displayed.
2.
Press the
button.
÷ The Barcode/Command Stack screen is displayed.
J
3.
the
BC/COMMAND STACK GROUP 002/ 001
001 SUBTITLE 01 AUDIO 2 ANGLE 3
002 03:10000–15000
003
004
005
006
007
008
SAVE DEL INS EXIT
1
Select “NO” with the
or
button and press
button.
÷ The Barcode Input screen is displayed when the
pressed.
4.
Press the
button is
button.
÷ The list display appears.
5.
Press the
or
button.
÷ Pressing the
button switches over to the next group.
÷ Pressing the
button switches over to the previous group.
DELETING A GROUP
BARCODE/COMMAND
1.
Press the
button.
÷ “BARCODE/COMMAND” is displayed.
2
3
BC/COMMAND STACK GROUP 001/001
001 PLAY
002 03:123000–129000
003 05:03–07
03 2 1
004
005
006
007
008
ALL CLEAR? YES NO
<VRB1208>
Press the
button.
÷ The Barcode/Command Stack screen is displayed.
BC/COMMAND STACK GROUP 001: 004
TITLE
00
SEARCH FRAME 000000
MARK FRAME - - - - - SUBTITLE
*
AUDIO
*
ANGLE
*
SAVE DEL
36
2.
INS
EXIT
Grouping some Barcode/Command Stacks
3.
Select “NO” with the
the
or
button and press
button.
÷ The Barcode Input screen is displayed when the
pressed.
button is
GROUPING SOME BARCODE/COMMAND STACKS
4
BC/COMMAND STACK GROUP 001/ 001
001 PLAY
002 03:123000–129000
003 05:03–07
03 2 1
004
005
006
007
008
SAVE DEL INS EXIT
6
BC/COMMAND STACK GROUP 001/ 001
001 PLAY
002 03:123000–129000
003 05:03–07
03 2 1
004
005
006
007
008
SAVE DEL INS EXIT
7-8
BC/COMMAND STACK GROUP 001/ 001
001
002
003
004
005
006
007
008
SAVE DEL INS EXIT
9
BC/COMMAND STACK GROUP 001/ 001
001
002
003
004
005
006
007
008
SAVE DEL INS EXIT
Press the
button.
÷ The list display appears.
5.
Select the group to be deleted by pressing the
or
button.
6.
Move the ‰ (pointer) to “GROUP” on the first line by
pressing the
button.
7.
Move the ‰ (pointer) to “DEL” by pressing the
button.
8.
Press the
button.
÷ This deletes the selected group.
9.
Move the ‰ (pointer) to “SAVE” by pressing the
button and press the
button.
IMPORTANT
Even if you have come to step 8 in the above deletion procedure, you
can still abort deletion by moving the ‰ (pointer) to “EXIT” by pressing
the
button then pressing the
button. The deletion is
entered in memory when the SAVE” operation is performed in step
9.
Grouping some Barcode/Command Stacks
BARCODE/COMAND STACK
5
BC/COMMAND STACK GROUP 001/ 001
001 PLAY
002 03:123000–129000
003 05:03–07
03 2 1
004
005
006
007
008
SAVE DEL INS EXIT
4.
37
<VRB1208>
GROUPING SOME BARCODE/COMMAND STACKS
1
DIVIDING A PREVIOUSLY INPUT GROUP
BARCODE/COMMAND
1.
Press the
button.
÷ “BARCODE/COMMAND” is displayed.
2
3
BC/COMMAND STACK GROUP 001/001
001 PLAY
002 03:123000–129000
003 05:03–07
03 2 1
004
005
006
007
008
ALL CLEAR? YES NO
BC/COMMAND STACK GROUP 001: 004
5
38
<VRB1208>
Press the
INS
button.
÷ The Barcode/Command Stack screen is displayed.
3.
Select “NO” with the
the
TITLE
00
SEARCH FRAME 000000
MARK FRAME - - - - - SUBTITLE
*
AUDIO
*
ANGLE
*
SAVE DEL
4
2.
or
button and press
button.
÷ The Barcode/Command Stack Input screen is displayed when the
button is pressed.
EXIT
BC/COMMAND STACK GROUP 001/ 001
001 PLAY
002 03:123000–129000
003 05:03–07
03 2 1
004
005
006
007
008
SAVE DEL INS EXIT
BC/COMMAND STACK GROUP 001/ 001
001 PLAY
002 03:123000–129000
003 05:03–07
03 2 1
004
005
006
007
008
SAVE DEL INS EXIT
Grouping some Barcode/Command Stacks
4.
Press the
button.
÷ The list display appears.
5.
Select the step where the existing group is to be divided by pressing the
or
button.
÷ Move the ‰ (pointer) the first step of the group created by division.
GROUPING SOME BARCODE/COMMAND STACKS
6
7
8
BC/COMMAND STACK GROUP 001/ 001
001 PLAY
002 03:123000–129000
003 05:03–07
03 2 1
004
005
006
007
008
SAVE DEL INS EXIT
BC/COMMAND STACK GROUP 001/ 001
001 PLAY
002
003 03:123000–129000
004 05:03–07
03 2 1
005
006
007
008
SAVE DEL INS EXIT
BC/COMMAND STACK GROUP 002: 001
TITLE
03
SEARCH FRAME 123000
MARK FRAME 129000
SAVE DEL
9
INS
6.
Move the ‰ (pointer) to “INS” by pressing the
button.
7.
Press the
or
button.
÷ This inserts a vacant step before the selected step and the numbers
of subsequent steps are incremented by 1.
8.
Press the
button.
÷ This divides the existing group at the vacant step.
÷ A new group is created. The Barcode/Command Stack Input screen
of the first step of the newly created group is displayed.
EXIT
BC/COMMAND STACK GROUP 002: 001
9.
Move the ‰ (pointer) to “SAVE” by pressing the
button and press the
button.
IMPORTANT
SAVE DEL
INS
EXIT
Even if you have come to step 8 in the above group procedure, you
can still abort group by moving the ‰ (pointer) to “EXIT” by pressing
the
button then pressing the
button. The group is entered
in memory when the SAVE” operation is performed in step 9.
Grouping some Barcode/Command Stacks
BARCODE/COMAND STACK
TITLE
03
SEARCH FRAME 123000
MARK FRAME 129000
39
<VRB1208>
GROUPING SOME BARCODE/COMMAND STACKS
1
JOINING TWO BARCODE/COMMAND STACK
GROUPS
BARCODE/COMMAND
1.
Press the
button.
÷ “BARCODE/COMMAND” is displayed.
2
3
BC/COMMAND STACK GROUP 004/004
001 PLAY
002 03:123000–129000
003 05:03–07
03 2 1
004
005
006
007
008
ALL CLEAR? YES NO
BC/COMMAND STACK GROUP 004: 004
5
40
<VRB1208>
Press the
INS
button.
÷ The Barcode/Command Stack screen is displayed.
3.
Select “NO” with the
the
TITLE
00
SEARCH FRAME 000000
MARK FRAME 000000
SUBTITLE
*
AUDIO
*
ANGLE
*
SAVE DEL
4
2.
or
button and press
button.
÷ The Barcode/Command Stack Input screen is displayed when the
button is pressed.
EXIT
BC/COMMAND STACK GROUP 004/004
001 PLAY
002 03:123000–129000
003 05:03–07
03 2 1
004
005
006
007
008
SAVE DEL INS EXIT
4.
5.
BC/COMMAND STACK GROUP 003/ 004
001 02:000150–002050
002 06:22–23
∗ ∗ ∗
003
004
005
006
007
008
SAVE DEL INS EXIT
Press the
button.
÷ The list display of the last group that was input is displayed.
Change the group with the
button.
÷ Move the ‰ (pointer) to the next step of the previously input number
Joining two Barcode/Command Stack groups
with the
or
button. This becomes the division point.
GROUPING SOME BARCODE/COMMAND STACKS
6
7
8
6.
Move the ‰ (pointer) to “DEL” by pressing the
button.
BC/COMMAND STACK GROUP 003/ 003
001 02:000150–002050
002 06:22–23
∗ ∗∗
003 PLAY
004 03:123000–129000
005 05:03–07
03 2 1
006
007
008
SAVE DEL INS EXIT
7.
Press the
BC/COMMAND STACK GROUP 003/ 003
001 02:000150–002050
002 06:22–23
∗ ∗∗
003 PLAY
004 03:123000–129000
005 05:03–07
03 2 1
006
007
008
SAVE DEL INS EXIT
8.
BC/COMMAND STACK GROUP 003/ 004
001 02:000150–002050
002 06:22–23
∗ ∗∗
003
004
005
006
007
008
SAVE DEL INS EXIT
button.
÷ This deletes the group delimiter and joins the current group with
the next group to it.
÷ The numbers of the groups after the current group are decremented
by 1.
Move the ‰ (pointer) to “SAVE” by pressing the
button and press the
button.
IMPORTANT
Even if you have come to step 7 in the above group Joining, you can
still abort group by moving the ‰ (pointer) to “EXIT” by pressing the
button then pressing the
button. The group is entered
in memory when the SAVE” operation is performed in step 8.
BARCODE/COMAND STACK
Joining two Barcode/Command Stack groups
41
<VRB1208>
USING A BARCODE/COMAND STACK
RECALLING/EXECUTING BARCODE
COMMANDS IN MEMORY
Switch the command group.
To execute a barcode command group:
Place the disc containing commands on the disc tray.
BC/COMMAND STACK GROUP 001: 001
Recall screen
1.
Press the
button.
2.
Press the
button.
3.
4.
Press the
button.
5.
Press the
Input the number of the command group to be recalled/
executed using the numeric buttons.
button twice.
÷ This recalls and executes the selected group.
TO EXECUTE STEPS IN A COMMAND GROUP
Switch the command step.
1.
Press the
button.
2.
Press the
button.
3.
4.
Press the
button.
5.
Press the
BC/COMMAND STACK GROUP 001: 001
Recall screen
Input the number of the command group to be recalled/
executed using the numeric buttons.
button.
÷ To re-enter the group number, press the
button.
6.
Input the number of the step to begin execution using
the numeric buttons.
7.
Press the
button.
÷ This recalls and executes the selected and subsequent steps in
the selected group.
NOTES:
÷ Pressing the
button while the FUNCTION indicator is lit
repeats the execution of the set command.
÷ If you press the
button in place of the
button in step
6 above, command steps will be executed step by step. After every
step has been executed, press the
next step. Pressing the
previous step.
42
<VRB1208>
Using a Barcode/Comand stack
button to advance to the
button allows you to return to the
USING A BARCODE/COMAND STACK
RECALLING/EXECUTING PREVIOUSLY INPUT
BARCODE COMMANDS FROM THE LIST VIEW
BC/COMMAND STACK GROUP 001/ 003
001 PLAY
002 03:123000–129000
003 05:03–07
03 2 1
004
005
006
007
008
BARCODE/COMMAND STACK screen
1.
Press the
button.
2.
Press the
button.
3.
Press the
button.
÷ The
off.
4.
button is defeated unless the function mode is switched
Press the
button.
÷ This displays a list of commands.
5.
Select a group by pressing the
or
button.
÷ Select the command group containing the command(s) to be
executed.
6.
Select a step by pressing the
or
button.
÷ Select the command step to begin execution with. If the command
step number is left to “001” in this step, the commands in the
entire command group will be executed.
7.
Press the
or
button.
÷ Pressing the
button starts consecutive execution.
÷ Pressing the
button starts step-by-step execution.
Some titles may not be able to be recalled and executed.
Example)
The search command cannot be executed with a title that does not
show the chapter, time and similar information on the screen or with
a disc that is not permitted to use the search function.
BARCODE/COMAND STACK
Recalling/executing previously input barcode
commands FROM THE list VIEW
43
<VRB1208>
HOW TO DISPLAY TOTAL HOURS PLAYED AND
TOTAL POWER ON TIME
This unit is capable of displaying the total play time and power ON
time as the working condition and maintenance timing information.
The play time and power ON time can be displayed as described below.
1.
Press and hold the DISPLAY button on the front panel
of the main unit before turning power ON, and press
the POWER button.
2.
The screen shows the following:
OPERATING TIME
POWER ON 00105:46
PLAY
00078:13
Power ON time, which is 105
hours 46 minutes in this example.
Total play time, which is 78 hours
13 minutes in this example.
CAUTION
As the time is measured by the CPU clock, the information includes
an error of up to 2%.
3.
When an operation (playback from the remote, for example) is performed, the time information display disappears and normal operation starts.
44
<VRB1208>
How to display total hours played
and total power on time
EXTERNAL SYNCHRONIZING FUNCTION
Through external input of a synchronization signal (black burst), video output signals can be synchronized with external signals on
the DVD-V7200. (During DVD disc playback.)
Through the use of this function, video switch timing can be matched, and switching can be done without causing picture disturbance
on the TV without the need for such devices as a TBC (Time Base Collector).
Sync generator
Synchronized use of 2 or more players
÷ Make sure that the terminator switch is ON on the terminal
player and OFF on the other players.
÷ When applying synchronization to one player, set the terminator
switch to ON.
Input: Black burst signal
DC 5V 40mA
(MONO)
INTERFACE CONNECTOR
R
L
AUDIO OUT
OFF
PCM/
DIGITAL OUT
DC 5V 40mA
COMPONENT
COMPOSITE
VIDEO 1
AUDIO
OUT
VIDEO 2
INTERFACE CONNECTOR
OFF
Y
BLACK BURST
EXIT SYNC IN
Cb
Cr
L
AUDIO OUT
S2-VIDEO
ON
(MONO)
R
VIDEO 2
Cb
Cr
Sync accuracy
(MONO)
R
L
AUDIO OUT
S2-VIDEO
PCM/
DIGITAL OUT
Y
BLACK BURST
EXIT SYNC IN
VIDEO 2
S2-VIDEO
Cb
Cr
COMPOSITE VIDEO OUT
COMPONENT VIDEO OUT
AC IN
AC IN
SIGNAL
GND
OFF
COMPONENT
COMPOSITE
VIDEO 1
AUDIO
OUT
ON
COMPOSITE VIDEO OUT
COMPONENT VIDEO OUT
AC IN
No.....X
INTERFACE CONNECTOR
OFF
Y
BLACK BURST
EXIT SYNC IN
SIGNAL
GND
ON
DC 5V 40mA
COMPONENT
COMPOSITE
VIDEO 1
AUDIO
OUT
ON
COMPOSITE VIDEO OUT
COMPONENT VIDEO OUT
PCM/
DIGITAL OUT
SIGNAL
GND
No.2
OFF
No.1
± 1H for input synchronization signal (During DVD disc playback)
NOTE:
EXTERNAL SYNCHRONIZING FUNCTION
BARCODE/COMAND STACK
Externally synchronizing 2 or more DVD-V7200 players, simultaneously starting video, and obtaining sync at the frame position for
playback is not possible with this player.
Because of timing of reception of the STILL to PLAY command and DVD disc content, an unevenness of approximately 2 frames
may occur.
45
<VRB1208>
Should this product require service in the U.S.A. and you wish to locate the nearest Pioneer
Authorized Independent Service Company, or if you wish to purchase replacement parts,
operating instructions, service manuals, or accessories, please call the number shown
below.
1–800–872–4159
Please do not ship your product to Pioneer without first calling the Customer Service
Department at the above listed number for assistance.
PIONEER ELECTRONICS SERVICE, INC.
CUSTOMER SUPPORT DIVISION
P.O. BOX 1760, LONG BEACH,
CA 90801-1760, U.S.A.
For warranty information please see the Limited Warranty sheet included with your product.
Should this product require service in Canada, please contact a Pioneer authorized dealer
in Canada to locate the nearest Pioneer Authorized Service Company.
Alternatively, please contact or ship your defective product freight prepaid to one of the
following Factory Service locations closest to you:
Pioneer Electronics of Canada, Inc.
Factory Service East
300 Allstate Parkway
Markham, ON L3R 0P2
(905) 479-4411
Factory Service West
13911 Bridgeport Road
Richmond, BC V6V 1J6
(604) 278-1014
For warranty information please see the Limited Warranty sheet included with your product.
Si ce produit doit être réparé au Canada, veuillez vous adresser à un distributeur autorisé
Pioneer au Canada pour obtenir le nom de la société de service autorisée Pioneer la plus
près de chez vous. Ou encore, veuillez communiguer avec le centre de service en usine
Pioneer le plus près de chez vous ou faire parvenir l'article défectueux, port payé, à ce
centre.
Pioneer électroniques du Canada, Inc.
Service en usine - Est
300 Allstate Parkway
Markham (Ontario) L3R 0P2
(905) 479-4411
Service en usine - Ouest
13911 Bridgeport Road
Richmond (C.-B.) V6V 1J6
(604) 278-1014
Pour obtenir des renseignements sur la garantie, veuillez vous reporter au feuillet sur la
Garantie Limitée gui accompagne le produit.
Published by Pioneer Electronic Corporation.
Copyright © 1998 Pioneer Electronic Corporation.
All rights reserved.
PIONEER ELECTRONIC CORPORATION
4-1, Meguro 1-Chome, Meguro-ku, Tokyo 153-8654, Japan
PIONEER NEW MEDIA TECHNOLOGIES, INC.
2265 East 220th Street, Long Beach, CA 90810, U.S.A. TEL:310-952-2111
PIONEER ELECTRONICS [USA] INC.
P.O. BOX 1540, Long Beach, California 90801-1540
PIONEER ELECTRONICS OF CANADA, INC.
300 Allstate Parkway, Markham, Ontario L3R 0P2, Canada
PIONEER ELECTRONIC [EUROPE] N.V. Haven 1087, Keetberglaan 1, 9120 Melsele, Belgium TEL: 03/570.05.11
PIONEER ELECTRONICS AUSTRALIA PTY. LTD. 178-184 Boundary Road, Braeside, Victoria 3195, Australia, TEL: [03] 9586-6300
PIONEER ELECTRONICS DE MEXICO S.A. DE C.V. San Lorenzo Num 1009 3er piso Desp. 302 Col. Del Valle, Mexico D.F. C.P. 03100 TEL: 5-688-52-90
<98F00ZZ0D00>
Printed in Japan <VRB1208-A>