1
C-2040ZOOM
● Quick Start Guide ●
http://www.olympus.com
2. Shooting
Manual focus
Battery check
Card error
White balance
ISO indicator
Spot metering mode
L
/M O DE
D
IA
A/S
/M
P
Exposure compensation
ER
F
OF
PO
W
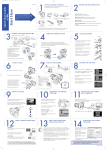
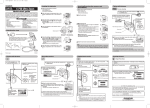
2. Point the camera at your subject.
Look through the viewfinder and point
the camera at the person or object you
want to photograph (the subject).
Position the AF target mark over the subject.
Auto bracket
Sequence mode
Self-timer/
Remote control
Recording mode
• When a movie is running, you can use the Arrow pad to do the following:
: Jump to the start of the current movie.
MOVIE
START
PLAY
: Jump to the end of the current movie.
INFO
: Play the movie for as long as the button is held down.
FUNCTION
: Play the movie in reverse for as long as the button is
CARD
SETUP
MODE
held down.
SETUP
[1/1]
[OK] button: Pause the movie.
Press this button again after the movie has finished to play the movie again.
Number of storable pictures
Card writing
Available functions from button on C-2040ZOOM
Flash Mode Button
Viewfinder
AF target mark
[To zoom in]
By turning the zoom lever to "T", you can enlarge the picture of your subject. When you
turn the zoom lever towards "W", the image reverts to the size it was when you switched
the camera on, allowing you to shoot a wider area.
Half pressed
Fully pressed
The flash mode changes each time you press this button. The available flash modes are
"Auto-Flash", in which the flash fires automatically in low-light and backlit conditions, "RedEye Reduction Flash" (
), which reduces the "red-eye" effect (where the subject's eyes
appear red), "Forced Flash" ( ), in which the flash fires for every shot regardless of the
conditions, and "Flash Off" ( ), in which the flash never fires, even in low-light conditions.
Spot/Macro Button
The light metering mode or Macro mode changes each time you press the Spot/Macro button.
The available modes are "Normal", which is used for normal autofocus photography,
"Spot Metering mode" (
), which measures light only at the center of the shot and is
useful for shots such as dark subjects in backlit shots, "Macro mode"( ), which allows
you to focus on subjects 7.9" to 31.5" from the camera, and "Macro + Spot Metering
mode" (
), which measures light only at the center of a close-up subject.
4. Erasing Pictures
You can erase pictures you no longer need by erasing them one at a time
(one-frame erase) or by erasing all the images on the card (all-frame erase).
Use the steps in "3. Viewing Your Shots" to display the image you want to erase.
One-frame Erase
Press the Erase button on the camera, use the
Arrow pad to select "YES" and then press the [OK]
button.
YES
NO
YES
The camera gives 2 short beeps and the green
lamp lights. At this point, the focus and exposure
(shutter speed and aperture setting) are locked.
If the green lamp blinks, this indicates that the
camera cannot focus. Release the shutter button,
move the position of the AF target mark slightly
and then lightly press the shutter button again.
OK
NO
Shooting Movies
1. Set the Mode dial to
AF target mark
Green lamp
All-frame Erase
.
The Monitor switches on and displays the available shooting time.
F2.0 1/800 +2.0
2. Shoot in the same way as for "P" mode.
The camera starts shooting when you press the shutter button
down. Press the shutter button again to end shooting.
The lowest memory gauge lights, the card access lamp blinks
and the camera starts recording the movie onto the card. You
Memory
can continue shooting when the lamp stops blinking and the
gauge
camera finishes recording data onto the card.
4. Take the picture. (Press the shutter
button down fully.)
With the shutter button pressed down
halfway, press it down further so it is
fully depressed. The camera gives a
short beep and takes the picture.
The camera then starts recording the image onto
the card and the card access lamp blinks.
If the green lamp light up when you press the shutter
button, you can take another picture, even if an image
is being recorded onto the SmartMedia card. If you
are taking a picture in low-light conditions, the
flash will fire automatically.
You can display images marked with the
icon as movies. Press the
(Menu) button and
use the Arrow pad to select "MOVIE PLAY" and then press
. When "START" appears, press
the [OK] button. When the card access lamp stops blinking, the movie starts playing. When
the movie ends, press the
(Menu) button to display the menu and then press the Menu
button again to exit Movie playback mode.
Flash intensity control
Macro mode
1. Remove the Lens cap and set the Mode
dial to "P" (Program mode).
3. Focus on your subject. (Press the shutter
button down halfway.)
With the camera pointed at your subject,
press the shutter button down lightly.
(Customer support) Tel. 1-888-553-4448
Slow synchro
Flash mode
Taking Pictures
You can also look at the image on the Monitor to
take pictures.
Press the
(Monitor) button to switch the
Monitor on and off.
OLYMPUS AMERICA INC.
Two Corporate Center Drive, Melville, NY 11747-3157, U.S.A. Tel. 631-844-5000
Press the
(Menu) button and use the Arrow pad to select "CARD SETUP" and
then press . Press
or
to select "
" and then press the [OK] button.
Select "YES" in the confirmation screen and then press the [OK] button again.
(To cancel image erasing, select "NO" and press the [OK] button.)
AF target mark
.
HQ
: Displays the previous shot.
When your subject is not in the center of the shot (focus lock)
First, position the AF target mark over your subject and press the shutter button halfway
to focus the camera. Then hold the shutter button down as you move the camera to compose the shot as you want it and, without releasing the shutter button, press the shutter
button down fully to take the shot.
: Displays the next shot.
12.23.,00 21:56 6453
: Jumps back 10 shots.
: Jumps forward 10 shots.
Arrow pad
* To display multiple shots (Index playback), turn the zoom lever to "W".
* To display a shot enlarged (in close up), turn the zoom lever to "T".
NO
[1/1]
This screen shows the still
picture playback menu.
* The most recent shot is displayed on the Monitor
(Single-frame playback).
• Use the Arrow pad to select the image you want to view.
Card access lamp
YES
CARD
SETUP
MODE
SETUP
3. Viewing Your Shots
Set the Mode dial to
INFO
FUNCTION
1234
1235
1236
1237
1238
1239
1240
1241
1242
5.
YES
OK
NO
Confirmation screen
Switch the camera off when you've
finished shooting.
Always switch the camera off when you have finished taking pictures.
Check that the card access lamp is no longer blinking and then set the
Mode dial to "OFF".
• The Monitor and control panel go blank.
• If you leave the camera switched on without using it in any way for 3 minuts or longer, the
Monitor and control panel automatically go blank to conserve battery power. (This is
referred to as Sleep mode.) To revive the camera when it is in Sleep mode, simply press any
of the camera's controls.
• Always fit the lens cap when you put the camera away.