1
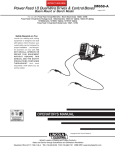
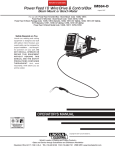
DIGITAL ANSWERER WITH CID
TM
MC
OWNERʼS MANUAL —
Please read before using this equipment.
4313385
12
13
14
1
2
15
3
4
5
NEW
REPEAT
MEMO
AM
16
CALL#
17
6
18
1.
Line Cord
12. Ringer Switch
2.
Incoming Message Length
Switch
3.
Call Back Button
4.
Display
5.
Erase Button
6.
Microphone
7.
Volume
8.
Button
/ OGM Button
7
8
9
19
20
9.
10
21
11. Delete Button
11
22
Play / Pause button
10. Menu Button
13. Power Jack
14. Telephone Line Jack
15. New Call LED
16. Review
Button
17. Review
Button
18. Speaker
19. Message LED
20.
/ Time Check Button
21. Memo / 2 way Button
22. On / Off / Stop Button
23. Volume
Button
23
IMPORTANT SAFETY INSTRUCTIONS
When using your telephone equipment, basic safety precautions should always
be followed to reduce the risk of fire, electric shock and injury to persons,
including the following:
1. Do not use this product near water, for example, near a bath tub, wash
bowl, kitchen sink or laundry tub, in a wet basement or near a swimming
pool.
2. Avoid using a telephone (other than a cordless type) during an electrical
storm. There may be a remote risk of electric shock from lightning.
3. Do not use the telephone to report a gas leak in the vicinity of the leak.
4. Use only the power cord and batteries indicated in this manual. Do not
dispose of batteries in a fire. They may explode. Check with local codes
for possible special disposal instructions.
5. Position the equipment near an electrical outlet that shall be easily
accessible and plug the adapter into the outlet.
SAVE THESE INSTRUCTIONS!
INDUSTRY CANADA CS03 STATEMENT
This product meets the applicable Industry Canada technical specifications.
This is confirmed by the registration number. The abbreviation, IC before the
registration number signifies that registration was performed based on a
Declaration of Conformity indicating that Industry Canada technical
specifications were met. It does not imply that Industry Canada approved the
equipment.
Before installing this equipment, users should ensure that it is permissible to
be connected to the facilities of the local telecommunications company. The
equipment must also be installed using an acceptable method of connections.
The customer should be aware that compliance with the above conditions
may not prevent degradation of service in some situations. Repairs to certified
equipment should be made by an authorized Canadian maintenance facility
designated by the supplier. Any repairs or alterations made by the user of this
equipment, or equipment malfunctions, may give the telecommunications
company cause to request the user to disconnect the equipment.
WARNING! Users should not attempt to make such connections themselves,
but should contact the appropriate electric inspection authority, or an electrician,
as appropriate.
CAUTION: The Ringer Equivalence Number (REN) assigned to each terminal
device provides an indication of the maximum number of terminals allowed to
be connected to a telephone interface. The termination on an interface may
consist of any combination of devices subject only to the requirement that the
sum of the Ringer Equivalence Numbers of all the devices does not exceed 5.
An alternative indication of the REN is the Load Number (LN); this number
should be divided by 20 to approximate the equivalent REN. The REN Number
of this unit is indicated on the bottom of your answering machine.
INDUSTRY CANADA RSS 210 NOTICE:
CLASS B LIMITS WITH INTERFERENCE
STATEMENT
This equipment complies with the limits of a Class B digital device as specified
in Industry Canada Regulations.
These limits provide reasonable protection against radio and TV interference
in residential areas. However, this device might cause radio or TV interference
even when it is operating properly.
Operation is subject to the following two conditions: (1) This device may not
cause interference, and (2) this device must accept any interference including
interference that may cause undesired operation of the device.
To
•
•
•
eliminate the interference, you can try one or more of the following:
Reorient or relocate the receiving antenna.
Move your device away from the receiver.
Connect your device to an outlet that is on a different electrical circuit
from the receiver.
This digital apparatus does not exceed the Class B limits for radio noise
emissions from digital apparatus.
BATTERY NOTES
Dispose of old battery promptly and properly.
Do not burn or bury battery.
Use only fresh battery of the required size and recommended type.
If you do not plan to use the phone for two weeks or longer, remove the
battery. Batteries can leak chemicals that can destroy electronic parts.
To avoid losing stored information, be sure the system is properly connected
to AC power before you replace the battery.
Disconnect the telephone line cord before replacing the battery to reduce
the risk of fire or injury.
© 2006 ORBYX Electronics. All Rights Reserved.
Notes:
•
Press ERASE button to exit a menu at any time.
•
To check the time and date, just press the
/ TIME CHECK button. The
unit will announce the current time.
•
If there is a delay of 30 seconds between any of the steps, the unit will
revert to standby mode.
INSTALLATION
TO INSTALL 9-VOLT BATTERY
In the event of a power failure, a 9V alkaline battery (not supplied) is required
to maintain your personalized outgoing announcement, recorded messages
and CID data. If the battery is not installed, all your personalized outgoing
announcement, recorded messages and CID data will be lost.
CONNECTING THE TELEPHONE LINE
To install battery
1.
2.
3.
1.
2.
Use a flat-blade screwdriver to lift up the battery compartment cover, and
then remove the cover.
Attach a 9V alkaline battery to the terminals and place the battery in the
compartment.
Replace and snap the cover into place.
TURNING THE UNIT ON/OFF
To turn on the unit, press ON/OFF/STOP button. The message LED illuminates
and the unit is set to answer calls.
To turn it off, press ON/OFF/STOP button. The message LED turns off.
Note: This unit will signal you when the battery becomes weak and needs
replacement. Once battery power has been sufficiently drained, the
icon
will illuminate on the LCD. Replace the 9V battery with a fresh one.
RECORDING OUTGOING MESSAGES (OGM)
For your outgoing message, you can either use prerecorded outgoing message
or you can record your own outgoing message. If you do not record a message
of your own, the prerecorded outgoing message will be used automatically.
CONNECTING AC POWER
1.
2.
Insert the AC adapter’s plug into the power jack on the back of the unit.
Plug the adapter into a standard AC outlet.
After power up, your unit will need approx. 40 seconds to initialize all the
functions (the LCD will show ‘INITIALIZATION ’) . After the first
initialization, the LCD will show ‘LANGUAGE’. Now you can setup your
unit (see “Setting Up Your Unit”) or the unit will show ‘CALLS:00 NEW:00’
after initialization.
Wording of the prerecorded outgoing message: ‘Hello, please leave a message
after the tone’.
To record your own OGM (up to 5 minutes):
1.
2.
3.
PREPARATION
SETTING UP YOUR UNIT
Press and hold
/ OGM button and the unit beeps. The LCD shows
‘OGM RECORDING’ and the counter starts counting up.
Speak clearly at a distance of about 15 cm (6 inches) from the microphone.
Release the
/ OGM button when you have finished speaking. Your
OGM will be played back automatically and the LCD shows ‘OGM
PLAYBACK’.
Notes:
•
To change your OGM, repeat steps 1-3 above.
•
Each outgoing message can be recorded, played back, or deleted
independently.
•
The length of your message will reduce the total recording time available
for incoming calls. For example, a 20-second message will leave
approximately 49 minutes and 40 seconds recording time.
•
To check your OGM at any time, press and release the
/ OGM button.
•
If you record your own message and subsequently decide to use the
prerecorded message, press
/ OGM button. While your own message
is playing, press DELETE button.
DO NOT CONNECT the line cord to the wall outlet until the setup has been
completed.
To set the language
The LCD shows ‘LANGUAGE’. If your LCD does not, press and hold MENU
button for 2 seconds.
Press CALL BACK button, the LCD then shows ‘FRA ENG’.
Note: The ‘ENG’ is blinking. Press REVIEW or button to select ‘FRA’, or
‘ENG’. Press CALL BACK button to confirm.
To set the LCD contrast
Once ENG is selected, the LCD shows ‘LCD CONTRAST’.
Press CALL BACK button, the digit ‘3’ blinks.
Press REVIEW or button to adjust the level of contrast of LCD (from 1 to
5, default is 3).
Press CALL BACK button to confirm.
SETTING THE NUMBER OF RINGS
To control the duration before the unit answers a call, slide the switch on the
rear side of the unit to the desired number of rings (2, 6, or TS).
TS (Toll Saver) – If you choose the Toll Saver option, and there are new
messages, the unit answers after two rings. Otherwise, the unit answers after
six rings. This lets you avoid unnecessary charges when calling by long distance
to check your messages. If you hear more than two rings, you know you can
hang up because the unit has no new messages.
To set the weekday
Once contrast is set, the LCD shows ‘ENTER WEEK’.
Press CALL BACK button, the LCD shows ‘SUNDAY’ and the unit announces
the weekday.
Press REVIEW or button to set the correct weekday.
Press CALL BACK button, the unit announces the weekday set and the LCD
then shows ‘ENTER TIME’.
SETTING THE INCOMING MESSAGE LENGTH
Set the slide switch on the rear side of the unit to 1 or 5 MIN (minutes) to
choose the length of incoming messages. After the caller hangs up or is silent
for more than 7 seconds, or the maximum message length is reached, the unit
hangs up and resets to answer the next call.
To set the time
Press CALL BACK button, the hour digits blink and the unit announces the
hour.
Press REVIEW or button to set the correct hour.
Press CALL BACK button, the minute digits blink and the unit announces the
minute.
Press REVIEW or button to set the correct minutes.
Press CALL BACK button to confirm. The unit announces the time set and
the LCD then shows ‘ENTER DATE’.
ANSWERING SYSTEM OPERATION
RECORDING A MEMO
A memo is a message that you record by speaking directly into the unit, without
calling in on the phone.
1. Press and hold MEMO/2 WAY button and the unit beeps. The LCD shows
‘MEMO RECORDING’ and the counter starts counting up.
2. Speak clearly at a distance of about 15 cm (6 inches) from the microphone.
3. Release the MEMO/2 WAY button when you have finished speaking. The
MEMO icon will be lit on the LCD.
To set the date
Press
Press
Press
Press
Press
Plug the telephone line cord from the unit into the wall jack.
Plug your phone’s line cord (not supplied) into the TEL. LINE jack.
CALL BACK button, the month digits blink.
REVIEW or button to set the correct month.
CALL BACK button, the day digits blink.
REVIEW or button to set the correct day.
CALL BACK button to confirm.
To set the area code
RECORDING A 2-WAY PHONE CONVERSATION
Once time and date are set, the LCD shows ‘SET AREA CODE’.
Press CALL BACK button, the first digit ‘–’ of the area code blinks.
Press REVIEW or button to enter the first digit. Press CALL BACK button
to confirm and go to next entry.
Repeat above steps until the 3-digit area code is set.
You can record both sides of a conversation on any phone connected to the
same phone line as the unit.
At any time during the conversation, press MEMO/2 WAY button. The LCD
shows ‘2-WAY RECORDING’ and the counter starts counting up to indicate
the unit is recording the call. Press MEMO/2 WAY button again to stop recording.
After you press CALL BACK button to confirm the third digit, the unit returns
to standby mode at once.
This procedure has now been completed, you should see all the current data
you entered on the LCD.
2
PLAYING MESSAGES
DELETING CALLER ID RECORDS
The Message LED flashes after the unit records new messages, recorded
memos, or two-way phone conversations.
1. To listen to all messages, memos, and two-way conversations, press PLAY/
PAUSE button. The unit plays each new message in sequence and
announces the date and time it was recorded.
2. During message playback:
•
Press
/ OGM button to repeat the current message.
•
Press and hold
/ OGM button until your hear a beep to repeat the
previous message.
•
Press
/ TIME CHECK button to skip forward to the next message.
•
Press
/ TIME CHECK button several times in succession to skip
multiple messages.
•
Press PLAY/PAUSE button to pause, press PLAY/PAUSE button again
to resume.
•
To stop message playback, press ON/OFF/STOP button.
3. After playing all messages, the unit sounds a beep and then returns to
answer-ready mode. The Message LED lights solid and all messages are
saved.
To replay the messages, press PLAY/PAUSE button.
Deleting a single record
1.
2.
3.
Deleting all records
1.
2.
BACKLIT DISPLAY
When you receive a call or press any key, the LCD will light up. It will turn off
after approx. 7 seconds when no key is pressed.
CALL BACK FROM THE CALLER ID MEMORY
1.
You can delete messages individually during playback, or all at once after
playback.
To delete an incoming message, memo, or two-way phone conversation (after
listening to it), press DELETE button during playback.
To delete all messages after playback, hold down DELETE button until you
hear a beep.
Note: You cannot delete the messages until you play them all back.
2.
3.
4.
ADJUSTING THE SPEAKER VOLUME
button to increase the volume, or
5.
button to decrease the volume.
SCREENING CALLS
The long distance dialing digit ʻ1ʼ will be inserted automatically during Caller
ID memory call back.
Press CALL BACK button, 11-digit number will blink. Press CALL BACK button
again to confirm to dial the 11-digit number.
MEMORY FULL
When the callerʼs phone number has the same area code as the
preset:
If memory is full, the unit cannot record new messages until you delete the old
messages. See “Deleting Messages” section.
The unit will answer calls after 10 rings and you will hear an announcement of
“Memory is full”. If the 3-digit security code has not been entered within 10
seconds, the unit will hang up.
Note: The maximum recording memory of your answering system is
approximately 50 minutes.
The long distance dialing digit ʻ1ʼ and the 3-digit area code will be deleted
automatically during Caller ID memory call back.
Press CALL BACK button, 7-digit number will blink. Press CALL BACK button
again to confirm to dial the 7-digit number.
Note: Your telephone company may require a different format for making outof-area (toll) calls WITHIN your area code. See the next section for the
procedure to obtain the applicable toll-call format for your phone company.
CALLER ID OPERATION
Caller ID is a service provided by your telephone company. When you subscribe
to this service, the telephone company sends the callerʼs telephone number
(and name, if available) and the callʼs date and time. This unit receives and
displays this information for each call. This unit saves up to 64 Caller ID records,
then replaces the oldest Caller ID record with each new one.
When your telephone company requires you to dial other than a 7-digit number
(same area code) or 11-digit number (different area code) to make toll calls
within your area code, follow one of the four options below for Caller ID call
back.
Option 1
1+Area Code+7-Digit Number (11 digits)
RECEIVING CALLS
During an incoming call, NEW appears and the New Call LED blinks while the
phone is ringing. The number of new and total calls appear. The New Call LED
blinks until all the new calls have been reviewed.
•
If only the callerʼs phone number is received, the callerʼs phone number
with the call time and date appear.
•
If an incorrect, invalid or incomplete signal is received, ʻLINE ERRORʼ
appears.
•
If the name and number are unlisted, ʻPRIVATEʼ appears with the call
time and date.
•
If the name and number are not available, ʻUNAVAILABLEʼ appears with
the call time and date.
Option 2
1+7-Digit Number (8 digits)
Option 3
Area Code+7-Digit Number (10 digits)
Option 4
7-Digit Number Only.
Follow the procedure below to select one of the four options for Caller ID call
back.
With the handset hung up on the base.
1. Press REVIEW
or
button to find the Caller ID memory location to
redial. Press CALL BACK button, the 7-digit number (if same area code)
or 11-digit number (if different area code) will blink.
2. Press REVIEW or button to select one of the options.
3. Press CALL BACK button again to confirm the dial. The LCD shows
ʻDIALING...ʼ. The selected number is dialed automatically and then
the LCD shows ʻPICK UP HANDSETʼ.
If no key is pressed within 30 seconds, the LCD will return to standby mode,
and display the total call counter, new call counter, current time and date.
REVIEWING CALLER ID RECORDS
Each Caller ID record includes the time and date of the call, the call number
(determined by the order in which the calls are received), the callerʼs telephone
number, and the callerʼs name (if available).
2.
Press REVIEW or button to find the Caller ID memory location to be
redialed.
Press CALL BACK button, the 7-digit number (if same area code) or
11-digit number (if different area code) will blink.
Press REVIEW
or
button to select one of the options.
Press CALL BACK button, the LCD shows ʻDIALING...ʼ and the phone
number to be dialed immediately. The LCD then shows ʻPICK UP
HANDSETʼ.
Note: If you pick up the handset before pressing the CALL BACK button,
ʻREPLACE HANDSETʼ will appear. Replace the handset then the number
will be redialed and ʻPICK UP HANDSETʼ will appear.
Pick up the handset on the telephone connected to the same telephone
line as the unit for conversation.
When the callerʼs phone number has a different area code from
the preset:
To screen your calls, let the unit answer. Listen to the callerʼs message through
the unitʼs speaker. If you decide to answer the call, pick up any phone connected
to the same phone line as the unit. The unit stops recording and resets to
answer the next call.
1.
After reviewing all new messages, press and hold down the ʻERASEʼ
button until the ʻERASE ALL?ʼ appears.
Release the ʻERASEʼ button and press it again while ʻERASE ALL?ʼ is
still on the display until ʻALL ERASEDʼ appears.
Note: You must review all new calls before you can erase all calls.
DELETING MESSAGES
Press
Press REVIEW or button until you see the record you want to delete.
Press ERASE button once. ʻERASE?ʼ appears.
Hold down the ERASE button until ʻERASEDʼ appears. The remaining
Caller ID records are renumbered automatically.
Press REVIEW button to review the latest number, or press REVIEW
button to review the oldest number.
After you view all the calls in memory, ʻEND OF LISTʼ appears and the
New Call LED turns off.
To view them again, press REVIEW or button.
Note: REPEAT appears if you receive more than one call from the same
number.
3
REMOTE OPERATION
SURGE PROTECTION
While you are away from your home or office, you can access your unit by
remote operation. Use a touch-tone phone to enter your remote operation
security code.
Your answering system with Caller ID has built-in protection circuits to reduce
the risk of damage from surges in telephone line and power line current.
However, lightning striking the telephone or power lines can damage your
telephone.
OPERATING THE SYSTEM FROM A REMOTE
LOCATION
Lightning damage is not common. Nevertheless, if you live in an area that has
severe electrical storms, we suggest that you unplug your phone when storms
approach to reduce the possibility of damage.
To use your unit from a remote telephone, you must first enter a 3-digit remote
operation security code. The security code label is located on the bottom of
the unit.
1. Dial your phone number.
2. When your outgoing message is playing, enter your remote operation
security code.
3. Two beeps will confirm that the right code has been entered. Now select
one of the remote commands. If no key is pressed for 10 seconds, the
unit will hang up.
Press:
To:
1#
Playback new messages
2#
Playback all recorded messages
7#
Turn on/off the unit
8#
Re-record an OGM
(press 5# to stop recording)
9#
Record a memo
(press 5# to stop recording)
0#
Room monitoring
5#
Stop room monitoring
SET-UP
Your answering system with Caller ID connects directly to a modular telephone
line jack. If your telephone wiring does not have a modular jack, you can
update the wiring yourself using jacks and adapters, or have the telephone
company update the wiring for you.
Note: The CSA number of the jack to be installed is CA11C (or CA11W for a
wall plate jack).
If your home has specially wired alarm equipment connected to the telephone
line, be sure that installing the telephone does not disable your alarm
equipment. If you have questions about what will disable your alarm equipment,
contact your telephone company or a qualified installer.
CARE/SERVICE AND REPAIR
Keep your answering system with Caller ID dry; if it gets wet, wipe it dry
immediately. Use and store your answering system with Caller ID in room
temperature environments only. Handle your answering system with Caller ID
carefully; do not drop it. Keep your answering system with Caller ID away from
dust and dirt, and wipe it with a damp cloth occasionally to keep it looking
new.
When you press 1# to playback new messages, or 2# to play all
messages, you can then press the following keys to get these remote
functions.
Press:
To:
3#
Delete current message
4#
Repeat previous messages
5#
Stop playback
6#
Skip current message
4.
Modifying or tampering with the telephoneʼs internal components can cause a
malfunction and might invalidate its warranty.
LIMITED WARRANTY
After all your messages have been played, you hear two short beeps. You
have 10 seconds to access the menu again, otherwise, the unit disconnects
automatically.
Who is Providing This Warranty?
•
REMOTE TURN ON
Orbyx Electronics, LLC (“Orbyx"), as the distributor of this Nexxtech™ product (your
“Product”).
What Does This Warranty Cover?
If you forget to turn your unit on, you can phone in from a remote location and
turn it on automatically.
1. Call your telephone number.
2. The unit answers after 10 rings. You will hear an announcement ʻNo one is
available to take your call. After several beeps, enter your 3-digit security
code.
3. After the second beep, press 7# then hang up. Subsequent messages
will be recorded.
•
This warranty covers defects in materials or workmanship in your Product under normal use
and conditions.
What is the Period of Coverage?
•
This warranty covers your Product for 12 months from the original purchase date.
Who Is Covered?
•
This warranty covers the original consumer purchaser. Coverage terminates if you sell or
otherwise transfer your Product.
What Will We Do To Correct Problems?
•
REMOTE RECORD NEW OGM
We will repair your Product or replace your Product with a new or reconditioned equivalent
product, at our option.
How Do You Get Service?
If you press 8# (to record new OGM):
1. When you hear a beep, begin recording your new OGM (up to 5 minutes).
2. When you have finished recording your new OGM, press 5# . The new
OGM will playback to you.
3. Hang up the telephone.
•
Call Orbyx TOLL FREE at 1-866-363-3059 for instructions for obtaining warranty service
from Orbyx’s authorized service providers.
•
Or, return your Product directly to the retail store from which you purchased the Product.
•
When you obtain service for your Product, you must provide a purchase receipt (or other
proof of the original purchase date) and a description of the defect(s).
What Does This Warranty Not Cover?
REMOTE RECORD MEMO
•
This warranty DOES NOT COVER:
If you press 9# (to record memo):
1. When you hear a beep, begin recording your memo.
2. When you have finished recording your memo message, press 5# .
•
damage due to misuse, abuse, alteration, unauthorized repair, or accident (such as
improper electrical current);
•
damage due to “acts of God” (such as lightning) or other contingencies beyond our control;
•
cosmetic damage;
ROOM MONITORING
•
externally generated static, signal reception or antenna problems not caused by your
Product; or batteries.
If you press 0# (to room monitoring):
1. The built-in microphone of your answering machine will be switched on
and you can them listen in on the room.
2. Every 30 seconds you will hear a beep. If you want to continue listening,
press 0# again within 10 seconds. Otherwise the unit will hang up.
3. To end room monitoring, hang up the telephone or press 5# if you want to
use other remote functions.
•
This warranty also DOES NOT COVER, and in no case will we be liable for, any incidental
damages (such as transportation costs to and from an authorized service provider, or loss of
time) or consequential damages (such as costs of repairing or replacing other property
which is damaged, including tapes, discs, speakers not included with your Product or other
accessories, or external electrical systems) resulting from the use of your Product. Some
states do not allow the exclusion or limitation of incidental or consequential damages, so the
above limitation or exclusion may not apply to you.
•
Defacing the serial number, or using your Product for commercial or institutional purposes,
voids this warranty.
TO RETRIEVE MESSAGES WHEN RECORDING
MEMORY IS FULL
Are There Other Warranties?
1.
2.
3.
When the message capacity is full, the unit will answer your call after 10
rings and announces ʻMemory is fullʼ.
Enter your 3-digit security code.
Follow the remote message playback procedure. After all the messages
have been played back, delete ones or all of them to create more memory
space.
•
There are no express warranties other than those expressed herein. Neither the sales
personnel nor any other person is authorized to make any other warranties or to extend the
duration of any warranties.
•
ANY IMPLIED WARRANTIES, INCLUDING ANY IMPLIED WARRANTY OF
MERCHANTABILITY (AN UNWRITTEN WARRANTY THAT A PRODUCT IS FIT FOR
ORDINARY USE), ARE LIMITED TO 90 DAYS. Some states do not allow limitations on
how long an implied warranty lasts, so the above limitation may not apply to you.
How Does State Law Apply?
•
4
This warranty gives you specific legal rights, and you may also have other rights which vary
from state to state.
LIMITED WARRANTY
ORBYX ELECTRONICS WARRANTY
ORBYX Electronics warrants that this product will be free from defects in materials and
workmanship for a period of one (1) year from the date of purchase. Within this period, simply
take the product and your proof of purchase to any ORBYX Electronics store or dealer and the
product will be repaired without charge for parts and labour. ORBYX Electronics reserves the
right to charge for transportation. Any product which has been subject to misuse or accidental
damage is excluded from this warranty.
This warranty is only applicable to a product purchased through ORBYX Electronics' company
owned stores and dealers and to a product that is presented for repair in a country where
ORBYX Electronics offers the product for sale. While this warranty does not confer any legal
rights other than those set out above, you may have additional statutory rights which will vary
under the laws of the various countries, states, province and other governmental entities in
which ORBYX Electronics operates. This warranty is subject to all statutory rights you may have
in the country of purchase.
Distributed exclusively in the U.S. by
Orbyx Electronics, LLC
501 South Cheryl Lane,
Walnut, CA 91789
Imported in Canada for/Importé au Canada pour
Orbyx Electronics,
Concord, Canada, L4K 4M3
Manufactured in China
For product support please contact www.orbyxelectronics.com or
1-866-363-3059
Limited Warranty/Garantie Limitée
U.S.A & Canada
© 2005 ORBYX Electronics. All Rights Reserved.
5
2LMB86YY