1
Installation Guide (Windows)
Express5800 Series
NEC ESMPRO ServerAgentService Ver. 1.0
Chapter 1
General Description
Chapter 2
Installation
Chapter 3
Uninstallation
Chapter 4
Appendix
SAS10_E-IG-W-002-01-001
© NEC Corporation 2014
Contents
Contents ................................................................................................................................................................. 2
Notations Used in This Document .......................................................................................................................... 4
Notations used in the text............................................................................................................................... 4
Abbreviations of Operating Systems .............................................................................................................. 5
Trademarks ............................................................................................................................................................ 6
Warnings and Additions to This Document ............................................................................................................. 7
Latest editions ................................................................................................................................................ 7
Chapter 1
General Description ............................................................................................................................ 8
1. Introduction ........................................................................................................................................................ 9
2. System Requirements ..................................................................................................................................... 10
Chapter 2
Installation ......................................................................................................................................... 11
1. Before Starting Installation .............................................................................................................................. 12
1.1 Installation method ................................................................................................................................ 12
1.2 Settings before installation .................................................................................................................... 12
1.2.1 Installing of .NET Framework ................................................................................................... 12
1.2.2 Setting of TCP/IP...................................................................................................................... 14
1.2.3 Installing of SNMP Service ....................................................................................................... 14
1.2.4 Settings of SNMP Service ........................................................................................................ 16
1.2.5 Monitoring of RAID system ....................................................................................................... 18
2. Installation ....................................................................................................................................................... 19
2.1 Service Mode and Non-Service Mode .................................................................................................. 19
2.1.1 Service Mode ........................................................................................................................... 19
2.1.2 Non-Service Mode ................................................................................................................... 19
2.1.3 Comparison of Service Mode and Non-Service Mode ............................................................. 20
2.2 Start of a setup program ....................................................................................................................... 21
2.3 Execution of a setup program ............................................................................................................... 22
3. After Finishing Installation ................................................................................................................................ 26
3.1 Operations Check ................................................................................................................................. 26
3.2 Port Setting ........................................................................................................................................... 27
3.3 HTTPS Setting ...................................................................................................................................... 27
3.4 Operations Check ................................................................................................................................. 35
Chapter 3
Uninstallation .................................................................................................................................... 36
1. Before Starting Uninstallation .......................................................................................................................... 37
1.1 Confirmation of .NET Framework .......................................................................................................... 37
1.2 Confirmation of Express Report Service / Express Report Service (HTTPS) ....................................... 37
2. Uninstallation ................................................................................................................................................... 38
2.1 On full install OS ................................................................................................................................... 38
2.2 On Server Core install OS .................................................................................................................... 40
Chapter 4
Appendix ........................................................................................................................................... 42
1. Notes ............................................................................................................................................................... 43
1.1 Event log ............................................................................................................................................... 43
1.2 Hard disk drive / RAID system / File system ......................................................................................... 49
1.3 I/O device.............................................................................................................................................. 51
1.4 Coexistence with another product ......................................................................................................... 52
1.5 Report ................................................................................................................................................... 52
2
1.6 OS dependence .................................................................................................................................... 52
1.7 Others ................................................................................................................................................... 55
2. Port number list ............................................................................................................................................... 58
3. Services list ..................................................................................................................................................... 59
4. The order of stop and start of services ............................................................................................................ 60
3
Notations Used in This Document
Notations used in the text
In addition to safety-related symbols urging caution, 3 other types of notations are used in this document. These
notations have the following meanings.
4
Important
Indicates critical items that must be followed when handling the operating software.
Note
Indicates items that must be confirmed when handling the operating software.
Tips
Indicates information that is helpful to keep in mind.
Abbreviations of Operating Systems
Windows Operating Systems(OS) are referred to as follows.
Notations in this document
Official names of Windows
Windows Server 2012 R2 Standard
Windows Server 2012 R2
Windows Server 2012 R2 Datacenter
Widnows Server 2012 Standard
Windows Server 2012
Widnows Server 2012 Datacenter
Windows Server 2008 R2 Standard
Windows Server 2008 R2
Windows Server 2008 R2 Enterprise
Windows Server 2008 R2 Datacenter
Windows Server 2008 Standard
Windows Server 2008 Enterprise
Windows Server 2008 Datacenter
Windows Server 2008
Windows Server 2008 Standard 32-bit
Windows Server 2008 Enterprise 32-bit
Windows Server 2008 Datacenter 32-bit
Windows 8.1 Pro 64-bit Edition
Windows 8.1
Windows 8.1 Pro 32-bit Edition
Windows 8 Pro 64-bit Edition
Windows 8
Windows 8 Pro 32-bit Edition
Windows 7 Professional 64-bit Edition
Windows 7
Windows 7 Professional 32-bit Edition
5
Trademarks
EXPRESSCLUSTER and Universal RAID Utility are registered trademarks of NEC Corporation.
Microsoft, Windows, and Windows Server are registered trademarks or trademarks of Microsoft Corporation in the
United States and other countries.
Avago, LSI and LSI logo design are registered trademarks or trademarks of Avago Technologies.
All other product, brand, or trade names used in this publication are the trademarks or registered trademarks of their
respective trademark owners.
6
Warnings and Additions to This Document
1.
Unauthorized reproduction of the contents of this document, in part or in its entirety, is prohibited.
2.
This document is subject to change at any time without notice.
3.
Do not make copies or alter the document content without permission from NEC Corporation.
4.
If you have any concerns, or discover errors or omissions in this document, contact your sales
representative.
5.
Regardless of article 4, NEC Corporation assumes no responsibility for effects resulting from your
operations.
6.
The sample values used in this document are not the actual values.
Keep this document for future reference.
Latest editions
This document was created based on the information available at the time of its creation. The screen images,
messages and procedures are subject to change without notice. Substitute as appropriate when content has
been modified.
7
NEC ESMPRO ServerAgentService Ver. 1.0
1
General Description
This chapter explains NEC ESMPRO ServerAgentService.
1. Introduction
2. System Requirements
Describes about the need environment of NEC ESMPRO ServerAgentService.
8
1. Introduction
Read this document so as to gain an adequate understanding of the contents.
The contents in this document are intended for users who fully understand features and operations of OS
related to this utility.
If there is any unclear point, see Windows online help.
Software for monitoring the server. This works with NEC ESMPRO Manager. You can choose Service Mode
or Non-Service Mode when installing this software. Service Mode resides as the OS service and Non-Service
Mode does not use the OS service to reduce the OS resources such as memory or CPU.
For details of Service Mode and Non-Service Mode, see "Chapter2 2.1 Service Mode and Non-Service
Mode".
For details of NEC ESMPRO Manager, see "NEC ESMPRO Manager Installation Guide".
9
2. System Requirements
NEC ESMPRO ServerAgentService requires the following hardware and software.
- Hardware
- Machine
Express5800 series
- Memory
Memory required for running OS + 100MB or more
- Free hard disk drive space
50MB or more
- Software
- OS
Windows Server 2012 R2
Windows Server 2012
Windows Server 2008 R2
Windows Server 2008
Windows 8.1
Windows 8
Windows 7
- OS component
Simple Network Management Protocol (SNMP)
.NET Framework 4.5.2
.NET Framework 4.5.1
.NET Framework 4.5
.NET Framework 4.0
Important
Monitoring for NEC ESMPRO ServerAgentService by NEC ESMPRO Manager
Ver6.00 or later.
Tips
●
SNMP Service is not essential function by Non-Service Mode of NEC
ESMPRO ServerAgentService. For details of Service Mode and Non-Service
Mode, see "Chapter 2. 2.1 Service Mode and Non-Service Mode".
●
NEC ESMPRO ServerAgentService cannot use on Windows Server 2008
Server Core or Windows Server 2008 R2 Server Core (Service Pack
Non-Application).
10
NEC ESMPRO ServerAgentService Ver. 1.0
2
Installation
This chapter explains installation of NEC ESMPRO ServerAgentService.
1. Before starting installation
Describes about necessary setting before NEC ESMPRO ServerAgentService installation.
2. Installation
Describes about installation procedure of NEC ESMPRO ServerAgentService.
3. After finishing installation
Describes about necessary setting after NEC ESMPRO ServerAgentService installation.
11
1. Before Starting Installation
Be sure to read this page before installing NEC ESMPRO ServerAgentService.
1.1 Installation method
NEC ESMPRO ServerAgentService has the following installation method.
♦ Pre-installation
In Windows pre-installed model of Express5800 series, NEC ESMPRO Agent is already installed.
To use follow a procedure of “1.2.4 Settings of SNMP Service”.
♦ Installation simultaneously with OS installation
You can install NEC ESMPRO ServerAgentService automatically when Windows OS is installed with
EXPRESSBUILDER.
To use follow a procedure of “1.2.4 Settings of SNMP Service”.
♦ Individual installation
You can execute setup program from EXPRESSBUILDER.
To install NEC ESMPRO Agent, follow a procedure of “1.2 Settings before installation”
1.2 Settings before installation
Install NEC ESMPRO ServerAgentService after some components are set.
1.2.1 Installing of .NET Framework
Installation of .NET Framework 4, .NET Framework 4.5 or later are indispensable by NEC ESMPRO
ServerAgentService.
The procedure of "1.2.1 Installing of .NET Framework" is unnecessary by the environment that .NET
Framework of the above version is installed. Follow a procedure after "1.2.2 Setting of TCP/IP".
Tips
If
uninstall
.NET
Framework
4
after
installation
of
NEC
ESMPRO
ServerAgentService, install .NET Framework 4 again. Then uninstall and install
NEC ESMPRO ServerAgentService.
12
♦ Installing of .NET Framework
The installing of .NET Framework is described below.
1. Sign-in (Log on) to the system with the built-in administrator, which has administrative
privileges.
2. Insert EXPRESSBUILDER into Optical disk drive.
Tips
If you are installing on Windows 2008 Server R2 (Service Pack 1) on Server Core,
you need to install follow the instructions below before you install .NET Framework
4.
- Start /w ocsetup ServerCore-WOW64
- Start /w ocsetup NetFx2-ServerCore
- Start /w ocsetup NetFx2-ServerCore-WOW64
3. Double-click "<Revision>¥win¥dnetfwk¥dotNetFx40_Full_x86_x64.exe".
Tips
On Windows Server 2008 R2 Server Core,
Double-click "<Revision>¥win¥dnetfwk¥dotNetFx40_Full_x86_x64_SC.exe".
4. Check [I have read and accept the license terms.], and click [Insatll].
Start of installation.
5. Click [Finish].
The installation completed.
Restart the system. When installing the first time of .NET Framework.
13
1.2.2 Setting of TCP/IP
Set a static IP address for the server.
See Help from Windows for how to set TCP/IP.
1.2.3 Installing of SNMP Service
Installation of SNMP Service is indispensable by Service Mode of NEC ESMPRO ServerAgentService.
The installing of SNMP Service is described below.
Tips
●
SNMP Service is not essential function by Non-Service Mode of NEC
ESMPRO ServerAgentService. For details of Service Mode and Non-Service
Mode, see "2.1 Service Mode and Non-Service Mode".
●
If
uninstall
SNMP
Service
after
installation
of
NEC
ESMPRO
ServerAgentService, install SNMP Service again. Then uninstall and install
NEC ESMPRO ServerAgentService.
♦ Windows Server 2012 / Windows Server 2012R2
1. Click [Programs and Features] in [Control Panel].
2. Click [Turn Windows features on or off].
“Add Roles and Features Wizard” window appears.
3. Click [Features].
[Features] but when it cannot be clicked by gray, when [Next] is clicked several times, [Features]
can be clicked now.
4. Check [SNMP Service] check box.
5. Click [Next].
6. Click [Install].
Installing, it becomes more effective, it starts.
7. Click [Close].
Tips
In the case of Windows Server 2012 or later Server Core installation, execute the
following commands by the command prompt.
"Dism /online /enable-feature /featurename:SNMP"
14
♦ Windows Server 2008 / Windows Server 2008 R2
1. Click [Programs and Features] in [Control Panel].
2. Click [Turn Windows features on or off].
"Server Manager" window appears.
3. Click [Features].
4. Click [Add Features].
"Add Features Wizard" appears.
5. Check [SNMP Services] check box.
6. Click [Next].
7. Click [Install].
Installing, it becomes more effective, it starts.
8. Click [Close].
Important
NEC ESMPRO ServerAgentService cannot use on Windows Server 2008 Server
Core or Windows Server 2008 R2 Server Core (Service Pack Non-application).
Tips
In the case of Windows Server 2008 R2 Server Core (Service Pack 1) or later
installation, execute the following commands by the command prompt.
"Start /w ocsetup SNMP-SC"
♦ Windows 7 / Windows 8 / Windows 8.1
1. Double-click [Programs and Features] in [Control Panel].
2. Click [Turn Windows features on or off].
3. Click [SNMP feature] check box.
4. Click [OK].
15
1.2.4 Settings of SNMP Service
At all except for server core installation,"♦ Setting preparation of SNMP Service" is unnecessary.
Follow the procedure of the next "♦ To change the settings of SNMP Service".
♦ Setting preparation of SNMP Service
The setting change of SNMP Service of the server that executes, Server Core installation is done from
PC for Management by way of the network.
1. Connected preparation is done on the server side.
Execute the following commands by the command prompt on the server side.
"netsh advfirewall firewall set rule group="File and Printer Sharing" new enable=Yes"
2. Install SNMP Service on PC for Management.
*Operation by "PC for Management" after.
About the method of installing SNMP Service, see "1.2.3 Installing SNMP Service".
3. The session from PC for Management to the server is established.
Execute the following commands by the command prompt on PC for Management side.
"Net use * ¥¥ <ServerName> ¥c$ /u: <UserName>"
Tips
●
ServerName is a name of the server that executes Server Core installation.
●
UserName is a name of Administrative account.
4. Click "Computer Management" in "Administrative Tools".
5. Right-click on the tree of the left pane, and click "Connect to another PC…"
6. The computer name of the server that executes Server Core installation is input to
"Select Computer" box, and click "OK".
Connected to "Computer Management" of the server that executes Server Core installation.
16
♦ To change the settings of SNMP Service
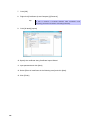
1. Double-click [Services] at [Administrative Tools] in [Control Panel].
2. Click [SNMP Service] from the service list and then [Properties] in [Action] menu.
"SNMP Properties" dialog box appears.
Tips
●
When a list of Windows service is opened when installing SNMP Service,
[Traps] property sheet,[Agent] property sheet and [Security] property sheet of
"SNMP Properties" dialog box are not indicated. When a property is not
indicated right, close a list of Windows service and open a list of Windows
service again.
●
When not installing Feature Administration Tools of SNMP Service, "SNMP
Properties" dialog box is not indicated right in Windows Server 2012. Add
[SNMP Tool] from [Control Panel] [Programs and Features] - [Turn Windows
features on or off] - [Features] - [Remote Server Administration Tools] [Feature Administration Tools].
3. Enter "public" or an arbitrary name in [Community name] box of [Traps] property sheet
and click [Add to list].
To change the community name of traps to be received from the default "*" in NEC ESMPRO
Manager side, enter the same name as the community name newly set in NEC ESMPRO
Manager site.
To receive trap from NEC ESMPRO ServerAgentService at NEC ESMPRO Manager, both
community names must be the same.
4. Click [Add].
5. Click [Add...] in [Trap destinations]. After entering IP address of NEC ESMPRO
Manager machine of the send destination in [Host name, IP or IPX address] box, click
[Add].
When a designated IP address (or host name) is designated by setting of Manager Alert
(TCP/IP) in the trap destination, the message to warn to overlap is indicated.
The alert overlaps by this setting, and is reported to NEC ESMPRO manager of a designated IP
address (or host name).
6. Click [OK] Terminate the network setup.
17
1.2.5 Monitoring of RAID system
Monitoring of RAID system uses Universal RAID Utility is a monitoring utility. Refer to several manual of
Universal RAID Utility.
18
2. Installation
Start installing after the system starts completely. If installation is conducted right after the system startup, it
may fail. Wait for a while and retry if the error message appears.
2.1 Service Mode and Non-Service Mode
Installation method of NEC ESMPRO ServerAgentService has a Mode of two kinds, "Service Mode" and
"Non-Service Mode".
Tips
Mode selection is performed in installation program. To use another mode of NEC
ESMPRO ServerAgentService, run uninstall once and run installation.
2.1.1 Service Mode
An installation mode of default. Mode to Install all feature of NEC ESMPRO ServerAgentService.
On preinstallation or "Installation simultaneously with OS installation", Service Mode is chosen automatically.
2.1.2 Non-Service Mode
The mode without Windows service program. The monitoring service and the report engine are not installed.
To choose Non-Service Mode, run setup program from [Apptications] on EXPRESSBUILDER Autorun Menu.
19
2.1.3 Comparison of Service Mode and Non-Service Mode
[OS Component]
Service Mode
Non-Service Mode
.NET Framework
Indispensable
Indispensable
SNMP Service
Indispensable
Unnecessary
Service Mode
Non-Service Mode
Installed
Installed
Note
[Monitoring Function]
CPU load monitoring
Note
Not reported in case of
Non-Service Mode.
File system monitoring
Installed
Installed
Not reported in case of
Non-Service Mode.
Storage monitoring
Installed
Installed
Not reported in case of
Non-Service Mode.
[Resident Service]
Service Mode
Non-Service Mode
Note
Start Monitor Service
Installed
Not Install
ESMCommonService
SEL Monitoring Service
Installed
Not Install
ESM System Management
Service
Communication base Service
Installed
Not Install
Alert Manager Main Service
Alert Manager Socket(S)
Service
Express Report Service
Possible to install
Impossible to install
Alert Manager ALIVE(S)
Service
Express Report Service (HTTPS)
20
Possible to install
Impossible to install
2.2 Start of a setup program
Setup program of NEC ESMPRO ServerAgentService is included in EXPRESSBUILDER.
Tips
On Server Core system, start a setup program with a procedure of
"EXPRESSBUILDER Command Line Interface User's Guide".
1. Sign-in (Log on) to the system with the built-in administrator, which has administrative
privileges.
2. Insert EXPRESSBUILDER into Optical disk drive.
EXPRESSBUILDER Autorun Menu is automatically displayed by Autorun function.
Tips
If Autorun Menu does not launch, double-click ¥autorun¥dispatcher_64.exe from
EXPRESSBUILDER.
(32-bit : dispatcher.exe)
3. Click [Applications].
21
4. Click [NEC ESMPRO ServerAgentService] and then [Install].
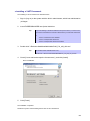
2.3 Execution of a setup program
Install with directions of a screen of a setup program.
To change a destination folder and a installation mode, choose Custom setup type on Setup Type screen.
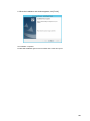
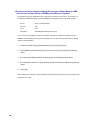
1. Click [Next].
22
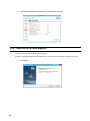
2. Chose a setup type, and click [Next].
To install with default destination folder and installation mode, choose "Complete" setup type.
Skip to 5. To change a destination folder or a installation mode, choose "Custom" setup type.
Tips
Default value of destination folder and installation mode as follows;
Destination folder : C:¥ESM
Installation mode : Service Mode
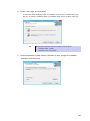
3. Choose Destination Location screen is indicated. If need, change the installation
destination, and click [Next].
23
4. Select Feature screen is indicated. If need, change status of Service feature check
box, and click [Next].
For Service Mode installation, put a tick on the check box.
For Non-Service Mode installation, remove a check of the check box.
Tips
5. Click [Next].
Start of installation.
24
Basic feature check box is always on because it is a indispensable feature.
6. When the installation end window appears, click [Finish].
The installation completed.
Installed NEC ESMPRO Agent becomes enabled after a restart the system.
25
3. After Finishing Installation
Be sure to read this page after installing NEC ESMPRO ServerAgentService.
3.1 Operations Check
Setup program of NEC ESMPRO ServerAgentService enable Windows remote management (WinRM) and
change settings. Setup program executes following WinRM commands in installation process.
winrm quickconfig –q
winrm set winrm/config/service @{AllowUnencrypted="true"}
winrm set winrm/config/service/auth @{Basic="true"}
In uninstallation process, setup program does not change these settings. If you need, change settings to use
by WinRM command.
Important
If you use Windows Server 2008 R2 "Pre-installation" model or you install Windows
Server 2008 R2 with "Installation simultaneously with OS installation", it may fail to
set Windows remote management (WinRM) settings. See "Fail registration by
WS-Man with NEC ESMPRO Manager Ver. 6.00", and set manually Windows
remote management (WinRM) settings.
26
3.2 Port Setting
A use port(5985/tcp,80/tcp) in WS-Man monitoring by NEC ESMRPO Manager is opened from after OS
installation, but an accessible machine is restricted to only a machine in the local sub-net depending on
installed OS or network environment. When monitoring in NEC ESMPRO Manager in the different sub-net,
open WS-Man access from NEC ESMPRO Manager with the following procedure.
1. Double click [Administrative Tools]-[Windows Firewall with Advanced Security] in
[Control Panel].
2. Click [Inbound Rules].
3. Select [Windows Remote Management (HTTP-In)], then Click [Properties] in the
[Action] menu.
Windows Remote Management (HTTP-In) properties" window appears.
Tips
Depending on OS, [Windows Remote Management (HTTP-In)] is divided into
plural by a network profile. Select rule for your network environment.
4. Select "Any IP address" in [Remoto IP adress] box of [Scope] property sheet.
When choosing [these IP addresses], add IP address of NEC ESMPRO Manager.
5. Click [OK].
3.3 HTTPS Setting
How to connect with NEC ESMPRO Manager using HTTPS is as the following procedure.
1. Prepare a certificate authority-signed (CA-Signed) certificate or create a Self-Signed certificate.
2. Register the certificate.
3. Check a thumbprint of the certificate.
4. Create HTTPS Listener.
5. Open a port of HTTPS.
6. Change the setting of NEC ESMPRO Manager.
Important
Using HTTPS for a connection with NEC ESMPRO Manager is recommended.
Because if you used HTTP, username and the password of Basic authentication to
use WS-Man communication would be flowed by plain text on the network.
27
♦ Prepare a certificate
When using HTTPS, A CA-Signed certificate or Self-Signed certificate is required. When you cannot
prepare a CA-Signed certificate, create Self-Signed certificate.
Tips
A CA-signed certificate is recommended to use.
♦ Create Self-Signed certificate
There are two ways of creating Self-Signed certificate. One way is to use makecert.exe (Certificate
Creation Tool), another way is to use keytool.exe that NEC ESMPRO Manager bundles.
The way to use "makecert.exe"
"makecert.exe" is available by installing Windows SDK, and it is possible to use it. Create
Self-Signed certificate by "makecert.exe" on a server that NEC ESMPRO ServerAgentService was
installed.
Log on the server by Administrator and execute a following command on Windows SDK Command
Prompt.
makecert.exe -r -pe -n "CN=IP Address" -e expiranation_date -eku 1.3.6.1.5.5.7.3.1 -ss my
-sr localMachine -sky exchange -sp "Microsoft RSA SChannel Cryptographic Provider" -sy
12 certificate name.cer
Example: In case of the server's IP Address is 192.168.1.1.
makecert.exe -r -pe -n "CN=192.168.1.1" -e 01/01/2020 -eku 1.3.6.1.5.5.7.3.1 -ss my -sr
localMachine -sky exchange -sp "Microsoft RSA SChannel Cryptographic Provider" -sy 12
C:¥temp¥esmprosas.cer
Tips
●
In case of an example, esmprosas.cer is made in C:¥temp. Make C:¥temp
folder before executing makecert.exe.
●
In case of to use makecert.exe, it is not necessary to register the certificate.
●
Refer to the following site about makecert.exe.
- Makecert.exe (Certificate Creation Tool)
http://msdn.microsoft.com/en-us/library/bfsktky3(v=vs.100).aspx
28
The way to use NEC ESMPRO Manager
Create Self-Signed certificate on PC for management that NEC ESMPRO Manager was installed.
In case of Installing NEC ESMPRO Manager in C:¥Program Files (x86)¥ESMPRO on 64bit OS
"C:¥Program Files (x86)¥ESMPRO¥ESMWEB¥jre¥bin¥keytool" -genkey -keystore
keystore -storepass storepass -validity validity -keyalg RSA -keysize keysize -storetype
pkcs12 -ext EKU=serverAuth -dname “CN=IP Address"
An example: In case of the server's IP Address is 192.168.1.1..
"C:¥Program Files (x86)¥ESMPRO¥ESMWEB¥jre¥bin¥keytool" -genkey -keystore
C:¥temp¥esmpro.pfx -storepass secret -validity 3650 -keyalg RSA -keysize 2048 -storetype
pkcs12 -ext EKU=serverAuth -dname “CN=192.168.1.1"
Tips
●
If using makecert.exe, "♦ Register the certificate" is unnecessary.
●
In case of on 32bit OS, paraphrase “Program Files (x86)” as “Program Files”.
♦ Register the certificate
Register the certificate by Microsoft Management Console (MMC) on the server that NEC ESMPRO
ServerAgentService was installed.
Tips
In case of the example, esmpro.pfx would be made in C:¥temp. Therefore, create
C:¥temp folder before executing makecert.exe.
1. Store the certificate on the server.
2. Run mmc.exe.
3. Click [File]-[Add/Remove Snap-in].
4. Select [Certificates] and click [Add].
5. Select [Certificates snap-in]-[Computer account] and click [Next].
6. Select [Local Computer] and click [Finish].
29
7. Click [OK].
8. Right-click [Certificates (Local Computer)]-[Personal].
Tips
In case of preparing a CA-Signed certificate, select [Certificates (Local
Computer)]-[Trusted Root Certification Authorities]-[Certificates].
9. Click [All tasks]-[Import]
10. Specify the certificate along Certificate Import Wizard.
11. Input password and click [Next].
12. Select [Place all certificates in the following store] and click [Next].
13. Click [Finish].
30
♦ Confirm a thumbprint of the certificate
Confirm a thumbprint of the registered certificate.
In case of the certificate was registerd without using makecert.exe
Confirm a thumbprint of the registered certificate with Microsoft Management Console (MMC)
1. Select [Certificates (Local Computer)]-[Personal]-[Certificates], select the certificate
that was registered by“♦ Register the certificate”.
Tips
In case of preparing a CA-Signed certificate, select [Certificates (Local
Computer)]-[Trusted Root Certification Authorities]-[Certificates].
2. Double-click the certificate and select [Details].
3. Select [Thumbprint] and copy the thumbprint to the clipboard.
31
In case of the certificate was registerd with using "makecert.exe"
Confirm a thumbprint of the registered certificate on the server.
1. Run mmc.exe.
2. Click [File]-[Add/Remove Snap-in].
3. Select [Certificates] and click [Add].
4. In the [Certificates snap-in], select [Computer account] and click [Next].
5. Select [Local Computer] and click [Finish].
6. Click [Close] and click [OK].
7. Select [Certificates (Local Computer)]-[Personal]-[Certificates], select the certificate
that was registered by“♦ Create a Self-Signed certificate”.
8. Double-click the certificate and select [Details].
9. Select [Thumbprint] and copy the thumbprint to the clipboard.
32
♦ Create HTTPS Listener
Create HTTPS Listener to connect HTTPS by WS-Man on the server that NEC ESMPRO
ServerAgentService was installed.
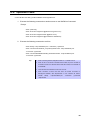
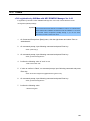
1. Execute the following command using the thumbprint that was confirmed by “♦
Confirm a thumbprint of the certificate”
winrm create winrm/config/Listener?Address=*+Transport=HTTPS @{Hostname="IP
Address";CertificateThumbprint="confirmed thumbprint"}
Example: In case of IP Address is 192.168.1.1 on the server
winrm create winrm/config/Listener?Address=*+Transport=HTTPS
@{Hostname="192.168.1.1";CertificateThumbprint="30 ab a3 7a 87 1e 5c ea aa 3d 83 74
d0 ba 19 46 6f 6c 37 ab"}
If you succeed in executing the command, the following string are displayed on Command
Prompt.ResourceCreated
Address = http://schemas.xmlsoap.org/ws/2004/08/addressing/role/anonymous
ReferenceParameters
ResourceURI = http://schemas.microsoft.com/wbem/wsman/1/config/listener
SelectorSet
Selector: Address = *, Transport = HTTPS
Tips
When not using HTTP Listener by setting HTTPS Listener, execute the following
command to disable the communication which isn't encoded.
33
♦ Open a port
Open a port to use HTTPS connection.
1. Double click [Administrative Tools]-[Windows Firewall with Advanced Security] in
[Control Panel].
2. Right-click [Inbound Rules] and click [New Rule].
3. Select [Port] and click [Next].
4. Select [TCP] and [Specific local ports], input 5986 in port number and click [Next].
Tips
When the server OS is Windows Server 2008, the port of HTTPS is 443. When
from Windows Server 2008 R2 onward, it is 5986.
5. Select [Allow the connection] and click [Next].
6. Select a profile that is used for a connection with NEC ESMPRO Manager from
[Domain], [Private] or [Public].
7. Input [Name] and [Description] and click [Finish].
Eample:
Name: NEC ESMPRO ServerAgentService (HTTPS)
Description: Inbound rule for NEC ESMPRO ServerAgentService to allow data transfer
using HTTPS [TCP 5986]
♦ NEC ESMPRO Manager Setting
If using Self-Signed certificate, change a setting of NEC ESMPRO Manager to allow Self-Signed
certificate by WS-Man communication.
If using a CA-Signed certificate, the following procedure is unnecessary.
1. Login NEC ESMPRO Manager.
2. Select [Environment].
3. Select [Network] tab and click [Edit].
4. Select [WS-Man Communication]-[Self Signed Certificate]-[Allow] and click [Apply].
34
3.4 Operations Check
Confirm whether the setting of NEC ESMPRO ServerAgentService.
1. Execute the following command on another server to set WinRM on Command
Prompt.
winrm quickconfig
winrm set winrm/config/Client @{AllowUnencrypted="true"}
winrm set winrm/config/Client/Auth @{Basic="true"}
winrm set winrm/config/Client @{TrustedHost="IPAddress"}
2. Execute the following command to confirm.
winrm identify -r:http://IPAddress:port -u:username -p:password
winrm e wmi/root/cimv2/Win32_ComputerSystemProduct -r:http://IPAddress:port
-u:username -p:password
winrm e wmi/root/ESMPRO/AS/ESM_GeneralInformation -r:http://IPAddress:port
-u:username -p:password
Tips
●
When connecting HTTPS, designate HTTPS as "-r" instead of HTTP.
●
When an OS on the server is Windows Server 2008, the port is HTTP/80 or
HTTPS/443. When from Windows Server 2008 R2 onward, it's HTTP/5985 or
HTTPS/5986.
●
Input username and password of OS' logon account.
●
When connecting a server that have been set HTTPS connection by
Self-Signed certificate, add "skipCACheck" to the command as follows.
WinRM
identify
-r:http://IPAddress:port
-u:username
-p:password
-skipCACheck.
35
NEC ESMPRO ServerAgentService Ver. 1.0
3
Uninstallation
This chapter explains uninstallation of NEC ESMPRO ServerAgentService.
1. Before Starting Uninstallation
Describes about necessary setting before NEC ESMPRO ServerAgentService uninstallation.
2. Uninstallation
Describes about uninstallation procedure of NEC ESMPRO ServerAgentService.
36
1. Before Starting Uninstallation
Be sure to read this page before uninstalling NEC ESMPRO ServerAgentService.
1.1 Confirmation of .NET Framework
Installation of .NET Framework 4, .NET Framework 4.5 or later are indispensable to uninstallation of NEC
ESMPRO ServerAgentService. If uninstall .NET Framework 4 after installation of NEC ESMPRO
ServerAgentService, install .NET Framework 4 again.
1.2 Confirmation of Express Report Service / Express Report
Service (HTTPS)
When Express Report Service / Express Report Service (HTTPS) are installed, Express Report Service /
Express Report Service (HTTPS) must be uninstalled prior to uninstalling of NEC ESMPRO
ServerAgentService.
37
2. Uninstallation
Start uninstalling after the system starts completely.
If uninstallation is conducted right after system startup, it may fail. Wait for a while and retry if error message
appears.
The uninstallation procedure of NEC ESMPRO ServerAgentService is common to Service Mode and
Non-Service Mode.
2.1 On full install OS
1. Click [Programs and Features] or [Add or Remove Programs] from [Control Panel].
2. Select [NEC ESMPRO Agent] and click [Uninstall/Change] (or [Change/Remove]).
3. The window which confirms the execution of remove is indicated, click [Yes].
Uninstallation is start.
4. When the uninstallation end window appears, click [Finish].
The uninstallation completed.
Restart the system is required.
38
Tips
●
If uninstallation is conducted right after the system startup, it can fail. Wait for a
while and retry if the error message appears.[AMIRTUpt.dll] file can remain
solely in the installation folder. In this case, delete it manually. If files other
than [AMIRTUpt.dll] also remain, do not delete them.
●
Due
to
InstallShield
failure,
the
error
message
"C:¥PROGRA~1¥INSTAL~1¥{6342F~1¥setup.exe" is indicated only at the
first startup after uninstallation.
●
Depending on OS uninstalling NEC ESMPRO ServerAgentService the
message that "Windows Explorer has stopped working" might be displayed.
However, uninstallation was normally completed. The system does not have
the influence.
39
2.2 On Server Core install OS
A setup program is started from EXPRESSBUILDER by Server Core installation.
1. Sign-in (Log on) to the system with the built-in administrator, which has administrative
privileges.
2. Insert EXPRESSBUILDER into Optical disk drive.
EXPRESSBUILDER Autorun Menu is automatically displayed by Autorun function.
3. A setup program of NEC ESMPRO ServerAgentService is started with a procedure of
"EXPRESSBUILDER Command Line Interface User's Guide".
4. Click [Next].
5. Chose a [Remove], and click [Next].
40
6. The window which confirms the execution of remove is indicated, click [Yes].
Uninstallation is start.
7. When the uninstallation end window appears, click [Finish].
The uninstallation completed.
Restart the system is required.
Tips
●
If uninstallation is conducted right after the system startup, it can fail. Wait for a
while and retry if the error message appears.[AMIRTUpt.dll] file can remain
solely in the installation folder. In this case, delete it manually. If files other
than [AMIRTUpt.dll] also remain, do not delete them.
●
Due
to
InstallShield
failure,
the
error
message
"C:¥PROGRA~1¥INSTAL~1¥{6342F~1¥setup.exe" is indicated only at the
first startup after uninstallation.
●
Depending on OS uninstalling NEC ESMPRO ServerAgentService the
message that "Windows Explorer has stopped working" might be displayed.
However, uninstallation was normally completed. The system does not have
the influence.
41
NEC ESMPRO ServerAgentService Ver. 1.0
4
Appendix
1. Note
Describes about note when using NEC ESMPRO ServerAgentService.
2. Port number list
Describes about the port NEC ESMPRO ServerAgentService uses.
3. Services list
Describes about the service list NEC ESMPRO ServerAgentService uses.
4. The order of start / stop of services
Describes about the start order and stop order of the service NEC ESMPRO ServerAgentService uses.
42
1. Notes
1.1 Event log
♦ Event log which is registered during the installation of .Net Framework
(Application)
During the installation of .Net Framework, the following event log is registered. However, there are no
problems to using a system.
Source
:
ASP.NET 4.0.30319.0
Event ID
:
1020
Level
:
Warning
Description :
Updates to the IIS metabase were aborted because IIS is either not installed
or is disabled on this machine. To configure ASP.NET to run in IIS, please
install or enable IIS and re-register ASP.NET using aspnet_regiis.exe /i.
43
♦ Event log which is registered during the hang-up of Alert Manager WMI
Service service Start failure of ESMCommonService (System)
The following log may be registered on the eventlog by the situation of the system - for example, you
installed NEC ESMPRO Manager and NEC ESMPRO ServerAgentService on the same machine.
Source
:
Service Control Manager
Event ID
:
7022
Level
:
Error
Description :
Alert Manager WMI Service hang-up
You do not have any problem if it shift to a start state (running), but, ESMCommonService of NEC
ESMPRO ServerAgentService may not start properly then. It is set to solve the phenomenon. Setting
method is described below.
1. Double-click [Services] at [Administrative Tools] in [Control Panel].
2. Click [ESMCommonService] from the service list and then [Properties] in [Action]
menu.
3. Set "Automatic (Delayed Start)" to Startup type of [General] property sheet.
4. Set "Restart the Service" to [First failure] and [Second failure] of [Recovery] property
sheet.
5. Click [OK].
By the setting mentioned above, NEC ESMPRO ServerAgentService starts after system operation after
progress for 2 minutes.
44
♦ Event log which is registered when connecting NEC ESMPRO Manager by
HTTP connection (System)
When connecting NEC ESMPRO Manager by HTTP connection, the following event log is registered.
Source
:
Microsoft-Windows-WinRM
Event ID
:
10120
Level
:
Warning
Description :
The WinRM service has received an unsecure HTTP connection from
192.168.1.1.
This is not a secure configuration.
User Action
Set AllowUnencrypted to False in WinRM configuration to ensure packets
are encrypted on the wire.
When this event log is registered, there are no problems using a system. However, the system is not
secure. If you construct a secure system, configure HTTPS connection with 3.2 HTTPS Setting in
Chapter 2. Then, this event log is not registered.
45
♦ Event log which is registered during the installation (Application)
During the installation of NEC ESMPRO ServerAgentService, the following event log is registered.
However, there are no problems to using a system.
Source
:
WMI
Event ID
:
63
Level
:
Warning
Description :
A provider, ESMCpu, Version=1.0.0.0, Culture=neutral,
PublicKeyToken=9223c336e3c53daa, has been registered in the Windows
Management Instrumentation namespace root¥ESMPRO¥AS to use the
LocalSystem account. This account is privileged and the provider may
cause a security violation if it does not correctly impersonate user requests.
Description :
A provider, esmfs, Version=1.1.0.0, Culture=neutral,
PublicKeyToken=f065d8e2e775be08, has been registered in the Windows
Management Instrumentation namespace root¥ESMPRO¥AS to use the
LocalSystem account. This account is privileged and the provider may
cause a security violation if it does not correctly impersonate user requests.
Description :
A provider, esmstrg, Version=1.1.0.0, Culture=neutral,
PublicKeyToken=bf878da6f0186331, has been registered in the Windows
Management Instrumentation namespace root¥ESMPRO¥AS to use the
LocalSystem account. This account is privileged and the provider may
cause a security violation if it does not correctly impersonate user requests.
When WMI provider which runs under Local System account is registered, these events occur. Some of
WMI providers included in NEC ESMPRO ServerAgentService run under Local System account.
Therefore, these events are registered.
46
♦ Event
log which is registered when doing shut down (system)
When you shut down the machine in which NEC ESMPRO ServerAgentService was installed, the
following event log is registered.
Source
:
Windows Remote Manager
Event ID
:
10149
Level
:
Warning
Description :
The WinRM service is not listening for WS-Management requests.
If you did not intentionally stop the service, use the following command to see the WinRM configuration:
winrm enumerate winrm/config/listener
When the WS-Management listener stopped, this event is registered. Windows Remote Manager service
is stopped at shutdown, so this event is registered. Thus, there are no problems to using a system.
♦ Monitors hardware log (SEL)
Monitors hardware log (SEL) by NEC ESMPRO ServerAgentService uses Windows Management
Instrumentation (WMI) Service. Therefore when WMI Service stopped or restarted, NEC ESMPRO
ServerAgentService cannot monitor any more.
When WMI Service stopped or restarted, the following event is registered with event log (Application).
Source
:
Application Error
Event ID
:
1000
Level
:
Error
Description :
Faulting application name: svchost.exe
When WMI Service stopped or restarted, restart the system. Or restart of ESM System Management
Service from Control Panel, then Administrative Tools, then Services.
(NEC ESMPRO ServerAgentService reconnects to WMI Service by restarting ESM System Management
Service)
47
♦ Report monitoring event
- The alert function is based on the event information registered in the event log of the system.
Thus, set the event log process on the event viewer to [Overwrite events as needed]. The monitoring
event is not alerted in the setting other than that.
- The event registered in the monitoring event tree on the setting tool of alert function (Alert Manager) is
not alerted to the manager if Alert Manager Main Service does not operate. Even when the service is
operating, if the enabled/disabled flag of each alerting ways is disabled, the event is not alerted.
The alert enabled/disabled flag is set by selecting [Base Setting] - [Report] Properties from [Setting] of
Alert Manager. Also the event occurred before Event log Service started at the time of system startup
cannot be alerted.
- You can set the time to the shutdown by selecting [Base Setting] - [Other] on the setting tool of the alert
function (Alert Manager). The initial value is 20 seconds.
When you set smaller value than this, the alert cannot be performed at the time of shutdown.
- When an alert failure occurs at the time of alerting of monitoring target event, an error message is
logged in the event log. If newly log the error message which occurs at the time of alerting as a
monitoring target event, the error at the time of alerting will be alerted again.
As a result, large number of alerts will be sent when recovering the failure. This leads to the increase of
system load and the degradation of the performance. Do not register the events especially which are
produced by the following alert function services as the monitoring target.
- Alert Manager Main Service
- Alert Manager Socket(S) Service
- (Alert Manager ALIVE(S) Service)*
(*) Alert Manager ALIVE(S) Service is the service registered only when Express Report Service
or NEC ESMPRO Manager is installed.
- On Manager Alert (SNMP) in alert report function, the length of messages should be up to 511 bytes.
When reporting a message with the length longer than 512 bytes, the 512th and the later message do
not appear on the alert viewer. Check the 512th and the later message on the event viewer on the
machine that sends the report.
If you want to display all the messages later than the 512th, use Manager Alert (TCP/IP In-Band).
48
1.2 Hard disk drive / RAID system / File system
♦ Monitoring of RAID system
Monitoring of RAID system uses Universal RAID Utility is a monitoring utility. Refer to several manual of
Universal RAID Utility.
♦ SATA Optical disk drive
In the case of using LSI Embedded MegaRAID, infomation of SATA Optical disk drive does not displayed
of [Information of server state/constitution] of NEC ESMPRO Manager.
♦ Information displayed in "Resource" of SCSI controller
Incorrect information appear in the [Resource] window displayed from [SCSI Controller] of [Information of
server state/constitution] of NEC ESMPRO Manager.
Check the information of resource using "Device Manager" and "System Information (winmsd.exe)" of
OS.
♦ Storage Devices other than SCSI/IDE Device
NEC ESMPRO ServerAgentService does not monitor storage devices other than SCSI/IDE devices (e.g.,
USB device).
♦ Configuration changes to the file system monitoring and storage
monitoring
Set by NEC ESMPRO Manager monitoring interval, hard disk drive pre-failure prediction monitoring
enable/disable, file system free space threshold monitoring does not take effect immediately if you
change. Setting configuration changes after you have changed in the next monitoring interval of
monitoring function of each is enabled.
♦ Monitoring the failures of the tape device is desired
NEC ESMPRO ServerAgentService does not monitor the failures of the tape device. If want to conduct
monitoring, use backup software or tape monitoring application. Using the event monitoring function of
NEC ESMPRO ServerAgentService allows you to monitor the event log of backup software or
applications.
49
♦ Network drive is not displayed of [Information of server state/constitution]
of NEC ESMPRO Manager
The drive connected to network is not displayed under the file system tree in [Information of server
state/constitution] of NEC ESMPRO Manager.
♦ Changing mode of Hard disk drive pre-failure prediction
Turning on/off the mode of hard disk drive pre-failure prediction, all hard disk drives work in the same
mode in either case. Cannot set the mode of each hard disk drive individually.
♦ File system information of media insertion
When you insert media such as a DVD or a floppy disk, NEC ESMPRO Manager as the file system
information of [Information server state/constitution] to display information such as volume label and
capacity information. So "GB" the smallest unit of information capacity, there is a case to display, "0.0GB"
capacity of the media such as a floppy disk capacity is small.
♦ File system free-space monitoring of capacity less than 100MB
In NEC ESMPRO ServerAgentService, capacity does not support free-space monitoring of the file
system of less than 100MB. Free space monitoring configuration of such a file system, is "disabled (not
monitor)" and from the beginig.
50
1.3 I/O device
♦ Serial Port
For the models supporting serial ports, note the following. NEC ESMPRO ServerAgentService has
multiple features that use serial ports. When using these features, the ports can become insufficient. The
serial ports available for each feature are as follows.
- UPS
: COM1-10
- APCU
: COM1-2
- (ALIVE Maintenance)*
: COM1-9
(*) Alive Maintenance uses Remote Access Service.
The available serial ports when using Remote Access Service for Manager Report (TCP/IP Out-of-Band)
are as follows.
- Manager Report: COM1-10
Among those above, only the following combination can share the serial ports.
- Alive Maintenance + Remote Access Service used by a user
When one of the features uses the line, the other feature cannot be used.
Tips
Manager Report (TCP /IP Out-of-Band), which uses Remote Access Service, can
be unable to notify failure information when sharing other serial port. Ensure not to
share serial ports.
51
1.4 Coexistence with another product
♦ FIle Sysytem monitoring cannot be inherited on the system using
EXPRESSCLUSTER
If a failover occurs, the settings of the threshold for the empty space monitoring function and the
enable/disable of monitoring of the operating sever are not inherited to the standby server. Make sure to
reset the threshold and the enable / disable of monitoring on the standby server.
♦ Using with Oracle Products
When Oracle product is installed, the startup of SNMP Service can be changed to "Manual". In such a
case, restore it to "Automatic" and configure the appropriate settings according to the instructions of
Oracle product.
1.5 Report
♦ Detail information of alert
Detail information of some alert displayed on the alert viewer can be shown as "Unknown".
♦ General client report
"General client report" cannot be used.
Though no error appears even if you enable this method, it does not work.
♦ Display of Report Settings
When installed on the same machine NEC ESMPRO Manager and NEC ESMPRO ServerAgentService,
[Report Settings] will be displayed only to the [Start] menu on NEC ESMPRO Manager.
1.6 OS dependence
♦ Notes on Server Core Insallation
- "Manager (TCP/IP Out-of-Band)" method cannot be used.
52
♦ Applying Service Pack 1 to Windows 7 (x64) / Windows Server 2008 R2
When you apply Windows 7 (Service Pack 1) / Windows Server 2008 R2 (Service Pack 1) to an
environment where NEC ESMPRO ServerAgentService is installed, apply update program (KB2487426)
first. If KB2487426 has not been applied before installing Service Pack 1, application error of NEC
ESMPRO ServerAgentService is registered to event log at the time of restart the system after update
program applied. However, NEC ESMPRO ServerAgentService normally works after a restart, and there
are no problems.
The detailed information is described on Microsoft Product Support Services.
Go to Microsoft website:
http://support.microsoft.com/kb/2487426/en-us
♦ User Account Control
User Account Control is turned on, if you start NEC ESMPRO ServerAgentService Control Panel or
collect.exe program, [User Account Control] dialog box will appear. Click [Continue] to start the program.
53
♦ Notes on host OS of Virtualization environment
When NEC ESMPRO ServerAgentService detects dangerous trouble information continuous to operate,
OS is shutdown in the setting of default. (If it is installed as Non-Service Mode, OS is not made
shutdown)
The shutdown not anticipated from Guest OS was generated because the service console shutdown
without shutting down Guest OS in the environment to operate Guest OS in the virtualization
environment.
Invalidate the shutdown function by the report from NEC ESMPRO ServerAgentService, and shutdown
from Guest OS by manual at the failure when the normal termination of Guest OS is valued.
[Setup steps of shutdown function by report]
1. Sign-in (Log on) to the system with the built-in administrator, which has administrative
privileges.
2. Click [Report Settings] in start menu.
Displays Alert Manager.
3. Click [Setting]-[Base Setting].
4. Confirms "Shutdown Delay" item of [Other] is the invalid (red).
When being valid (green), click an icon and change it to invalid (red).
5. Click [OK] Setting Terminate.
54
1.7 Others
♦ Fail registration by WS-Man with NEC ESMPRO Manager Ver. 6.00
If registration by WS-Man of NEC ESMPRO Manager Ver. 6.00 is fail, confirm Windows remote
management (WinRM) settings.
Important
If you use Windows Server 2008 R2 "Pre-installation" model or you install Windows
Server 2008 R2 with "Installation simultaneously with OS installation", it may fail to
set Windows remote management (WinRM) settings. If you use the above
environment, be sure to confirm this notice.
1. On Command Prompt from [Start] menu, click the right button and select "Run as
administrator".
2. On command prompt, input following command and press Enter key.
winrm quickconfig -q
3. On command prompt, input following command and press Enter key.
winrm get winrm/config/service
4. Confirm the following value is "true" or not.
- Basic value under auth
5. If value to confirm is "false", on command prompt, input following command and press
Enter key.
winrm set winrm/config/service @{AllowUnencrypted="true"}
6. On command prompt, input following command and press Enter key.
winrm get winrm/config/service
7. Confirm the following value.
- AllowUnencrypted
55
8. By which to use HTTP or HTTPS to connect with NEC ESMPRO Manager, run the
following WinRM command to use NEC ESMPRO ServerAgentService.
If you use HTTP to connect with NEC ESMPRO Manager;
winrm set winrm/config/service @{AllowUnencrypted="true"}
If you use HTTPS to connect with NEC ESMPRO Manager;
See "Chapter2 3.3 HTTPS Setting"
winrm set winrm/config/service @{AllowUnencrypted="false"}
♦ Monitoring component's hardware from NEC ESMPRO Manager
Registering BMC (EXPRESSSCOPE Engine) to NEC ESMPRO Manager and setting up SNMP Alert
configuration are required to monitor component's hardware error.
♦ Restart after Hardware trouble occurs
When abnormality of Hardware is detected, OS is shutdown.
When OS is restarted without action/recovering trouble after shutdown, shutdown is done just after the
restart.
♦ Memory leak (Windows Server 2008)
Memory leak occurs intermittently irregularly on Windows Server 2008.
The detailed information is described on Microsoft Product Support Services.
Check the contents.
[Article ID: 955515]
http://support.microsoft.com/kb/955515/en-us
Execute the above hotfix or Service Pack 2.
NEC recommends Service Pack 2.
56
♦ Memory leak (Windows Server 2012)
Svchost.exe including WMI service leaks a memory in Windows Server 2012.
The detailed information is described on Microsoft Product Support Services.
Check the contents.
[Article ID: 2793908]
http://support.microsoft.com/kb/2793908/en-us
Execute the above hotfix.
♦ When Performing Duplex System Management
To perform duplex system management by using EXPRESSCLUSTER, install NEC ESMPRO
ServerAgentService on a local disk on both the operating and standby servers. The installation
procedure for NEC ESMPRO ServerAgentService is same as a normal installation, except that install on
two servers.
57
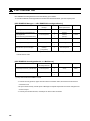
2. Port number list
NEC ESMPRO ServerAgentService uses the following port numbers.
To use NEC ESMPRO ServerAgentService with Windows Firewall enabled, open the required ports.
[NEC ESMPRO Manager <-> NEC ESMPRO ServerAgentService]
Function
NEC ESMPRO
Direction
Manager
Auto Registration
Auto-assignment
Server Monitoring (WS-MAN/HTTP)
Auto Registration
Auto-assignment
Server Monitoring (WS-MAN/HTTPS)
NEC ESMPRO
Remarks
ServerAgentService
->
5985/tcp
<-
(80/tcp)*
->
5986/tcp
<-
(443/tcp)*
SNMP report to Manager
162/udp
<-
Auto-assignment
TCP/IP report to Manager
31134/tcp
<-
Auto-assignment
HTTP
HTTPS
snmp-trap
->
CIM-Indication report to Manager
6736/tcp
<-
Auto-assignment
(configurable)
(*) If you installed NEC ESMPRO ServerAgentService on Windows Server 2008, port HTTP/80 and
HTTPS/443 are used.
[NEC ESMPRO ServerAgentService <-> Mail Server]
Function
NEC ESMPRO
Direction
Main Server
Remarks
->
25/tcp
SMTP
110/tcp
(POP3)*
ServerAgentService
Express Report Service (Internet Mail)
Auto-assignment
<<->
(*) Only when "POP before SMTP" is used.
- In case of two-way protocol, upper arrow shows that connection starts, and lower arrow shows that
connection turns.
- The port number used by TCP/IP report to Manager or Express Report Service can be changed in set
screen of report.
- In case of port number unknown, unused port is used to start connection.
58
3. Services list
NEC ESMPRO ServerAgentService uses the following services.
Services
Alert Manager Main
Process name
AMVMain.exe
Start-up
Function
Automatic
Manage Various trouble
Service
Alert Manager
Remarks
reports.
amvscks.exe
Manual
Socket(S) Service
Report to Manager by
When either of
using TCP/IP.
"Manager(TCP/IP In-Band)
and Manager(TCP/IP
Out-of-Band)" is set to valid
(green) at Base Setting
Window, the service is
started.
When both settings are set to
invalid (red), the service is
stop.
ESMCommonService
ESMCommon.exe
Automatic
Enable NEC ESMPRO
monitering function.
ESM System
Management Service
esmsmsrv.exe
Automatic
Monitors hardware log
Only IPMI corresponding
(SEL)
model.
59
4. The order of stop and start of services
To stop or start services, perform the following procedure.
On some model of server, some service cannot exist.
Non-Service Mode does not register service.
[order]
[Stopping services]
[Starting services]
1.
ESMCommonService
ESMCommonService
2.
ESM System Management Service
ESM System Management Service
3.
(Alert Manager ALIVE(S) Service)*
SNMP Service
4.
Alert Manager Main Service
(Alert Manager ALIVE(S) Service)*
5.
Alert Manager Socket(S) Service
Alert Manager Main Service
6.
SNMP Service
Alert Manager Socket(S) Service
(*) Alert Manager ALIVE(S) Service is the service registered only when Express Report Service or NEC
ESMPRO Manager is installed.
60
NEC Express Server
NEC ESMPRO ServerAgentService Ver. 1.0
Installation Guide (Windows)
NEC Corporation
7-1 Shiba 5-Chome, Minato-Ku
Tokyo 108-8001, Japan
©NEC Corporation 2014
The contents of this manual may not be copied or altered without the prior
written permission of NEC Corporation.