1
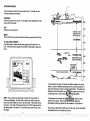
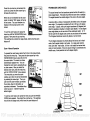
X-25
INSTALLATION AND OPERATION
INSTRUCTIONS
LOWRANCE ELECTRONICS, INC.
LITHO IN U.S.A.
988-0105-33
12000 E. SKELLY DR., TULSA, OK 74128
PDF compression, OCR, web-optimization with CVISION's PdfCompressor
N OTES
PDF compression, OCR, web-optimization with CVISION's PdfCompressor
N 0 T ES
TABLE OF CONTENTS
INTRODUCTION
INSTALLATION
POWER CONNECTIONS
SPEED/TERMPERATURE SENSOR
KEYBOARD BASICS
DISPLAY
MENUS
OPERATION
AUTOMATIC
RANGE
ZOOM Automatic Operation
ZOOM- Manual Operation
SENSITIVITY
GRAYLINE®
FISH ID
CHARTSPEED
DISPLAY MODE
ALARMS
FISHALARM
DEPTH ALARMS
LAMP
FEET/METER
DISPLAY CONTRAST
ASP (Advanced Signal Processing)
TRANSDUCERS ANDCONE ANGLES
SIGNALINTERPRETATION
FISH ARCHES
WATERTEMPERATURE ANDTHERMOCLINES
SURVEYING A LAKE
BAITFISH
SONAR TROUBLESHOOTING
-
1
1
2
3
4
5
5
6
6
6
7
8
9
9
10
11
12
14
14
14
15
15
16
16
17
18
19
20
22
22
23
Copyright © 1990, Lowrance Electronics, Inc
All rights reserved.
All features and specifications subjectto change without notice.
All screens in this manual are simulated.
26
PDF compression,
OCR, web-optimization with CVISION's PdfCompressor
4. The boatmust bemovingataslowtrollingspeed to seefish arches. Ifthe boat
Is motionless, fish stay inthecone,showing on the display as straighthorizontal
lines.
ELECTRICALNOISE
A majorcauseofsonarproblemsis electrical noise. Thisusuallyappearson the
sonar's display as random patternsof dots or lines. In severe cases, it can
completelycoverthe screenwith blackdots, orcause the unit operateerraticly,
or not at all.
To eliminate or minimize the effectsof electrical noise, firsttry to determinethe
cause. With the boat at rest in the water,the firstthing you shoulddo is turn all
electrical equipmenton the boat off. Make certain the engine is off, also. Turn
yourX-25 on, thenturn offASP (Advanced Signal Processing). Thereshouldbe
a steady bottom signal on the display. Now turn on each piece of electrical
equipmentonthe boat and viewtheeffecton the sonar's display. For example,
turnonthebilgepumpand viewthesonardisplayfornoise. Ifno noise is present,
turnthe pumpoff, thenturnon the VHF radio and transmit. Keepdoing this until
all electrical equipmenthas been turned on, their effect on the sonar display
noted, then turned off.
Ifyoufindnoiseinterferencefrom an electrical instrument, trolling motor, pump,
or radio, try to isolate the problem. You can usually re-routethe sonar unit's
power cable and transducer cable away from the wiring that is causing the
interference. VHF radioantennacablesradiate noise when transmitting, so be
certain to keep the sonar'swires awayfromit. Youmayneedto route the sonar
unit'spowercabledirectlyto the batterytoisolate itfromotherwiringonthe boat.
If no noise displays on the sonar unit from electrical equipment, then make
certain everythingexcept the sonar unit is turned off, then start the engine.
Increase the RPMwiththe gearshift in neutral. If noise appears on the display,
the problemcouldbe one of threethings;sparkplugs, alternator, ortachometer
wiring. Try using resistorsparkplugs, alternatorflIters, orrouting thesonarunit's
powercableawayfrom engine wiring. Again, routing the powercabledirectlyto
the batteryhelpseliminatenoise problems. Makecertain to use the in-line fuse
supplied with the unit when wiringthe powercableto the battery.
When no noiseappears on the sonarunit after all of the above tests, then the
noise source is probably cavitation, Many novices or persons with limited
experiencemake hasty sonar installations which functionperfectlyin shallow
water,orwhentheboat is atrest. In nearly allcases, thecause ofthe malfunction
will be the location and/or angle of the transducer. The face of the transducer
must be placedin a locationthat has asmoothflow of water at all boat speeds.
Read your transducerowners manualforthe best mounting position.
25
PDF compression, OCR, web-optimization with CVISION's
PdfCompressor
INTRODUCTION
Weak bottom echo, digital readings erratic,or no fish signals(cont.):
2. Electrical noisefromtheboat'smotorcaninterfere withthesonar. Thiscauses
thesonarto automatically increase its Discrimination or noise rejection feature.
Thiscan cause theunittoeliminateweakersignalssuchasfish oreven structure
fromthe display,
3. The water may be deeperthan the sonar's ability to findthe bottom. If the
sonarcan'tfind the bottomsignal whileit's in the automaticmode, thedigitalwill
flash continuously. It maychangethe range to limitsfargreaterthanthe water
you are in. If this happens, place the unit inthe manualmode, then changethe
As
range toa realistic one, (forexample, 0-100feet)and increase thesensitivity.
should
a
bottom
move
Into
shallower
water,
appear.
signal
you
4. Checkthe batteryvoltage, lithevoltagedrops,the unit'stransmitterpower
also drops, reducing its ability to find the bottom ortargets.
Bottom echo disappears at high speeds or erraticdigItal reading or weak
bottom echowhileboat is moving
1. The transducer maybe in turbulentwater. It must be mounted in a smooth
flow ofwater in orderforthe sonarto work at all boatspeeds. Air bubbles in the
water disrupt the sonar signals,interfering with its ability to find the bottom or
othertargets. The technicaltermfor this is 'Cavitation'.
2. Electrical noisefromtheboat'smotorcaninterfere withthesonar. Thiscauses
thesonarto automatically increase its Discrimination or noise rejectionfeature.
This can causetheunit to eliminateweakersignalssuchasfishoreven structure
fromthedisplay. Try using resistorsparkplugsorroutingIhe sonarunit'spower
and transducer cables awayfrom otherelectrical wiring on the boat.
s.
Thank you for purchasing a Lowrancq sonar. Your X-25 is a high
quality sonar designed for both professional and novice fishermen.
These units have an automatic featurethat finds and displaysthe
bottom, fish, structure, and morel All you have to do is pressthe on
key. However, if you wish to fine tune the unit, all you have to do is
press the menu key. The X-25 has powerful featuresavailable through
easy-to-use menus.
To get started with your unit, first readthe installation section. This is
whereit all begins, Improperinstallation can cause problemsdown the
road. After you've readthe instnjctions, installthe unit,then readthe
rest ofthe manual. The more you know about your unit,the better it
will performfor you. Take this manual for reference when you head for
the water.
INSTALLATION
Mountthe X-25 in any convenient location, providedthere is clearance
when it's tilted forthebestviewingangle. Holes in the bracket's base
allowwood screw or throughbolt mounting. It may be necessaryto
place a pieceof plywood on theback side of thin panels to 'reinforce
the panel. Make certain there is enough room behind theunit to attach
the power and transducer cables.
No fish arches whenthe Fish ID featureIs off:
1. Make certain the transducer is pointing straight down. This is the most
common problem ifa partialarch is displayed. Seethe Fish Archsection inyour
owner's manual formore information.
2. The sensitivity maynot be highenough. In orderforthe unitto displaya fish
arch, it has to be ableto receive the fish's echo fromthe time it enters the cone
until It leaves. If the sensitivity is not highenough,the unit displaysthe fish only
when it is in the centerof the cone.
3. Use the Zoom feature. It is much easierto displayfish arches whenzoomed
in on a smallrange ofwaterthan a largeone. For example, you will have much
betterluckseeing fish arches with a30 to 60foot range than aDto 60foot range.
This enlarges the targets, allowing the displayto show much more detail.
Drill a hole in thedashfor the power and transducer cables. Thebest
locationforthishole is immediately underthe gimbal bracket. This
way, the bracket covers the hole. The smallest holeboth the power
and transducercablescan passthrough is one inch. However, you
can't pass a power or transducer connector and anothercable through
1
24
PDF compression,
OCR, web-optimization with CVISION's PdfCompressor
a one inch hole.
TherefOre, afterdrilling the hole, passthe transducer
connectorup through the holefrom underthe dash. Thendrop the
powercable down from the front side of the dash. Slide the bracket
over the hole,then routethetransducer and power cables out the slots
in the bracket. Finally,fastenthe bracket to the dash.
IMPORTANT
SERVICE INFORMATION!
If yourunit is notworking,orif you needtechnical help, please use the following
troubleshooting section before contactinga service centeror the factory customerservicedepartment.Itmaysaveyou thetroubleofreturning yourunit. See
POWER CONNECTIONS
The X-25 works from a 12 volt DC systemonly. For the best results,
run the powercable directlyto the boat's battery. Keepthepower
cable awayfrom other boat wiring, especially the engine's wires. This
will give the best isolation from electrical noise. If thesupplied cable is
not longenoughto reach the battery; splice #18 gauge insulated wire
to it. You can attachthe power cableto an accessory or powerbuss,
however, you may have problems with electrical interference. See
page 25 for moreinformation on electrical noise.
This unit has reverse polarity protection. No damagewill occur if the
powerwires are reversed. However, theunit will not work until the
wires are attachedcorrectly.
the HowTo Obtain Service section on page 26 if you needservice.
SONARTROUBLESHOOTING
Unit won't turn on:
I.
Checkthe power cable'sconnection at the unit. Also checkthe wiring.
2. Makecertain the power cable is wiredproperly. The red wire connects
tothe positivebattery terminal, black to negative orground.
3. Checkthe fuse.
4. Measurethebatteryvoltageatthe unit'spowerconnector. It shouldbe atleast
volts. If it isn't, thewiring tothe unitisdefective, the batteryterminalsorwiring
on the terminals are corroded,orthe battery needs charging.
ii
Unit freezes, locks up, or operates erratically:
1. Electrical noise fromtheboat's motor, trollingmotor, oran accessory may be
interfering withthesonarunit. Re-routing the power andtransducercablesaway
from otherelectrical wiringon the boat may help. Route the sonarunit'spower
cabledirectlyto the battery instead of througha fuse blockor ignition switch
RED
WIRE
2. Inspect the transducercable forbreaks,cuts,or pinched wires.
3 amp
FUSE
3. Check both the transducerand power connectors. Make certain both are
securelyplugged in to the unit
Weak bottom echo, digital readings erratic, or no fish signals:
TO
1. Make certain transducer is pointing straight down. Cleanthe face of the
transducer. Oil,dirt, andfuel can cause afilmto formonthe transducer, reducing
its effectiveness. If the transduceris mounted inside the hull, be sure it is
shooting through onlyone layeroffiberglass andthat itissecurelybonded tothe
hull. Do NOT use RN siliconerubberadhesive or Marinetexid.
SPEED!
TEMP
SENSOR
2
23
PDF compression, OCR, web-optimization with CVISION's PdfCompressor
SURVEYING A LAKE
SPEED/TEMPERATURE SENSORINSTALLATION
The most successful anglers on any body of water are those who fish
it day after day and year after year. Eventually, they learn the hot
spotsthat produce fish consistently. They discoverthrough experiencewhere, and at what depth,they can expect to find the fish they
want at any season. And they realize that these productive areas
change throughout the year depending on waterlevel, temperature,
food, and other factors.
Mountthespeed/temp sensoron theboat's transomin a location
wheretheflow of wateris the smoothest. Thereshould be a minimum
ofturbulenceand air bubbles in the chosen location. The port (left)
side of thetransom is preferred, however, thestarboard(right) side
can be usedif necessary. Do not mountthe speed sensorbehind
strakes, ribs,or thru-hull fittings. These will disturbthe flow of water to
the speed sensor. In a typical installation, the speed sensoris
mounted six to twelve inches fromthe centerline of the hull. The
sensormust always be in the waterto function properly. Makecertain
the chosen location is in thewater even at high speed or when the
boat is on plane.
WiththeX-25, anyone can eliminate guesswork and concentrate on
the areas where fish are likely to be. Even if it's thefirst time on the
lake!
The most efficient way to become acquaintedwith a bodyof water is
to surveyit with your X-25. Start with a map of the lake, if possible,
and indicate the promising spots in relation to landmarks on shore.
As you go about your survey, your X-25 will tell youthe depth and
type of bottom. It will also reveal suspended fish.
Keepa few marker buoys in the boat, ready to toss overboard. When
the X-25 indicates a school of fish, throwthe buoyout. With the
school thus marked, you can makeyour turn and come back to fish in
exactly the right spot. This is essential when you're far from shore on
a big lake. Unless you mark the school of fish whenyou're over it,
you may not be ableto find it again.
(Requires OPTIONALLST-T Speed/TempSensor)
Once you determine theproper location, placethe sensor on the
transom. Makecertain the sensor'sbottom is flush with the bottom of
the hull. Mark the transomin four places, two in each slot. Drill a
5/32" mounting hole at each location. Mountthe sensorto the hull with
four #10 stainless steel screws (not included). Use a good grade of
caulking compound to seal the screws. Adjust the sensorso it is flush
with thebottomof the hull and tighten the screws.
If the baseof the transom has a radius, fill the gap between the
transomand the sensor with caulking compound. This will help insure
a smooth waterflow.
BAIT FISH
The importance of bait fish to successful fishing can't be over-emphasized. They are the principlefood of all game fish in most waters.
Bait fish are theplankton feeding forage fish, such as minnows and
shad. Bait fish can also be the young of game fish, such as crappies,
bluegill, and bass.
Most bait fish concentrate within five feet of the surface wheresunlight
promotes the growth of the plankton on which they feed. One method
of fishing is to use the X-25tQ find the bait fish first. With the Fish ID
feature off, a school of bait fish will look like a "cloud" on the display.
Usually, game fish will be nearby, often directlybeneath the school of
bait fish.
Routethesensorcableto thein-line connectoron the X-25's power
cable. The speed/temp sensoris now readyfor use.
3
PDF compression,22 OCR, web-optimization with CVISION's PdfCompressor
KEYBOARDBASICS
The unit soundsa tone when you pressany key. This tells you the
unit has accepted a command.
ON/CLEAR
Use this key to turn the unit on. It also clears menu selections and the
menus from the screen.
830
OFF
This key turns theunit off.
750
MENU
770
The X-25 has many menus of features that are accessed with this key.
UP and DOWN ARROWS
Use thesekeys to adjust virtuallyeveryfeature and function on the
unit. Use these keys to adjustthesensitivity, chart speed, range, and
760
more.
750
680
560
500
470
The temperature of water in the lake is seldom constant from top to
bottom. Layers of differenttemperatures form, and the junctionof a
warm and cool layerof water is called a thermocline. The depth and
thickness of the thermoclinecan vary with the season or time of day.
In deep lakes there may be two or more at different depths.
NOTE: The up arrow key also stops and starts thechart when no
menusare displayed. In other words, anytime you wish to stop the
chart, first make certain no menu is on the screen. Then pressthe up
arrow key. The chart will freeze and theword "STOP' appearsat the
top right portion of the screen. To start thechart, press theup arrow
key again.
4
Thermoclines are important to fishermenbecause they are areas
wherefish are active. Many times bait fish will be above the
thermocline while largergame fish will suspend in or lust below it.
The X-25 can detectthis invisible layer in thewater, but the sensitivity
will probablyhaveto be turned up to see it.
21
PDF compression, OCR, web-optimization with CVISION's PdfCompressor
Very small fish probablywill not arch at all. Medium sizedfish will
show a partial arch, or a shape similarto an arch if they're in deep
water. Large fish will arch, but turn the sensitivity up in deeper water
to seethearch. Because of water conditions, such as heavy, surface
clutter, thermoclines, etc., the sensitivity sometimes cannot be increased enoughto get fish arches.
One ofthe bestways to getfish arches is to expand or "zoom" a
segment 01 the water. For example, from 45 to 60 feet. The smaller
the segment, the betterthe screen resolution will be. The easiestway
to do this on theX-25 is with theZoom feature. This feature expands
the echoes, making it easierto see detail. For the best results, turn
the sensitivity up as high as possible withoutgetting too much noise
on the screen. In mediumto deep water, this method should work to
display fish arches.
If you seefish signals when the unit is in the manual mode, but don't
getfish symbols whenthe Fish ID. feature is on, try increasing the
DISPLAY- General
The lights flashfor about ten seconds when the X-25 is turned on.
Three menus appear, one afterthe other. The menusare the lights
(LAMP), feet-meterselection (FEET/METER), and contrastadjustment
(DARK/LIGHT). To turn the lights on, pressthe up arrow key. To
switchfrom feet to meters, pressthe down arrow keywhen the proper
menu appears. To adjustthe contrast,wait for the DARK/LIGHT
menu to appear. Now press the up arrow key to darken the screen,
thedown arrow to lighten it. The menus disappearafter a few seconds. If youdon't want to waft, press the ON/CLEAR key to clear the
menus from the screen.
When the X-25 is first turned on, the displayappears similarto the one
below. The unit is in the automaticmode and the Fish ID feature is on.
The depth rangedisplayson the left side of the screen. In this example, the range is from 0 to 60 feet. The digitalbottom depth display
shows at thetop left portionof the screen.
'ii--
sensitivity.
a
37,3FT
4-c
•1
WATER TEMPERATU RE AND THERMOCLINES
Watertemperature has an important-if not controlling-influence upon
the activities of all fish. Fish are cold blooded and their bodies are
always the temperature of the surrounding water. During the winter,
colder waterslows downtheir metabolism. At this tirrie, they need
about a fourth as much food as they consume in the summer.
Most fish don't spawn unless the water temperature is within rather
narrow limits. The surface temperature meter built intothe X-25 helps
identify the desired surface water spawning temperatures for various
species. Trout can't survivein streamsthat get too warm. Bass and
otherfish eventually die out when stockedin lakes that remaintoo
cold during the summer. While some fish havea wider temperature
tolerance than others, each has a certain range within which it tries to
stay. Schooling fish suspended over deep waterlie at the level that
provides this temperature. We assume they are the most comfortable
here.
F
-
MENUS
The X-25uses menus to guide you throughthe unit's functionsand
features. The menu key accessesthese features, allowingyou to
customize the unitto your particularneeds and waterconditions. All
you have to do to leaveone menu and enter anotheris pressthe menu
key repeatedly. If you ever get lost in the menus, simply press the
ON/CLEAR key. This clears the menus from the screen,
5
20 OCR, web-optimization with CVISION's
PDF compression,
PdfCompressor
Menus change depending on the mode the unit is in. For example, if
theautomatic mode is turned off, the sensitivity menu changes from
"AUTO SENS"to "MAN SENS." Other messages mayappearin
menu boxes or new menus canappear, again depending on previous
selections.
OPERATION
FISH ARCHES
Fish arches are created whenthe coneof sound passes over a fish.
The distanceto a fish when thecone first strikes it is shown as "A"
below. When the center of the cone strikes the fish, the distanceis
shorter as shown "B". As the cone leaves the fish, the distance
increases again as shown in "C".
BOATSDIRECTION OF TRAVEL
AUTOMATIC
Whenthe X-25 is firstturned on, theautomaticfeature is enabled. This feature
automatically adjuststhe unit's rangeand
sensitivity according to waterconditions. It
alwayskeepsthe bottom depth displayed
in the lower portionof the screen.
iiUTO
To turn theautomaticfeatureoff, press the
menu key until the AUTO/MANmenu
appears. Now press the down arrow key.
This highlights the letters "MAN." The unit
is now in the manual mode. Wait a few
secondsand the menu will scroll off the
screen's left side. Pressing the ON/CLEAR key also clears it. To turn
the automatic feature on again, repeat the above steps, exceptthis
time press theup arrow key.
RANGE
You can't adjustthe range whenthe X-25
is in the automatic mode. It is adjustable
when the unit is in the manual mode,
however. To do so, first put the unit in the
manual mode. Nowpress the ON/CLEAR
key to clearthe screen. Then pressthe
menu key until the 'RANGE SEL" menu
appearsas shown. The current range
shows atthe bottomof the menu. In this
case, the range is 60 feet. Now pressthe
up arrow key to decreasetherange, the
down arrow key increases the range. After
you selectthedesired range, press the
A
B
C
When the Fish ID. mode is off, the depth of the waterwill affect the
size and shapeQf the fish arch due to thecone angle diameter. For
example, if the cone passesover a fish in shallow water, the signal
displayed on the X-25 may not arch at all. This is due to the narrow
cone diameterand the resolution limitations of the display.
19
PDF compression,6OCR, web-optimization with CVISION's
PdfCompressor
Both 8 degreeand 20 degreetransducers give accurate bottom readings, eventhough the bottom signal is much wideron the 20 degree
model. This is because you are seeing more of the bottom. Remember, the shallowedge of the signal showsyou thetrue depth. The
rest of the signal tells you whetheryou are over rocks, mud, etc.
SIGNAL INTERPRETATION
YourX-25 gives an accurate picture of the bottomthat your boat is
passing. A bottom of firmsand, gravel, shell, or hard clay returns a
fairlywide signal. If the automatic mode is off and the signal narrows
down, then it means that you have movedovera mud bottom. Mud
absorbs the sound wave and returns a weak signal. Turn up the
sensitivity to see a betterbottom signal.
Big rocks or stumps on a smooth bottom send back signals above the
bottom level signal. The height of the signal dependson the target's
height. As you pass over a post, it should be clearly visible as a short
line extending above thebottom signal.
ON/CLEAR key to clear the display. If you wait a few seconds,
automatically clear.
it will
ZOOM
The zoom feature enlargesall echoes on the screen. If the unit is in
the automatic mode, ittracks the bottom signal, always keeping it near
the bottom of the screen. This lets you see small detail, at thesame
time enlarging all echoes that appearon the screen. The unit doesn't
trackthe bottom in the manual mode, and the adjustments are slightly
different.
Zoom - Automatic Operation
To zoom the display, first press the MENU key until the RANGE/
ZOOM menu appears. Now press thedown arrow key. This switches
theunit intothe zoommode. A new menu immediately appears as
shownon the right.
A steep slope returns a wide signal, the steeper thewider. Signals
returned from a high underwater cliff are usually the widest of all.
373FT
RANGE
et
ZM——
20
t
a
•i
if
31.4FT
ZOOM
SIZE
•
•-
TRACK
w-p.
C
L
r
U
This is the zoom size menu. Zoom size is the distance betweenthe
upper limit and the lower limit. The upper limit shows at thetop left
cornerof thescreen. The lower limit is in the bottom left corner. For
example, if the upper limit is 40 feet and the lower limit is 70 feet, the
zoom window size is 30 feet. The word "TRACK"appears in this
menu whenyou first activatethe zoom. This means the X-25 is trackingthe bottom in a zoomwindow,always keeping it on thedisplay.
7
18
PDF compression,
OCR, web-optimization with CVISION's
PdfCompressor
Press the up arrow key to decreasethe
zoom size, press the down arrow key to
increase the zoom size.
Whenthe unit is switchedinto thezoom
mode,the tellers "ZM" appearat thetop
of the screen. The zoom windowsize
displaysin thetop right corner of the
E
3IAFT
ZM——20
ZOOM
SIZE
Wa
'-
2OFT
screen.
C
To turn thezoom featureoff,press the
menu key until the RANGE/ZOOM menu
apears. Now presstheup arrow key.
This switches theunit into the range mode, whichturns thezoom
featureoff.
Zoom - Manual Operation
TRANSDUCER CONE ANGLES
The sound waves from the transducer spread outintothe water in a
cone shaped beam. This looks much like thebeam from a flashlight.
The anglebetween theoutside edges of thecone is the cone angle.
Lowrance offers a choice of transducers with either an 8 or 20 degree
coneangle. The transducer supplied with the X-25 has a 20 degree
cone angle. Typically, wide cone angletransducers (20 degrees) are
ideal for operating in shallow to medium water depths. The 20 degree
cone angleallows youto see more of theunderwater world. In 15
feet of waterthe 20 degree conecovers an area about six feet across.
The 8 degree transducer coversonly about a two foot circle.
The 20 degree transducer is almost always the bestto use in fresh
water, the 8 degree mostly in salt water. In a deep water environment, (300feet - fresh water, 100 feet - salt water)the narrow cone
angle is more desirable. Since the sound energy is concentrated in a
smallerarea, it can penetrate to much deeperdepths..
To operatethezoom featurewhen theX-25 is in themanual mode,
first pressthe menu key. Then pressthedown arrow key in the
RANGE/ZOOM menu to place the X-25 in
the zoom mode. The zoom size menu
ZM——2O
automatically appears next. You can
changethe zoom size by pressingthe up
or down arrows. After you selectthe
desired zoom size, pressthe menu key
until the "MOVEZOOM" menu appears.
This menu lets you movethezoom
windowup or down in one foot increments
by pressing the arrow keys. Thus, you
can move the zoom windowup towards
the surface, down to thebottom,or
anywhere in between. The window stays
____________________
where you put it. It doesn'ttrack the
bottom signal.
C
34I4FT
50'
C
100'
150'
To turn thezoom featureoff, press the menu key until the RANGE/
ZOOM menu appears. Now pressthe up arrow key. This switches
the unit intothe rangemode, whichturns thezoomfeatureoff.
200'
20 DEGREE
8 DEGREE
17
PDF compression,8OCR, web-optimization with CVISION's
PdfCompressor
To chanQe from feet to meters or vice-versa, press the menu key until
the FEEt/METER menu appears. Press thedown arrow key to switch
to metric, the up arrow to switchto feet. Displays show in feet when
the unit is firstturned on. The menu will clear automatically after a few
seconds or pressthe ON/CLEAR key to clearthe screen.
SENSITIVITY
DISPLAYCONTRAST
The X-25 adjusts thesensitivity level to keep a solid bottom signal on
thescreen. It adds a little extra when it's in the automatic mode. This
gives it thecapabilityto show fish and other detail. However,situationsoccurwhere it becomes necessary to increase or decreasethe
sensitivity level. Typically, this occurs when youwish to see more
detail, so you need to increasethe sensitivity. The procedureto adjust
it is thesamewhethertheunit is in the automatic or manual mode.
The unit's displaycontrastis adjustable to
suit differentlighting conditions. Thiswill
help you seethe screen from different
angles, or at various times of the day.
To adjustthe contrast, pressthemenu key
until the DARK/LIGHT menu appears. To
decreaseit, press the down arrow key.
Press the up arrow key to increase the
contrast. The bar graph in the Dark/Light menu boxshows a graph of
the contrast. The screen will also show theeffects of the change. If
you reach the maximum or minimum level, a tone sounds alerting you
to the limits. The menu will clearautomatically after a few secondsor
you can presstheON/CLEAR key to clearthe screen.
ASP (Advanced Signal Processing)
ASPis a program embedded in the X-25's
computer that is specifically designed to
eliminate noise. It continually monitors
thesignals fromthe receiver, determines
which echoes are noise and rejects them.
Thisallowstrue target echoes to display
on thescreen with a minimum of clutter.
Thisfeature is especially useful since it
typically lets you operate the boat at all
speeds withoutadjusting the sensitivity or
othercontrols. When the X-25 is first
turned on, ASP is enabled. To turn ASP
off, pressthemenu key repeatedly until the ASP menu appears. Now
press the up arrow toturn it on or the downarrow to turn it off. The
menu will clear automatically after a few seconds or you can press the
ON/CLEAR key to clear the screen.
The sensitivity menu lets you controlthe unit's abilityto pick up echoes. A low sensitivity level excludes muchof thebottom information,
fish signals, and other detail. Nigh sensitivity settingslets you see
features, but it can also clutterthe screenwith noise and other unwanted signals. Typically, thebest sensitivity level shows a good,
solid bottomsignal with grayline.
To changethe sensitivity level, first press
the menu key until thesensitivity menu
appears. If the unit is in automatic, the
menu shows "AUTOSENS." Otherwise,
the menu shows "MAN SENS." Now
pressthe up arrow key to increase the
sensitivity, the down arrow to decreaseit.
A verticalbar graph in the menu box
showsthe sensitivity level. Echoes
scrolling onto the screen wilt also show the
effects of the sensitivity change. If you
reach the maximum or minimum sensitivity
level, a tone sounds alerting you to the
limits.
After you've adjusted theunit to the desired sensitivity level, pressthe
ON/CLEAR key to clear the display. If you wait a few seconds, it will
automatically clear.
GRAYLINE
GRAYLINE lets you distinguish between strongand weak echoes. It
"paints" gray on targets that are strongerthan a preset level. This
shows the difference between a hard or soft bottom, large fish versus
smallerones,or rocks and brush on the bottom. For example, a soft,
muddy, or weedy bottom returns a weaker signal which shows a
9
PDF compression,16OCR, web-optimization with CVISION's
PdfCompressor
narrow or no gray line. A hard bottom returnsa strong signal that
causesa wide gray line.
If you havetwo targets of equal size, one with gray and theother
without,thetarget with gray is the strongerecho. This helpsdistinguish fish from structure, or the largerfish from a smallerone.
turnthe alarm Soundoff until the shallowalarm is triggered again.
To turn thealarm off, press the menu key until theshallow alarm menu
appears. Thenpress the up arrow key until the word "OFF" appears.
The alarm is now off.
® is
adjustable. Since it showsthe differencebetween
and
weak
echoes, changingthe level mayrequirea different
strong
GRAYLINE
Deep Alarm
The deep alarm adjuststhesameas the
shallowalarm. Use the"DEEPALARM"
menu to adjustthe deep alarm. When the
bottomsignal goes deeperthan the
setting, an alarm tone sounds.
sensitivity setting.
To change theGRAYLINE level, first press
the MENUkeyuntil the GRAYLINE menu
appears. Now pressthe up arrow key to
increasethe level, the down arrow to
decreaseit. The bar graph in theGRAYLINE menu box showsthe level now in
use. Echoes scrolling onto the screen will
also showthe effectsof the GRAYLINE
change. If you reach the maximum or
minimum level, a tone sounds alertingyou
to the limits.
The level chosen by theX-25 when it's first
turned on is usually adequate for mostconditions. Experiment with
your unit to find the GRAYLINE setting that's best.
FISH ID FEATURE
The Fish ID feature identifies targets that meet certain conditions as
fish. The micro-computer analyses all echoesand eliminates surface
clutter, thermoclines, and otherundesirablesignals. In most instances, remaining targets are fish. The Fish ID featuredisplays
symbols on the screen in placeofthe actualfish echoes. Thereare
four symbolsizes: tiny, small, medium, and large. These showthe
relativesize between targets. In other words, it displays a small fish
symbolwhen it thinksa target is a small fish, a mediumfish symbolon
a larger target, etc.
The micro-computer is sophisticated, but it can be fooled. It can't
distinguish between fish and other suspended objects such as turtles,
submerged floats, air bubbles, etc. Individual tree limbs extending
outwards from a groupof limbs are thehardestobjects for the Fish ID
10
LAMP
373FT
The X-25's display is backlighted for night
use. To turn the backlights on or off, press
the menu key repeatedly until the LAMP
menu appears. Now press the up arrow to
turn the lights on or the down arrow to turn
them off. The menu will clearautomaticallyafter a few seconds or you can press
theON/CLEAR key to clearthe screen.
tt
:-C
.
______
FEET/METER
The X-25 can showthedepth in feet or
meters. When the unit is in the metric
mode, all depth readings, ranges, zooms,
and alarm settingsare in meters. Speed
displaysin knots and log is in nautical
miles. Temperature is in degrees Celsius.
When it's in the feet mode, all of the
above settings are in feet, miles per hour,
and statute miles. Temperature shows in
degreesFahrenheit.
15
PDF compression, OCR, web-optimization with CVISION's PdfCompressor
ALARMS
featureto distinguish from fish. You maysee Fish ID symbols on the
screen when, in fact, there are no fish. Practice with the unit when the
Fish ID feature is on and offto becomemore familiarwith Fish ID.
FISH ALARM
The FishAlarm sounds a tone when a fish
symbol appearson the screen. To usethe
fish alarm, press the menu key until the
"FISH ALARM" menu appears on the
screen. Now press the up arrow key to
turn the alarm on. Repeat the above steps
to turn thefish alarm off. (Note: Ifthe Fish
ID feature is off, it will be turnedon when
you turn the fish alarm on.)
When the X-25 is first turnedon, the Fish
ID feature is automatically turned on, also.
To turn this feature off, pressthe menu key
until the Fish ID feature's menu appears as
shown below. Now pressthe down arrow
key. Thisturns the featureoff. To turn it
backon, repeat the abovesteps, but press
the up arrow key instead.
DEPTH ALARMS
The depth alarms are triggered only by the bottom signal. No other
echoes will activate these alarms. The depth alarms consistof a
shallowand deep alarm. The shallow alarm sounds an alarm tone
when the bottomgoes shallowerthan the alarm's setting. The deep
alarm sounds a tone when the bottom goes deeperthan it's setting.
Both alarms adjustthesame, although throughdifferentmenus.
ShallowAlarm
To set the shallowalarm, press themenu
key repeatedly until the"SHAL ALARM"
menu appears. Press the downarrow key
to increasethe depth,theup arrow key
373FT act
decreases it. The number in the shallow
alarm's menu box showsthe current
shallow alarm setting. Whenthe number
reachesthedesired setting, release the
373FT
FISH
ID
The Fish ID feature can't be used when the
X-25 is in the manual mode. If youturn the
automatic featureoff, the Fish ID feature
will automatically be turned off, also.
CHARTSPEED
The rate echoes scroll across the screen is calledthechart speed. It's
adjustable by pressing the menu key until the chart speed menu
___________________ appears. Chart speed is set to maximum
— when the X-25 is firstturned on. To decrease it,
the down arrow key.
__
ac ec Press the press
up arrow key to increasethe
speed again. The bar graph in the Chart
CHART
.ec Speed menu box shows a graph of the
SPEED
speed. Echoes scrolling onto the screen
will also showthe effectsof the change.
If you reach the maximum or minimum
level, an warning tone sounds.
ml-373FT
—s
C—
-STOP
373FT
arrow key. Press the ON/CLEAR key to
remove the shallowalarm menu from the
screen. Nowwhen the bottom depth goes
shallower than the alarm'ssetting an
alarm tone sounds. At the sametime the
alarm sounds, a message box appearson
the screen as shown at left. Press the up
arrow key to silence the alarm. This will
a-c
To stopthechart, first clear anymenu
fromthe screen by pressing the ON/
CLEAR key. You can't stop the chart while
a menu is displayed. Now press theup
arrow key. The chart will freeze and the
word "STOP" appears at the top right
portionof the screen. To start thechart,
press the up arrow key again.
_____
________
PDF compression,14 OCR, web-optimization with CVISION's PdfCompressor
11
DISPLAY MODE
The X-25 hassix differentscreen modes. To changemodes, press
the MENU key until the "DISP MODE" (DisplayMode) menu appears.
Then pressthe up or downarrow keys until the desired mode number
appears. The modes are as follows:
CHT 1 (Chart #1)
This is the default mode usedwhen the
X-25 is firstturned on. It hasthe following
features:
1. Automatic On
373FT
DIsP
MODE
•CHT
1
S
__
CHT 4 (Chart #4)
This is the High Speed Scroll mode. It
shifts the chart speed into high gear,
scrolling echoes at a high rate. It hasthe
following features:
1. Automatic Off
2. Fish ID FeatureOff
3. All Digital Displays Off
____________
2. Fish ID FeatureOn
3. Digital Depth Display On
___________________
DEPTH FT
DIG 1 (Digital #1)
CHT 2 (Chart #2)
Same as Chart#1 plus digital surface
watertemperature display(Requires
optional LST-T Speed/Temp Sensor.)
ZM-—20
C
34•4FT
47MPH
CHT 3 (Chart #3)
Sameas Chart#1 plus digital speed
display.(Requires optional LST-T Speed/
Temp Sensor.)
SHAL ALM
L
I
OFT
DEEP ALM
OFT
DEPTH FT
[38.3]
°F
I
TEMP
L
76.2
[SPEED
C
12
This is thefirst digitalonly screen. It
showsthe digital depth displayat the top of
thescreen in very large numbers. The
shallowand deep alarm settings are
displayedbeneath the digital depth. No
chart showson this screen.
[60.8]
I
I
f
L
MPH
33.2
LOGMI
2.9
DIG 2 (Digital #2)
The digital depth displayshows at the top
of this screen in very large digits. The
digital temperature, speed, and log shows
beneath the depth. (Requires optional
LST-T Speed/Temp Sensor.) The log
starts countingwhen the X-25 is first
turned on. The log is resetto zero when
the X-25 is turned off.
13
PDF compression, OCR, web-optimization with CVISION's PdfCompressor