1
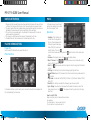
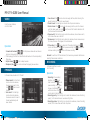
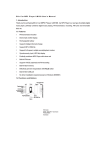
-T9-4GBK_user_manual.indd 1
MP4-T9-4GBK
User Manual
Please read carefully before use
11/09/2009 9:55:22
MP4-T9-4GBK User Manual
NOTICE/ATTENTION
MUSIC
1. Please note that new batteries will achieve best performance after two to three
6-8 hour full-charge and discharge cycles. Future charges only require 4 hours.
2. To protect against data loss, please backup sensitive data regularly. General use
and data loss prevention will be the responsibility of the end user.
3. This unit has no serviceable parts. Any attempts to tamper with this unit will
void all warranty agreements.
4. This player is a sensitive electronic device. Please treat it with care.
5. If needed the unit can be cleaned with a clean damp cloth only.
In the main menu, choose “music”
option, then double-click to enter
into “music playing” item.
PLAYER INTRODUCTION
Power On
Hold the on/off slide button, to power the unit on.
Main interface
In the main interface, use the touch pen to choose the function, then double click
the corresponding function menu.
Operation
1 Equaliser: Click Settings icon
to enter into the play menu.
You can choose between the
following: repeat mode, play
mode, MSEQ, EQ select and
UserEQ Setup. Then click
icon to return to previous menu, and click
again to return to the main music
menu.
2 Volume: When playing music, click
,
to adjust volume.
3 Next / Previous: Click
/
to choose previous or next track and a long
press to fast-forward or rewind
4 Hold: Click
icon to pause and click it again to return to play. Hold the button
to stop.
5 Settings: Click Settings icon to enter into playing setting interface.
6 Repeat Mode: Repeat, All, All repeat, Intro, Once, double click any mode and click
to return
7 Play mode: In order and Shuffle, MSEQ: 3D, Bass, LEQ. EQ Select: Normal, MSEQ,
Rock, POP.
8 UserEQ: Each setting can adjust the frequency up or down by 6dB.
9 Lyric display: Download lyrics and save the file name the same, as music file.
When playing music, click
. The player will directly enter into lyric display
interface.
How to use LRC file?
Keep consistency of lyric name and music name
For example:
The track name is : see you see me. mp3
The lyric name is : see you see me. lrc
2
MP4-T9-4GBK_user_manual.indd 2-3
3
11/09/2009 9:55:23 AM
MP4-T9-4GBK User Manual
3 Save channel: Click
icon to enter into saving interface, after choosing the
saving channel, click “√” icon to save channels.
4 Present mode: Click Settings icon to enter into the pre-set submenu.
5 Delete channel: Click
icon to enter into saving interface, click the channel
which has been saved, then click
icon, then confirm “whether delete or not”.
The channel will then be deleted.
6 Stereo switch: Click Settings icon to enter into submenu, choose stereo switch,
in this menu there are: on and off.
7 Receive area: Click Settings icon to enter into submenu, choose receive area, in
this menu, there are : China, Japan, USA and Australia.
VIDEO
From the main interface,
click the “Video”.
Operation
1 Forward and backward:
/
Click for previous video and next video or
long press to rewind or fast-forward.
2 Choose playing file from the Video file list and double click the corresponding
file to play.
3 Adjust volume:
,
Click to adjust volume.
4 Breakpoint play:
Click icon to continue the playing previous video.
Remarks: As with most FM transmissions, this device may encounter interference
resulting from external conditions.
RECORDING
In the main interface, to enter
click “recording”
FM RADIO
In the main menu, double click “ FM radio”
1 Manual search: Click Settings
icon to enter into submenu,
choose manual search, then
click
/
icon to search
channel.
2 Auto search: Click Settings
icon to enter into submenu,
choose auto search to search
channel automatically and
save channel.
4
MP4-T9-4GBK_user_manual.indd 4-5
8 FM recording: Click
icon to enter into FM recording interface, click
icon to start to record, click
icon to pause recording, click
icon again to
continue recording, click
icon to confirm save recording.
Operation
1 Recording: In the recording
interface, click
icon to
start to record, click
icon to
pause recording, click
icon
to save. A confirmation screen
will then be shown. Click
icon to return to the main menu.
2 Recording quality: Click Settings icon to enter into submenu, choose “recording
quality”, in this menu there are: Low rate and high rate.
3 Recording volume: Click Settings icon to enter into submenu, choose “recording
volume”, in this menu there are 4 kinds of options.
5
11/09/2009 9:55:23 AM
MP4-T9-4GBK User Manual
EBOOK
PHOTO BROWSE
In the main interface double click
“EBook”. Click / to choose a file
or directly double click file to
enter EBook reading interface.
In the main interface
double click “photo
browse”. Click
/
to choose file or directly
click file name to enter
into full display screen
interface. Return to the
photo browse list. Click
to return to the photo
browse list, double click
to return to the main
interface.
Operation
1 Jump page: Click Settings icon to enter into the submenu and enter into jump
page interface, click
/
to adjust the page number and click YES
2 Save mark: Click Settings icon to enter into the submenu, choose save mark,
and double-click it to save the corresponding page
3 Load mark: Click Settings icon to enter into submenu, choose load mark,
double click the bookmark which has been saved, then it will auto jump the
corresponding page
4 Delete mark: Click Settings icon to enter into submenu, choose Delete mark,
double click the saved bookmark, the corresponding bookmark will be deleted
5 Font size: Click Settings icon to enter into submenu, choose Font size to enter
into font settings, double click the font which you want
6 Font color: Click Settings icon to enter into submenu, choose font color to enter
into font color settings, double click the font color which you want
7 Browse mode: Click Settings icon to enter into submenu, choose Browse mode
to enter browse mode setting, in this menu there are: Auto mode and manual
mode
8 Auto page turning: Click Settings icon to enter into submenu, choose Auto
page turning settings, in this menu there are 4 kinds of time: 10 seconds,
15seconds, 20seconds and 25 seconds
9 Exit: Under reading mode, click
icon to return to the main interface
6
MP4-T9-4GBK_user_manual.indd 6-7
Additional
In the main menu to choose “folder” item, click and enter into this item, in the
explorer, when insert TF card, there will be two option: “flash Memory” and “TF
Card”
1 Choose files: In the explorer, there will be two option: “flash Memory” and “TF
Card” when you insert TF card, the all files will be displayed when choose the
corresponding option, click
/
icon to choose folder, and click again to
play the file. The file will not be played if the file isn’t recognized
2 Delete files: Click
key when you want to delete some files, then it will
spring a dialogue: YES or No, choose yes icon to delete that file.
7
11/09/2009 9:55:24 AM
MP4-T9-4GBK User Manual
SETTINGS
> Display setting: Back light
time, Brightness adjust, back
light mode, carton effect,
photo browse,
> Backlight time: 5 seconds,
10 seconds, 15 seconds, 20
seconds, 30 seconds and
always on.
> Brightness: 1X,2X,3X,4X,5X,
The smaller of the number,
the brighter of the brightness.
> Back light mode: Full dark
screen and half dark screen
> Carton effect: Off, From left to right, up to down, Jalousie, From inside to
outside and rotate.
> Photo browse: Off, 2 seconds, 5 seconds,8 seconds
> System settings: In this setting there are 5 items: firmware upgrade, restorable
system, screen calibration, Vibration, transfer screen
> Restore: Click the System Restore option, there will be a dialogue “whether
restore system to default status “ Click YES, the player will restore the default
settings.
> Calibration: Click the center of three “†” for two series. The calibration will be
completed and it will exit automatically(Remark: After calibrating the screen, you
should turn off normally, the action will be saved)
> Vibration: On and off (After the closure of this vibration, there will be no shock
when touching the touch)
> Clock setting: Time setting, date setting
a. click time setting to enter into clock setting interface, then click
/
left/right icon to set hour/minute, click YES after setting
b. Click date setting to enter into clock setting interface, then click
/
left/right icon to set Year/month/date, click YES after setting
> Language: Simple Chinese, English, Traditional Chinese
> System information: The local capacity status, manufacture name and TF card
capacity, which is read-only information
> Auto Shut time: 3 minutes,5 minutes,10 minutes,15 minutes, 20 minutes and
no automatic shut
TF CARD OPERATE STEPS
1 Insert TF card
Insert TF card to the player, when popping, then push TF card to exit.
2 TF card connect with computer
Under inserting TF card, when the player connects the computer, there will be
two mobile disk, now you can operate these two disk as the other mobile disk.
3 Disconnect the player with computer
Enter into “Explorer” interface, there will be two option, “Inside Memory” and “TF
card”, directly double click “TF Card” option. It will show all files of the TF card,
double click the file to play.
RESET
Can be used to set unit back to factory settings
8
MP4-T9-4GBK_user_manual.indd 8-9
9
11/09/2009 9:55:25 AM
MP4-T9-4GBK User Manual
FAQ
Player can not open
Headphones can not hear
the voices
Keys do not work
SPECIFICATIONS:
Check whether the battery is ok
Display screen
3.0inch 260K ,pixel 400*240, LCD display
Connect power adapter to inspection the player again
Connect the computer
USB2.0 high speed
If you still can not open the player after charging, please
contact our customer service
Memory size
128M-8G
Battery
li-polymer battery
Please check whether the headset connection is ok or not
Sampling rate
8KHz
Recording format
WAV 32K bps
Recording time
8hrs (128M Flash)
The max output of earphone
(L) 11mW, (R) 11mW
(32Ohm)
MP3 bit rate
64K bps – 320K bps
WMA/AVI bit rate
64K bps – 384K bps
Frequency range
20Hz to20KHz
Headset and adjust the location of players
SNR
85dB
Turn off electrical installations nearly
Receive the frequency range
76MHz – 90MHz / 87.5MHz
– 108MHz
Store station
30
The max output of earphone
(L) 10mW, (R) 10mW
(32Ohm)
SNR
45dB
Please check volume is set to 0
Make sure whether the electronic lock was locked, so
please move upward unlock / reboot button, then try to
open the electronic lock to operate the player
Record
Please check whether the headphone plug clean, dirt can
lead to noise
Serious noise
FM reception poor
Check whether music files is damaged. Try to identify
other music. If the file has been damaged, may lead to
very serious noise or sound jump
MP3, WMA, WMV, ASF
Headphones can be used as an antennas
Screen display garbled
Please check whether it has set up the correct language
options, select the language <set> - <system settings>
- <Language> to set up
Can not download files
Make sure the computer player with the right connections
between computer and player
Confirm whether the memory is full of storage space
Confirm whether there is an USB cable damage
10
MP4-T9-4GBK_user_manual.indd 10-11
FM radio
Music format
MP3, WMA, APE, AAC, FLAC
Temperature
-5 to 40°C
Language
Simple Chinese, English, Traditional Chinese, Korean
Support system
Windows98/SE/ME/2K/XP/VISTA/ MAC OS 10
11
11/09/2009 9:55:25 AM
-T9-4GBK_user_manual.indd 12
T9
4GB Video & Music Player
For technical support please visit
www.LaserCo.net
11/09/2009 9:55:26