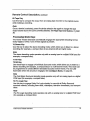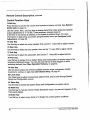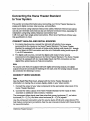
1
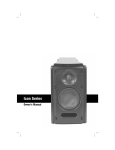
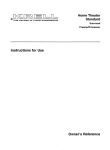
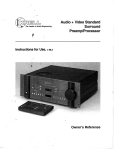
HomeTheater
Standard
Instructions for Use
Owner’s Reference
Home Theater Standard
SurroundSoundPreamplifier/Processor
Instructionsfor Use
v. 99.3
KrellIndustries,
Inc.
45 ConnairRoad
Orange, CT 06477-3650USA
TEL203-799-9954
FAX203-891-2028
E-MAIL
krell @krellonline.com
WEBSITE
http.’/Jwww.krellonline.com
This productcomplieswith the EMC
directive’ (89/336/EEC)
andthe low-voltagedirective (73/23/EEC),
WARNINGS
TheHome
TheaterStandardmustbe placedon a firm level surfacewhereit is not exposed
to drippingor
splashing.
Theventilation grids on top of the Home
TheaterStandard
mustbe unobstructed
at all timesduring operation. Donot place flammable
matedalaboceor beneaththe component.
Donot remove
or bypassthe groundpin on the endof the ACpowercord. This could causeradio frequen=
cy interference(RFI) to be introducedinto your playbacksystem.
Beforemakingconnectionsto TheHome
TheaterStandard,makesure the backpanel powerswitch is off.
Make
sureall cableterminations
are of the highestquality andfree fromfrayedends,short circuits, or cold
solderjoints.
THEREARE NO USERSERVICEABLE
PARTSINSIDE ANYKRELL PRODUCT.
PleasecontactyourauthorizedKrell dealer,distributor, or Krell if youhaveanyquestionsnot addressed
in
this Owner’sReference.
ThisproductIs manufactured
in the UnitedStatesof America.
Krelle is a registeredtrademark
of Krell Industries,inc., andis restrictedfor useby Krell
TM is a trademark
TM is a trademark
Industries,Ino., its subsidiades,
andauthorized
agents.Krell Playback
System
Krell Industries,Ino. Krell MusicSurround
of Krell Industries,Inc. Krell CAST
is a patentpending
for Krell Industries,Inc. TosLink
is a trademark
of Toshiba
Corporation.
PHAST
Link is a trademark
e, HighDefinition Compatible
TM are either registeredtrademarks
of PhastCorporation.(~’, HDCD
Digital ¯ andPacific Microsonics
or trademarks
of
Pacific Microsonics,
Inc, in the UnitedStatesand/orothercountries.HDCD
system
manufactured
underlicensefromPacific Microsonics,
Inc. Thisproduct is coveredby oneor moreof the following: In the USA:5,479,168,5,638,074,5,640,161,5,808,574,5,838,274,5,854,600,5,864,311,5,872,531,
andin Australia: 669114.
Otherpatentspending.Manufactured
underlicensefromDolbyLaboratories."Do/by,""Pro Logic,"andthe double-D
symbol
are
trademarks
of DolbyLaboratories.ConfidentialUnpubtished
Works.Copyright1992-1997
DolbyLaboratories,Inc. All rights reserved,All othertrademarks
andtradenames
are registeredto their respectivecompanies.
©1999by Krell Industries,Inc. All rights reserved
P/N 303987
Contents
INTRODUCTION
DEFINITION OF TERMS
UNPACKING
PLACEMENT
_.
ACPowerGuidelines
GETTING STARTED
...
ReadTills First
An Introduction to SystemSetup
FRONTPANELDESCRIPTION
BACK PANELDESCRIPTION
REMOTECONTROLDESCRIPTION
BatteryInstallation andRemoval
CONNECTINGTHE HOMETHEATERSTANDARD
TO YOURSYSTEM
ConnectAnalogandDigital Sources
ConnectVideo Sources
ConnectAmplifier(s)
SYSTEMSETUPAND CONFIGURATION
OVERVIEW
SYSTEMSETUPAND CONFIGURATION
Navigatingthe Menu
Accessingthe Main Menu
ConfigureSpeakers
Listening RoomSetup
Calibrate Volume
ConfigureDevices
ConfigureLevel Adjustment
Operation
SAVINGSETUP, RECALLINGSETUP, ANDRESTORING
FACTORY
DEFAULTSYSTEMCONFIGURATION
SETTINGS
OPERATINGTHE HOMETHEATERSTANDARD
On/Off/Stand-by
TapeInput and Output
MainZoneand Zone2 Operation
Other OperationFeatures
WARRANTY
RETURNAUTHORIZATIONPROCEDURE
SPECIFICATIONS
Krell Home
Theater Standard
Page
1
1
2
3
3
4
4’
5
7
13
17
17
21
21
21
22
23
24
24
24
25
27
28
30
36
41
49
50
50
50
51
52
54
55
56-57
III
Illustrations
FIGURE
1 The HomeTheater Standard Front Panel
F~GURE
2 The HomeTheater Standard Back Panel
FIGURE
3 The HomeTheater Standard RemoteControl
iv
Page
6
12
16
Krell HomeTheaterStandard
Introduction
Thankyou for your purchaseof the Krell Home
TheaterStandardSurroundSound
Preamplifier/Processor.
The HomeTheater Standardprovides optimummusicand cinemasoundtrack
reproductionquality throughKrell C.urrentMode,discrete ClassA direct-coupled
circuitry, andbalanced
outputson all six channels.Broadcast
quality switchingand
circuitrywincluding component
video, S-video, andcompositevideo---ensure
unmatched
video p~fformance.
Built-in DolbyDigitai,~ DolbyProLogic, andDTS’,,
decodingmakethe Home
TheaterStandardcompatiblewith virtually any surround
soundsource,includingdigital videodisc(D,VD)softwareanddigital television
broadcasts.
Dualzonecapability gives youa vadetyo.f configurationpossibilities for whole-house
systems.A handheldremotecontrol, RS-232and PHAST
Link communications
ports,
RC-5baseband,
and12 VDCinput/output (12 V trigger) interface integrate the Home
TheaterStandardinto any system.TheHome
TheaterStandard’sflexible, modular
architecture allows you to upgradehardwareandsoftwareto accommodate
future
surroundsound.formatsand desig,n enhancements.
Theowner’sreferencemanualcontains important information on placement,
installation, andoperationof the Krell Home
TheaterStandard.Pleasereadthis
informationcarefully. A thoroughunderstanding
of thesedetails helpsensure
satisfactory operationof andlong life for your Home
TheaterStandardandrelated
system components.
Definition of Terms
Off
Thepowerbreakerswitch on the backpanelof the amplifier is in the downposition
whenthe amplifieris off.
Stand-by
A low powerconsumption
status that keepsthe audioandregulatorcircuits at idle.
Operational Mode
Theamplifier is in the operationalmode
whenit is readyto play music.
Krell Home
TheaterStandard
1
Unpacking
Openthe box andremovethe top layer of foam. Yousee these items:
1 HomeTheater Standard
1 IECconnector(ACpower)cord
1 HomeTheater Standardhandheldremote control 2 AAA-size1.5 Volt batteries
1 T-15Torx wrench~small"U’ type)
1.T-10Torx wrench(small "L" type)
2 12 VDCoutput (12 V trigger) cables
1 packetcontaining the owner’sreferencemanual,the RS-232Port developer’s
reference,the "readthis first" insert, andthe warrantyregistrationcard
Carefully removethe unit andaccessoriesfrom the box. Remove
the foamendcaps
andprotectiveplastic wrapfromthe unit.
Note
Saveall packingmaterials./f youmustship your Home
TheaterStandardin the future,
repackthe un#in its original packaging
to preventtransit damage.
SeeReturn
AuthorizationProcedure,on page55.
2
Krell Home
Theater
Standard
Placement
Beforeyouinstall the Home
TheaterStandardinto your system,reviewthe following
guidelinesto choose
the locationfor the component.
This will facilitate a clean,troublefree installation.
TheHome
TheaterStandarddoesqot require any type-of special rack or cabinetfor
installation. For the dimensions
of your Home
TheaterStandardsee Specifications, on
pages56-57.
TheHome
Theater"S~andard
requires at least two inches (5 cm)of clearanceon each
side andat least two inches(5 cm)of clearanceabovethe component
to provide
adequateventilation. Further, the Home
TheaterStandardrequiresat least three inches
(7 cm)of clearancebetweenother connected
components.
For installations inside
cabinetry, extra ventilation maybe necessary.
AC POWER GUIDELINES
TheHome
TheaterStandardhas superbregulation anddoesnot require a dedicated
ACcircuit. Avoidconnectionsthroughextensioncordsor multiple ACadapters.High
quality 15 ampgrounded
ACstrips are acceptable.Highquality ACline conditionersor
filters maybe usedif they are grounded.
Power Cord
TheHome
TheaterStandardshould be usedonly with the powercord supplied. Contact
yourauthorizedKrell dealer,distributor, or Krell beforeusinganydevicesdesigned
to
alter or stabilize the ACpowerfor the Home
TheaterStandard.
Krell Home
Theater
Standard
3
Getting Started
READ THIS FIRST
Performthe following steps to makethe On-Screen
Display (OSD)viewableon your
video monitor. Thevideo format andvideo signals of the Ho_me
TheaterStandardand
the video monitorneedto matchbeforethe OSDis viewable.Thevideo format of the
videosignal canbe set to either NTSC
or PAL.
Thefollowing table details the different videosignalsand.video formatssupportedby
the HomeTheater Standard:
Video
Signal
Type of Connector
Composite Single-Ended RCA
S-Video
DIN
Component 3 Single-EndedRCA
Most CommonlyFormat
LabeledAs
Standard
Video, Composite NTSCor PAL
S, SV,S-Video
,Y, Cr, Cb
NTSCor PAL
NTSCor PAL
Toselect the initial videosignalandvideoformat:
1. Connectyour video monitorto the video output connectorson the Home
Theater
Standardthat corresponds
to the input connectors
on your videomonitor(refer to
the abovetable).
TheaterStandardby switching the back panel powerswitch to
2. Poweron the Home
on. Thenpressthe powerbuttonon the front panel.
Thefollowing diagramshowsthe front panel device buttonson the Home
Theater, and
showsthe video signals andvideo formatsassociatedwith eachbutton:
FRONT
PANEL
DEVICE
BUTTON
o
DVD
o
~
SIGNAL
Composite
FORMAT
NTSC
o
LD
o
o
SAT
o
~
o
VCR1
o
~
S-Video Component Composite
NTSC
NTSC
PAL
o
TV
o
~
o
CD
o
~
S-Video Component
PAL
PAL
boththe videoformatandvideo
3. Pressthe front paneldevicebuttonthat matches
signalcompatible
withyourconnected
videomonitor
(refer to the .abovediagram).
Thisbecomes
the currentlyselectedvideosignaloutput.
4
Krell Home
TheaterStandard
4. Verify that the video monitor’svideo signal input corresponds
to the Home
TheaterStandard’svideo signal output. Pressthe menukey on the handheld
remotecontrol to verify that the OSDis nowviewableon the video monitor. The
systemconfiguration mainmenuappearswhenthe video format and video signals
betweenthe Home
Theater Standardandyour video monitor are compatible.
If youhaveanyquestionsregardingthe selectionof the.videoformat, pleasecall your
authorized
Krell dealer,distributor,6r Krell.
AN INTRODUCTIONTO SYSTEMSETUP
TheHome
TheaterStandardprovidesa variety of connectionandoperationoptions for
outstandingmusicandcinemasoundtrackreproduction.To take full advantage
of the
featuresthe Home
TheaterStandardoffers, you’ll needto set up your systemin this
order:
1. Connectyour Home
TheaterStandardto the desired analoganddigital audio
sources,videosources,andamplifiers. SeeConnecting
the Home
Theater
Standardto YourSystem,on page21.
2. Configureyour Home
TheaterStandard’sspeakervolume,input devices, andtrims
using the built-in, easy-to-folloWSystem
SetupandConfigurationmenus.Step-bystep instructions begin on page24, System
SetupandConfiguration.
Control descriptionsfor information
3. Reviewthe Front Panel,BackPanel,andRemote
on input, zone,andmodeselections, speakeradjustment,input andoutput
connections
for analog,digital, andvideosources,andremotecontrol operation.See
pages6-20for illustrations anddescriptions.
After you’ve connectedandconfiguredyour Home
TheaterStandardandknowits basic
features, you’re ready to go. SeeOperatingthe Home
TheaterStanclard, on page50.
Krell Home
Theater
Standard
5
5
321
6 7
8
9 10
4
11
18
12
19
13
20
14
16
15
21
11 TunerButton and LED
12 Auxl Button and LED
13 Aux2Button and LED
14 Tape/VCR2
Button and LED
15 MainZoneandZone2 Button
16 Main Zoneand Zone2 LEDs
input Device Selection ButtonsandLEOs 17 I~fraredEmitter
5 DVDButton and LED
ProcessingModeButtonsandLEDs
6 LDButton and LED
18 Stereo Button and LED
7 SATButton and LED
19 Music1Button and LED
8 VCR1Button and LED
20
Music2Button and LED
9 TVButton and LED
21
Pro Logic Button and LED
10 CDButton and LED
Basic Operation
1 PowerButton
2 Power LED
3 Stand-by LED
4 Infrared Sensor
22
17
23 2624
29 26 3027
22 Front Panel Window
23 UserButton
24 BalanceButton
Individual ChannelButtons
25 CenterButton
26 Rear Button
27 SubButton
28 SaveButton
29 Level Downand Up Buttons
30 RecallButton
Front Panel Description
SeeFigure I on page6
The HomeTheater Standardfront panel provides poweron and off; input, zone, and
processingmodeselection; monitoring and display of processorstatus; and balance
and volumecontrol.. The front panel components
are described below.
Basic Operation
’1 PowerButton ....
The powerbutton switches the HomeVideo Standard from stand-by to operational
mode.
Note
Whenyou poweroff while zone2 is selected, only zone 2 turns off. Press the power
button or HTSkey a secondtime to poweroff the mainzone.
2 Power LED
The blue powerLEDilluminates whenthe HomeTheater Standardis in operational
mode.
3 Stand-by LED
Thered stand-by LEDilluminates whenthe back panel powerswitch (54) is. on,
indicating that the HomeTheater Standardis in stand-by mode.Krell recommends
that
the backpanel powerswitch (54) remainin the up position at all times.
4 Infrared Sensor
The infrared sensor receives commands
from the HomeTheater Standard remote
control. For proper remotecontrol operation, makesure the infrared sensoris not
coveredor obstructed.
Input Device Selection Buttons and LEDs
Whenproperly configured, the HomeTheater Standard keeps track of each device and
its associated connections. For example,DVDuses Coax1for digital audio, Composite1
for video, and S-1 for analog audio. The HomeTheater Standardautomatically engages
the correct inputs whenyou press a front panel device selection button.
The Home
Theater Standardis equippedwith the following input selections, which allow
you to select the device connectedto your HomeTheater Standard. The LEDsabove
eachselection illuminates whenthat input is engagedand indicates the operating zone.
5 DVD Button and LEDs
Usethis button, to select the digital videodiscdevice.
Krell Home
TheaterStandard
7
Front Panel Description, continued
6 LD Button and LEDs
Usethis buttonto select the laser disc device.
7 SAT Button and LEDs
Usethis buttonto selectthe satellite feeddevice.
_.
8 VCR1Button and LEDs
Usethis buttonto sele.c.t the VCR
device.
9 TV Button and LEDs
Usethis buttonto selectthe television device.
10 CDButton and LEDs
Usethis button to selectthe compact
disc device.
11 Tuner Button and LEDs
Usethis button to select the AM/FM
tuner device.
12 Auxl Button and LEDs
Usethis buttonto select an auxiliary device,suchas phono,tape, or an additional DVD,
LD, CD, or VCR.
13 Aux2Button and LEDs
Usethis buttonto select a secondauxiliary device,suchas phono,tape, or an
additional DVD,LD, CD,or VCR.
14 Tape/VCR2Button and LEDs
Usethis button to compare
the outputfroman analogtape recorderto the original
sourcewhile makinga recording. SeeTapeInput andOutput, on page49. Also use
this buttonto select an additionalVCRinput.
15 Main Zoneand Zone2 Button
Usethis. button to select either mainzoneor zone2.capability. SeeMainZoneand
Zone2 Operation,on page51.
16 Main Zoneand Zone2 LEDs
TheHome
TheaterStandardhas two zonecapabilities, mainor zone2. Thereis a red.
LEDaboveandbeloweachinput device selection button. Whenthe red LEDbelowa
button is illuminated, the deviceis operatingin the mainzone.When
a red LEDabovea
buttonis illuminated,the deviceis operatingin zone2.
8
Krell Home
Theater
Standard
FrontPanelDescription,
continued
17 Infrared Emitter
Emits the Home
TheaterStandardremoteoperation codeto a learning remote.See
ProgramRemote,on page 45.
A learning remotecontrol canbe programmed
to o.per.ate the Home
TheaterStandard
via the infrared emitter. SeeProgram
Remote,
on page46.
ProcessingMqd.eButtons and LEDs
18 Stereo Buttonand LED
Usethis buttonto select the stereodecoding
mode,whichallowsyouto listen to a
stereo recordingin two channel(left andright) mode.Thered LEDilluminates whenthis
mode
is activated.
Note
Thestereo decodingmodeoperatesonly with an analoginput or a digital PCM
input (for
example,a compactdisc).
19 Music1Button and LED
20 Music2Button and LED
Usethese buttons to engageKrell MusicSurroundmode.This music-decoding
mode
allowsyouto listen to a stereo recordingin a multi-channelmode.This mode
canalso
be programmed
to create different simulatedacoustic environments.Thered LED
illuminates whenthis circuitry, is engaged.
SeeConfigure
Music,on page44.
Note
TheKrell MusicSurrounddecodingmode
operatesonly with an analoginput or a digital
PCM
input (for example,a compactdisc).
21 Pro Logic Button and LED
Usethis buttonto engage
DolbyPro Logiccircuitry for usewith all DolbySurround
encoded
material, including laser discs, videotapes,television broadcasts,andcompact
discs. Thered LEDilluminates whenthe Home
TheaterStandardis in the DolbyPro
Logic decodingmode.
Note
ThePro Logicdecodingmode
operatesonly with an analoginput o. r a digital PCM
input
(for example,a compact
disc).
Krell HomeTheaterStandard
9
FrontPanelDescription,continued
22 Front PanelDisplay
Thefront panel display provides status messages
for Home
TheaterStandard
operations,including volumeandbalancelevel, decodingmode,andzoneinformation.
In addition, whena newdeviceis selected,the physica~inputs are displayed.
23 User Button
Usethis button to select oneof three available dynamicrangecompression
modes:
max(imum),normal, or~night. SeeUser Button Setup,_.onpage47.
,
24 BalanceButton
Pressthis buttonto adjust the mainleft/right speakerbalance.This buttonconvertsthe
volumelevel controls to balancecontrols. BAL0 in the front paneldisplay window
indicates the centerposition. Balancemaybe adjustedin .5 dBincrements,up to 6 dB.
Balancelevels are shownnumericallyon the front paneldisplay. Thebalancelevel
buttonsrevert to their original functionsas mainvolume
level controlsafter three
seconds
of inactivity.
Individual ChannelButtons
Usethe Center, Rear, andSubbuttons to changetaste trims (maketemporaryspeaker
output adjustmentsof +/- 10 dB). Thesetemporarychangesrevert to
0 dBwhena newdevice is selected or the systemis powereddown.For more
information on taste trims andmaster(programmable)
trims, see ConfigureLevel
Adjustment,on page36.
25 CenterButton
Pressthe center button, then usethe level up anddownbuttons(29) to adjust the
center speakervolume.
26 Rear Button
Pressthe rear button, thenusethe level up anddownbuttons(29) to adjust the rear
speakervolume.
27 SubButton
Pressthe sub(subwoofer)button, then usethe level up anddownbuttons(29) to adjust
the subwooferspeakervolume.
28 Save Button
Usethis button to savesystemconfigurationsettings andlearning remoteprogramming,.
SeeSavingSetup, Recalling Setup, and RestoringFactoryDefault System
Configuration
Settings, on page49.
10
Krell Home
Theater
Standard
Front Panel Description, continued
29 Level Downand Up Buttons
Usethe volumelevel buttons to adjust the output for the entire systemas well as
balanceand individual levels for the center speaker, rear speakers, and subwoofers.
Thevolumelevel is shownin the front panel display. Thevolumelevel buttons are also
used to scroll through menuselections. See SystemS~tup and Configuration, on
page 24.
30 Recall
Button
.......
,
Usethis button to recall current systemconfiguration settings. SeeSavingSetup,
Recalling Setup, and Restoring Factory Default SystemConfiguration Settings, on
page 49.
’
Krell Home
TheaterStandard
11
31
32
33
31
4144
34
32 37 38 39 3635
AnalogOutputsandInputs
31 BalancedAnalogAudio Outputs
32 Single-endedAnalogAudioOutputs
33 Multi-ChannelAudioOutputConnector
34 B-1 Left and B-1 Right
35 TapeIn Left andRight
36 TapeOutLeft andRight
37 VCR1
I.n Left andRight
38 VCR1
Out Left and Right
39 Zone2 Out Left andRight
40 S-1, S-2, S-3, S-4, S-5Left andRight
40
434246 48
Digital AudioInputsandOutputs
41Digital OpticalInputs
42 Digital AudioInputs
43 DigitalAudioOutputs
44 S-videoOutputs
45 S-videoInputs
46 CompositeVideoOutputs
47 CompositeVideoInputs
48 Component
Video Outputs
49 Component
Video Inputs
45
49 47
5O
52
E6 54 : 55
RemoteControl
50 RS-232RemoteConnector
51 PHAST
UnkOut and In Connectors
52 RC-5In
53 12 VDCOut and In
Power
~
54 BackPanelPowerS~vitch
55 IEC Connector
53
BackPanel Description
SeeFigure 2 on page12
Thebackpanelof the Home
TheaterStandardprovidesall input andoutput
connections,remotecontrol inputs andoutputs, poweron andoff, andpower
connection.Thebackpanelfunctions are describedbelow.
AnalogAudioOutputsand Inputs
31 BalancedAnal0-gAudioOutputs
-.TheHome
TheaterStandardis equippedwith six balancedanalogaudio channel
outputs,with XLRconnectors,
for the left, center,right, left rear, right rear, and
subwoofer.
32 Single-endedAnalogAudioOutputs
TheHome
TheaterStandardis equippedwith six single-endedanalogaudio channel
outputs,with RCA
connectors,
for the left, center,right, left rear, right rear, and
subwoofer.
33 Multi-ChannelAudioOutputConnector
TheHome
TheaterStandardis equippedwith a multi-channelaudio output, with a DB25 connector,Whichcontainsthe outputconnections
for all the outputchannels
(left,
center,right, left rear, right rear, andsubwoofer).
34 B-1 Left andRight inputs
TheHome
TheaterStandardis equippedwith oneset of balancedinputs with ×LB
connectors.
TheXLRpin configurationsare as follows:
Pin 1: Shield(ground)
°)
Pin 2: Non-inverting
(0
Pin 3: Inverting°)
(180
35 TapeIn Left andRight
TheHome
TheaterStandardis equippedwith oneset of single-endedtape inputs with
RCAconnectors.
36 TapeOut Left and Right
TheHome
TheaterStandardis equippedwith oneset of single-endedtape outputswith
RCAconnectors.
37 VCR1In Left and Right
TheHome
TheaterStandardis equippedwith oneset of single-endedinputs with RCA
connectors,for a VCRaudiosource.
Krell HomeTheater
Standard
13
BackPanelDescription,continued
38 VCR1Out Left and Right
TheHome
TheaterStandardis equippedwith oneset of single-endedoutputs with RCA
connectors,for a VCRaudio source.
39 Zone2 Out Left and Right
-TheHome
TheaterStandardis equippedwith one set of single-endedzone2 audio
outputs with RCAconnectors.
40 S-1, $-2, S-3, S-4, S-5 Left andRight Inputs
’
TheHome
TheaterStandardis equippedwith five sets of single-endedaudioinputs with
RCAconnectors.
Digital AudioInputs andOutputs
41 Digital OpticalInputs
TheHome
TheaterStandardis equippedwith two digital EIAJoptical inputs with
TosLinkconnectors.
42 Digital AudioInputs
TheHome
TheaterStandardis equippedwith six coaxial digital audio inputs with RCA
connectors.
43 Digital AudioOutputs
TheHome
TheaterStandardis equippedwith two digital audio outputs: onecoaxial with
an RCAconnector,andoneEIAJ optical with a TosLinkconnector.
44 S-video Outputs
TheHome
TheaterStandardis equippedwith two S-videooutputs with DINconnectors.
ThemainS-videooutput (labeled OSDon back panel) includes on-screendisplay. For
dubbingpurposes,the secondS-videooutput doesnot include on-screendisplay...
45 S-videoInputs
TheHome
TheaterStandardis equippedwith four S-videoinputs with DINconnectors.
46 CompositeVideo Outputs
TheHome
TheaterStandardis equippedwith two compositevideo outputs with RCA
connectors.Themaincompositevideo output (labeled OSDon back panel) includes onscreendisplay. For dubbingpurposes,the secondcompositevideo output doesnot
include on-screendisplay.
47 CompositeVideo Inputs
TheHome
TheaterStandardis equippedwith four RCAcompositevideo inputs with
RCAconnectors.
14
Krell Home
Theater
Standard
Back Panel Description, continued
48 Component
Video Outputs
TheHome
TheaterStandardis equippedwith oneset of component
video outputs with
RCAconnectors.Component
video uses three wires (labeled Y, Cr, andCbon back
panel) to conveythe video signal, including the OSD.
49 Component
Video Inputs
TheHome
Theater$.t.a. ndardis equipped
~withtwo sets of component
videoinputs.
Remote Control
"
50 RS-232Connector
TheHome
TheaterStandardis equippedwith an RS-232port, which providesanother
methodof controlling the unit. TheRS-232remoteconnectorreceives messages
from a
computer
basedcontrol system,providingmoreintelligent control of the Home
Theater
Standard. For moreinformation, see RS-232Port: SendingCommands
and
Interpreting Data, developer’s-referenceshippedwith the Home
TheaterStandard.
51 PHASTLink Out and In Connectors
TheHome
TheaterStandardis equippedwith PHAS~
Link connectors,which are the
interfaces for connectingthe Home
TheaterStandardto a PHAST
Landmark
system.
The PHAST
Link connectionsprovide seamlessintegration of the Home
Theater
Standard within a PHAST
system~
,~
52 RC-5In
TheRC-5input makescustominstallation easy andsecureby acceptingbaseband
RC-5input commands
from hardwiredremotecontrollers.
53 12 VDCin and Out
The12 VDCoutput sendsa 12 Volt poweron/off signal to other Krell components
via a
12 V trigger cable,as well as to otherdevicesthat incorporate12 Volt poweron/off
trigger input. TheHome
TheaterStandardhasfour programmable
12 Volt outputs:
Out1,Out2,Out3,andOut4;oneinput is available.
Power
54 BackPanel PowerSwitch
Usethis switch to changethe Home
TheaterStandardfromoff to stand-by.
55 IEC Connector
The Home
TheaterStandardis equippedwith a standard femaleIECpowerconnector,
for use with the ACpowercord.
Krell Home
Theater
Standard
15
56
57
6O
61
’59
’58
63
62
67
66
69
65
68
73
72
.77
76
79
71
75
78
80
83
82
81
PowerFunctions
56 AmpKey
57 FITS Key
ZoneSelection
58 Main Key
59 Z2 Key
DeviceSelection
Keys
60 DVDKey
61 LD Key
62 SAT Key
63 TV Key
64 CD Key
ControlFunction
65 Tuner Key
Keys
66 Auxl Key
74 Bal Key
67 Aux2Key
75 Cntr Key
68 VCRKey
" 76 Rear Key
69 TapeKey
77 Sub Key
78 Prey Key
ProcessingMode
79 User Key
Key
80 Level Keys
70 Stereo Key
81 MenuKey
71 M1 Key
82 Mute Key
72 M2 Key
83 Enter Key
73 PmLogic Key
RemoteControl Description
SeeFigure3 onpage16
TheHome
TheaterStandardremotecontrol provideson andoff, input selection,
processingmodeselection, speakervolumeandbalanceadjust, andmutefunctions, as
well as accessto the SystemSetupa.nd Configurationmenu.
To sendoperationalinstructions directly into the Home
TheaterStandardusing an RS232basedexternal ~;.o.ntrol device, see RS-232Port: SendingCommands
and
Interpreting Data, the developer’sreferenceshippedwith the Home
TheaterStandard.
BATTERY INSTALLATION AND REMOVAL
TheHome
TheaterStandardhandheldremotecontrol uses two AAA-size1.5 Volt
batteries. Batteriesare includedwith the shipment.
Toinstall or replacethe batteries:
1. Remove
the backplate, using the Torx wrenchprovided.
onthe plastic battery
2. Install the batteriesfollowingthe batterypositiondiagram
receptacle.
3. Replacethe backplate.
4. Theremotecontrol is readyfor operation.
Replacebatteries whenremotecontrol function becomes
intermittent.
Remove
batteries,if the remotecontrol is not to be usedfor a long pedodof time.
Battery leakagecan damage
the remotecontrol,
Home
TheaterStandardremotecontrol keys andtheir functions are describedbelow.
Power Functions
56 AmpKey
Usethis keyto poweron/off a Krell remotecontrol amplifier.
57 HTS Key
Usethis key to switch the Home
TheaterSystemunit betweenstand-bymodeand
operational mode.
Note
When
youpoweroff while zone2 is selected, only zone2 turns off. Pressthe power
button or the HTSkey a secondtime to poweroff the mainzone.
Krell Home
Theater
Standard
17
Remote
ControlDescription,continued
ZoneSelection
58 Main Key
Usethis keyto select the mainzonefor a device.
59 Z2 Key
Usethis key to select zone.2 for a device. SeeMainZoneandZone2 Operation,on
.’.
Note
TheHome
TheaterStandarddefaults to the mainzone. To activate a devicein zone2,
youmustpressthe remotecontrol Z2 button (59) beforeselecting a device,
Device Selection Keys
60 DVDKey
Usethis keyto select the digital videodiscdevice.
61 LD Key
Usethis key’ to selectthe laser disc device.
62 SAT Key
Usethis keyto select the satellite sourcedevice.
63 TV Key
Usethis keyto select the television device.
64 CDKey
Usethis key to select the compact
disc device.
65 Tuner Key
Usethis key to select the AM/FM
tuner device.
66 Auxl Key
Usethis key to select the auxiliary device,suchas phono,tape, or an additional DVD,
LD, CD, or VCR.
67 Aux2 Key
Usethis keyto select a secondauxiliary device,suchas phono,tape, or an additional
DVD,LD, CD, or VCR.
68 VCRKey
Usethis key to select the VCRdevice.
18
Krell Home
Theater
Standard
Remote
ControlDescription,continued
69 Tape Key
Usethis key to compare
the outputfrom an analogtape recorderto the original source
while makinga recording.
Note
Oncea deviceis selected, pressthe deviceselection key againto changethe tape
output sourcebusto the zonecurrently selected. SeeTapeInput andOutput,on page
Processing ModeKeys
TheHome
TheaterStandardautomatically engagesthe appropriate decodingformat,
DolbyDigital or DTS;if oneof these,signalsis present.
70 Stereo Key
Usethis key to select the stereodecoding
mode,whichallowsyouto listen to a stereo
recording(for example,a compact
disc)in two-channel
(left andright) mode.
Note
Thestereo decodingmode
operatesonly with an analoginput or a digital PCM
input (for
example,a compactdisc).
71 M1 Key
72 M2 Key
Usethese keysto engagea Krell MusicSurroundmode,whichallows you to listen to a
stereo recording(for example,a compactdisc) in a multi-channelmode.This modecan
be programmed
to create different simulatedacoustic environ-ments.Thered LED
illuminates whenthis circuitry is engaged.SeeConfigureMusic,on page43.
Note
"/’he Krell MusicSurrounddecoding
mode
operatesonly with an analoginput or a digital
PCM
input (for example,a compactdisc).
73 Pro Logic Key
Usethis key to engage
DolbyPro Logiccircuitry for usewith all DolbySurround
encoded
material, including laser discs, videotapes,television broadcasts,andcompact
discs.
Note
ThePro Logic decodingmodeoperatesonly with an analoginput or a digital PCM
input
(for example,a compact
disc).
Krell Home
Theater
Standard
19
Remote
ControlDescription,continued
Control FunctionKeys
74 Bal Key
Pressthis keyto convertthe volumelevel controls to balan_c,e controls. SeeBalance
Button (24), on page10.
Usethe Center, Rear, andSubkeys to changetaste trims (maketemporaryspeaker
output adjustmentsof -~1.:10 dB). Thesetemporarycha_,ngesrevert to
0 dBwhena newdevice is selected, or the systemis powereddown.For more.,
information on taste trims andmaster(programmable)
trims, seeConfigureLevel
Adjustment, on page 36.
75 Cntr Key
Usethis key to select the centerspeaker,thenusethe ~" $ keys(80) to adjust volume.
76 Rear Key
Usethis keyto select the rear speaker,then usethe $ .], keys(80) to adjustvolume.
77 SubKey
~
Use.this keyto select the subwoofer~
then usethe $ $ keys(80) to adjust volume.
78 Prev Key
Usethis key to escapefrom a SystemSetupandConfigurationon-screenmenuto the
previouslydisplayedscreen.Youcanalso usethis key to keeptriggers on while
switching devices. SeeOtherOperationFeatures,on page52.
79 User Key
Usethis key to select oneof three available dynamicrangecompression
modes:
max(imum),
normal, or night. SeeUser Button Setup, on page47.
80 Level Keys
Usethesekeysto adjust volumelevel, balancelevel, andto scroll throughSystem
Setup andConfiguration menus.
81 MenuKey
Usethis key to accessthe SystemSetupandConfiguration on-screenmenus.
82 Mute Key
Usethis key to mutethe Home
TheaterStandard’soutput. VOLUME
MUTE
appearsin the
front paneldisplay.
83 Enter Key
Usethis key to select menu
itemsor to display the current systemconditions.
20
Krell Home
Theater
Standard
Connectingthe HomeTheater Standard
to Your System
This section providesinformation about connectingyour Home
TheaterStandardto
analoganddigital sources,videosources,andamp.lifier.s.
Krell recommends
using balancedinterconnectcables. Balancedinterconnectcables
not only canminimizesonic loss but also are immune
to inducednoise, especially for
installations using1(Sr~gcables.Balanced
connections
have
6 dBmoregain than single-endedconnections.When
level matchingis critical, keep
this specificationin mind.
CONNECT ANALOG AND DIGITAL SOURCES
1. For analoginput sources,connectthe right andleft outputsof yoursource
components
to the inputs on the Home
Theater Standard. TheHomeTheater
Standardis equippedwith six sets .ofsingle-endedanalogaudioinputs (S-1 through
S-5 andtape) via RCAconnectorsandoneset of balancedanalogaudioinputs (B1) via XLRconnectors.
2. For digital audiosources,connectthe digital audiooutputof your source
components
to the digital inputs on the Home
TheaterStandard.TheHome
Theater
Standardis.equippedwith six coaxial digital inputs via RCAconnectors
andtwo
digital EIAJoptical inputsvia TosLinkconnectors.
Note
For sourceunits that are equipped
with bothdigital andanalogoutputs,the digital
outputsshouldbe connected
for listening in the mainzone;the analog.outputsshould
be connected
for listening in zone2.
CONNECT VIDEO SOURCES
Note
Seethe ReadThis First insert, shippedwith the Home
TheaterStandard,for
informationon maltingthe on-screen
display visible on your videomonitor.
to the appropriatevideo input of the
1. Connectthe output of your videocomponents
HomeTheater Standard.
TheaterStandardto the inputs of video
2. Connectthe video outputsof the Home
recordersor additionalvideomonitors,if desired.Thecomponent
video signal uses three wires that conveyluminance(Y), red minus
luminanceIR - Y] (Cr), andblue minusluminance[B - Y] (Cb) signals.
Usethe component
connectionwhenthe sourcedevice (DVD)andoutput device (TV)
both feature component
connections.Seethe user manualsincluded with these devices
for moreinformation. "
Krell Home
Theater
Standard
21
Connecting
the Home Theater
Standard
to Your System, continued
TheHomeTheater Standardis also equippedwith four S-video inputs and four
compositevideo inputs. S-video cables transmit the color and luminancecomponentsof
the video signal separately. Thecombfilter within the sourceunit performsthis
separation. If the source’scombfilter is superior to the onewithin the video monitor, use
the S-video connections, Otherwise, use compositevideoinput.
The HomeTheater Standardis equipped with two S-video outputs, two compositevideo
outputs, and one set of component
video outputs. One. S-video output, one composite,
video output, and the component
video output include on-screen display. For dubbing
purposes, only the output labeled OSDdisplays on-screeninformation.
Note
TheHomeTheater Standarddoes not. convert video signal formats, Le., an S-video
input signal is output as an S-video signal Thesameis true for compositeand
componentvideo signals.
CONNECT AMPLIFIER(S)
Connectthe outputs of the HomeTheater Standardto the input(s) of your power
amplifier(s).
The HomeTheater Standard has balanced outputs with XLRconnectors and singleendedoutputs with RCAconnectors. Both outputs are active at all times, allowing
simultaneousconnectionto separate amplifiers. Only one of these output formats
should be connectedto a single amplifier. Usethe DB-25connector to connectto a
DB-25-equippedamplifier.
22
Krell Home
TheaterStandard
SystemSetup and Configuration Overview
This pageoutlines the SystemSetupandConfigurationMenus.Theseeasy-to-follow,
step-by-step menuslet you set up your Home
TheaterStandardfor optimum
performance.
Detailedinstructions beginon page24.
Krell recommends
that youconfigure your component
in the following order:
1". CONFIGURE SPEAKERS
ConfigureSpeakersSetuplets youselect speakersthat are in your systemand
configuretheir bassrange.
2. LISTENING ROOMSETUP.
ListeningRoom
Setuplets you. to enter the exactlocation of eachspeakerin your
system~so that the Home
TheaterStandardcan calculate the properarrival anddelay
settings.
3, CALIBRATE VOLUME
CalibrateVolume
Setuplets youmatchthe level of different speakersandamplifiers in
your system,
4. CONFIGURE DEVICES
ConfigureDevicesSetuplets you assigneachdevice’s inputs, modes,andtriggers.
5, CONFIGURE LEVEL ADJUSTMENT
ConfigureLevel Adjustment
Setuplets youselect mode,device, andanaloginput trims.
Thesefixed positive or negativevolumeoffsets let youmaintainlevel matchingwhile
switchingbetween
inputs with significantly different volume
levels.
6. OPERATION
TheOperationSetuplets youchoosethe menudisplay’s background
color, the position
anddisplay time for on-screendisplay, andvideo display brightness.This menu
also
lets you.chooseyourserial control, set up virtual acousticenvironments,
program
another remoteto accept HomeTheater Standardcommands,
and set up dynamic
range compressionmodes.
Krell HomeTheater Standard
23
SystemSetup and Configuration
Theremotecontrol is the maininput devicefor the Home
TheaterStandard.All initial
setup andsubsequentsystemconfiguration adjustmentsmust.bemadethroughthe
remotecontrol, or via the RS-232
port.
For maximum
performance,the Home
Theater Standardmustbe configured for each
systemdevice,its capabilities, andspeakerpositionsin the listening room.Kreil
recommends
configurin~g..yoursystem,step-by-step,in sequentialorder. Enter
information into the Home
TheaterStandardthroughinteractive on-screenmenus.
Thesemenus
are structured to guideyou throughthe setup processfor eachdevice or
for your entire surroundsoundsystem.
NAVIGATING THE MENU
Tonavigatethe menu,usethe remotecontrol’s directional, enter, andprevious,keys.
Thedirection keys:<---, T, --->, and.], (80) let youmove
aroundthe menu
screenand
highlight the desiredselection(indicatedby a blinkingcursor). Theenterkey(83)
youselect the highlighteditem. Thepreviouskey (78) sendsyouto the previousscreen.
If at anytime duringthe systemconfigurationprocessyouwishto exit the menu
system,
pressthe remotecontrol menukey (81).
Note
Some
optionsin the Home
TheaterStandardare designedspecifical/y for digital and~or
ana/ogdevices.To usethe dig#a~or ana/ogoptions, youmustconnectthe correct
formatdevicefor the desiredoption.
It is easier to understand
the numerous
options available to you throughthe Home
TheaterStandardif youhavea specific configurationexample.Thefollowing sections
illustrate setupandconfigurationby showingyouhowto select a DVDdevice, configure
availableoptions, andintegrate the deviceinto your system.
ACCESSING THE MAIN MENU
To beginconfiguring the system:
1. Connectthe on-screenvideo output of the Home
TheaterStandardon the back panel
to yourvideomonitor.Set the videomonitorto this input.
Seethe ReadThis First.insert, shippedwith the Home
TheaterStandard,for
informationon makingthe on-screendisplay visible on your videomonitor.
2. Connectthe ACpowercord to the IEC powerconnector(55) on the Home
Theater
Standardandto the ACwall receptacle.
3. Movethe backpane.I powerswitch (54) into the up (on) position. Thered power
on the front panelilluminates. ThewordsPLEASE
WAIT,INITIALIZING.,,
appearin the
front paneldisplay (22). When
the initializing message
disappears,the Home
Theater
Standardis readyfor operational mode.
24
Krell HomeTheaterStandard
button(1) or the remote
controlHTSkey(57)
4. Useeither the front panelpower
poweronthe Home
TheaterStandard.Theblue powerLED(2) on the frent panel
illuminates.TheHome
TheaterStandard
is nowin operationalmode
andreadyto be
configured.
5. Pressthe remotecontrolmenu
key(81). TheMAINMENUscreenappears:
KNELL HTS
....
-MAIN MENUCONFIGURESPEAKERS
LISTENING ROOMSETUP
CALIBRATE VOLUME
CONFIGUREDEVICES
CONFIGURELEVEL ADJUSTMENT
OPERATION
1.
CONFIGURE SPEAKERS
Thefirst menu
option,configure
speakers,
allowsyouto engage
or disablespeakers
in
yoursystem
andselect bassrangebasedonyourspeakers’
lowfrequency
capabilities,
Speaker Setup
Usethe $ keyto highlightCONFIGURE
SPEAKERS,
thenpressthe enter(B3) key. The
SPEAKERSETUP screen appears:
KNELL HTS
-SPEAKER SETUP-
FRONT
FULL-RANGE
YES
CENTER FULL-RANGE
YES
REARS
YES
SUB
FULLLRANGE
OK
TheFRONT,
CENTER,
REARS,
andSUBindicatepossiblespeaker
locations.YESindicates
speakers
currentlypresentin the system.FRONT
speakers
are alwayspresent.
Krell HomeTheater Standard
25
Bass Range
Thespeakersetupscreenalso showsthe bassrangesfor the front, center, andrear
speakers.Optionsavailableare not basslimited (FUL..L-RANGE)
or basslimited (LIMITED).
Theoption youselect depends
on the low frequencycapabilities of eachspeakerin
your system.SeeModify SpeakerSettings, below.
_.
Note
Thespeakersetupscreen.shows
the defau/t settings for eachspeaker.If your system
corresponds
to the default settings, select OKatthe bottomofthe menuscreen,then
pressenter (83). Youreturn to the mainmenuandcan proceedto the next system"
configuration,listening roomsetup.
Modify Speaker Settings
If the default settings do not correspond
to your speakers,youcanmodifythe speaker
settings, usingthe followingsteps:
Enable~Disable a Speaker
Usethe direction keys(80) to select the speakeryouwishto enable.Pressenter (83)
select YEs.
Usethe direction keysto select the speakeryouwishto disable. Pressenter (83)
select NO.
Select Bass Range
Tochange
the settings for the front, center,or rear speakers,usethe direction keysto
highlight the speakerwhosesettings youwish to changeandpressenter (83). The
SPEAKERRANGEscreen appears:
KRELL HTS
-SPEAKER RANGEIFTHESE SPEAKERSARE NOT
DESIGNEDTO REPRODUCE
DEEP BASS, PRESS ENTER
TO CHANGESTATUS
NOT
BASSLIMITED
OK
Select NOTif the selectedspeakercanreproduce
low freq uencies(deepbass). Select
YEsif the selected speakercannotreproducedeepbass.
26
Krell HomeTheater Standard
After selectingthe appropriateoptionfor yourspeakers,pressenter(83), highlight oK,
andpressenter (83).again. Youreturn to the speakersystemsetup menu.Theonscreenphrasefor the selectedspeakernowreadsLIMITED
or
FULL-RANGE.
-2. LISTENING ROOMSETUP
Thesecondmainmenuscreen,the listening roomsetup, allows you to tell the Home
TheaterStandardthe exact location of eachspeakerin your system,so that the Home
TheaterStandard
cancalculatethe pr.operarrival anddelaysettings.
KNELL HTS
-MAIN MENUGONFIGURESPEAKERS
¯ LISTENING ROOMSETUP ~
CALIBRATE VOLUME
CONFIGUREDEVICES
CONFIGURELEVEL ADJUSTMENT
OPERATION
Usethe 1" $ keys(80) to highlight LISTENING
ROOM
SETUP
andpressenter (83).
LISTENING ROOMSETUP screenappears:
KNELL HTS
-LISTENING ROOMSETUPLEFT
~0FT~
CENTER
RIGHT
OFT
OFT
L REAR SUB
R REAR
OFT
OFT
OFT
When
youaccessthe LISTENING
ROOM
SETUP
screen,the cursor is blinking at the LEFT
speaker.Pressenter (83), then usethe 1" key (80) to increasethe number
to the correct
distance(in feet, up to 30 feet) fromthe mainlistening positionto the left speaker.Press
enter(83) againto set the selection.
Usethe ~ directional key (80) to highlight the 0 FTunderCENTER.
Pressenter (83).
the sameprocedure
to input the correct distancefor the centerspeaker.Pressenter
(83) againto set the selection.
Dothe samefor the remainingspeakers
in the system.After all the distancesare set,
pressthe previouskey (78) to return to the mainmenu.
Krell HomeTheater Standard
27
Note
Anyspeakernot configured
in the speakersystem
setupmenu
displaysN/A(not
available)for the distance
specification.
3. CALIBRATEVOLUME
Thethird menu
option,calibratevolume/allows
youto calib~.te eachchannel
usingthe
Home
TheaterStandard’s
internal noisegenerator.
Note
~ ".:.
A sound
pressure
level (SPL)meteris requiredfor this procedure.
’
KRELL HTS
-MAIN MENUCONFIGURESPEAKERS
I+ CALIBRATEVOLUME
44
CALIBRATE VOLUME
CONFIGUREDEVICES
CONFIGURELEVEL ADJUSTMENT
OPERATION
Usethe 1" $ keys(80) to highlightCALIBRATEVOLUMEon the mainmenu
andpressenter
(83). The CALIBRATE
VOLUME
screen appears: ....
KRELL HTS
-CALIBRATE VOLUMESELECT THE CHANNEL
LEVEL CALIBRATION
METHOD
AUTONOISESEQUENCE
MANUAL
NOISESEQUENCE
PROGRAM
MATERIAL
Theauto noise sequence
scrolls throughthe different speakerchannelsautomatically,
allowingyouto quickly calibrate channels.Themanualnoisesequence
requires that
youselect eachchannelbeforecalibrating.
Highlightyourpreferredchoiceandpressenter (83). Themessage
INITIALIZING...blinks
while the Home
TheaterStandardloadsits noise generator,or receivesa signal from
external programmaterial.
28
Krell HomeTheaterStanda~:l
Thefollowingscreenappears:
KRELL HTS
-CALIBRATE VOLUMELEFT
CENTER
0 dB ~ 0 dB
RIGHT
0 dB
LREAR
0 dB
R .REAR
0 dB
SUB
0 da
Auto Noise Sequence
Set the SPLmeterto C weightingandslowresponse.After initializing, the LEFT
channel
dBsetting bl!nks, andyouhearbar~ded
white noisethroughthe left speaker.This noise
continuesfor two secondsandthen movesClockwiseto the next speakerin the system.
Note
Theadjustmentmustbe madewhile the channelis blinking.
Whilethe individualchannel
is blinking, usethe 1" ,1, keys(80), to adjusteachspeaker’s
setting until the SPLmeterreads75dB.
Repeatthis processfor the remainingspeakers.When
all the speakersare set, press
the previouskey (78) twice to return to the mainmenu.
Manual Noise Sequence
Set the SPLmeterto C weighting’andslowresponse.After initializing, the LEFTchannel
dBsetting is highlighted.Pressenter(83). Youhearwhite noisefromthe left speaker
the dBsetting starts blinking. Usethe 1" $ keys(80) to adjustthe setting until the SPL
meter reads 75dB.
Pressenter (83) andusethe --~ key (80) to highlight CENT
ERchan
nel dB sett ing. Use
the 1"-$ keys(80) to adjustthe setting, as above.Repeatthis procedure
for all remaining
speakers.
When
all the speakersare set, pressthe previouskey (78) twice to return to the main
menu.
Note
Anyspeakernot configuredin the speakersetupmenu
displays N/A (not available) for
the dBspecification.
Krell HomeTheater Standard
29
Program Material
Theprogram
materialoptionusesthe samescreenas manual
noisesequence,
but with
externalmaterial.Thesourceplays,simultaneously,
fromall configured
speakers.
This
allowsyouto individuallyadjustspeaker
balances
based
onyourlisteningpreferences
rather thanSPLreadings.
4.
CONFIGURE DEVICES
Thefourth mainmenu
option, configuredevices,allowsyou to configureinputs, modes,
andtriggersfor eachdevicein the system.First, select a devicethat youwantto
configure.Next, assigna videoinput, videoformat,audioinput(s), anddefault decoding
modefor eachconnected
device. Youmayalso define 12 V trigger operationfor each
device.
KRELL HTS
-MAIN MENUCONFIGURE,SPEAKERS
LISTENING ROOMSETUP
CALIBRATE VOLUME
I+ CONFIGUREDEVICES~
CONFIGURELEVEL ADJUSTMENT
OPERATION
Usethe 1" $ keys(80) to highlight CONFIGURE
DEV|CES
oft the mainmenuandpressenter
(83). TheSELECTDEVICE
screenappears:
KRELL HTS
-SELECT DEVICEDVD~14
VCR
TUNER
TAPE
LD
TV
AUX1
SAT
CO
AUX2
OK
30
Krell HomeTheater Standard
After selectingthe device(the example
usedis DVB)that youwantto configure,press
enter (83). TheCONFIGURE
DVDscreenappears:
KNELLHTS
-CONFIGUREDVD
~ CONFIGUR~
VIDEO~
CONFIGURE
AUDIO
CONFIGURE
CONFIGURE
TRIG
....
MODE
....
OK
Configure Video Input
Pressenter83) to selectthis option.TheASSIGN
VIDEO
INPUT
screenappears:
KRELL
PITS
-ASSIGNVIDEOINPUTDVD
~’ COMPOSITE1
44
OK
PRESSENTERAND
USE
~" .I, TOSWITCH
BETWEEN
VIDEOINPUTS
When
youaccessthis screen,youseethe blinkingcursorat COMPOSITE1.
To selecta
videoinput option(COMPOSITE1,
COMPOSITE2,
COMPOSITE3,
or COMPOSITE4;
UNASSIGNED;
S-VIDEO1,S-VIDEO2,S-VIDEO3,or S-VIDEO4;COMPONENT1
or COMPONENT2)
follow directions
at the bottom
of screen.Selectthe UNASSIGNED
videoinputoptionif the selecteddevice
doesnot usea videoinput, for example,
a CDplayer.Pressenter(83) to confirm
this
setting. TheASSIGN
VIDEO
FORMAT
screenappears.
Krell Home
Theater"Standard
31
Assign Video Format
KNELL HTS
-ASSIGN VIDEO FORMATOVO
NTSC
OK
PRESS ENTERAND
USE1",], TOSWITCH
BETWEENNTSC AND PAL
Afterselectingthe appropriate
videoformat,selectoKandpressenter(83) to return
the ASSIGN
VIDEO
INPUT
screei3.SelectOKandpressenter(83) to returnto the
CONFIGUREDEVICES screen.
Note
Seeyourvideodevice’soperatingmanual
Youmustselectthe correctformatfor the
videodeviceto functionproperlywiththe Home
TheaterStandard.
Configure Audio
Thenextoptiononthe CONFIGURE
DEVICES
menu
is CONFIGURE
AUDIO.
Usethe 1" $ keys
(80) to select CONFIGURE
AUDIO
andpressenter(83). TheCONFIGURE
AUDIO
INPUT
screen
appears:
KNELL HTS
-CONFIGUREAUDIO INPUTDVD
ANALOG
DIGITAL
OK
Note
If the selected
devicehasbothdigital andanalog
outputs,usethe digital outputs
for the
mainzone,andthe analogoutputsfor zone2.
Touseananaloginputonly, set the digital inputto UNASSIGNED.
32
Krell HomeTheater Standard
Assign Analog Input
.If youselectANALOG,
the ASSIGN
ANALOG
INPUT
screenappears:
KRELLHTS
-ASSIGN ANALOG
INPUTDVD
1~ S-1 <~
’
,
OK
PRESS ENTER AND
USE1" $ TOSWITCH
BETWEENANALOGINPUTS
When
this screenappears,youseethe blinkingcursorat s-1. Toselectanotheranalog
deviceoption(s-1, s-2, s~3,s-4, s-5, TAPE,
VCR1,
UNASSIGNED,
B-l) followdirections
at
bottom
of screen.Selectthe UNASSIGNED
analoginputoptionif the selecteddevicedoes
not useananalogoutput,for example,
a CDplayer.Pressenter(83) to confirm
this
setting.
After youhaveselectedthe desiredanaloginput, selectOKandpressenter(83). You
returnto the CONFIGURE
AUDIOINPUT
screen.
Assign Digital Input
If youselectDIGITAL,
the ASSIGN
DIGITAL
INPUT
screenappears:
KRELLHTS
-ASSIGNDIGITAL INPUTDVD
l+ COAX1<<
OK
PRESS ENTER AND
USE1" J. TOSWITCH
BETWEEN
DIGITAL INPUTS
Krell HomeTheater Standard
33
When
youenter this screen,youseethe blinking cursor at COAX1.
To select another
digital input option (COAX1,
COAX2,COAX3, COAX4,COAXS,COAX6,OPT1, OPT1,
UNASSIGNED),
follow directionsat bottomof screen.Selectthe UNASSIGNED
digital input
option if the selecteddevicedoesnot usea digital output, for example,an analogVCR.
Pressenter(83) to confirmthis setting..
Select OKandpressenter (83) to return .to the CONFIGURE
A~IOINPUT
screen.
Select OKandpressenter (83) again, to return to the CONFIGURE
DEVICES
screen.
Configure
Mode
"
Thenext option for the CONFIGURE
DEVICES
screenis configure mode.Select CONFIGURE
MODE
andpress enter (83). TheASSIGN
MODE
screenappears.
KRELL HTS
-ASSIGN MODEDVD
MOVIE
OK
When
youenter this screen,youseethe blinking cursor at MOVIE.
SelectingMOVIE
directs the Home
TheaterStandardto select DolbyDigital or DTSprocessingif oneof
thesesignals is present;otherwiseDolby.Pro Logic is engaged.Toassignanother
modeoption (STEREO,MUSIC1,
MUSIC2,
UNASSIGNED),
pressenter (83), then usethe
keys(80) to select the desiredmode.Pressenter(83) to confirmthe setting. Select
andpressenter (83) to return to the CONFIGURE
DEVICES
screen.
Configure Trigger
Thefinal option on the CONFIGURE
DEVICES
screerl is configuretrigger. This option allows
youto customize
the operationof the four remoteoutput12 VDC(12 Volt trigger)
connectors(53) on the backpanel.
Select CONFIGURE
TRIGGER
andpressenter (83).
34
Krell HomeTheater Standard
The CONFIGURE
12 V TRtGGERscreen appears:
KRELLHTS
-CONFIGURE
12 V TRIGGERDVD
TRIGGER1-.
TRIGGER2
TRIGGER3
TRIGGER4
)l, MODE
,N
0
0
0
0
DELAY
1SEC.
1 SEC.
1 SEC.
1 SEC.
OK
Select Trigger Mode
Use the 1" ,I, keys (80) to movethe blinking cursor to the MODE
for the desired trigger,
and press enter (83). The SELECTATRIGGER
MODE
screen ap )ears:
KRELLHTS
-SELECTA TRIGGERMODE0
ALWAYSOFF
1
MAINANDZONE2
2
MAIN ONLY
3
ZONE2 ONLY
OK
Trigger Mode0: This trigger is not activated whenthe configured device is selected.
Trigger Mode1: The selected trigger
for main or zone 2 listening.
activates whenthe configured device is selected
Trigger Mode2: The selected trigger
selected for main zone listening.
activates only whenthe configured device is
Trigger Mode3: The selected trigger activates only when the device is selected for
zone 2 listening.
Krell Home
TheaterStandard
35
Usethe 1" ,], keys(80) to selectthe desiredtrigger mode
andpressenter(83) to select.
Youreturn to the CONFIGURE
12 VTRIGGER
screen,whichnowreflects the changeyou
just entered.
Adjust Trigger Delay
Onthe CONFIGURE
12 V TRIGGER
scree.n, usethe ~ key to movethe blinking cursor to
DELAYandpressenter (83). Usethe 1" ,I, keys(80) to increaseor decrease
the number
of seconds
(rangeis from0 to 30).
When
desiredtriggeP~node
andtrigger delaysareset-forall triggers, select OKin the
CONFIGURE
12 V TRIGGER
screen,andpressenter (83) to return to the CONFIGURE
DEVICES
screen.
Configuring Additional Inputs
ThescreenprocessaboveusesDVDas the selecteddevice. For anyof the other
devicesavailable (LD, SAT, VGR1, TV, CD, TONER,AUX1, AUX2, TAPE), use the same
process.
When
all deviceshavebeenselected andconfigured, select OKon the CONFIGURE
DEVICES
screenandpressenter (83). Youreturn to the SELECT
DEVICE
screen.Select
andpressenter (83) to return to the mainmenu.
5. CONFIGURE LEVEL ADJUSTMENT
Thefifth mainmenuoption, CONFIGURE
LEVEL
ADJUSTMENT,
allows youto. set trims. Trims
adda fixed positive or negativevolume
offset for devicesOr modes
with significantly
different volumelevels. After adjustingvolumetrim, youcaneasily switchbetween
theseinputs or modes
without experiencingexcessivechangesin volumelevels.
KRELL HTS
-MAIN MENUCONFIGURE SPEAKERS
LISTENING ROOMSETUP
CALIBRATE VOLUME
CONFIGUREDEVICES
CONFIGURELEVEL ADJUSTMENT
OPERATION
36
Krell HomeTheater Standard
TheHome
TheaterStandardusestwo types of trims: mastervolumetrims andtaste
trims. Mastervolumetrims (mode,device, andanaloginput) changethe volumesof all
speakersat once, are programmed,
and do not changeunless reprogrammed
through
the menu.Tastetrims adjust individual speakers
usingthe individual channelandlevel
buttons(29). Tastetrims are not programmed
andare temporary.
Note
Themastervolumecontrol hasa numericalrangefrom0 to 152, with 34 as the Do~by
referencelevel. Thecenter speaker,rear speakers,andsubwoofervolumetrim havea
range of +/- 15 dB.
’
Whenyou select CONFIGURE
LEVELADJUSTMENT
on the main menu,the LEVEL
ADJUSTMENTS
screen appears:
¯ KRELLHTS
-LEVEL ADJUSTMENTSMODETRIM
DEVICETRIM
ANALOGINPUT TRIM
OK
Select Mode Trim
Modetrim increasesor decrease~the volumeautomatically whenyou changedecoding
modes
(DOLBYDIGITAL, DTS, DOLBYPROLOGIC, STEREO,MUSIC1, MUSIC2) to matchlistening
levels betweenmodes.
Select MODE
TRIMandpress enter (83). TheSELECT
MODE
screenappears:
KRELLPITS
-SELECT MODESTEREO
OK
PRESSENTER AND
USE1" J, TOSWITCH
BETWEEN MODES
Krell HomeTheater Standard
37
When
youenterthis screen,youseethe blinkingcursorat STEREO.
To selectanother
option(DOLBYDIGITAL, DTS, DOLBYPROLOGIC, STEREO,MUSIC1, MUSIC2) press enter (83),
thenuse$ ,1, keys(80) to scrollthrough
theoptions.
Selectthe desiredmode,andpressenter (83). TheTRIMADJUSTMENT
screenappears:
KRELL HTS
-STEREO TRIM ADJUSTMENT....
~OdB~
OK
PRESSENTERAND.
USE1:.,I. TOCHANGE
MODETRIM
Theblinking
cursoris onthe 0 dB.Pressenter(83). Use1" ,i, keys(80) to select
appropriate
trim adjustment
(rangeis from-15 dBto +15dB). Pressenter(83) to
the selection.
’
SelectOKandpressenter(83) to returnto the SELECT
MODE
screen.When
all trimshave
beenadjustedas desired,selectOKonthe SELECT
MODE
screenandpressenter(83).
Youreturn to the LEVEL
ADJUSTMENT
screen.
Select Device Trim
Thedevicetrim is a master
volume
trim that is activatedwhen
an inputdeviceis
selected;
it hasa range
of +/- 15 dE}.’
SelectDEVICE
TRIMandpressenter(83). TheSELECT
DEVICE
screenappears:
KRELL HTS
-SELECT DEVICEI~ DVD ~
OK
PRESSENTER AND
USE1",L TO SWITCH
BETWEENDEVICES
38
Krell HomeTheater Standard
When
youenterthis screen,youseethe blinkingcursorat DVD.Toselectanotheroption
(LD, SAT, VCR, TV, CD, TUNER,AUXl, AUX2, TAPE), pressenter(83), then use
1" $ keys(80) to scroll through
the options.Pressenter(83). TheDVDTRIM ADJUSTMENT
screenappears:
KRELL HTS
-DVD TRIM ADJUSTMENT~" OdB~
OK
PRESSENTERAND’
USE1",1, TOCHANGE
DEVICETRIM
Theflashingcursoris onthe0 dR.Pressenter(83), thenuse1" ,], keys(80) to select
appropriate
trim adjustment
(rangeis from-15 dBto +15dB). Pressenter(83) to
the selection.
,,
SelectOKandpressenter(83). Yo~returnto the SELECT
DEVICE
screen.SelectOKand
pressenter(83). Youreturnto the LEVEL
ADJUSTMENTS
screen.
Select Analog Input Trim
IMPORTANT
Anana/ogdevicemustbeselectedfor this optionto function.
TheANALOG
INPUTTRIM
screenis usedto measure
the level of an analoginputsourceto
the Home
TheaterStandard.When
the ANALOG
INPUTTRIMscreenappearsan upwardly
pulsinggraphicmeteris displayed.
Thismeteris anon-screen
equivalent
of a signal
gainmonitor.
KRELL HTS
-ANALOGINPUT TRIMDVD
$1
0 dB
-2 dB
-4 dB
-6 dB
~
INPUT
GAIN 0 dB
Krell HomeTheater Standard
ANTI
CLIP ON
39
Input Gain
Youcanboostweakersignals by increasingthe input gain valueat the bottomleft of
this screen(in 3 dE},6 dE},and9 dBgainincrements).
To maximize
yoursystem’ssignal to noiseratio for a particular input, the input gain
valueappliedto the signal shouldbe increased(if ne.eded)to maintaina signal strength
closeto o dE}gain. Theoptimalsignal~ainvalueis o dE}.
Anti Clip
Setting anti clip to ONengages
automaticdistortion protection.Anti Clip measures
the
signal level andpreventsthe input signalfromdistorting (clipping) the analog-to-digital
converters.Set anti clip to OFF
if youwantto disengage
distortion protection.This is
particularly useful if youneedto maintainmaximum
signal-to-noisethresholdswhen
recordingfroma source.
If youselect a non-analog
sourceto configure,youseethe following screen:
KRELL HTS
-ANALOGINPUT WARNINGYOU CANNOTSET
AN INPUT LEVELFORA
NON-ANALOG SOURCE
OK
SelectOKandpressenter (83) to return to the level adjustment
menu.
Select oKandpressenter (83) againto return to the mainmenu.
40
Krell HomeTheater Standard
6.
OPERATION
Thefinal option,OPERATION,
allowsyouto choose
background
colorfor yourvideo
display,configure
on-screen
displayandfront paneldisplaybrightness,
choose
serial
controlformat,selectmusicmodes,
program
a learningremotecontrolto operatethe
Home
TheaterStandard,andprogram.user
buttonsetupandDTSautoswitch.
KRELL HTS
-MAIN MENUCONFIGURESPEAKERS
LISTENING ROOMSETUP
CALIBRATE VOLUME
CONFIGUREDEVICES
CONFIGURELEVEL ADJUSTMENT
1~ OPERATION~
Usethe "~ $ keys(80) to selectOPERATION
andpressenter(83).
appears:
OPER
ATION menu
KRELL HTS
-OPERATION~ BACKGROUND
COLOR~1
OSD CONFIGURE
FPD DISPLAY CONFIGURE
SERIAL CONTROLCONFIGURE
CONFIGUREMUSIC
PROGRAMREMOTE
MORE
Krell HomeTheater Standard
41
Background Color
To .changethe background
color for your video menu
display, select. B/kCKGROUND
COLOR
and press enter (83). TheMENU
BACKGROUND
COLOR
screen ap pears:
KRELLHTS
-BACKGROUN£~
COLOR-
-"
MENUBACKGROUND
COLOR
BLACK
BLUE
GREEN
RED
OK
Theblinking cursor appearsat MENU
BACKGROUND
COLOR.
Usethe 1" $ keys(80) to move
the cursorto the desiredcolor (blackis the factory default). Pressenter(83).
background
menucolor changesimmediately.Select OKandpress enter (83) to return
to the operationmenu.
Note
Withcomponent
video, black is the available background
color.
Configure On-Screen Display
Theon-screendisplay feature allows youto choosethe position andmessage
display
time for on-screendisplays andmessages.
To configure the on-screendisplay, select
OSDCONFIGURE
andpress enter (83). The CONFIGURE
OSDscreenappears:
KRELLHTS
-CONFIGURE
OSDONSCREEN
TIME: 3 SEC.44
LINE NUMBER: 1
OK
Theblinking cursor appearsat ONSCREEN
TIME.To changethe length of on-screen
display, pressenter (83), then use1" $ keys(80) to adjust the number
of second(range
is 0-5 seconds).Pressenter(83) to set the selection.
42
Krell HomeTheaterStandard
To changethe line number
on whichthe display appears,usethe 1" $ keys(80) to move
to LINENUMBER.
Withthe blinking cursornext to LINENUMBER,
pressenter (83), then use
~ .], keys(80) to select the screenline. Therangeis 0 (top line of screen)through
(bottomline of screen).A doublearrowon the right side of the screenmoves
up and
down,indicating line position. Pressenter(83) to set the selection.SelectOKandpress
enter (83) to return to the operationmenu.
Configure FPD Display
Thefront paneldisplay (FPD)feature allowsyouto adjust the FPDdisplay brightness.
Select FPD DISPLAY CONFIGUREand press enter (83). TheFPD DISPLAY CONFIGUREscreen
appears:
KRELL HTS
-FPD DISPLAY CONFIGURE1~’ BRIGHTNESS
3 ~
OK
Pressenter(83), then use1’ $ keys(80) to select BRIGHTNESS.
Therangeis 0 (off)
(brightest, the factory default). Pressenter(83) to set the selection.SelectOKandpress
enter(83) to return to the operationmenu.
Configure Serial Control
This screenallows youto choos~.betweenPHAST
Link andRS-232serial control
sources. Select SERIAL
CONTROL
CONFIGURE
and press enter (83). TheREMOTE
FORMAT
screen appears:
KRELL HTS
-REMOTE FORMATRS232
OK
Theflashing cursorappearsat RS232.Pressenter (83), andthen use1‘ $ keys
(80) to select RS232or
PHAST.
Pressenter (83) to set the selection. SelectOKandpress
enter(83) to return to the operationmenu.
For moreinformation, see RS-232Port: SendingCommands
and Interpreting Data,
developer’sreferenceshippedwith the Home
TheaterStandard.
Krell HomeTheater Standard
43
Configure Music
Thenextitemin the OPERATION
menu,CONFIGURE
MUSIC, allowsyouto determine
which
musicmodes
youwant. Select CONFIGURE
MUSIC
andpressenter (83). TheMUSIC
MODE
SETUP
screenappears:
KRELL’HTS
-MUSIC MODESETUPMUSIC1
MUSIC2
OK
USEl"J, TOSELECT
A MUSIC MODE
AND PRESS ENTER
Followthe on-screen
directions,choosing
MUSIClOr
MUSIC2.
Youenterthe selectmusictypescreen.When
youenterthis screen,youseea blinking
cursor.
KRELL HTS
-SELECT MUSIC1TYPEI~ ONSTAGE44
OK
PRESS ENTERAND
USE1" J, TOSELECT
A MUSIC TYPE
TheONSTAGE
optionis the example
usedhere. Eachselectedoptionactivatesa
differentvirtual acoustic
environment.
Select an option(ONSTAGE, FRONTROW, GENERALADMISSION, ORCHESTRA,MEZZANINE,
BALCONY,
MONO,ENHANCED
STEREO,or PARTY), by pressing
enter(83), thenusethe 1" ,1,
keys(80) to scrollthrough
the options.Pressenter(83) to set the selection.Select
andpressenter(83). Youreturnto the MUSIC
MODE
SETUP
screen.SelectMUSIC2
and
repeatthe process
to choose
a virtual environment.
Speakers
activefor eachvirtual environment
are shown
in the followingtable. If a
speaker
is notpresentin yoursystem,
the signalis redirected
to the availablespeakers.
44
Krell HomeTheater Standard
Virtual AcousticEnvironments
ON STAGE
L/R/C/S/RR
FRONT ROW
L/R/S/RR
GENERALADMISSION
L/.R/S/RR
L/R/C/S/RR
UR/C/S/RR
LIWCISIBR
ORCHESTRA
MEZZANINE
BALCONY
MONO
ENHANCEDSTEREO
PARTY
L=Left
Speaker
R=Right
Speaker
S=Sub
Speaker
RR=Rear
Speaker(s)
C/S
L~R/CIS
L/R/C/S/RR
C=Center
Speaker
After the desiredoptionsare selected,selectOKandthenenter(83) in the MUSIC
MODE
SETUP
SCREEN
to return to the operationmenu.
Program Remote
Program
Remote
allowsyouto program
a learningremotecontrolto operatethe Home
TheaterStandard.Select PROGRAM
REMOTE
andpressenter (83). ThePROGRAM
REMOTE
screenappears:
KRELL HTS
-PROGRAMREMOTEUSEFRONTPANEL1",~
TO SELECT A COMMAND
SAVE SENDS COMMAND
AND RECALL EXITS MODE
REMOTE
INPUT IS INACTIVE
START
Krell HomeTheater Standard
45
KRELL HTS
-PROGRAMREMOTEMODEONLY
I"ANO,I, SAVEAND
RECALL ARE ALLOWED
ON FRONT PANEL, REMOTE
I,.N_P. UTIS INACTIVE.PRESS
ENTER
-’ TO CONTINUE
OK
Note
Theinfrared sensoron the front panelis renderedinactive until programming
is
complete.
on the PROGRAM
REMOTE
screenandpress
1. Usethe "i’ $ keys(80) to select START
enter(83).
2. Pressthe front panel level buttons (29) toselect a command
(commands
appears
the front paneldisplay).
3. Place the programmable
remotein programmode(see learning remoteuser
manual).
4. Placethe infrared sensorof the programmable
remoteso that it facesthe infrared
emitter (17) on the Home.
TheaterStandardfront panel.
5. Pressandhold the savebutton (28) on the Home
TheaterStandardfront paneluntil
the programmable
remotehas learned the code. (Seeyour remote’suser manualfor
informationon time needed).
6. Repeatsteps 2 through 5 for as manycommands
as desired.
mode,
7. Pressthe recall button(30) on the front panelto exit the program
When
all remotecontrol programming
is finished, pressthe menu
key (81) to return
the main menu.
46
Krell HomeTheater Standard
Configure More
Usethis menuto select dynamicrangecompression
modeswith the user button or to
changethe DTSautoswitchsetting.
KRELL HTS
- CONFIGUREMOREUSERBU’I-rON SETUP
DTS AUTOSWITCH
User Button Setup
This function allows you to select from three dynamicrangecompression
modesusing
the user’button(23) on the front panel,or the userkey(79) on the remotecontrol.
KREI/L HTS
-USERDYN RANGE TOGGLE
NONE
OK
i. Usethe I" $ keys~80]
’ ’ on the remotecontrol to select MORE
on ’~’^
,,,~ OPERATION
menu
screen,.andpressenter(83).
MORE
screenappears.Pressthe 1" $ keys(80) to select USER
BUTTON
2. TheCONFIGURE
SETUP,
Select OKandpressenter (83). TheUSER
BUTTON
SETUP
screenappears.
TOGGLE
to switch betweenhavingdynamicrangechoicesturned
3. Highlight DYNRANGE
on or off (none).
4. Pressandreleasethe userbutton(23) on the front panelor the userkey (79) on
remotecontrol to scroll throughthe following dynamicrangechoices:
NORMAL
(11 dB of compression)
MAXIMUM(no compression)
NIGHT
(22 dBof compression)
5. Pressenter (83) to set the selection.
Krell HomeTheater Standard
47
DTS Autoswitch
DTSAUTOSWITCH
ONkeepsyour Home
TheaterStandardoperating in DTSmode,even if
the bit streamis interrupted. Bit streaminterruption--whichcanoccurin somedevices
whenyoupressandreleasefast forward,track back/forward,or scanbuttonsfor a
compact
disc, digital videodisc,or laser disc--cancause_potentially
damaging
bursts of
noise.
This menu
allows youto select whetherthe DTSautoswitchis turnedon or off.
However,
Krell recommends
that youleave the DTSa. utoswitchsetting on.
KRELLHTS
-DTS AUTOSWITCHON
OK
To changeDTSautoswitchsetting:
orl the OPERATION
menu
1. Usethe 1‘ ,I, keys(80) on the remotecontrol to select MORE
screen,andpressenter (83).
2. TheMORE
screenappears.Pressthe 1" $ keys(80) to select DTSAUTOSWlTCH.
3. Usethe 1" $ keys(80) to select whetheryou wantDTSautoswitchONor OFF.
key (81) to exit.
4. SelectOKandpressenter (83) to set the selection. Pressthe menu
48
Krell HomeTheaterStandard
SavingSetup, Recalling Setup, and RestoringFactory
Default SystemConfigurationSettings
SAVING SETUP SETTINGS
Tosavethe settings that youhaveentered,pressarid l~ld the savebutton(28) for
approximately
four seconds.Thefront paneldisplays SAVINGSETUPwhile the settings
are being stored in the Home
TheaterStandard’sno.nvolatile memory.
",
RECALLING SETUP SETTINGS
Todetermine
yoursystem’scurrentsettings," pressandhold the recall button(30) for
approximately
four seconds.Thefront paneldisplaysRECALL
SETUP
while the settings
are beingretrieved from the Home
TheaterStandard’snonvolatile memory.
Anysettings
that havebeensavedwill be availablethroughrecalling systemsetu p.
RESTORING FACTORY DEFAULT SYSTEM
CONFIGURATION SETTINGS
Toreplaceall systemsettingswith the factory default settings, follow thesesteps:
1. Pressthe front panelpowerbutton (1) to put your systeminto stand-bymode.
2. Simultaneously
pressthe recall button(30) andthe powerbutton(1). Thefront panel
displays:
PLEASEWAIT
INITIALIZING
Yourcustomized
Home
TheaterStandard’ssettings are reset to their factory default
settings.
Krell HomeTheaterStandard
49
Operating the HomeTheater Standard
After the Home
TheaterStandardis connectedto sourcedevicesandamplifiers, and
systemsetupconfigured, the Home
Theater.Standard
is ready for operation.
ON/OFF/STAND-BY
-.
Theater
1. Insert the ACpowercord into the IECpowerconnector(55) on the Home
Standard.Insert the_otherendinto the ACwall receptacle.
2. Movethe back panel powerswitch (54) into the up (on) position.
WAIT,
3. Thered powerLEDon the front panel illuminates. ThewordsPLEASE
INITIALIZINGappearin the front paneldisplay (22). When
the initializing message
disappears,the Home
TheaterStandardis readyfor operation.
4. Useeither the front panelpowerbutton(1) or the remotecontrol HTSkey (57)
poweron the Home
TheaterStandard.Theblue powerLED(2) on the front panel
illuminates. TheHome
TheaterStandardis nowin operational mode.
5. To return to stand-by,pressthe powerbutton(1) or HTSkey (57) again.
Note
Kre/I recommends
that the backpane/power
switch remainup (on) at aft times.
TAPE INPUT AND OUTPUT
TheHome
Theater.Standardhas a discrete tape input andoutput. Thetape output is
usedto senda S-1, S-2, S-3, S-4, B-l, or VCR1
input to a recordingdeviceor
processor.Youcan usethe tape feature in two ways:
1. Usethe tape input to compare
the output signal of a three-headanalogtape recorder
to the output signal of an audiosource,whenmakinga recording;Pressthe tape
button(14) or key (69) to switch between
the tape recorderoutput(LEDilluminated)
andthe input source(LEDnot illuminated).
Pressa devicekey a secondtime, after the devicehas beenselected, to changethe
tape output sourcebus to the currently selectedzone.Tapeout cancomefrom the
mainzoneor zone2.
TheaterStandardis
2. Usethe tape output to create a processorloop, whenthe Home
connected
to a graphicequalizeror other ancillary equipment.Connectthe
equipment
to the Home
TheaterStandardtape outputs(36) as describedin the
equipment
manufacturer’smanual.Pressthe tape button (14) or key (69) to switch
betweenthe processoroutput (LEDilluminated) andthe input source(LED
illuminated).
Note
Thetape output functionsonly with ana/ogsources.
50
Krell Home
Theater
Standard
Operating the HomeTheater Standard, continued
MAIN ZONE AND ZONE 2 OPERATION
The HomeTheater Standard has two audio zones, main and zone 2. The main zone
consists of the mainviewing or listening area, andzone2 consists of anotherlistening
area. Youcan select a multi-channelaudio, digital or analogaudio, or a video devicefor
mainzone listening. Zone2 can only be used with an analog audio device. To configure
a device that has both..d..igital andanalogoutputs, see ConfigureDevices,on page30.
The HomeTheater Standard’s two-zoneoperation offers a numberof listening options.
¯ Youcan play both zonessimultaneously, with the main zoneplaying a device in one
part of the houseandzone2 playing a different (or the same)device in anotherpart
of the house.
¯ With the HomeTheater Standardin operational or stand-by mode,you can activate
the main zoneonly. Or, while the Home
Theater Standardis still in stand-by mode,
you can set up zone2 listening so that whenyou switch to operational mode,only
zone 2 plays.
¯ Youcan play a device using the main zone while using zone 2 to record.
Main zoneand zone 2 listening is most easily accessedthrough the remotecontrol.
Play Both Zones
With the HomeTheater Standard in stand-by mode:
1. Pressand release the HTSkey (57) until the red LEDilluminates.
2. Pressthe input deviceselection button or key for the deviceyou wish to play.
3. Beginplaying the device.
4. Pressthe Z2 key (59).
5. Pressthe input device selection button or key for anotherdeviceto play in
zone2. Or select the sameinput device button if you want the samedevice to play in
both zones.
6. Beginplaying the device.
7. Press the HTSkey again to turn off the mainzone.
8. Press the Z2 key and the HTSkey to turn off zone2.
Krell Home
TheaterStandard
51
Play Either Zone
Main Zone
1. With the Home
TheaterStandardin operational or stand-bymode,press the HTSkey
(57) to activate the mainzone.
2. Selectthe deviceyouwishto play.
3. PressHTSkey againto turn off the mainzone.
Zone 2
1. With the Home
TheaterStandardin stand-bymode,press the Z2 key (59).
2. Pressthe HTSkey(57) andselect a device;it will play in zone2 only.
3. Pressthe Z2 key andthe HTSkey (57) to turn off zone
For additional remotecontrol options, see RS-232Port: SendingCommands
and
Interpreting Data, the developer’sreferenceshippedwith the Home
TheaterStandard.
Play in MainZoneand Recordin Zone2
1. Pressthe mainzonebutton (15) orHTSkey (57), then select the input device
you wantto play throughthe mainzone.ThemainZoneLEDilluminates. Begin
playingthe device.
2. Torecordat the sametime, pressthe zone2 button (15), then select the devicethat
youwantto recordby pressingthe input deviceselection button. Thefront panel
display readsTAPE
OUT
TOZONE
2, Start playing the devicethat youwishto record.
Recordingbeginswhenyou start playing the device.
3. Tomonitorthe outputbeingrecorded,pressthe input deviceselection buttonfor the
devicebeingrecorded.Thematerial beingrecordedwill temporarilyoverridethe
¯material playing throughthe mainzone.
4. Pressthe input selectedfor mainzoneplaybackto return the mainzoneto playingits
original material~Therecordingwill continueuninterruptedthroughzone2.
OTHER OPERATION FEATURES
When
youare listening to or viewingdifferent devicesthat havedifferent trigger settings
(configuredthroughthe setupmenus),youcanhold a trigger setting usingthe Prevkey.
Forexample,
your"IV monitoris set for trigger 4 on andyourCDis set for trigger 4 off.
However,
youwantto watcha ball gameandlisten to a CDat the sametime. If you
press.the TVbuttonor key, thenthe CDbuttonor key, the "iV monitorturns off. Tokeep
the monitoron andactivate the CD:
52
Krell Home
Theater
Standard
1. Pressthe TVbutton(9) or key (63) to select the device.Beginplayingthe device.
2. Pressthe prev key (78).
3..Pressthe CDbutton(10) or key(64). Beginplayingthe device.
If youwishto keepplayingthe TVbut listen to the radioin_s.tead:
1. Pressthe prev key(78).
2. Pressthe tunerbutto_n_.
(11)or key(65).
TheHome
TheaterStandardwill hold the trigger settings, while keepingthe TVon. The
CDwill turn off, andthe tunerwill activate.
Thesesettings remainon until youpressanotherdeviceselection buttonor key, without
pressingthe prey key.
Krell Home
Theater
Standard
53
Warranty
ThisKrell producthasa limited warrantyof five yearsfor
parts.andlaboroncircuitry. Should
this product
fail to performat anytimeduringthewarranty,Krell will repair it at
no costto the owner,exceptas set forth in this warranty.
Thewarrantydoesnot apply to damage
causedby acts of
Godor nature.
Thewarrantyonthis pageshall bein lieu of anyotherwarranty, expressed
or implied,including,but not limited to,
anyimpliedwarranty
of memhantability
or fitness for a particular purpose.Thereare no warrantieswhichexceed
beyondthosedescribedin this document.
If this product
doesnot performas warrantedherein, the owner’ssole
remedy
shall berepair. In noeventwill Krell beliable for
incidental or consequentialdamages
arising from purchase,
use,or inability to usethis product,evenif Krell has
beenadvisedof the possibility of suchdamages.
Proofof pumhase
in the formof a bill of saleor receipted
invoicesubstantiatingthat the unit is within the warranty
periodmustbe presented
to obtain warrantyservice. The
warrantybeginson the date of retail pumhase,
as noted
on the bill of sale or receiptedinvoicefromanauthorized
Kreildealeror distributor.
Thewarranty
for Krell products
is valid onlyin thecountryto
whichthey wereoriginally shipped,throughthe authorized
Krell distributorfor that country,andat thefactory.There
maybe restrictions on or changesto Krell’s warranty
because
of regulationswithin a specific country. Please
checkwithyourdistributor for a complete
understanding
of
the warranty
in yourcountry.
If a unit is servicedby a distributorwhodid not importthe
unit, theremaybea chargefor service,evenif the product
is withint_hewarren~
period.
Freightto the factoryis yourresponsibility.Return
freight
withintheUnitedStates(U.S.A.)is includedin thewarranty.
If youpurchased
yourKrell productoutsidethe U.S.A.and
wishto haveit serviced
at thefactory,all freightandassociated chargesto the factory are your responsibility.
Krell will payreturnfreightto the U.S.A.-based
freightforwarderof yourchoice:Freightandothercharges
to shipthe
unit fromthe freight forwarder
to youare ale0yourresponsibility.
.Krell is notrespon_s!ble
for anydamage
incurredin transit.
Krell will file clbimsfor damages
as necessary
for unitsdamagedin transit to the factory.Youareresponsible
for filing
claimsfor shippingdamages
duringthe return shipment.
Krell doesnot.supplyreplacement
parts and/orproductst~
the ownerof the unit. Replacement
parts and/orproducts
will befurnished
onlyto thedistributorperforming
serviceon
this ’unit onanexchange
basisonly; anypartsand/orproducts retumed
to Krell for exchange
become
the propertyof
Krell.
Noexpressed
or implied warrantyis made
for anyKrell
productdamaged
by accident, abuse,misuse,natural or
personal
disaster,or unauthorized
modification.
Anyunauthorizedvoltage conversion, disassembly,
component
replacement, perforation of chassis,
updates,or modifications performedto the unit will
void the warranty.
Theoperatingvoltageof this unit is determined
by thefactory andcanonlybechanged
by an authorized
Krell distributor or at the factory. Thevoltagefor this productin the
U.S.A.cannotbechanged
until six months
fromthe original
pumhase
date.
In theeventthat Krell receivesa productfor warranty
servicethat hasbeenmodifiedin anywaywithoutKrell authorization,all warranties
onthat product
will bevoid.Theproduct will bereturned
to odginal
factorylayoutspecifications
at
the owner’sexpense
before it is repaired. All repairs
requiredafter the producthasbeenretumed
to odginalfactory specificationswill becharged
to the customer,
at currentpartsandlaborrates.
All operationalfeatures,functions,andspecificationsand
policiesaresubjectto change
withoutnotification.
To register your product for warranty benefits,
please complete and return the Warranty
Registration Card enclosed in the shipping box
within 15 days of purchase. Thankyou.
54
Krell HomeTheater Standard
ReturnAuthorization
Procedure
If youbelievethere is a problemwith your
component,
pleasecontactyour dealer, distributor, or the Krell factory to discussthe
problembeforeyoureturn the component
for
repair. Toexpediteservice, youmaywishto
completeande-mail~-the Service Request
Formin the ServiceSectionof our website
at:
http://www.krellonline.com
TEL
FAX
E-MAIL
203-799-9954
Monday-Friday
9:00 AMto 5:00 PMEsT
203-799-9796
[email protected]
WEBSITE www.kreilonline.com
HomeTheater Standard
PRODUCT
SERIAL NUMBER
To return this product to Krell, please
follow this procedureso that we may
serveyoubetter:
1. Obtain a ReturnAuthorization Number
(R/A number) and shipping address
from-theKrell ServiceDepartment.’
2. Insureandacceptall liability for lossof
or damage
to this productduring shipmentto the Krell factory andprepayall
shipping charges. Please see the
Warrantypagein this manual,concerning liability for shipping damage
and
shippingcharges.
This productmayalso be handdeliveredif
arrangements
with the Service Department
havebeenmadein advance.Proof of purchasewill be requiredfor warrantyvalidation at the timeof handdelivery.
IMPORTANT
Usethe original packagingto ensuresafe
transit of this productto thedealer,distributor, or factory.Kre/I may,at its discretion,
return this productin newpackaging
andbill
the ownerfor suchpackaging
if the product
received by Kre// wasboxedin non-standardpackaging
or if the original packaging
wasso damaged
that it wasunusable./f
Kre/I determinesthat newpackagingis
required,the ownerwill be notified before
this productis returned.
To purchaseadditional packaging,please
contactyourauthorized
Krell dealer,distributor, or the Krell ServiceDepartment.
Krel] HomeTheater Standard
55
Specifications
SIGNAL TO
-NOISE RATIO
"A" WEIGHTED
93 dB
TOTAL HARMONIC
DISTORTION
(THD)
UNWEIGHTED
20 Hz-20kHz, -88 dB
INPUTS
ANALOGAUDIO
1 pair balancedvia XLRconnectors
DIGITAL AUDIO
5 pairs si~ngle-ended
via RCA
connectors
6 coaxial via RCAconnectors
VIDEO
ANALOGTAPE
OUTPUTS
ANALOGCHANNEL
ANALOGTAPE
DIGITAL.
VIDEO
ZONE2
REMOTECONTROL
2 EIAJoptical via TosLink.connectors
4 S-videovia DINconnectors
4 compositevia RCAconnectors
2 component
via RCAconnectors
1 pair single-endedvia RCAconnectors
6 balancedvia XLRconnectors
(one per channel)
6 single-endedvia RCAconnectors
(oneper channel)
1 multi-channelvia a DB-25connector
1 pair single-endedvia RCAconnectors
1 coaxial via RCAconnectors
1 EIAJoptical via TosLinkconnectors
2 S-videovia DINconnectors
2 compositevia RCAconnectors
1 component
via RCAconnectors
1 pair single-endedvia RCAconnectors
1 infrared
REMOTE CONNECTORS 1 RS-232
1 PHAST
Link (in andout)
1 RC-5input
4 12 VDCOUT(12 V trigger)
1 12 VDC
IN (12 V trigger)
56
Krell Home
TheaterStandard
DECODINGMODES
SURROUND
ENHANCEMENT
MODES
DIMENSIONS
WEIGHT
SHIPPING
UNIT ONLY
DolbyPro Logic
DolbyDigital
DTSDigital SurroundSound
9 Kreil MusicSurroundModes
19.0wx 6.0 h x 15.0d in.
48.3wx 15.3hx 38’.1 d cm
25lb.
16lb.
Krell Home
TheaterStandard
11.34kg.
7.26 kg
5/