1
Use & Care Guide
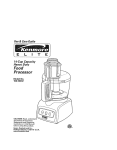
10-Cup Capacity
Food Processor
Model No.
100.80002 - Black
100.81002 - White
100.82002 - Red
CAUTION:
Read, understand and follow
at] Important Safeguards and Operating
Instructions in this Manual before using
this product,
Sears, Roebuck and Co,,
Hoffman Estates, IL 60179 UoS,Ao
www.kenmore, com
KENMORE FULL WARRANTY
If this product fails due Io a delact tn malarial or workmanship wilhin two years from the
date of purchase, return il to any Sears store or other Kenmore outfet in the Un[Led States
for free replacemenL
This warranty does not include expendable parts, such as filters or blades, which can wear
out from normal use within the warranty period
This warranty applies for only 90 days il this product is ever used for olher than private
household purposes
This warranty applies only whIis this producl is used In the United States
Th}s warranty gives you specific tegai rights, and you may also have other fighLs which vary
from state to state..
Sears, Roebuck and Co, Hoffman Estates, IL 60179
When using eleclrlca! appliances,
followed, Including the following:
I
basic safety precautions
should always be
Read allinstructions.
2- To prolecl against risk of e[eclrical shock do not put Food Processor in water
or other liquid.
3 Close supervision is necessary when any appliance is used by or near children.
4 UNPLUG from outlet when not in use, before putting on or taking elf parts,
and before cleaning
5. AVOID contact with moving paris
6 DO NOT operate any appliance with a damaged cord or plug, or after the appliance
malfunctions or has been dropped or damaged in any manner Return apphance to
the nearest authorized sewice facitity for exarninalion, repair or adjustment
7 The use of accessory attachments not recommended
may cause fire, electric shock or persona! iniury
8 DO NOT use outdoors
9
or sold by the manufacturer
DO NOT let the cord hang over the edge of tabEe or counter
10 Keep hands and utensils away from moving blades or discs white processing feed
to reduce the risk el severe injury to persons or damage to Ihe food processor
A scraper may be used but must be used only when the Iced processor is not running
11 Blades are sharp Handle carefully
12 To reduce the risk oi injury, never p_ace cutting blade or discs on base wilhout first
putting bowl properly in place
13
Be certain cover ts securely rocked In place before operating appliance
14NEVER
teed
foodbyhandAlways
usefoodpusher
15 DO NOT attempt to defeat the cover interlock machanism
16 To protect against eleclrtcal shock, tNs appliance is equipped with a cord having
a 3-prong grounding-type plug for Insertion tn!o a proper grounding-type receptacle
DO NOT atter the pJug for use in a 2-prong reeeplacle If the plug wiII not _l into
a receplacte, have the proper receptacle installed by a qualified electrician
17 SAVE THESE INSTRUCTIONS!
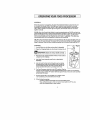
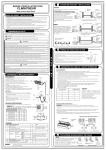
Fig,, 1
Food
Chute
_r
Loop
;hute
Slide
Bulton
SficetShred Disc
Center
Post
Stem
Bowl
Conlml
Knob
Chopping Blade
Before
using
lhefood
processor,
wash
allparis
excepI
theBase
inhot,soapy
water
Rinse
dryThese
parts
cana_so
beplaced in the dishwasher on the top rack Do not
put in or near the ulensit basket,,
CAUTION:
CAUTION: Bledes are sharp Handle carefully..
CAUTION:
NEVER place food pmcessor's motor/base
in water
or other liquids_
NOTE: DO NOT attempt to chop ice in this Food Processor; it wil! damage the
Bowl and dull the Chopping BiadeoThis unit will not whip cream, beat egg
whites to a desirable volume, grind coffee beans, spices or other items with
high oil content, or slice or shred hard-cooked eggs, marshmallows,
or soft cheeses.
IMPORTANT: For your protection, this unit has an Interlock system..
The Processor will not operate unless the Bowl Is properly locked onto
Base and Cover is properly locked onto the Bowl, Do not attempt to operate
the unit without the Bowl, Bowl Lid, and Food Chute Lid correctly in place,
ASSEMBLY
1 Make sure lhe Control Knob Switch is in lhe OFF position and the power cord
is unplugged.
2 Be sure Food Processor base is on a flat, dry, clean, stable surface before you
begin processing,
3 To assemble, put the Bow} en the Base by aligning Ihe Bowl handle with the un{ock icon
on the base, Turn the Bow] counterclockwise until tl clicks into place (see Fig 2 and 2a).
The Bowl handle should now tace straight to the center front
NOTE: There Is only one position for the Bow1 to lock onto the Base The unil will not operate
if the Bowl does net lock onto the Base.
ASSEMBLYcont.
"x
,t On the Bowl Cover are the load chute, food chule lid, and movable loop, which serves
as a housing for the food pusher Also included is the shaft conlainlng the spring
mechanism that controls the slide button used to lock the food chute tid into place
These are part of the Bowl Cover assembly
5
Place the Bowl Cover Assembly onto the Bowl Align the arrow on the Cover and the
unlock Icon on the Bowl (see Fig- 2 and 2a) Turn the Cover counterclockw}sa towards
the center front until it clicks
NOTE: There is only one position for the Bowl Cover to lock onto Bowl The unit will no!
operate if the Bowl Cover does not lock onto the Bowl, o[ ff the Food Chute Lid does not
lalch onto the Food Chute
6
Make sure the food chute lid is securely latched inlo place.
7 To open the Food Chute Lid pull the Slide Release Button out
and Movable Loop (see Fig 3 and 3a) up and back to open
Lifl the Food Chute Lid
Fig,3a
/_Flgo
3
B. When the food pusher is not being used to feed items down through Ihe food chute,
It should be locked into place tn the movable loop This Is usually the case when using
blades down in the bowllnstead of discs at the top of the bowl.
When locked together, the food pusher and movable loop can also act as one larger food
pusher To lock the food pusher into the movable loop. slide the tab located on the food
pusher into the slot on Ihe dm of lhe movabte loop
5
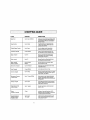
CONTROLS
When the processor is plugged In, the green Power iight illuminates 1o show that the unit
is connected to a power source When the base, bowl and cover assembly is eorreelty
connected and locked into place, the OFF light is also illuminated green to show that the
unit is ready to operate if tile OFF light is not green, the bowl and cover are not locked
logether corroclly
PULSE: When the Control Knob Switch is turned counterclockwise to PULSE and heId, the
green PULSE ligh_ comes on and the Food Processor operates As soon as you let go of the
Switch the Processor shuts off and the Switch returns the OFF position Use PULSE for
shmt processing tasks, such as chopping nuls, raw meats or vegetabiee This allows you
much greater control of the consistency of what you are processing.
ON: When the Control Knob Switch is turned clockwise to ON, the green ON light comes on
and the unit will run continuously This is good for _esstender toed and items that take a while
fonger to process When you have finished processing, turn the conlrot knob switch to OFF
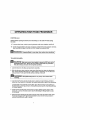
CHOPPING:
....
1 Lock the Bowl onlo the Base as described in Assembly
2
_
Fig, 4
Place the Chopping Blade onto the Center Post (see Fig. 4)
CAUTJO
N; Blades are sharp, Handte carefully,
1
3
Piece food to be chopped into Bowl Refer to Food Gutde to
prepare food for chopping
4
Lock Bowf Cover Assembly onto Bowl, as described in
Assembly
5
Lock the Food Pusher into the Movable Loop by totaling
counterclockwise until the food pusher's tab is under slot
in the movabte loop's tid, then lock feed chule tid irttothe
spdng operated s}ide button by pressing down firmly
6 The Food Processor should be in the OFF position. Plug the
cord into an electric outlet. The Power light itluminatas green 1o show it is connected Io
a poweJ'source, and the OFF button Illuminates green if base, bowl, and cover assembly
are al_locked inlo place
7 Turn the knob to ON to run constantly, or for better control
over consistency, turn and held knob on PULSE
When finished processing;
• tl Pulsing, release Knob Switch and unit automatically stops.
• If you turned processor to ON, turn Control Knob Switch to OFF lo stop
,, Allow the chopping biacie to stop rotating
CHOPPING cent.
NOTE: Before opening the Bowl Cover Assembly, turn the unit OFF and unplug
the cord,
g To remove bow_ cover, unlock by turning ¢_ockwise untti cover unialches, and lilt all.
10
Lilt the chopping blade by its base and remove. Unlock the Bow! by turning it clockwise,
(see Assembly on pages 4 and 5), and lift off. Emply the processed food
WARNING:
Chopping
Blade is very sharp, Use caution
when handling,
_1
TO SLICE OR SHRED:
_
J
unplugged before use. Never use your hand to push food into processor,
AUTION:
Make
sure control
switch
is turned to OFFend unit Is |
The
use of heavy
pressure
wtl! notknob
speed
operation.
1 Lock the Bowl onto the Base as described in Assembly
2 Slide the disc slem down onto the center post of the base, then piace the sllce/shred
disc, with the desired side facing up for either slicing or shredding, onto the disc stem
and push down At this point the disc will be at the top of the bow]
_
ARNING:
handling.
Slicing/Shredding
Disc is very sharp, Use caution when
3o Lock the Food Pusher onto the movable loop by rotating counterclockwise until tab is
under slot in the !top's lid At this point, Ihe movable Ioep works as part of the Iced pusher
Lock Ihe Bowl Cover Assembly onto the Bowl. Open fhe Food Chute Lid by pulling out
the siide button, and iitt up and out on the loop/food pusher (see Fig 3 and 3a), and ieave
in the open posilion
4 Fill the food chute wilh pieces oI Iced such as potalo, cabbage, green pepper, whets
tomato=sic, and look the food chula lid. See the Shredding or Slicing Guide for sizes
of food pleces
5 Close food chute lid and latch into place. Plug the power cord into electric outlet Green
Power light and green OFF light should illuminate to show that the food processor is
properly assembled and ready to operate
TO SLICE OR SHRED cont.
6 Turn control knob switch to ON, then press down lighl_y bul firmly on food pusher and
movabia loop to lead items down and onto slice/shred d{sc. When the chute is empty.
turn control knob switch to OFF, unplug, allow the disc to stop rotating, and unlatch the
food chule lld
7 To process more food, place food into the foodchute and repeat above steps When
finished, press OFF, unplug, and allow disc to stop rotating
_
CAUTION:
opening
the Bowl Cover
Assembly,
have
turned theBefore
unit OFF
and unplugged
the cord,
be sure
you
8 Open bowl cover by turning clockwise, and remove disc with disc siam..
_
ARNING:
handling,
Slicing/Shredding
Disc is very sharp_ Use caution when
9. Unlock Bowl by turning clockwise towards Unlock icon and lifl bow! of[
Emply the processed food
TO PROCESS LONG AND THIN FOOD ITEMS
_
unplugged beforeuse. Neveruse your hand to push foDd into processor°
CAUTION:
Make
sure control
switch
is turned to OFF and unit is
The use of heavy
pressure
will notknob
speed
operation°
t Lock the Bowlonto the Baseas described in Assembly
2 Slide lhe disc stem down onto the center post of the base, then place the slice/shred
disc. with the desired side facing up for either slicing or shredding, onto lhe disc stem
and push down At this point the disc will be at the top of the bowl
_
WARNING:
WARNING:
Use
caution when
handling.Slicing/Shredding
3. Lock bowt cover assembly onto bowl
4. Make sure the food chute lid is latched into place
Disc ts
very
sharp,
TO PROCESS LONG ANDTHIN FOOD iTEMS cont.
5 Fill the movable loop with long and Ihie food items such as pepperor_i, carrots, or celery
6 Insert food pusher into the movable ieop Plug feed processor cord into etectric outteL
Green Power light should be on, and the OFF Ughi should also be illuminated
_
WARN|NG:
Food
pusher
aiways be used when processing food,
NEVER
use hand
to push
foodmust
directly,
j
7 Turn the Knob Switch to ON, then press down tightly but firmly on food pusher to feed
items down and onto slice/shred disc When the chute is empty turn the knob swtich
to OFF
8 To process additionai ilems unplug the food processor and add more long pieces into
the movable loop Insert lood pusher into movable loop and plug food processor cord into
e[eotrtcoulleL Green Power lighl and green OFF right should be illuminated 1oshow that
the food processor is again ready to operate
9. Turn the knob to ON, then press down lightly but firnlly on lood pusher to feed items
down and onto slice/shred disc_When the chute is emply, press OFF, unplug, and wait
until disc stops rotating
_
CAUTION:
opening
OFF and unplugBefore
the cord,
the Bowl Cover
Assembly,
turn the unit
10 Take off the bowf cover and carefully lift out disc and disc stem Unlock Bowl by turning
clockwise towards Unlock Icon and tiff
bowl oil Empty Ihe processed food
FOOD PROCESSING TIPS - LIQUIDS
Hot foods and liquids under 176'_ F can be processed tn the bowl. Anything over this
J.emperature is too hot Be sure Io process sma_ arnounts of liquids (2 cups or less)
at a time Larger amounts may leak from the bowi
NOTE:
DO NOT A'N'EMPT
to sharpen the cutting edges of the Chopping Blade or the
reversible Disc They are permanently sharpened at the factory and will be ruined by
attempted sharpening
!., Be[ere cleaning, turn the Control Knob Bw{tch to "OFF" and unplug the cord to
Food Processo_
2. Whenever possible, rinse parts immediately after processing for easy cleanup
3 Wipe the Base. Contro_ Knob, and feet with a damp cloth and dry thoroughly
Stubborn spols can be removed by rubbing with a damp clolh and a mild, non-abrasive
cleaner DO NOT immerse the Base in liquid
4. AII removable parts can be washed by hand or in a disl_washer in the tap rack
Do not put In or near lhe utensil baskeL
5 tf washing removable parts by hand, wash in hot, sudsy water, rinse and dry thoroughly
6 If necessary use a small nylon bristle brush to thoroughly clean the Bowl and Bowl
Cover Assembly This type of brush will also help prevent cutting yourse_t on the
Chopping Blade and Slicingt'Shredding Disc
7 Do no! use rough scouring pads or cleansers on any plastic or metal paris
8 Do not fill the Bowl wfth bo[iing water or place any of the parts in boiling water
9 Some foods, such as carrots, may lamporar[ly stain the Bowl To remove stains, make
a pasta of 2 tablespoons baking soda and 1 tablespoon warm water Apply the pasta
to the stains and rub with a cloth Rinse and dryr
tO
CHOPPINGGUIDE:
FOOD
AMOUNT
DIRECTIONS
BabyFood
Up to 4 cups (100Omt_
Add up to4 cups cockedvegetables and/er
meat to Bowl alongwith t/4 cupliquidper
copof sofkt foorJ Processcnnllnuousty ts
desired
5assess
Bread Crumbs
Up to 5 sficce
Cut either freshor dry bread sflces isle
1 I/2 to 2.1richpisces. Addfo BOwIand
process tofine crumbs
Ceohls/CrachorCrumbs
Up to 5 cups
U_a formaking crumbsfromgraham
crackers, ehecolale ar vanillawafers
Craeberriss_ Minced
3 cups(750ml)
Pal_e to chop Ie desi/ed_Iae_e_s.Can
else add sager to make cranbsnyrelish
Egge. Cflnpped
Up to '12
Peel, dry end had,tohard.cooker| eggs
Add toBowl. Pulse [o chop,checking
fineness alter 4/5 pn_aes
,
,
,,
..............
,....
Gertic m=ne_
Up to '[2
Be sure Bowl is dry. Dropafore(a) down
facd chute whileunit is running.
Meet. chopped
(Raw or Cooked)
Up fo 21/2cups
(600ml)
Cui the meal into t-inch cubes Add to
bow_end pulse tochop
Musbraomf_.chapped
Up to 12Mer_ium
Halve fargo _nas andadd to BOwl Pulse
lodesired
ilnenese.
Nuts, Chopped
2 cups(3oOmt)
Add to Bowl end Pulse !o chop
Onions, CI!opped
Up to2 large
Ouertorend _dd Io Bowl PtJlseI or 2 times
io coarselychap.Forgreen onions,up Is2
cops cutinto1.,inchpieces
Permesan or Romuno
Cheese.grated
Up _n1V2 cups 1375ml)
AHowcheese Io reach room temperature
Cgt Into 1-inch cl.tbssAdd tobowl and
purse to coarsechap; processcontinuously
1ofinely gdde
Parsley.Chapped
Up le 2 cups
Add lo Bawl and Purseto chop tn desired
fineness,aboul 1o ID15eeson_s Precess
otherherbs In same way
Pepper;Green, Red
YeIIaw
Chopped
Up to 1 pepper
Cur into t 4nob pieces Add to bowi and
pulse Io chap
Scape.
Pursed r_rCreamed
2 cr_ps
Add up ta 2 ctlpshol (less than175_F}
vegetable soup for pureeingnnd creaming
Processtodesired_smuolhnese
Squash|Butternut).
Pumpkin or Sweet
Pelotoes Puree{_
Up to 5 cups
14n cubes
Add 114cupof cookie!]
liquidper cup of
_e(J, Pulse tofinelychop,then process
canliaueusly
topuree
11
CHOPPING GUIDE
FOOD
Strawberries,
Pureed
Tom_toee. Chopped
FOOD
AMOUNT
DIRECTIONS
2 cups
Htlll and h_lve large betliee, Add lo bowt
end pu]se Io chop P_oc_ss cenltnuously
Io puree
4 medium
QueMer 1emulous
to desl[_dstz_
Add up Io 4 and pulse
DIRECTIONS
Csbbage
Use _hredding d_$e I_t very fine cebbnqe ol clew, Cut Into p}eces 1o fit chute
Shred, u._lng light l:,cuesure Empty Bmvl n_ cabbegs reeches disc
Ct_rfols
Pesltien in chute end sh_ed
Cheese,
Cheddar
Cheese
mu,<;tbe well chilled
Cheese,
Mu_erelle
Cheese must be eht_led in freezer for 30
minules prier to shredding
Cut to til ¢hul_
Use tlghl pre_;eu_e
Putetoes
Cut to fit chute
Zur, chini
Cut to {it chute
Ct_! to Ill chute
e_ther lengthwise
12
or hnrlzentally
:::SLICING GUIDE
FOOD
:
DIRECTIONS
Apple
HaNs andstack horlzonlelly in ehu_oUse fkm pressure
Cabbage ! Let[use
Helve head. cuI fofi!
ctluta
Carrots
Culle itt ehulo
Cela_
Remove siring
Packchute forbesl i'csulIs
Cucumber
Cutto lit chuteifnecessary
Mushrooms
Slackchute with n_Jshtoems en Iheir sides for lengthwise sEisss
Onlons
H_tva andfltl chute,positioningonions apd_ht lot coarsely choppedrecall °,
_eohes / Pears
Halvoe_Id
c_m PCSIIIDn
UpdghlInchulaand slice
using
IIgllt
plescu_a.
Peppers:Green.
Red Yellow.ate
Keep whelmcut slam and ctl end seed, keep top endtnlacl Rt popper
Into
chafe.
Intact
endtothetop,
equeezin!j
sllgl_ll'/to
Ill
}fnecessary
Cul large cne_ inlo quarters or strips dr._pen_hgon desired fBsult_
Slice
usingm_dcr_tepressure
Papperonl
CutIntn
3,in Im_gII_e
Remava inedible
oa_Ing
P_lalues
Peel if dos_cd Positiontn chute,outlingtar,qepolatoaain h_Ivoa
S!rawberrles
HullArtanga berdee on their sides forlengthwise s_lcae
Tutor=toes
U_] small lo_*_toesfor whata sliceshalveif no_P.s_alyUsa gcel]ybut filmpressure
Turnips
Peel Cuttuz'nipstofit
chule
Zucchini
Slice elf ends Use smaJlsquashforwhofa slices; halve is{get ones tof_Ichute
13
Get stfixed, at your home or ours
Your Home
For repair- In your home - of all majorbrandappliances,
lawn and garden equipment, or heatingand coolingsystems,
no matter who made It, no matter who sold It l
For the replacementparts,accessoriesand
owner'smanualsthat you need to do-it-yourself,
ForSears professionallnstatlaUon
of home appliances
and items like garagedoor openersand water heaters
1.800.4-MY-HOME ® callanytime,
dayornight
(1-800..46g..4683)
(USA, and Canada}
W%YW,18BraI_COM
WW'WJS_I'S_C_
For expert home solutions advice:wwwomanagomyhoma,com
Our Home
For repairof carry-inproductsfikevacuums,lawn equipment,
and electronics, call or go on-linefor the nearest
Sears Parts & Repair Service Center
1-800-488-1222 Cu.s_A
)
1.800-469-4663 (Canada)
Call anytime, day or nlght
www_aoani_conl
www°6oat's,ca
To purchasea protection
agreementon a productservi_d bySears:
1-800-827-6655 0JsA)
Parape_r servidodemparad6n
a domicilio,y paraordenarplazas:
1-888_U4-1OGAR®
(1_B-784._427)
1.800-361.6665 (Canada)
Au Canadapours_-_ceenfran_ais:
1.800.LE.FOYERMC
(1_x_33-6_7)
www,,seara,ce
©_LLC
® RoglBte,rad
Tmde,me,rkI TM Trademark I _ SePAce Mark o! Seam Brand_, LLC
® Merca Re,glstradaI TM Merce,de, Fdbdce,t e_ Merca de Se,rvic_ ds Sears Brands, LLC
_c Marque,de, comme,rc_/_D Marque,d_poe_e de Seem Sran_e, LLC