1
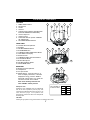
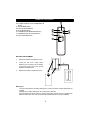
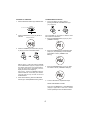
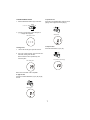
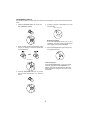
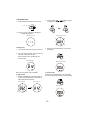
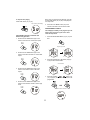
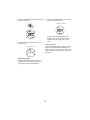
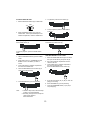
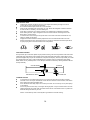
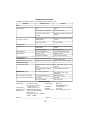
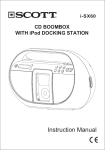
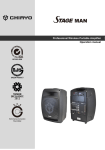
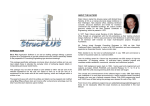
R
PORTABLE CD PLAYER with MP3
DIGITAL RADIO CASSETTE RECORDER
MODEL JX-CD492
OWNER’S MANUAL
Visit our Web Site: http://www.jwin.com
WARNING:
TO PREVENT FIRE OR SHOCK HAZARD, DO NOT USE THIS PLUG WITH AN EXTENSION CORD,
RECEPTACLE OR OTHER OUTLET UNLESS THE BLADES CAN BE FULLY INSERTED TO PRESENT
BLADE EXPOSURE. TO PREVENT FIRE OR SHOCK HAZARD. DO NOT EXPOSE THIS APPLIANCE TO
RAIN OR MOISTURE.
CAUTION
RISK OF ELECTRIC SHOCK
DO NOT OPEN
This lightning flash with
arrowhead symbol, within an
equilateral triangle, is intended
to alert the user to the
presence of uninsulated
“dangerous voltage” within the
product’s enclosure that may
be of sufficient magnitude to
constitute a risk of electric
shock persons.
1.
2.
3.
4.
5.
6.
7.
8.
9.
10.
11.
12.
13.
14.
Warning: to reduce the risk
of electric shock, do not
remove cover (or back) no
user-serviceable parts
inside. Refer servicing to
qualified service personnel.
!
The exclamation point within
an equilateral triangle is
intended to alert the user to
the presence of important
operating and maintenance
(servicing) instructions in the
literature accompanying the
appliance.
Read these instructions.
Keep these instructions.
Heed all warnings.
Follow all instructions.
Do not use this apparatus near water.
Clean only with dry cloth.
Do not block any ventilation openings. Install in accordance with the manufacturer’s
instructions.
Do not install near any heat sources such as radiators, heat registers, stoves, or other
apparatus (including amplifiers) that produce heat.
Do not defeat the safety purpose of the polarized or grounding type plug. A polarized plug
has two blades with one wider than the other. A grounding type plug has two blades and a
third grounding prong. The wide blade or the third prong are provided for your safety. If the
provided plug does not fit into your outlet, consult an electrician for replacement of the
obsolete outlet.
Protect the power cord from being walked on or pinched particularly at the plugs,
convenience receptacles, and at the point where they exit from the apparatus.
Only use attachments/accessories specified by the manufacturer.
Unplug the apparatus during lightning storms or when unused for long periods of time.
Refer all servicing to qualified personnel. Servicing is required when the apparatus has
been damaged in any way, such as power supply cord or plug is damaged, liquid has
been spilled or objects have fallen into the apparatus, the apparatus has been exposed to
rain or moisture, does not operate normally, or has been dropped.
This appliance shall not be exposed to dripping or splashing water and objects filled with
liquids such as vases must not be placed on apparatus.
CAUTION: TO PREVENT ELECTRICAL SHOCK, MATCH WIDE BLADE PLUG TO WIDE SLOT AND
FULLY INSERT.
1
PRECAUTIONS
CAUTION:
To avoid electric shock, this unit must not be exposed to dripping or splashing water
Minimum distances around the apparatus for sufficient ventilation;
The ventilation should not be impeded by covering the ventilation openings with items, such as
newspapers, table-cloths curtains, etc.
No naked flame sources, such as lighted candles, should be placed on the apparatus;
Before scrapping the appliance, remove the batteries and place them in the appropriate battery
collection container.
CAUTION
CLASS 1 LASER PRODUCT
Use of Controls or adjustments or performance
of procedures other than those specified herein
may result in hazardous radiation exposure.
LASER SAFETY
This unit employs a laser. Only qualified service
personnel should attempt repair.
DANGER: INVISIBLE LASER
RADIATION WHEN OPEN AND
INTERLOCK FAILED OR
DEFEATED. AVOID DIRECT
EXPOSURE TO BEAM.
CAUTION: HAZARDOUS LASER
RADIATION WHEN OPEN AND
INTERLOCK DEFEATED.
CLASS 1 LASER PRODUCT
LUOKAN 1 LASERLAITE
KLASS 1 LASERAPPARAT
CAUTION
CLEANING:
Always disconnect unit from power supply before attempting to clean it.
Use soft cloth moistened with soapy water, wipe gently.
Do not use solvents or abrasive materials.
2
LOCATION OF CONTROLS
TOP VIEW
1.
2.
3.
4.
5.
6.
7.
8.
9.
1
DBBS ON/OFF Button
FM Antenna
Handle
CD Door
Cassette Control Buttons (PAUSE/STOPEJECT/FFW/REW/PLAY/RECORD)
CD Door Open Lid
Volume Control
FUNCTION Selector (TAPE -“CD/Radio
Off” /RADIO/CD)
FM STEREO/MONO Selector
FRONT VIEW
10. Cassette Door/Compartment
11. Speakers
12. FOLDER DN/M-DN Button
13. STOP/BAND Button
14. TUNING/CD SKIP DN/Backward Button
15. CD/TUNER LCD Display
16. Remote Sensor
17. TUNING/CD SKIP UP/Forward Button
18. PLAY/PAUSE Button
19. Built-in Microphone
20. FOLDER UP/M-UP Button
21. PROG./MEM. Button
3
2
12
5
4
14
13
7
9
6
16
15
8
18
17
21
19
20
11
11
10
REAR VIEW
22. Battery Door/Compartment
23. Headphones
24. AC Input Socket
25. RESET Switch - If the set locked up, or
does not display information, or the data
displayed is wrong, press the “RESET”
switch with a sharp object, e.g. needle etc.
The data must then be re-entered.
Note: Tuner memory would be lost
when “RESET” switch pressed.
25
22
23
1.5V x 8 UM 2 or
“C” size or LR14
Headphone Jack
Headphone Jack “PHONES” (23) for headphones
with 16-32 Ohm impedance (3.5mm jack). Use
corresponding adaptors (Electronics shops) if you
have different plugs. The speakers are
automatically switched off when the headphones
are being used.
CAUTION:
Listening at high power for long periods of time can damage users’ ears.
3
24
-
+ -
+
- +
-
-
+ -
+
+
- +
-
+
REMOTE CONTROLS
30
26. FOLDER UP/M-UP and FOLDER DN/M-CN
Button
27. PROG./MEM. Button
28. CD PLAY/PAUSE Button
29. PLAY MODE Button
30. TUNER/CD SKIP DN/Backward Button
31. TUNER/CD SKIP UP/Forward Button
32. CD STOP/BAND Button
29
31
28
32
27
26
BATTERY REPLACEMENT
1.
Remove the battery compartment cover.
2.
Insert two "AA" size / LR6 / UM-3
batteries (not included) into the battery
compartment and ensure the proper
polarities are maintained.
3.
Replace the battery compartment cover.
2
1
3
Battery Life
To prevent damage due to battery leakage, the remote should be checked periodically as
required.
Damage due to battery leakage is not covered by the warranty.
When the battery becomes weak, the remote control will not work, be sure to replace both
batteries at the same time. We recommend ALKALINE batteries for longer usable life.
4
OPERATING INSTRUCTION
POWER ON/OFF
1. To turn on the power, slide the FUNCTION selector (8)
to your desired mode (RADIO, CD or TAPE with Play
button pressed).
2. To turn off the power, slide the FUNCTION selector (8)
to TAPE position.
(CD / RADIO OFF)
TAPE
(CD / RADIO OFF)
TAPE
RADIO
RADIO
CD
CD
BASIC OPERATION
Volume Control
Once the required station has been located, adjust
the VOLUME controls (7) to the desired level.
VOLUME
DBBS Control
Press the DBBS button (1) once to get a rich bass
sound,
5
LISTENING TO THE RADIO
1. Set the FUNCTION selector (8) to RADIO mode
(CD / RADIO OFF)
TAPE
RADIO
STORING PRESET STATIONS
1. Tune to the station you wish to store by
pressing TUNING UP or DOWN button (14)/
(17) or (30)/(31)
SKIP/
TUN DN
CD
SKIP/
TUN UP
OR
2. Press the BAND button (13) or (32) for AM or
FM band.
Example : FM mode
3. Press the TUNING Up or Down button (14)/(17)
or (30)/(31) to tune to the desired station.
SKIP/
TUN DN
SKIP/
TUN UP
OR
Manual Tuning - Press and hold the TUNING
UP or DOWN buttons (14)/(17) or (30)/(31) until
the display approaches your desired station.
Then tap the buttons repeatedly until the
display shows the exact frequency.
Auto tuning - Press the TUNING forward or
backward buttons momentarily and release.
The tuner will move up or down to the next
available station.
The unit enables you to program 10 stations of FM
and 10 stations of AM band.
2. Press the PROGRAM button (21) or (27) once.
(“MEMORY” flashing)
3. Press the FOLDER/M-UP or FLDER-DN button
(20)/(12) or (26) repeatedly to set the desired
preset station number. (“MEMORY” still
flashing)
4. Press the PROGRAM button (21) or (27) again.
The station is stored. (“MEMORY” steady on)
4. When finished listening, slide the FUNCTION
selector (8) to TAPE (RADIO/CD OFF) position.
5. To store other stations, repeat above steps.
RECALLING PRESET STATION
Press the FOLDER/M-UP or FOLDER/M-DN
(20)/(12) or (26) button on main unit or remote
control repeatedly to select the desired station.
6
PLAYING COMPACT DISCS
To pause the CD
1. Set the FUNCTION selector (8) to CD mode
Press the PLAY/PAUSE button while the disc is
playing. Press it again to resume playing.
(CD / RADIO OFF)
TAPE
RADIO
CD
PLAY/PAUSE
2. If there is no CD inside or disc damaged, a
"- - -" display will be appear.
While paused
When there is no disc
To stop the disc
Loading a disc
1.
Lift the CD door lid (6) to open the CD door.
Press the STOP button (13) or (32).
STOP/BAND
2. Put a disc inside and then close the CD door.
After that, reading TOC will start.
Note: Ensure the disc is pushed fully and
locked in place.
Stop condition (TOC display)
After reading TOC
Note: This unit is CD-R / -RW compatible.
To play the disc
Press the PLAY/PAUSE button (18) or (28) to play
the CD.
PLAY/PAUSE
Playing track 1
7
Skip and Search Function
Press the SKIP Next or Back buttons (14)/(17) or (30)/(31) briefly.
SKIP/
TUN DN
SKIP/
TUN UP
OR
IN PLAY MODE
PRESS ONCE
PRESS TWICE
BACK TO THE
BEGINNING OF
PREVIOUS
THE CURRENT
TRACK
TRACK
NEXT TRACK
IN STOP MODE
PRESS ONCE
PREVIOUS
TRACK
NEXT TRACK
Press and hold the SKIP button during playback :
: FAST FORWARD
: FAST BACKWARD
NOTE : During search mode low level audio will be heard to assist in locating the
correct point in the track.
To repeat a track or disc
Press the PLAY MODE button (29) on the remote
control one time, "one track repeat" will be
active.(REPEAT Flashes)
One track repeat (flashing)
PLAY/
MODE
With one more press, "all track repeat" will be active.
(REPEAT ALL will show steadily)
With one additional press, the repeat mode is
cancelled.
All track repeat (steady)
PLAY/
MODE
Random play function
In CD stop mode, press the PLAY MODE button
(29) on remote control three times (RANDOM
displayed), then press PLAY/PAUSE button (18) or
(28) to start random play. Press PLAY MODE
button (29) once again to change normal playing
mode.
Random playing start
PLAY/
MODE
8
PROGRAMMED PLAYBACK
This CD player enables you to program up to 20 tracks in the sequence of your choice. First select CD stop
mode.
1. Press the PROGRAM button (21) or (27) one
time. (“MEMORY” flashes)
4. Continue to program, repeat steps 2 and 3 for
each selection.
When program is full
PROGRAM
Reviewing programs
Press the PROGRAM button (21) or (27)
repeatedly. The track number programmed on
each program number will be displayed.
2. Press the SKIP Forward or Backward button
(14)/(17) or (30)/(31) to select the desired track
to be programmed.
SKIP/
TUN DN
5. Press PLAY/PAUSE button (18) or (28) to play
the programmed tracks.
SKIP/
TUN UP
OR
Choose track 4
Clear the program
Press the PROGRAM button (21) or (27) to recall
previously programmed track (“MEMORY” icon
flashes), then press CD stop button to cancel the
preset programs or change function mode or open
the CD door.
3. Press the PROGRAM button (21) or (27) one
time, then the selected track, e.g., track 4 is
stored.
PROGRAM
9
PLAYING MP3 DISCS
1. Set the FUNCTION selector (8) to CD mode
(CD / RADIO OFF)
TAPE
RADIO
2. Press CD SKIP
/
buttons (14)/(17)
or (30)/(31) to select desired track.
CD
SKIP/
TUN DN
SKIP/
TUN UP
OR
2. If there is no disc inside or disc damaged, a
"- - -" display will be appear.
Folder 2 track 3 selected
When there is no disc
Loading a disc
1.
Lift up the CD door lid (6) to open the CD door.
3. Press the PLAY/PAUSE button (18) or (28) to
start playing.
2. Put a disc inside and then close the CD door.
After that, reading TOC will start.
PLAY/PAUSE
Note: Ensure the disc is pushed fully and
locked in place.
After reading TOC
Note: This unit is CD-R / -RW compatible.
To play the disc
1. Press the FOLDER UP or DN button (20)/(12)
or (26) to select desired folder. Total tracks of
select folder will then be shown.
Folder 2 selected
Playing track 3 of folder 2
To pause the CD
Press the PLAY/PAUSE button (18) or (28) while
the disc is playing. Press it again to resume playing.
PLAY/PAUSE
Tracks of folder 2
While paused
10
To stop the disc playing
Press STOP button (13) or (32).
Note: Once your desired mode selected, press the
PLAY/PAUSE button (18) or (28) to start playback
from stop mode.
Stop condition (TOC display)
STOP/BAND
5. Press the PLAY MODE button (29) on the
remote control fifth for cancel above modes.
PROGRAMMED PLAYBACK
This CD player enables you to program up to 20
tracks in the sequence of your choice. First
select CD stop mode.
PLAY MODE for Repeat Track/Folder and
Random Play Operation
1. Press the PLAY MODE button (29) on the
remote control once for current track repeat.
1. Press the PROG./MEM. Button (21) or (27) one
time.
PLAY/
MODE
PROGRAM
Program input mode
2. Press the PLAY MODE button (29) on the
remote control twice for tracks in current folder
repeat.
PLAY/
MODE
2. Press the FOLDER UP or DN button (20)/(12)
or (26) to select desired folder.
Choose folder 3
3. Press the PLAY MODE button (29) on the
remote control third for tracks in all folder
repeat.
PLAY/
MODE
3. Press the CD SKIP
or
button (14)/
(17) or (30)/(31) to select the desired track to be
programmed.
4. Press the PLAY MODE button (29) on the
remote control fourth for tracks in random play
mode.
SKIP/
TUN DN
SKIP/
TUN UP
OR
PLAY/
MODE
Choose track 4 in folder 3
11
4. Press the PROG./MEM. button again, then track
4 of folder 3 is stored.
6. Press the PLAY/PAUSE button (18) or (28) to
play the programmed tracks.
Playing track 4 of folder 3
PROGRAM
Note: Press the PROG./MEM. Button (if
programmed tracks still exist) then PLAY/
PAUSE button, the program play will start
again.
5. Continue to program, repeat steps 2 to 4 for
each selection.
When Program is full
Clear the program
Press the PROGRAM button (21) or (27) to recall
previously programmed track (“MEMORY” icon
flashes), then press CD stop button to cancel the
preset programs or change function mode or open
the CD door.
Reviewing programs
Press the PROG./MEM. button (21) or (27)
repeatedly. The track number programmed on
each program number will be displayed.
12
PLAYING CASSETTE TAPE
3. To playback, press the PLAY button (5).
1. Set the FUNCTION selector (8) to TAPE mode
TAPE
RADIO
CD
2. Press STOP/EJECT button (5) to open the
cassette door. Insert a prerecorded tape to the
cassette compartment, close the cassette door.
4. To stop Playback, press the STOP/EJECT
button (5).
To suspend playback
To Fast Forward or Rewind tape
Press PAUSE button (5).
Press REW or F.FWD button (5).
To resume playback, press the PAUSE button
again.
TAPE RECORDING From TUNER
1. Set the FUNCTION selector (8) to the TUNER
mode.
2. Follow steps 2 and 3 in "LISTENING TO THE
RADIO" to tune in the station you wish to
record.
3. Insert a blank tape to cassette compartment
then close the cassette door.
TAPE RECORDING From CD or MP3
1. Select the FUNCTION selector (8) to CD mode
then open the CD door by lift up door lid (6).
2. Put a disc inside CD compartment and then
close the CD door
3. Insert a blank tape to cassette compartment
then close the cassette door.
4. Press the RECORD and PLAY buttons (5).
4. Press the RECORD and PLAY buttons (5) at
same time to start recording.
5. Press STOP/EJECT (5) to stop recording.
5. Press PLAY/PAUSE (18) or (28) to start CD
playing for recording.
6. Press STOP/EJECT (5) to stop recording.
7.
Note:
1. Return to Tape mode, rewind the tape
to listen to recorded materials.
2. Recording through built-in microphone
(Tape mode): similar to
above instructions.
13
Press the STOP/BAND button (13) or (32) to
stop CD playing.
CARE AND MAINTENANCE
COMPACT DISC CARE
Treat the disc carefully. Handle the disc only by its edges. Never allow your fingers to come in
contact with the shiny, unprinted side of the disc.
Do not attach adhesive tape, stickers etc., to the disc label.
Clean the disc periodically with soft, lint-free, dry cloth. Never use detergents or adhesive cleaners
to clean the disc. If necessary, use a CD cleaning kit.
If disc skips or gets stuck on a section of the disc, it is probably dirty or damaged (scratched).
When cleaning the disc, wipe in straight lines from the center of the disc to the edge of the disc.
Never wipe in circular motions.
To remove a disc from its storage case, press down on the center of the case and lift the disc out,
holding it carefully by the edges.
Fingerprints and dust should be carefully wiped off the disc's recorded surface with a soft cloth.
Unlike conventional records. compact discs have no grooves to collect dust and microscopic debris
so gently wiping with a soft cloth should remove most particles.
TAPE HEAD CLEANING
The tape heads, pinch roller and capstan require periodic cleaning. This removes particles of the metal oxide
coating that wear off the tape and accumulate on these parts and impair performance. Switch off the power,
press the Stop/Eject Key to open the cassette door, and press the Play Key. Clean the tape heads, pinch roller
and capstan with a soft cloth or cotton swab dampened in isopropyl alcohol or special tape head cleaner.
NOTE: Never use any metal objects on or near the tape heads. Do not allow any cleaning material to fall into
the tape assembly.
CAPSTAN
COTTON SWAB
RECORD/PLAY HEAD
PINCH ROLLER
CLEANING THE UNIT
To prevent fire or shock hazard, disconnect your unit from the AC power source when cleaning.
The finish on the unit may be cleaned with a dust cloth and cared for as other furniture, Use caution
when cleaning and wiping the plastic parts.
If the cabinet becomes dusty wipe it with a soft dry dust cloth. Do not use any wax or polish sprays
on the cabinet.
If the front panel becomes dirty or smudged with fingerprints it may be cleaned with a soft cloth
slightly dampened with a mild soap and water solution. Never use abrasive cloths or polishes as
these will damage the finish of your unit.
Caution: never allow any water or other liquids to get inside the unit while cleaning.
14
TROUBLESHOOTING GUIDE
Should this unit exhibit a problem, check the following before seeking service.
Symptom
Possible cause
Radio
Noise or sound distorted on AM or Station not tuned properly for AM
or FM
FM broadcasts.
FM : Antenna is not extended.
AM : Unit is not positioned
correctly.
AM or FM, no sound.
Retune the AM or FM broadcast
station.
Extend FM antenna.
Rotate unit until best reception is
obtained.
FUNCTION Selector not set to Set FUNCTION Selector to RADIO
position.
RADIO position.
Volume at minimum
Cassette Player
No sound.
Solution
Increase Volume.
FUNCTION selector not set to Set FUNCTION selector to TAPE
TAPE position.
position.
Increase Volume
Volume at minimum
Clean the Record/Play head.
Dirty Record/Play head.
Sound distorted.
Speed varies
Tape old or worn.
Dirty roller and capstan.
Cassette Recorder
Will not record.
Distorted sound on playback.
Compact Disc Player
CD Player will not play.
Replace the tape.
Clean roller and capstan.
Press prevention tab removed
Cover hole with tape
Defective tape or dirty tapehead.
Replace tape or clean tape head.
FUNCTION selector not set to CD Set FUNCTION selector to CD
position.
position.
CD is not installed or installed
incorrectly.
Insert CD with label side up.
CD skips while playing.
Disc is dirty or scratched.
Wipe disc with cloth or use
another disc.
Disc is inserted but CD player
skips over spot and will not play,
Disc inserted upside down.
Insert disc properly.
Disc is dirty.
Clean disc.
Disc is non-standard.
Use correct disc.
SPECIFICATIONS
Power Supply
Power Output
Dimension of Unit
Radio Section
AC 120Volts ~ 60Hz
DC 12V (1.5V x 8 UM2 or
“C” size or LR14)
1.2W/CH with 10% THD
290(W)x233(D)x150(H)mm
Tuning : PLL with 20 Presets
(FM 10, AM 10)
Freq. Range : AM 520 - 1710KHz
FM 87.5 - 108MHz
Model No. ________________________________
Tape Section:
CD Section
Speaker
Remote Control
Built-in ALC
DC Bias/Magnet Erase
Top Loading CD
3", 8 ohms
8 Keys, Battery size "AA" x 2
Serial No. _________________________________
15