1
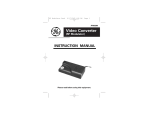
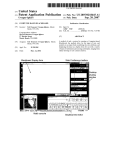
97859 Instructions.quark
2/26/02
1:28 PM
Page 1
Scroll Mouse
HO97859
Instruction Manual
www.ge-electronics.com
97859 Instructions.quark
2/26/02
1:28 PM
Page 2
CONTENTS
Connecting Your Mouse . . . . . . . . . . . . . . . . . . . . . . . . . . . . . . . . . . . . . . . . . . . . . .1
Installing the iWheelworks Software . . . . . . . . . . . . . . . . . . . . . . . . . . . . . . . . . . .1
Customizing Your Buttons . . . . . . . . . . . . . . . . . . . . . . . . . . . . . . . . . . . . . . . . . . . . .1
Customizing Your Own Command Menus . . . . . . . . . . . . . . . . . . . . . . . . . . . . . . . .2
Customizing Your Scroll Wheels . . . . . . . . . . . . . . . . . . . . . . . . . . . . . . . . . . . . . . .3
Troubleshooting . . . . . . . . . . . . . . . . . . . . . . . . . . . . . . . . . . . . . . . . . . . . . . . . . . . . .4
Instrucciones en Español . . . . . . . . . . . . . . . . . . . . . . . . . . . . . . . . . . . . . . . . . . . . .6
97859 Instructions.quark
2/26/02
1:28 PM
Page 3
CONNECTING YOUR MOUSE
CAUTION: Always turn off your computer before connecting or disconnecting
your mouse. To connect your mouse, plug the PS/2 connector
into your computer’s PS/2 port.
INSTALLING YOUR iWHEELWORKS SOFTWARE
PS/2
Mouse Port:
In order to take full advantage of your mouse, you must install the enclosed
software. While your input device will work as a basic mouse once it is plugged
in, the software must be loaded to use the programmable features.
To install from Windows® 95/98/Me/NT/2000:
1. Insert the Mouse SETUP DISK into your floppy disk drive.
2. Click the Start button and then click Run.
3. Now type <drive>:\ setup. For example, if the Mouse SETUP DISK is in
drive A, type: a:\ setup
4. Now click OK . (Follow the on-screen instructions.)
NOTE: If you do not restart your computer, the software will not operate.
5. Once restarted, the mouse icon 8 should appear in the Windows® system
tray. Double click the icon to bring up your mouse control panel.
CUSTOMIZING YOURMOUSE
From the mouse control panel, you can customize your mouse to meet your individual needs! Just click on the appropriate tab to adjust settings:
1
97859 Instructions.quark
Button
Pointers
2/26/02
1:28 PM
Motion
Page 4
Settings
Customizing Your Buttons – click on the Button tab:
-Button Assignments - Easy drop down menus allow you to set each programmable button to execute any individual command. Just click the down arrows
to see the list of commands you have to choose from. Then, click on the one
you want.
-iWheelWorks Enhanced Productivity Option – Drop down menus for each button include a "NetJump" and "LuckyJump" command. Selecting either of these
options programs the button to display a pop up menu with 14 commands to
choose from! To customize the commands in the "NetJump" or "LuckyJump"
pop up menus, click on the Settings tab and follow the instructions below
(under "Customizing Your Own Command Menus").
-Double Click Speed – Increase the speed to execute a double-click
-Set for Right or Left Handed User – The default setting for buttons 1 and 2 will
be reversed.
Customizing Your Own Command Menus - click on Settings
tab:
-NetJump Command Menu (top grid) – The top grid is your NetJump command
menu - this grid comes preprogrammed with 14 commonly used Web-browsing
commands.
-LuckyJump Command Menu (bottom grid) – The bottom grid is you LuckyJump
2
97859 Instructions.quark
2/26/02
1:28 PM
Page 5
command menu – this grid comes preprogrammed with 14 all-purpose commands.
-To Customize your NetJump or LuckyJump Command Menu
1) Select from the Command Menu your desired command.
2) Click on the square of the Net or LuckyJump grid where you want this
command placed.
3) Set the toolbars for all your favorite commands and click ok. Your ready!
(In order to access the pop up command menu you have customized, be sure
there is programmable button assigned to that command menu (Net or
LuckyJump) under the Button tab.)
Customizing Your Scroll Wheels - click the Settings
tab:
Customizing Your Scroll Wheels:
After clicking on the Setting tab, just click the options you want:
-Adjust Your Scrolling speed
-Reverse Scrolling Direction
-To Use the Wheel to Zoom in Office 97/2000 - you can hold the Ctrl key and use
the wheels to scroll in or out
-To Control Your Multimedia Speaker Volume with your Wheels - Set "Volume
Control" as one of your commands in your Net or LuckyJump command menus.
Then, selecting this command from the pop up menu will pull up a Volume
Control Panel, and you can use the wheels to adjust the settings to your preference.
3
97859 Instructions.quark
2/26/02
1:28 PM
Page 6
Troubleshooting
Problem: No Mouse Movement
Possible Cause: Make sure the mouse is securely plugged into the appropriate
PS/2 mouse port. Make sure you have installed the software that came with our
mouse or the standard Microsoft® mouse drivers included with your
Windows® operating system. Shut down and restart your computer.
Problem: The cursor on the screen stays in one spot or moves erratically.
Possible Cause: Check the mouse cable for any sharp twists or breaks, especially where it connects to the mouse. Straighten if necessary.
Problem: Mouse movement does not produce corresponding cursor movement
or there is a brief pause during movement.
Possible Cause: Clean the mouse ball: Remove the botto cover. Use a premoist ened cleaning wipe to clean the ball and a lint free cloth to dry. Also, clean out
the ball cage with a premoistened cleaning swab. Allow to dry and then
reassemble the mouse.
Problem: Third Button function will not work after installing the software.
Possible Cause: Make sure your mouse is properly connected. Make sure there
are not other driver conflicts as follows:
1. Open the control panel from " My Computer."
2. Run " System" icon, and select the "Device Manager" folder.
3. Point to the item list under the "Mouse" icon.
4. Press the "Remove" button to remove the other mouse driver.
5. Reinstall your mouse software.
4
97859 Instructions.quark
2/26/02
1:28 PM
Page 7
90 Day Limited Warranty
Jasco Products Company warrants this product to be free from manufacturing
defects for a period of ninety days from the original date of consumer purchase.
This warranty is limited to the repair or replacement of this product only and
does not extend to consequential or incidental damage to other products that
may be used with this unit. This warranty is in lieu of all other warranties
express or implied. Some states do not allow limitations on how long an implied
warranty lasts or permit the exclusion or limitation of incidental or consequential damages, so the above limitations may not apply to you. This warranty
gives you specific rights, and you may also have other rights which vary from
state to state. If unit should prove defective within the warranty period, return
prepaid with dated proof of purchase to: Jasco Products Company, 311 N.W.
122nd, Oklahoma City, OK. 73114
GARANTIA LIMITADA DE NOVENTA: Jasco Products., Co. Inc. garantiza este producto por un periodo de noventa
días desde la fecha de la compra original, como libre de defectos de fabricación. Esta garantía está limitada a la
reparación o reemplazo de este producto y no se extiende a daños consecuentes o incidentales en otros productos que puedan ser usados con esta unidad. Esta garantía es en vez de cualquier otra expresa o implícita.
Algunos estados no permite limitacíones al tiempo de limitada o permite el exclusión o limitaciones del daños
incidental o consiguiente, así el limitacíon del arriba no aplicarse. Esta limitada darse justicia, y talvez tiene otro
justicias que cambia del estado a estado. Si la unidad resulta defectuosa durante el periodo de garantía,
devolverla prepagada a: Jasco Products Co., Inc., 311 N.W. 122nd. Street, Oklahoma City, OK. 73114
5
97859 Instructions.quark
2/26/02
1:28 PM
Page 8
CONEXIÓN DEL MOUSE
Para conectar el mouse a un puerto de mouse PS/2:
1. Busque el puerto de mouse redondo de 6 conexiones en la cara posterior
del equipo.
2. Inserte el conector del mouse en el puerto para el mouse.
USO DEL MOUSE
Con el software iWheelWorks tendrá todas las ventajas de la rueda Microsoft
IntelliMouse y además podrá desplazarse en Windows 95, 98, Me, 2000 y NT4.0.
El mouse (ratón) dispone de una rueda que también puede usarse como botón.
Sólo tiene que hacer clic en la rueda como si fuera un tercer botón programable normal.
DESPLAZAMIENTO CON EL MOUSE
Tarea
Desplazamiento vertical con la rueda
¿Qué es?
Usar la el desplazamiento de la ruda para moverse con
precisión hacia arriba o hacia abajo.
¿Cómo se hace? Para desplazarse hacia arriba, mueva la rueda hacia
adelante y para desplazarse hacia abajo, mueva la rueda
hacia atrás.
Tarea
¿Qué es?
Desplazamiento horizontal con la rueda
Usar el desplazamiento de la rueda para moverse con
precisión hacia la
izquierda y hacia la derecha.
¿Cómo se hace? Para desplazarse hacia la izquierda, coloque el cursor sobre
la barra de desplazamiento horizontal y mueva la rueda hacia
adelante. Para desplazarse hacia la derecha, mueva la rueda
hacia atrás.
6
97859 Instructions.quark
2/26/02
1:28 PM
Page 9
INSTALACIÓN BAJO WINDOWS®95/98/ME/2000/NT4.0
1. Inserte el disco Mouse SETUP en la unidad de disco flexible.
2. Haga clic en el botón Inicio y a continuación haga clic en Ejecutar...
3. Ahora escriba <unidad>:\setup. Por ejemplo, si el SETUP DISK está en la
unidad A, escriba: a:\setup.
4. Ahora haga clic en . (Siga las instrucciones en pantalla.)
CONFIGURACIÓN DE LAS PROPIEDADES DEL MOUSE
Bandeja del sistema
Ficha Botones
Asignación de botones: Haga clic en la flecha para seleccionar la función que
desee para cada botón. (Consulte la sección Ficha Configuración para obtener
más información).
Velocidad de doble clic: Aumenta la velocidad de doble clic.
Configuración de los botones: Configure el mouse para usuarios zurdos o diestros. Se invertirán los valores predeterminados para los botones 1 y 2.
Ficha Punteros
Desde la ficha Punteros podrá cambiar el aspecto del puntero del mouse. Haga
clic en la flecha, en la opción Esquema y elija la opción deseada. En el panel se
muestran los punteros disponibles para cada esquema. Puede elegir otros pun
teros y crear un esquema personalizado haciendo clic en el botón Guardar
como.
Ficha Movimiento
Velocidad del puntero: Le permite ajustar la velocidad del cursor en la pantalla.
Saltar al botón: Seleccione esta casilla para que el puntero del mouse se
desplace automáticamente al botón predeterminado cuando se abra un cuadro
de diálogo o una ventana.
7
97859 Instructions.quark
2/26/02
1:28 PM
Page 10
Sónar: Si selecciona esta casilla de verificación, al presionar y liberar la tecla
Ctrl, se resaltará el cursor.
Estelas: Active esta casilla de verificación si desea que el puntero muestre una
estela al desplazarse. Esta opción resulta de utilidad en las pantallas de cristal
líquido (LCD), en las que puede ser difícil ver el puntero.
Ficha Configuración
Lista de comandos: Muestra todos los comandos disponibles (incluyendo los
menús de comandos definidos por el usuario) que puede asignar a NetJump o a
LuckyJump.
NetJump (cuadrícula superior): En NetJump se agrupan los comandos usados
comúnmente para explorar la Web. Para cambiar un comando, seleccione uno
nuevo desde la Lista de comandos y haga clic en el icono de la cuadrícula que
desee cambiar.
LuckyJump (cuadrícula inferior): En LuckyJump se agrupan comandos de todos
los propósitos. Para cambiar un comando, seleccione uno nuevo desde la Lista
de comandos y haga clic en el icono de la cuadrícula que desee cambiar.
Rueda: Seleccione la casilla Invertir el sentido del desplazamiento para cambiar el sentido del desplazamiento al girar la rueda. Seleccione el botón
Desplazamiento o Desplazarse una "página" por unidad de desplazamiento para
definir la velocidad de desplazamiento que desee.
Ejecutar los comandos de LuckyJump
NetJump agrupa las tareas más frecuentes en un entorno Windows en una
cómoda cuadrícula que aparece justo bajo el cursor. Para usar LuckyJump,
abra las Propiedades del mouse y seleccione la ficha Botones. Asigne
LuckyJump en el menú desplegable del botón que desee. Haga clic en Aceptar
para cerrar la ventana Propiedades del mouse. Presione un botón para abrir la
cuadrícula LuckyJump y ejecutar el comando que desee. (En la sección Ficha
Configuración encontrará más información sobre la personalización de
LuckyJump).
97859 Instructions.quark
2/26/02
1:28 PM
Page 11
Ejecutar los comandos de NetJump
NetJump combina las tareas más frecuentes al navegar por el Web en una
cómoda cuadrícula que aparece justo bajo el cursor. Para usar NetJump, abra
las Propiedades del mouse y seleccione la ficha Botones. Asigne NetJump en
el menú desplegable del botón que desee. Haga clic en Aceptar para cerrar la
ventana Propiedades del mouse. Presione el botón deseado para abrir la
cuadrícula NetJump y ejecutar el comando que desee. (En la sección Ficha
Configuración encontrará más información sobre la personalización de
NetJump).
9
97859 Instructions.quark
2/26/02
1:28 PM
Page 12
Distributed for Thomson multimedia Inc. by Jasco Products Company,
311 N.W. 122nd Street, Oklahoma City, OK 73114