1
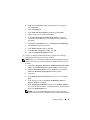
9 In the Database Credentials window, click Use the Same Password for All
Accounts, enter a new password in the appropriate fields, and click Next.
NOTE: Record your new password for later use in database administration.
10 In the Storage Options window, select Cluster File System and click Next.
11 In the Database File Locations window, select the location for storing
database files:
a
Select Use Common Location for All Database Files.
b
Click Browse.
c
In the Directory Browse window, use the pull-down menu and select the
CFS drive created in step e in step 12 in "Installing Oracle Clusterware
Version 10.2.0.1" on page 31.
d
Click OK.
12 Click Next.
13 In the Recovery Configuration window, perform the following steps:
a
Select Specify Flash Recovery Area.
b
Click Browse.
c
In the Directory Browse window, use the pull-down menu and select the
CFS drive created in step e in step 13 in "Installing Oracle Clusterware
Version 10.2.0.1" on page 31.
d
Click OK.
e
In the Flash Recovery Area Size text box enter the total amount of size
that was created in step 2 in "Preparing the Database Disk and Flash
Recovery Area for Database Storage With OCFS" on page 29 for Flash
Recovery Area.
14 Select Enable Archiving.
15 Click Edit Archive Mode Parameters.
a
In the Edit Archive Mode Parameters window, ensure that the path
listed under the Archive Log Destinations is as follows:
X:/
where X is the CFS drive letter created in step 2 in "Preparing the
Database Disk and Flash Recovery Area for Database Storage With
OCFS" on page 29 for Flash Recovery Area.
40
Deployment Guide