1
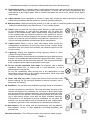
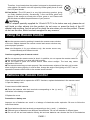
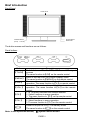
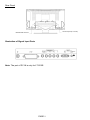
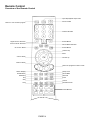
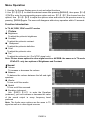
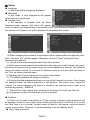
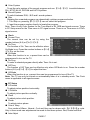
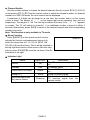
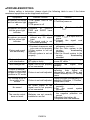
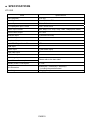
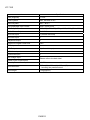
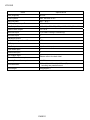
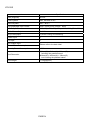
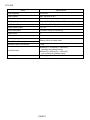
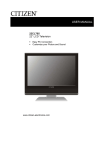
LCD COLOR TELEVISION
LT1512E
LT1712E
LT2012E
LT2612E
LT3212E
INSTRUCTION MANUAL
Please read this manual carefully before operation.
CONTENTS
Important Safety Instructions .......................................................................................... 3
Using the Remote Control................................................................................................ 5
Batteries for Remote Control ........................................................................................... 5
Packing List....................................................................................................................... 6
General Information .......................................................................................................... 6
Brief Introduction .............................................................................................................. 8
Remote Control ............................................................................................................... 10
Overview of the Remote Control ................................................................................... 10
TV Function Except Teletext Function ........................................................................... 11
Teletext Function ........................................................................................................... 12
Installation ....................................................................................................................... 13
General Operation........................................................................................................... 13
Menu Operation............................................................................................................... 14
Function Introduction ..................................................................................................... 14
Picture ........................................................................................................................... 14
Sound ............................................................................................................................ 14
Setup ............................................................................................................................. 15
Tune .............................................................................................................................. 15
Clock ............................................................................................................................. 16
PC Setup ....................................................................................................................... 16
Other Functions .............................................................................................................. 17
Volume Control .............................................................................................................. 17
Sound Mode Selection .................................................................................................. 17
Picture Mode Selection.................................................................................................. 18
Recall ............................................................................................................................ 18
Signal Switch................................................................................................................. 18
Channel Switch ............................................................................................................. 19
Sleep Function .............................................................................................................. 19
Indicator Light................................................................................................................ 19
TROUBLESHOOTING...................................................................................................... 20
SPECIFICATIONS ............................................................................................................ 21
Note: Due to ongoing upgrades all the On Screen Displays and illustrations in this manual may be
somewhat different from the actual situation. Please take the ones on the PDP Colour TV as the
standard.
Important Safety Instructions
Electrical energy can perform many useful functions, but it can also cause personal injuries and property
damage if improperly handled. This product has been engineered and manufactured with the highest
priority on safety. But IMPROPER USE CAN RESULT IN POTENTIAL ELECTRICAL SHOCK OR FIRE
HAZARD. In order to prevent potential danger, please observe the following instructions when installing,
operating and cleaning the product. To ensure your safety and prolong the service life of your LCDTV
product, please read the following precautions carefully before using the product.
1.
Read these instructions---All operating instructions must be read and understood before the product
is operated.
2.
Keep these instructions---These safety and operating instructions must be kept in a safe place for
future reference.
3.
Heed all warnings--- All warnings on the product and in the instructions must be observed closely.
4.
Follow all instructions---All operating instructions must be followed.
5.
Attachments---Only use attachments/accessories specified by the manufacturer. Do not use
attachments not recommended by the manufacturer. Use of improper attachments can result in
accidents.
6.
Power source---This product is intended to be supplied by a listed power supply indicated on the
marking label. If you are not sure of the type of power supply to your home, consult your product dealer
or local power company. For added protection for this product during a lightning storm, or when it is left
unattended and unused for long periods of time, unplug it from the wall outlet and disconnect the cable
system.
7.
Power cord protection ---Protect the power cord from being walked on or pinched particularly at plugs,
convenience receptacles, and the point where they exit from the apparatus.
8.
Overloading---Do not overload wall outlets, extension cords, or convenience receptacles on other
equipment as this can result in a risk of fire or electric shock.
9.
Entering of objects and liquids---Never insert an object into the product through vents or openings.
High voltage flows in the product, and inserting an object can cause electric shock and/or short internal
parts. For the same reason, do not spill water or liquid on the product.
10. Servicing---Refer all servicing to qualified service personnel. Servicing is required when the apparatus
has been damaged in any way, such as power-supply cord or plug is damaged, liquid has been spilled
or objects have fallen into the apparatus, the apparatus has been exposed to rain or moisture, does not
operate normally, or has been dropped.
11. Damage requiring service---If any of the following conditions occurs, unplug the power cord from the
AC outlet, and request a qualified service person to perform repairs.
a. When the power cord or plug is damaged.
b. When a liquid is spilled on the product or when objects have fallen into
the product.
c. When the product has been exposed to rain or water.
d. When the product does not operate properly as described in the
operating instructions.
Do not touch the controls other than those described in the operating
instructions. Improper adjustment of controls not described in the
instructions can cause damage, which often requires extensive
adjustment work by a qualified technician.
e. If the product has been dropped or the cabinet has been damaged in any way.
f. When the product displays an abnormal condition or exhibits a distinct change in performance. Any
PAGE 3
noticeable abnormality in the product indicates that the product needs servicing.
12. Replacement parts---In case the product needs replacement parts, make sure that the service person
uses replacement parts specified by the manufacturer, or those with the same characteristics and
performance as the original parts. Use of unauthorized parts can result in fire, electric shock and/or
other danger.
13. Safety checks---Upon completion of service or repair work, request the service technician to perform
safety checks to ensure that the product is in proper operating condition.
14. Wall mounting---When mounting the product on a wall, be sure to install the product according to the
method recommended by the manufacturer. This is a safety feature.
14. Stand---Use only with the cart, stand, tripod, bracket, or table specified
by the manufacturer, or sold with the apparatus. Do not place the
product on an unstable trolley, stand, tripod or table. Placing the product
on an unstable base can cause the product to fall, resulting in serious
personal injuries as well as damage to the product. When mounting the
product on a wall, be sure to follow the manufacturer’s instructions. Use
only the mounting hardware recommended by the manufacturer.
15. Careful move---When a cart is used, use caution when moving the
cart/apparatus combination to avoid injury from tip-over. Sudden stops,
excessive force and uneven floor surfaces can cause the product to fall
from the trolley.
17. Lightning---Unplug this apparatus during lightning storms or when
unused for long periods of time.
For added protection for this television equipment during a lightning storm,
or when it is left unattended and unused for long periods of time, unplug it
from the wall outlet and disconnect the antenna. This will prevent damage
to the equipment due to lightning and power-line surges.
18. Do not use this apparatus near water---for example, near a bathtub,
washbowl, kitchen sink, or laundry tub, in a wet basement, or near a
swimming pool, and the like.
Do not use immediately after moving from a low temperature to high
temperature environment, as this causes condensation, which may result
in fire, electric shock, or other hazards.
19. Clean only with dry cloth---Unplug this product from the wall outlet
before cleaning. Do not use liquid cleaners or aerosol cleaners. Use a
damp cloth for cleaning.
20. Ventilation---Do not block any ventilation openings. Install in accordance
with the manufacturer instructions. The vents and other openings in the
cabinet are designed for ventilation. Do not cover or block these vents
and openings since insufficient ventilation can cause overheating and/or
shorten the life of the product. Do not place the product on a bed, sofa,
rug or other similar surface, since they can block ventilation openings.
This product is not designed for built-in installation; do not place the
product in an enclosed place such as a bookcase or rack, unless proper
ventilation is provided or the manufacturer’s instructions are followed.
21.Heat sources---Do not install near any heat sources such as radiators,
heat registers, stoves, or other apparatus (including amplifiers) that
produce heat.
22.Panel protection---The LCD panel used in this product is made of glass.
PAGE 4
Therefore, it can break when the product is dropped or impacted upon by
other objects. Be careful not to be injured by broken glass pieces in case
the LCD panel breaks.
23.Pixel defect---The LCD panel is a very high technology product, giving
you finely detailed pictures. Occasionally, a few non-active pixels may
appear on the screen as a fixed point of blue, green or red. Please note
that this does not affect the performance of your product.
CAUTION!
The AC adapter specially supplied for 15 inch LCD TV is for indoor use only; please do not
spill liquid or other objects into the product, do not cover or press the body of the AC
adapter with anything, and do not pull or pluck the wire when you use the product. Please
do not use the wire, which has been snapped for any reasons.
mportant Safety Instructions
Using the Remote Control
● Use the remote control by pointing it towards the remote sensor window
of the set. Objects between the remote control and sensor window may
prevent proper operation.
Note: the illustration is for your reference only, the remote sensor may
locate differently with different model.
Cautions regarding use of remote control
● Do not expose the remote control to shock. In addition, do not expose the remote control to
liquids, and do not place in an area with high humidity.
● Do not install or place the remote control under direct sunlight. The heat may cause
deformation of the unit.
● The remote control may not work properly if the remote sensor window of the main unit is under
direct sunlight or strong lighting. In such a case, change the angle of the lighting or LCD TV set, or
operate the remote control closer to the remote sensor window.
Batteries for Remote Control
S
If the remote control fails to operate the LCDTV functions, replace the batteries in the remote control.
1 Open the battery cover.
2 Insert two size-AAA batteries.
● Place the batteries with their terminals corresponding to the (+) and (-)
indications in the battery compartment.
3 Replace the cover .
Precaution on battery use
Improper use of batteries can result in a leakage of chemicals and/or explosion. Be sure to follow the
instructions below.
● Place batteries with their terminals corresponding to the (+) and (–) indications.
● Different types of batteries have different characteristics. Do not mix batteries of different types.
● Do not mix old and new batteries. Mixing old and new batteries can shorten the life of new batteries
PAGE 5
and/or cause old batteries to leak chemicals.
● Remove batteries as soon as they are non-operable. Chemicals that leak from batteries can cause a
rash. If chemical leakage is found, wipe with a cloth.
● The batteries supplied with the product may have a shorter life expectancy due to storage conditions.
If the remote control is not used for an extended period of time, remove the batteries from the remote
control.
Packing List
LCD TV
Operation Manual
Power Adapter
Power Cable
Infrared Remote Control
AAA Batteries
1
1
1(only for 1512E)
1
1
2
Note: Please keep the wrapping box and the packing materials well for future
convenience of transport.
General Information
Radio Frequency input
It can store up to 100 TV programs (the program number range from 0 to 99)
AV input
In scart mode, the system can automatically activate scart detecion to identify signal
input modes (CVBS or RGB) and input signal character (16:9 or 4:3); Capable of
receiving PAL, NTSC, SECAM color systems; convenient to watch VCR (video cassette
recorder), Pickup Camera and other Disc’s programs
YPbPr input
Capable of receiving high definition YPbPr signal in 480i, 480p, 576i, 576p,
720p(50/60Hz), 1080i(50/60Hz), and 1080p(50/60Hz) formats
ACI function (Auto channel Installation)
Stereo and digital accompanying sound processing
Auto detect and demodulation IGR, and decode NICAM digital accompanying sound
VGA input
a. Connecting with the host computer
b. Use it as a display terminal
c. Connect the 3.5mm(diameter) audio cord to your computer’s audio main board,
music can be transmitted from the host computer
Program & Child Lock
Capable of locking your favorite TV programs and the function button on the front panel
Timer function
In TV mode, the LCD TV will automatically power off within 15 minutes without any
signal input; in PC mode, it will enter into the Power Energy Saving Mode if there is no
signal input. When a valid signal is received, it will power up again
Blue background without signal
PAGE 6
In TV, AV, RGB and YPbPr modes, screen displays soft blue background if there is no
signal input
Multi Language On-Screen Display menu
Ordinary and graphical user interface makes the menu operation user-friendly
Power Energy Saving Mode (Power management mode)
When used as PC display terminal without PC signal output, the LCD TV will
automatically power off within 30 seconds and enter into the Power Energy Saving
Mode. It will power up again when it receives a signal from PC. Otherwise, you can
】/【P+】/【P-】 on the remote control.
press the number buttons or【
Plug and Play
No installation software is needed to use the TV as computer terminal display
equipment
Adjusts the picture quality automatically
No flicker and radiation
Auto on/off when time is set
Zoom mode
Full-screen, 16:9(4:3 screen), Film, Subtitle
Legerity, convenient, low power consumption
Picture enhancement function
Dynamic complexion adjustment: improve the anamorphic complexion to make it more
appealing
Black field prolongation: darken the large part of black section to enhance picture
contrast in dim backgrounds
Colorful edge adjustment: increase edge gradient of color signals to make the
silhouette clearer
Brightness edge adjustment: increase edge gradient of brightness signals to make the
silhouette clearer
Super definition display panel
Dynamic comb filter
10-page teletext storage
Earphone output
PAGE 7
Brief Introduction
Front Panel
LOCAL KEYS
R/C RECEIVER
INDICATOR
POWER ON/OFF
(except LT1512E)
The button names and functions are as follows:
Panel buttons
Button
【TV/AV】
【MENU】
【VOL-】
【VOL+】
【CH-】
【CH+】
【
Description
Switch between TV, AV, RGB, YPbPr, and PC signal
sources
The same function to【AV】on the remote control
Enter or exit the OSD (On-Screen Display) menu
The same function to【MENU】on the remote control
Decrease the sound volume. Adjust functions in menu
operation. The same function to【V-】on remote control
Increase the sound volume. Adjust functions in menu
operation. The same function to【V+】on the remote
control
1. In TV mode, decrease the channel number
2. Select functions in menu operation
3. The same function to【P-】on the remote control
1. In TV mode, increase the channel number
2. Select functions in menu operation
3. The same function to【P+】on the remote control
Power on or put the LCD TV to standby mode
】
The same function to【
】on the remote control
Note: In this operation manual, 【】symbol means Button.
PAGE 8
Rear Panel
AC INPUT(except LT1512E)
HEADPHONE OUTPUT
Illustration of Signal Input Ports
DC IN
Note: The port of DC IN is only for LT1512E.
PAGE 9
Remote Control
Overview of the Remote Control
Ajust displayable aspect ratio
Power On/Off
Reture to last viewed program
Channel Number
Signal Source Selection
Picture Mode Selection
Invalid Button
On-screen Menu
Invalid Button
Sound Mode Selection
Channel Up
Enter
Volume Down
Volume Up
Channel Down
Name the programs in Menu mode
Status Display
Sleep Timer
Invalid Button
East/West
Sound Mute
Subcode
Text
Index
Size
Cancel
Hold
Reveal/Conceal
Invalid Buttons
PAGE 10
TV Functions Except Teletext Function
1 . RECALL : Return to last viewed program
2 . ZOOM : Adjust displayable aspect ratio
3 . POWER ON/OFF : Switch on or off TV set
4 . 0-9 Channel Keys : Key in the alphanumeric digits to switch to the designated channel
directly
5 . TV/AV : Toggle between different signal sources available
6 . MENU : To go to the On Screen Display(OSD) menus
7 . P MODE : Select different modes of picture settings
8 . S MODE : Select different modes of sound settings
9 . P+ : Scroll to next channel
10 . P- : Scroll to previous channel
11 . V- :Decrease audio volume
12 . V+ : Increase audio volume
13 . OK : Select or confirm menu item
14 . DISPLAY : Show info of current program
15 . SLEEP : Select time of TV to sleep mode
16 . MUTE : Mute sound
17 . ∞I/II: Select between mono/stereo sound or dual I/II soundtrack
18 . HOLD : Freeze screen
PAGE 11
Teletext Function
1. 0-9 Channel Keys : Key in the alphanumeric digits to go to the designated page directly
2. P+ Keys : Press【P+】to scroll to the next page
3. P- Keys : Press【P-】to the previous page
4. L.ROTA Key : RED Teletext Button
5. PRE Key : GREEN Teletext Button
6. NEXT Key : YELLOW Teletext Button
7. R.ROTA Key : CYAN Teletext Button
8. TEXT Key
: Switch between teletext on, mix and teletext off.
9. EAST/WEST Key
10. SUBCODE Key
: Switch between different languages
:Switch between secondary pages by entering the four digit
number
11. INDEX Key
: Go to index page directly
12. HOLD Key
: Retain the current teletext page and again to cancel the function
13. SIZE Key
14. CANCEL Key
: Switch between zooming to the upper half, lower half and in full
: Exit from the teletext mode
15. REVEAL/CONCEAL Key
: Reveal or conceal hidden text for quizzes etc
PAGE 12
Installation
1. Remove the LCD TV from the box and place it on a flat surface in a well-ventilated
location.
2. Connect the output terminal of RF cable to the corresponding TV RF signal input
terminal. The LCD TV is a high-tech digital product. Do use quality RF cable to obtain
optimal results.
3. Connect the output terminal of the AV devices such as YPbPr, DVD to the corresponding
terminal of the LCD TV.
4. Connect one end of the VGA terminal to the corresponding signal source terminal, and
connect the other end to the corresponding LCD TV terminal. Screw down the screws
on both sides to secure it.
5. Ensure that every AV signal cord is correctly connected to the corresponding interface.
6. Connect one end of the AC power/power adapter cord to the power input jack of the LCD
TV, then plug the other end to the corresponding jack.
7. The panel can be tilted upwards by no more than 100 to achieve better visual angle. When
doing so, rotate the TV with two hands, one to fix the pedestal while the other to tilt the
panel. Take great care and do this in a moderate pressure in case any accidents
happen.(only for LT1512E LT1712E LT2012E)
General Operation
Switching the TV On
1. In Standby mode, press【
】on the remote control or front panel to enter to Power On
mode.
2 The indicator is red when the TV is in Standby mode.
Switching the TV Off
1. Press【
】on the remote control or on the front panel to switch off the TV
2. Unplug the AC power/power adapter cord from the power outlet supply after turning off
the power to switch the TV off completely.
Caution: The TV will be shut off automatically when the power trips. Do unplug the
power cord from the AC outlet if so. The last TV mode will appear when
power resumes
Do not turn on/off the TV too often
Auto Off If there is no Signal Input
The TV will enter into Standby mode after 15 minutes when there is no signal input in TV
source; The TV enter into power saving mode after 30 seconds when there is no signal input
in PC source.
PAGE 13
Menu Operation
1. Use the On Screen Display menu to set and adjust functions
2. Use 【P+】/【P-】 to select the desired menu after pressing【MENU】, then press 【V+】
/【OK】to enter the corresponding menu option and use 【P+】/【P-】to choose from the
options; Use 【V+】/【V-】to adjust the options value and return to the previous menu by
pressing 【MENU】again. The menu will disappear without any operation within 10 seconds.
Function Introduction
In TV, AV, RGB, YPbPr and PC modes
Ⅰ Picture
● Brightness
To adjust the picture’s brightness
● Contrast
To adjust the picture’s contrast.
● Sharpness
To adjust the picture’s definition.
● Color
To adjust the picture’s color.
● Tint
To adjust the picture’s tint. (For NTSC signal only)
Note: Picture menu options in other signal sources. AV/RGB: the same as in TV mode
YPbPr/PC: only two options of Brightness and Contrast
ⅡSound
● Volume
To increase or decrease the volume.
● Balance
To balance the volume between the left and right
speakers.
● Woofer
To turn on/off the woofer.
● Spatial
To turn on/off the surround.
● Equalizer (submenu)
Use 【 OK 】 / 【 V+ 】 to enter the Equalizer
(submenu), you can increase or decrease the value
of the sound output in every frequency band
preferred
Note: The Audio menu options are the same in TV
signal as well as in other signal sources
PAGE 14
Ⅲ Setup
● Language
To select the different language displayed.
● Blue Back
In this mode, a blue background will appear
when there is no signal input.
● Program Lock
In the submenu of Program Lock, the Enter
Password menu appears (this menu will appear
when you switch to a channel after it was locked once);. Input the default password of 1235,
the submenu of Program Lock will be displayed if the password is correct.
(a) When changing the password, the password will be updated after four digits are input
twice. The word ”OK” will then appear. Otherwise, the word “Failed” will appear if two
passwords are different.
(a)Unlock all the locked programs when Clear All is entered.
(b)When some locked channels are switched to after exiting from the Program Lock menu,
the picture and sound will be locked unless the correct password is entered. The unlocked
status will remain until the TV is turned off. Password must be re-keyed after switching on
the TV to the locked channels again.
(c) Operating Auto Search will cancel the current locked status.
(d)The default password will always be effective.
(e)Entering the default password allows you to go to the Program Lock menu, then change
the password while the default password is still effective. The branch menu cannot be
entered if a wrong password was keyed in, therefore the previous menu needs to be
reverted by pressing 【MENU】
(f)There will be a short pause when entering the functions of Lock All and Clear All.
(g) All programs would be locked when Lock All is entered.
● Childlock
In Child Lock On mode, local buttons on TV do not work. A prompt ”keyboard locked” will
be displayed. However, the remote control buttons will still function. When the TV is on and
the Child Lock is on, a prompt ”Locked, power off after 6s” will appear, using the remote
control can solve this. Otherwise, It will automatically enter into Standby mode.
● Prog. Swap (submenu)
PAGE 15
Swap between two programs and their
channels. This can be done by pressing
Switch button after two different channels are
selected.
● Program
Display the current program’s channel
number
● Name
Rename the program with four colored
buttons on the remote control
【Red】for Capitalized English letters
【Green】for Alphanumeric numbers from 0 to 9
【Yellow】for special characters as “#”
【Blue】Resuming “*” in unnamed mode
Use【V+】/【V-】to input and select the characters
Note: In PC signal mode, there are 2 options of Language and Child Lock in the Setup
menu. In AV/RGB/YPbPr signal mode, there are 3 options of Language, Blue Back and
Child Lock.
Ⅳ Tune
Press 【P+】
【P-】
/
to select the Tune menu. There
are altogether 7 items to adjust: Auto Search,
Search, Band, Fine Tune, Color System, Sound
System and Skip.
● Auto Search
In Auto Search mode
1. The TV does auto-search and stores
programs from VHF-L to UHF.
2. During search, all programs searched are automatically stored.
3. When the search is done or when all 100-program positions are occupied, or you
have pressed 【MENU】during the search process, the search will halt and the TV will
return to the Tune menu with channel 0.
● Search
In Search mode, press【V+】/【V-】so that the TV manually searches the lower or upper
program position until one program was searched and automatic storage will commence. If
the program is not needed, then press【V+】/【V-】again. After pressing 【MENU】, the TV
will exit from Search and return to the menu.
● Band
To set which band the current program belongs to.
● Fine Tune
In Fine Tune mode, press【V+】
【V-】
/
to until the best picture and sound is achieved. After
adjusting, the TV will auto-store the channels. Press 【MENU】to exit and return to the Tune
menu.
PAGE 16
● Color System
To set the color system of the current program and use 【V+】/【V-】 to switch between
PAL, NTSC,N4.43, SECAM and AUTO systems.
● Sound System
To switch between D/K,L, B/G and I sound systems.
● Skip
Skipping the unwanted program can dramatically quicken program selection.
1. Turn Skip on, pressing【P+】/【P-】can not select this program.
2. Input the program number directly to locate the program.
Note: There is only Color System for the Tune Menu in AV, RGB and signal sources. There
is PC Setup menu for the Tune menu in PC signal source. There is no Tune menu in YPbPr
signal source.
Ⅴ Clock
● Current Time
The current time can be set by using the
number buttons (0-9) or【V+】/【V-】.
● On Time
The function of On Time can be effective when
On Mode is on. Press the number buttons or【V+】
/【V-】to set the time.
● On Mode
When this function is on, a preset time can be
programmed to turn on the TV.
● On Prog
To enter a selected program directly after Timer On is set.
● Off Time
The function of Off Time can be effective only when Off Mode is on. Press the number
buttons (0-9) or【V+】/【V-】to adjust the time.
● Off Mode
When this function is on, a preset time can be programmed to turn off the TV.
Note: The TV can only be turned on automatically when it is in standby mode. The Clock
menu is applicable in all signal sources.
Ⅵ PC Setup
● H Position
To adjust picture position horizontally.
● V Position
To adjust picture position vertically.
● Clock
To adjust picture clock position.
● Phase
To adjust picture phase.
● Colour Temp
Four modes of Warm、Normal、Cool and User can be chosen with 【V+】/【V-】in cycle.
Only in User mode can adjustments be made to the three options: Red, Green and Blue.
● Auto Adjust
PAGE 17
To automatically adjust the picture position, clock, phase and color temperature to a
preset optimum value. This mode is invalid in DOS mode.
Note: The PC Setup menu is only available in the PC signal source.
Other Functions .
● Volume Control
1. Press【V+】to increase or【V-】to decrease the volume when there is no menu on the
screen. The Volume bar will disappear if there left idle for more than 6 seconds.
2. Press the【MUTE】button on the remote control to turn On/Off the MUTE mode. In Mute
mode, a sign of“Mute” in red will appear on the upper-right corner of the screen. This
symbol is hidden when the menu operation is entered, but the feature is still valid. It appears
again when the menu operation is exited. When there is no valid signal input, the TV will be
mute (but no mute symbol) with a blue background.
● Sound Mode Selection
Press 【S.MODE】 to select between Personal, News, Theater and Music modes and
activate the Picture Mode. The latter three modes are default setting that cannot be adjusted.
Entering the Personal mode allows setting to the preferred mix.
Sound Mode
Personal
News
Theater
Music
Sound Quality
For the user’s preference
For general programs of conversations and news report
For better audience effect as soft, magnificent and vivid
For general music programs
Note: The operation and setting of the Volume Control are applicable to all the signal
sources.
● Picture Mode Selection
Press【P.MODE】to Switch among Personal, Soft, Normal and Rich modes.
Picture Mode
Picture Quality
Personal
Soft
For the user’s preference
For more mellow pictures
Normal
For general programs
Rich
For better visual effect such as magnificent and vivid
Note: The setting of this selection is in the same state are applicable to all the signal
sources.
● Recall
In TV mode, press【RECALL】on the remote control to return to the previous channel or
signal source.
● Signal Switch
Press【AV】on the remote control to select between the signal sources: TV, AV, RGB,
YPbPr and PC. The order is as below:
TV
AV
RGB
PAGE 18
YPbPr
PC
● Channel Switch
Use the number buttons to choose the desired channel directly or press【CH+】/【CH-】
on the panel or【P+】/【P-】on the remote control to select the channel number. If a channel
number is in SKIP ON mode, the next channel will be displayed.
A maximum of 2 digits can be keyed in at one time, the number button on the remote
control is used. The symbol of “- -” on the upper-right corner represent tens and one
respectively. The range is 0~99. The first input number is for tens, if it is “1”,“1-”appears
on screen. The TV will switch to channel 1 if no additional number is keyed in within 3
seconds. Alternatively, press【OK】to switch to the desired channel after the corresponding
number is keyed in.
Note: This function is only available in TV mode
● Sleep Function
Press【SLEEP】on the remote control once to
Sleep 30
activate the function and subsequent keying in to
select the sleep time of 0, 15, 30, 45, 60,90, 120,
150,180, 240 and 0 minutes. This is will be reflected in
the top right hand corner of the screen. After this step
is done, press 【SLEEP】to view the set sleep. See the
illustration in the right.
● Indicator Light
Status
Light Color
On/Off
Off
Standby
Red
Timer On/Off Or Sleep
Green
Sleep (PC)
Yellow
Receives signal from
the remote control
Flickering
PAGE 19
Description
The TV works normally/is power
off
In Standby Mode
Timer On/Off is valid or Sleep is
on
Sleep for power-saving;
The indicator will flicker when the
TV receives signal from the
remote control
●TROUBLESHOOTING
Before calling a technician, please check the following table to see if the below
mentioned symptoms can be diagnosed and fixed.
Symptoms
Possible Causes
No picture, no sound,
and no indicator light
on
1.The power cord is not
plugged in
2.The power is off
No picture, no sound, Functions
of
ON/OFF
but the green light
TIME and SLEEP have
indicator
been set
No picture, no sound,
but the yellow light
indicator
1.PC is in VGA Mode
without any PC signal
input
2.The signal cord is not
connected properly
Picture and sound
with abnormality
1.Contrast, sharpness, and
color are not set properly
2.Color system is not set
properly
3.Sound system is not set
properly
Picture is fuzzy or
with interference
Blue background
Signal source is weak or
RF cable is faulty
No Video signal or the
signal cord is not properly
or not connected
Picture is unclear,
crawls or have black
stripes on horizontal
position in PC mode
Picture is not well adjusted
PC Picture is not in
the middle of the
screen
Picture is not well adjusted
No sound
No Audio signal or the
signal cord is not properly
or not connected
The remote control
does not work
Batteries are not correctly
installed or are flat
PAGE 20
Solution
1.Plug the power cord in
2.Turn the power on
Press【
a 】to turn on the TV
1.Press 【 】or input the PC
signal
2.Connect the signal cord
properly
1.Adjust the value of Contrast,
sharpness, and color
2.Set the Color system to the
country
broadcasting
standard
3.Set the Sound system to the
country
broadcasting
standard
Use a stronger signal or change
a new RF cable
Connect
the
signal
cord
properly
Adjust
automatically
by
selecting
Auto
Adjust
or
alternatively adjust Clock and
Phase manually via PC Setting
menu
Adjust pictures automatically by
resetting H Position, V Position,
Phase and Clock
1.Connect the audio signal cord
correctly
2.Set
the
sound
system
correctly
1.Make sure the positive and
the negative polarities are
correct
2.Reattach the battery lid
3.Replace with new batteries
●
SPECIFICATIONS
LT1512E
Items
Specifications
Size (diagonal)
15.0 inch
Color System
PAL, SECAM, NTSC
Sound System
D/K, I, B/G, L/L’
PC Displayable Input Format
VGA / SVGA /XGA
YPbPr Input Format
480i, 480p, 576i, 576p, 720p, 1080i, 1080p(50Hz, 60Hz)
Audio Power Output
2 x 2.0 W
AV-Audio Input
1 (shared with RGB)
AV-Video Input
1
Earphone Output
1
PAL/NTSC Digital Comb Filter
YES
RGB Input
1
YPbPr Input
1 (with audio input)
VGA Video Input
1
VGA Audio Input
1
AC Voltage Input
Please refer to the back label
Rated Power Consumption
Standby Power Consumption
≤1.5W
Unit Dimension
454mm(W)×343mm(H)×166mm(D)
(including the pedestal stand)
Unit Weight
4.5kg(Approx.)
PAGE 21
LT1712E
Items
Specifications
Size (diagonal)
17 inch
Color System
PAL, SECAM, NTSC
Sound System
D/K, I, B/G, L
PC Displayable Input Format
VGA / SVGA /XGA
YPbPr Input Format
480i, 480p, 576i, 576p, 720p, 1080i, 1080p(50Hz, 60Hz)
Audio Power Output
2 x 2.0 W
AV-Audio Input
1 (shared with RGB)
AV-Video Input
1
Earphone Output
1
PAL/NTSC Digital Comb Filter
YES
RGB Input
1
YPbPr Input
1 (with audio input)
VGA Video Input
1
VGA Audio Input
1
AC Voltage Input
Please refer to the back label
Rated Power Consumption
Standby Power Consumption
≤1.5W
Unit Dimension
525mm(W)×350mm(H)×230mm(D)
(including the pedestal stand)
Unit Weight
7.5kg(Approx.)
PAGE 22
LT2012E
Items
Specifications
Size (diagonal)
20 inch
Color System
PAL, SECAM, NTSC
Sound System
D/K, I, B/G, L
PC Displayable Input Format
VGA / SVGA
YPbPr Input Format
480i, 480p, 576i, 576p, 720p, 1080i, 1080p(50Hz, 60Hz)
Audio Power Output
2 x 2.0 W
AV-Audio Input
1 (S-Video is using in communtiy)
AV-Video Input
1
Earphone Output
1
PAL/NTSC Digital Comb Filter
YES
RGB Input
1
YPbPr Input
1 (with audio input)
VGA Video Input
1
VGA Audio Input
1
AC Voltage Input
Please refer to the back label
Rated Power Consumption
Standby Power Consumption
≤1.5W
Unit Dimension
590mm(W)×435mm(H)×230mm(D)
(including the pedestal stand)
Unit Weight
10kg(Approx.)
PAGE 23
LT2612E
Items
Specifications
Size (diagonal)
26 inch
Color System
PAL, SECAM, NTSC
Sound System
D/K, I, B/G, L
PC Displayable Input Format
VGA / SVGA /XGA / WXGA 60HZ
YPbPr Input Format
480i, 480p, 576i, 576p, 720p, 1080i, 1080p(50Hz, 60Hz)
Audio Power Output
2x5W
AV(S-Video)Input
2 (audio is using in communtiy)
YPbPr Input
1
PC Input
1
AC Voltage Input
Rated Power Consumption
Please refer to the back label
Standby Power Consumption
≤2W
Unit Dimension
804mm(W)×510mm(H)×294mm(D)
(including the pedestal stand)
804mm(W)×436mm(H)×106mm(D)
(not including the pedestal stand)
Unit Weight
17.5kg(Approx.)
PAGE 24
LT3212E
Items
Specifications
Size (diagonal)
31.56 inch
Color System
PAL, SECAM, NTSC
Sound System
D/K, I, B/G, L
PC Displayable Input Format
VGA / SVGA /XGA / WXGA 60HZ
YPbPr Input Format
480i, 480p, 576i, 576p, 720p, 1080i, 1080p(50Hz, 60Hz)
Audio Power Output
2x5W
AV(S-Video)Input
2 (audio is using in communtiy)
YPbPr Input
1
PC Input
1
AC Voltage Input
Please refer to the back label
Rated Power Consumption
Standby Power Consumption
≤2W
Unit Dimension
954mm(W)×579mm(H)×314mm(D)
(including the pedestal stand)
954mm(W)×502mm(H)×105mm(D)
(not including the pedestal stand)
Unit Weight
21.5kg(Approx.)
PAGE 25
All the features and specifications are subject to change without notice.
LT1512E LT1712E LT2012E LT2612E LT3212E